Transcripts
1. Intro to Course: Hello my little brush limbs. What's the brush link? Anyone who wants
to learn ZBrush, welcome to my course. This is a course for
beginners or for anyone who wants to learn
how to model this fellow. That is a baby Phoenix
sec, that's glowing fire. I know, I know. It's quite a revelation. One of the easier things
to model on ZBrush, well, my characters will come in different forms, so buckle up. If you have never
used ZBrush before, that is completely fine. This is a beginners
course where I will be explaining the tools that
are relevant to this model. But there are also the
basic tools and ZBrush, which means if you know them, you will be able to
model almost anything. Zbrush is actually quite easy once you know
how to get to use it. This course has
three parts to it, and these parts are
divided into chapters. It's just to make it
easier for you to be able to take breaks so that
you're not overwhelmed. So without boring you any
further, let's get into it.
2. Simple Modeling (Body and Eyes): We're going to
start by retrieving a reference image so that we know what we're modelling
and what it looks like. For that, I want you to go
to brush down two samples. Then I want you to click on Spotlight Projection
to deactivate it. After that, I'd like you
to go to texture and imports were importing
an image as texture. There is a link to download
this image under the course. Once you download it, you can import it. So this is the image
we're looking for. Next, I want you to
go to this button. It's called add two
spotlights and click on it. As you see the image will
appear on the canvas. It's not perfect, but it's
good enough to work with. Now we're going to
need to scale it down so that it doesn't
get on our way. It has the word scale on it. And if you press it
and drag it down, it's going to scale
the image for you. Scale it in whatever
way works for you, and place it on the site. We are just going to use
this image as a reference. We're going to start
with lightbox. Lightbox has different
shapes in it. It has of course, preset models. However, we're just going
to download a sphere. So click on DynaMesh sphere. You will need to
double-click that. And as you see, the sphere
appears on our Canvas. Right now, however,
we can't edit the sphere yet
because we need to get out of the image
reference mode. In order to do that,
we need to click. And as you see, the sphere then becomes selected in every
modeling program, the green arrow always
represents the y-axis, which is going to move
the ball up and down. The red arrow
represents the x-axis, which is going to move the
ball from side-to-side. The blue arrow
represents the z-axis, which will move the
ball back and forth. The model is always going
to be in the center. And we need it to be
in the center because we are going to
model symmetrically so that when we
model one side or the other side gets
modeled exactly the same. I will show you how if you
click on the yellow square, you're able to scale the model. So what we need
right now is to make sure that symmetry is turned on. We need symmetry to be
turned on in the x-axis, which means anything we
model on the right or on the left is going to
be identically mirrored. Mirroring is exactly
what the M stands for, which is why we're
going to need to have the M clicked as well. So I'm going to show you
what this really means. As you see, the
character is egg-shaped. So we're going to need
to create an egg out of the sphere in order to deform
the sphere a little bits, we're going to need
to go to brushes. If you click on that,
you are going to see a load of brushes. We are looking for
the Move brush, which is the most
commonly used brush. Now since the ball is bigger, we're going to need
to change the size of the brush to be a little bigger. That looks about right. So let's start modelling. Notice that every time
I model the sphere, I click on Shift. Clicking on Shift activates
the smooth brush, which smoothens
anything you remodel. Usually when we model something, we use any brush we want and the smooth brush
interchangeably. So keep that in mind and use
the smooth brush every now and then to keep your
models looking clean. Keep modelling until
you have an egg shape. So now that our
egg shape is done, we are going to model
the sockets for that. We're going to have to
go to brushes again and click the standard tool. We are going to
change the size of the brush to match
the eye sockets. The Phoenix has big eyes, so make sure to have a
similar sized brush. Let me show you what the
standard brush does. If you click on it, normally, this is what it does. However, that's
not what we want. We want sockets which
goes inwards in order to revert the
direction of the brush. Just click Alt. So press Alt while modelling and you're going to see
the opposite results. The eye sockets need
to be a little bigger and they should match
the reference image. Keep playing with it until you are happy
with the results. Don't be afraid to experiment. The more you get
used to the tools, the better you will become. I think I'm happy with
the way this looks. It doesn't have to be perfect. Remember we're just
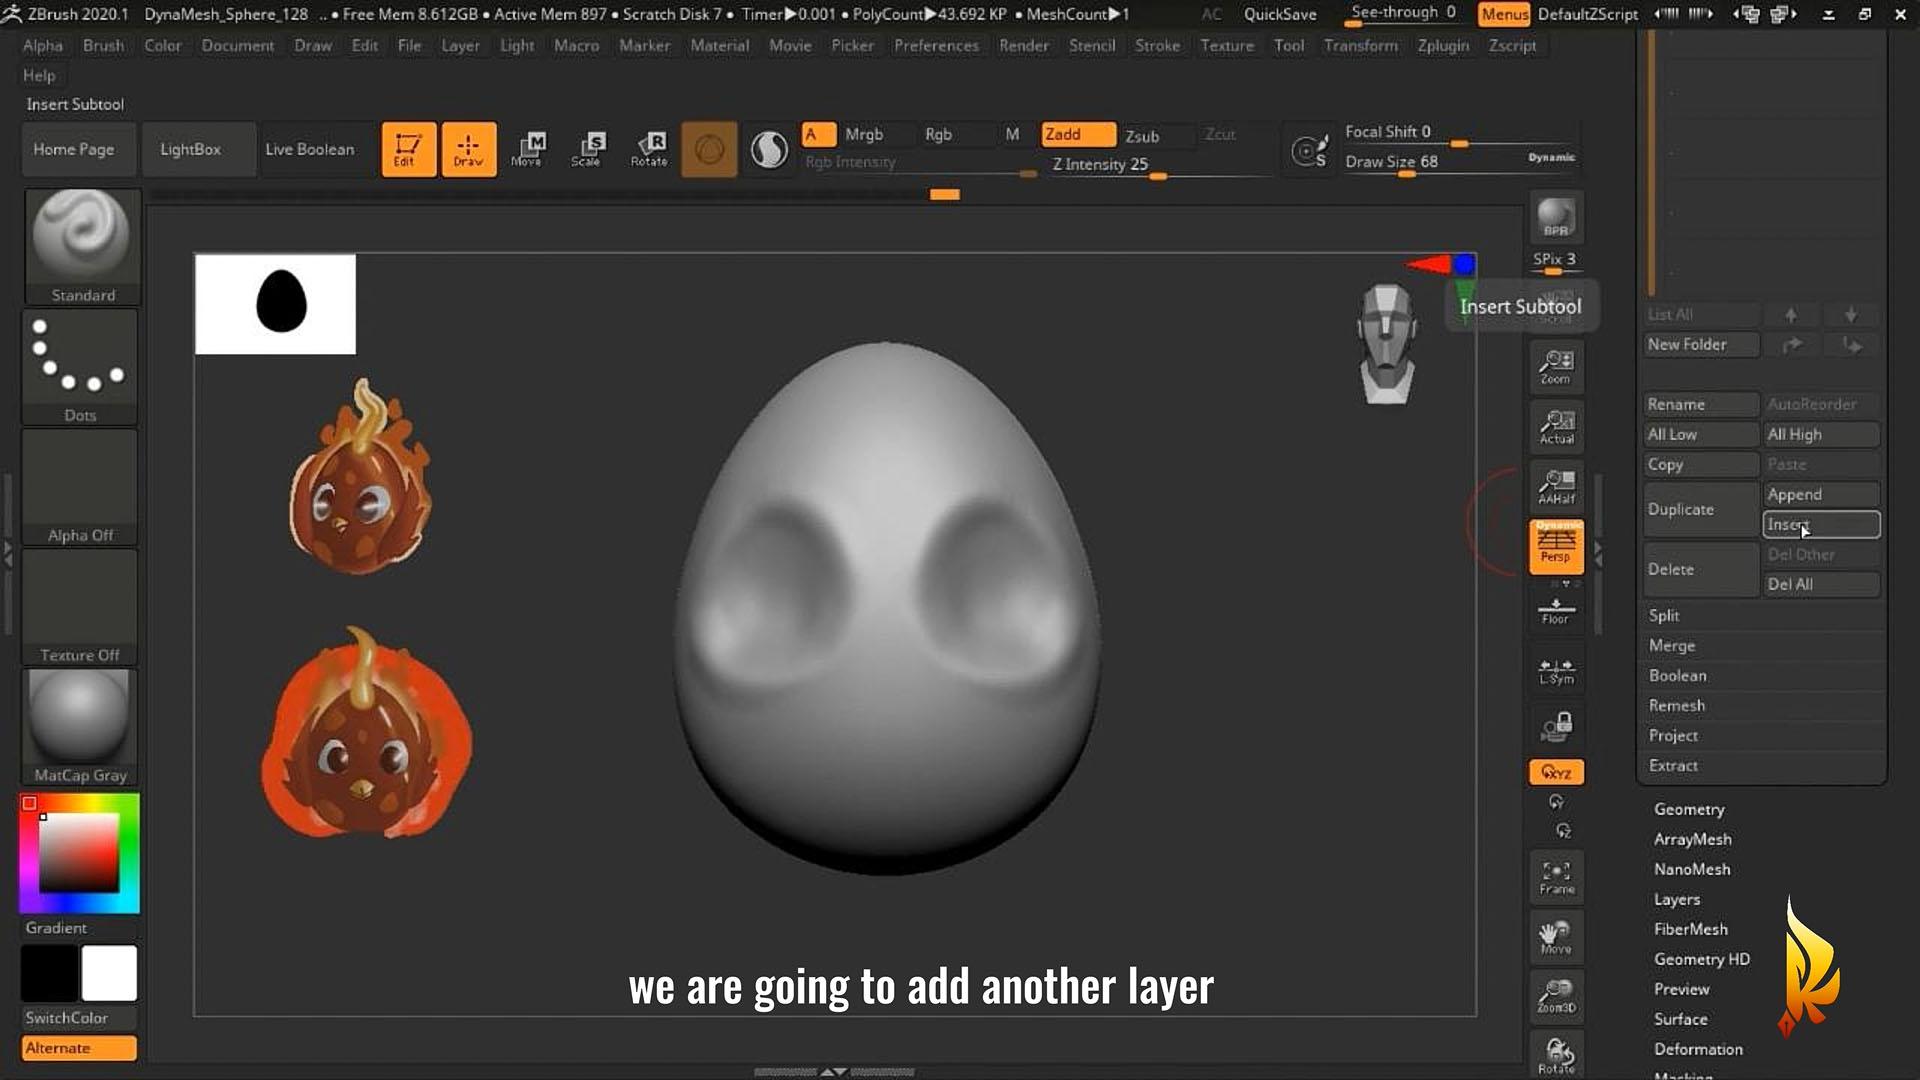
making basic shapes. The details will come later. Now that the eye
sockets are ready, let's move on to the eyeballs. We are going to
add another layer. In the sub tool category, which will then be
the eyeballs because we want the eyeballs
to be separate. So in order to do that, we're going to click
on the Insert button. The Insert button shows you many shapes that you
could add to your model. We're going to click
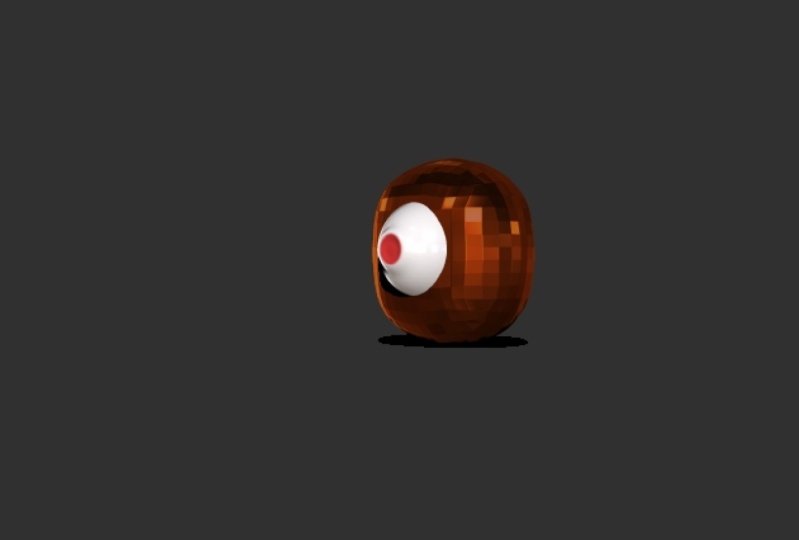
on the sphere. As you can see now we
have a very huge spheres, so we're going to scale it
down to match our model. If you notice the egg
shape is not showing up. And the reason for
that is because the I toggle is turned off. You can click that
whenever you want to hide other forums of
your model that you don't really want to see while
modelling something else. But before we unhide
the body figure, we need the iris. We needed to start
looking like an eye. So we're going to
start coloring. Now remember the introduction
to the upper row. You are going to de-select
the a and the M, select RGB for color. Pause when we start using
our brush on the model, we only want the color to
change and nothing else. You could use the
standard tool brush for coloring as well. We want to circular symmetry, which is why we're
going to click on Transform and down the symmetry, we are going to click on radius. The radius to be on the z-axis because we
want it to be facing us. All we want to do in order to activate the radius symmetry, these two de-select
everything else except the z axis and the R
stands for radius. Now, try selecting a color
and drawing on the sphere. And this is what it
should look like. Just a heads up if you
ever happen to come across an extra image that blocks whatever model
you're working on. It's probably because
you clicked on Shift S, which creates a clone of your model that does not
go away from the screen. In order to get rid of that, just go to layer and clear. This happens every now and then. Do not get frustrated
if this happens to you, this is usually the solution. Test your coloring
skills and choose whatever color you want your
Phoenix's eyes to look like. I chose brownish red because it matches our reference image. Let's see how this turns out. Frightened makes lighter
with darker colors. Now, draw in the black pupil, usually as dark as can be. And you should make
it big because we're talking about a baby
with googly eyes. So I guess the bigger
the pupils, the cuter. Once we're done
with the coloring, in order to take a look at what the eye would look like
with a different material. You can check out our
material selections to give the eyeball are very
reflective material, go-to toy plastic and select it. You'll see that the lighting
matches the eyeball. This is just an idea of the
material we could be using. Now go back to basic material and we'll
deal with materials later. I am going to
narrow down the eye a little bit because should match the Sockets API to copy the reference image
as much as possible. When we're done with
the shape of the eye, we're going to want to
match it to our model. So when you select the eye
button on our model layer, the model is going
to appear again. I know it's appears
in a different color, so don't panic that's
normal because the color you have selected right
now is different. So you can click on
a lighter color just to see the older
model the way it is, Let's choose any color right now that you're
comfortable with. That you can start
modeling the eye into the body when we
change the size of the eyeball tool hide behind the egg-shaped model when order to see the eyeball because
it's still in there. But we could do is go to Transform and click
on transparent. When you click on transparent, the egg becomes
transparent and you are able to see the eyeball and site where you'll
be able to move it properly to the eye sockets. You can always turn
transparent on or off depending on what you need to make sure
that it looks right. I think this is starting to
look better when you are happy with the way
your eye looks. We are going to mirror
it to the other side. So we're going to
copy the eyeball and make it appear
on the other side. Who way to do this? To go to Z plugin and
all the way down to sub tool master until you
see the mirror button. Click that on the x-axis is correct because we want it
to be on the other side. Click Okay, and that's
what it looks like. Now we have both eyes in
the correct position. What you could do is just add in some details to the sockets to make them fit
the eyes properly. That would be it for the eyes. Really well done. You have come this far. I'll see you in the next lesson.
3. Further Insight into Modeling (Beaks and Wings): Welcome back my
brush links back to my ZBrush for beginners
course part two. So far we have created the basic shape of
the egg and the eyes. Now we're moving on to the beak. The further we go
into the course, the more tools I'll be
introducing to you. So pay good attention in
order to create the beak, we will go again to the sub
tool, insert another shape. Again, the shape will be
inserted in another layer because we would like
to model it separately. So two sub tool and insert. We will be inserting
a sphere again. Of course, there are
many ways to modelling. Everyone has their own styles. This is the way I decided
to create the beak. Now that we have the sphere, Let's decrease the size a little bit so that we can
work on it properly. Next, I want you to
press on control shift. We are going to be cutting
the sphere in half. Control Shift has a few options. So while keeping
control shift pressed, go to Select Correct. All the way to the side to trim curve where you see
the scissor trim curve enables container so you can cut any shape
you want just straight. This is pretty much what
it would look like. So we cuts the back
half of the sphere, and now we want to
cut the bottom half. We're trying to model the
upper part of the beak. You can use the
rectangles to narrow down the beak from the front until you have a
shape you're happy with. Now there's more than one way to cut the bottom
part of the beak. You could either do it from
the side or from the front, as long as it's
straight and even fine, nothing has to be perfect. Remember where we're practicing, but try to make it as
straight as possible. Once we're done
cutting the bottom, Let's try and have the
beacon the right shape, and place it in the right area to get an idea of
what you need to model and what it
should look like for us if we look
at the picture, the beak is quite small, so let's scale it down. Of course, don't make
it too small yet, because we're going to
try and model it first and make it look
like more of a beak. So before we shape the
upper part of the beak, let's model the lower one in
order to create a coffee of the upper beak or any model
you want to create a clone, press Control and drag the model either
up or to the side. And as you see, a clone of
the exact model is created. We will just rotate this shape in order to create the bottom part of the beak. Of course, try to copy the reference image
as much as possible. Notice that when
you add a clone, you have it on the same layer, two models in one layer, you can change the selection of each model interchangeably. And you do that by pressing
Control and click. Notice every time you
press Control and click, it changes the
selection of the model. The darker side is de-selected and the lighter
side is selected. When you have it in place, Let's shape the upper beak. I want you to click on Draw
and go to the move tool. Of course, make sure that
symmetry is turned on. Remember, always
make the basic shape first before you go
into the details. Since I don't want the bottom
edge to be that sharp, I'm going to click
on smooth shift and will go along the lines to
make it a little bit smoother. I think this looks
more like a beak. You can be as
creative as you want. Now that we have
the general shape, Let's make it smaller to fit
the reference image more. Notice that the lower
part does not seem to be symmetrical
or in the middle. So we're going to change that. We can do it manually. There are ways to
doing this exactly, but I'm trying not to make
this video too complicated. So you can totally
use your eyes to measure and there's
no problem in that. Now we'll go to the
move tool again, make sure symmetry
is selected and we will change the shape of the
bottom beak a little bit. Now we change the selection
to the upper beak again. Remember, Control, click and don't click on the shape itself, just click anywhere
on the canvas. We will add a few details
to the upper beak. For that, click on the
standard brush and change the shape of the brush according to whatever fits you
while and modelling, I'm using the normal
standard brush without clicking on Alt just to shape the middle part of the beak and inflate
it a little bit. You see this way it looks
sharper and I'll do the same to the sides or
the bottom of the beak. Now I want to create the
dense for the nostrils. In this I'll be clicking Alt. They look like dimples though, so I want them to look
more like nostrils. For that, I'm going
to use a pinch brush. What's pinch does is
basically bring two sides together on basically
pinching the dense. As you see, the two
sides of the dense come together whenever
you use the pinch brush. Now it looks more like
a bird's nostril. And congratulations, this is
the way you create a beak, at least one way of
how to create it. So now that we have the beak, Let's move on to the wings. For that once again, we're gonna go to insert
and insert a new sub tool. Again, I'm going to
choose the sphere. I find them easier to model. This time we're
going to narrow down the sphere to a very thin look. So when you look at the
side, it's still circular. We'll use the move tool
to shape it into a wing. If you notice, I use
the transparent tool. Once again, you can go to
Transform and click on transparent and keep
the wing selected. That way it will make
every other model transparent so that you can just work and focus on the wing. This swing is very cartoony. It does not have
detailed feathers in it, but it should look like a wing. So I'm going to model it in almost the exact same way
as in the reference image, just to give the
illusion of feathers, we can practice creating actual feathers
and coming videos. For now, this fits
this character. Remember to use the smooth
tool every now and then. I know it looks like a
rooster's head to wait for it. Once we have the basic shape, we always use the standard tool just to add in the details. But remember it's
always the basic shape. That's the most important part. I'm going to turn
transparency off to get a look at what it would
look like with the model. Now that I know the size, I will click on solo. Now what solo does is
hides every other model and makes you work on the
model you selected alone. Then I'm going to use
the standard tool to add in the details. This is what a cartoony
wing looks like in my eyes. It gives the illusion
of feathers. I would interchange
between using the normal standard
brush and working on Alt to draw in dense inflate where you feel like it needs
to be inflated. Also notice that
symmetry is turned on. So whatever I draw
on one side of the wing translates
onto the other side. When you look closer
into the wing, you notice that
there are lines that are not quite straight. They seem a little pixelated. The reason for that is
the number of polygons. When you go to Transform
and click on Pali FU will see the number of polygons and what it actually looks like. Now you could increase
the number of polygons to make your model
more detailed. You could also click on Z ring mesh to
redistribute the polygons. Dynamesh is good for
forming basic models. Dynamic sub-divide as good for the details which is on the top, how these different modes
are used in modelling. I will explain in
a different video because that is more advanced. One of the most
challenging lessons in modelling was to know the difference between
DynaMesh dynamics sub-divide and z re mesh. For now with this model
just needs to look good enough and make it smooth as much as possible
and you're good to go. The reason we are
not going to focus on the details when it comes to the wings is because
fire we'll be covering it. So it just needs
to be good enough. Make sure you smooth
out the edges and make any changes you feel like
needs to be made over here. I'm trying to make the
edges a little more pointy so they would match
the reference image. So when you are happy with the
final result of your wing, go to transform and
deactivate solo. Now you see the rest of your
model and we're going to try and resize the
window to fit the model. Look at your model from
all angles to check if the wing is in the right
place and the right size. You notice that the wing gets covered by the egg
shapes sometimes though, in order to avoid that, I'm going to curve the wing a little bit with the move tool. I will change the size
of the Move Tool to a very huge size so that the wing gets
easily manipulated. Then I will try to create
a dense just to make wings appear more circular so that it wraps around
the egg properly. So this is what it
would look like. Just adjust the angle and
play with it until it fits. If the tip is covered by the body that is
completely fine, it should look like the
wings are sprouting from the egg when you are happy
with the way your wing looks, we are going to mirror
it onto the other side. Do you remember how
to do a mirroring? You go to Z plugin sub tool
master and click on mirror. Remember the x-axis is correct. Click on Okay, now our
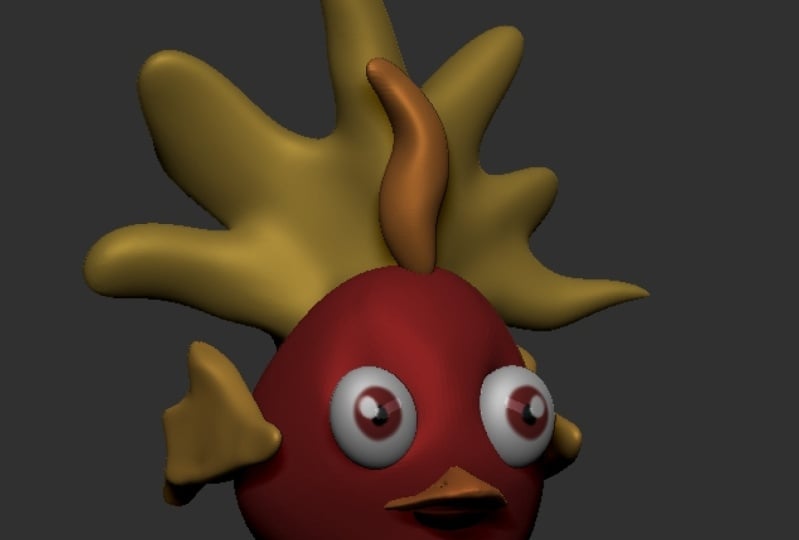
egg, Phoenix has wings. The only thing that is left for our model right now is fire. So we're going to start with
the fire on top of the head, and then the fire that
glows out of the body. Let's start with the head. We are going to create
another sub tool. So click on Insert sphere, you look at the reference
image we are trying to create the hair on
top of the egg, that is actually a flame. We are going to narrow down
the sphere onto the head. Then we are going
to deform it with the move tool to make
it look more wavy. So play with it a little bit until you have a similar shape, you can always then click
on Draw and activate or deactivate symmetry according to whatever fits your model. As you notice, the flame
is not symmetrical. So I start out with
symmetry just to make sure that the front
side is symmetrical. And then I deactivate symmetry
and I make it too wavy. Of course, adjust
the brush size, click Shift to smooth and
it's out every now and then and enjoying
modeling again, when you are happy
with the main model, start adding some details
with the standard brush. Now it starts looking like hair, but the texture will
make it look like fire. Flames have a more
pointy points, so I'll make the
tip more pointy. You're happy with
the last results. Let's move to the flame
that comes out of the body. Perfect and well done. You can tap yourself on the
back for coming this far. In the next and final part, we are going to model the
flame that comes out of the body and we will color
and texturize the model. See you in the next part.
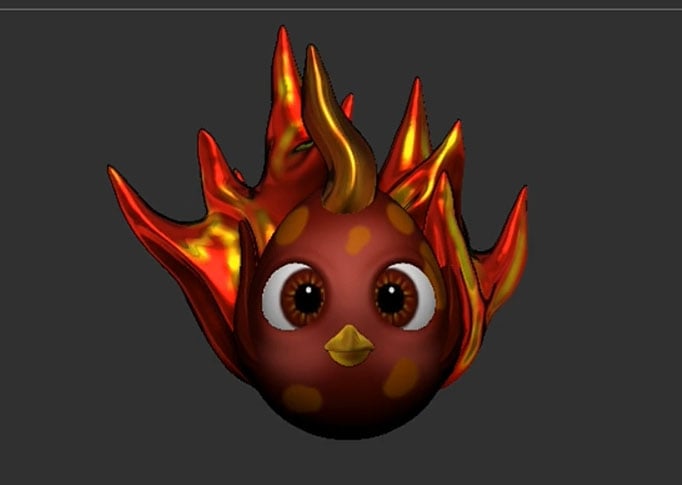
4. Coloring and Texturing Your Final Model: Hello my brush wings, and welcome to the third and
final part of my course. By the end of this course, you will have a finished
glowing fiery Phoenix sec. The only thing
that's left to do is model the fire that
comes out of the egg. Then learn how to
color in ZBrush. So let's start. Once again. We're going to go to
sub tool insert sphere. Now remember the flame
that's going to come out of the body is
going to be so random. You can play around and model
it in any way you want. Flames do look messy. So let me show you one
example of how I did it. I use the move tool
to start moving the model around and starts
creating pointy tips, moving them out of
the actual model. I turned on polyether
to look at the polygon. Because whenever
you deform a model, the polygons deform with it. And the more you stretch it out, the more difficult it
is to get the details. And so in order to avoid
the polygons stretching, every time you remodel, you can always
click on DynaMesh. Dynamesh helps you redistribute polygons so that you can be able to model in more details. Now, take a look at the
stretched polygons here. Order to redistribute
the polygons, press on Control
and click there. You see whenever
DynaMesh is selected, you will see how the polygons
redistribute themselves. This way you can
model much easier. So keep testing things
out, keep pulling out. Tips out of the fire can be as random as
you want it to be, as you see, I made it
point to you as well. After I was happy
with the model, I started adding in
the details with the standard brush besides the flames and fit them into your model after you
like the position of it, you can create a clone
and reposition it. And to create clones again, press Control and drag, then reposition
the second flame. Once you are happy
with the position of the second flame and you're happy with your overall model. You can always tweak and change whatever you feel
needs changing. But generally this
is the way it should look and well done for
reaching this point, we are done modelling. So this is the last
chapter of my course. Now that we have our model, I will show you how
to color in ZBrush. After choosing the colors, we will choose material
and I will show you how to make the fire
and look more like fire. So the first thing we do
when we want to color and objects is
select the object. So we are going to
color the egg first, pick the color from down there according to the
reference as well. You will see that the
whole model changes color. Now it hasn't really
been colored. This just shows you what color you are choosing and
how it will look. In order to apply the
color to our model, we have to add one extra step, if fewer, happy when we
are ready to color it. Remember the upper row
D selects a and z, add and select RGB. That is because we only want
the color to be affected. Now you can go to color
and fill objects. When you click on Fill object, you will see that the icon under the sub tool changes color. That means the color
has been applied. Now we will do this to
all the other sub tools. We'll see that when you choose another color with
the other sub tools, the egg remains alert with
the color you applied to it. Orange, red looks more
like fire with a color. Now that's all the sub
tools are colored. Let's start drawing
in some highlights. For that, Let's add material to the eyes since they
are already done. Let's go back to material
and click on plastic. As you see, the whole
model turns plastic. It's the same issue
as with the color, which means we need to
apply it to the eyes first. So keep the m and the
zed add selected, go to color again
and fill objects. That way you fill in
the material as well. Now, when you select
a different material, the eyes remain plastic. Now that we generally
know how it works, we'll start playing
around with the material, find out what fits best. As you see, I tested out
quite a few materials. Have fun with it. So in this example
for the flames, I choose math cap metal for now. Then. For the beak, I chose
mad cap whites. Then I stuck with that for a moment because it
looks close enough. So now we are going to
highlight the egg a little bit to give them the
Phoenix of bits more color. So go to a lighter red, use the standard
tool and make sure to select the rest and
keep RGB selected. Let's highlight the cheeks. In order to add spots
or circles to the egg. Click Control, then
click on Mask. And we will select the mask lasso tool that gives you the
freedom of selection. I'll show you what
I mean in a minute. Once you selected, click on Control and create your circles. As you see the shape
is highlighted. Keep pressing control and do
the same all over the act. Keep in mind that when
you select one area, the opposite area also
gets highlighted. When you are done with
all the highlights, press Control and
click on the Canvas. Now it is the circles
that are selected, which means we are able
to fill them with color. Choose your color, then click
on color and fill objects. After that, click on Control again and click on the canvas. And this is what your
egg will look like. Now let's start giving the
beaks a little more color. After we are done, Let's give the flames the
few highlights as well. Keep giving a tie
lights all around, then click on a lighter
color to fill the object. A lighter Chrome makes for
a veteran fire and look, it will, however not be
the last material we use. So no worries if it doesn't
turn out the same after that, give the flames few
dark shades as well. Finish highlighting
with bright yellow, add darker shades with dark red. We are going to give the hair the same material
and the same color. Then we will
highlight it as well. Since fire is transparent, we will go to vector
displacement map right down there and change
the BPR visibility, which is pretty much like
transparency or opacity. When we click on BPR up there, which is pretty much
the render tool. As you see, the hair
becomes transparent. We will do the same
to the body fire. So go again to
vector displacement, display properties and
BPR transparent shading, then lower BPR visibility
and click PPR again. Although this looks fine, it does not look like fire. So we are going to have
to change the material. We are going to change
the material to flat color and fill object. Even though it
doesn't look perfect, it will look good when
it's transparent, it looks a bit better. It just needs a few
more highlights. We are going to use the
mask lasso tool once more. Add more highlights to the fire. Let's make it a bright yellow. Then we are going to add smaller highlights of
even brighter yellow. This will be the end result. Now with the standard brush, we will add in white highlights. We will do the
same for the hair. As you see, it starts to look more like glowing
fire in ZBrush. It takes a lot of
experimenting to get to a better result and it is
okay to try things out. Says what the final
result looks like. Of course, with the rendering, the fire appears to be more transparent that
you have come this far and you have made
a fiery Phoenix egg. Well done and congratulations. For now, you have mastered
the basics of ZBrush. Hello brush lings. If you've come this far, it means you can
model in ZBrush now. So congratulations for that. By the way, if you want
to render your model, you can always go to Document
exports and it will export your models directly
in Photoshop format. So you can render your Phoenix
and Photoshop if you want. That's how I did this one, but I also use key
shot eight for that. Of course, there will
be another course on rendering That's all
uploading Skillshare. So keep an eye for that. You can go ahead and practice
until the next course.
 Resu Chron, ZBrush Made Simple