Transcripts
1. Intro to class: Hi everyone. Welcome back to another
Skillshare class. My name is Cali and I'm an artist from the UK,
living in Australia. In today's class,
I'm going to take you through how to
draw a fashion figure. We're going to start with the front-facing basic
fashion and figure. And then I'm going to
share how I would draw a dynamic pose and
then take this from sketch all the way through liner colors onto
the final result. Using all the tips and all the things that I
share for these classes, you should be able to draw
you a very old-fashioned picked up by the
end of the classes.
2. Class project: For this class project, I suggest to joy very
old-fashioned and figure out using the template
that I've got here. So I set out this template to
really help you kind of get an understanding
on how to set up your own fashion figuring
out with a nine head chart. I really hope that that helps. You can download that below
and use that for free. Don't forget to post all
of your projects that you do if your fashion girls in
the project section below, I would really love to see them.
3. Drawing the Basic Figure: So just here I've got
this template which is available for you to
download if you want to use it. So this is just a guide to, this is like a nine head chart. Basically, you've got the
nine circled as in the heads. And then here I've
just listed where each part of the body
were full as you draw it. So this can just help you get the guide down a lot easier. So I'm going to draw, and now this is going to be the basic figure
like front-facing. So this is where the top
of the head would be. And this is where
the chin would be. This is where you'd
put the chin here. And then coming down to here. Shoulders with
generally sit just a little bit underneath
the first line. Then the waste would
say about here. And I just usually do a shape
like that to kind of do it. But you can do like circles or squares is up to you really. Then from here we're
going to bring it down and bring out for the hips. So just on this one would be
where the hips would sit. Then I'm just going to bring
down a line for the leg. And this is where the knees
would sit just on this line. So I'm going to bring
it down to here. And that's going to
continue the line down. And then here at the bottom
where you've got the feet. I'm just going to
draw an a big kind of triangle for the fee. And then for the arms. I'm going to bring
it down to here, which is where the
elbows would be. The elbows for kind of
around the waist area. And then bringing
it all the way down to here is where the
hands would sit. Sorry, that's generally in
the middle of the thigh area. That's where the hands
usually would fall. So this is a very
basic generic shape of a front-facing figure. So now in the next class I'm going to just take
you through how I would change up the pose a little bit using line of action.
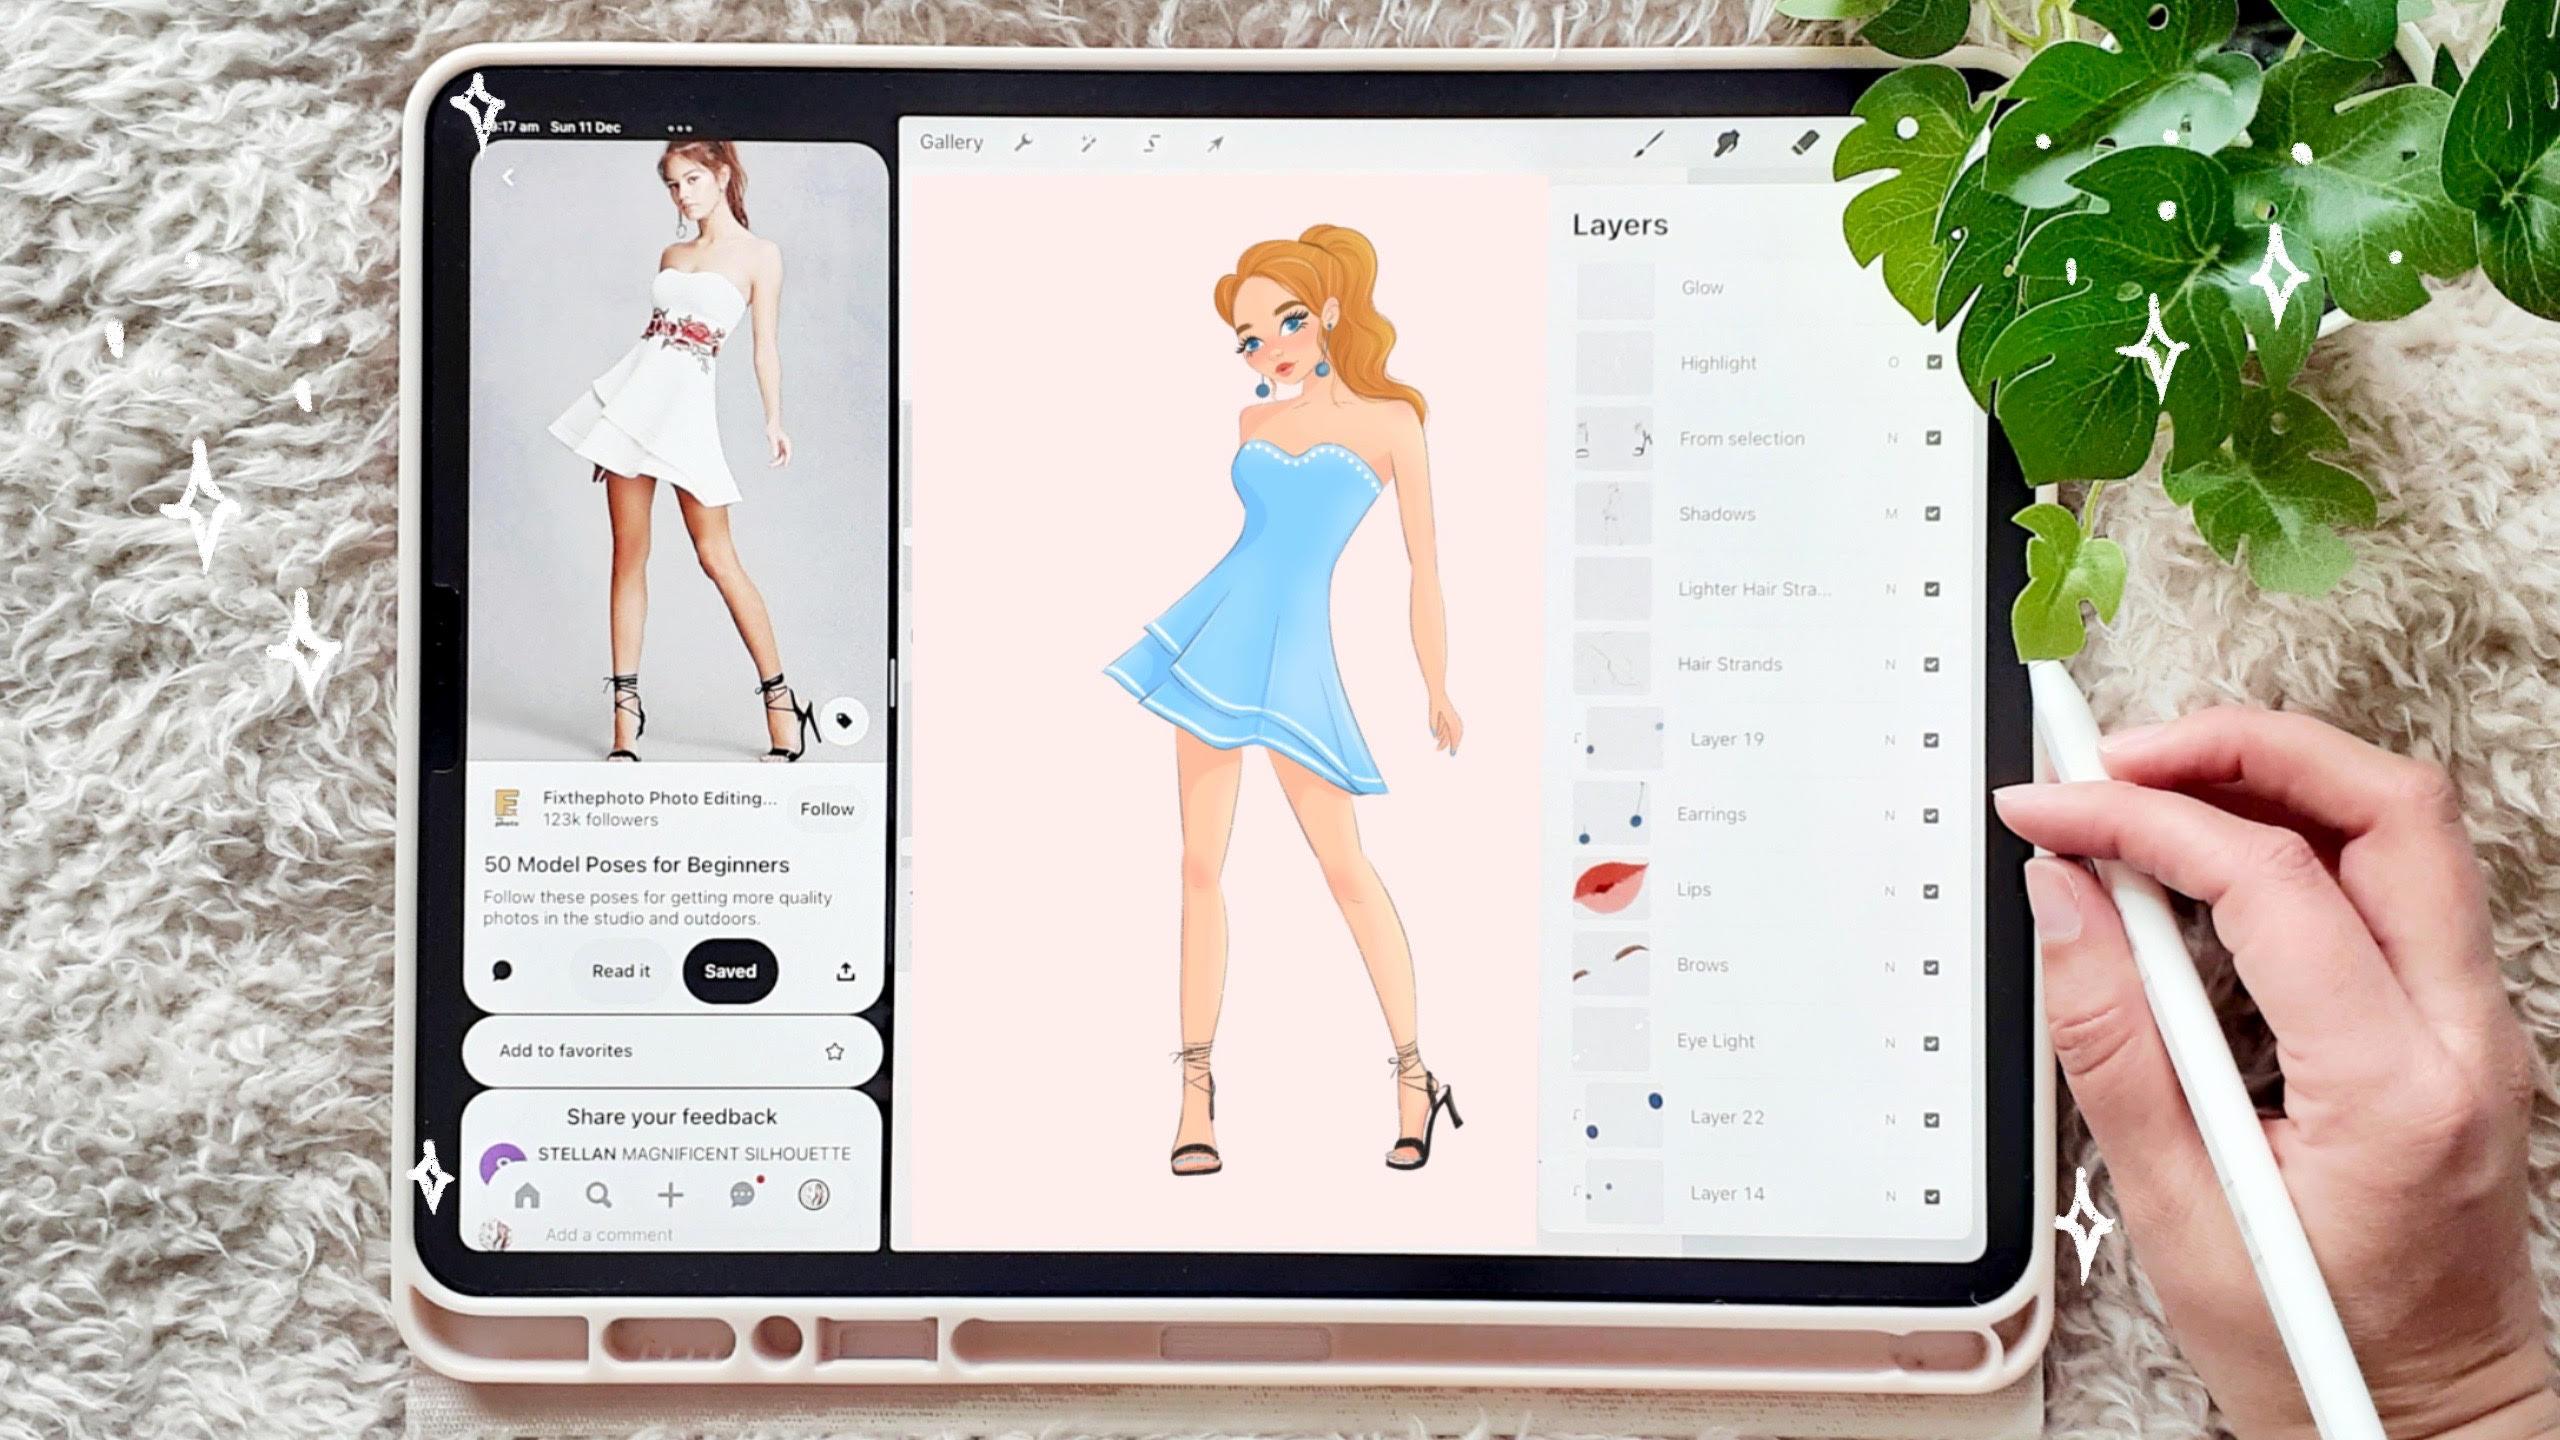
4. Drawing a Dynamic Pose: Okay, so now we're going
to do a dynamic pose. So this is a static pose where
it's just facing forward. Dynamic pose is basically just a pose that's
like with movement. So it's got a bit
more character to it. So I'm going to turn off this layer and make a
new layer above that. Then I'm going to bring in Pinterest for a
reference photos. I'm just going to drag
this over to the side. Let go. And now I've got Pinterest
on the side of procreate. So I'm going to bring up this picture here
from my reference. As I just spoke. She has quite a simple
kind of pose is going on. So it's not too crazy, but it's definitely something that is a little
bit more different. So I'm going to start
by drawing in the head. Her head is a little bit tilted, so I'm just going to
tilt the head slightly. And then I'm going to just
draw it down the neck, which is also kind
of an angle there. So it's going to draw
the line like that. And then I'm just
going to think about the line of action. So her line of action is going
through like an S curve. So basically it's like
that kind of shape. So the line of action
is basically like an imaginary line that
you can draw along, like the character's pose. And it just follows the body posture along
to help you guide you in like where your drawer in the torso and the
hips and all that. So if I go back down
to this layer here, It's gonna draw her in this
line here for the shoulders. And then for the waist, high waste is actually tilted. So I'm gonna draw
a line like this. And then her hips
are also tilted. Again. I'm going to draw
another line tilted there. And then I'm just going
to connect those. So it's basically
like the exactly the same as we did in
the straight on, but we're just following
the curvature of this line so it helps us
draw it a little bit better. And then for the legs, her leg go straight down on this side. So I'm just going to
bring the lime down. That's where the knee would go. All the way down to the feet. Let me just put in a little bit of something
there. It looks a bit better. This leg is sticking
out a lot more, so it's going to bring
that down like this. Then this arm at the top
here, you can't even see it. It's really hiding
behind her body there. And then this arm is coming out. This is why the elbows
would be obviously she's I'm tilting down
slightly with her body, so it may be just a
little bit below that. So when you use this chart, you can still kind of figure out if she's bending it
in a different angle, like how it's going to affect
where the elbow would say. So usually it would sit
on this line but because she's bending like that way, it's going to be down
a little bit further. And then her hand
would be about here. That is basically
your dynamic place. So in the next video, I'm going to start bringing it together
a little bit more.
5. Sketching: So now let's move on to
the sketching phase. So I'm first going
to take the layer opacity down just so
I can solve see it. But so it doesn't distract
me from my drawing and I'm going to make a
new layer on top of that. So then using the six B pencil, which is found under
sketching on Procreate. I'm now just going
to start filling in the face details and all
the body and everything. And I'm just going to use the selection tool
here to just select her head area and move it over because I felt like it was
a bit too far to the right. Then. Now I'm just going
to add in her dress. And so I'm just using
the guide below to help me place the outfit on top and also using the
reference picture to help guide on where
to draw things. So I will look at
maybe wear the dress, comes out to the side and how
far away it is from the leg to imposition to the hands
and all that sort of stuff. So you will see me move
the right-hand side arm up a bit because I did do
that a little bit too long. But yes. So now I'm just adding in the legs and the shoes. Once I'm happy with the sketch, I'll go to the Adjustments
tool in the top left and go to Canvas and
then go flip horizontal. And this will just
give me an idea of how this image looks
flipped to the eye. So whenever you flip an image, it can always look slightly
different to what you look at it in the other
way round basically. I always do this
to all my sketches first to make sure that
they aren't looking off in any way before I move on to the linework and color.
6. Line art: So now I'm gonna
do the line art. So I'm gonna make
a new layer above the sketch and then bring the sketches opacity right down. And then I'm going to choose
an almost black color. And then I'm going to use
the dry ink brush for this. And you can actually
find the dry ink brush under inking on Procreate. I'm just going to find the
right size for my brush. I'll take away Pinterest so
I don't need that anymore. And then I'm just going to
start in the line work. All right? So basically when
I do line work, it's good to add in thickness
of different lines. So e.g. where the
chin would fall, the chin is in
front of the neck. So to make the chin
line slightly thicker, just brings it forward a
little bit and makes it appear like it is in
front of the neck area. So I go for you like the whole drawing and
I'll just look at parts of the image that I know that
in front of something else, like the ear is in
front of the hair, the dress is in front
of the body parts. So I would just
put thicker lines and I don't always connect
all my lines as well. I have a continuous line. I always break up the
line slightly and give it just gives it a little bit
more character like that. I just prefer it that way. So here I'm just bringing
Pinterest backup because I need the reference
photo of the shoes. And I always think that reference photos are
really good to just get like parts of images down that you don't always know how
to do from your mind. Using reference
images to me is like a really great way
to help you draw, and it's fine to use
reference images. You don't have to remember
everything from your head. So I'm just bringing up these shoes because
they were a little bit unusual and I don't really draw these type of
shoes very often at all. So I definitely needed the reference to
help me out there.
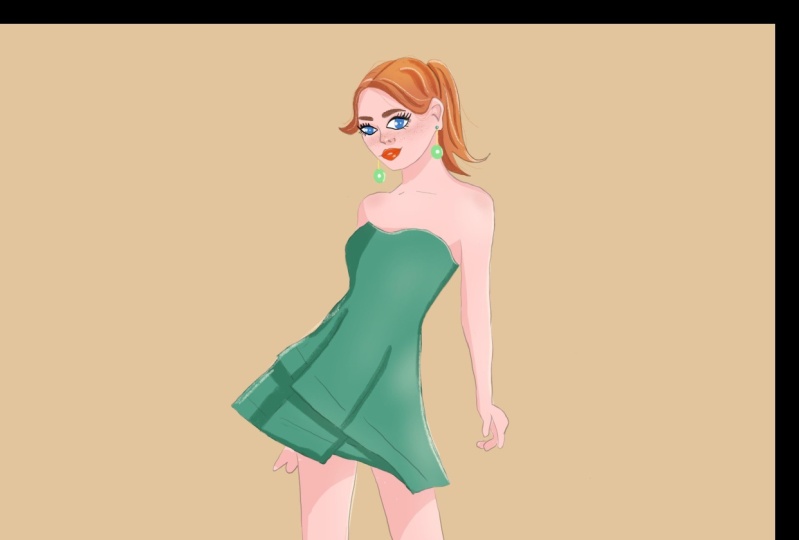
7. Choosing a Colour Palette: Now I'm going to move on to
choosing a color palette. I will choose the six
B pencil for this. This is a brush that I actually duplicated
and then I changed the settings so I
could make it a lot bigger so it could cover
more areas more quickly. So I'm going to
use that brush and I'm just going to go
through my colors. I've already got a
color palette for skin, which I've put a bunch of different colors
together before. So I'm just going to
pick some colors, play around with it. And I do about three
or four of these. And then I will choose like
which one I like at the end. I always do the color
palettes on new layers. And then I'll minimize
and to the side so that I can see which ones I
like after I finished. Um, yeah, I'm just going to block in the large
areas of color and were really rough way just so I can see what
it would look like. I'm not focusing too much
on making it all neat. And if anything, at this point.
8. Let's Colour: Okay, So now we're gonna
do the flat colors. So I'm just leaving the color
palette to the side there. Then I'm gonna make a new layer. And then just drag those color, the other colors underneath
so they're out the way. And then I'm going to
name the new layer skin. I'm just going to color pick by pressing my finger
onto the canvas. And then before I get started, I'm just going to
take the opacity down off those line art layers. Let's just so I can see, well, I'm doing a little bit better. I'm going to use the
shell brush for this. And you can actually
find the shower brush under calligraphy on procreate. So I'm just going
to quickly go back to the line art layer because I noticed the eyebrows sticking
out the side a little bit. Sorry, I'm just choosing
the heart airbrush for my eraser and just
erase that adequately. Then I'm going to
start coloring in with the shale brush,
the skin layer. And as I was doing this, I feel like the shell
brush carnivals and giving me the
most cleanest edges. That's kind of annoying. So I just took a
little bit longer, but I was almost wanted
to change brush, but I already started before. I'll just continue
with the shale brush and then I'll change
up for the next part. As you can see, I'm
struggling here to get that clean line because the
way that the brush is made, it's a little bit funny angles. You can't get that kind of line, that clean line that you want. But yeah, anyway,
I'm just going to do that on this layer
and then I'll make another new layer
for the dress and another new layer for the hair
and everything like that. And this is just all
the flat base colors for the illustration, basically.
9. Adding Details to the Face: So now I'm going to fill in some details like for
the face and everything. So I'm just taking
the line work and layer's opacity down so I can see a bit better
than what I'm doing. And I'm just going to make
a new layer above the skin. I'm going to choose
a white color. And then I'm going to
choose the hard airbrush, which is on the airbrushing. And then I'm just
going to fill in the white parts of the eyes. And the hard airbrush is good
for this because it gives a really clean
edge to the brush. So I just really like
using that for the eyes. Then our decided here to bring back up an
old color palette Example and change her
hair color because I felt like the pink was blending
with the skin a bit too much. So I'm just color pick
him by holding my finger down and then I'm
clicking on the layer, go into Select and making
sure it's in color fill. And then this will automatically just change the
color of the hair. Now making a new
layer above the eyes. I'm going to set that
to clipping mask. Then hold down on
the blue color of the dress to select the color and then make
it slightly darker. And then again, still
using the hard airbrush, I'm just going to
fill in the pupils. And so by using a clipping mask, this helps the colors stick to the layer below it so that I won't go over the white lines. Next, I'm going to go to the line art layer and I'm
going to use the eraser brush, which will be on hard airbrush still from the last
time I used it. And I'm just going to
erase out the pupils of the eyes there so that
the color shows free. If you want to change the brush that you
use for the eraser. By the way, if you didn't know, you could just press on the eraser tool again
up in the top right. And then it'll bring up the list of all the brushes and you can choose which brush you
want to erase with their. Next, I'm going to
select the hair color and then make that a
little bit darker, and then make a new layer. So this is going to
be for the eyebrows, and I'm going to choose
the dry ink brush, which is under inking. Now I'm gonna go back to the
line art layer and I'm going to use the selection
tool up the top left. And I'm going to select
around the eyelashes and then swipe three fingers
down, cut and paste. And so this will now bring
them on a new layer. And it will set them back to a full opacity so that their dog like this where I just
don't have to draw in the eyelashes,
eyelashes again. Then I'm just selecting around the lines there that
I didn't actually want dark and cutting and
pasting them into new layer. And then bringing
those opacity back down so that it matches
the rest of the line art. And then I'm just going to
combine those layers together. Now I'm going to make a new
layer above the eyebrows. And I'm just going
to name this lips, then choosing a pink color. So I'm going to select
this hair color that I've previously got here, and then just make it
a little bit darker and just play around until I
get the color that I like. And then I'm going to
use the studio pen, which will be under inking. Then I decided to ask you wanted to change the color slightly. So I went to the lips layer, I clicked on it
and press Select, making sure it's on color, fill up the bottom row. And then you can go up
to the color chart, move around your pen to
choose a color and it automatically changes
the color on the canvas. Now I'm going to
make a new layer above that for the earrings. And using a darker blue color, I'm going to draw the circle in, hold the pen still, and then it will
snap into a circle. And then I'm going to
drag and drop the color. Now on the line art layer, I'm just going to
select the one with the shoes on and use the selection tool
to carefully select around the black
parts of the shoe. And then I'm going to
swipe three fingers down the screen and cut and
paste onto a new layer. Then I'll bring the
opacity back up and I don't have to worry
about drawing then again, this kind of just I could just
draw the shoes and again, but I decided just to do this
because it would be easier. Although as I was doing it, it was a little bit
tricky trying to get compared to the lines of like where the skin would
go to where the shoe was, ended up being a bit messy, but I'm asked to
do it in the end. Say, yeah, yeah, I probably could have
done that a lot better, but that's just how it went.
10. Adding Shadows: Now I'm going to add a
new layer for shadows. And I'm going to set
this to multiply. And then I'm going to
color pick the skin, make it a little bit darker, and set it towards the red
tones a little bit more. Then I'm going to use
the dry ink brush and then start applying
on my shadows. So I would usually apply the shadows around any
creases of the body. So like the neck area, the, is the eyes and under the nose. And then also at any
folds of the dress. And then I'm also thinking about where the light
is coming from. My case, I'm thinking
the light is coming from the top right-hand side and sort of directing
down onto her. I'm not the best at
shadows like I just try and place them where I
feel like they would go. I know I probably don't
place them like the best, but this is just how I do it and I keep them quite simple. I don't really
overthink it too much. I also am using the Smudge Tool, which you can find
at the top right in-between the brushes
and the eraser tool. And this I think is just on her heart
airbrush at the moment. I'm just using that to
smart a few of the shadows, so give it a softer feel. And so yeah, I'll just do all of the shadows for the skin, the dress, and the hair. And usually I would select the layers and then go
back to the shadows layer. But for this, I'm just
staying on the shadows layer. And basically cheap pick color, picking the color of the
skin, dress or hair, and then darken it
slightly and using that as my color to use on
the shadows layer.
11. Adding Highlights: So now I'm going to
work on the highlights. So I'm going to make a new
layer above the shadows. And then I'm going to
set this to overlay. And I'm going to choose
a whitish yellow color. And for the brush, I'm going to use the soft brush which
is under airbrushing. So I'm gonna go to
the head layer, select it, and then go
back to highlights layer. And then basically I'm going to imagine
that the light is coming down from the top right, like I said in the
shadows video, I'm just going to
softly apply the light kind of where it would
be hittin the body. And so I'm gonna go back
to like the dress layer, select the dress layer, and then do exactly
the same on that one. So making sure you're always go back to the highlights there. When you apply the highlights. Once it's on hold that okay, back to the highlights layer. Then go to opacity and
bring the opacity write down basically just
wherever I feel suits it.
12. Final Details: So now I'm just going to
add some hair strands. So I'm going to select
the hair color, take it a little bit darker. And I'm going to choose
the shell brush, which is under calligraphy. I'm just going to add in some
extra hair strands here. And this part I actually
did before the shadows. I don't know why I
got ahead of myself. So I'm just quickly
added in this clip here. So you might have seen
this layer already added, which was underneath
the shadows. Now I'm just making a new layer, which I'm going to name glow. I'm just going to add some
extra glue, the illustrations. I'm going to choose the
shale brush again for this. And I'm just going to add in some extra highlights around
the edges of the hair. And like on top of the shoulder, at the edge of the
dress and yeah, just little places
like that basically. And then I'm going to take the
opacity of the layer down. Next, I'm making a new layer
for the light of the eyes, like the, the
reflection of the eyes. Sorry, I'm using the mono
line brush for this, which is under calligraphy. And I'm just using
a pure white color to fill in the
white of the eyes. Then I'm going to take the
opacity of this layer down. Then I'm going to add a new
layer above the skin and set this to clipping
mask so that it attaches to the skin layer. And then I'm going to
choose the soft air brush. And then I'm going to add
some blush on the cheeks, the shoulders and the knees
and places like that. Now I'm adding a
new layer and I'm going to do some light
hair strands in the hair. So I'm going to color, pick the hair color and then make it a
little bit lighter. And I'm going to use the
shale brush tip for this, which is under calligraphy. So now I'm going to add
some detail to the dress. So I'm going to
make a new layer. And then I'm going to keep
it on the shale brush and I'm going to add some lines at the
bottom of the dress. So I'm going to set this
layers if clipping mask so that it sticks to
the dress layer. Then I'm going to switch
to the mono line brush and use this to add some
polka dots at the top. Bring it back up the layers. I'm now going to swipe to the right to select
all the layers. Then I'm going to
group them together. Then I'm going to swipe to
the left and click Duplicate. And then I'm going to
flatten one of those. So I've now got backup
of all my layers. Then I'm going to adjustments at the top left and go into curves. I'm just going to
play around with this to change the colors around. And then go back
up to adjustments. And click on hue,
saturation and brightness, and play around
with that as well. And then I can actually click my finger on the screen
and click preview. And that will give me an
idea of what it would look like and then click
Apply once I'm happy. So finally I'm just making a new layer underneath
and I'm going to choose a light pink color and then drag that over just so it
gives a nice backgrounds. So that brings me to
the end of this class. I really hope you
enjoyed watching along and hope you've
learned some acne. Definitely follow
my profile here and you can check out all my
other links on my profile. You want to follow my
art journey elsewhere. Need me any feedback for new classes I'd really
love to hear from you, and I'll see you in
the next one. Bye.
 Beach Life Studio, Illustrator