Transcripts
1. Welcome to the class: Hi, welcome to the course. My name is George Lucas
and I am from India. I've been in this
creative business for almost five years. I love video making, editing, along with photography,
drawing, and graphic designer. This is second part of
my beginner guy calls on Dove injuries or if you haven't
watched the first class, I highly recommend you watch the first-class
and come back. In this class, I'm
going to tell you how to set at the right
project settings for your edits beforehand to create backup with
the right settings. What our proxies, what
are optimized media and how to generate proxies
and optimized media. And finally, how to use
them in your projects. I hope this class will become
useful to you in many ways. So if you're ready, let's
dive into the first-class. Once again, welcome
to the class.
2. The right project settings : Welcome back. In this class, we're going to discuss the
project settings and resolve. So it's not going to be the wavy or for
the professionals, but if you're starting
out with the Avengers, so these are gonna be
settings that you need to set up before you
start your editing. So to access our
project settings, but you need to do click
on project settings. And the first thing that
comes is massive settings. In this video, we're going to
dive into master settings. In the next upcoming videos, we will go through this
all other settings. So in this video we're
going to take what our master settings and what are the options master
settings offer us. So the first thing in
massive settings is timeline format and
timer resolution. So basically time, the
timeline resolution is basically the
resolution that you are going to preview or the resolution that
you're going to export your project at the end
of after every editing. So you can actually select the quality that
you want to export. Keep in mind about one
thing that you can actually upscale the quality about
the camera settings, settings that you have
when you show the video. But you can reduce the settings so that you will
have a smoother playback. If you don't want
to create proxy, this could be your way of
compensating with proxies, but it is not efficient, I said, but you could use this or that. Your video will be, your timeline will be reduced to a smaller file size quality. Watch this video and
then when you explore, you really need to change
it to the original one. Even if you forget to change
it to the original one, you don't have to
be worried about it because when you try to export, Angie will tell you that you are trying to export
this video in a much lower quality than the original
quality of the video. So even if you forget about changing it back
to the original one, you don't have to worry to
worry about that damage, it will tell you about that. So that's what quality, the quality that
you want to export. Now, the next thing is
the pixel aspect ratio. The pixel aspect ratio is
some eight is going to change the size of your pixel into six. Nice man. Now, you are having
a square pixel. When you change it to
anamorphic are forced to three, it is going to
change according to that so that you
will get d features, an anamorphic lens or an
anamorphic shooting style. So that's that. But in our case, I'm using a free version
of DaVinci Resolve. So I do not have this feature
because these features are exclusive for
the studio washing. So let's move to the next one. The next one is so important. It is timeline frame rate. Timeline frame rate is a
framework that you want to export. As right now. The savings to 24, 24 gives you this smooth motion
blur and cinematic feel. That's what 24 gives you. You can actually reduce quality. But again, you need to
remember that you can upscale your frames per second because you do not have
more frames per second, can actually reduce their frames per second than the original. Let's say you showed
your video on 60 FPS and you want
to reduce it to 24. That is actually something
that you can do, but you can't actually upgrade from 62 one-to-many FPS because you do not have an extra
60 FPS in your video. So when you do that, your video is going to be all
choppy and it's gonna be, it's not gonna do
anything that you want. So keep that in mind. So select the one that you want to select the frame
rate that you want. And I just, for this example, I just choose 24 SPS. And here I only have 60 FPS. The reason is because
the free version, you only have access
to 60 FPS if you want something like one 20th years or
something like that, you need to upgrade to the professional studio
washing of DaVinci, Resolve that something
about the free version. And now you add frame rate is something same as
timeline frame rate when you made a change and there it will automatically change so you don't have to
worry about it. So we're monitoring is also something that I
didn't know ties because it is as good as it
is, you don't have to touch. It is more complicated thing. We will discuss about this
in the upcoming classes. Now one of the
important aspects of this master settings is
optimized media and render cash. Optimized media
and render cache. In this, the first
thing that you have is the proxy
media resolution. Before. It's telling
me what to choose. What is the CDC twos in
proximity or a solution? Let me tell you
what is our proxy. Proxy is kind of a top-down
or low resolution version of your original video so
that your computer will be able to handle that fall smoothly so
that you do not have. To have a hard time while
editing your wheel. So that's what proxies, because if you are using the original media
with the full size, so Raphael or log file, it is already big. And when you calibrate it, you are actually doing
something on top of that. Along with that, Let's say you cut down on it and
then you add effects and you had a text
about motion graphics. And whenever you do
add all these things, you are actually adding
a layer on top of it, making it hard for your computer to have
a playback through it. Professional editors
preferred proxy, so that your video will
be trimmed down to a smaller size
portion and you do not have to worry about the playback or
stuttering in between. Lay back on all those things. It will be easy for
you to do that. What proxies now about
Optimized media? Optimized media is somewhat
of the same concept, except here, you won't have
the resolution chopping down. You will have the
original quality. That alone with comes with a little bit more
higher sized radio. So it won't be as efficient
as mode as proxies. But at the same time
you are not using the resolution or the
quality of the video. So it is kind of a personal preference is most of the people
uses proxy, haven't. I don't know anyone
using optimized media, but I think optimized
media is also something a lot of people uses. So that's about proxy
media and optimized media. Now, let's choose the settings. So proxy media resolution
is something that you are telling DaVinci
Resolve to chop down the original video
to this settings. Let's say one eighth of the original quality
of the video. What you are telling
devil injuries, or by selecting any
of these quality, any of this selection, if you click have, your blocks is going to have
half of it's going to chop down behalf of the quality
of the original media. And then you could use it. If you select 116, it
is going to chop down torsion of one-sixteenth
of the origin media. That is going to happen when
you select proxy media. So my recommendation
is to use one eighth or quarter
because that one, that one loose the lose a considerable amount
of quality and it will be, I think, enough for most of the people to work in between. So we're going to select quarter
or whatever depending on your whatever you want and
how details you want to see, depending on that, select
the appropriate selection. Now proxy media format. So I used H.264 because it is actually one of the broader
formats and you have a lot of dynamic
range in between and also you won't lose
a considerable amount of details and also the
colors will look different. So H264 is the format or the color space most of
the streaming platforms use. So keep that in mind and use standard or you have
a lot of options, but you are actually limited
with this because this is the free version industry
or wash. And you have this progress if for two to 42 to HQ and all those features. But in those I kind of
recommend using h 0.264 0265. Optimized media
resolution is also the same thing then,
just like Proxy, you are telling
our soul to select the appropriate settings or how much trimmed the quality of the original
video that you want. So you select whatever, whatever settings you want. And you are telling essentially, to chop down this
one-sixteenth of the original video or one
eighth or something like that. Now, optimized media format. So this is something
that you need to keep in mind, doesn't it? Because this is the
recommended settings and I have no idea about
some of the settings, so I kind of keep this, this one gives the most
close to original result, not the right one. Because in the pro version you, we have porous afford to, to HQ and it is the
recommended version. But still, since we are
using the free version, I can recommend you to use this and also in
the Render cache format. So what is cash or
run the caches? Essentially, let's say
you have a big time ln of a lot of files
are the raw files, log files, and then you have those edits and
color grades and That is actually going to
make heavy for your computer. And in-between the video, it is definitely going to make some part of the clips more hard for the computer to
have a smooth playback or the original
frame rate playback. Let's say you have
a 24 SPS timeline and sometimes some part of the clips won't be able to
have that 24 FPS playback. So in that situation, there will be a red mark
in the timeline here. And that essentially means
that place is something that can give you the full
playback or full FPS. So that's that why
they render cache do for you is that let's
say you are taking a break or you are moving from your computer for
a little while. After your computer is either
then your program is open, your dove and you saw computer with the
help of your system will actually start rendering out the red hot parts to play back. The parts where it's hard
for you to play back, it will start to render
out those paths. And then once you come back completely depending
on the time and use tags, those parts will be rendered so that Andrew Indian and save to the location so that you do not have to worry about the FPS you already
rendered out or diverges already
rendered out that for you so that you
don't have to worry about the FES that were rendered cash is
paid essentially doing. Here, we're telling it to use this format to render
that part of that clip. So I kind of stick to the XHR, execute x could change it
depending on your research on each color space. That's what this is one of
the important settings. This is essentially
telling dangerous. So to start the process
of rendering out the caches after 11
s, here is 11 s. That means once you
leave your computer, and then after lemon seconds, computer will start
rendering those cashes out. If you leave it to 1 s, immediately after you
leave the computer, after this 1 s, your computer
demonstrate his soul will actually start rendering
out those hard parts. Because at that time, the computer or you're not dealing WG to
do anything else. So the computer is idle, the program is the program have the power and efficiency to run to render out
the dose hard parts. So that's why we're doing so. We need, we need to remember
if it's not ticked, click on an apple and then set the timing according
to whatever you want. I recommend you to set it to one seconds
so that it will be, it will start immediately, it will start rendering those caches immediately
you leave your computer. So now we get to working
for this section. In this, working for this
section is pretty much simple. You're telling them
into this hole where you want to save
your proxy media. So you select a space and then the proxy media
will be saved there. The caches exactly like that. The cash will be saved there and the Gallery
still scatter. So this is something
that we're going to get used to when it comes
to colors and color base. So we don't have to worry
about that, but still, it's essentially telling to save those gallery is
still there. Now. My recommendation is actually to keep everything in one place, like I've discussed this
in my previous course. If you haven't
watched that goes, I recommend you to watch it
and that goes up discussed about what is a database and
how to create a database. Also, what is dynamics, which also what is the
difference between toward ERP and Tatyana files and how to pulled unexplored and
all those kind of things in my previous course kind
of feels like a nerdy stuff, but it is actually one of
the important basic stuff that you need to understand
in DaVinci Resolve? According to my I don't know, according to my knowledge. So that's essentially
that that I have discussed a few
organizational method. So what I usually do is actually create a folder for
whatever you're working on. Then inside that I create a folder for videos
and maybe for, let's say proxy caches and galleries and
all those things. And along with a
folder for database, that everything will
be in one place. You do not have to wander around your computer
for ease things. Everything will be at one place. That's my recommendation. So that's about working for less and last frame
interpolation, which is something to do
with when you actually, you want to use slow motion video or wanna
make video too slow motion. Or when you won't
have to drop down to a particular frame sick and you will use its AAA settings
and all those things. I actually do not use
this settings here, I leave it here. Instead I use an edit tab
when you want a job down, or when you want to
reduce the size of size, or when you want to reduce
the speed of a video. I actually do that
in the Edit tab and we have all the setting, all these settings
bear to change. So I kind of recommend
you doing that. I leave it here. I didn't want it. I didn't had the
privilege to use this since I've been
working on Dove injury. So I'll tell you
you have to do that and edit out when it
comes to Edit tab. So in my case I don't use it. I'll leave it as default. So that was about master settings or project
settings in DaVinci Resolve.
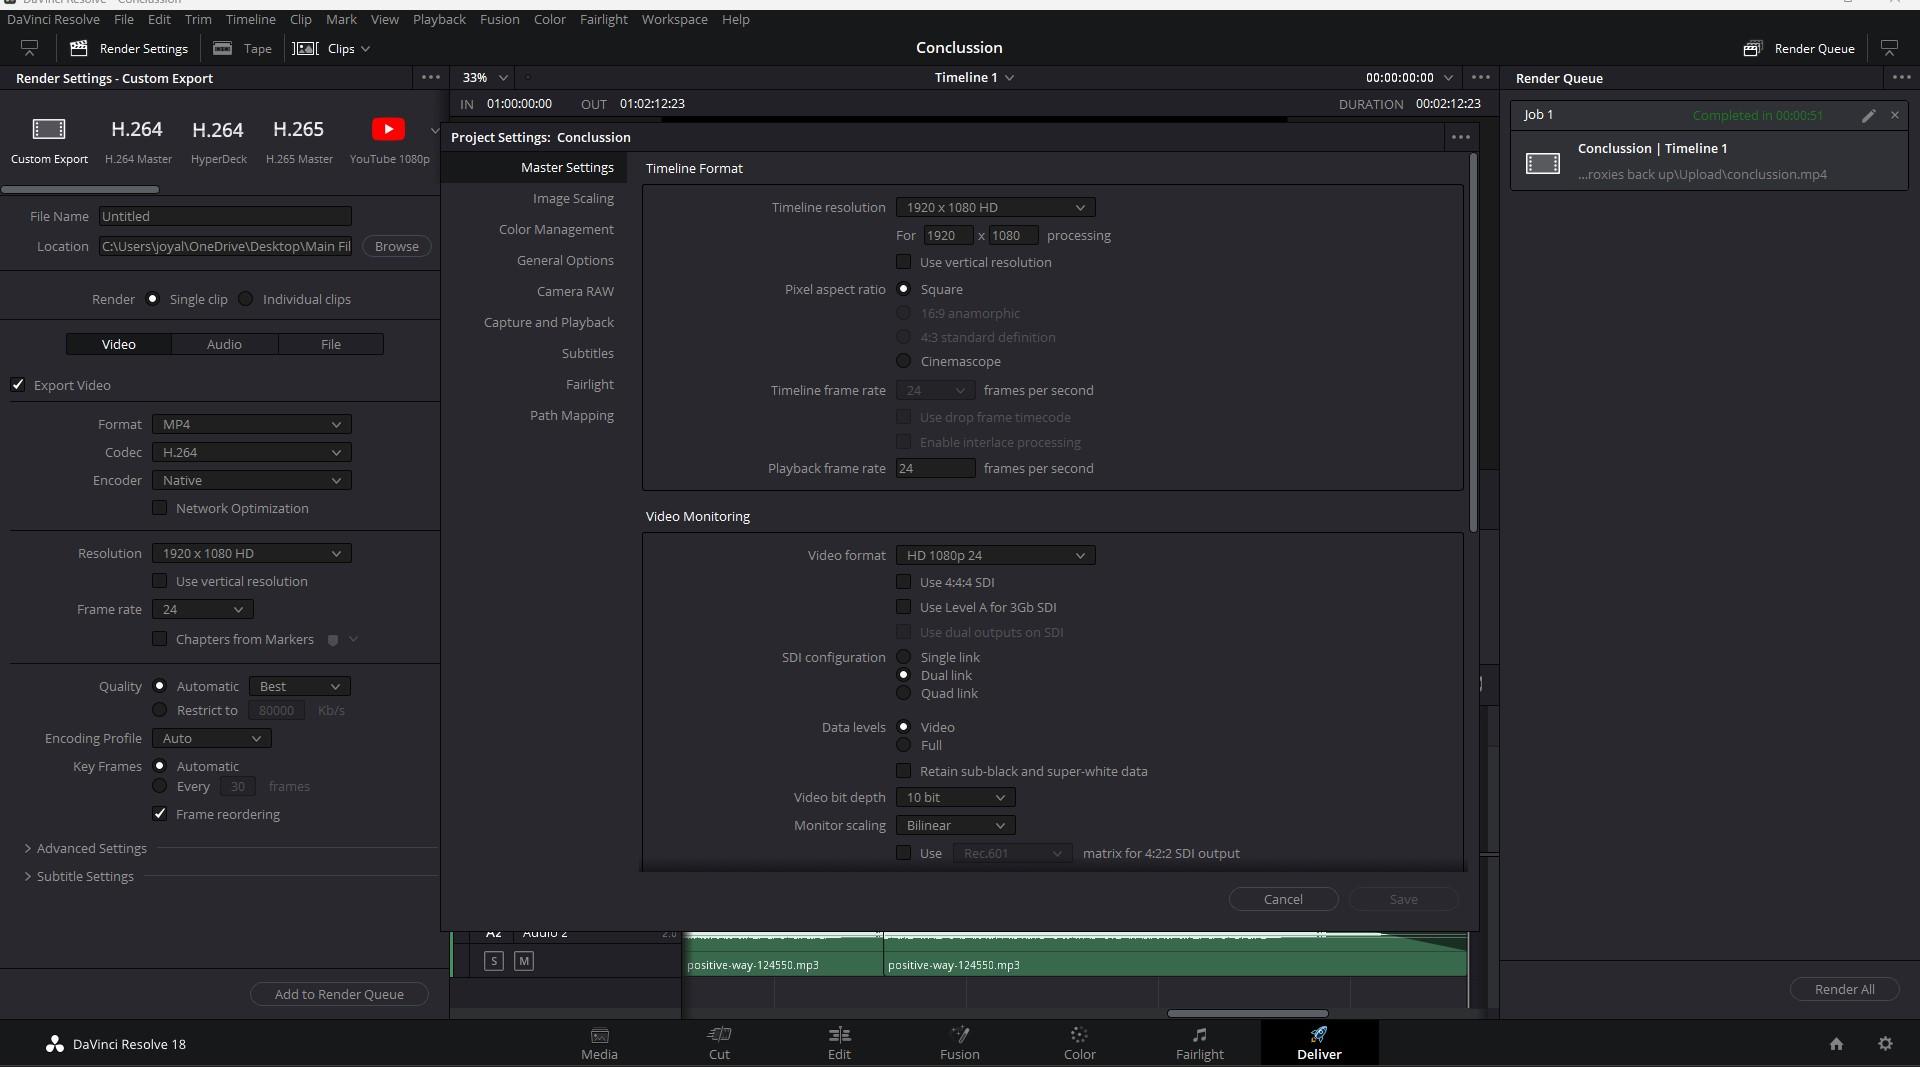
3. Setting up the Project Backup : Welcome back to this code. In this video, I'm
gonna show you how to set up your
backup projects for your project files and DaVinci Resolve even though the injury solve this
kind of brushed, crashed free when you compare it to any other
editing softwares, premiere Pro on
anything like that. But whatever, having an option or safe
backup is always nice to have. So that's why we're going
to set up our backup today. To set up your backup, you need to be inside your project that
you're working on. Then you need to click here on this place called
DaVinci Resolve. When you click, there will
be a bunch of options. From here, you click
on Preferences. And then by default you will
be land to the system base. You need to actually
navigate to. The user pays, you
need just click. And this won't be an apple. You need to enable Bye
checking the tick mark, and then you will
have three options. There's three
options or every do is actually novelty will make a backup folder for every 1 min. So every 1 min you work, there'll be a backup
folder created. And that backup folder will be the force backup follow will
be deleted once it hit 1 h. And basically, when you hit 1 h, it will have a bag
full of for 1 h. So whenever that one bag
photos being created, It's actually first
come first serve. So when you have a load, the first one will be
automatically deleted. And then when it hits one are our big file will be created and the others will be deleted. And then you will have again the one-minute backup
folder till the next star, and it goes and goes and
you will have a bunch of backup folder so that you
won't miss any of the steps or any of the progress that
you've made in your edits. That is basically it. You can actually set a
minute any time here. And I've said 1 min. Every 1 min, there will
be a backup created, and then after 60
min, it will be 1 h. So after 16 min, that'll be our backup
folder will be created for the whole entire one-hour
and then one day. So this is how you set the time. You want to set that and you
can actually set anytime I think keeping these all
one is kind of good thing. Maybe you could
actually increase this. It depends on you and the
stories that you have in your computer because if you
put everything in one year, it's gonna be a lot of backup files that you
have to deal with. So that's one thing. And then below it is a
place where you need, you can add locate
the location for your backup file so you can
save your backups anywhere. But I kind of recommend you to keep everything in one place. Have discussed about the organizational
thing in my previous class. If you haven't watched my previous goals and
da Vinci Resolve, I recommend you doing that
cause I I discuss about how to create database and what is database and what is dynamics, which in what is RA, RB file or is it different
than how to export and import all those
kind of nerdy stuff, but equally important stuff. So I think that's something so I recommend you to
have enough folded dedicated for your projects
so that you could save, or you could have them in different folders inside a folded educator
for your media, dedicated for your backups, of all dedicated
for your proxies, your optimized media, your render chaos,
you're galleries, tools and everything
so that and also for your database so
that you won't have to wander around through your computer storage to find each fall everything
will be in one place. Don't put anything inside your database folder that is something that you
need to keep in mind. So but you can actually
keep everything or you could actually I locate
things in different files. And you could keep it in one
place so that everything will be in one
place and you could easily access AT
folders that you want. So that's my recommendation. So here you can actually
select where you want to save your backup. And then you could
actually click on Save. And these settings will be saved for the settings
for this project. Okay, now let me show you how backup files is
going to look like. So this is a video that
I've been working on. And then to access your banker
for liberty need to do you actually need to
right-click on the project and then you here, you have project backups and then you have all this baggage. It's actually from
yesterday till now, have all the bags backup for that projects since I've
been working on that. And when I open that and when
I continue working on it, the backup file will be created again for the work that I've
been done on that project. So this is how you create this. Have you set up your
backup in DaVinci Resolve? In the next video, we
will discuss about project settings and also
how to create proxies. So until we meet again, thank you for watching. Have a nice day.
4. How to generate Proxies and Optimized Media?: Hey, welcome back. So in this video, I'm
gonna show you how to create proxies and timelines are solving the previous video, showing you how to set up
the settings for proxies. So in this video,
we are going to create the proxies
for our project. And so I think you
have an idea of what is proxy from
the previous video. If you if you don't, I'll give you a small or
really top-down version of definition of proxies. Proxies is basically use
to edit your videos. Let's say you a bunch of high size videos that
your computer can handle or it is lagging or
getting the FBS that you want, then you could actually
use proxies so that the file and keep in mind, the resolution also
will be reduced and like optimized
media in proxies, the resolution also
will be reduced, and then the file will be considerably small depending on the settings that you choose. I've shown you that in
the previous video. Using the settings, whatever
you said in your settings. Okay. I'll show you that, sorry. Whatever you choose
in your setting. Whatever you choose
a new settings. So here you have the
settings for your proxies. So if you set it to water, your proxy will be developed into
something corridor of quality of the
original media. The proxies will have
only the quarter, quarter resolution of the original media,
the broader size, so that you will have
an easy time having the playback or editing the
videos and all those things. So that's what basically progresses so that
you have the freedom of navigating through having that playback in any of
the editing softwares. In particular down
into the soil, you set the settings
beforehand and then when you create them and
create proxies, proxies will be
created according to the settings that
you said before. That's basically proxies. It is actually a
low-resolution derivative of your original media so that it is easy
for you to edit on. It won't be hard on your
computer's hardware. So that's what
basically progresses. And now I'm going to show
you how to create a proxy. Oh my God. Now I'm going to show you
how to create a proxy. So what do you need
to do? You need to come to the media pool. And I already created a proxy, but I'm going to show you again. Maybe you have a lot of clips. But if you do not have a
lot of clips in this case, I have only one clear
what you need to do. You actually need to click, right-click on the video that
you need to generate proxy. And you can actually
generate proxy here, or if you want to generate optimized media are
discussed about octopi, optimized media is and all
in the previous class. So I think you have
that knowledge. So if you want to generate optimized media or a the proxy, if you want to generate
optimized media, you have the options here. If you want to generate proxy, you just click on
Generate proximity and you just click and the
proxy will be generated. In this case, I don't
want a proxy now, I've already edited this video, so I'm not going to make,
I'm going to cancel it. So that's how you
create a proxy. And then that video
will be top-down or low resolution of
the original one. But even though you've created, if you don't tell DaVinci to use your proxy down the road, use them and you will only
use the original file. So how you are telling
WG to use this file? For that, you need to
go here on playback, you click here and click on. Use optimized media
if available. When you flick it. Wg will actually use proxies, are actually, sorry, I definitely will
use optimized media. And when you click
on proxy handling, peripheral proxies, check here. Then that means
you will actually use proxies if you
have created proxies. So here you could see that Wednesday already
created proxy for this media and the resolution
is considerably low, it reduced to a
considerable amount. So if you want to see
the original one, disabled all proxies and you
could see the original one. So depending on
what settings you said Aren't you will
reduce the quality. So this is how you create
a proxy individually. And I think this course
was useful for you. And we'll meet you
in the next class.
5. Thank You!: Once again, thank you all for watching this course
and I hope you have some things to take away with you for
your next project. If you haven't watched my first goals and DaVinci Resolve, I highly recommend watching
it because I have this, because a lot of important
basics there for that. Check my profile. There will be a number
of classes coming on your way as a
continuation of this one. So wait for that. Once again, I sincerely
thank each of you and all the best for
your video editing journey. Until we meet again, take care and have a nice day. Thank you.
 Joyal Jose, Graphic designer, Video and Photographer