Transcripts
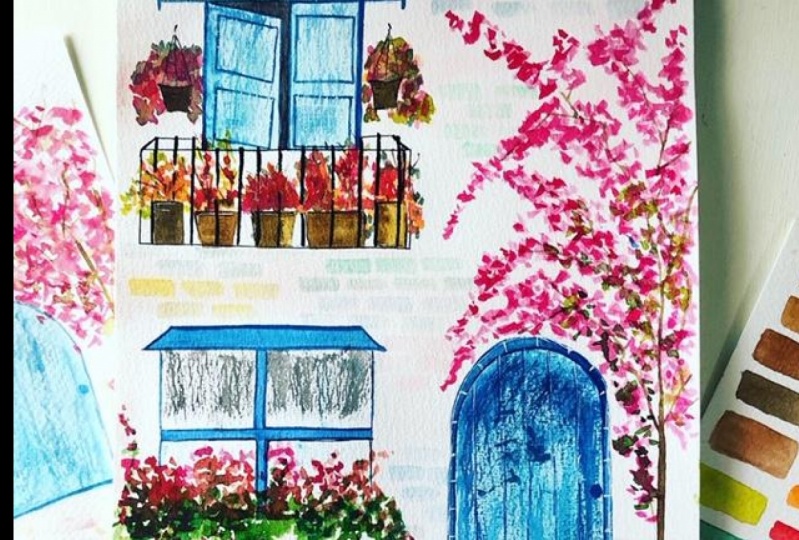
1. Class introduction : Did you ever want to learn how to paint these beautiful door and window illustrations with colorful Bogan bilious? And if you've been following me on Instagram, you must be knowing how much I love painting such illustrations. And in today's class, I'm going to share my signature style off painting such illustrations. Hi, I'm Dick and a Syria from limitless art. You can know more about me on my profile on skill share. It's in at once class, and I'm going to teach you this particular painting, which has a door and a window with bougainvillea trees. But I'm also going to share a lot of composition tips and ideas for you, which will help you and creating your very own unique illustration. And I also have a color palette lesson included where you can pick up the colors that you want to paint your final project with, and by the end of the clause, you'll have your very own door and window illustration painted in your own style. It's going to be a super fun killers because of breaking down the entire claws into different parts, which is just very easy to follow. I'm so excited to paint my most favorite subject along with you, so let's get started
2. Materials required : in this video, I'll be talking about the materials you will require for the class. The materials are very simple and basic. First, they would need a watercolor paper. You can either choose toe, have a watercolor sheet or beamed in a watercolor people part. But make sure that the people you use is cold press and has at least 300 GSM. I'll be using the watercolor paper pad, and I wouldn't require a masking tape because it's already glued on two ends. But if you're using loose paper like this, make sure that you use a masking tape and tape your paper on all the four sides toe award buckling while painting. Next, you would need a set of watercolors amusing. The prima tropicals and the center colors are from different other palettes. I'll be talking more about the colors in one off the next lesson. Next, you would need a set off brushes. Oh, the 1st 1 is a flag brush. It can be off any size, and another one you need a round brush order off size six or eight picker on burst that you're very comfortable painting with and a smaller brush off size toe and additionally, you will need Reza scale and pencil for the sketching part and for the last and giving all the final touches. You would need a white pin and some black gel pin and, as usual, a bunch off people napkins and oh, what a container! And this is all that you would require for painting a lovely illustration with me today. In the next lesson, let's do some warm up.
3. Warm up lesson : before we get started, I hope you have taken these three classes off mine on skill share, where I have covered all the basics. The 1st 1 is the Incan vertical adore illustration, where I share some sketching and composition tips, and I also teach how toe paint these illustrations in a very easy with the next one is the watercolor planted ports, step by step, where I teach how to paint 20 different types off planted for It's a fun and relaxing class , and the 30 loss is three days to paint, watercolor book and regular trees. It's one off my recent classes where I teach three different ways toe paint, a bogan wheeler tree. So if you have taken all these three clauses, you are perfect for this lesson and Bill Burton doing some warm up. This lesson is, moreover, revision lesson for you just practice everything that you have loaned. So first we'll just practiced some planted parts like this. I've just painted a port, and I'm adding different colors off brown, which will bring in a lovely picture toe the party and once I'm done with the port and just going to paint some random flaws like thes in a very loose tile and then at some green for the leaves. And now I'm adding some more color to make the plant look more colorful and to practice a little more. You can paint a nother planted Porto for this one on painting apart, similar to the 1st 1 that I painted. But you can just practice with any other different shapes that you want to be included in the Finals. Last project. You can try and explode with different types and shapes, and for this part, I'll just pain some simple green grass like this and just add something. Fluster it. You can paint a couple off more off thes planted ports if you want to practice more, but otherwise, if you're done with, this will move on to the next. Warm a pleasant and learn how to paint bricks in all my door and window illustrations. I paint the breaks in this way, using a dry brush technique. What I do is just take off the excess paint on the tissue paper electors so that the brush becomes more dry and then with the dry brush, you just create these beautiful breaks, which gives a very lovely picture. It looks very simple, but might require a little bit off practice before you get the Pulford Briggs like these. So this was the first technique for painting the brakes. I think you can see the picture off the brakes now in the close up and the next one, I'm going to teach you another technique off being trained. The bricks. If you found it hard using the dry brush technique, I think this technique will be much more easier for you. For this technique, you can paint the brake using or diluted paint and then crumble of people trouble like this and then absorbs the excess being so this will give you a lovely tech show. By using this technique, make sure that you keep absorbing the excess paint. After you paint every break, advise the paint will dry quickly. Also, this technique shows up different on different paper, so you might want to try this on the different people, which will give a different effect. But I prefer for painting the breaks with the dry brush technique just by absorbing the excess paint on the paper. Double INGE's. Paint them like this. You can practice painting more off these bricks in any off the techniques that you like and then next will paint a simple dough like this. You can paint any shape off the door that you want, and after this I'll be teaching you how to add the lecture to the door using the dry brush technique. It's the same technique that I thought while painting the brakes, so I'm just going to absorb the excess paint on the people napkin like this, and then just gently move my brush on the people and get this beautifully texture it sure that while doing this, you're holding your brush lightly with very little pressure toe. Get this texture. Repeat the same technique and try adding texture to the dorie of already painted. After adding texture to the door, I'm just painting an outline and adding some extra elements to the door with their you did bean. And the last thing that will paint in this warm up lesson is the Bogan video tree. You can choose to paint this in any off the three techniques that you learned from this class off mine own sculpture think my favorite is the Western red or the dry players wet in wet, and I'll be using that technique toe pain and practice a bogan real a tree over here. And with this video, you're don fit the warm up obsession for our today's class.
4. Choosing your colour palette : in this. Listen, I'll be guiding you to pick a color palette for your painting. Today we will divide the color palette into three different parts. The 1st 1 is the main one, with which will be painting the trees and the doors. The 2nd 1 is a color palette, which will be painting the walls and the brakes. The 3rd 1 is a color palette with rich will paint the plan toes and other elements. Choosing the right color palette for your painting is ready. Important because it can actually change the entire way you're painting would turn out. Suppose a futures are dull color palette like on the left side. The painting might look different, and it will have a different feeling. But if you choose brighter colors like bright pink and blue, like on the right side, you're painting will be totally different, and I'll give a very nice and a bride wipe. So this was a very small comparison off two paintings in different colors, so you actually understand how important it is to choose the right colors. So let's get started on picking the color palette for our today's painting, and before that I'll just give you an idea of how choosing your color palette will give a different feeling. Affected your painting. For example, If you choose a color palette, which has a lot of greens and some bronc colors, then you're painting might look like this. Richard given NYSE some of vibe and then, if you're painting, has a lot off pink and orange with some brown and blue, then you're painting might look like this, which would give or spring or in autumn vibe. So pick up your paintbrushes and let's begin. Also, you don't have to necessarily pick the colors that I do. You could completely choose the colors that you want to paint with and just be creative. Just guide you and picking the colors part by part. So the first part off the color palette is for the But when we live trees and though does so for this, I'm choosing bright pink colors, but you could choose orange, or even if you don't want to paint bougainvillea trees and go our paint simple trees or those simple green trees you can choose or different for. I tees off greens for this, having three or four shades off the color would be ideal for the color palette, so you can makes light and dark shades off that color and put it in your color palette. And next, we'll pick a color palette for the doors and picking oh different shades off blue for painting my doors again. For this, 3 to 4 colors would be ideal. You can choose a door color depending upon the color that you have chosen to paint the trees. It make sure that it is contrasting, I suppose if you have chosen like orange and violet, I think painting a brown and very drastic wouldn't would be great if you need more color inspirations, I think you can reference some patrols, which would give you ideas for picking the color palette. Now, after we're done picking a main color palette, we would pick a color palette for painting planters on other elements for which I'm choosing are very bright and denies green. And for the parts I'll pick off brown color with a little bit off yellow, so it makes it look like an orange brown color. So which would go great with the color Balata Baldry chosen, and then I'll add a little bit off, yellow to the palate and also a dark brown, and it is not always necessary for you to follow this color palette and restrict yourself value painting. But this is just a simple exercise for you to know and be guided on which colors you want to use while you paint. But while you're painting, you can completely like. Feel free to add new clothes or paint with any other different colors that you want. And last we would pick a color palette for painting or breaks and falls. I would prefer to choose very light and muted colors because I don't want to have any bright and dark colas and the Bagram. So I mostly prefer using great or light blue, our beach bring or any other shade, which is very light and great, in contrast with the color palette that old re pick in case if you don't have these light colors, what you can do with you can just makes white pain with any off Piccolo's and just get the shades and that's it. We're done picking a color powered for are painting today
5. Choose your final composition : composing elements in your painting is one off the most important thing before we start painting and in this listen, I'm going to share some tips on composing your painting. It can also differ depending upon the people dimension that you're choosing for your pending. If you have a rectangular people, then the painting would be different. And if you have a square paper, the composition will be different. So I'll just show you some examples of how you can compose. If you have a rectangular people, I'm just drawing to show tangles first and then now feel begin composing. So the first thing that you need to do is just draw a ground line like this and then draw adored like this, so you need to draw the door also in proportion. So if you have a big paper and then if you want so many elements to be added, just draw oh medium sized door and then off window vich is in proportion. So the first things always the door on the window that you need to compose, and once you're done with that next, you can just choose where you want to place your tree and and then to balance the composition. Maybe I'll just at another tree on the right side. So this is something which looks good, and then you have some nice elements that you can paint with. So, in case if you want to have a balcony kind off like this, what you can do is just have a balcony like this on top. This is just another idea for you to compose, in case if you want to paint something like this and at the bottom, you can just draw off window like this. And on the right hand side, you can just draw the door. So basically it's like the door and the ground line. Is it exactly half off your people paper size, and then you can just choose where you want to put the tria tangle. Just put it in the center because that look nice with the other elements. So if you want to go ahead with the second composition, which I showed you for the right Anglo size people, then you can go ahead with this and I'll be teaching you step by step so you can just follow what I'm going for. The other extra elements that you add like the balcony. Now, if you choose to do this on our square people than the composition will be slightly different. You cannot compose the same window and door in the square paper, so the composition will be little different. For example, this one I cannot add an open window because the paper sizes too small and I want to for it . Other elements have just add a closed window and a simple door and then a tree on both the sites. So this could be the possible composition type. If you're choosing a square people and the next option is just like or door in the center, and then you can just have to trees on the either sides. So this is just a example. But if you want, you can also choose, although composition things like just like this. Oh, door in the center and ball and then some planted parts, and I have some more references for you. This is basically a calendar that I did for 2019 with door and window illustrations, so I'm just showing you so you get an idea off the different compositions you can make for your final painting. You can be creative and choose different elements like cycle captors and anything that you want to include in your pain thing. So I want you to be creative and choose or unique composition that you want to paint, and I conveyed to see what you're choosing for the final painting.
6. Pencil sketch : in this lesson, we're going to do the basic sketch for our final painting. You can choose the composition that you have decided to go with. I'll be going with a simple window on top and a door at the bottom. But if you've chosen to do about neon so you can add them. And if you choose to do the same painting that I'm teaching, you confined a downloadable file for your reference whiles catching from the project session off this class, so it would be much easier for you to sketch along with me first. What you would do is just draw a baseline for the ground line like this, and you know where the door is and approximately in proportion. I'm just trying a door like this. Make sure to draw everything very lightly, so when you paint about this, thes lines will just disappear. But if you have sketched it very dark, the pencil lines will still remain. And now I'm just drawing off window and proportion, which is little about the door and make sure that you draw out of window and door and proportion. Being an architecture student, this comes very easily for me But if you're proportion off the door and window is not right , your painting would wouldn't look very great, because proportion is very important in such paintings. And if you have taken this class off mine on skill share before, understanding proportions would be much easier for you. And I'm just drawing some small details for the window. So I remember while I paint them. And next after the window l just catch a rough bogan wheeler tree, which is going to come on the left side off the painting, just drawing the branches roughly so I know which direction I need to paint the tree and after this, and just drawing too little pots like this at the bottom next to the door. And I'm just drawing another bullet, dilatory and no smaller size just to bring balance in the composition. And if you notice that any other element is not in proportion, like if the daughters become too big or if it's just too narrow, just make sure that you changed the element immediately. INGE's replace it with the correct proportion because once you start painting and after that, if you realize that the door could have been smaller up ago. It's too difficult for you to change. You might have to redo the pain, so it's better to change the proportions off the elements in the initial stage off sketching itself. I know that sketching is not easy for everyone, and sometimes one might just feel too lazy if you had to redo the entire sketch. I do that sometimes to bird. I know that redoing and correcting the proportion is totally vote, because in the end you will have a beautiful painting, which is right in proportions. So don't be lazy in correcting the proportions. And I'm just adding little details to the windows like the partition, and I'll just add some small plans. Also, here's and I think we are almost done with those catching part. All other details will be added via we pain, so it's not required for you toe. Just catch everything but only sketch the things which you need to remember. Wild meeting. And that's all in the next lesson. We would just go ahead with the first basic wash
7. Background wash: in this lesson, we're going to paint. So basically for the wall, which is basically going to act like, oh, background. So what I'm doing is I'm just picking the wall color from the color palette that have chosen. You can keep the Gallipoli besides you while you pain and the same color that I'm choosing for the wall just going to dilute it with so much off water. And before you get started and paint the walls, make sure that this has to be the lightest leer. So even if you have chosen a doctor and make sure that you had so much of water and diluted to make it very light. And I'm changing my brush from 1.5 inch toe two inches because I think painting the background with a larger flat brush would make it more fun and easier. So I've just choosing a bigger brush, and what I'm forced doing is just applying a layer off water like this and then when the surface is still red, I'm just going to drop in the lighter color like this in the wet on wet technique so that plans and spreads and gives a beautiful picture. So the wall I'm going to cover the entire ball area in the same three by just waiting. It injures dropping the color like there's just very randomly in few places and not the entire ball area. Just make sure that you don't overdo this, because if you just have it in few parts off the wall, it's going toe. Give a beautiful effect, ones. You're done with the entire painting and ones you overlaying the brakes and after painting the background ball next, we would just give ah, very light wash for our door. From the color palette. You can just pick lightest color that you have to paint the door read. It can be a the light brown or any other color just diluted with so much of water. And just give already light wash like this and repeat the same for the windows also, and just give ah, very light wash for the window panels. And once you're done adding the basic wash for the those and windows a love it to dry. Meanwhile, well, just paint the bougainvillea trees in the next lesson
8. Painting the tree - layer 1 : in this lesson will paint the basic playoff for the Bogan really tree. But before we paint, just make sure that the Wall area is trying. I think mine isn't dried well, and that's why the brown and spreading. So I just let it dry for a little while and then start painting the branches. You can just paint too prone over the pencil sketch you have done so that the pencil sketch gets covered toe and similar way. I'll just pain the branches off the tree on the right side. After painting the branches, we would just paint our Bougainville ya's. I'm just going to die. You'd more off pink so that I get a lighter layer for the tree. If you have taken this class off my non skill share, then painting these drugs would be much easier for you on this larger scale. Alternatively, you can also use a bigger brush like size 10 or eight to paint this and quickly finish it off. But apparently what happens is that you wouldn't get these final brushstrokes, which would actually make the boot. Villiers look so beautiful. So it's going to take a little bit off time and patience toe being the entire tree, but it's going to be worded because it's just going to make it look rating beautiful. So initially, as I said, I'm just adding a very lightly or so I know where the tree comes. And then in the next layer off the street, I'm just going to add more bride. Oh, thanks. So keep the first layer very light and another reason for you to keep the first layer very light is that in case vile painting, if you feel the shape off, the tree is in, come out well, What you can do is when you add the next layer off the dock, Okelo, all these light Leo's can be covered, and it'll just act as a background. And so it wouldn't matter to the painting much. And that's why even I also perform painting or very lightly off first. Similarly, I'm just going to keep adding thes strokes wherever just drawn the branches on the black side and the right side tree, and you can just follow along with me and just paint because I've just kept the video and really time okay , - and you can just stop painting ones. You feel satisfied with the basic shape off the tree
9. Painting planted pots : in this video, we'll be painting the planted ports and we'll paint some grass at the bottom. Sometimes the basically is like the background and the basic washed that we aren't for the doors and windows, and also the basic layer off Mugen Villas might make the painting look ready, dull and very unfinished part. It's only when we start adding thes elements like thes planted ports and slowly heeb detailing every part off the painting. And that's how, though painting is going to come alive step by step. So first is the planted part on it's the easiest element to paint in the entire painting, so just giving, oh, player toe the parts and then I'll add some taco brown, tow it tow. Bring a little more shadow effect. After painting the part. I'm just going to paint some cleans for which a mixing the green, which I've chosen for my color palette. You can makes different greens and also tested on the paper and see if it's the same green that you have chosen. And then if it's a saying, you can go ahead and pain with it, and then for the bottom part off. Though tree and next to the planted parts. I'm just going to add the's strokes like this, but should make it looked like Ross. And this layer I'm just doing with the lighter green so I can just add another layer off taco greens, which would bring in little depth in the painting and to make it look even more interesting . What I'm doing is instead of repeating the same strokes that I did with the lighter green, I'm just repeating these random strokes, which I painted for the planted pot. So this would make the grass part look more interesting. And after I'm done with that, I'm just adding thes little pink flowers for the parts and also the grass so that this is in balance with the bogan re largely is that were painted in case if you're painted a green tree or any other color tree, make sure that you paint these flaws in a very contrasting color. In case if it's green, you can used these red floods. Or maybe even yellow flowers would look ready. Beautiful, and I'm just mixing a darker color off brown to give or shadow effect of the planted parts , adding some more floods on top off the grass like this, and I'll just add thes same flaws on the right side also under that tree. And that's all we're done detailing the first part off this painting. Next we'll move on and at some details and texture to the door and window.
10. Detailing the window : in this video, I'm going to teach you how to add details and take sure toe the window first. What will you do is add outline like this with the doc local or hear amusing dark blue. Because I've painted the window and light blue, you can use a kennel brush off size 22 draw these lines, but I just wanted to be medium. Take. I don't want it to be very fine, so I'm just using a size six brush so that these lines will be shown. I'm going to draw the outline for the entire window, including the partition and the window panels. And this outland that you're doing doesn't have to be very perfect. Straight lines like you would get with a scale and a pencil. It can even be a little crooked, and that's completely fine. Just make sure that you do with a lot of patients and take enough time being thes lines. Alternatively, you can even use a pen to do. But I think using a pen would give a different effect and also a different finished results . So what I would suggest you is go ahead and paint these outlines with a paintbrush before and later ones were done for the entire painting. We can just pick up a pigment liner and just give or outline and one Z or done giving outline to the window. You can add a little texture like this, using the dry brush technique for still, add little with their darker blue. And then we'll just make some medium blue and just add a texture like this in between toe. I'm using the same drivers technique to add this light blue, and I will repeat the same for the other window panel to, - and I lied little more texture and color to the center part off the window, too. And to give the glass effect for the windows, I'm just adding the dry brush technique again for the window, so this would make it look like glass. And I'll also add some Greek alot using the same dry brush technique. And I really love how the window is looking now with so much off picture. So this is my way off, adding pictures, toe the doors and windows in any any off my painting that you would have come across and to make the window look more interesting. I'm just going to add some floods like these on the window panels immediately like adding such small details, which would actually make the painting look more interesting. And it will enhance the entire painting. And that's all we're done, adding texture and details to our window. In the next video, we'll add the same things to our door.
11. Detailing the door : in this video, we're going to add the picture to the door the same way as we added for the window. But before we add the sexual just going toe, paint an outline with a gray color for the door, which would look like or doorframe and viol a painting, this doorframe. There might be other elements which would be coming in between like thes bougainvillea. So what I'm doing is I'm just going to paint and gaps shadow just painting it fully and after painting the door frame, just going to start adding, take short of the door those same way, how we added for the windows. You can follow along with me and just watch me paint because it's almost the same thing that we painted before. I mean, and once you don't painting the door, you can just had an outline between the door and the door frame with the 10 0 brush, and I think the door frame the repainted looks little 10. So I'm just going to add another Leo for the door frame so it looks little more vital. - I mean, and once you're done, you can just add the's thin lines like these in the door. You can also create different patterns on the doors if you like, But I like to keep it simple and just being thes 10 lines for the door, and that's it. Feel almost done with half off the painting. We just need to add another layoff, Bogan Villas, and then breaks and and then a painting would be finished Freddie Soon.
12. Painting the tree - layer 2: in this video will be adding another layer for a bougainvillea three. I'm just adding another doc hoping clear on top, off the light pink and using the same brush strokes and violent painting this layover DACA color. I'm being very careful on not to paint an overly the entire lightly. I'm just going to paint a little bit on the previous layer and also in between the gap. So both the light and the dark Carlos is equally balanced, and the bougainvillea tree will look much more beautiful. And I'm leaving the rest off the video and real time so that you can just watch follow along and paint with me, - Okay ? I mean, I mean
13. Adding shadows and highlights : we are almost done with the painting just that we need toe. Add in little shadows and highlights toe make the painting look more lively, so I'm just using the black pen. It's basically a black marker sign pen. I'm just adding shadows, toe the parts and also to the window. These little highlights and the shadows that you add to the painting in the end, actually matter a lot. So it's basically like the little things that matters the most. One thing you need to remember. Value at the Shadows Tone outlined the entire object. If you do it, it just look like the kids in the and they're lower grades just outlining the objects after they color. And that wouldn't look good at all over here. So make sure that you don't overdo while adding the highlights and the shadows. Now I'll just add some highlights to the doorframe, which will make it look like breaks. - I mean here of compared the before and after images off adding highlights and shadows. And in the after image, you can see that how much difference does it makes and makes the painting look more lively ? And for the we'll just add some more shadows to the window, just adding in the left corner because I wonder if indoor toe look as if it's in the friend and the tree is in background. So I'm just adding some shadows in the corners. And now I'll add the shadows on the door since we have a tree on the right side and I wanted to look like as if the shadow off the tree is falling on the door. So I'm just adding these driver strokes again with Sadako closer look like the shadow off the tree is on the door and this will bring lovely texture. - I mean, now, after adding shadows to the pods window and the door now we'll just add a little on the trees so that it is balanced. So I'm just using the same Luca Lo so that even the color is also balanced and it looks like that a shadow so. But if you use black will become too dark. So I just before using the color that I have used for the door. I mean and you made stop. Once you feel that your painting looks lovely and I think your painting must be looking much better after adding thes shadows and highlights in the next lesson, Villagers at some final touch ups like the brakes and then we are done with this painting.
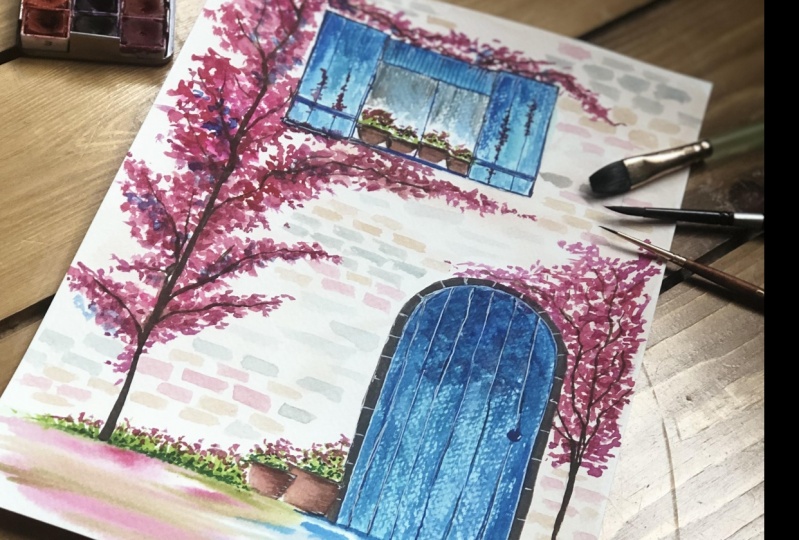
14. Painting brick and final touch ups : after adding so many layers and so many details and highlights, step by step in this video will be adding the brakes, which will be the final touch up for this painting. And adding breaks is my favorite part off painting such illustrations and what I do is to make the painting love more in this thing and set off just one color for the break. I use couple off lighter shade so the painting looks more colorful, so I'll just start adding the breaks like this on the talk. First, I'll do with the light blue Kyllo, and I would want you to paint these breaks with so much off patients and take some time while painting because this is the final part off the painting. And if you just do these brakes very quickly and just quickly with some shocks, you finish it. It might even drew in the painting, and it might not look how you imagine it to be. So just how little patients and that's all your painting is going to turn out so beautiful , and I'm sure you'll be proud off it. And also just keep in mind that you don't overdo are just add breaks to the entire ball idea. Just I'd randomly here and there. And after adding with blue, I'll just add with another color randomly again. Okay, - and now you can see how, just by adding colorful breaks, the painting is just looking so beautiful. And after adding the brakes, I'm just going to add some more details for the bottom part. I'm just going to read it with clear water first and just drop in some colors like this, like brown, green and little bit off pink. So it just oh, simple style that I follow in almost all off my painting. So it's basically the reflection off all the clothes that is on top and just adding some more details, and we are finishing with this painting. I'm so proud that you have painted along with me, and I'm sure your painting would be just so beautiful. I can literally wait to see how beautiful your artwork is turned out
15. Final thoughts : thank you so much for joining my claws. It really means so much to me. And I hope that he learned a new skill or technique from my class today. I would be more than happy to see anything that you create from this closet can be even the practice session or the final project or just apart off the painting. You can share them with me under the project session, and I wanted to say you that particular is a beautiful medium which requires a lot of practice. So you may require a lot of practice and keep experimenting with this medium, so you get better. With this, you can experiment with different layouts and compositions like this. But most importantly, just remember to have fun and be relaxed y your painting with watercolors. And lastly, if you really like my claws and enjoyed, I would appreciate if you could just take time to leave reviews. And I would also like to know if you have any suggestions or feedbacks for me to improve on my class. And you can also leave and ask any questions that you want to know under the community session, and I'll make sure that I think Time to reply your question. To get notified off my upcoming classes on skill share, make sure that you are following me on sculpture so you don't miss a class from me. I hope to see you in my next class soon again. And until then, happy painting and bye bye.
 Viddhi Saschit, Author|Artist|Surface Pattern Designer