Transcripts
1. Welcome to the class!: Welcome to a calm and fun week of getting into the habit
of using a sketchbook. Maybe you're a logo designer, and you want to get more
comfortable using pen and paper, or maybe used to sketch a lot, but you just got
out of the habit. If that sounds like you,
and you want to have a very pressure free and fun way to just sit down for
a few minutes every day to get into
that nice routine, this week is a
perfect soft start. So for the next seven
day, each day will have prompt with just a
few instructions. Enough that that blank page
doesn't feel so intimidating, but also open enough that
you could use the prompts in your own style and even reuse them in different
ways in the future. For each day, I will
talk you through my quick sketch as an
example and also give you some ideas on how to approach your own work when life and work in general
keeps us really busy. Each day helps us practice
getting the essence of an idea or an object onto the paper in
just a few minutes. Personally, I like to set
aside 10 minutes every day in the evening for sketching because I tend to
work better at night. For those kind of more open
creative projects like this. And having a time can be a
really great way to remember, and also you can even
grab a nice drink and make a bit of a creative
recharge at the same time. The class project for
this class is to post your sketches every day and add to your project as you go. If you feel really inspired, you can even add your own
thoughts on what inspired you and how you felt as you
were creating your sketch. But also, this is a very
pressure free zone. So if you just want to
sketch and not post, that is also totally fine, whatever works best
for your creativity. I'm really excited to dive into some fun and quick sketches.
I'll see you in class.
2. Day 1 - Shadows: Are kicking off with one of my favorite exercises from when I went to art
school as a kid, and that is to just
draw the shadows. Usually, when we
create a sketch, we start by outlining all of our shapes and building
out light and dark areas. But if you want to really
train your eye as a designer, learning to just draw
the shadows helps you really understand the
shapes a lot better, and it's great if you want to create using negative space, which is really common in both logo design and
editorial illustration. So all we have to do today
is find an object laying around our desk or on our home and place it by our sketchbook. If you want to make the shadows a little bit easier to see, try having your room quite dark and then setting a light
next to your object. Then try to see where the
shadows are falling on the desk and how they are
landing on the object itself. You can start with
faint shading, and when you see
it come together, you can fill in areas more. Simpler the shape that you pick and the smoother
the surface it is, the easier will be to draw. So you can pick an object based on how much time you have. Once you worked on
your sketch for a few minutes, take a step back, and one trip I like
to do is to squint at the sketch and see if you can still recognize
what the object is. We want to be able to really
fully understand the image, even if we are only
seeing the shadows. If you're not quite there yet, try to have a look at
what you're missing, and if there are
windy areas you can extend or tweak so that
you get that full image. And that's it for
today. Good luck with your sketch, and
I'll see you tomorrow.
3. Day 2 - Favourite book: Welcome back. Today we are drawing inspiration from
your favorite book, and we're also creating
some simple constraints. So we want our sketch to be contained in some sort of shape, and we want to keep the style a really simple line sketch. If you like to keep
it super simple, you could just pick
a common shape like a Pentagon or a triangle, or you could be
inspired by your book. And, for example, choose an
arch if you love fantasy. Then we're going to
pick an item, a symbol, or another simple element
from the book itself. For me, I really love the book the Spellshop and they make lots of enchanted
raspberry jam. So I think I'll pick
a circle and then a jam jar as my item to sketch. You feel unsure about to draw, feel free to copy my prompt. So keeping our
lines super simple, I'm just going to be
creating my circle and then adding the
outline of a jar. I always start with the
basic shapes first, and then we can add a simple lid and some details
like the jam inside. Now, if you just
have a few minutes, you could easily leave it here and have a great
second day sketch. If you'd like to keep
going for a bit, we can have a look
at which little details you can add using this same simple style that will make the design
feel a bit more special. Maybe some shine on
the side of the jar or a few bubbles or sparkles
since the jam is magic. Having this time to look at your sketch and
seeing what effect adding or removing something
has is super important, both for illustration and
for things like logo design. I have often started with
a more complex sketch and then simplified it to work better as a logo
icon, for example. That's it for today.
I'll see you tomorrow.
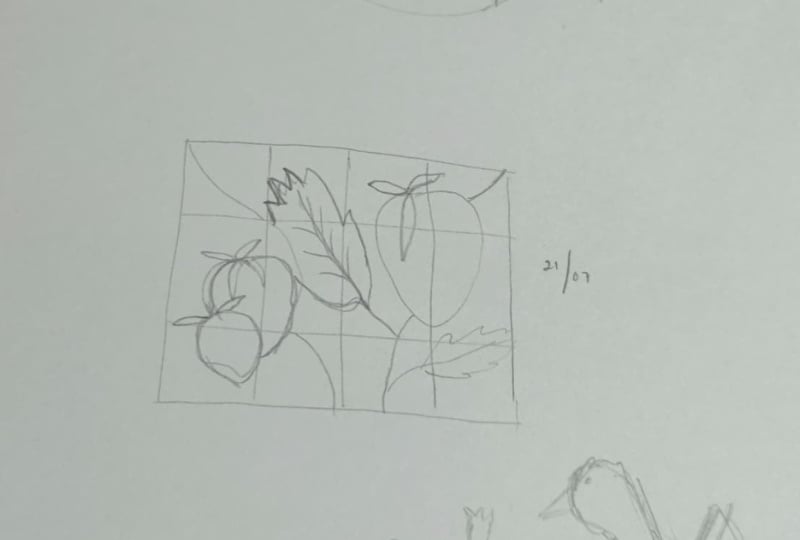
4. Day 3 - Grids: Day three, and today
we are using grids, which is something
you hear more about in things like layout
and print design. But I just think it helps any
design feel more balanced. A grid is just a set of horizontal and
vertical lines that will guide you where to add something or keep it
empty as white space. I'm going to create a
simple five by three grid as the base for my sketch today. And to create a sketch
that feels balanced, I want both sides of this middle line to
feel equally heavy. Going to show you what I
mean with some strawberries. So we have all these
little squares here. Now, if I place a big
strawberry on this side, I could either place a big
one on the other side or I could do two smaller ones that have the same
visual weight. Same thing when we start
adding in the leaves. We can use this grid as a way to structure our design
and make sure that it feels visually balanced without actually making the
design fully symmetrical, unless you want to, of course. You can make your grid as simple or as detailed as you like. Have a play around
and see what impact it has when you do your
different layouts.
5. Day 4 - Different perspectives: Today we are seeing things
from a new perspective. You're probably used
to drawing most of your things facing
straightforward, but that often creates
quite a static and a bit of a boring design. So today, we're going to
grab something from home or our design desk that is
usually quite ordinary, but draw it from a
really unusual angle. I'm going to pick this
nice little cup and look at it from a
sort of below and underneath side angle as if it was kind of falling
towards me in the air. For the style, you can do whatever feels most comfortable. And when you make the sketch, try and really challenge
your brain a little bit. I found that even
though I can see that the cup is in a very
different angle that I'm used to looking at, my brain is so used
to seeing a cup and having a pre formed
idea of what that looks like that sometimes
my sketch is more from memory than from what
I'm actually looking at. If you feel a bit stuck, try and see the proportions rather than seeing it
as a whole object. That way we can get rid
of some of that bias.
6. Day 5 - Movement: Having so much fun with
the sketching practice, and I hope you are, too. Today we are getting our
inspiration from food and focusing on a sense of
movement and dynamicism. I like food for this
because food has so much history and culture
and emotional meaning for us, so it's quite a
personal thing to draw. I like to eat a lot of pasta, and I love lasagna, so I think that would
be my object for today. Now, I want to see how we can take that really
complex thing like food and then break it down
into just a few components. I think I'm going to
pick the pasta plates, the sauce, some spinach, and the cheese because that has quite a dynamic aspect
if you sprinkle it on. Now, to create a
sense of movement, you can take lots of
different approaches. If you have a soup
or a smoothie, maybe there's a swirling
or spilling or dripping, let your fantasy be the driver
here and have fun with it. We are not creating a
super complicated sketch just focusing on movement. I find it quite helpful to
create a line for the movement itself first and then lightly position your
different elements. Then we can sketch them
out in more detail once we actually have the clear
direction of movements. Knowing how to create
a sense of movement is really important for
all kinds of design. From creating a logo
for a sports brand to a website illustration that
captures our attention. Really amazing work.
I'll see you tomorrow.
7. Day 6 - Texture: So far, we've been keeping our sketching style
really nice and simple. And today is not a huge step, but I want to focus on texture. Sometimes texture
is the one thing that makes our work
feel really human. It makes it easier for
people to connect. And in a world of very quick AI generated illustration
and logo design, more clients are looking for design that really
feels handmade. So start by doing a
little texture hunt. Maybe you pick a flower on your morning walk or grab a
banana from your kitchen. Then try and ignore
the colors and just focus on the texture of
the object you're drawing. Is it bumpy, frilly,
sticky or hairy? How can we use simple lines, shading or other
little details to show this texture without necessarily creating a lifelike sketch? When I'm playing around
with something like this, I like to make a few
swatches to test out different ideas and
different approaches. Kind of like a little window
for each quick exploration. I hope this one got you thinking about your sketches
from a new perspective, and I'll see you tomorrow for our very last
sketch of the week.
8. Day 7 - Iterations: The final day, and I
thought it would be really great today to focus
on iterations. Whenever we have an
idea for a design, it can feel like a lot
of pressure to come up with a perfect
design right away. But I always find that I have to create a few different layouts and different versions of my sketch before I actually
find one that I really like. So you can pick whatever
motif you like for this. I'm seeing so many cute ducks
all over my social media, so I'm going to go pick a duck. And a little flower so
we can have some sort of different interactions between the two
different elements. I want to start by finding some really nice reference
poses for ducks. And I'm just using free
stock sites like pexels or splash for this so that
we can have a nice base. And then I'm going
to dream up little scenes for this duck to be in. I'm not spending so
much time on each, just exploring the pose and then trying something
a little bit new. I like this one,
so I'm going to go back and define it
a little bit more. This process of trying
out different options is really important, both to develop your
drawing skills and to make sure that we
don't get stuck on our very first sketch. Treat your sketchbook
as an experiment, and don't be too precious about making it
all look perfect. This was our final
sketch this week, but I have one more video
with a few key tips to help you keep the sketching
practice and the habit up.
9. Wrapup: Made it through the whole week. I had so much fun creating
these little challenges, and I can't wait to see what you post in your class projects. Also make sure to give
each other some support by liking and checking out
each other's projects. If you have any
questions at all, you can leave your question in the discussions tab
just under this video. As you move past this week, my best tip to continue
sketching is to always have your sketchbook open on your desk with a
pen at all times. And if you can set aside like a ten minute time slot once a day or once a week,
just to play around. We work on client projects, we are working on a timeline and with very specific
instructions. And I found that I grow and develop my skills
the most when I can just play around with
some personal projects and pressure free
sketches in my own time. If you like, you can treat
this as a reset that you can come back to whenever you need a little sketching refresh. Super good like with your
sketches and have a lovely day.
 Malin Lernhammar, Designer and teacher