Transcripts
1. Introduction: Have you lost touch
with creativity? Or perhaps you haven't
painted in a long while. And so the thought of
picking up that brush or an empty blank sheet of paper is pretty intimidating or maybe are going
through a creative func. Well, they've all been there
at some point or the other. But the good news
is, in this class, I will help you reignite
your passion for creativity. And we will build our
Creative Habit slowly, but steadily, one day at a time. For the next seven days, they can migrate a friends. My name is manushree. I'm your instructor,
artist and author. I primarily work with
watercolours and wash, and I'm so excited to have you join me in this
incredible journey. Now this class is
perfect for beginners, intermediate or advanced
artists are actually anyone who's going through a creative block
for that matter. I've carefully selected
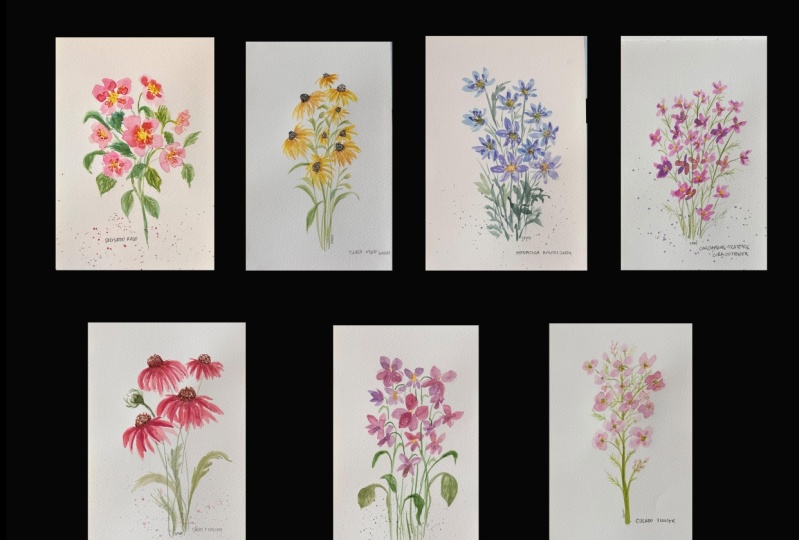
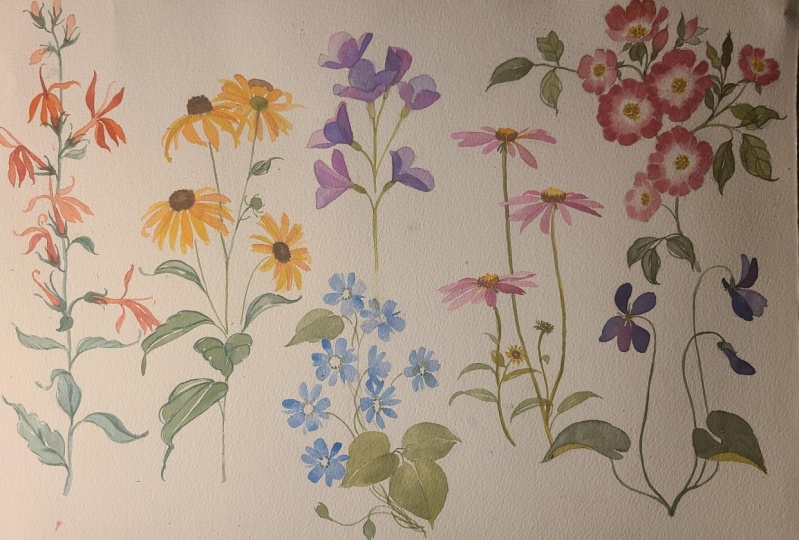
seven simple wildflowers, which we will be painting
across the seven days. So think of it like
one Flower per day. And I've also kept the supplies
to an absolute minimums. So think of basic colors, just two or three basic brushes. Because at the core of it, this class is about developing
our Creative Habit. So there's less emphasis
on the supplies, but more on showing up every single day to
our creative space. Having said that, each
floral lesson is filmed in a step-by-step format
which is easy to follow should you choose
to paints the same flavor? However, you can also choose
to paint your own Flowers. Feel free that way. And it has filmed under 20 min. So the whole idea is that
you're able to create that tastes Flower within 20 min because I know
that life can be full. Another thing to note is the lessons are done
with watercolours. However, the techniques
that I share can be applied across
different mediums. So feel free to make your bag with and work with
your favorite media. And most importantly, to remember that At
the end of the day, it's about showing up
at your creative space, enjoying the
process, having FUN, and building a sustainable
creative practice by investing little
time each day, will nacho our creative
spirit and unlock its limitless potential
or Creative Habit is essential in any
artistic group. And it does wonders for our
mental well-being as well, because it allows
us to be present in the moment and find
joy in the process. So without further
ado, let's dive in, grab your supplies,
and let's get started with our seven Day
Creative Habit Challenge. I hope to see you in the class
2. Class & Project Overview: Welcome to our seven
Day Creative challenge. Today we embark on a journey
that celebrates power of consistency and the freedom
of creative expression. Let's explore some of
the key elements which will make this Challenge
truly special. First and foremost,
I would like to emphasize on the
power of consistency. So starting from today and over the course
of next seven days, we will dedicate
ourselves to Creating. Now, there might be times
when your mind would come up with excuses and it
could look like, I do not have enough time or
I do not feel like creating. But I would encourage you to really push past
that feeling and out at least under 15 min to create the prompt for that day. Because it is true, consistent
practice that we unlock our creative potential and
witnessed remarkable growth. The next point that I want to discuss is about the supplies. So do not worry about the exact supplies because
for this challenge, the emphasis is not
on the supplies, but it is on developing
a Creative Habit. Feel free to choose watercolors, colored pencils, or
even digital tools. Whatever truly gets you excited to paint
every single day, to create every
single day rhabdo? So embracing unique
interpretation of the lessons and make them your own to help us stay
on track and motivate it, I recommend finding an
accountability partner. By sharing your progress and experiences with
a fellow creator, you can inspire and encourage one another
throughout the challenge. And that will make the king
throughout the challenge much more easier and enjoyable. Additionally, I encourage you to join our vibrant social
media community. Share your creations
Thoughts on challenges using our designated
hashtag by engaging with others and
witnessing their journey, we strengthen our commitment
and sense of belonging. The project resources section, you will find two things. First is the link to
a Pinterest board for all the inspiration pictures
that I will be showing you and utilizing in this class. And second is the prompt list. This list will have Flowers for every single day
that I have designated. And you can utilize it to explore your own
inspiration pictures, and prepare yourself well in advance for that days Challenge. Each day, a new lesson will
be dropped at 06:00 P.M. IST, providing a consistent schedule
for everyone to follow. Take this opportunity to carve out a dedicated time slot for your creative exploration and ensure you're ready to
embrace the day's lesson. Now I do understand that because of the time
zone differences, the lessons may come out
early in the morning or evening or in the
afternoon, but that's okay. You can always take the lesson at your own designated time, which you choose for yourself as your creative practice time. Once you have completed
your artwork, I encourage you to
share it here on Skillshare project section and also on social media to make sure to tag me because it is a wonderful opportunity
to showcase your unique interpretation of each flower and also to
celebrate your creative growth. In addition to that, I would be happy to provide my inputs on your artworks
should you require them. So make sure to post them here, as well as in
social media and do tag me at the
whimsical, creative. And in the end, if you have
any questions, queries, or concerns, please do not
hesitate to reach out to me. You can contact me via e-mail to whimsical
creative@gmail.com. And I'm here to
support you throughout your seven Day Creative
Challenge one, and that's about it. I am super-excited and
I hope you are too. Let's get started. I'll see you in the next video.
3. Materials and Supplies: Welcome to the seven Day Creative Habit
Challenge my dear friends. And before we dive
into our Challenge, let's quickly discuss supplies. Now, I have mentioned this in the introduction
and I would like to reiterate it that you
do not essentially need to complete this entire
challenge with watercolours. Instead, feel free to pick
the medium of your choice. Because all the techniques are all the flowers
that we are painting, you can easily recreate them with any other
medium as well. Now that sudden done, Let's have a quick look
at what all I be using. So I'll be using watercolor
tubes by Winsor and Newton. These are their professional
watercolor tubes. I'm not going to share
the exact pigments are the colors simply
because I do not want us to put lot
of emphasis on that. Instead, even for
myself and I was painting every flavor for
the entirety of seven days, I actually mixed and matched
a lot of my pigments. So someday you may find me
Painting With permanent rose or cadmium red deep or
even Alizarin crimson. What I do want you to do is
when you see me using red, just pick any red from your color palette
that you already have. And you'll be able to follow
the lesson with that itself. Now, you need some
watercolor paints. You can use either
Watercolor tubes or you can even use pan sets like these. There are Watercolor
bands and there's this nice convenient
mixing area. These are great because
this is very portable and also it comes with an
inbuilt mixing palette. However, if you're
not using these, then you'll need some
mixing palettes. So I will be using
ceramic mixing pallets. You can use a metal or any other sort of mixing
palette that you have, that's going to work
absolutely fine. As for our brushes, I've tried to keep
this also very simple. So for the majority
of the class, you'll find me using
these two brushes. They are both round
brushes from Princeton and their size number four
and size numbers that you can actually use any
round brush that you have, just ensure that it comes to a nice point and it
is take at the bottom just so that it can hold nice amount of water for
watercolor paintings. And additional supply is pencil. So if you feel you want to have some sort of
guideline when you're painting or trying to find out where to place
your flower heads, then this is going
to be very helpful. You can just mark where the stem goals and with
the flower heads would go. And this will help
you have some sort of a guide to jump off of when
you're trying to paint. Next thing that we have
is our Watercolor paper. I'll be using this
particular 100% cotton, 300 GSM watercolor paper. However, feel free to use any of the cotton paper
that you have. Just ensure that it's
at least 300 GSM. If you're not using
a cotton paper, you can get away with
using a cellulose paper. But to ensure that
that is also 300 GSM, because if the paper is
not that thick enough, it's not going to
take water valid. Then we also need
something to dab off extra paint or to
lift off some colors. So you'll need a
sponge like this. This is a very nice
reusable sponge instead of having paper towels. But this end, a couple of paper towels would come in handy when we're painting of lovers. I think this is about it. Am I missing something? Oh yes. You do need a
jar full of Florida because obviously to rinse our brushes or do bring
water to our beans. So that is also one
thing that you need. Apart from it. I think you should just
prepare a beverage of your choice every day to go along with your
creative practice. Just bring a smile and
I'll take it from there. And I cannot wait to see you
on day one of our challenge
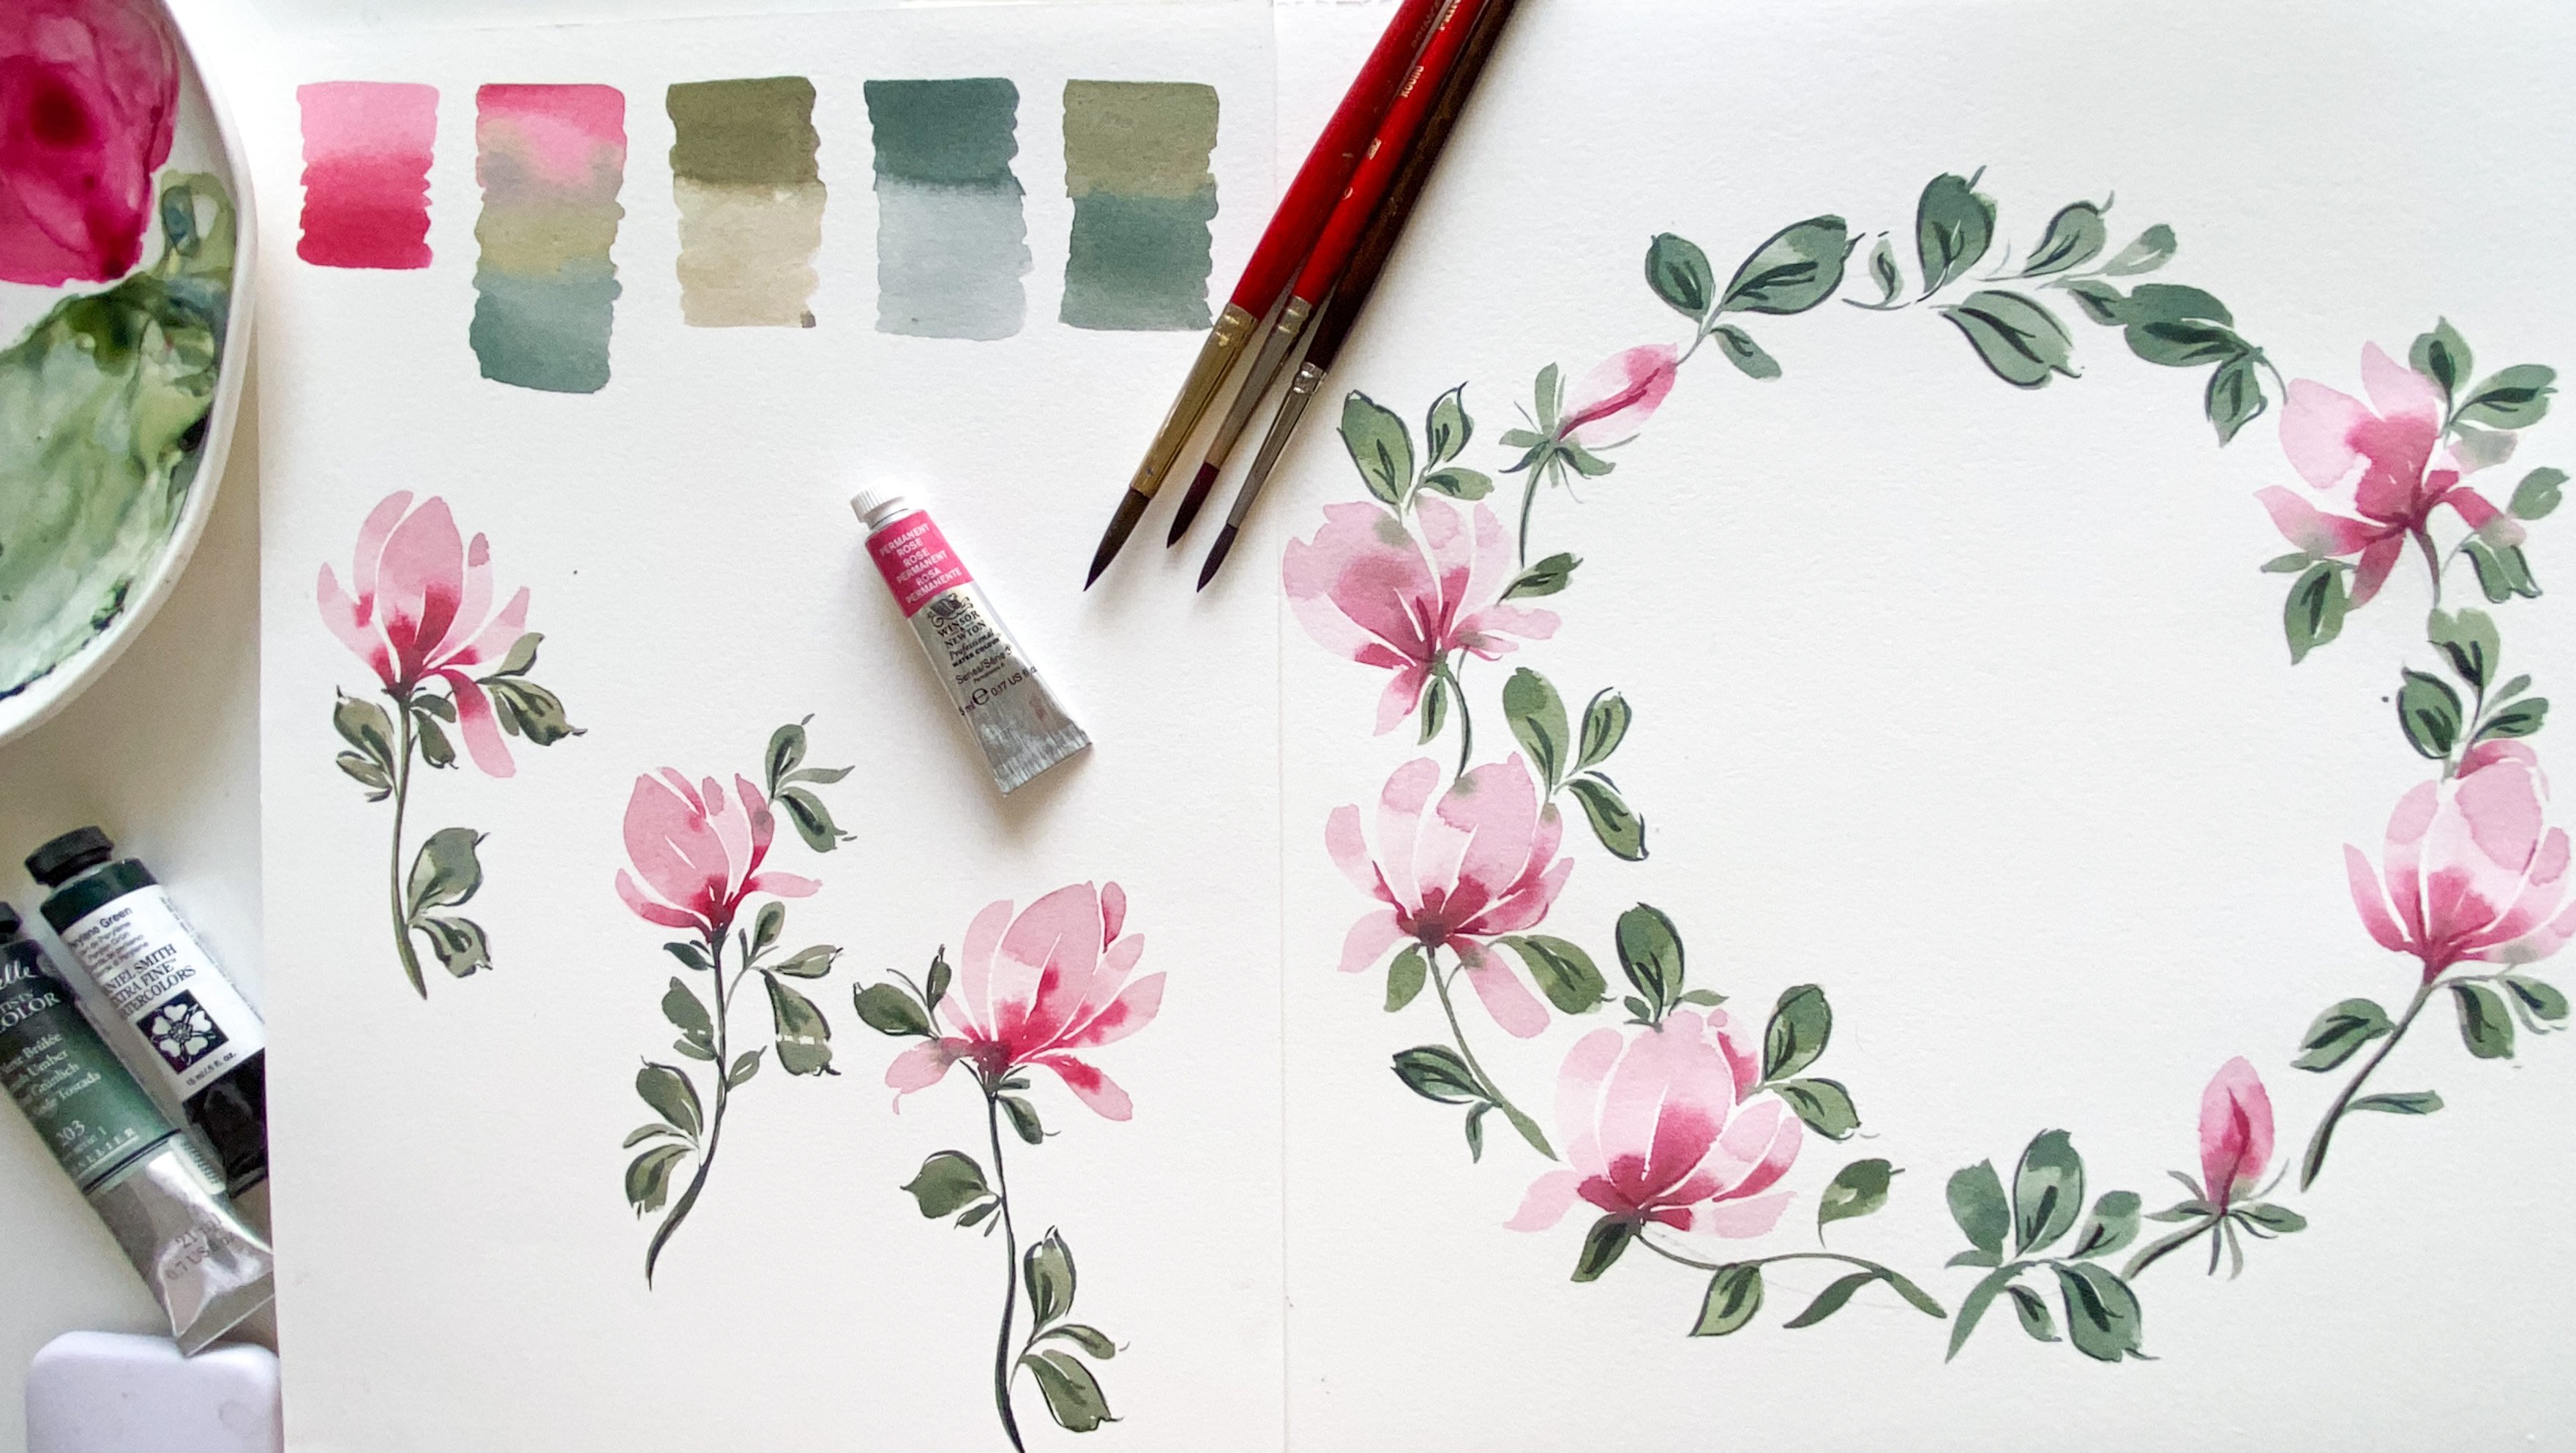
4. Day 1 : Cardinal Flower: Hi and welcome to our first day of the seven
Day Creative Habit Challenge. So as you know, for the one, we'll be painting these
beautiful garden flowers. Garden Flowers symbolize
love and romance, and they are native
to North America. The reason why I chose Cardinal Flower was
because, of course, this entire Challenge is
a symbol of how much you and me we both love
creativity and watercolors. So I just felt that this was the perfect Flower
to get started with. The color scheme for this
would be pretty simple. We're looking at
reds and greens. So I'll show you a
couple of pictures of the Cardinal Flower in case
you've never seen one before. So here are some of the pictures I have from my Pinterest board. I'm also going to be sharing a link to the Pinterest board, which will contain all these
inspiration pictures that we utilize or look at throughout
our seven day challenge. Just a word of caution
with any sort of pictures. Basically, even if these
pictures could be, some of them could
be royalty free, some of them not so much. So two things you
should consider. First is if you're just going to use it for your
sketchbook purpose, then it's absolutely fine. You can just
replicate the image. Meaning the basic stems, stems structure, the
Flowers structure, everything you can replicate
without any issue. However, if this is something
you'll be posting online than I would suggest that you
make some creative tweaks. If you see that
the sudden stem is going in this direction. And if you like, how the
flowers are clustered on it, instead of doing it like this, exactly like how
it's in the image, you can give it a nice curve, or you can increase the length. Or you can just add
couple of leaves. Just try to make it
a little different from what is their
only reference image. There are two good
things about it. First, you're not
replicating the image as is, so that would prevent you from running into any
copyright issues. And the second is, when you are choosing to do something
a little differently, you are actually
exercising your creativity to imagine something which
you cannot see right now. But it's there in your mind and you can choose
to execute it. Alright, so that
is said and done. Now, let us have a look
at this gorgeous flower. I just want to take
a couple of minutes. I'm to really tell you a little about the basic
structure of the flower. Now this is a long
stemmed Flower. What I mean by that is that
usually the stems a pretty long and the flowers are
clustered around that stem. So let me see. Yeah. So this is a long slender stem and the Flowers would be
coming out of it. Now you'll see that these petals are very
wispy and Sweet. So they are quite easy to paint also because
this is going to give us a lot of creative liberty when we will be looking
at Painting them. Now let us have a look at this image and you can see very distinctly
how the petals are. So we'll be utilizing
two methods, will be using one stroke with a round brush and
the stamping method. To create these patterns
for our colors, I have actually picked
reds and greens. So you can just pick any red and green that
you have on hand. I have already taken out my colors and
I've prepared them. Just add a little
bit of water so that there is a nice
pool of each color. And I've also used to green. So this is sort of like a
lemon yellow that I'm using. This is a beautiful crimson, cadmium red, and this
is a regular sap green. I be adding little bit of
this yellow to the green if I would want to
make it a little lighter or brighter rather. Alright, so, yeah,
that's about it. Let's get started with
painting our Flower. The first thing that we
are going to do is let's just rinse our brush in water. Take out the excess. Now, I'm going to get started
with a lighter green color. So you can achieve that by actually adding more
water to your pigment. Or you can also choose to add tiny bit of
white watercolor. And that will also give
you a gorgeous PESTEL, short sort of green color. Now I'm gonna go ahead
and map out to stem. The reason why I'm choosing
to go first with the stem is because the stem would act
as an anchor for my flavor. Now, I do tend to have my reference image
next to me whenever I am painting a new flavor because this is a flower that I've painted couple of times. I'm not gonna be using a
reference image for this one. However, if this is your first time painting
a Cardinal Flower, I would highly
recommend that you have a reference picture
right next to you. So just adding the
stem and I'm leaving little bit of dashes
here in there because some Flowers would come
straight at us from the stem. So this is the space that
I've left out for them. I'm just going to add tiny
bit of leaf at the very top. And then some leaves
at the bottom. And I'm gonna use my one
stroke to create the leaf. And the way I do it is
I just take the tip of my brush and I drag it. And as I'm dragging it, I'm adding little
bit of pressure. And then as I'm
ready to come up, I again release the pressure and vapor come back to a point. If you want to create
a two stroke leaf that's gonna be a
little thicker. You can start again with
the tip of your brush. As you are going down. Just press down and
then gently come up. That's how it's going to look. I'm not gonna be putting lot of emphasis into
brushstrokes and such. The reason for
that is that this, the intent of this class is
to build a Creative Habit. And so I'm going to be focusing
on showing you how you can spend ten to 15 min and
actually paint a flavor. If you're interested in
learning all these strokes, I would highly
recommend you check out my previous
Skillshare classes. They cover all of this information in lot
of depth and detail. Once this is done, I'm now going to be
rinsing my brush. Again. I'm, by the way, I'm
using a size four brush. This is a size four
round Princeton brush. Now we'll be using the rate. Again, I'm going to
be starting with a lighter value of red. Which means in this red, I'm adding more water
and a hint of fight. Then I'm gonna start
painting the flowers. If I feel that it is
still a little dark, I'm going to add
more water to it. So I'm just following
the shape of these flavors and painting them. So they sort of
come out like this. So basically you has
something of this sort, a line that comes
out a pet loop. And then you have
them sort of creating a fan of sorts coming
out like that. Be sure to vary the length of the patterns that will give
an illusion of perspective. So there are three petals
which are always together. So I'm trying to maintain that. And they come out sort of like
from a right angled petal. You sort of see these three
petals should get the, we are doing that as well. So for the same red now I'm going to mix
the darker value, which means it has more
pigment, less water. But since I feel that
it's a little thick, so I'm going to add
little bit of water. And now let's paint
with this darker value. There are two options. You can either adding
this darker color to the already existing
petals or you can create new petals and have them painted with this
kind of darker value. I'm gonna do it both ways because I want to give
it a layered effect. So I want to demonstrate
that there are certain petals which are
kind of in the background, and then certain ones which
are right on the top, very close to the viewer. Again, varying my strokes
and making petals thicken. Think. We have a visitor Sometimes if I feel I have too much paint to
pigment in my brush, I just go ahead transit and
dab the excess on my tissue. That's also a great way
to vary the value without having to add any additional
water onto a palette. Then on top, in some
of the Flowers, I have seen this gorgeous bud. So I'm going to add a
couple of buds on top. I'm thinking of adding
probably three buds, or maybe I'll stick
with just two. Let's see. I think
I like how to look. So I'm gonna leave it like that. Okay, now that I've
lover is done, I'm just going to add some
finishing touches to our stem. The stem is right
now extremely light, and now's the time to
add in some shadows. I'm going to start with adding little bit of detail with a
darker value of the screen. And I'm going to
be concentrating my shadows towards the areas which have more
cluster of flowers. Also going to add a
little bit of this too tiny stems from which
the flowers are coming out. And do that as well. Right? This looks good to me. You can choose to
add some leaves. Now, in our reference picture, they want lees like this, but this is where creative freedom really
comes into the picture. Being an artist, you
are allowed to modify your creation according
to how you best like it. So I think adding these tiny leaves would
make it really pretty. You don't have to add them. This is just my
personal preference. I'm going to do that. And feel free to skip this or do something
entirely different. Something that you
feel would look good. You can just add that. You'll notice that the colors are looking really gorgeous. And part of the
reason why that is, is because we've used a
complimentary color scheme. Complimentary color scheme
is a pair of colors which are just opposite to
each other on the colors. If you'd like to learn more about color schemes
and colors and gentle. I have a book called
contemporary Kaltura, which goes in depth and detail in a very easy
conversational language. And step-by-step
projects to show you how much you can
achieve with colors, with just a couple
of colors which are already in your
existing palette. So the thing about
complimentary color scheme is that it's a combination
of two colors. And the reason why it's called a complimentary
color scheme is because both the colors
will compliment each other, meaning they bring out the
best in the other color. And that's why it's just such
a beautiful combination. I'm going to call my piece done. Before we close off our day one, I wanted to share a Fun fact. Cardinal Flowers are actually
magnets for hummingbirds, their absolute favorites for hummingbirds and pollinators
like butterflies and moths. Because of their beautiful
tube-like structure and the bright red color. I just found it
very interesting. So I thought I'd share it. Alright, you have taken the
first step of the journey, which is actually the
most challenging part that is of showing up. And from here on, it's gonna get easier.
I promise you. I hope to see you again tomorrow
with our day to Flower. Dylan, goodbye, Take
care and happy creating
5. Day 2 : Black eyed Susan Flowers: Hello everyone. Welcome to day two
of our Challenge. And I'm so happy that you
have chosen to show up today. And let's get started. Remember that you have a
good momentum going on. So make sure to keep showing
up and being consistent. Because as you know, it's gonna be a snowball. The more you do it,
the more easier it'll be to take out time
for creativity. And also it will deepen your understanding of
whichever material or medium you're painting these flowers with
for today's flavor, I have chosen for us to
paint the Black eyed Susan. Now, Black eyed Susan
are buying Neil Bland, meaning the other first to grow after a natural
calamity or disaster. And that is why they also represent encouragement
in the Flower language. So here are some of the pictures
of the Black eyed Susan. And you can see that it's a pretty straightforward Flower. It has got a beautiful
deep brown center. And then we have these gorgeous whimsical
patterns coming out of it. Here's another picture. You'll also notice
that even this Flower has a very long slender stem. Some of the tops look
much like a cone, which has blonde top. Here are some of
more such Flowers. So what I'm observing is that the colors vary a lot from deep, the yellows, too
bright, lemony yellow. So that is also
something I'm going to be mindful of and
we'll paint them. Here they are with echinacea
flower or cornflower, which is also going to be a
Flower that will be painting. So my initial idea
for these Flowers was to just paint
them by themselves. But then I came
across this image. Once again, you can find all the reference images
pinned on my Pinterest board. Use them wisely as per our
discussion, the last lesson. And I'm going to be
sharing the link to the Pinterest board in the resources section
of Skillshare. You can access that through
skill show desktop version. So initially my
plan for this was to paint them with just
all by themselves, like how I have shown the
final piece initially. But when I came
across this picture, I really loved how there
is this pops of purples. So we're gonna be adding that
in a very interesting ways. Let's get started with
painting these flowers. Let me put this aside. I have my colors laid out. I have a warmer yellow here, and then cooler yellow. This is the cooler yellow, this is the warmer yellow. I have little bit of poeple
here and a hint of red here. So you'll see that
I'll add that to our popup and we'll get to
that at a little stage. And then I'm going
to be utilizing the same green we
used yesterday. So let me put this
aside as well and let's get started without
flavor for these flowers, you have two ways
to go about it. The first is we can
again just Begin with the stems and then place our
flower heads accordingly. Or the second way is the
first paint the flower head, more precisely the centers. And then we add the petals
and finally the stems. So for this one, Let's do
it the other way round. Let's put the center's first and then the petals
and then the stem. So for the centers, what I'm gonna be doing is I'm
going to be using a brown. Of course, as you saw, the centers are
gorgeous brown color. For that, I'm going to be mixing this popup with the yellow. And if this is news to you that when you mix two
complimentary colors, again, we have
yellow and purple. These are two
complimentary colors. And whenever you mix two
complimentary colors, you're going to get a
darker brown black sheet. So that is what I'm
going to be doing. I'm gonna be creating a brown. The reason why I'm
not using any other brown by choosing
to mix this one is because the lesson number of colors be used more cohesive, are Painting would look. So I want everything to be tied in enhance I'm using
the same colors which I'll be using
for flower petals and adding pops of color. You'll see what we'll
do with the Bobo later to mix our brown
for the centers. And obviously, if mixing colors and knowing more about colors or something you're interested in, be sure to check out my book. It's filled with pages and pages with knowledge
about colors, color mixing, and whatnot. Alright, so let's get
started with the centers. I'm first gonna be using a lighter value of the
brown that we have mixed. So I'm gonna be adding
more water to this and dabbing the extra paint pigment onto my paper towel so that
I have a lighter value. And then we'll get started
with placing our centers. So some of the centers you saw, the resembles sort
of like a cone. So I'm going to map
out that shape first, and then I'm going to fill it. I'm using a Loose hand. I'm not too particular about which areas are getting filled
and mature naught because That's fine. We'll keep it pretty
loose and simple. So depending on how you
want to place your flowers, I'm just randomly placing these centers and I'm going to be changing their orientation. So you can see that this
is gonna be a flavor which is almost like if you were to look top-down at the Flower, then this is all the
center would look. This is if you were to
look at it from side view. So just bearing that in mind. And now I'm going to
add little bit of the darker value of the same
brown to some of the areas. So my light source is
coming from this direction. So I'm going to be placing
my shadows towards this. And for this one, I know for sure that
my battles will be there and it's
slightly downturned. So I'm gonna be concentrating
most of my shadows here. Apart from that,
where else do I want? I want a smaller flavor on dark. So I'm just going to
keep it very small. The center. I like to have my Flowers
in numbers of ADH. Either I can stop right
now at the count of three, or I can go forward
and act two more. I'm gonna go ahead two more
and bring the total count to five, black Susan Flowers. And then where do we put one? I'm gonna put one here. And it's gonna be almost covered with the petals just
barely visible. Okay, So now that is done
and I'm happy with it. I'm going to move
on to the petals. I'm just going to add a
little bit of shadows more. And we're going to be adding some details once
I centers are dry. So don't worry too
much if you feel that it looks a little flat, will take care of that later. Now let's get started
with our yellows. So for our petals, It's simply going
to be stroke based. Okay? What I mean by that
is I'm just creating a lighter and darker value just so that we have
a little dimension. So adding more water and
adding little bit of fight with one stroke method. If what you're gonna
do is you're going to touch and just press down, drag and lift up and not
going to bring it to a point. If you have the reference
picture close to you, you'll notice that
not all petals have pointy tapering ends. Some of them have rounded edges. Some go Now, bring that out. I'm just going to vary
the color ever so slightly and will also vary
the size of our petals. You can also choose to add some darker color right at the very base of these patterns. You will observe that they are quite darker
towards the piece. So I'm being mindful
of that as well. Now let's move on to our next
flower with just this one. For this, my idea was that
it will have the petals coming out like so from
behind the center. And the center is
gonna be very hidden. Some gonna add petals like this. Okay? And then we have, are pretty straightforward
one, which is this one. But for this also, I'm going to vary the
size of my petals. Some of them will be
bigger and then the, those will be smaller. But generally the petals of
Black eyed Susan a very long. So make sure to have them
towards the longest side. Again, it's helpful if you
have the reference image next to you so that you can accurately see how
the battles bend. What does the shape
of the petal, and how best you can paint it. Gonna be using a darker color
right at the base of this If you, he'll tiny news. That's my cat in the background. I think he woke up from his nap and he's
needing some attention. Once we're done with
our day to Flowers, I'm going to be offering
him lots of Godel's. Now some petals had
this distinct shape, meaning it had almost like
a rounded 90 degree angle. If you look at the
reference pictures, you'll find that it's there. And so the same, basically the repetition
of the strokes. That is, I take the
tip of my brush, press down and then just
come up in-between. We're not waiting to come
to a point for this one. And additionally, I'm
going to be adding tiny amounts of brown just so that we can make little
bit of darker backwards. I'm just adding that as well. Towards the very edges. I'm going to add
this darker color. Okay? And then for this flower, this particular one, I wanted to leave it with just
a couple of petals. I'm not going to finish
it. I don't know. I just really liked the unfinished reference
image Flower that I saw. It should be there on
the Pinterest board. If it's not there, then I'm going to try and
find it and add it so that you can also see did
not have all the petals, okay, it just had
a little bit of petals like this and I found
it really interesting. Okay, so our flowers
are pretty much done. Now I'm going to use the
green to create our stems. For the green, I'm going to
be mixing the same yellow. We used. Just adding little
bit of that to make sure that everything's
nice and cohesive. And let's give them
nice, gorgeous stems. For this tiny one, I'm going
to create a stem like this. Boom, look at this
nice bleep that has happened. I absolutely love it. I'm going to leave it
because this battle was already wet and I brought
in vet green paint. So here we have a tiny
wet-on-wet happening. Very lovely. Okay. This is about it. Again, feel free to
paint the stems, the Flowers just
the way you like. You do not have to follow
the way I'm painting it. And we'll give it
one stroke leaves, some lighter, some darker. So again, these are four
leaves and I like odds. It's always better. So I'm going to
add one more here. Now for our final details, we can just go ahead and add
some details to our centers. So I'm gonna be focusing
my details towards the very base of where the shadows are supposed to be. You can see him doing that. I'm going to also
take a clean brush and just going to use water to buff out the edges of this
so it isn't as harsh. Just a little bit. I personally don't
like carcinogens, but if you like them, then by all means try that. It's interesting. Look for sure. Same for here. I'm just adding
the darker shadow and you'll see that the centers instantly little bit more here. So like we discussed
in the last class, it, whenever you combine two
complimentary colors, they are just going to bring
out the best in each other. So bearing that in mind, I'm going to be adding tiny
dots of poeple to this. So what I'm gonna
do is I'm going to just blacker the book, the amount of water that
you have on your brush, would the main, how big or
small the splatters will be. While you're doing that,
just makes sure that you cover the other Painting if
you have it on the page. So let me get a piece of
paper and cover this one. If you have more
water in your brush, you're gonna get
bigger splatters. If you have less water, you're going to get
smaller splatters. But in a sense, you do want to have a
nice flowy consistency of pigment to water
ratio in your brush, hits the fan part, you take the left forefinger, Vice-versa. If you're left-handed
and then you just stop your brush onto
your forefinger. And that's going to create these nice splatters of poeple. I feel that it is
still a little dark. So I'm going to add more water and dab
off the excess paint. And now whatever is left, I'm going to create
splatters with that. Oh, this is nice. And if you don't wanna
do the splatter method, there is one more
thing that you can do. You can take a small brush. This is a size zero
brush and just dip it in the paint and just make tiny dots near
the yellow flower, just like irregular dogs
near the yellow flowers. You can also create
lighter colored dots. This makes for a very
FUN look, and that's it. We are done with our day
to Painting as well. Congratulations for
completing day two. I hope you're posting your
journey and process somewhere, either on your Instagram
account as opposed, or if you feel comfortable, Do share it in the
stories to tag me, I would love to see
your journey as value. That's about it. I will see you tomorrow. What are the three of
Creative Habit Challenge? Thank you so much, Take care, and until then, happy Creating
6. Day 3 : Cardamine Pratensis Flowers: Hello and welcome everybody. I'm so happy and excited for
day three of our challenge. I'm extremely proud of you for showing up for our day three because we are almost midway
into our challenge, right? So let's get into
today's Flower. Let's see which Flower
via Painting today, Today's Flower is called
Cardamine Pratensis. I hope I'm pronouncing
it correctly. Here's the beautiful flavor. You can have a look. It is so delicate and has these beautiful
distinct four petals. For each floret. It's just such a
beautiful flower. And you see this gorgeous
yellow green centers just making this pink
and purple pump. It's just so beautiful. Look at the buds also, they're so tiny and delicate. This flower is also
known as cuckoo flavor. And it's a small mustard plant which has pink flower,
pink bubble Flowers. And the reason why it is
named as Google flavor is because it usually
Flowers during spring, and that is about the time
cuckoo birds starts to sing. It is native to Europe
and Western issue. So yeah, these are some of
the Fun facts about it. And here's the Flower. Let's get started
with painting it. So again, let's begin
with the colors. I have the bubbles
from yesterday and I have read from
the day before. So I'm going to be
utilizing that to create soft purples and pinks, basically pastel pinks and pastoral purpose for our Flower. Again, the green, we can use
the similar sort of green. So let's get started. One difference today I'm doing is we're using this
kind of brush. This is a, this is angled brush. And I'm going to show
you how easy it is to create this particular flower
petals with this brush. And this is also going to be a great way to see what sort of potential every brush holds in terms of providing us with
different kinds of strokes. So I thought this is
gonna be a great idea. But don't worry
if you don't have this brush because I'm
going to be showing you how to create the very
same petals with just a regular round
brush as well. Alright, so I'm going
to be mixing my bubble. And we want to have
very light values. I'm going to add generous
amount of water. And same for my pinkish purple. Again, I'm going to be adding a generous amount
of water to it. And in addition to that, you can also choose to add a little bit of
white watercolor. And that's gonna give you
this beautiful pastel more. Let's start with placing our stems and creating
ankles for Flower to go in. I'm going to do it in a
dashed fashion so that we leave behind areas for
our Flowers as well, the ones which are
towards the center. And then I'm also
going to be adding these tiny flicks
for the flowers, which are going to be
towards the sides. Now for this also, most of the flowers are situated towards the top
part of the stem. So let's quickly add
couple more stems. And for this, because it's
going to be a longer one, I'm going to Jolie mark down the tiny stems which
will hold our Flowers. These are two stems. Let us go and create
just 21 more. I'm not too worried to
connect them per say. Because all these things
we can manage later, we can move into
creating the centers. Because the centers were this
gorgeous green gold color by Winsor and Newton. And I'm going to take
out a tiny amount of it. Look at the teeth marks
on the cap of it. Am I the only one? I hope I'm not the only one. But yeah. When push
comes to shove, you got to open
them with TR deep. Okay, So I'm gonna
mark tiny centers. This is gonna be random, okay? I'm not thinking too much. I'm just adding these tiny
centers for our Flowers. And these are not
the final centers. Meaning this doesn't define the actual number of
flowers I'll be painting. I'm just starting
with something. Once that's done, I'm going to start painting the four petals, the four distinct
petals of our flowers, varying the value to make sure
that we have sort of like a pinkish purple battle going on and then some
lighter petals as well. Even more lighter than
what we have here. I wanted to make it something like peeping from
behind this flower. So I'm going to place
the center right here. So what I'm doing is I'm
just touching my brush onto the paper and I'm wiggling
it in shape of this petal. You can also choose to do
it with multiple strokes. That's also going to look
good and violet is wet. You can go ahead with this green gold and
just add a touch of it. And that's going to do the
wet-on-wet magic here. Now, I'm going to be
looking at some of the more pinker
shade becquerels. Again, this one, the idea is it's peeking from
behind this flavor. So that's why I'm just
showing two petals. Let's make some center ones. The ones which are right
at the center of our stem. For the third petal,
I'm just going to make it lighter and more purple. So I'm gonna make some
very lighter ones here. You can see I'm going to dip
it into the PINKO value. And we have FUN here. So again, I'm gonna just add
in this green gold color. You can see the kind of
different look you get. If you leave couple of
spaces between the petals, that it makes it look
more structured. Whereas if you don't leave white or negative spaces
between the petals, it just looks like a very
close together flavor head. Both are absolutely beautiful and it totally
depends on the kind of look you want to achieve
with your flower heads. So go ahead and make a
choice on the basis of that. I'm not going to stick
to the actual flower, which has full petal rule. Instead, I'm going
to bend it a bit. And for some flowers, I'm just going to give
them three petals. So it's very important
that you take these sort of liberties while
you're painting. Now that I've shown you how to paint this flower
with a round brush. Let me put this aside and I'm going to show you
how to paint it, then angled brush, you
want to pick an angle. So I'm keeping my brush
at a 45-degree angle. And I'm just going
to pressing it down, dragging it and lifting
up and my petals done. I'm going to repeat that again. And this time I can choose to go in this sort of
direction as well. And in this direction. So you see, this makes me
have more organic strokes. I really like how this looks. I'm gonna do couple of more. So again, I'm painting it
with one sweep of the stroke. You can also position
it in such a V and then just drag it into the
direction of the petal. And now I'm going to dab
some of the paint and create lighter petaled flowers to depict that they are
in the background. And that'll give our
Painting much more depth. Here are some, I'm going
to create some more here. And be sure to give them
these gorgeous centers. Going to add the center. And now I'm going to make
some mature more purple. So, but again, dabbing the
excess onto my paper towel. And then going ahead
with Painting that. For this one, I'm just going
to give it two petals only. So with this brush, you'll actually need little
bit of practice to master it. But it's just look at the kinds of strokes
you're getting there. So organic, so very similar
to the actual flower. And if you'd like
to learn more about different kinds of
brushstrokes that are possible with different brushes. I covered that as
well into my book. Actually, everything that I
absolutely enjoy doing and I feel would add value to a beginner or an
intermediate artist. I've added that in my book. And you'll find that we
truly explore the potential of around full board and
flat brush, give it a goal. And I'm sure you would love the information I
have shared in the book I'm not sure if you can hear, but my elder god has also
woken up and not very mindful of what sort of stroke I'm creating because this is a very loose style of painting. And the emphasis is on getting the ascendance
of the flower, right? That we're doing with the actual placement
of the florets, the stems, and general shape of the petals and the colors. So you can just truly have FUN with the button
stokes actually. And above all, always remember when you're trying to
build a new habit, it's best to keep
it as simple as you can and as enjoyable
as possible. That's the shortcut way
to make sure that you will stick to the challenge and come back to it
every single day. But if you make it more complex than there
are chances that you wouldn't want to show up for the entirety
of the challenge. Okay, this looks
pretty good to me. Now I'm gonna go with
sometimes values because I feel the scan Use
little bit of definition. I'm going to actually
add these darker values, either directly onto
the existing patterns. So some of them like so. And I might choose to
create some new ones. So we'll see how that goes. Okay, time to switch
to the round brush. I'm gonna show you
with that as well. This looks really good to me. I'm gonna leave it at that
and I'm going to start adding some definition
to our greens. This is actually where we
will pay attention to whether our stems and florets
are joined or not. So prior to this we left gaps. Now we'll fill those gaps to make sure that
it looks connected. And then doesn't look like
our Flowers are just hanging in there without
any stem and place. And some of them have this beautiful yellow structure from which the Flower comes out. So I'm gonna give
some of them, dad. And finally, I'm going
to be finishing it up with some beautiful leaves. I'm not sure if they look anything like
this Flowers leaves. But I just want to have Fine At this point and add leaves. That spark joy to me. If you want to add
leaves which look exactly like how this
Flowers leaves are, you are more than welcome to use the reference pictures
and paint accordingly. All right, so this looks
pretty good to me. I'm very happy with how our
D3 Flower has turned out. Congratulations on
finishing up the tree. And with this, I take you leave, I'll see you
tomorrow for our day four of the Creative
Habit Challenge. Dylan, happy Creating
7. Day 4 : Hepatica Americana Flower - I: Hello everyone. Welcome to day four of our seven Day Creative
Habit Challenge. And once again, I'm so proud of you for choosing to
show up consistently. And as you know, I hope you're
able to see that now it's much easier to take out time
for our creative practice. And also that it doesn't feel
as overwhelming as the one. That is the thing about habits. The more we repeat
a certain activity, the more easier it becomes and we can start
looking forward to it. So I hope you are experiencing
all the good things. And we are midway
in our Challenge, almost midway just three
days more after this one. And we'll be done with our
seven Day Creative Challenge. Alright, without further ado, let's get started and have a look at the Flower
we have picked for today. So today's flavor is
Hepatica Americana. It's herbaceous flowering plant, and you'll see that
it can have anywhere 5-6 to even 12 petals. Look at this one here. The reason why I chose this was I really loved the centers. It's almost like tiny
sun inside the flower. The way these beautiful
stamens come around, outer for green center. Now this flavor can be
found in multiple colors, like white, pink,
blue, and purple. Today we'll be painting it in a beautiful turquoise blue hue. Here are some more pictures. This is the one which has a really good look
at the center. And you can see that
how these statements really emerged out this
gorgeous green center. Here's another view. And this is how it looks when
it's found in a cluster. So beautiful. Here is the blue that
will be attempting today. In our lesson. We're gonna be painting
something like this or something like this. In addition to that, I do have couple of more images where we can see how
the petals oriented, for instance, look
at this one here. This is so beautiful, so we can only see a partial
view of these three petals. And then we can see a really good look
at the other three. And because its envelope
in the Flower like that, we can really focus
on the centers. And this is the kind
of leaves they have. The leaves are really huge in
comparison to the flavors. But as always, you
do not have to make the exact same
leaves as things. Feel free to paint the leaves that you like Creating, okay? So you can find all
these images in our Pinterest board as always. And as you know, the link to that Pinterest board is provided in the project
resources section. If you visit the skill
shares website version. Okay, So let's get started
with painting our Flower. I have some blues mixed in here. This is the turkey's blue
that I was talking about. And this is a mix of ultramarine and a little bit
of Turkey's blue as well. For white, because the whites of the centers are really white, we will be using wash. So here I have some wash. I am just adding little water to it to make sure that it is nice and wet by the time we need it for
this flower as well, I'm gonna be using
round brushes. And let's get started. The first thing that
you would want to do is map out the stem. I'm just going to mix
little bit of green from our previous
day's color palette. If you have existing green on your palette from
last three days, feel free to use that. And taking a size zero brush, I'm going to be mapping
out some stems. At this point. It's good to have your reference image
right next to you. That way you can really see how you want to
cluster the levels. I think I'm gonna go ahead and create a nice
bunch of these. So accordingly, I am placing my stems, right? So unhappy with this
directional stems, you can choose
whichever direction you want for the stems. Now let's get started with
painting the flower centers. Centers are really
important here. And the reason why I'm
gonna do them first is Because they're going to help me define the orientation
of each flower head. For the center, I'm gonna
be using this mix of green gold with
little bit of white. And I want to keep it towards the yellow side because that's going to
make the blue box. I'm sure by now. You have a good idea of
how much I love mixing and tweaking colors
to really bring out the best in
every illustration. And if it is
something that you're interested in, doo, doo, doo, have a look at my okay. So I'm going to first create these three centers and
then we'll see how it goes. Now I'm going to be mixing this blue arrow keys will be varying value
for our petals. So I'm gonna go
with five petals, six Battle of seven petals. I'm not really going to be
painting or 12th petal one. The reason for that
is I feel it will be to busy for my liking. But if you like really
full flower heads, do paint the petal version, it's gonna look very beautiful. I'm being careful not to
touch too much of the center, but I am going to allow some
petals to touch the center as well so that we can get
this gorgeous, wet-on-wet. For this one, I'm
going to attempt that beautiful envelope shape. So I'm placing two
petals on the sides. And now we have to create
the petals at the back. Feel free to dab off the extra paint onto
your paper towel. Get this looks good. So I'm using my reference
picture and really shaping the flower petals to
mimic these Flowers. And you can see that
I'm using to stroke, sometimes multiple
strokes to achieve that. Now let's go ahead and
create some more Center. For these ones. I'm gonna
make them lean a little more towards the ultramarine. And I'm also going to keep the values
pretty dark for these. If you feel that
the blue has done too much into the
yellow green center, you can always take a clean brush and just
dab off the extra color. And it's good to go. Making some more centers. And couple more here. And for these ones, I'm gonna be keeping
them very light. Some mixing tiny bit of white. Occasionally, I'm gonna give off to the lighter flower heads
8. Day 4 : Hepatica Americana Flower - II: If you feel that the centers have too much yellow
and red plus green, then just add little
bit of green to them. If they're vet, it's better
advice we can always do. Let andre, like I'm doing here. So some of the
centers have tried, but I'm just going to
add a little bit of green on those dry centers. Okay? I'm gonna stop here. And now I'm just going to add
some more darker details. Because when we will be using white for our centers,
I want them to pop. And for that, I'm seeing that my petals need to be
a little more darker. For some petals, I'm
going to go ahead and do a little bit of wet on dry. Okay. Now we wait for
these to dry before going ahead with
our white gouache to add those center details
while they are drying, I'm going to prepare
our gouache. With gouache, you want to have a pretty thick consistency. It should feel like
souffle on your brush. So it should have that nice, uh, whipped cream consistency. Then you pull it in your brush. If you make it too watery, you will not get it to pop. Now, some of the layers are dry, so I'm just gonna get started. This looks pretty dry to me. I'm just going to start with the tip of my brush
and I'm creating those kinds of rays of sun stamens coming
around and do each. I'm just going to give
a tiny little dot. And finally doing
that makes sure that you vary the length
of these statements. Some of them will be longer, some of them would
be short-term. Once again, I'm going to
start from the petal and then just flick my brush ever
so lightly touching it. And it doesn't even have to look like a circle the top
of the statements. You can just dab
it ever so gently. Just take the tip of your brush and touch the paper and just flick
it down and lift up. That's the stroke
that we are doing. For these teams. And if you feel that the
white is looking to flat, you can always add a
hint of yellow to it. And just go back to
those centers and add that little bit of tiny dots and it's going to
instantly make it pop. So you can see that
unlike the petals, It's not going to show as much. So the darker your petals are, at least keep some of the
petals dark in each florid so that the details on
the stamens really pop. Now let's add some leaves. So for the leaves,
I'm mixing tiny bit of the blue that we
used for the flowers, just so that it
would all look very cohesive and let's
paint the leaves. I said that the leaves
are really large. So you can either paint
them how they look or you can just choose to
add your own spin to it. And remember to have
fun while creating this starts the main purpose of these exercises
that you learn to have fun while taking
out time to be creative so that it's easier to sustain
this creative habit. I'm really taking creative
liberty and I'm adding leaves. Just as I feel like adding, not confirming to how
they actually look. Alright, we are done
with these flavors. One more additional detail. If you feel like adding these
wet-on-wet vein details for our leaves and see how cool it is because it
just instantly diffusers. For some, the ones
which have dried, it's going to look like crisp. But for the others which are
yet to dry for those leaves, it's going to look,
hey, nice and diffused. Okay, I'm calling it done. This is it for our D4 flower. And I'll see you in
the next lesson, which is going to be D5. Dylan, happy creating
9. Day 5 : Sweet Violets - I: Hello and welcome to our day five of seven Day
Creative challenge. I hope you are enjoying the challenge and also
make sure to celebrate the fact that you have been consecutively showing up for
daily creative practice. Okay, let's quickly dive
into today's Flowers. For today we are
Painting violet flowers. Now, wildflowers are not
only beautiful to look at, but they also
attract all sorts of pollinators from butterflies,
bees to hummingbirds. They also tend to
symbolize honesty, protection, dream, and healing. Okay, so let's have a quick look at our Flower reference images. Here is Aldo Flower looks
and you can see that it has these beautiful tones of
pink and purple and gold, just white centers, and
the leaves are quite huge. This is how they grow
when in a cluster. And this is also
a top-down view. Another interesting
thing that I observed towards the way the leaves beautifully call into the shape onto the basic structure
of the flavor. You can see that the
Flower has five packets. What makes it special is to have the petals are quite thick, and then we have
slightly tunnel petals. And then there is the
center petal which has a little bit of
detailing going on. The shape is also
very important. If you look at it, you will see that it's almost
like a butterfly shape. So we have these two petals
coming out like this. And then the other two slimmer
ones come out like that. And then we have to
center petal here. Here are some more examples. And you can see that again, it's a very FUN Flower to paint because you can really get creative with the petals
the way they don't. And it's just a thing of
beauty in my humble opinion. Some of them also have this
sort of like orange center. And if you want, you can add that. I'm going to see, I may add this gorgeous or
uncentered a couple of them. And for some vigorous, just paint them normally
for our color palette. I'm going to be choosing
this mortgage purple, pink color and not going with the traditional
more violet color. I don't know this, this was just so beautiful and I felt that the scholar would add variety to our seven Day Creative
challenge as well. Alright, this is
another cluster. And as always, you can find all these pictures pinned
on Pinterest board. The link to which
you can find in the project resources section of the Skillshare's
website version. Cool, let's get started. Let me put this aside. Now. I have this mauve
color mixed here. So basically I've taken a permanent rose color and I've mixed a little
bit of blue into it. And this is what
I ended up with. I also took this color
and you may remember this color palette from
our yesterday's lesson. And I went ahead and added it to this ultramarine
blue section. And that gave me sort of
like this nice purple color. I'm gonna be using both. And let's see how it turns out. For this flower, I'm
actually not going to be painting the stems first. I want to paint the
flower heads first. And I'll be using two
brushes simultaneously. So one of them is
gonna be loaded with this mauve color here. And then the other
has this popup. And then I will keep
one brush which has mostly water and
a hint of the small. Okay, I'm going to start
with this lighter value. And let's see. I'm being mindful of the
petal shape that we observed. And I'm adding this darker color right at the bottom
edge of the petal. So two petals come
out like this, sort of like wings
of a butterfly. And then we'll have ten up
petals coming out like so. And another one
coming out like this. Then we'll have our center
battle which overlaps. And for that, I'm
going to be using a little bit of purple color. And with my lighter
valued brush, I'm just going to blend it. So this is my first flavor. Continue painting them. Oops. Be mindful of which brush
holds, which color? Like I just accidentally dipped
my brush into the small. So just be a little
careful when you're using multiple brushes with
different colors of washers. So now I'm gonna again
start working on the petal. And for this one, I'm gonna get really
creative and make it sort of like the one we saw
which was twirling. And I'm gonna do this. Then we can use a
lighter petal color. And then I'm going to
paint smaller petals. I'm gonna leave it at that. Now I'm going to dip this purple one slightly
into the morph. And you'll see in a moment why. Because it's gonna give
this pink at the top. And that is something I want. That'll make this dual
tone back, right? And then again, we will
paint these patterns. And finally we have our
central battle as well, which I'm going to
give a little bit of this violet to distinguish
it from the other two. Let's do this again. Feel free to vary
the shape as well. You do not have to paint exactly like how the reference
picture looks. Unless you wanted to create realistic botanical
version of this flower. In that case, feel free to paint it exactly
like how it looks. But if you're painting it in
a freestyle way like I am, just have to creative liberty canal. That has become a tradition
actually in our lessons.
10. Day 5 : Sweet Violets - II: I'm also gonna be varying the size of farm binded Flowers. So we're going to have
them in all sorts of different sizes and
not just in one size. Now I'm gonna do the larger
petals, lighter value. And I'll do the smaller
petals with the darker value, Creating some which are coming from behind
the other Flowers. So we get to see
just a little bit of the petals and not all
the flower petals, just couple of petals
would be visible. I think at this point, I'm pretty happy with
how it is looking. So I'm gonna stop here
and we'll take it forward with adding stems. And finally, we'll go ahead
and add some details. Let me add a very
tiny one up top. I think it's can
look very pretty. I'm going to leave it at that up painting leaves the stem. So I'm gonna change the brushes. And I'm going to use
sap green color. So you will see it's very peculiar stem shape that you get to
observe at Violets. They have this sort of stem through which the
flower heads come out. I'm just going to mimic that. Just mapping from bare
the stem would be coming out of the flower head
and following further. It's good to have the reference picture
handy so that you know how best to approach the stem. Now I'm going to give them their characteristic large
speed like leaves. They have this beautiful
speed structure to them. And let's see if I can
do justice to that. While taking creative liberty. That is, feel this one went a little too wild. Let's see. This is much better. I'm actually going to add
an overlapping leaf here. I'm trying to make it like
there are multiple leaves. I think this looks much better. So once all the petals are dry, I'm gonna go ahead and create that vein like structure
for this center petals. So for that I'm just flicking
my brush and creating this. And this is going
to truly bring out. Then finally flavor aspect. And that's about it. I'm just going to add one final detail. And that's gonna be
these orange centers just to make them pop even more. And for that, I've
mixed a little bit of white gouache with
my orange Watercolor. And that's gonna give me sort
of like an opaque effect. So it's not gonna be
completely opaque. But it'll show up, especially
on the darker petals. Right? I'm pretty pleased with
how this has turned out. If you want, you can also add some details onto the leaves, but that's totally up to you. You can choose to add
couple of things or you can just let them be as S. So that is all for
our today's flavor. I cannot wait to see you
tomorrow for our day six. And happy creating
11. Day 6 : Cone Flowers - I: Hello and welcome back the day six of our seven Day Creative
Habit Challenge class. So today is really
special because not only is it our
second last day, and I'm so excited and
so happy that you have continually shown up for
each day of this challenge. There's one more left
that is tomorrow. And the flower that
we have baked for today is going Flower, or more specifically,
it is called echinacea. It's hard beiges
flowering plant, which is found mostly in Eastern and Central North America. They symbolize healing. And it is said that
if you leave out the seed heads after
the bloom has wilted, that they attract songbirds
like gold finches. How cool is that, right? Okay, let's have a quick look at the reference pictures will
be using for this flower. Here are some of the pictures
that we will be using. This is how they usually look. Now, couple of things
I want you to visually observe is the
overall structure, especially these Cone
like structures. The specific reason
why they are named as Cone Flowers is
because of these centers. And I also want you to
observe the color variations. And I'll also show you
a couple of varieties which are very new
and interesting. So let's quickly
go through them. So this is the first picture. I observe, a very beautiful, nice stems and gorgeous leaves
and a fixture of petals. Then we have this coloring
and I absolutely love it, the beautiful orange peach. And then beings named near to the centers is just such
a joy to even look at. And this is specifically wanted us to look at
because there's a shows that some of them have
so many more petals than they are other versions which have lesser
number of petals. So if you'd like your Flowers
to be a little fuller, you can go for this kind of
look and just look at this, I mean, this tiny detail. I'm not sure if it is the
Flower which is yet to bloom, or if it is the one, I think it is the
Flower which is yet to bloom this up bugs
of these flowers. Anyway, let me know.
If you happen to know at what stage these are, are these parts
of these flowers, or this is after the wilted, I have a strong feeling. This is how they're buds look. These are some of
the interesting, but it is this almost
looks like a pom, pom and the petals
are coming out. So yeah, you take your pick. All these reference
pictures will be available on our Skillshare
class Pinterest board. The link to which, as always, can be found in the
project resources section of Skillshare's website version. Alright, let's get started
with painting this flavor. Okay, so I have mixed my paints
and I have a green hair, brown, sort of like you can get this brown by just
mixing your green and pink. This is my deep pink, this is my orange, and this is the yellow I have. So let's first start painting the centers with this
very diluted brown. I'm going to take off the excess color
onto my paper down. And let us start mapping
the Kuhn like centers. So it will be great if you have the reference picture that you've baked right next to you. I observed that the centers
have usually two shapes. One was this cone
shape where the top was sort of blunt
and then the other was the cone shape where the dot pad and the other was how actual rounded
bone looks like. I'm gonna create
both the variance and leaving some white
spaces in between. Earning the best color. While it is still wet, just to do some
wet on wet is when Then I'm gonna make a
small, tiny one here. And let's see where
we can add one more. I'm going to add those tiny bubble-like structures
right here. One of them, not gonna
give it that round center. Instead, I'm just
leaving a space for it just by marking that. Just weird and bad. Wilco. Next up is our flower petals. Now you'll remember that I was Rowley smitten by
this gorgeous orange, peach pink petals, which we saw in one of
our reference pictures. So I'm just going to
be Painting that. For that, I'm mixing
little bit of yellow, orange and the pink
that I'm using. And let's start
working on our stem. Again. You want to have
a very light value. And the stems are
pretty straightforward. You just need to take
the tip of your brush, press it down, lift up. Just like our one stroke leaves. It's very similar to that. And what I'm gonna do is
one line, it is the wet. I'm going to add little bit of this thing at the very base. The part that is
near the center. This coloring
actually reminds me a lot of zinnias to they also have this beautiful
the Will Shade coloring and then this
just so beautiful. I'm also varying the value. I'm dipping my brush
into the water puddle and then back into the paint
or onto my paper towel, depending on whether
I want to take out some color or I want
some more color. And making some wispy petals
also, whichever very thin. And of course some
larger ones do. Having those tiny hints of
ink just next to the center. This one, I'm gonna give it
very tiny petals because I wanted to look like
I need Flavel, which has just started blooming and adding this theme. Now I'm gonna go
back with this brown that we mixed with
our green and red. I'm going to add some more
shadows into the center. We're not adding details, but shadows right now. Details at the very last step. Because then most of our most of our
Flowers would be dry. And I'll have a good idea so as to where should I
put which details? Taking off the extra
on-demand paper down. Some shadows. So again, for the center shadows, they will be mostly
clustered towards the base from where the
stems are coming out. So I'm focusing
more on that area.
12. Day 6 : Cone Flowers - II: If you feel that it's
leaving hard edges, it may because the
paint has dried. Then you can always
take, go down, brush and soften the edges. I'm going to reinforce and do a little bit of
that on wet for the shadows with
the darker color right at the center
as it's about to dry. Now I'm gonna go
ahead and pain are. But we were talking about
some mixing this yellow with my green because I
did observe that the buds had this very
beautiful flower, almost fluorescent green
coming out of them as petals. So I'm gonna mimic
that before this. Let's walk on the
center of the bud for a second because that
was relatively darker. So I'm going to take a
lighter value of this brown. And finally it is wet. I'm going to add this green. Looks that's going to do, is it's going to make the
green a little bit more muted. And della, and that's what
we want for our center. Okay. Now that it is wet, I'm going to start leasing are fluorescent bedtools.
Just like that. It didn't have too many petals, so I'm going to be very
sparse without headless. Here I'm mixing my green
with little bit of white goulash and adding
some. I mentioned. Okay, I'm pretty happy with it now and start with the stems. So I hope you remember
or you can refer to our reference pictures
that echinacea have these beautiful slender stem actually now that I think of it, the Flowers, all of, mostly all of the flowers
that I have eight. They have very beautiful
long slender stems. May graceful, I find them. I'm just trying to
map out where to place stems for WIC flavor. Just mapping stem for this one. You will observe that not making my stems very straight or stiff. Instead, I always give
them slight curves. I feel that just makes
it look more natural. Okay. Alright, Now it is time to add the
final details. Now once the flower
petals are dry, you can always go back
and add in some color. If you feel that some areas I'm, have become too lighter
for your liking. Or if you want to give
that layered petals look, then also you can
choose to glaze. So what leasing is, actually, it's a technique in watercolor where once the
first layer is dry, you come with a
different color and then you layer it on top
of the existing color. I shared about glazing
and lifting in my book. Because these are very
useful techniques to know. Especially when you're painting flowers which have lot
of layers to them. So you see how instantly this looks more layered
and more clustered. Without losing this light
and shadow effect the deck, basically that we can
achieve with layering. I'm going to add a little
bit of layering effect, this one as well. I'm gonna give it a
one rogue petal here. Just because I could
see that this area was empty and I wanted the flower to look like
it's just having FUN. Okay, So I'm gonna
leave it at that. And now we can begin
adding our leaves. Syphilis again, we have
to keep it very simple. There isn't much. As you would remember. It had nice slender leaves. So just adding that. Okay, Now for the last step, which is adding the details
to our own Flowers Centers. For that, I'm taking sepia, that is dark brown color. Whatever leftover green I have, I'm going to mix it with that. And using very tiny brush. This is a size zero brush. I'm going to add tiny speckles. Do suggest those
gorgeous, fuzzy. I didn't know what we call them. Following the direction
of the center and adding these tiny details
to our center. Just tapping my brush onto the paper to add this
fuzzy little detail. If I feel that I want a
little bit of shadow, I'm just going to what, some dots and just dab it with my finger to just
soften the edges a bit smooth even for
these tiny details, I'm actually following
the shadows that we had established before when
vivo Painting or centers. Alright, we're done
with our Cone Flowers. And I think it turned
out really nice. I would love to
see your version. And it just makes me so
joyful whenever I see you folks sharing your
progress across our Challenge. And it's just amazing. Be shot to share it in the
Project section on Skillshare. I'd love to have a look, cheer you on, and I'd
make amends to it. Okay. So I'll see you
tomorrow then. Happy Creating
13. Day 7 : Dogwoodrose Flowers: Hello everyone. Congratulations. You have finally made it. Today's seven, and
I am so happy, so proud of you. You definitely need to
celebrate after today's lesson, I hope you'll give
yourself a small treat. It could be a cookie or a specialty that you
brew for yourself. Or you can treat yourself
to some Art supplies if you feel that you'll
be continuing with this challenge, I for one, highly recommend
that you do continue it and make it into a 14
day or 21 day challenge, that, that would be amazing. And I also hope that you're able to finally see the benefits of sticking up with
this activity for seven days in a row and you're
spending quality time with yourself being creative
and not feeling as old as you felt on day one without further ado,
let's get started. So for our day seven, I have baked Dogwoodrose. Another interesting
fact I found about these flavors is they
can self pollinate, meaning they do not
need pollinators and they can create
their own seeds. That is such a
cool thing, right? So let us have a look
at our Flower to understand the shape
and structure better. You will observe
that these flowers have very nice petals. They're almost like hard shapes. And this would allow us
to really be creative because there isn't
a specific shape. From some angles. It does
look like a heart-shaped, but look at this one, it's just a irregular, rounded petals. So this will allow us lot of freedom to paint the
petals as we see fit. I want you to observe
these tiny buds. I think they would make such a cool detail when we
paint these flowers and the leaves are very
similar to how a standard rose
flowers leaves are. And here's one more with pink also observed this tiny stem. Alright, so this is it for
our reference pictures. You can find the
reference pictures on our Pinterest board
for the class. The link of which
you can find in the Skillshare's website version in project resources section. Okay, so let's get started
and paints are Flower. So since this is our last day, I want it to be a
little special. So far we've been painting
flowers which have the slender stem going
on situation, right? But this one, I wanted
us to lightly touch upon the composition aspect
of Painting Flowers. And so we'll be creating a cluster of these
dog would Flowers. Let's start with getting
up paints ready? I'm just going to be diluting some paint to create
lighter pink value. And I'm going to be
loading one brush with this yellow
for the centers. So I'm gonna be first
mapping out the centers. And because it's going to look
like a cluster of flowers, I really want to focus on
different directions in which we'll be painting or
orienting our Flowers Raton, this is going to be one
direction than I want. Nice and up peeking
through the petals. So this is gonna be the
second direction than I want of front centered one. And then again, I would want to have one that's going in
the downward direction. And we can have one more, which can be coming
from behind of this one that can look a little smaller in comparison to this. Once I have mapped my centers, I'm gonna get started
while the colour is where to map out my battles
for these flowers. So this is pretty easy. One, I'm going to be using two strokes to paint this petal. And since it's just gonna
be facing right towards us, there isn't much to be done in terms of the petal orientation. So taking this
lighter pink color, I'm adding the pattern. And while I have done that, I will go ahead and drop
in some darker pink color, taking some extra or
onto my paper towel, I'm going to be adding it
towards the center. Like so. And continuing
with our veterans, this one, I wanted it to
face towards this direction, which means but
we will be barely visible because it is
queued in perspective. But we do get to see
the petals which are behind this center. These petals would also be
a little darker because they are right
behind our center. So I'm just being generous with adding this darker pink color. This one. I said I wanted to come
from behind of this, but pretty much
still the head on orientation is what
I'm going for. So I'm gonna hide some petals or toxin petals behind this flower. And this will be very dark
because it is behind this. And then adding some
darker pink color. I think about reds are types. They're a little tutorials. When they dry, they shift a lot. Meaning when you lay them down and do a little wet on wet, they look much darker. But once they have tried, the become much lighter. So if you see that happening, feel free to add some more
color to your patterns. And finally we have this one. So keeping it very simple. Okay, I'm pretty happy with
how this has turned out, and now we can go
ahead and focus on the leaves, Wildflowers dry. So I'm gonna take
some green and mix it and create a nice paint mix. Add a little bit yellow. And of course, I've added
a little bit of this. Think that we have used
to paint a flower petals. And let's start
painting these leaves. So the leaves are
pretty straightforward. They are to stroke, please. Do bear in mind to
alter the values. I really like how this
is coming together. So if you want to dip your
toes with composing Flowers than my book does have couple of projects where
we compose full bouquet, bunch of different flowers. And I think that
will be very helpful if that's something even
alone or experiment with. I'm going to add dying
stems to our cluster. But since we are going for, as of these flowers
were in a shrub, I'm not gonna be actually
making the stems, but I'm actually trying to insinuate that we are
looking at the shrub, Dogwoodrose shrub from
top or right head-on. So we don't get to
see the stems really. We get to see the
leaves and flowers. Mostly. Let us add
some more leaves here. And Neander, the flavor, I'm just adding delicate leaves. I'm not overwhelming it
with these larger ones. Instead just giving it a tiny little leaves
coming out from behind. Like so to standing a little bit of yellow
to this one because I feel it doesn't have it. It was looking very flat. Kim. This looks pretty good to me. I think we can move
on to our next step, which is adding some
details to our centers. For our center, again, I'm going to be
mixing little bit of brown with a yellow with which
we've been to the center. And we're going to add
some details to it. This is a raw sienna. And with this, I'm gonna
do the same thing. Let's create our statements. I'm just gonna go
a little shorter. I'm not creating very long
stems with this color Okay, This looks good to me. Now the only thing that
is left as just adding some details for our green. So let us take some
darker green color. And I'm just gonna add
some tiny shadows. And a little bit of this
spiky things at the edges. If you don't want harsh edges, you can always dab it
with teen paper towel. And I'm going to add these
details only for some leaves, not all of them. That is all. I have just added a tiny bit
of details for our leaves. You can choose to add
that or not do it. That's totally up to you. I really wanted to do that. So I have added some more
leaves, tiny, delicate ones. So this is it. I hope you enjoyed
this challenge and I hope you learned a lot of tips, tricks and techniques
and you will keep this creative
practice going forward. Thank you so much for joining
me in on this challenge. And many, many congratulations for successfully completing it. Do check out my book if you would like to learn
more about colors, color theory, color mixing, color schemes, and
even compositions. I share. I go so
much in depth on all these topics that
you would love to learn and expand your
toolkit even further. Alright, I'm gonna be sharing different ideas and
what you can do with the paintings
have been creating for the last seven days and how
you can take it forward. So I'll see you in the
next bonus lesson. Till then, happy Creating. And Once again, many, many, many congratulations for
sticking through it. Don't forget to treat yourself. You deserve it by
14. Final Thoughts: Congratulations my dear
creative friends on completing this
transformative journey. I hope you've enjoyed
exploring wildflowers and developing the
Creative Habit which is going to stay with you. I want to express my
heartfelt gratitude to each and every one
of you who chose to be part of this journey because
it's been such an honor to witness your growth and beautiful work that you've
created across the seven days. As we conclude this class, I wanted to give you a couple of strategies which will
help you maintain the momentum and keep your
creative habit sustainable. Firstly, the most important thing I hope by
now you understand that it is essential
to set aside some time to for our creativity. So make sure to carve
out your routine in such a way that there is space for your
creative practice. It could be the
first thing when you wake up or when
you're going to bet, or perhaps during lunchtime because consistency is key here. Next, now that you have completed the seven Day
Creative Challenge, it's time to take it a step forward with a 21 Day
Creative Challenge. And I know it might sound a little challenging
in the beginning, but you can have FUN. You can create your
own prompt list with all the subjects that are of interest to you
and you would like to explore throughout the
duration of the challenge. Next, another effective
strategy is to find an accountability partner or to join a creative community. Because when you have
people or someone with whom you share your
passion for Art and creativity, their support and
encouragement would ensure that you
stick to your Habit. And lastly, remember that
creative blocks and setbacks are a natural part
of the journey and so do not lose heart. Instead, embrace them. If you skip one
day, That's okay. Life happens, right? But makes sure to pick it up the next day and makeup for the day that
you have skipped, continue experimenting
with your techniques and subject as you go forward
with your creative habit. This Creative Habit that we have developed is actually
a lifelong journey. So it's always a great idea to have a small sketchbook handy because you'll find yourself inspired by different things
when you go out and about. And just a quick sketch or a quick little doodle of
anything that you've seen. The sketchbook also
counts as a part of creative practice that
we do for that day. Thank you once again
for joining me and allowing me to be a part
of your beautiful journey. If you liked this class, please do leave me
a review because your thoughts and
inputs helps me improve my father offerings and also
encourages me to create valuable content and classes that will help you in
your creative journey. Furthermore, you can find lots of my other
classes on Skillshare and I promise you
they will help you enhance your artistic skills. And you can also find me on Instagram at the
whim skill creative, and on YouTube as well, where I share small
tutorials, sneak peeks, and behind the scenes of the projects that
I'm working on. Alright, take care. I'll see you in my next class. Happy Creating my dear friends.
 Manushree Mishra, Watercolour Artist