Transcripts
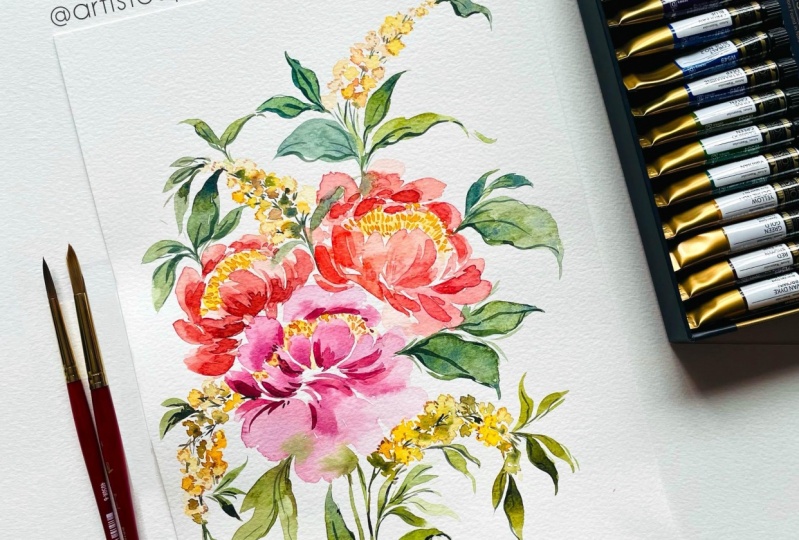
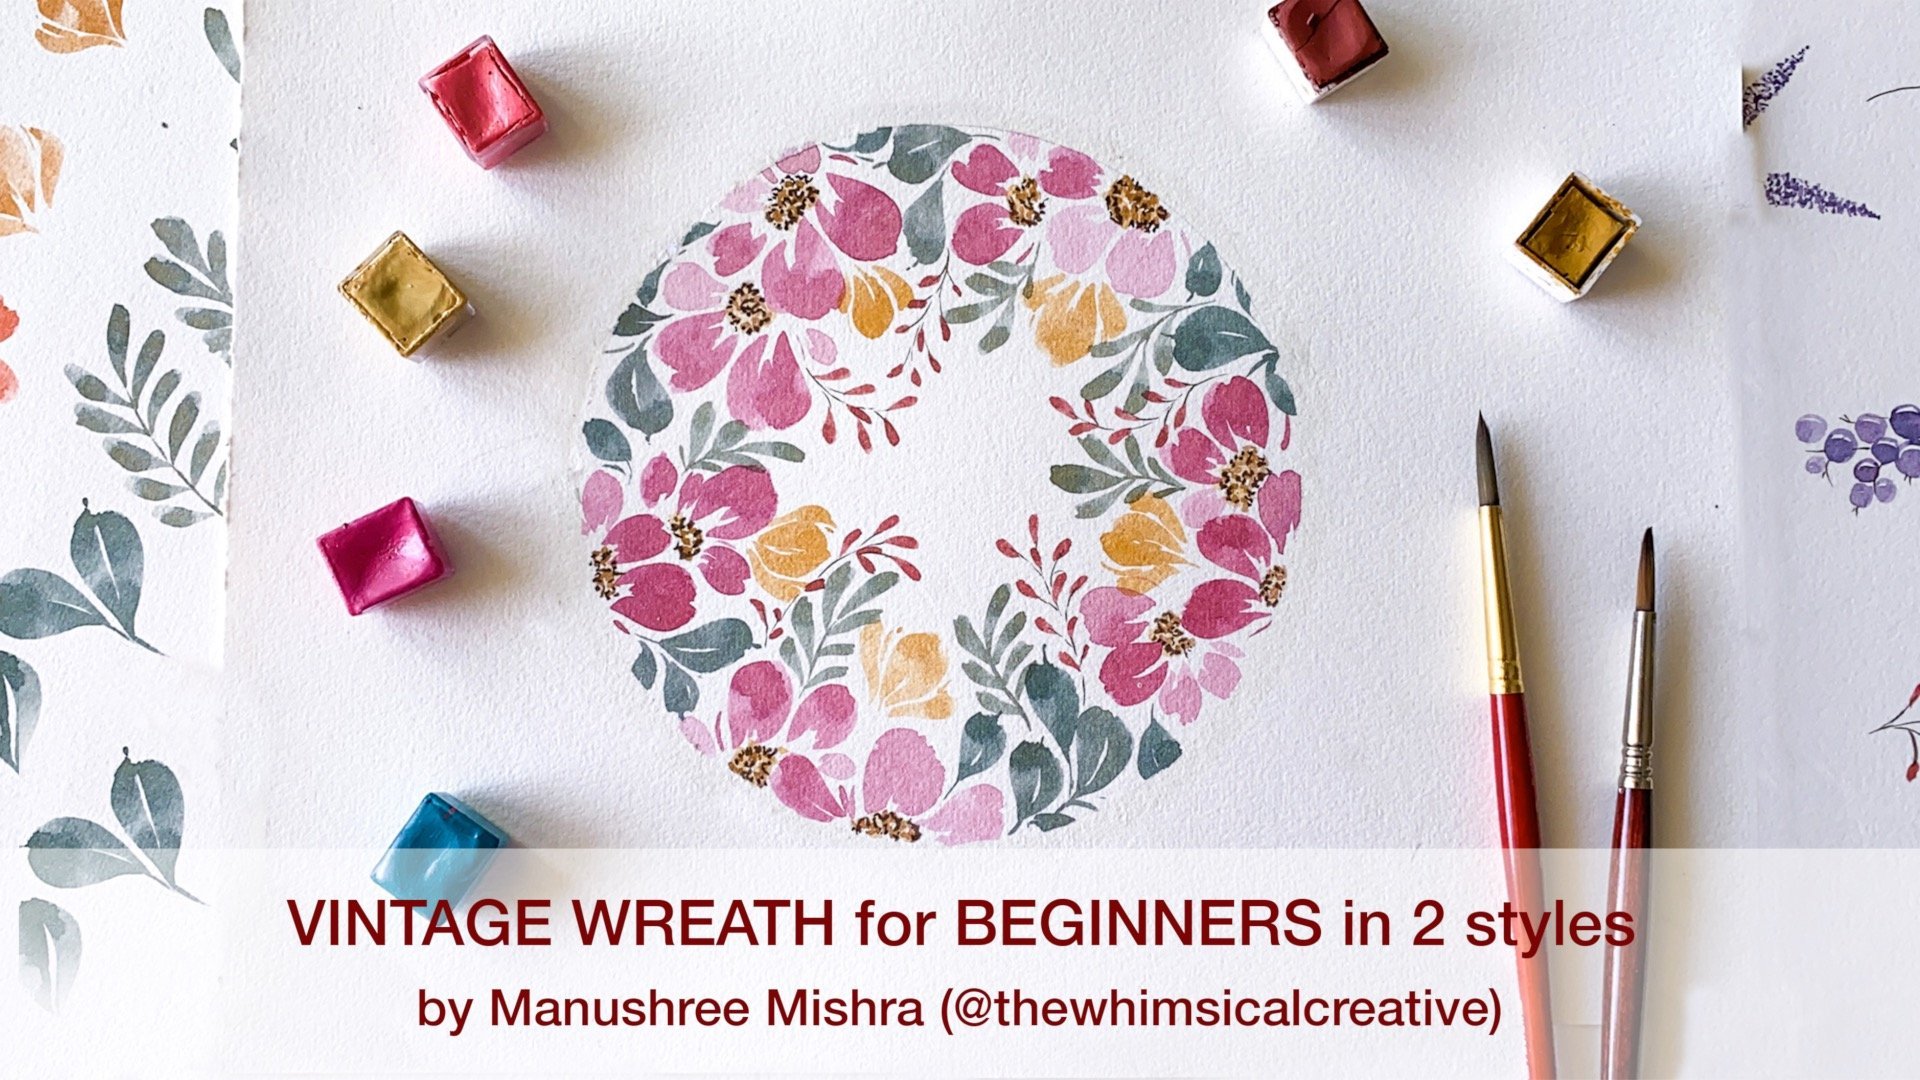
1. Introduction: Hello, I'm monastery, the artist behind the whimsical creative. And I'm so happy that you're here. Welcome to my Skillshare class. Beauties are one of the most gorgeous flowers out there. And it can be an equally daunting task to capture them in loose, carefree watercolor style. But that's exactly what we'll be doing in this class. I'm going to take you through the entire process step-by-step, right, from understanding and capturing the sense of our peony flower, what exactly is it that makes a puny different from any other flower? And then translating that into a loose watercolor style. We'd also have a look at how to create a cohesive color palette. And then there's another bone is flat that we'll be learning to paint. That is mimosa flowers, because I feel the colors and textures of mimesis. Next, two peonies makes for a very beautiful composition, and that's what's going to be our final project. We will be combining all that we learn, different sketching techniques, watercolor techniques, and go leaving. Yes, that's also a bonus part of this glass. I'll be showing you how to play Go leaves in different ways so that it gives different results. One result would be more like three-dimensional, and then another result would be more flattened, subdued. Both results will add so much more interesting in jama to your final art piece. And I can't wait for us to combine it all together in our final composition. So what we'll be going through as we'll be learning the basics here. And it's gonna look something like this. The basic strokes, understanding how to craft the flowers. And then finally taking this forward, combining it together to create something like this, a very unique composition embellished with all sorts of details. So this class is an intermediate level to us. So if you have no prior experience with watercolors, I would encourage you to take my previous classes, specifically the vintage rates glass because in that class we go in depth in understanding paint to water ratios. Lots of drills to warm up and do gather brush control. Lots of basic strokes for flowers and leaves so that you know, it makes you more comfortable with watercolor physio for Stein. However, if this is not your first time with watercolors, then you're all set. Come join me in this class and let's get the funding bodies started.
2. Supplies: Let's have a quick look at all the supplies that we will be needing for today's class. We'll be needing round brushes. I'm going to be using a vet ideal found pressures from size for six to eight. And then you can also use filbert brushes. I'll be using these two. These are optional because we'd be building up unions major league with the round brush. However, if you want to know the kind of different strokes that you can get through these filbert brushes here more than welcome to use them as well. Next up, we will also be needing Benson and an eraser to help us with the sketching bit. Moving on, for our watercolors, we will be using couple of differentiates of things I'm using here. Permanent rose from Winsor and Newton and Alizarin crimson and also be using tiny amounts of Payne's gray for our yellows. You want quite a selection of them? The ones that I have bacteria, Indian yellow, raw sienna, green, gold, and Winsor yellow. All of these are from Winsor and Newton. Now, moving on to our greens, I be using meddling green, green apatite and greenish amber. Couple of CEMA from Daniel Smith and been greenish numbers from Sennelier IB listing all these supplies exactly by brand that I'm using in the project resources section. So make sure to check that out if you would like to know the exact colors that we're using today. Next up, we'll be needing some gold leaf. I have some gold flakes and also full gold leaves. And we'll also need a leafing adhesive and using one from Phoenicia Jelani, you can find it on Instagram. You'll also need a cup or a saucer. Do board the leaving adhesive and take it from a jar of clean water, a paper towel to dab off the excess water column. And finally, the paper I'm using are essentials. 300 GSM, 100 percent cotton watercolor paper. You can use any paper that you have, just make sure that it's at least 300 GSM. And lastly, we'll be also using a guage. I'm using this yellow quash. You can use any colored wash that you want. You can even use a whitewash. And that's it for our supplies. Let's dive straight into the class.
3. Sketching Part I: If you've taken any of my previous Skillshare classes, you would know that we usually start with every subject by lightly sketching out things first. And now the scattering step is completely optional. It's totally something which would differ from artist to artist. I personally like sketching because I feel that gives us dying to really look for the details and peculiarities that makes a subject for what it is. The study would allow us to differentiate what is it that makes a peony appear me and not a tulip or a rose or a mimosa. Now you can totally skip this step. If this is something you don't enjoy doing or you don't think that it's adding any value, feel free to skip that. The first thing that you would want to do is go ahead and look up for some reference pictures of B0. Nice. If you have actual flower available to you, that's even better. You can pick up all of them and laid them on your table and study them. However, if you're like me and you don't have access to the actual flop at the moment, simply go to the Internet. I personally prefer Pinterest and I just go there and peonies and then you end up having lots and lots of results, different colors, textures, and even different direction. Now, carefully just go through them and choose the ones that stand out to you. So I went ahead and did that. And these are some of the peonies that spoke to me. Now, your selection of peonies can differ from mine. And that's, that's absolutely fine too. Because the techniques that we'll be learning in this section, you can apply it to any flower of choice, not just even pure nice, but aiming subject for that matter. Let's pick this 1 first. I really like that. It's towards the sides and it's almost an open puny. And so I'll try to see and capture this. When you are trying to capture a subject and your intent is to translate it into a loose watercolor style. Always tried to be free with your sketching. Don't be too hard on yourself and don't restrict your strokes, just let it flow and loosely, lightly try to capture what you see here in the picture. So the first thing that I would like to map out is the shape of this building. I see that the shape is somewhat like this. So this is loosely me trying to map out the shape of the beauty that I have in front of me. Now, I'm going to start sketching out individual battles. So there are smaller battles that I see here. And I'm just going to loosely sketch them out. I'm also observing that these two are smaller beggars and then I have a larger one here. And then I also see this one is sort of like governing towards the side. And then we have some buttons at the back, self-map data. And then finally we have these petals. Some of them are really 10, and then some of them are really open, like so. And then there are also these ruffled petals at the back. And they're quite small because they're at an angle, they appear to be quite thin. So I'm gonna try to capture that as well. So that's it. That's my very light sketch off this pyrrole. I'm going to mark the statements again likely and loosely. And I see that there is a stem, so I'm going to give it a stem off my choice, I'm not going to follow the reference. And then I see tiny leaves coming out from here. So I'm going to mock them S2. Now the next POME that I'm going to be sketching out is this one. It's a front-facing Paeony. And I'm again, go now go ahead and roughly map out the shape almost like a circle. And I see that there's this cluster of bedrooms, which almost looks like a so-called within my larger shapes. So that's what I'm going to mark here. And then I'll start marking the bed rails. Likely. And as I'm doing that, I am being mindful of the fact that the edges of the puny speckles usually have these ruffled texture to them. But something I would like to capture when I will be interpreting them in loose floral style later with watercolors. Again. Then we have Julie larger petals like this and shapes. All right? And then here we have tiny stamen.
4. Sketching Part II: Okay. Let's move on to another one. I really like discussed. Oh, I'm gonna pick this one now. So how the overall shape looks to me like this. And then I have a couple of petals hiding my stamens. And it's almost opening up entirely and capture that. And the stamens. And then these are larger petals. And then I have smaller petals. Then I have petals behind the second layer. So this was my first layer of petals, which are set on the stamens. Then I have my second layer of petals. And then I also have my third layer of buttons down there. And then finally there's a pecking here that I see. And we can easily observe these leaves which are sort of like this. Now. Just know that of course right now we're observing how debris and the stick puny looks like. But it's not important to stick to realism. You can take creative liberty and interpret the leaves or petals and the way that suits you. So feel free to experiment and do that. Okay? I think there's this one which I really like, dude, it's quite similar to the one we did earlier. But I'm going to go ahead and sketch this one out too. So I have my inner circles like shape. And then I have my ruffled petals that is also divided in different layers. So I have my topmost layer, which is the one immediate to these four nodes. And then I have my second layer. Finally I see told layer sbin. And once again, lots of opportunity to observe the leaves. And I'm observing that leaves are actually of two varieties. The first is something like this. It has three edges to it. And then I also see that there are some leaves are just tough single edge to them. So these are the two kinds of leaves that I have observed so far. I think this is about it. I feel that I am well acquainted with the flapper. So I'm gonna make a note of all the things that I found through the study. Fosters the roughen edges like peonies have. Second is they have these bright yellow stamens. Then I observed three layers of vectors that surrounds the stamen. And that's how the entire flower is actually constructed or built. It's around that, these statements. And then three, usually three to four layers of petals and then leaves. So they're very interesting. I have mapped them out until some of them have three edges, some have forages. And I've also seen coupled with two Hs and the stages of building. So you have a closed feeling that we saw. Then there is half-open peony. And we also had fully open. So these are my observations from this sketching study. I hope that your observations are also along the similar lines. In case you absorb something that I've missed you do let me know in the discussion section, I would love to know. It's always so amazing to actually understand what other people might say that you might have missed observing. Okay, so that's it for our sketching. Now, we'll go ahead and prepare alkyl about it.
5. Creating Colour Palette: Alright, let's dive into preparing our color palette and using a variety of things today. So this is my permanent rose. This is alizarin crimson. This is my rules of ultramarine. This is undersea green. The one here is green apatite. And I have my shadow, violet here, a little bit of Payne's gray and greenish amber. Now, don't worry about the colors. You can find all the exact sheets that I have used today in the project resources section on Skillshare. But just know that it is a feature which is available for the desktop version of Skillshare. So you might have to login to the website in order to check that. No, I want to prepare lot of mixes. So I'm going to prepare lighter values and darker values boat. I have my Bowman intervals here. And I'm going to add a tiny amount green to it. And this undersea green is gonna neutralize it a bit. Now this is a very lighter value because I have used a lot of water and less pigment. Now I'll go ahead and create a darker value of the same mix. So this is my Bowman and tools. It has less water. I'm going to rinse my brush off and pull up some undersea green from here and add it. And this is my Docker value of the same Godot. Let's watch it. This is how it looks. And I'm also going to swatch the lighter value next to it, allowing it to bleed a bit. And that way we know W, we know what light is cheats can we expect to get from this mix? So this is even more lighter. Again, the same color. I'm also going to take little bit of undersea green and swatch it out next to this thing so that we can see the kind of bleeds that these colors would be creating when they'd be mixing. So we'll try to do little bit of wet on wet with our puny so that we can get these mixes. I'm also going to see how the greenish amber would react. Some adding that to your swatches. And then I also have my rows of ultra marine. So let's add that to the mix as well. You can either do it irregularly like this, or you can even do it in parallel lines. What if you find you're most comfortable with? So I'm gonna do one with this as well. And this Alizarin crimson and to read. So I might mix it with a little bit of permanent molars. The color that I get after that is something like this. And let's add green apatite genuine to the mix as well. Members still had some pink and that's why it's donning the green into gorgeous warm brown. But I'm going to inset. And let's see, how would this look next to our ooh, look at that. It's gorgeous. I also want to see how would the green apatite look next to rose ultramarine. So I'm going to swatch this out and then go ahead and let some of those ultramarine and swatch it out. The next to the scholar. Looks gorgeous. I also have a little bit of shadow violet. This, I'll primarily be using MBB, painting the stem of things. You can swatch that out and see how that looks as well. So this is, for the most part, is, I've got a palette. I be using core beliefs for the stamens of the peonies and that is going to be separate. But to mock the statements, we will be using some sort of light yellow color and have a little bit of yellow leftover. You can pick any yellow that you want. You can pick an OCO or raw sienna. Both of them would look concrete. I'm going to be raw sienna. And that's it. These are all the colors that we'll be using for painting today's speaker needs.
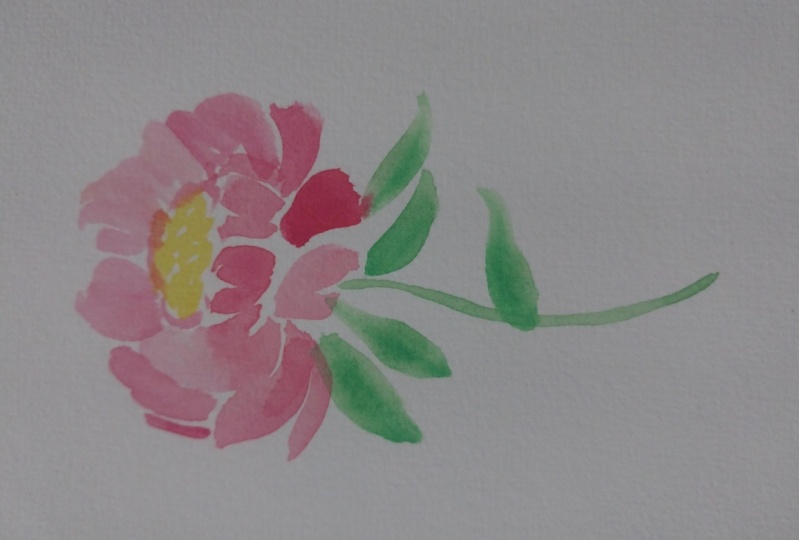
6. Practising Basic Strokes: Let's have a quick look at our strokes. The first stroke that we'll be learning is simple, single button stroke. I'm using my number 6 brush. You can see TEA. And what you essentially want to do is you want to touch the brush ever so lightly, press it down, come up to a point and you're going to repeat the same thing. Okay? So something like this. And rather than just it with one single stroke, because we are painting peonies, we will need multiple strokes. If you remember, when we were sketching our GPIO means we had a shape like this, which was at the center. So I'm going to try and build out with these same strokes and petals. Just very quick strokes. This is my first layer of petals, or the inner layer of petals done. Now this would look very flat because I've used the same value for the color across all the petals. So I'm gonna go ahead and add the darker value just at the very tiny tips of these petals. So you would want to do way to end, these petals are still wet. This is our wet on wet watercolor technique. Additionally, there's one more way you can bring in the value variation without having to act the Scala just at the tips. What you can do it. So say, these are my girls. So I went ahead and did my first three petals with lighter value. I'm going ahead and painting the other petals with a darker value. This is also something you can do. It gives the similar sort of effect in terms of printing value variation. Our next pedal stroke is though back loops, which are just at the base of a building. So let me see. I have my reference below me here. I'm actually referring to this one while I'm creating these petals, I feel that's very helpful. And I encourage you to do the same as well. Ido get actual Paeony if possible, as a reference. Or you could go onto Pinterest or Unsplash pixabay, any royalty-free it two sides and then use this reference and then use the peony pictures as a reference. So next trope that we'll be learning is for these petals, you can see they are very tiny and basically they gave a sense of direction at the base of the structure that we have learned. I'm going to put this aside. And so those, but those are somewhat like this. They have a pin and sort of like become voluminous in the middle. And again they become 10. So something like this. Or I can see one which is like this. And then basically you need to stamp just the sight of your brush to create those petals. Again, if you feel that it looks very dire, meaning it doesn't have any value variation. Well, please feel free to go ahead and add some darker value. So this may be our petals at the base. Okay, next up we have our buttons which are coming from both the sides that is encompassing this initial structure. And how I like to beam is connected, just touch my brush and then vigorous. But so do it again. I'm just create a guide for myself and then Dutch my brush and mostly regolith to create this sort of a protein structure. Once again, because you would want to communicate that this is being overlapped by the petals and front. You want to add this darker color to indicate shadows up autumn of these buttons. And the more you observe, the more you'll be able to create your very own version of these different petals. So feel free to explore these and don't be limited by what I'm sharing here. Make sure explore and find out your own unique way of creating these buttons. And some will be like this. These are basically site, but those just very quick strokes. And adding the darker color. Next is our button. But these are the largest of the entire strokes for the Bedouins we were learning. And how we're going to go about them is, I'm just finishing this one. You want to use belly of your brush for the most part to create these petals. So you're going to start, you're going to press down, press all the way down, drag and come to a curve. You're going to start again at the same point and do the same thing and join these two strokes together to get this big luscious bit too. And you can add in the darker color at the very base, why it's still a bit. So these are all the strokes that create RP means I will go ahead and quickly being one. So these are our basic strokes which we will be using to create up unions. So let me go ahead and create one. Again. I'm still using the very same puny here as my reference. It's there in my side, but I'm going to keep referring back and forth as I feel whenever I need some sort of guidance on where to place my petals are ready to place the shadows and for the overall shape isn't. So if you want a good tip that I can give you is just to make the process a little bit more. You can go ahead and sketch out the basic shape of the battle, basic shape of the POME. So I'm just trying to capture the overall shape of the PV. And in doing so, I'm trying to be very loose. I just want the basic shape and that's it. I'm going to leave it at that. This is enough to guide me and helped me painted out. Okay. So I'm going to start with this initiative. Sought of a semicircle of petals. Just adding these petals like so. And making sure to add these darker values. Vital, everything is spread. You'd want to be a little, who'd want to be a little with this. But on wet technique. Next step, I'm going to add mine based, but let's same thing, just adding this darker value here as well. Now I'm going to go from my site but dose, just to enhance the kind of shape. Some more lighter values for my important battles. Be very mindful of the direction and shape of the petals. So the ones which are immediately down, the fees down. And then once the modern battles, which are towards the side, they're always going like this across the puny. So make sure to capture that. And for this one, I'm actually going to go ahead with a darker value. Then again, we have our lighter petals here. Adding in the dark girl. Okay, this is pretty much done. Most bought, my puny is dry. However, I want to do a couple of leaves before it got completely dry. Now, I'll quickly go ahead with my green color and until I do add leaves, I can see that it's almost drying, so I'd have to hurry up a bit and create some leaves. So I'm gonna go ahead and create our three words cave, as we saw when we were kind of sketching out. And another duet, slave. And I think I'm going to create a single one inch leaf. I'm terribly some leaf here. So like this. Now this is it for my POME, for most BAD. Now I'm going to go ahead with the yellow Kano and create the base for my gold foiling. So what I'm gonna do is I'm going to just add the pseudorandom yellow drops, rinse my brush with clean water. And then I'm going to buff out the edges. Sort of creating this very light wash of yellow color by concentrating most fit close to the bitters and then buffing it out ever so slightly. So this is done. I'm going to wait for it to dry before I come back to it. But song called filing details.
7. Gold Leaf Application Technique: So in this lesson, we'll learn how to apply go leaves in obeyed, that renders a three-dimensional effect in the end. So my, so one of my secrets is using Warsh. So for these statements, I have actually used quash straight from the tube. I have not used any water. And since course, is thicker than water color, it already has some texture to it, which is going to show up when we paint with it. So I will quickly show you. I'm using a size number one brush and there and what trends the brush. And I'm just gonna go ahead, take my brush straight into the tube of the course and pick out some things. And directly from this, I'm going to create some statements. Alright? So how I'm going to go create that is Dutch press lift, or almost like a flip is what we're doing here. So you can see how much squash I have on my brush. It's plenty. Okay. And you want to have that much thicker consistency of course, because that's what's going to help us build that three-dimensional look of the gold leaf. Along with the leafing adhesive, which we'll see in a moment. So this is exactly how I have been, did these stamens of this particular puny. And right now it's completely dry. I can touch it and I know that it's completely dry. So only when the layer of washes dry should you go forward with the leafing or deserve. So I'm using this leafing adhesive from money shot you Lani, my goal leaves that are also from how IVB listing all the supplies on the project resources. So make sure to check that out. You may have to use the web version of Skillshare to access that. And you can find her, she's an artist and I found her on Instagram. And I can attest that WHO leafing adhesive and more leads are really great. And you can definitely try them out if you are looking forward to experiment with gold leaves. Okay, so before we go forward, you want to use an old brush which you don't mind winning. So I'm using just a local brush, which is a size 0 brush. And now I'll go ahead with the leafing adhesive. I'm just going to give it a nice shape. And I'm going to start adding this. Do these statements. And the way we're applying it is you want to be surely generous but this adhesive. Because again, the idea is to have a three-dimensional sort of leafing, gold leafing effect. And for that, you want there to be some dimension. And how we are going to build that as through quash and through this layer of adhesive chondrite. So I'm just adding this adhesive. Okay. Now we'll have to wait until it's dry. And how would you know that it's completely dry and ready for lethal? You'll be able to see Xin across, but it will not be wet to Dutch, meaning if you'll try to touch it, it'll be slightly sticky, but it will not be wet. That's when you know that it's ready for us to blind gold leaves on it. Since this set of statements is also dry, I'm going to add the finger. These have two, this one as well. And I think this will also be a great example to show. All right, So we're pretty much done with it. Now, if you wanted a more sort of like a flat look for your gold leafing, then skip the dwarf step. You can use watercolor and being doubt your statement. Or if you're confident, you can go ahead with simply the leafing adhesive and painted the statements. That way you'll get much more flatter sort of gold leafing effect in comparison to the one that we are doing today, which is going to be more three-dimensional. I'm gonna keep this a D suicide. And here I have some leftover Goldie flakes. This is what today, to demonstrate how to apply whole leaf. Now before we begin our gold leafing process, I'm going to take some cornstarch and rub it on my fingertips and bombs. This just helps in making sure that the gold leaf doesn't stick to our hands. So again, this is optional, but just a little trick which helps a lot when dealing with gold leaf. So I can see that my leafing adhesive is try it sticky to Dutch, but it's not better at all. So now I will quickly go ahead and take some Gore flakes that I have left from my previous school leaving projects. And I'll slowly start adding them carefully. I've replace it on top of these statements. Make sure that it lays flat and use enough gold leaf. Don't try to be stingy with it. I'm going to use one here. And if you want, you can slightly tap it with your finger. If you've used cornstarch, you will observe that the gold leaf would not stick to your fingers as much. And that's great. You can use your fingers. And I'm going to keep this aside. Well, and now we'll let the goal leads B for about a minute or so till it gets completely attached to the adhesive. And then we'll come back with the fluffy brush and would remove the extras. So here's the burst that I'll be using to remove the core leaf. And before I do that, I'm going to gently tap it across bear, I had applied adhesive just to encourage it to stick well. And then I can go ahead with circular motion and start removing the excess gold leaf. Whatever excess that you have, you can save it for your future projects. So make sure not to waste that and keep it safely in our container. You can see that it looks surely gorgeous, except this one batch here. Actually, I got impatient and I removed it before it had dying. Do dry completely. So make sure not to do the same mistake as me. And otherwise, it looks really great. You can see, I hope you can see that it has lots of dimension to it and it's not flat. And that's times two. The first layer of goulash. And then using the leasing adhesive generalists. That's what contributed to this sort of a look. So that's it. If you wanted to let it be like this, you can do that. Otherwise, if you want to seal it, you can use more Bosch and just with the tiny brush, you can apply it over the gold leaf. And that's going to see that and keep it protected and it will not transfer or move at all after it. So that's it for our leafing lesson. Now let's get started with our final project.
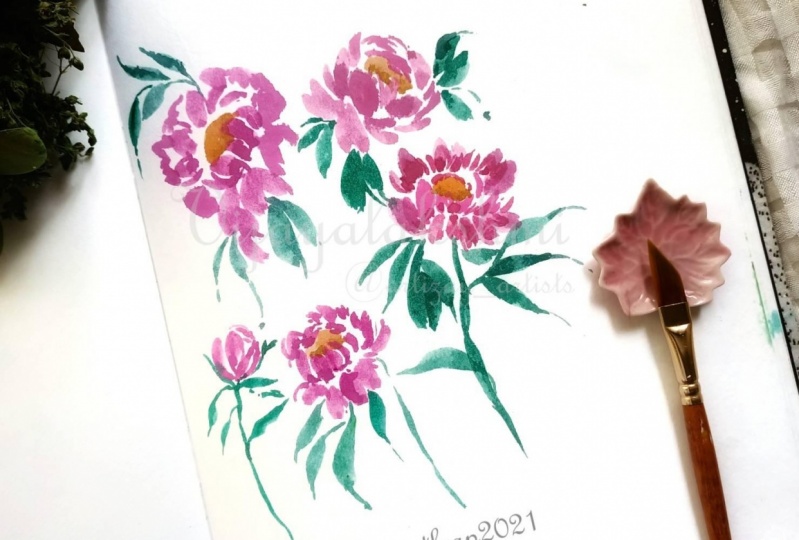
8. Painting Peonies Part I: I'm going to be using to kind of crushers minus this small filbert brush. And then the other is around brush. You can use whichever brush you want and feel most comfortable with. So we'll start with a light wash of color. And I'm just going to create these tiny petals strokes. And while I'm doing that, I have my reference picture right in front of me so that I can easily look at it and understand how the petals are forming. Bear on the coiling. And do I have to emphasize shadows and all of those details. So it's always good to have your reference images next to you when you're painting. Something up alternate between this filbert and the round brush simply because of the kind of strokes I get with both. So I'm going to try and maximize what each sort of brush has to offer. I'm just following the pencil sketch guide that I had created. And accordingly, I'm adding my shadows. That is the darker areas up behind, so I'm going to make them darker. And I know that this lease buttons are devotes the downward direction. So again, I'm going to have to make them darker as well. So i'm I'm making sure to rinse my brush in clear water to get these lighter values. As you might remember, we spoke about when you're sketching that this is circular shape in the center, which is at the core of this flower. I'm going to add tiny lines to enhance that a bit. Okay, Some pretty much done with my puny in case I wanna go ahead and drop in some darker color. I'm going to do that. But for most part we are done with it and just adding in some color in the areas which are still red. To intensify my darker values. And I'm going to go ahead with my large round brush and using a number 10. And while everything is still wet, I'm going to take a mixture of greens. So I'm mixing green apatite and undersea green. And I'm going to paint the leaves, try to see if you can bend them while everything's wet. For me, it's pretty much drying more sleep. So I wouldn't be able to capitalize on that. But I think here, here's one that I can actually take advantage of the fact that it's non try it and give it a nice thin stem. And remember the tree edge to leave that we sketched. And that's what I'm going to add here. Okay, so we're done with our first puny. Now I'm going to do a small loping only here. For that. I'm just going to use my finagle it. I'm mixing Alizarin crimson withdrawals, a photo moving. This is going to be a really darker valued mixture. And then I'm going to rinse my brush and come back with the lighter value and then allow it to bleed. But let's do the lighter valued Perkins to touch a darker value tones. I'm going ahead with the same mix, but this time I'm adding more of ultramarine and less of Bowman Alizarin crimson. And I'm going to create the petals on the top. Gonna rinse my brush and come back with lighter values. We just sort of envelope being the center of structure. I'll take some darker value. And I'm going to drop it in these petals out of it. And that's it. I'm done with my tiny P on E2. And this one has just a very simple leaf that I'm giving it. And a couple of smaller ones here. And maybe I can give some leaves here. I'm not trying to create perfect leaf. Instead I'm trying to stay loose and
9. Painting Peonies Part II: Okay, that's not being slightly upturned, open peony, which is this one right here. Just mocking the betting switch and can strokes. Adding the darker and continuing to mock the strokes. This is better Center will come. So I'm going to leave that space, is mocking these larger petals, which kinda like job. From the edge. You can also take the brush and soap it across to create these strokes. And just add the edges of all these petals. I'm adding this darker value to signify that there are these shadows. And that these petals are kind of layered behind this area. And then I'm going to take some undersea green add in these single edged leaves. You'll notice that I'm varying the leaves a lot. I'm trying to capture all the kinds of leaves that we studied by sketching this building. So the tree edge li for its leaves, singlets, leaves, and all of that. And finally we have one more dining. Good. This one I'm painting a little differently. Instead of adding our darker value just towards the edge of the petals, I'm actually going to add them in between the vegetables like so. And then there are some petals like this. So I'm just looking at my reference to know where exactly to place the shadows or the darker bits on the petals. And then this one is like a little that has a little stubby branch. So I'm sorry, I just made it too large. And then it has a tiny better be going through like this. And then it's delivered its side. So this is how it's stem looks like in tiny leads coming through. Lastly, we have this BMI size of the petals in the bud. And the bottom bit of the bud would always be very dark. I'm going to try to introduce the green. And that's it. Now the final thing is we will be marking out the stamens, which I'm going to use gold leaf. I'm also, I'm also going to give that entire section right here a light wash of the color. So sort of like a semicircle. What I'm going for. And I'll go ahead and buff out or soften out the edge a bit. So I know this is where the stamens would come again. And this is actually raw sienna. And after you do that with a lot of work done to create this mix, and I'm just going to buff it out a bit. And this point, I'm just creating this first layer, concentrating most of the yellow color towards the bottom. So just when it starts drying, I add darker value of the same color. And I'm going to let it dry.
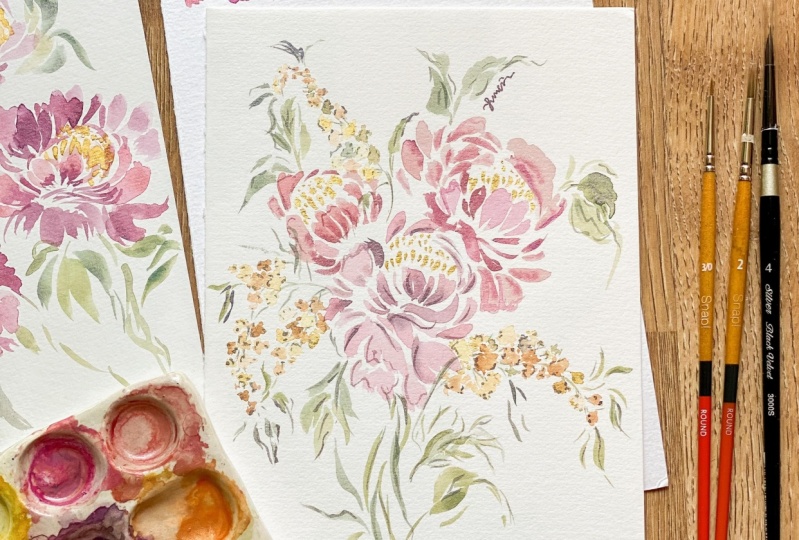
10. Final Project Part I : So let's begin our final project. And for our final project, what I've done is I have a composition in please. Basically there are three different Bu means that I have sketched out. You can see one is this here. And then I have fun with just facing in this direction, like so it's the largest one. And then a mid-sized puny which is facing in this direction. Apart from that, I also have my mimosa flowers. So there's a branch coming out from here. There's a small mimosa branch coming out from here. And then finally, I have one branch here. Now I have loosely defined leaves as well. However, I'm going to add them as I move along. So the sketches simply do so as a guide for me when I'm placing my watercolors. But I'm still gonna take creative liberties and just move with the flow. Alright? So the first thing that I'm doing is I'm actually taking a very light wash of my pink mixture, which is a mix of a couple of things. I have. Bowman and downstream crimson, rules of virtual machine, fake violet and a little bit of permanent rose. So you just want to really be light pink color. I have loaded brush with dad. And then I'm also going to load one brush of mine with more intense mix of the same colors. I'll start with this middle puny first. So just painting the initial layer of petals and forming this sort of half cup like shape. And then adding this darker color towards the bottom or creating some petals with this color as well. That also works. Now this part is done. Now I'm going to add the base petals, which are almost horizontal at this point. So I'm adding that as well. And again, adding little bit of this dark color to signify that there are shadows. Now I'm moving to the site, precludes make sure that there's enough water and you don't want the colors to dry before you have a chance to add some. Rectangular details. And finally, I'm feeding the bottom petals, Barton most petals. And I'm choosing to add some dark, deep, dense as I go along. And that's it. Now, while this is still wet, I will try to add some greens next to it. So I'm going to create the stem. This tree. I'm doing that. I'll try to also bringing some color variation. So mixing a little bit of beings crave to my green to make it more dark and sort of like a nice Smokey green color. And I'm going to add it. So even though these petals of my opinions I've tried I've tried to start with my memo sub-branch. And for that, just remember that we are using to perform brush and creating these small yellow flowers in different shapes and sizes. You would also want to use variation and values. So now I'm going in for a very light value. And whenever you use a lighter value, it's always a good idea to use a darker value next to it, and that will print out more contrast. Same for the color variation. And as we move towards the top of the MIMO sub-branch, the flowers, but continuing becoming smaller. And buy these Plaza wet. Sometimes you can go ahead and add in some blobs of a different temperature. Like for example, this was a cool yellow flower. And then I went ahead and added a warm yellow to this tiny one here. And while it's wet, once again, he would want to add in the greens. So just going to add a tiny green leaf like this. And it's always helpful if you have your reference picture on front. That way you can reference it.
11. Final Project Part II: And I'm also going to add some shiny brown branches that you can see next to each tiny flower. Just adding that and spend. And I can see the leaves are sort of like there's a center leaf and then the leaves come around to that center one. And that's what I'm trying to capture here. So starting couple of more docker valued levels to bring in some more contrast. And it's important not to overdo it. Just be a little bit careful and all of these details little at a time. Rather than going overboard and then not being able to salvage it. I'm going to stop it here. I'm happy with this one. There are a couple of leaves that I had marked out here, so I'm going to add that as bone. These are very thin leaves just dotting this. Alright, so now I'm going to wait for this to dry completely before we come back and add some more details. Next step, since we are doing memo says, I'm thinking I'll finish this branches spin and then move on to the next peonies. So just make sure that this Bogost dry before you base your hand. Otherwise, you end up smudging. That has happened to me quite a few times. So try to be a bit more careful now. No brown that I am using, that the brownish yellow like this. That is actually shadow. Why MIT and I'm mixing it with them already. The yellows which are present on my palette. And that way I'm not create something which doesn't look that it belongs to this ballot. And it sort of creates some more harmonious looking. Hello. It'll be difficult to create smaller flowers. So make sure that your waters, when you're trying to create smaller mimosa flowers, creating a lighter. How sometimes you can also choose colors from an existing flavor, rather than going out and coming with a new color. Once again, speak towards the tip of a branch. I'm playing with dark brown color, tiny branches. Some of the plaza. So I'm done with these still. I'm going to move on to one more MIMO sub-branch which is left. And then finally we would complete lighter value.
12. Final Project Part III: So I'm using and that's one modulus which is called Bush. Yellow. Tiny bit of the yellow stuff you've seen. And some of them are wet. I'm going to add a different value of yellow to them, more than value, it's like a different colored yellow. So see you if it's a warmer yellow, I'm going to add a cooler yellow. And that's going to make it more interesting. Right? Now it's time to add the greens. Hi, hi. Now I'll go ahead and start with this puny. Add some more light on Romney had them ourselves. Since Tiran there a little bit. And then just adding in the ground to connect them. I'm happy with this fun. Now let's go ahead and work on this journey for this puny, I'm going to mix that we already had with some of the yellow from this memo says to create a beach column. So I'm using a little bit of lemon yellow. And I'm going to see the kind of color if courtroom going to add some more pink do it. And I'm thinking I'm happy with this one. And then also create darker valued version of the speech galore. Just to add in contrast. Under some loading up my brush with this peach color. My smaller brush with the darker peach color. And let's paint our beach beyond me. So again, I'm using quick strokes for our first layers of petals, adding in this darker peach color in between. And I have a very large petal, tiny bit of color down. And that's pretty much done for my peony. I'm going to be acids because we're going to fill these yellow statements right now while it's wet and quickly add some leaves. So this is going to be. The single leaf right here. Now finally, we are left with an artist. I'm again going to use a combination of the speech color. Using both the lighter value and darker value. To get these buttons. You can also choose to tiny amounts of yellow to the speech if you wanted to. Have a larger effect, size better. Again, I'm going to give it a darker color to define these. And then we have another site that Lou and dope beckons like. So I feel like in a couple more petals here and make the center about a bit more narrow. It's not happy with tongue large. It looked so just spend to hit an added some more petals like this. And I'm going to go ahead and start adding the leaves while it's on. Keeps dropping in some of the shadow I lived. I can see one more stem here, sums or start that do. And I'm gonna wait for all of us to try before we move on and add our final details to the mimosa flowers. And the stamens do a puny things, which would be followed by using green leaves and applying it on the centers of the pyramids.
13. Final Project Part IV: So I went ahead and added all the details to our composition like these small fuzzy details, some details and contrast in the leaves. And I also being did the stamens with squash and then went ahead over them with some, with the leafing adhesive. And now the leaving a disservice almost dry because I can see that it's shiny, but it's not wet at all. And it's slightly sticky to Dutch. So now's the perfect dying to a glycol leaves. Before we do that, make sure to take some cornstarch and drop it on your hands and most importantly, on your fingertips that is going to prevent the gold leaf from sticking onto your fingers. And for most part, try to use the rice People with which the gold leaf gums, but sometimes you may need to just put it in place a bit. And if you have cornstarch on your hands and fingers, then that helps a lot with the gold leaf not getting stuck, do you? Alright. So what I'm gonna do is I'm going to gently take my gold leaf and ever so lightly. And we'll go now. Batted. If you feel that there are some areas which are still left, that, that's fine. You can always add more color leaf. So I have some bits and pieces of gold leaf here that I'm using. And don't be frugal with cool leaf, just make sure that you're using more than enough. And with the same paper, I'm going to go ahead and just gently press down a little bit. And now we're going to read for our cool leaf to adhere to our leafing at these. You can also go ahead and just ever so gently use your fingers, but only do this if you have used cornstarch. Otherwise, it will get stuck to your fingers. And B all over the place. It'll be like a mess. So you don't want that. I'll also add tiny amounts of corn leaf to this memo says Send just randomly adding some adhesive. For this majorly, I'm going to use the leftover coli from here because I have lot of cool leaf lakes and I wouldn't want them to go to waste and soil use that for the memo says, just to add a little bit of blink to them and spin. You can also choose to add some gold leaf to the leaves. If that's something that you wanna do, You can do that by all means. After you've left the cool leaf for some time, you can take a fluffy brush like this, and you can slowly start scraping the gold leaf off. And you'll be left with these flakes. So you can go ahead in I'm going ahead and applying some of these to the minimal surface. So some of the flakes you can just pick. I'm just going ahead and applying them, do minimal sets to DAD. Stuff that I had used was getting stuck and it is messy. Let me be honest with you. Called leafing is quite messy. So you need to have the patients. I'm using the same brush to brush couple of areas after applying it so that it has to do. And they're going to use this right here. So you'll notice that wherever there is a deserve, our gold leaf would stick to it. I think these were the only areas where I have put the adhesive. So we're pretty good. Now, I'll start removing it. So for our puny, I'm just going ahead with the Quick john motion of my brush. And everything that is not stuck is getting removed. It's very important that you use a brush which is quite fluffy. And once you have removed everything, don't try to go over that area again. Otherwise, you may lift up the gold leaf on the statements, which is something we don't want. All right, So we have removed it from our peonies and it's looking gorgeous. I'm just loving how beautiful it looks. And now I'm going to ahead and removing it from these mimosa flowers. It was majorly scattered. Okay, I think we're pretty much done. And get the leftover flicks, don't throw them. You can keep them and use these flakes in your next goal leaving projects, so make sure not to throw them away. Another thing I want you to consider is whenever you are using gold leaf, you have to ensure that there are no fans or wind blowing nearby. Otherwise, it will be mess. You'll have coli flying everywhere. So make sure that your doors and windows are closed, your fans are closed and there is no wind around. Those spread the gold leaf everywhere. Okay. So now I'm pretty much done with collecting the leftover flakes. I'm going to keep it aside. So I've removed the gold leaf, and this is how the final piece looks like. It's absolutely gorgeous. It looks absolutely gorgeous with the gold leaf details shining at different angles. And I really hope you had lots of fun learning the mimosa flowers and lots of watercolor techniques, also, gold leafing techniques. I look forward to seeing you in my other classes. Also make sure to upload your gorgeous project in the project resources section here on Skillshare. Alternatively, if you choose to create something from this class, you can tag me on Instagram at the whimsical creative, I always love to see all the beauty that you guys create and would love to share it with others as well. So that's it for today's class. I will see you in my next class. Until then. Happy creating buh-bye.
14. Final Thoughts: I hope you had fun with this class and definitely would have picked up a couple of tips, tricks and techniques that I'm sure you can apply in your own unique way in your beautiful artworks. I would love to have a look at what ever you create from this class. So your class project could be maybe simple brushstroke exercise that we did, or a branch of mimosa or ability. Or if you want to take it forward, you could even create your own composition and full-stack in our project resources section. Just to note, that project resources section is available at the desktop version of Skillshare. Make sure to access that when you are trying to upload your projects or if you want to know exactly what supplies we have used, that is also listed down in the project resources section. Should you choose to post your article consortium media, be sure to tag me at the whimsical creative. I would love to have a look and share it with others. If you enjoyed this class, please do leave me a review. It helps me a lot. I have so many more classes on Skillshare. Make sure to check them out or would like to see more content for me. Makes sure to follow me when YouTube, I routinely share short, easy tutorials there as well as on Instagram. And I hope to see you in my next class soon. Till then, happy creating. Okay.
 Manushree Mishra, Watercolour Artist