Transcripts
1. Intro: Blender can feel a bit overwhelming when you're
just starting out, not because it's complicated, but because a few core concepts
aren't explained clearly. Most beginners jump
straight into tutorials, but without understanding
how Blender thinks, things like modifiers,
transforms, modes start to feel random. In this class, I'll
walk you through seven core Blender concepts
that every beginner must understand to start
using the software more confidently and avoid common
pitfalls and frustrations. Cover how navigation works, what objects and
data really are, how and when to
apply transforms, how modifiers differ from tools, and how blenders different
modes fit together. Now, this class is designed
for complete beginners, but if you've been playing
around with Blender for some time now and are still learning a few
things here and there, you're going to be able to fill the gaps and finally understand how some of the tools
you've been playing around with actually
work under the hood. The end of this class, you will put everything you
will have learned into practice by
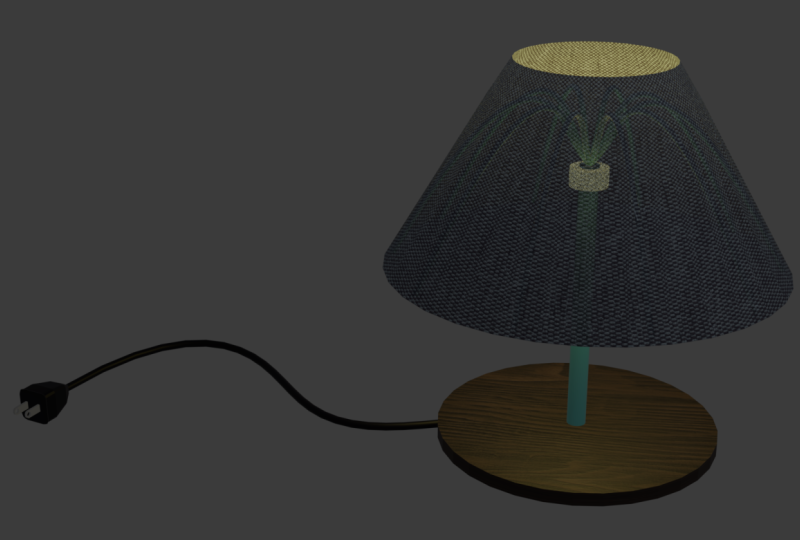
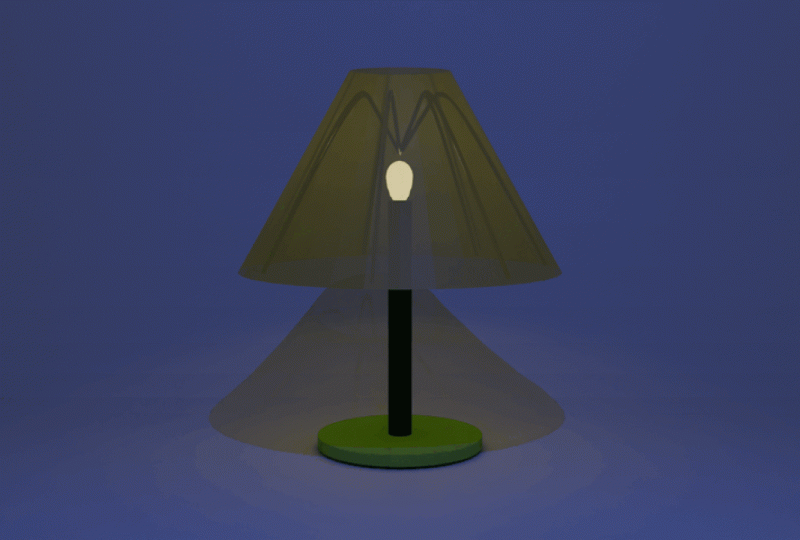
modeling a three D lamp, a desk lamp, not to make art but to reinforce the
theory in a practical way. So if you're ready
to stop guessing and get serious and start
understanding Blender, let's go. Let's get started.
2. 3D Navigation: Now, before we talk about
anything else in Blender, we need to talk about how you
move through three D space, because if you can't
navigate confidently, everything else feels
harder than it needs to be. This area here is called
the three D viewport. Think of it as your window
into the virtual scene. You're not moving the world. You're moving your point
of view in the world. In other words, you are
moving through the world. There are three basic
navigation actions you'll use constantly. The first one is orbiting, rotating around your scene. Just press the middle
mouse button and drag. We also have panning. This is simply if you want
to slide the view left, right, up or down. You can hold down Shift and the middle mouse button
and start dragging. Then the third navigation
action is zooming. You can move closer
or farther away from objects. And that's easy. You simply just scroll or control middle mouse button
for precise zooming. If these feel awkward at
first, that's normal. Give it 10 minutes,
play around with it, and your hands will start
adapting faster than you think. Now, one of the most important
navigation shortcuts in Blender is frame selected. And to do that, you
can select the object, then press the num pad period. Blender instantly centers and
zooms the view around it. So when you're lost in space, you don't know where you
are in the three D scene, select something in the
outliner and press period. Blender will teleport
you back to that object. If your three D
scene has a camera, you can quickly switch to the camera view by
pressing the Numpad zero. This shows you exactly
what the camera sees. And if you're on a
laptop without a numpad, you can go to view
cameras active camera. The three D viewport
isn't limited to just one way of
seeing objects. Blender lets you switch between different viewport
shading modes. The first one is the wire frame. This shows you the
raw structure, that is the vertices and edges
that make up the object. Then we have solid mode, which just shows you
the object with a focus on form and shape without
visual distractions. Thirdly, we have
material preview, which simply previews materials and lighting quickly
without a full render. I like using it to quickly apply materials and resize them because it's very fast compared to the fourth mode
we're looking at, which is the rendered mode. And this is the
mode that shows you the scene as it will appear
in the final render. This will show you what
the render engine that you're going to use to
render your scene sees. And so it's a heavy
mode to be in. Everything slows
down because you have heavy materials
and lighting, and Blender has to
calculate all that. So that's why I sometimes switch back to
material preview mode. To be able to re size and scale my materials
when I apply them, just to make sure
there correct size, and then switch back to rendered mode once I
have the correct scales. If you try to do that
in rendered mode, Blender might crash or restart. You can switch between
these modes instantly by pressing Z and choosing from the pie menu that
appears or by clicking the shading icons in the
top right of the viewport. Once navigation clicks, Blender stops feeling
overwhelming. You're no longer
fighting the interface. You're exploring a
beautiful space, and everything we cover
next builds on this.
3. Objects vs Data: Let's talk about
objects versus data. In Blender,
everything you see in the three D viewport
is an object. But every object is really just a container that
points to a block of data. The data could be a mesh, a curve, a camera, or a light. And understanding
this relationship is a huge step forward. Let's take this sphere. This is an object called sphere. If I want a completely
independent copy of it, I press Shift D. Now
I have two objects, and each one points to its own mesh data,
underlying data. That's why I can scale, edit, or modify one without
affecting the other. But here's the catch. When you duplicate objects this way, you're duplicating everything, the object and the
underlying mesh data. And I want to illustrate
this with an example. So looking at our sphere here, if I shift D and shift D again, as you can see, if I
expand the sphere object, it's pointing to this
specific data block. Now, if I click this
data block icon, this will change immediately to object data properties
because it's giving us the options to edit or manage the underlying data
of this object, which is this data block. If I expand this,
this sphere one is pointing to a data
block called sphere one, and sphere two is pointing to a data block called sphere two. That's why if I
switch to Edit Mode and switch to face
mode and extrude this pace nothing happens to these others because
I'm only editing the underlying data
of this object, which is this data. If you do this dozens
or hundreds of times, it can become very
taxing on your machine, and this introduces us to a very important concept in
Blender called instancing. If I instead press out D, I get a linked duplicate, which is also
called an instance. Now, if we look at
the sphere object, it's pointing to a
sphere data block. If we expand spear one, it's also pointing to the
same underlying data block. So is sphere two. That means I edit, if I go to Edit Mode
and extrude this pace, the other objects will also
have that face extruded because they are sharing the
same underlying data block. This is incredibly powerful. It saves your PC's memory. Your scene stays fast
because you're not trying to read from
multiple data sources, and you can manage complex
scenes much more efficiently. You can still move, rotate, and scale each instant
independently, but the underlying
geometry is shared.
4. Applying Transforms: Let's talk about
applying transforms. In Blender, we can move, rotate, and scale an object. When you do this, we say you're
transforming the object. But there's a really
important difference between changing a transform
and applying it. Here's the simplest
way to think about it. When you scale an object, you need to tell Blender this new size is the new
real size of this object. This should be the reference
size of this object. Every new action from
now on should be based on this new scale
of this object. If you don't do
that, Blender still thinks the object is
its original size, even though it looks
bigger on screen, and that's what causes those
weird beginner problems you keep bumping into.
So let me show you. Let's add a cube. Scale it up in Object Mode, X, and let's say there. Now, go into Edit Mode. Switch to edge select and
let's select this edge, Control B to apply a bevel. Now, if you look at this
bevel, it looks weird. That's because Blender
is calculating the bevel based on the original
smaller cube we had. It doesn't know we scaled it up. Now, watch this. Let's
go back to Object Mode. While the cube is
still selected, let's press Control
A and apply scale. Let's go back into Edit Mode. Now let's do a bevel again. And Va. Here we go. Now the bevel works
exactly as expected. Same bevel settings,
completely different results. Nothing changed visually
about the cube. The only difference
is that now Blender agrees on what the
size of the object is. So why does this matter? Well, bevels, modifiers
and Edit tools, physics, UVs, and shading all behave more predictably when you
apply your transforms.
5. Modifiers: Now, we've already
established that everything you add to a Blender
scene is an object, and that the object
itself is really just a container pointing
to a block of data. That data block holds all
the information about how the object looks and
behaves in the three D scene. Blender reads that data
to know what to draw, how to shade it, and how it
should react to changes. Modifiers are how we manipulate that underlying data without
permanently changing it. Instead of directly editing
the mesh, we tell Blender, take this data, run it
through these rules, and show me the result. And that's what makes
modifiers parametric. You can tweak values and
change your mind later or even remove them entirely
without destroying your models. And once you're
satisfied with how the modifiers are
affecting your objects, you can apply them
to commit them. Let's quickly look at a few of the most common modifiers
you'll use all the time. The subdivision surface. This modifier simply
smooths out your mesh and gives you full control
using the levels slider. The mirror modifier
is perfect for symmetrical modeling like
vehicles or characters. You don't want to spend time
repeating what you just did on the left side,
on the right side. The array modifier repeats an object along a
line or a circle. You can also scatter it
randomly as you please. Let's look at one more.
The Boolean modifier, which adds or subtracts
geometry like cutting a shaft hole
in your cylinder. Now, one very important thing to understand is the order
of modifiers matters. Blender evaluates modifiers
from top to bottom. If you put a subdivision
after a boolean, the boolean might give messy
or unexpected results. If you put it before the
cart will be smoothed. So if your mesh is not
behaving as you expect, check if your modifiers are
stacked in the right order. And when you are finally
happy with the results, you can click that little apply button to bake everything
into the mesh. Now, this makes the
changes permanent. Once you apply the modifier, the changes become
permanent and you have no way of tweaking the values without Control Z,
without undoing everything. That flexibility is one of
Blender's biggest strengths.
6. Modifiers vs Tools: Now let's clear up a very
common point of confusion. Modifiers versus tools. We've already seen that
modifiers are non-destructive. They sit on top of your mesh
and tell Blender how to display or process it while
you're working on it. And until you apply them, you can always tweak or remove them and return to the
original shape you had. If I press T on the keyboard, I bring up the toolbar. This contains tools like bevel, extrude, knife, and more. These tools work
differently from modifiers. Let's do a quick demo.
Let's add a cube. Switch to Edit Mode. Let's select a face
and now extrude. You see how the mesh
changes instantly. That change is written
directly into the geometry. It's permanent.
It's destructive. Unlike a modifier,
this extrusion can't be adjusted later with
sliders or settings. The only way to undo
it is with Control Z, which also means undoing everything you did
after that point. That's why the
tools in the T menu are called destructive tools. Now, this doesn't
mean tools are bad. I mean, those are the tools
I use most of the time. You need them all the time. The key is to know
when to use each. Use modifiers when you want
flexibility and control, and you know you're building a reusable system that you
will be coming back to edit. Some people also prefer
working with tools and just simply saving versions
of the Blender file. Once you understand
these differences, Blender workflows start
to make a lot of sense.
7. Modes: Because Blender is both an
editing and simulation tool, it gives you a lot of
different tools to work with. But sometimes you'll click
a tool and nothing happens. Most of the time,
that's not a bug. It's because you're
in the wrong mode. Remember what we said earlier, every three D model you see is an object that points to
an underlying data block. Blender needs to know what
you're trying to edit. If you want to move, rotate or scale the object as a whole, you use Object Mode. But if you want to
change the actual shape, the vertices, edges, and faces, Blender has to temporarily
switch to Edit Mode so it can work directly on the data
block, the underlying data. In other words, Object Mode edit the container,
the entire cube. Edit Mode edits the
contents of the container, the underlying data
defining the cube. That's why some tools work
only in specific modes. There are tools that will
only work in edit mode, others will only
work in Object Mode. So Blender isn't just one mode. It's a collection of modes, each designed for a
specific type of edit. We have Object Mode. If you want to move
objects as a whole, if you want to set parenting, if you want to work
with collections, you should be in Object Mode. Then we have Edit Mode, which allows you to edit
vertices, edges, faces. This is where modeling
really happens. Then we also have sculpt mode. This is for people
who are interested in brush based deformation
for organic shapes, like if you want
to model monsters, dragons, human beings,
you can use sculpt mode. So just make sure you
do some research and find out what the
rest of the modes do.
8. Parenting: Finally, let's talk
about parenting. Parenting is Blender's
way of saying, This object follows that one. Whatever that object does,
this one should also do. So let's see how to do
this. So let's add a cube. Let me also add a UV sphere. Select the UV sphere,
then the cube. Then let's hit Control P, and I'll say Object. Now, let me select the cube, G, drag it, and
watch what happens. The UV sphere follows it because it's parented
to the cube.
9. Model a Desk Lamp - Part 1: This lesson, we're going to put everything
we've learned into practice by modeling
a desk lamp. And along the way,
I'm also going to be sharing extra tips and tricks, features that we did not cover
in the previous lessons. So let's see how to work on
a sample project in Blender. Want to keep things simple, where in the three D viewport, I'm going to hit Shift A, and I'm going to add a cube. Now, you will notice my cube
looks a little bit flat. So the way I like
to change the way my models look is by clicking
this drop down menu, shading, and go to
cavity, enable this. You will notice
now the edges are more conspicuous, looking good. And on this type field, let's select both to have some
illumination on the edges. Just like that. So
that's how I like it. And if you want to
go an extra mile, you can also go here
and switch this to MD cap and object
color to random. Now every new object that you add here with Shift A is
going to have its own color. So if I add a cylinder, G, it's going to have
its own unique color. This is how I like
my environment. So that's just a tip and trick. Now, we want to create the
base of the desk lamp, so Shift A, mesh, and let's go with a cylinder. We want to reduce the height
of this because it's a base. So I'm going to hit while
it's still selected, and then Z to constrain
it to the Z axis. And there we go. So remember, now we're in Object Mode because we're editing
the object itself, not the underlying data. We're just resizing the
object, the cylinder. Now, because we've resized it, let's hit Control A
to apply the scale. We've not moved
it, so Control A, we don't need to
apply the location. If we move it G, Z, that's when we
will need to apply control A location because if we try to do other
things like applying modifiers without
applying the location, Blender will be applying
those modifiers based on where it was initially
before we moved it. So let me just undo that because the base is
going to be down there. Now, one thing you need to
keep in mind is when you add a primitive or any shape
or object into Blender, it will be added exactly
where this cursor is. This thing that
looks like a target. So the way to move it
around is by using this, you can select this
and then click anywhere or Shift
and right click. So if I now shift A
and say add a cube, it will be added
there. Now, do that. The reason I'm
showing you that is because we want
to be able to add different parts of the lamp in different places depending
on what that part is. So we will need to
move this around. But to return it to the center, we hit Shift S and say
cursor to world origin. I will return to the origin
of the three D world. Now, Shift A, let's
add another cylinder. And this time I'm just
going to hit S and then S again for
freestyle resize. Then GZ, grab and push it up. In fact, GZ up to maybe there. Then S, Shift Z. If we hold down Z,
we're telling Blender, resize this object in all
axis except the Z axis. Shift Z like that. And then let's say S and then Z. Now we're telling Blender,
let's resize it in the Z axis up to
maybe that point. Then let me hit one on the numbered to switch the
orthographic front view. Then G Z, up to that spot. All right now, this
is still active. That's why we're still
moving the cursor around. So let me switch
back to select box. Now, in fact, we want
this up here now. We want it at the
center of this face. So how do we put it there?
When I select this, first of all, I need
to say control A. Then let me just
apply all transforms because I've moved it
around and I've scaled it. Now, its origin has
gone back down there, but I want to put
this cursor up here. So I'm going while
it's still selected, I'm going to switch
to Edit Mode. Now we're in Edit Mode, and I want to switch to face select mode so that I'm
able to select the faces. I'll select this top face,
and then I'll zoom out. Shift S, cursor to selected. So the cursor will jump to the selected phase,
just like that. Now I can exit Edit
Mode into Object Mode, and I want to switch to the front orthographic
view with number one. And right here, I
want to say shift A. Now, a mesh is an object. At the same time, curves
are also objects. We can work with curves, and we want to add a curve here. So I'll select curve, and I want to add a path. So that's the path. I'm going to hit S twice to resize it maybe
up to that spot. And it's been added exactly
where the cursor is. So I'm going to hit
tab to switch to Edit Mode or just
switch manually here. So we're in edit
mode of this curve. I'm going to switch
the front view once again with Numpad one, and I'm going to hit G to
carry it and rotate it. Doesn't really matter how far, but I'm going to hit
G and try to position that end of the curve maybe
at the center right there. Doesn't have to be precise. Then I'm going to select this, click that, and then
hit E for Extrude. That will extrude the curve and create an extra
point out here. Now, if I exit Edit
Mode into Object Mode, we have a curve like that. What we want is
to create a frame around this tube that is
going to hold the lamp top. I'm going to create an array modifier using
the selected curve. Let's go here and let's add a modifier while the
curve is selected, Modifier let's go to generate. First of all, let's
say curve to tube. We want to turn the curve
into a tube, just like that. Now, yours might
be large or huge. Just regulate that
using this number. So you can hold down shift
to move in small increments, and let's just resize
it to maybe that spot. Now, while it's still selected, we can add another modifier. Now that it's already a pipe, let's add an array. The array will be added
below the curve to tube, and let's change this to circle. And because it was added
and we positioned it, if I switch to the front, we positioned it starting
from here moving outwards. It's going to rotate
around this spot, and now we have that number. We can increase the
number or reduce it. Alright, there we go. Now the next step is to
add the lamp top or cover. So let's go ahead
and say Shift A, mesh, and let's add a cone. It will be added like that. Now, before you move it around, you will see this
add cone option, expand it, and it has several
options that we want here. For example, the base fill, first of all, let's
go to the radius stop and red increase it. Just like that so
that it's not sharp and we want to reduce the depth. In fact, let's
switch to the front with one on the num pad, and I'll hit Alt Z on the keyboard to
make it transparent. Now we can see through Alt Z
or this here. Where is it? This here. So with the cone still selected
and this still expanded, we want to reduce the depth
slightly just like that. And let's remove
toggle that X ray. We don't want this
cover and this cover. So let's say base field
type, nothing like that. And I think we have the cover we want because we want to
keep everything simple. So switch to the front view, and I'll just click
away to commit that. Now, that menu will
not come back again. Now, let me at Z to make it
transparent and select this. Then GZ, push it down maybe up to that spot so that the frame is just
almost at the top, but not quite at the top. Now, you will notice these
are going out of the cover. The good thing about
the method we've chosen to work with
the modifier system and the curve system
is we can go back and edit our underlying data. Because remember,
this is a curve. So if I go to Edit Mode,
it's still a curve. So if I select this dN GX, pull it inwards, all
the other copies of it will follow suit. Think that's a very
good reusable system, the importance of
working non-destructive. So let me just click
away to commit that and switch back
to Object Mode, Z, and now our frame is inside.
10. Model a Desk Lamp - Part 2: Now, one more thing we want to create is the bulb. Select this. I'm going to shift
D to duplicate it, escape to let it go, but it's still right here. So G Z to push it up. Then S, Shift Z to resize
it in all axis except the Z and we want it
to get to that spot. Switch to the front view to Z, G Z to push it up, and that's our bulb. You can now apply an emission
material to mimic a bulb. Now, let's go ahead and
refine things a little bit. For example, the
base is too wide, so I'm going to say
S and then shift Z. Maybe up to that spot. And then SZ. Yeah, I think
that makes more sense. And I think this is also
too tall, S's to front. A Z, transparency SZ. Now, this is widening it. I don't know how else to edit
this angle. I'll be honest. But GZ, let's place
it right there. I'll select this Edit Mode, select that G, G twice, and let's place it right there. Now you will notice right here, the curve is getting curvier
as this gets shorter. So this part is actually
protruding outside the cover. Now, it looks beautiful,
but it doesn't make sense. We need to make
sure it's inside. So what we can do is edit
this cover right here. If I switch to the front
with one on the numpad, switch to Edit Mode. A, to select everything. If nothing is selected,
it will look like that. Control A or A, just A. Then Control R. That will
bring up the loop cart too, and it will allow us
to cut that line. If I click and
without moving it, click again to commit. That creates a loop
card right there. And if I click aside, as you can see, we
have a loop card. Select that edge,
then hold down Shift out you're going to select
the entire loop all around. And you can now say s twice
to increase the width. We can do the same
here, Control R to create another loop, then click again, then twice. There we go. Now, if I switch to the front with
one on the num pad, now it's carving outwards. Alt Z, I think it's now taking the shape
of the frame inside. I can select this Alt Shift
and twice to make it smaller, seems too wide right there. Up to that spot. Now that
I'm satisfied, first of all, A Z Object Mode. There's our simple lamp without any materials
applied to it. I notice this is not touching. So S ZG Z. Now I can switch
the front select this Control A, apply
all transforms. Control A, apply all transforms. Control A, apply all transforms. And for now, we're just going to leave that frame like that. We're not going to
apply the transforms. Now, let's start
organizing everything. First of all, we
want to make sure this cover is parented
to the frame. So select the object
you want parented. Or in other words,
select the child, then select the intended parent, which is the frame. Then Control P. I'll
just say object. And now, if I select the
frame and move it around, it will move the cover as well. Now, we want to parent the
frame itself to this tube, this stand, select the
frame and then the stand, then Control P. And say object. That means if we
move this stand, it will move the frame
which will move the cover. Let's also select the bulb and parenting it to the
stand, Control P object. Let's move it exactly. Then now select this, then the base and
Control P Object. Now, if we move the base, we move the entire lamp. Very nice way to stay organized. And in here, as you can see, everything has now been
placed under this lamp, which was the original
cylinder we added. We can rename it to base. Then this, as you can see, in the hierarchy, the base
has its own data block. And then in the hierarchy, we have the stand
parented to this. So it's one step inside. So stand. Under that we have
its data block and yet another cylinder,
which is the bulb. Bulb. Of course, when
we expand the bulb, it has its own data block. Then we also have a nerves path, which is this frame. If I expand it, it
has some modifiers. Remember, we applied modifiers, and under it, we
parented the cover, which is this cone, so it's
under the nerves path. So let me just call it the
frame, then the cover. Of course, when we
expand the cover inside, it has its own data block. And the frame being a curve has its own nerves path data block, this one here. And these are the
modifiers we applied. We applied a curved tube
and an array modifier. Expanding it gives
you more details. So as you can see in Blender, everything is organized
into objects, data blocks, and in fact, something
else I've not shown you here is collections, but that's just grouping things. Maybe I'll cover that in the next batch of concepts you need to
keep in mind because this is a series called Blender theory where
we're going to learn about the
theory behind some of the tools you use
most in Blender. So you can have a
deeper understanding of how they work under the hood. Now, what we've been
practicing all this time is the manipulation of
data, geometry, data. And we've seen how to use these destructive
tools on this side, and we've also seen
how to use modifiers to create a reusable system that you can go back and edit. For example, we can
edit this frame. We can also edit Anything
else that has modifiers. Let me see modifiers. Yeah, so modifiers are only
applied to this frame. So we can increase the number
of bars we have there. We can even leave it at three. Later, we can come back
and say we want 12 or 11. So this is a reusable system. We can also come and increase the thickness of
each of those tubes. So we're manipulating
the vertices that define where the edges
and faces will be. Let me just select this Edit. So this is an edge. If I switch to face,
this is a face. If I switch to vertices,
this is a vertex, single vertex, a single
point in three D space. These four vertices
here define this face. And these two vertices
here define this edge. So this data is what
defines the overall cover. This is one system
we've just looked at, but we're just getting started. Blender has another
amazing modifier that is a whole
system on its own, and it's called geometry nodes. Let me just switch
back to Object Mode. If we select this and go
here to add modifier, as you can see here, we
have geometry nodes, and it's placed right
here all alone. Add a procedural operation
effect to the active object. When we click this, we're
going to add what we call a geometry node modifier to this specific tube,
this specific cylinder. And there's a whole world of amazing things you
can do with this system. Now, we're not going
to go deep into this. I just wanted to mention
that if you want to learn of an advanced system for manipulating the underlying
geometry of the shapes you have and you want to create amazing simulations in Blender, you need to learn
geometry nodes. I created a whole introductory
class on geometry nodes, and you should check
it out right now. Learn how to manipulate
data beyond these tools and the simple modifiers
we've learned about today.
11. Final Thoughts: And that brings us
to the very end of this edition of
Blender theory. I hope you found it valuable. If you're new to Blender, these seven concepts
are important, and I hope you at least
found a few of them useful. And once you're done
with your class project, don't forget to upload it
right here by clicking the Projects and Resources tab right below
this video player. Upload your lamp model, and let's see what you
were able to create. You can add materials if you
already know how to do that. And if you enjoy this class
or learned something from it, I would really like to know
what you thought about it. Your review will go a
long way in helping other students know what to expect if they choose
to join the class. So I would really
appreciate it if you took just 1 minute of your time go to the reviews section right below this video player and drop
your review right there. And until next time, make sure you model something in Blender. Peace.
 Ken Mbesa, Web Designer | 3D Artist