Transcripts
1. Introduction: 6 Steps to Beginning Better Botanical Drawings: Hey, friends, do
y'all want to draw botanicals but never really
know where to start? I get it. Those
intricate details can feel completely overwhelming,
but don't worry. I got you. I have come up with a six step process
to take you from start to finish to building a better
botanical line drawing. This class is for anybody, whether you don't
know where to start or maybe you are already drawing and just want to
up your game a little bit. Look, I'm going to
take you through the six step process with
different botanicals, working our way
through each lesson. And then for the final project, I'm going to take a completely different
botanical specimen, go from start to finish through
the six steps so you can draw alongside with me and
see the process in full. So if you're ready to
stop second guessing yourself and build more
confident drawings, then this is the class for you. Come on inside. Let's
get our materials, and let's get building some
better botanical drawings.
2. Materials Needed : M. Okay, the materials you're
gonna need for this class are some
botanical specimens. I grab these from my backyard
because I'm a big gardener. If you don't have a backyard, then just go for a walk
in your neighborhood, and you'll find lots
of foliage everywhere. It is all around us. It is one of the most
beautiful things that people forget about
and don't even notice. So then you're also
going to need some pens. I use a uni pen or a
micron, at least a 0.5. I've got some tape, some
scissors, a little bit of guash. So I've got either a white guash or this pale lavender color. I got a fluffy paint brush
and some water and a rag. Okay, then I'm also going
to need some paper. So I've cut up some paper right here just into
these little squares. The paper that I like to use
is this Borden and Riley. It's a smooth bleed proof, all purpose paper for
pens and pencils. It's a very smooth finish, so I really like drawing on it. And then for the final project, I also like drawing on
painted construction paper. So I've made this little book that I've put a lot of
construction paper in, and then I just go back and
I paint it with white guash. Then I like putting my
botanical drawings in it, and they start piling up
after a while and looking so beautiful with these
different colors as a border and a background. So I encourage you to get just a piece of
construction paper. We're going to fold it in half and paint in the middle of it, and then you can put your
final project on it. So you'll have a
nice little border and something to frame. Okay, so grab your supplies
and meet back here, and we're gonna dive right in to the six steps to better botanical
drawings. Let's get started.
3. Step 1: Focal Point & Composition: Okay, so once we have our
specimen we want to draw, and I'm going to do
several examples over the course of this class. The first thing we need to do
is to set our focal point. What do I mean by set
your focal point? So I'm just going to make four little canvases
in these squares. And I'm just going to use
our principles of design and decide where and what I
want the focal point to be. The reason this is important is because it's
going to help you determine your size and
shape of everything. So for example, I'm
just going to group this into three different
sets of leaves, one here, one here and one here. And in this first set, I'm going to say this is
my focal point down here. So maybe I make my focal point
of leaves around this big. Well, if I did it
that big and I go up, I'm only going to
see the bottom part of these leaves right here if this is my borders. So here's where that other
set of leaves would be, and then perhaps the
stem would be coming down somewhere like that. And that would be
the focal point and the relative
proportions around it. Now, if you want to see
this whole thing, Okay, you can do that, too, but
you're going to have to make this a whole lot smaller. So maybe here are those leaves. Then the next set of
leaves would be up around here and then this
last one about here, having the stem coming
down like that. So there's another composition. Only the whole
thing is in focus, and in this first one,
it would be more, this would be your focal point. So let's change it up again. What if I want? Let's
change it this way. Oh, yeah. See, now I like that. I've got these two
as my focal points, and this is a third tertiary. So let's draw this one first. This one down here
at the bottom. We're just going
to do like here. And then this group
of leaves here, and then maybe this
set coming up here. Okay, so we're working
on our compositions. Here comes the
stem down and out. Okay, and then
let's do one more. Let's Oh, let's make
this the focal point, this middle one
right here and maybe have it coming across this way. I like that. Let's go here. And then this sweeps
over this way, and it is gonna fall off
the canvas or the page. Okay. And then this
one is more over here. So these bottom two are
actually very similar. I've just moved this up
and over a little bit. And that's that. Okay. So you see what I mean?
I've got a couple more that I've done right here. But setting your focal point is really going to help you out. I like these two here, and of these, let's see. I'm more drawn to I'm more
drawn to this one already. So I'm going to
outline this one. So if you set your focal point first and build
your composition, you're going to be a
lot happier when you go to start looking at
your leaf patterns and all the intricate things
that you've got to fit in these areas that we've made. Okay, so, number one,
set your focal point.
4. Step 2: Leaf Patterns: Okay, what's the second one? Number two. Start
with leaf patterns. Now, what do I mean by this? I mean, we need to start
noticing how these things are growing in relative
space to each other. So in this one, this
is the salad burnt. This is a herb. Okay, and
I put this in salads. It tastes like cucumbers.
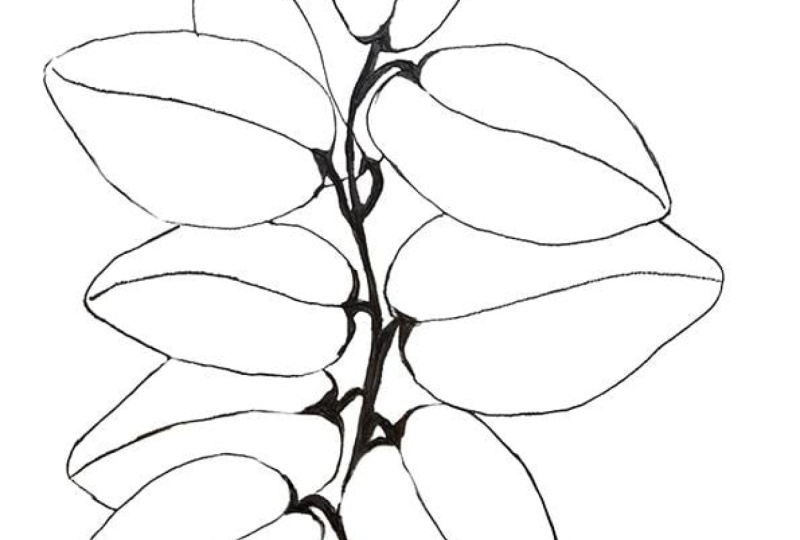
It's actually really good. How does this one grow? I'm noticing that the leaves grow opposite at
each other, okay? At every node, this
is a node right here. Okay, and the node
is where the leaves are going to originate
off of the stem. So this burnet is
growing opposite. Everywhere, I've got a leaf
coming off of the stem. I have a leaf coming
off opposite. So up here, I've got a leaf
coming off of the stem, and I've got one opposite. And this is true all the way up until I get to the very top. And I bet. Yep. And it looks like I just have a single one at the very top. So that's the pattern that
these leaves are growing in. And they are growing opposite. Alright, let's do another one. Let's go back to Let's go back to this rose.
How is it growing? Comes back every year.
What a beautiful plant. It flowers many
times in one season. But let's check out
how it's growing off of the main stem, right? If I turn it to its side, I quickly realize I don't have an opposite situation.
Here's my stem. And I've got this coming
off of the main stem, and then I've got these
bunches of leaves that happen. And we can explore those
patterns here in a minute. But I don't have another
group of leaves coming off of this main stem until up here. That's these. And then
I've got one more set coming up off the top here. So that's how this
one is growing very different from the way
these are growing, right? Let's try it again.
Let's do another one. Alright, let's take
a look at this one. This one's a little
more complicated, but we can reduce it down. So as I look at this, and I'm gonna break
this one apart. Okay, this is a Goji
Berry, by the way. It comes back every year. Okay, the Goji berry, if you really look in here, can separate out these
groups of leaves, and we can see that they're
growing alternately. So here's one set of leaves coming off of this
side of the stem, and then you've got the next
set of leaves coming off the opposite alternate
side of the stem. So what do I mean by
that? Here's your stem. Here's one group of leaves. That's these. And then these
come off opposite, but alternately, they're
going up and off here. These come up. Let's
look again closely. Yep. That one's
coming off that way, and these are coming
off the other way. It's just they're not very big. We're at the very beginning
of the growing season here. But I can see that that's there. I've got another set
coming off here. There. And then opposite. They're alternating the
nodes are alternating. Back and forth instead of
opposite instead of this. Okay, so that's what I mean by start with your leaf
patterns and start looking at how the leaves are originating
out of the stems. In the next session,
we are going to go over leaf orientations and how those will help us to make a very natural organic
looking botanical drawing.
5. Step 3: Leaf Orientation: Okay, in this section, we are going to go over
leaf orientations. Okay, the reason this
is important is because depending on the angle
and position of a leaf, it's going to change
the size and the shape. So I'm going to go
ahead and pluck off a few individual leaves so that I can lay them flat
and take a good look at them. Now, if your leaves are not
laying flat, by all means, get out your little piece of tape and just tape it down to your paper so
you can really look at it. So as I look at these leaves, I'm noticing they're very
different from, say, these leaves that I'm looking
at because they're all oriented in different shapes
and in different ways. These are laying flat.
So these are very stagnant and not
very interesting. However, we can study them a lot better in this orientation. So I'm going to look at the general overall shape of the leaf and just
start drawing it. So these are pretty much ovals. Now, they might be a little
tapered more at each end, so let's try to
draw it that way. So they're more
like little ovals with points on each end. And then if we get
even more specific, they're more pointed and jaggedy on one side
than, say, the other. So I'm going through a
progression of the general shape, maybe tapering it, and then committing to some
additional textures that the shape might have. So go through this
exercise with your leaf flattened to really start appreciating what the
leaf itself is doing. So yeah, so we'll go
through and we'll do that and look at your
leaf orientation and these extra little details that will bring
that leaf to life. And then as I look
over the rest of it, I'm also appreciating how all these other
leaves are turned. So because they're on their side and they're
curled up a little bit, a lot of these leaves
have this shape, right? Because I'm only seeing
half of the leaf and half of the serrated
edges on that leaf. Or I might see one that
has jaggedy edges here, but I also see the
other half of it. And then there's the
little stem from the leaf. Okay, so that's
another orientation. I can come up here and look
at some of these others. I've got Gosh, it
looks like I've got one that's kind of
bent like that. Wow. That's kind of different. But, you know, the
more I practice these different shapes
and kind of do a study of what I see and then
twisting the shapes around and actually picking up some of these different orientations, I'm actually learning a lot
more about the leaf itself, how it grows, how I can
manipulate that in my drawing. Okay, so let's do another
one leaf orientation. I've got some English ivy here. Let's see about
this O English ivy. I'm going to pluck off
one of these leaves. Let me see if I can tape
this little guy down. Okay, so it's like a
five pointed star, one, two, three, four, five, although I really do see like
this triangle shape, right? But then I also see, like, these wings coming
off of each side. That's this and this. And I
also see this dip right here. Then that's where all
this originates from. Okay, so let's try
that one more time. So I've got my big point up top. I've got these smaller star
shaped little appendages. Okay. So I'm just kind
of repeating this without the structural
lines in between, just to see if I
can draw the same shape kind of over
and over again and really get a feel for
what this leaf Does. Okay. And then when I'm feeling good
about this, the flat one, I can always come back and
start turning this and really exploring the different
shapes that I'm seeing. And really, I mean, that's
what I'm seeing from this one, even though this is
the shape of the leaf, but by the time you turn
it on its side, wow, it's kind of turning in
to something else, right? I mean, that's what I
see there. Boom, boom. But you throw in one
of these around it, and it's telling your brain. Oh, yeah, that's a That's
a English ivy leaf. Okay. There's another one on its side. So this really takes some practice and some
trust for yourself. Like, that's a weird
oh shape, right? However, however, however, I
feel like it's what I see. And if I put it with
all these other leaves, suddenly, it looks
correct, doesn't it? So these are all the same leaves that
look like this only. You're never going
to look at all of the leaves taped down. So check out your
leaf orientations, check out your leaf shapes, draw some crude ovals and
squares and diamonds until you get the right shape
and just practice over and over and turning them all
on their sides and whatnot. This is a very helpful step in creating a successful
botanical line drawing. In the next lesson, we're
going to learn to mind the gap and be aware
of our negative space. I'll see you then.
6. Step 4: Mind the Gap: M. Alright. Number. Let's do number four. Okay, number four
is mine the gap. So we need to observe
our negative space. I'm going to put out a
couple different things, and we're going to look
at negative space. This first one is a rose. This is the knockout rose. And you see how sparse it is. If our leaves are this big, they're not taking up much space relative to all the
space over here. If I were to draw this
stem very crudely and pick the size of these leaves
relative to the whole thing, they're not very big, are they? They're really only
about this big. This next set that
comes off right about here is only about this big. And then this set up at the
top is only about this big. So there is a whole lot of negative space
from here to here, here to here, from here to here. So this one is the Rose. Okay, let's talk about
this one, the burnet Okay. The burnet is a
little different. So you notice that
as this one grows, we've got more negative
space in between the nodes on this one
closer to the bottom, and it disappears up top, right? So if this is our stem, I've got leaves coming out
opposite at the bottom here. Okay. Now, if the leaves
are this size, I can easily fit another leaf in between
in this negative space, this gap right here, right? So I know that if I can fit more than one of these
leaves in that space, I need to go up
at least to here, I would say, to keep everything relative to keep
that negative space in play. So for example, I'm
just coming up now. So that looks about right. But what about the next section? See? This is the
negative space between here and here, here and here. Now, it's gonna get closer together when we do
this next set, right? So I can't fit but one leaf. Like, in this bottom one,
I probably can fit two. This one, I'm gonna say
I can only fit one. So I'm gonna pull this
guy off right here. And this one Okay, a little bit closer
together, right? That's the negative
space right there. And now the next one, look, I can barely see the page
underneath that one. So I know it's got to
come off right about here and encroach on the space of
this one. Same on this side. Okay, encroaching on the space. And then this top leaf
is kind of tucked back behind those first two with
no space in between them. There's zero space.
Okay, let's do this one. This is called winter
savory. I love this herb. It's pretty great,
too. And okay, so several things
are happening here. I've got one big leaf growing
out every other, right? But then I also have
these bunches of leaves growing out opposite, as well. Wow, so that's a lot going
on. The Winter savory. Let's talk about all
this negative space. So if I've got the stem, and I'm starting here
at the bottom, say, these leaves kind of take
up the space right here. And I'm doing the whole
set. I'll do the whole set. If I come up to here, I've got quite a bit
of space I need to leave open before I
do this next set. So I was going to come off here, but I really think I
need to go higher. So I think this bunch
is here in the middle. You know, and then I've
got these longer leaves that come out on each side. Maybe that's how I
need to do this. Okay. Now, this next set is
kind of in the middle here. Is this one. And then I've got my long leaves
coming off each side. Okay, here's this
other set here. Long leaves each side. So I'm doing a fair job of keeping the negative
space happening. This is the stem. Okay. Now, let's keep looking up. So this is kind of
disappearing now. I'm not getting as much
space in between all this. So this is actually kind of
looking like a big mass with a topper and then slowly just bigger leaves coming out of it every once in a while. So I'm kind of
taking some latitude just because it's
getting jumbly. But I've done a
good job of leaving my negative space here. Here, here, here and
here, a little bit here. And then these little
nibblets of it up. So visit the structure, look at it, draw leaves
together, bunch them together. We bunch these together, right? And I bunch these together, but you get the idea
of how it grows. Number one, we've discovered the leaf patterns
and how it grows, but now we can also mine the gap and really watch
the negative space in between to get everything looking the way that it
should and look more natural. Alright, and the next lesson, why it's important
to draw outward. We're going to start
with our focal point and draw outward, and you will start seeing
the magic come together, the magic happen.
Alright, here we go.
7. Step 5: Draw Outward: Alright, so number five. Draw outward from Focal Point. What do I mean by this? Okay, so like here, I can, you know, of course, decide how I want this oriented
front, back, up, down. I might just leave it just
like this and have a go. So I've got two, three
choices on focal point. So I'm kind of liking
this area here. I'm liking it because
it's got some overlap. It's got some details. I can see the
leaves straight on. Let me tilt this a little bit
so you see what I'm seeing. I'm seeing the leaves
from this orientation. It looks very beautiful
right in there. So I'm going to concentrate on maybe these three leaves
together and start there. So I'm just going
to start this leaf, whatever size I want it to be. And we just have to
realize that once we pick that initial leaf and
that initial size, it's going to set
up the proportions for the entire drawing. So here's my first leaf, right? Now, if that is
this leaf and I'm drawing this one next
because it's behind it, I'm noticing it's a
little bit smaller, and then this one is a
little bit smaller still. So I'm just going to and
no one's gonna know if something is right or
not when I draw it. As long as it's keeping in good company with all the
other things that I'm drawing, it should look correct. So I'm using that triangle, kind of patterny design that we worked on earlier when we
were looking at leaf shapes. Okay, so I've got these
three leaves now, and I can see the tiniest
bit of stem in between. I can go ahead and
fill that in. Okay. And then my next leaf I
see is this one over here. Now, if this one is
bigger than these three, and I want to go up to here. So this is what I mean
by drawing outward. I've got my middle done, and now I'm just gonna
bounce from side to side to fill in the
rest of these shapes. So I will quickly do
that while you watch. So that's what I mean
by drawing outward. I chose my focal
point in the middle, and then I've come
outward from it, drawing all these other shapes. Okay, so that's what
I mean by drawing outward from your focal point. Start in the middle,
wherever that is, and then work out
from each side, keeping everything portional,
which is our number six. In the next lesson, we're
going to mind our proportions. Keep those in check. That will bring together our last step so that we can
get onto our class project.
8. Step 6: Check Proportions: Okay, and number six is
double check proportions. Okay, to demonstrate this, I'm going to use a piece of fake foliage just
for simplicity. So when I say double
check your proportions, this is what I'm talking about. So I'm gonna arbitrarily, it doesn't matter what size you make something
to begin with. Say my first leaf
is this big, right? And I know that the opposite leaf or that there is
an opposite leaf, okay? So I can go ahead and
draw that opposite leaf. Coming out about the
same distance, right? I'll make it a little flatter, just to be different. Okay, and by proportions,
this is what I mean. You can take your pen
and kind of measure. And I notice that it's about
the same distance from the node to the tip
of the leaf as it is from the node
to the next node. Now, wow, that's a proportion I can really use
while I'm drawing. So it doesn't matter that
this doesn't match that size. I can just take the size
of leaf and measure down, and I can put a dot right
there knowing that that is where the next node
needs to be coming out. And I can draw the next leaf. I can do the next leaf
on this other side. But what that's doing
is it's helping me. I'm gonna connect
the two now with my stem because I like doing
the stems last, remember? So I can connect that down, and it's done several things. It's minded the gap of the negative space
between here and here. It's a lot wider on this side. I've bent it over, and it's the right proportion of
spacing between the nodes. So, hey, let's do that again. There's my space there to there. I'm going to put a dot, and I know that I can now
draw my next leaf shape. And I know I can make
it come out opposite. I can turn them a little bit, like we've done in
the other lessons, the different leaf orientations, and now I can drop
this line down, even put a little
curve in it to make it look like it's really growing. Okay? I'm going to do
this one more time, and I'm noticing
that this set of leaves is a lot
smaller than this set, but it's still that
same proportion down. So I'm going to
measure, pull it down, put my dot there, and
now I'm going to pull these tiny little
leaves on each side. And connect. And then I've got one tiny leaf
at the very bottom. Okay? So that's how
it goes. You start. You pick your spot and you go, and you measure, and that will definitely
help with your proportions. It'll help you mined the gap. It'll help with your
leaf orientations. It will help all of it. So let's do one more time. So those are all there. That's this one. I'm
gonna do this one here. Okay, so how do I do it up? Well, I'm gonna do
the same thing. I'm gonna measure over and
then I'm going to pull it up. I'm gonna put my dot
right about there. Now, I see this
leaf is bent down, and it's getting
close to this leaf. It's not touching it,
but it's getting close. So I think I like that
natural variation. And then this other opposite
leaf is coming up more, and then I can connect my stem. Minding all the proportions. See how that all looks correct
now because I've measured. I've found commonalities,
I've found patterns, and I have found the trick
to drawing this endlessly. So yeah, next up,
we're gonna prep our paper with some
guash so that we can move on to our final
project. Alright, see you there.
9. Class Project Part 1 (steps 1-3): Okay, the first thing
we're gonna do is get our construction
paper down to a more manageable
size so that we are not intimidated by a
very large drawing. So I like to do it
more this size paper. And if I'm doing one, I
might as well do two. So I'm going to get
out my white guash. And just sort of
spurts them around. I'm gonna leave about a 1 " border all the
way around this, just because I think
it always looks pretty to have a nice border, but I don't like it perfect, so you will see me
leave this very rough. But I also think it
makes for a very good framing a framing piece
of art when you're done. So once I've got it coated, I'm kind of moving some of
that paint to the other side. I don't want to waste. And I'm also making it smooth. That way, if I really like
the final drawing I've done, I can scan it into
my computer and I can use it for other projects. Alright, so that looks
pretty good there. Let me put some more down
here. Get this coated. Alright, that looks pretty good. We're gonna let those dry. We're going to start
my six step process. Okay, so here we go. Here's our finished
canvas that I've done. I'm just going to set it
up to the side right here. Okay. This is the
plant I've chosen. It is a It is a royal t ivy. It grows very prettily. I love all of its leaves
and how it looks. So I've got my pen,
and we're going to begin to set our focal point. We are going to take
a look at this plant. And see what it is that we
think is special about it. We're going to take a look at
it and see what, you know, draws our attention
and go from there. Okay, I kind of like how these leaves fold over each other. This is really pretty how all of these guys are
lined up facing this way, and then it gets all
twisty from there. I kind of like seeing
this from the side. You know, you appreciate
the underneath of the leaf a little bit and how it's growing off of the
stem. I kind of like that. I also think about manipulating these in
the way I want them. Maybe I don't want to see these leaves on top
of this other side. So I I can bend them away or I can just take them
off of the plant altogether. So you can make plants do
what you want them to, and then I can always
add these leaves back, you know, where I want them. So that's very pretty.
This is very focal point, and then it kind of gets all
natural. So let's try that. I've got my stem and
these groups of leaves. Okay. So that's
one configuration. Maybe I only want to
see this top part. Maybe I'm just gonna see leaves like this kind of spinning spinning
off of each other. And then this top one comes out. Okay? So that's a little
more interesting, and then the stem
bends down that way. So I've blown this
area up considerably, and I think I like
that a little bit. Closer to these leaves. So do this big S curve, and then we can see these leaves kind of
coming off of it. So this is a little
interesting here. The way those grow, here's
the stem, that S curve. So we've got a few
choices there. Let's try one more.
Oh, there you go. Just bending it over
like that. I like that. Maybe get it to come down
like that and get one leaf really big coming up and off
frame. Highlight this one. And this one. Now, number two, start with leaf
patterns, not the stem. What do I mean by
that? Remember, we're gonna look at how
these things grow now. And I am noticing that they
are growing alternately, and they're kind
of spinning around the entirety of the plant. Let's draw some wavy line. Okay, that's for the stem. We're just looking at the
leaf patterns right now. Looking at the leaf patterns. So I can tell that, say, this leaf here, that's this one right here. There it is coming off of
the stem, that is the node. And I noticed that
this next one right here grows up into the
right of that one. So it's up into the right. And then I've got the leaf. Coming off opposite.
Then this next one is up into the right more. So it's kind of up in here. The next one is this one. So see how it's growing to the left. It's
growing to the right. It's growing towards us. Now it's going to go
back over to the left. And then it's going to come
up and over to the right. And then it's gonna
be up and kind of coming off of the
stem right towards us. Well, what about
the leaf itself? Well, let's keep going, right? Let's keep doing our study. Okay, there it is. It's
a very pretty leaf. So it's got this curve to it. And then it comes up
and out into a point, but it's also curved at the end. It comes out and then back in. It's kind of come off like that. Okay, let's do it again. So it's kind of an oval shape that's tapered at the top and then
brought in at the bottom. Okay? So you can do a oval, taper it at the top. Gonna make it wider
and then come back in. And after you do a few of those, looking at this, then we're
going to go back over here, maybe grab one and just
kind of twirl it and see what we can come up with and
see all the different shape. I can get that so super thin. I can also get it to go on its side and
underneath itself. Like that. You do that triangle
and then dip underneath. Okay? There's that leaf. You can shorten it and
then turn it this way. Okay, so I'm going to keep
doing this little leaf study, turning it every which way
until I exhaust, you know, my options that I've
really explored all the different ways
this little leaf can be turned and still
represent itself. And the thing is, is
that when remember, our brain will sew all
these shapes together, and we put them all together, and of course, it's
a leaf, right? Of course it's a leaf.
Okay, so there we go. That is steps one through three, and in part two, we are going to go over steps four through six and
bring this all together.
10. Class Project Part 2 (steps 4-6): Okay, number four, we're
gonna mind the gap. Remember our negative space, so I can come back here. I know that I've got a certain amount of space in between these nodes, right? I can look at the
relative size of everything to really notice I'm gonna cut these
bottom leaves off. Let's see. It just depends on our angle about the negative
space that we want. If I turn this on
its side like this, look how thin the leaves get and how much bigger our
negative spaces here. But if I turn it this way, suddenly, these leaves
show themselves to us. And I have less negative space
in between those leaves. I can manipulate
this how I want it, but I think there's the
lesson in this plant. If I'm looking more down on it, I have less negative space. So if I see the face
of the leaf more, I'll have less negative
space in between the leaves than if
I see a side leaf, I'll have more space in between leaves. What
do I mean by this? This is our stem. Okay. So if I have
leaves that are on its side coming out alternately. Here's the next one down here. If these suckers are
on their sides more, I'm going to see
more negative space in between these leaves. So I will go up. And then alternate so see how the leaves
are on their sides, and I definitely have a larger gap of negative space
in between these leaves. Okay? But if I look at
it a little more this way and I see that the leaves I see the
face of the leaf more. I discover I have less space
in between these leaves. Oh Let's do another set. So in this example, I have less space, less negative space in between these leaves because I'm seeing more of the
face of the leaf. Okay, the next thing
we're going to do is we're gonna draw
outward from our focal point. Okay, let's go back
to where we set our focal point in our drawings. And I really liked
how these were curving at big angles, right? So I'm gonna try to figure
out how to do that. I'm gonna rotate my canvas. I can make this whole thing
kind of sweep across. So I'm going to do, like,
a combo of this and this. I'm just going to keep
this in mind that I want this dynamic and I want it
to really bend and flow. I'm gonna have to do this fairly large because my
specimen is small, but my canvas is bigger, right? So I'm going to
really set the stage. Actually, I'm going
to one more time. I'm gonna do my canvas. And this is me double checking before I start my final project. Okay, here's this.
Here's my canvas. And I really want this
sucker to really bend. I definitely want this
leaf in the frame, so I might have to bend this
up just a little bit more. There we go. And I'm looking at
the negative space. I'm looking at everything. I'm looking how this leaf
is gonna come up and over and fill in
this space here. This one's gonna fill
in this space here. Yeah. And this will
get bigger and bigger, fall off the frame. Okay. I think I'm pretty good. These will come up
and off and over. Yeah, that's going
to be very dynamic. Okay. Alright, I'm pretty good about that. Let's
go back out here. We're going to draw outward
from our focal point, which is going to be down here. And then we're also going
to get out our number six, which is double check
our proportions. So I'm going to make this
first draw for my focal point. Make this first drawing
from my focal point. And so I'm gonna
put my leaf out. Boy, I'm noticing, too, the length of this little
stem off of the stem. Well, it's pretty long. It's not as long as
the leaf itself, but it's almost double. Okay, so if I have this
leaf come out, there. The stem on this thing is
going to be about this long, about this long, right there. So, suddenly, it's come
over to about right here. So I'm gonna sweep
that stem down. And then I've got this one that comes up and kind of bends my leaf relative to this, keeping the distance, the space. We're talking about
our proportions now. See how I need to
mind the gap in here. So this leaf needs
to not come off until about right in here. Then it comes down to meet up. Alright. The next
thing I'm noticing is this leaf right here is on
top of all these others, so I have to do it next. I really don't have a choice. I see it sweeping
clear out to here, which is past this bend. Someone maybe put a dot there. And then it's here, which
is roughly out to there, which I'm gonna put a dot here. And really, this is
just a flat leaf. I'm not seeing much of it. But I know it's in front
of everything else, and it's really going to
make this thing talk to us. 'Cause now I can come in. I can come in with
my other leaf here. And this leaf that's behind it. Okay. Now, I'm coming
around the bend. I'm curving it around. I'm coming up this way. I'm also seeing leaves that are skinny. This one's in front. This one goes down
almost to this one. So check this out. I'm
just minding my gap. I'm minding my dead space, my negative space, and
trusting the process. So I'm going to come
and now start filling in some of this branch. I'm going to catch
this leaf that's back behind filling in this
negative space here. Coming up. Doing the drawings
of them every other. So here's this leaf coming off. Here's this one,
this one, this one. It's either growing in
every other orientation. This one's gonna come off here. We'll make it come
back behind this one. Coming down the stem. I'm gonna start catching this
one that's almost touching. It actually is touching, but it's coming off the
stem way down here. All right. And then I've got another leaf that's coming
up from clear down here. Got another leaf coming
from way down here. This one right here.
Coming up. Funny shape. Here's this one, filling in this whole negative space here, but it's kind of skinny,
trusting the process. Alright, grabbing
these last two leaves and then meet me in the next section
where I will show you a next step you can take
with your line drawing.
11. Gallery & Conclusion: Right. So that was
pretty successful. So now I can just go back and, you know, slowly color in. I can use my watercolors, just filling the sin
with some green. Just so we can see
the difference from the leaves in
the background. So as I finish this, I really want to encourage
you guys to please post your final
project on my page. I'd love to see what
you create and how you enjoyed the six step process with different botanicals. I'm also gonna leave you
with a little gallery, and I hope that they
will inspire you to create more line drawings. Okay, great friends. I'm so glad you joined me
for this class, and I can't wait
to see you again. Talk to you very soon. Cheers. I'm Jules.
This is my art vendor.
 Jules Art Bender, Artist and Art Educator