Transcripts
1. Introduction: Do you want to improve your
drawing and sketching skills? After learning basic techniques, practice is the only way
you'll get better at it. This practice if done
using variety of exercises gives results faster. My name is Mandarmat and I'm a fine artist
and a sculptor. I do painting, sculptures
and also teach art in my studio and
in online classes. In this class about
drawing exercises, I show you five unique exercises you can do to practice drawing. These exercises will help you
improve your observation, improve eye hand coordination, reduce the fear of
drawing and enable you to see like an artist
using your right brain. This class is good for traditional artists,
digital artists, illustrators, art design
or architecture students, or even for those who like
to draw just as a hobby. Enroll in this class and enhance your drawing practice by
adding variety to it. I'm eager to see your
drawings inside the class.
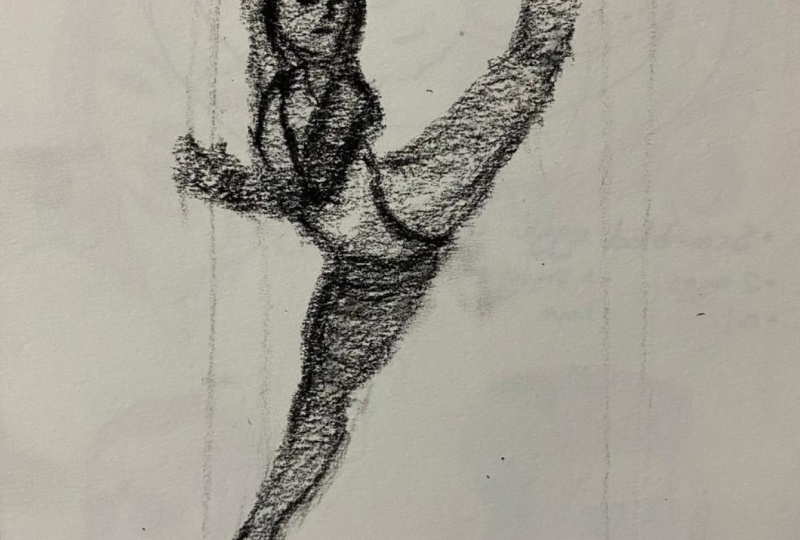
2. Drawing With Crayon: In this lecture, I'll show you another drawing
exercise that makes you think and draw in terms of masses
rather than lines. For that, I'm using a
piece of tick Ron and I'm using it sideways so that
I can get a broad stroke. For reference image, I'm using a website called
artist pixelve.com. I've started drawing
the torso first, which is the big shape, and then I'm going to add
the limbs and the head. Rather than minute details, my focus here is to capture
the overall pose correctly. Just like drawing with a brush, you might find this
stuff in the beginning, but with practice,
it'll get easier. Thinking in terms of
masses and capturing them convincingly is an
important skill in any form of
drawing and painting. Now, it's your turn to draw
a mask drawing like this. I'm eager to see your work
in the project section. But
3. Drawing Upside Down: This lecture, we'll look at
another drawing exercise that forces us to see in
the way the artists see. The idea is to uncover the
reference image slowly as you go on drawing what you see in the revealed
portion of the image. The reference photo is also kept upside down so as to make it difficult for our left
brain to recognize the object. The way to go about
it is to not see the whole reference image in the beginning and to draw what you see in
the revealed portion. You should look at the lines
in the reference image to note their starting
point, angle, and length. Then carefully draw these
lines on the paper. Once all the visible
lines are drawn, reveal some more portion of the reference image and draw
the newly visible lines. Continue this process till complete image is
revealed and drawn. Careful observation and drawing are right brain
activities and hence, seeing the image
partially and upside down forces left
brain to suspend its interpretation
of the image and allows right brain to do
its work more properly. Hence, we tend to observe an unrecognized
reference image more carefully and in turn draw
it with more accuracy. It is like walking in the
dark with a dim lantern in our hand one step at a time. People who consider
that they are very bad at drawing are the ones who are amazed the most by the result of their
upside down drawings. This exercise teaches us to observe details carefully
and not to allow our preconceived
notions about how a particular object looks like dictate what
we actually draw. After all, a good drawing is a faithful copy of the
thing being drawn. Now it's your turn to draw
an upside down image.
4. Drawing With A Brush: Welcome to the lecture
in which I'll be showing you how to practice
drawing using a brush. Though I draw lines and then fill those in
with black color, the emphasis is on drawing
masses then the outlines. Use of a brush eliminates
getting caught in the details and I can concentrate more on
the overall shapes. Drawings done this way have a direct feel to
them rather than the precise or articulated look of an academic drawing
done with a pencil. This also helps you
in loosening up and getting more expressive
strokes over time. To start with,
it's better to use reference images that
are silhouettes. Here I'm drawing silhouettes of people in various positions. At first, this might
be difficult but keep practicing and you'll
get better at it very fast. Do not be too precise and
slow with your brush, and don't be stressed up
about the final product. What you will learn will be far more important than
the drawing itself. As a variation, you could use a brush pen instead of a brush, but the tool is not
more important than the approach of drawing
masses rather than lines. Practice this regularly, and
you will see the benefits.
5. Continuous Line: In this lecture,
I'll be showing you a drawing exercise that's called continuous line exercise. In this exercise, the
pencil or the pen is not to be lifted off of the paper
until the drawing is complete. Obviously, it's okay to go over the lines which
you have already drawn. The drawing that you
create in this way is not going to look as
good as a drawing made in normal fashion
where you lift your hand and start another
line where it's required. But this imperfection adds
a unique character to the drawing and makes the drawing more
interesting to look at. Benefits of this
exercise are that it improves your eye
and hand coordination. It trains your brain to
observe details more carefully and makes you think more consciously about every
line that you draw. Here I'm making a drawing of a Sadhu or a holy
man from Varanasi, in which a monkey is sitting
on the Sadhu shoulder. As you can see, I'm using
thick and thin lines, and I'm doing that by wearing
the pressure on the pencil. You can do this exercise with any mark making
tools such as a pen or a pencil and as you don't
expect a perfect drawing, there is less pressure on your mind and you can do this exercise
just for the fun of it. You should do this exercise whenever you get few
minutes of free time. Do it just as an exercise and do not worry about
the resulting drawing. Real benefits of this
exercise are improved observation and eye hand
coordination. Go for it.
6. Drawing in Paper App: Here is another way you can
practice drawing whenever you have very little time and just your iPhone
or iPad with you. I'm using an app
called paper by 53, and I'm yet to find the replacement for this
application on Android. So for the moment, this
type of drawing can be used only by people
who have an I device. This is the application which is open in this
part of the window. And here I have my photos open. So what I'll be doing is
that in this application, there is a tool which
looks like a paint roller. I'm going to use that to draw. And just to show
you how it draws, if I want to draw a square
with it, it goes like this. If I want to draw a letter C, I have to do it like this and then trace the outline
of the letter, and that's the way it works. We might use the
scissor tool sometimes. What this tool does is
that I can simply cut some portion of this already
present drawing out of it, and then I can just throw it away and you
get this kind of shape. So this is a nice scissor. You can even create
negative spaces with that. The way you get rid of
the cut part is that you flick it outside the
screen and it goes off. That's the way I'm going to use. Those are the two tools
which I'm going to use to show you a way
to practice drawings. This way of practicing drawing is I will help you
see the big shapes, and it's a fun way of
drawing something. I don't expect a perfect
drawing with this, but then it gives
you a different feel of the painting when you
draw with this kind of tool, which you wouldn't get with
a pencil or a pen or brush. So let's get started. I'm going to use let's
first for the starters, let's draw some fruits. So the simplest one is an apple. So I'm going to sorry, I'm to use this tool. And so for the apple, I'm going to draw it like this. And this is the stem. This is the highlight
which I'm trying to show on the fruit. Then if I want to draw a pair, I would start like this. And complete it here. If I have to draw a fig, I'll be starting like
this and then go down and come up like this
and end at the stem. If I have to draw a banana, it'll be something like this. This way of drawing makes you think of the shape
very carefully. So first time you may not
get clean shape as this, but that's the reason
practice is there. So once you practice, you will be able
to draw like this. Now if I want to
draw something else, I'll take another page
and let's draw a bird. I'm using this image
from Pixabe which I've saved into my photos and I'm
using that as the reference. If I can even change the colors
in which I want to draw, I've chosen a yellow color. If I want to draw that, I'll start from the beak and then observe the
head, how it goes, and then that's the back and these are some
belly feathers, and here are the legs. And this is the
chest of the bird, and then here is the
beak, where it ends. It's not perfect. I would have liked the bird to have this width lesser than
what it is right now, but it's just another way
of drawing something. I could go in and use
this scissor tool and cut some portion
from the What happened? Let me undo. So I'm going to use
the Cesar tool and cut some portion from
the back of the bird. And to cut, you have
to close the shape. Otherwise, it closes
in a straight line. I'll show you what I mean by
a straight line if I want to cut this portion
and don't end it, then it'll close like this, which I don't want to happen. So it will be
something like this, which I don't want to happen. So I'll just undo and then
use this tool to just go in and close the shape
here and throw it away. Still, it doesn't
look like this bird, so I'm going to shave some
part of the bird from here. It's like sculpting. But you
get the idea how it will be. Now if I want to cut the eye, this is a graphic way
of showing the bird, it's not how the
bird looks actually. But this is a fun way
of drawing something. Now let's move to another
bird and take another page. Let me hide this start from
the beak, then the head, and the wing and it has some feathers here, and then the tail starts and the body and it ends here. I'll indicate the legs here. This app has another
feature in which you can overlap the drawing and it creates some different
color because of the overlap. So that's the way this
application works and you can see how we can use
it to draw different things. Let's draw a person
on another page. Let me hide this
starting from the head. He goes like this
in the shoulder in the hand and the foot. And the other leg
and the other foot the dress from here, the other hand starts The shoulder and
ends at the head. Now I want to get
the white areas which are here and here. Now I can use the scissor tool
and cut out these shapes. See how easy it is
and it gives you a different kind of
a drawing which you wouldn't have been able to
do with a normal pencil. So now let's try a
different approach. Let's add one more page to it. Let's go here. And then, one. Let's see I want
let's draw this, but I'm going to draw this
in a different approach. I'm going to I'm going to
replicate something like a sculpture in which I remove the unwanted areas
from the stone. This is the square or rectangle
which I have with color. Now I'm going to
use the scissor and then cut out whatever
is not required. For example, I'm going to cut this and let me not go
overboard and cut too much. I've cut that portion. Now I'm going to cut
the negative shape. This is the head and the
closing of the shape. And now I can come in
and cut this portion. You can see that I've gone
wrong with proportions. If the head is here, the body will end somewhere
here and outside the device. So I don't want to
continue like this. I'm going to cut this whole thing off or
we can take another page. Let's add one more page
here. Let's start again. Now let me use black color. I have this rectangle from
which I'll be cutting. Just to take the proportions, this is where the legs will
be and this is the hip. Let me first cut out the external shape on
the left hand side. The hand, the torso, and here will be the leg. Let me cut this off first, and I'll do the same
on the other side. And here I'm going to cut
the space between her legs. The head. This is the outline for the hand and here goes the
negative shape. I have a fairly okay drawing. I'm going to cut some
more portion from here. And some more from here. Even the hand needs
some repair work. But I won't go too much and
try to adjust adjust this. I need some work here. Yeah, I'm happy
with what I have. This is just a different
way of drawing something. It's like, if you
don't have this app, you can take a black paper
and then try cutting out portions of paper which you don't want and you will end up with
something like this. I hope you have enjoyed this
different way of drawing. If I find an
application on Android, which acts like this, then I'll surely update this lecture. But until then people
with IDS can use this and see we started with
drawing few fruits, then we drew this
bird and this bird. This was a mistake. Then I drew this
and finally this. Thank you for watching.
 Mandar Marathe, Fine Artist, Sculptor, Illustrator, Designer