Transcripts
1. Introduction : Hello everybody and welcome
to the Solid Works class. My name is Alan, I'm a
product designer in them, also a big fan of 3D designing. In this course, we will
learn fundamental truths and concepts for this SolidWorks engineering
and design software. So SolidWorks is one of the largest computer
aided design or CAD softwares group
values across numerous industries
including manufacturing, automotive, aerospace,
defense, medical devices, robotics and automation, consumer products
construction and many more. This course will run through
the core concepts and tools available within SolidWorks to help us design and
build any parts, drawings, and assemblies we may require for our
specific project. So start by getting
comfortable with the user interface and
workspace of the solid works. So we'll move on to creating our first sketches
and design our fist. But once we've learned in
number of paths designed to introduce drawing
tools to generate technical or
engineering drawings required to
manufacture our paths. Finally, we will learn
assembly tools to help us design and build our
assembly projects that contain
multiple components. So by the end of this course, you will have a
strong foundation of the SolidWorks fundamental required to create and
design your own project. So let's get started.
2. Solidworks Environment : Hello everybody and welcome
back to the SolidWorks class. My name is Alan, and I will be showing you how to navigate
through the software. So let's get started. So let's first open
up a new file. To do that, we go on to the top left corner,
Wait, region file. Then click in. The drop-down menu will
pop up, click you. Or you can press Control plus in this window we click
on pad, then press Okay. So let's wait for it to
finish uploading or kay? So as you can see now, we have a new project, we have a new file opened. So there's a lot of stuff here, but don't worry, we will
look at each and everyone. So we are going to start
by creating a sketch. In order for you to
create a sketch here, you have to select a plane
which you want to sketch. Then you start your, your sketch. So you're playing. Your drawing determines how
you choose your, your plane. So in this, in this video, we are going to just start
with this top plane. So you can go into this, but then you click or you
ingest going to sketch here. Then you choose the
shape which you want to use for your sketch. So I would start
with the rectangle. So there are different
kinds of rectangles. As you can see, there's
this corner rectangle and center rectangle. And the three-point
corner rectangle then three points
in the rectangle. So it depends on the way you
want to draw your rectangle. So let me show you the differences between
these rectangles. Rectangle you saw after
clicking on the shape, you can see that
we have to choose in a plane since we had
not chosen the blend. So we can select the top plane. Alright. Let me normalize it. So as you can see,
it's not normalized. Non-man. Now you can see
that it's normalized. So let me show you how. So you click on to
working environment. Then. Then you drag
this corner rectangle. So you, when you click, you will specify
the first corner. So it will be fixed. Then you move your cursor. All right, so this is our, our rectangle, the
corner rectangle. You draw the rectangle
starting from the corner. Let me undo and
select another type of k. Let's choose
the center rectum. So this one, you draw it
starting with the center. So it takes bands going out. You can see I clicked. Then you re, you
move your cursor. You can see it's expanding
from the center, right. So let me exit and Andrew, to exit your click
Escape on your keyboard. Then undo, press Control Z. Or you can, you can go
into Edit menu and do. The shortcut is Control C. Alright. So then there's three-point, send that rectangle, three
points in that rectangle. You specified the three,
the three points. So you click, then
you move your case, and then you click again
to specify another point. Then you click again to specify the point is you can
see we still yellow for the rectangle drew on our kids are so you can
press Escape, right? As you can see now, FOR right, this is a three-point
corner rectangle. Swipe specified this corner and then specified this corner. Then this last dead gone. Alright? So let me, let me undo. Alright, and pick another
type of rectangle. Alright? So let me select which one, the three points
in that rectangle. So it's almost similar to the previous rectangle rituals and the three-point rectangle. But the only difference that the third corner is our center. So we click, drag, click again to specify the other corner is
you can see now, here. As you can see now we
just exit recently. Alright, click. Get your game. Is,
you can see I have specified the two points only then we have
this center as well. So this center is our third. Alright? So this is the
difference between three points, corner rectangle and the three
points in that rectangle. Then we have a little cramped. It is just, it's just a type of rectangle
which is parallel lines. This line will be parallel
to this one in this line. And this line will be
parallel to this line. So let me exit. Just, I'm too fast. So let's move on to another
sketch to the polygon. So you can click on the polygon, then you click on our
environment and then you drink. So as you can see now
we have a polygon. The polygon, we can specify
number of sides we want. As you can see, it
starts from from three. So when it's three, it's a triangle,
has three sides. It means that it's a triangle. Really spring break. So you do that by
going on to this icon. Then you click isometric or
you can just click normalize. Then. Alright? So you can increase the number of sides
depending on your polygon. So the painter going,
as you can see, we are increasing the number
of sides we want, right? So you can add as many,
is many scientists, you want me just to
five, pinned up gone. Well, you can also specify
the radius and a lot of error of things that you can use to define your polygon. Alright? So that's it for now. Sketches, some of these
ones are pretty simple. You can just use it. We ingest Joe Lynn to choose them while you're on the anode. Complicated. Alright,
so let me undo. And let's choose this
circle. Alright? So I've selected this circle
then your drug, right? So that's how you
draw your circle. It's pretty simple.
As you can see. Now I want to show you this tool called the
smart dimension. This tool is used to edit dimensions onto
our sketch, right? So let me just unnormalized. Let's exit, discard
changes and exit. Now let's choose another plane. Just use this top plane. So if you use these, this option of choosing
a plane from here, when you select a plane, window popup, then you
will select your sketch. Alright? Now we need to choose one to use and use
the rectangle tool. Or K selected. I selected three
points and directing, let me just use this one. Okay. Press Escape. So as you can see
now we have drawn our sketch, our rectangle. Now we need to add dimensions. So I'm going to Smart Dimension. Then you click on the line, you went to a Derrick Jensen. You're going to see it's 55
points, nine millimeters. Let's change to seek his 60
millimeters then dimensions, and I'll leave it to 14 to 14. Alright. So we, we've drawn our sketch and we
have edit dimensions. So to exit this question save, we just go on to this icon
or you can click Okay. Now, by clicking Okay, we exited the Smart
Dimension two, we have saved our dimensions. Now for us to exit and safe, then this gauge will
go into the circle. And if you want to
exit this sketch, but deleting, what
do we have sketched, you just press this one. So we want to save. So click on this icon. Now you can see that
we have exited sketch. Alright, as you can see, now we have a new sketch
that has been entered 12 onto our list. Here. Whatever you drew, it will
be added on to this list. It will be added
on to this part. So you will see, we will notice some of
those items that we'll be using a being added onto this list as we
proceed with our lessons. Alright, so that's
it for this class. See you again in the next class.
3. Creating a Sketch: Hello everybody and
welcome back to class. My name is Alan. In this class we're
going to continue from where we live from
our previous class. We are going to look at
extruded boss and extruded cut. So let's go into the sketch we did previously and
we just click on it, then go on to Edit Sketch. Then after editing sketch, we go onto features. Then we click on extruded boss. Extruded boss base allows us to stretch our rectangle
into a 3D object, right? So as you can see, as I increase the thickness of the number of
millimeters here, you can see that our sketch, Let's say that our
sketches, right? So as you can see,
it's expanding. So we have added
60 millimeters on to erecting wave extruded
by 60 millimeters. So now we can guess Glick or K2. To Save. Now you can see that
our sketch here has been converted into
a 3D rectangular prism. So let's go on to
this extruded cut. So before we go into extra cut, we need to to add the sketch so that we
can cut through this. This is rectangular
prism, this 3D object. So we need to click on a face. We want to sketch one. Then we click on Sketch. Sketch. We can press nice. Then we choose a circle. Now let's draw this
circle on top of object. Then we add as much mentioned. We can just put foot five, foot five millimeters diameter. Then we click, Okay. Then we go onto features. We select extrude, cut, extrude cut to cut
through the object. So it's just depending on
the schedule you've drawn. So since I've drawn
here is terrible. It will just do a wall. So you select the type
of extra to catch you and you go into, you click on this
drop-down menu, gives you the different kinds
of extrude cuts methods. So this blind through and through all both.
Through all both. It cuts it cuts through
and through on both sides. So it, from this
point to this point, and also it goes from
this point to infinity. All right, so up to next, it cuts up until it
reaches the next surface. Or in x plane up to, up to vertex, it cuts
up until it reaches a. Look at some of
these ones is we'll continue with our,
with our class. Alright? So for this example, I will just select through. Alright. So let's click on k. Okay? Now you can see that we
have extruded cut object. So now we have circular
hole on our object, right? So that's it for the extruded
boss in the extruded cut. See you in the next class.
4. Extruded Bose And Extruded Cut: Hello everybody and
welcome back to class. My name is Alan. In
the previous class we looked at extruded
boss and actually cut. In this class we're going
to do a simple exercise. So we just want to draw a simple bracket using what we learned in
the previous class. So let's go ahead and
open up a new file. You click on a
patch. Press, Okay? Okay. So we need to
select the plane. We want to draw a bracket. Just choose them. I will just choose
the front plane. Okay, lets us work
with the front plane. We normalize it. Then we'll go into sketch
to start our sketch. And I'm going to choose
center rectangle. Then according to the
center, drag my cursor. All right, now we have our
sketch, our rectangle. Next tip is to dimensions, right? So 100 millimeters. Let me just write six
to 60 millimeters. Alright. So now we want to go into
Features and texts through the rectangle by the next
foot by ten millimeters, I can just put let's try 15. Let's just leave it
did 15 millimeters. So click. Okay. So as you can see now we have, we have our 3D object. So our next step
is to it another, another, another pad so
that it becomes a bracket. So let's choose selected
face to it, the rectangle. So after selecting your
face, you choose sketch. Then now we, let's
normalize the end. Alright? So the next step
is now to choose the rectangle we want on this, on this sketch one to it. We need to select the
corner rectangle, went to align it won the same on the same corner of previous,
previous rectangle. So now that I've selected
the corner rectangle, and I can now go
into this corner. Then click and drag. As you can see, our
rectangles are aligned. So once I reach this line, okay, I didn't select
the last corner. So now we went to
add dimensions. I selected the wrong. All right. 20 millimeters. Okay. Then this one right here. That's okay. Alright. So gauges not ready. Next thing we want to
know is to extrude. Alright? Now we need to extrude. So extra BY by 65
from six to five. We're going to just put it. Eighty-five millimeters. Five millimeters. And click Okay. Now you can see that
we have the bracket. So the next thing we're going
to do now is to add some, some walls when to eat it. So I'll click on to
this face and sketch. Let's normalize, chooses to escape. So let's say dimensions
and let's also align it. So we're going to make it to make it ten millimeters from. So we're going to make it to ten millimeters
from, from the line. Doesn't blend. Now we
need two dimensions. The diameter for the circle. Alright. Okay, Let's just hit. Okay, now ten is fine. So we need to draw another
circle on this side. So I'll introduce you to this new feature,
the Mirror entities. So the first two meter
we need mirror line. So I'm going to
draw a center line. Center line does not appear now as kicking chairs
for construction. Alright, let's click skip. Then we click on mirror. Then we select the entity
is one, meter, this one. Then we select the mirror
about this line we've drawn. So as you can see, we
have another simple one. The other side. Let's click. Okay. Now we need to extrude cut
to make them to joules. Extrude cut. So we need to make them true. And click on k. Right. Now you're going to see that we have two doors on the
other part of brackets. So the next thing we're
going to do now is to add rows also onto,
onto this part. We will click the surface, then we're going to sketch. Alright, so we
need to normalize. Normalize. So again, all right, so let's draw circle. We can know some dimensions. Let's make ten millimeters. Then we can specify the distance from this
line to this point. We can make it ten as well. Okay? So we also want another circle
here, another row here. So instead of us drawing, drawing this same segue, we can use the same
feature we used before, the Mirror entities, right? The first thing that
we need a middle line. So let's draw our middle line. So we'll use our center
construction line. Sorry. Okay, so now we can redraw this cap. So now we can select
our entities feature. We, entities, we need to meet at this circle about this line. Okay? Now, click Okay. Then the next thing
is to go on to feature so that we
can extrude cut. So we're going to
cut through all. And then click Okay. Alright. So you can see
that we have added them to, always have that part, right? So now the next thing we
are just going to do unto all bracket is to
it, it fill it. So the first 28 Phillies
will go on to features. Right? After clicking on features. We want to feel it. Right now we have selected for that different
kinds of Philip. There's this constant
sense feel it and we have referred
in both sides feel it in my fist fillets. Furan fleet. So I'll just select
items to fill it so that you can see this part. Can choose. Right? We use click
on this line. So if we want to fill it in, you go just click on
on the, on the agent, then you select
This part, right? So first fill it requires us
to select the faces we want. So this one will be this
descender, this interface. Then we decide this and
then we decided face. Now you can see we have round
fill it on the preview. So let's click. Okay. As you can see now we've added the
affiliate effects, fill it. We can do this. So let's go on to features. They feel it, right. We can select this face, then recording. Then we chose this. So the face you want
to feel it is the one which is put on the, on the center, right on the top. But as you can see, but the problem we have now is that our circles are in line, line of fill it. So just can we do, Let's just choose this
or that type of use. These are the type
of affiliates. Alright. It's clear selection. All right, ten down, we can
select the edges. Then we can increase increase our radius
or feel it trade. Yes. So that's it. Then we click. Okay, let me just try
to put twenty five. Twenty five, twenty five. Let me just put 220. Lucky click, Okay. Right. So this is the result we
get from adding feel it. Right? Now we can see that we
have nice mechanical part. Right? So that's it for this class. See you again in the next class.
5. Extrude Bose And Cut Exercise : Hello everybody and welcome
back to this week's class. My name is Alan. In this class we are going
to look at Revolve Boss. Let's open up a
new file created. Let's wait for it to
finish uploading. Okay? So let's say you want to draw a cylinder or something
like a cylinder. How would you do it? Of course you would use the
circle and then extrude Boss. Let's do that right away. Let me use the top. Now. Let's sketch. Alright. So it's intimations. Just leave them there. It's 1603. Alright, now we extrude. So one millimeter. Right? Now we have a cylinder. So this is our cylinder. In this class, I will
show you another way you can do it by using
the revolve boss. So let's write index, discount and change. So now let's choose the
right plane and sketch. When to use this this feature called the
four posts or base. So it's going to sketch. So if want to draw a cylinder, we start by drawing a rectangle. So we can use the corner to corner rectangle. We can now add tell us much. All right, Let's interface. Let me just introduce it to just reduce it to maybe 40, 4215. Okay. So we've made
intimations blend and let's make it five K. So now the next thing is to
select to the fourth plus. Okay? So one revolt was you have to select an excess
of revolution. Because this part, we will revolve around
a certain point, which will be our center. So I want this line
to be our center. As you can see now
we have a cylinder. So the thing that happened is that our rectangle is
revolved about this point. For me. What? For me? Yeah. For me. Circle. It can revolve. You can choose the degrees
of freedom solution, right? So you can make it, let's make it 28 degrees. You can see a 180 gives us half. So you can see how it
looks like a water trough. The shape of a water trough. So we can also maybe
make it 910 and a decrease in 990. So let me, let me
change it to 316. Alright. So we give our cylinder, as you can see, we
have our cylinder. So what if you want
to draw a sphere? Of course you can use, they actually did
both to do that. So it's more challenging if you want to draw it
using the x-ray bus. Almost impossible. So the best tool you can use
this, this revolve boss. What you need to do is
to draw a super fast. Then you revolve it about
the center of the circle. So let's try it out. So far we just need
to throw in here. Or I can just exit the sketch and describe
whatever we have done. So let's use the front plane. Then we normalize it. You can press
Control plus eight. Alright? So let's go on to sketch. To choose a circle. We can use this intercept. And we'll go on to be center
and draw our circle, right? So the next thing we
would do here is to draw a line on the center
of the circle. And then we need
to cut this off. So we can use this
trim entities feature. So the treatment is
which has just used to jim to cut out
the unwanted parts. So we don't want this
part, this part. So I'm just going to
cut out this part. As you can see now
we have half circle. Alright? So we can click Okay. After clicking on k, Now we can go on to features
and select both of base. Now, our axis of revolution
would be this line. All right, let's see. We have sphere. So this is the way you
can use to draw SV. Alright. So this is all you can
apply the revolve feature. So the revolve feature is
a lot of applications. I think we can draw one more. One more exercise on
the phone to pause. Alright. Okay, So we can choose
the front plane, sketch and choose the line. Unique shape. All right? Okay. Now we need to exit. No Can going to
features and riffle. Alright, so choose
this is the center. So as you can see now, we have that if that, if that chip, alright, so we can try to lend me just clear this initially and
maybe pick this part. So we can devolve
about this line. And also if I choose this one, we can revolve about a line. So as you can see, you have an empty space here. There's an empty, empty
space around you. So let's try to choose
another selection. Let's try this one. See the type of shape
we have purchased. You would have
done this by first drawing the dispatch circle. Then you extrude. Then after that you
draw this circle. Then you extrude cut. After extracting
cards, maybe up to, you extrude cut up
to up to this point. Then after executing
cut up and up to this point and you
draw another segue, then you extrude Boss, Extrude this circle up
to this this length. So it would have taken
you some time to do this, but I've just use the one
feature to draw the bow shape. So that's it for this class. As it for the revolve based. See you in the next class.
6. Lofted Surface: Hello everybody and welcome back to Solid Works
class name is Alan. And in this class we
are going to look at planes and they loved
it, boss or base. Alright, so let's
open up a new file. Paths and click Okay, wait for it to
finish. All right. So you may have some maybe projects
which are a bit complex, which require different kinds of which require a number of
planes in numerous places. So that's what we're going
to look at this class. We are going to design something
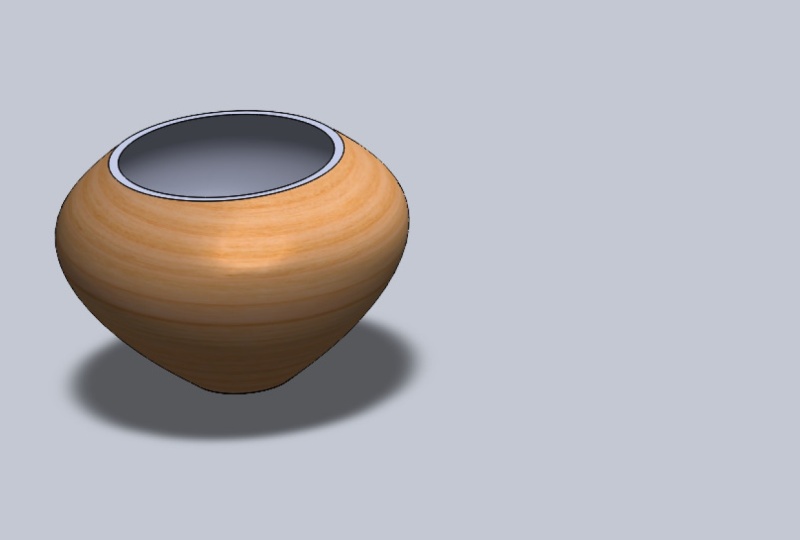
like fast a flowerpot. Alright? So in this class we will
start by choosing your plane. Alright? Then we'll go on to reference, then go on to plane. Okay? So as you can see, we have a plane that
has been added. So we can change the change. Let's change, or
it is on the top. So there's no problem. I wanted to change this
side the direction. Since it's on this side. There's no need to change. If you need to change,
you can go on to flip. So now we need to edit distance
table to meters from, from our reference plane. So we can just click Okay. So as you can see now
we have two planes. Now. We have this plane
number and reverse wave, then the first top
plane, this one. So we can go into this plane and also another plane
to that right away. No case where if you can
see that we can edit, we can change we can change the distance from
the plane to 2020. Right? Now you can see that we
have three planes now. So I will just select
the first plane, the top plane, and then go into sketch and now draw a circle. All right? So our first circle
of radius, radius. Okay, let me put the
smart dimensions. Click and then we trade. So they tunnel between the
six meter, six millimeters. Right to Vinci. Now that we have
our first circle, then we on another
circle to this plane. So before we do that, we need to save what
we've drawn here so we exit this kitchen safe. Alright, so now we are able to draw on to a lack of brain. Go sketch. And then we just normalize. It. Becomes easy to sketch. A circle on this one to be
quite maybe for radius of 40. Okay, Let's dimensions. Dimension is 90 millimeters K. So let's save what we have. Right? We have our Now we have our second
circle, one plane. So let's add another
one to display. One, this one to be slightly smaller than the circle
or no phase plane. And select a sequence with the same dimensions. 62 millimeters. Now we can, so now we, we've done sketching, our circles are now
different planes. The next thing we'll do is to
go onto features then love, love, love to pause. Right now we select
our first sketch. Select our second sketch. This one. This one. Right? Now, you can see that we have our nice design or fear fast. Alright? So we can, we can just hide these planes
by right-clicking on it. Then you select the eye to eye. As you can see,
we have our fast, but it's close enough. So we need to. As you can see, the fast
is close to one prop in those white on the bottom side. So I will introduce
you to the shell, the shell feature, this one. So in order for you to do that, to go into Features, then click onto the shelf, then you select your Pacto. We need to show the preview. So this is what it
will look like. So we need to change
then parameter z. Let's increase by 202022. So it didn't make us. Alright. Theresa key or I can work
with than one meter. Let's put 1.5115. Okay. Right now you can see that we opened up the fastest. So this looks nice. Looks really nice. So after designing this, you can maybe use a 3D printer to make your flower
pot using plastic PLA. So this is fairly nice. Very nice African touch flop. So this is, as you can see, this is a coefficient. They love it because it
allows you to draw some of the conflict complex
shapes that are available. So you may be doing
such a project, but you wonder how can I
trust? You can use them. The reference planes and then
you make use of the riff off to pause or base feature. So let's do something. Sketch. So let's
go on to the last. Okay, let's go into the
first sophistication. We edited sketch. What want to do here is to
remove this circle, right? So I'm going to delete this
circle and replace it with one to replace it with delete it and replace it with
a rectangle or a square. All right, Let's choose
the center tingle. Going to this center, right? Dimensions. We'll just
make it a square. You to notice the difference. Alright? So four millimeters. Four millimeters. So we have a screener, k then we exit. Wow. Look at that. Look it. Alright. So now you can
see the difference. Now it looks nice, looks, looks very neat. So this is the result we get
from mod wheel chairs or so. You can see now you can do flop was much more dose or any
convex shape you want. We can even add
the fillets on to the edges just to
make it look nice. So we can select the edge. Then we'll go on to fill it. Under the features. Are eight another and
another and another. This is our result. So as you can see, we
have very nice ship. In the next few minutes, I will show you how you
can make it the color or you can change
the color of this, this drawing of this project
we're done, they flop. What? We can do that by
dilating what we need to color this one and this one. For now let's just neighbors, but then you go into this fee. Then you choose appearance. So you choose the
type of material and plastic, metal, painted, glass, solid lines, fabric, organic, chooses not to try. Let's see what's available. Right? Look at that. So this is the type of stone
that we have selected and look at how it looks like. Isn't it cool? So you can choose whatever
type of appearance you, and you can choose any type of appearance you and I've
chosen the light concrete, the inner part of fast. See now, fairly nice design. Design. So let me just
save this weekend. Press Control S to save, save, save. So that's it for this class. See you again in the next class.
 Allen Mupandasekwa