Transcripts
1. 3D Isometric Diorama in Nomad Sculpt : What's up, guys drug-free Dave, here and welcome to my
newest class on Skillshare. We're going to make
a 3D isometric diorama in Nomad school. I've always wanted to make one. So I decided to try
to make one in nomad scoped and I think it
came out amazingly. So the first thing I wanted
to do was teach a class. So I can show you guys
everything I know. One thing about these
scenes as they feel really complicated in a feel
really advanced, but it's really just small
individual themes broken down. So when you're
taking this class, don't think about it as a
class to get to the ending, think about this
class is a lot of tiny tutorials are put together and you come up
with something amazing. Each class is developing
something or making a new item. We're going to learn
how to decimate and really make our models low poly. And when you're
doing a scene like this ball of your models, all of your scopes
have to be very small because a
lot in one space. It's actually really fun and
really easy once you sort of get your formula
going and you can figure out how to sculpt, but also how to make things efficient and optimized
for our scene. So of course by now you know me, my teaching style, very relaxed. There's no stress involved
as long as you have some patience and you're
willing to sit with me. And you want, if you
really want to make some beautiful 3D models and
3D scopes, then you're good. You're in the right place.
So all that being said, let's move on to the next
video. The class project.
2. Class Project: What's up, guys? Welcome to the class project. So of course we're gonna
make a little scene. There's a lot of classes and each one will usually touch on one or two different things or items that we're gonna
build along the way. Make sure to take breaks and don't stress
about this stuff. I'm gonna go through
everything slowly. There is a lot, but it's
really just a lot of small, tiny things roped together
that make one big scene. So don't worry too
much about it. It seems daunting, but it's not. We're going to have a good time. So be sure to download all
of the extras and things in the projects
and resources tab. I'll have a bunch
of three fruity, three fruity free 3D things that we can add in at
the end of the class. Some of my sculpture,
some of my characters, things like that,
also makes sure to download the environment. That's the environment that
I use for all my scopes. And essentially you just
go to the environment and you just tap the current one and then just import
that image in. That's what I use for
all my 3D models. So that's included as well. So I'm gonna be using Nomad
sculpt on an iPad Pro 2021. So my machine is
fairly powerful. Just be extra careful
when you do voxel merges or do any sort of big, heavy things like
like voxel remeshing. I'll usually tell
you when I bought so remeshing, you'll even see me. I save the, I saved
the project before I do some really big
bucks or 3D meshes, because that's at least
in my experience, that's when the
program might crash. So just be aware of
that and save often. I don't even have autosave on, but I save very often. So just in case the
program crashes. One more thing about my classes, which I probably don't
have to say because I've been seeing it in action. This is your scope,
this is your model. So if you have
something that you want to change or
something that you see that you may wanna do different than
what I do in the tutorial. Please feel free to do that. This is your art. Feel free to make it to
your specifications. I'm just here showing
you exactly what I know. So whether you follow that or you take what I
know and build on it, both are great and acceptable. And that's what I hope
to see in my classes. I think that's pretty much
what I wanted to go over. So let's finally get
to some sculpting. Actually, we have a
little more setup. We're going to make some new
tools and things like that. So that's what we'll get to
first in the next video. Getting Started.
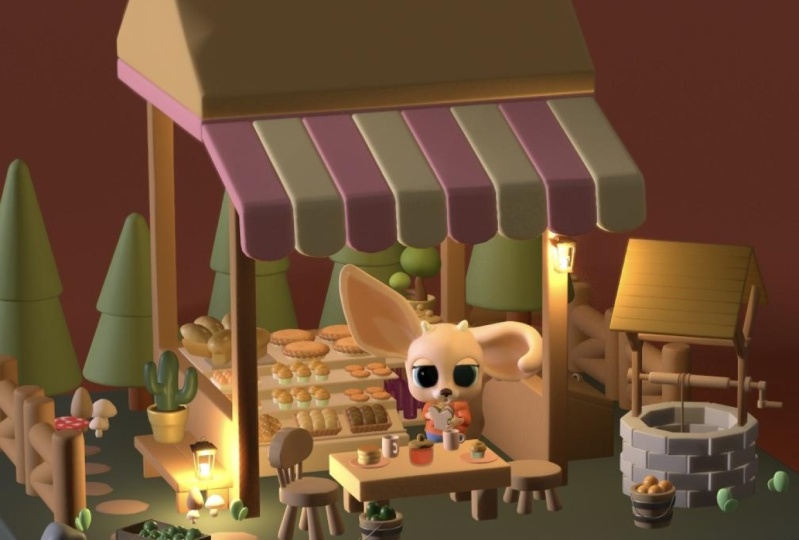
3. Getting Started: All right guys, welcome.
So we're going to make a scene very
similar to this. I'm going to try to keep it very simple because there's a
lot of elements going on. And don't get overwhelmed when you see it
because it's really just small pieces all brought together at once to
make one bigger piece. So when you see it all at once, it may look overwhelming, but it's really not
once you break it down. And I'm going to help
break it down for you. And we'll have some
fun with this class. So I'm going to exit out of this and then
we'll get started on a brand new
scene as you would. Alright, so we have our
brand new scene here. And sometimes I edit in Metcalf. I think it's a little
easier to see. So I might go back-and-forth
makeup and let PBR. But just so you know,
why minus red or white. And make have just means
it'll ignore all the lights. So you can kinda see the
models a little bit easier. Also just make sure
that you're in orthographic to start with. And there's a few brushes that I think are really
great that I use a lot. The first one is
the smooth brush. So you can just tap
it and tap clone. And once you tap clone, say maybe name it smooth color. I already have mine, so I'm going to delete
these after I make them. So we have smooth color. So once you have that, just go here and just lower
the intensity. And that's all you have
to do. So we just want to use the smooth tool,
but we're lowering, we're lowering the
intensity of the, of the brush so it won't
move the mesh around. It'll just smooth out the color. So we might use this later. So that's the
smooth color brush. And then you can just save it, and then it'll be saved so
you can come back to it. So the next one is,
what is the next one? The next one is the
rounded edge tool. I use this one to
smooth everything out. And this is how you make it. It's as close to the smooth color because
it's still the same tool. So we want to tap
it and tap clone. Let's say we just name it edge, edge tool or edge brush. So you can name
it what you want, but this is for the edges. We're going to use this a lot. So for the smooth edge brush, you want to do is go in here. Set the fall off the falloff, set the falloff to flat, then go down to grab
dynamic radius. And I believe that is all you
have to do for this brush. Or there's one more step. Go to the pressure, this little hand. Turn this off. So uncheck, Use global settings. Basically this just means that all of the settings
have the same pressure. So if you're using
the Apple pencil, the pressure settings
are all the same. We want this one
to be different. So we're going to uncheck. This will weaken. You can go to preset, tap on it and then tap flat. It's probably easier
way to do it. Preset tap flat. Okay, so now the
pressure is flat. And then we have our settings
here fall off as flat, grabbed an image gradients. So let's just see
these settings. And then you're good to go. I have mine here.
Alright, so there's just a couple of the
things I want to go over, just so there's no confusion
of what I'm doing. There's a solo button
here down on the bottom. And I think you can set
it up here somewhere. There's these little, these
little display settings, and then here's the
shortcut buttons. So there's solo, which
actually isn't a shortcut. I thought it was. There's
also a lock selection. So if you don't
have that, you can tap the lock selection. So in case there's a bunch
of things on the screen and want to just
focus on one thing. You can just tap Lock. So I might do that later. Also, here's the
little voxel Ramesh. That's this. You might see me
go down here and pull this up and do
the ramus from here. It's the exact same thing is
if we were to remiss from up here and do these
steps and then Ramesh. So it's all the same thing. The voxel 3D meshes here, or you can always just go up
here to the options voxel. And this is the same,
the same thing. Okay? And another thing is the pivot tool or
the Pivot option. So in our gizmo, Let's say we add and you can go ahead
and add this with me. Let's add a box,
will flatten it. Let's make it bigger.
Make sure you hit front will make it a little bit bigger and
it will flatten it again. And we can go ahead
and validate it. And then we can
voxel ramus rematch. See, I might pull up from
here and go to like 200. So if you see me doing that,
That's what I'm doing. But if you feel more
comfortable just going up here, just tap here. Voxel 200. And you can voxel 3D mesh. So let's say we have our sphere, a tap on the sphere. Let's bring it up. Don't worry about trying to remember all these things I'm
telling you now. I just want to give
you a preview of them. So when you see me doing it, it'll be less confusing
and you won't be like, oh, like what is
this quick move? Because sometimes I
move a bit quickly. So I just want to
show you these things so you have an idea. But, but don't, don't worry about trying to remember all these things now, anytime I do it, I'll
probably mention it. So no, no stress there. So when you bring the sphere up, Let's say we want the sphere
to be on the surface. You know, like let's say
this is like a foot. And we want the foot to stay
on the surface of the floor. A neat little trick
is you can tap pivot that adjusts the
adjusts the gizmo. So right now the
gizmos in the middle, because that's the
center of the model. But you can adjust that. So
let's say we bring this down the right to the edge of the floor and you
tap pivot again, and that sets it in place so you can move your
pivot around anywhere. And why this is useful is now
it'll stay at that level. So let's say we
need to resize it, even though it's
coming out the bottom, It's still on that level. If we wanted to move it around, it's gonna be still
on that level. So it's just very
useful because we'll be doing a lot of things where we want to put something
on a shelf. And it's just nice to be
able to make it a little bit bigger and it stays
on the shelf, like it stays right
on this on the shelf. So I found this to
be very useful. And you'll, you might
see me doing it during the tutorial. Okay. There's also a snap button. So the snap is right now
I have it at 90 degrees. So if I rotate like this, it'll go 90 degrees. And you notice it turns
around the pivot point. If the pivot point was
still in the middle, you will hardly see a difference
because it's a sphere. So you might see a little
bit of a difference, but not much. But when she moved the pivot, then then it moves 90 degrees. You can set this to
whatever you want. We might set it to something
a little bit later. If we want smaller increments, then you can do that. Let's say that this is our base. So this is the base, this
is the bottom flat part. And we're going to build
everything on top of this. We want to make sure
that it's in the middle. So let's go to our gizmo
options and we can hit it. Well, if it was
not in the middle, like if it was here, then you could go here and
you can hit Move origin. That's something you can
do with all the models and things like say the sphere, we want to just put
it in the middle. Boom, now it's, now
it's in the middle. So that's the move origin. Also do this really quick. Go to your symmetry options up here and go down and make sure that you have a show
line you don't really need. So plain, just have show line. And essentially what that is, is see how it shows
you the line. So this will, this is
the symmetry line. So let's say we wanted
to just solo this. So if you had the
symmetry option on, if you have it off, then it
will just act on one side. You have it on, it'll
act on both sides. So that's very, very useful. Now if you wanted
to do like this, but you want at the
top and the bottom, then you need the blue. So you'd go to your
symmetry, the blue one. And now you see this
blue line here and I use S4, four dots. So we have the red
is left and right, the blue is top and bottom. But there's also like
the very top and then underneath, that would be green. So that way like if
you wanted to do something here, it's
also underneath. So that's just a quickie
on the symmetry. Again, don't be trying not to be very overwhelmed
by this stuff. I just wanna give you just a little pre
tutorial prior to that. Prior previous previous team prior to prior to the tutorial. So don't worry, I just
wanted to kind of go through those things
because sometimes I can speed through the videos and I'm so excited to get started sculpting that sometimes I feel like I might throw
a lot at you at once. So those are the main
things that we'll do. Again, I'm going to talk you through these
things when I do them. But I just wanted to
give you a heads up. So we can finally
get to sculpting. Alright. So I think in the next
video we'll use this as our base and we'll finally get started with our little scene.
4. Low Poly Love: Alright, so let's just go
ahead and get started. So I want to start from scratch. Just so there's no confusion, we'll just start from zero. So first I'm going to add a box, and this will be our base. So I'm just kinda
squashing it down. Make it a little bit bigger, and then we'll do
something like this. It's a perfect square. And I think that's
looking pretty good. So let's rename this to ground. Alright, we'll validate it. Okay, It's looking good. So now we can box
will re-emerge it. Or voxel or just box
will remeasure it. And what this will do is it will sort of
give it a little. It'll give the mesh some
strength so it won't be so soft. I like to call it Clay. You knew that was
going to add that. I add that to all
my all my videos. I love that clip and
I do like to call it clay because it's, you
know, it is sculpting. So I kinda think of it as clay. That's how all this
stuff makes sense to me. So voxel remeshing just sort of makes the clay a little bit harder and a little
bit easier to work with. In the tricky part with what
we're gonna do since this is like low poly and
all of that stuff. The numbers that
we remember it at, like 200 versus 500 versus, you know, all of that
stuff makes a difference. And it's not an exact science. So sometimes I
have to figure out the right numbers that way. Eventually, later
on down the line, we can decimate, which is here. We can decimate and we can bring everything down to
a decent number. So that way at the
end, R-CNN winds up being a low poly scene. So e.g. for this one, let's remember it around to 50. So we'll go to here voxel, remeshing and we'll go to 250. And will remember it. You see like the corners get
a lot more, a lot sharper. So this is a, this
is the big thing. So they're rounded edge
brush that we made. What this does is you
can see that it'll, it's kinda hard to see, but you start from the
middle and you go out from the middle ear that he sees he had the edges
starts to round out. Oops. So that's what the
rounded edge brush does. But you want to
start in the middle. You want to drag it out. And then we'll round
out the edges. Let's see if I can show you. I'll turn the wireframe on. Okay. This is what
it looks like. Okay. This is before
we remembered it. This is after we meshed it. See there's a lot more polygons, lot more little squares. And this is after we did run one rounded edge and
two rounded edge. So let's do a few more. Okay, So I know this
is a little confusing, but sometimes people want to see the wireframe and
things like that. So we've used the rounded
edge on this square. Now, this looks more rounded, but it still looks
like a square. Once you scroll up,
you would never think that all like
these is a rounded edge. And that's good because
when we decimate, so now we'll go back here. Decimate. Here. We can decimate. So what this does is it
cuts the polygons in half. So you get these kind
of weird shapes, but it's lowering the size. So now it's 34 point to decimate 17.1 and so on and so forth. And it keeps going down. And notice what it's
doing with the edges. So this is what we want. There's sort of concentrated on these edges so we can
maintain the shape of the, of the, of the mesh. So 4,000 is like, It's not bad but
it's still too high. I like to go lower. So I'm going to
turn this wireframe off so we can just see the mesh. So what I'd like to do is just decimate until it looks crazy. Then I will decimate no more. So 4,000, Let's
go down one more. Cuts it in half. 2000.
Let's go down again. 1,000. It's still looks pretty good. Still usable. And then we can try it again. And it's at 05:37. And then it starts to
look a little wonky. Starts to look a little wonky. But still very, very good. This is the part where
it's subjective, like it's up to you
if this is okay, if you want to keep it or
you can go back a step to where it looks
a little cleaner, but it's just like more. The file size is a
little bit bigger. So, oops. I'll keep it up. I'll keep it at
1,000 because later on we can always come
back in remeshing. We did 250. So just
as an experiment, let's add, or let's, let's add another box. And this will, this will fall under examples and tips because I always get
that on my videos. I need more examples and tips. So I'm gonna do a, a lot of examples and tips. Alright, so we have
the same thing we did a box, we'll validate it. And now we need to
voxel remeshing. It. Will voxel Ramesh, this one. Let's just do 200
instead of 250. So we, we missed this one
at 200 instead of 250. And we have rounded edge brush
once, twice, three times. Okay, so we did the
rounded edge three times. This one was 250. This one is a voxel
remastered at 200. Let's see what happens
when we decimate. So we have 123. I don't know, I don't know
why I'm counting down 702. This is 352. Now if we turn it, it's a
little bit wonky on the back. You know, sometimes you have
to look at the other sides. But it's still decent. I would I would I
would say that this looks better than this one does. Let's see if we spin it. How the back of
this one, it looks on the back of this one is okay. But either way, so you see it's not really
an exact science, but essentially we just want
to have the lowest size. So this one is 352, and it looks better
than this one. This one is 1,000. So there's a lot of that that's
going to happen. For me. This is essentially trying
to make something is a low poly project is
this kind of stuff, figuring out what we
need now this is 352. I could always step back to 702 and I think
that looks great. It looks better than this one. So I'm just going to delete this one even though we named it. So now we have our
ground and remember, I want to put it in the middle, like I'd like to just
put it in the middle. So I'll go to gizmo and
then just do move origin. And now it's right
directly in the middle. So we're gonna do a lot of this. And now really quick, Let's figure out the first parts
of our little shack. So we're going to sort of
put it towards the back. So the first thing is we'll
make a square or box. Okay, Oops, you can
take it off, edit. We can move it up. And let's just tap font and let's just line it
up with the ground. Like that. I always make it a little
bit lower than the ground. Okay, So this will be
essentially our shack. Let's make it a little
bigger for now. I should have moved the pivot
point like I told you guys. Okay. We can probably make
it a little bit bigger. Let's move the pivot. So I tapped on pivot and now I'm moving it down to
the ground plane. Tap it again. Now I can I can resize and it'll stay on the correct level. Let's move it back some. So maybe something
like this for now. So it doesn't look like a stall, but this is how I make my
systole and everything else. It's actually quite simple. We're just going to
make two more boxes, are a few more boxes
and we're going to cut the front out. We'll cut the windows out. So we'll do it that way. So this can be, well, we can rename this shack. The name might get
changed, but that's okay. So we'll validate it. And I'd like to just voxels. Voxel re measured at 200. Okay, so we reinvested at 200. So now let's clone it. And I like to change
this name to Shack x. I put Xs for things that I
want to for specific reasons. So we can remember that
we need to delete these. So we have Shaq x. So shack x, we're just going to make the front
part of the stall, so I'm going to pull it out. I'll shrink it. And this can sort of be the front
part of our stall. Will shrink it a
little bit this way. Actually we can do it
a little bit more, shrink it here a little bit
more, something like that. And I also like to
see how low it is. Yeah, I also like to
stretch it out that way. I know it's going through
the bottom as well. So now there's a
small box in here. We'll be able to do a
Boolean operation and extract that shape from this. But before we do that, let's go to this box again, the main one, regular shack. And let's clone that. And let's just do one X
so we know for this one, let's stretch it out this way. And then we'll make it
smaller, little bit smaller. And we can use this
one for Windows. And I like to just line
it up with this one. Let me shrink it first and
then line it up like that. So these are gonna
be, are the windows for our Shack and I'm actually going to make
them a little longer. So maybe something like this. Make these. Here we go. So something like this spans all the way across. Easy enough. Now the next part is we're going to clone, clone this one. So we're going to
clone shack one x because we just want to spin this so we have a window coming out
the back as well. So let's just spin it. I'm on 15. That would have been easier
if I was on 90 or 45. 45. That way 22 clicks and it's
in the right position. So that looks good. Alright, so we have
all of our cuts. I think I don't think we
need to make any more cuts. So the only other thing that I was that
I was thinking of, I will discuss in
the next video.
5. Love Shack : So one thing I
noticed when I was making my other
scene is I tend to make this a bit small, like like not tall enough. So let's remedy that
pretty quickly. We'll just grab all of our boxes and we'll just move
them up like this. Just move them up
a little bit and you don't have to
actually do this. I'm not sure how
tall you made yours, but if it's just a regular box, sometimes it might
not be high enough. And later on we can go
back and raise it up, raise our stall up
a little higher. But I just want to get
ahead of it and do it. Now. I'm going to grab I'm
gonna grab this one because this is the
front part of the stall. So this is this
main this main box. This is the, this
is the back window, so just disregard this one. But we want this one that
we made in the front. And actually this not
quite long enough. That's okay. Oops. We'll grab that front one. I guess it's shack x. And then we'll grab
the main shack. Will grab those two. Let's see if we need
to stretch them out. Delicious, stretch them out. Alright. So we'll just stretch those out. And everything else
looks pretty good. If you want to grab
the other boxes, like raise the windows
up, you can do that, but I don't really do it since
I since I talked about it. So we'll take this one
and then the back window. So we'll just grab these two and you can stretch
them out as well. Maybe you should raise them up. So they're kind of equal width. Everything else? There we go. So now the shock is a little bit taller and all this here
a little bit equal. Hopefully that wasn't
too confusing. It looks silly now, but this is, this is probably
one of the biggest like Boolean operation
things that we'll do the check. So it's important. So this is our
main regular shack that we're going to extract
all these shapes from. And this is actually
a lot of fun and I think we have the regular shape. Let's grab all of them. Let's turn the eyes off of everything but our
regular initial shack. Let's save. Because like I was
saying, I always save, I don't have autosave on. So like, I like to say before
I do big boxful merges. So now we'll do a voxel
Ramesh in probably like 404, 50, Let's do 450. So let's do 450, will rematch. And there we go. So now we've cut everything out and we have a very good-looking stall. And we've actually
mentioned that for 50. So that makes it nice and clean, crisp cuts, which
is what we want. Alright, so this is
looking very good for now. So the next thing we can do is we can probably bring in elements that
we want to have in here. Like we can make
like a little r, little stall and
things like that. But some steps in there, maybe like a little
table in there. And that's gonna be pretty easy. So everything else when
you're thinking of a scene, it's all shapes. Everything is made up of shapes. And once you start doing
more of this stuff, when you look around
your own room or your kitchen or wherever, you'll be able to figure
out how to make those, how to make things
out of shapes. That's really all it is. My other scene. Everything is just a shape. So when I look at it, didn't save any e.g. when I look at this
old to sculpt, this is a bowl that I
made with the leaf, which is, will probably make
something with the late. But the ice cream
is just tourists, like it's just the round rings. And then the top is
just a sphere that I just kinda went over. You know what I mean? Everything is just as
literally just shapes. These are just like squares
that I just carved. These are just cylinders that I just flattened
pancakes or cylinders. Everything is just shapes. It's just when you put
them all together and you really think creatively. That's when they start to
look really, really good. Of course, using
Boolean operations, you can make things like
this really easily. You can make a
shack or anything. Exactly how you want it to look. Okay, that's enough. That's enough. Sometimes that
can be very long-winded. I apologize. But I really,
hopefully it's wisdom. Hopefully it's taken us wisdom. The rounded edge brush, again, very, very, very useful. You see our line down the front. And right now this is 517 k. So the one that I showed you in the
beginning was about, the whole thing was
about this size, was about 517 k. So now you know, this
is way too big for just this little
skeleton of a shack. So this is where rounded
edge brush comes in. Pulling out from the middle. I think I'm gonna do probably
about around five of them. So we'll do around five of them and we'll see
how that looks. So now will decimate. Go here, decimate 12. I don't know why I always
start to count down. I apologize. Something I have to work on. I have so many ticks
that I have to like, take care of what I'm doing
classes. That's good. 501. I think that's I
think that's good. 501 is very good. It'll probably get very
wonky if we go low C. Yeah, very wonky. But 501 is very, very good. I'm just going to
change this name to we'll just change
it to regular Shaq. So now we have the ground
and we have our Shack. So let's bring in a new box. And this can be our, if we want to make like
like little steps. So we can put like wears
and things on layers. I don't know where I
got that name from, but I swear I swear
it's a square. I'm pretty sure it's a word
like goods and things. This will be like our
our main counter. And we can even put
this further back in in our scene if we want. Let's move it back here. Maybe we'll skinny
it up a little bit. And then maybe we can, we can duplicate this and we
can make little steps. But for this one, let's
go ahead and validate. And then let's get
this to a low poly. So let's voxel Ramesh it at, let's try 300 this time. Now the edges are
nice and sharp. So we'll take rounded edge. And again, we'll just pull
off from the middle, 2345. And also just a side note. Sometimes my numbers, my scene vertices might
not match yours because sometimes I'll do
things and then I'll re-record because I'm not sure which one I'm going to use. So if you ever see these, this is off suddenly. It's probably because I
did some other things, but either decided
not to keep them in the tutorial or like e.g. right now, I've done two
versions and then I'm going to pick which one I think
is best for the videos. So anyway, so we did five rounded edge brushes
pulling from the middle. So let's see how low
we can get this. Here. Decimate. It'd be nice if I
can get it lower than 1,000. Okay, I'll take 983. I think that looks really good. Okay, so let's
name this counter. So we have the counter
and let's clone it. And let's name this
one counter top. So this can be like
a, like a countertop. I'm going to connect it to this. So let's take counter again
and let's close it again. And let's pull that one off. We can shrink it and then
we can shrink it like this. Maybe a little higher. We go. So now we have our
two little steps and we can put another step two. So if you want to, if
you want to clone that, or if you're in the gizmo,
you can just use clone here. And you pull that one off
and you can flatten it. And then we just move it back, like that, like so. So then we have a pretty
good little setup there. So let's go ahead and take, let's name this one. Step two, what does give
me some different names? Step three, step one. Now we can connect
them and this is good for keeping
everything organized. So the countertop,
we can let's flatten it will flatten the countertop and maybe we'll make it a
little longer this way. And we'll pull it off the edge. Here we go. So it doesn't
have to be too perfect. Doesn't have to come
off too far either. So maybe something like that. I think this looks good. So let's take all of the steps. So the counter and these steps, they're actually off quite small so we can probably
just join them. Counter step one and step two. Let's just join them together. We'll rename this counter and then we'll put the
top back, back in it. Okay, so now we have
all of these are together and it's actually 2000. So you know, what
we can probably do. 2000s is quite big. So let's go ahead
and refresh this at, we'll do 300 again. So we'll voxel, we
measured at 300, and then we'll do
the same thing. We'll use our rounded
edge brush five times. We'll do six, we'll do
one for good measure. And then will decimate again. And we'll see if we can get
it down lower than 2000. You kinda see how you can
get sizes to be smaller. Now, this whole thing is 570, which I think looks, I think it looks really good. So we're in a good spot. And this was also good
to kinda show you how I get the file so small. It's important to start thinking
about things this way so you can get more in
your, in your scenes.
6. Box Shelf: Alright, so let's take
the whole counter. And I'm not sure why. I always like to push it off to the side. I think it's just
like the way that I like the space to be,
you know, I don't know. Maybe we'll put a
little like stool or a little table back
here, something like that. But we can figure that out. But I think for
now this was this is pretty good for our steps. Okay, so how about we just
make some shelving over here. So we'll use this leaves
the top of the countertop, which is actually
I guess it's okay. Pardon me? Wants to see
if I can make it smaller. Let's make a new shelf. So let's go ahead and, and
so we have our counter. And another thing to be careful of is when we add this next box, notice how it kinda disappears. You have to be careful that
things don't go inside your whatever these
things are called. The anytime you
have something like this that you put a new shape, it can go inside of
there and you'll do, you can lose it forever. Not forever, but once you start getting like 50
different things, then it becomes a
little more difficult. Let's make a little counter. So let's flatten this up. We'll bring it up. Let's
just make it to its size. So I've just pressed front so we can just
have a nice view. And we can sort of make
this the right size. Again, doesn't have to
be super, super perfect. I never usually worry about
making things really perfect. Maybe we'll make it
a little smaller and a little more shallow. I'll move it back. And do
we want it level with the okay, So we have our
little shelf there. So let's validate it. And let's fox will Ramesh it at. Let's try 300 again. Okay, round edge, 12345. And then decimate. By
the end of this, we'll, you'll be able to do that so
fast because I do it really, really fast now, because
everything I do, I end with those steps. 707. This is good. This is way less, this is 354. So we're in good shape. And I want to just
do a small test. Here's another tip. Sometimes I'll do a
small test like e.g. this is smaller
so I'll clone it. And then I'll say, okay, well what happens if I was
to make this the countertop? Instead? Will it look
funny if I stretch it out? And I don't think it does. I think it looks better
than the one we have. So that's another thing
I'm looking out for. This is 93, this is 354. So I'm just going
to delete this. I'm going to delete
the countertop. And I think this is box one. I'll put it in there.
And I will just replace replace the
countertop with this. And I'll be very
happy that I got. I was able to lower the size. It's sort of like a
strange kind of game, you know, to sort of
figure out what you can get away with. It, get your size is small. Okay. I think
that's pretty good. Now we have a new countertop
and we have this. Let's see, maybe
we want to use a, maybe we want to use
a box here to make another shelf. I
think that'll be fun. I'm just going to tap
ground so the box will appear above it. So now we have our box
and I'm going to bring it up right to the edge like this. Then I'm going to
lower the pivot. I'm actually not
sure if I'll have to reset this again,
but hopefully not. Okay, so now we have our box. Let's validate in this
voxel Ramesh, like 300. Okay, The remission at 300. So now let's take our
box, Let's clone it. So we have Box2D. And just for consistency,
I'll name it box x. So we have box and
box x, soapbox x. We can make the shelf. Let's go front so we can get a decent view. It's
kinda hard to see. So lifted up, shrink
it a little bit more. So maybe something like this
is good for our box shelf. Okay, so now we'll just extract will do the
same thing we did for the, for everything else. So we'll go voxel rematch, but we have to remember
to hide the box x. We have to select them both. And then we have to hide box x. If you're having trouble just turning one off or
just turning the other off, just go to advanced
and turn off. I think it's a sink visibility, maybe I keep them off. So that's probably
where they should be. So box x is crossed out
and then we have this. Then we'll VOC salary mesh. I'm just going to save first. And we'll voxel Ramesh. I'm gonna do it at like 400. Okay. That looks good. So now I'll just place it
where I want it to go. Shrink it up, you know what? Let's move the pivot. So let's take the
pivot, move it back down. So it's level. And that'll make that'll
make it a little bit easier. Slide it back to the wall. Okay, something like this. And maybe I'll just make
it a little bit bigger so it spans the whole
width of that space. I don't really want
any empty space there. Maybe something like that. Or you can make it
smaller like this. But either way, I think
that's pretty good. So we can use, we can
put some stuff on there. And also if you want to
make it more shallow, you can do that as well. That was the cat. Being a rascal is usual. Alright, so let's bring
down the size of this box. It's huge. What happens if
we remeasure it at 300? Okay, so I brought
down that size. So now let's do
round brush five. Now let's see what we get.
I think that's the key. If it's too high to
just bring it down. A tad bit wonky, but for 15, I think it looks pretty good. So we'll keep it there. So I'll rename this box shelf. So it looks like the sweet spot to remeshing is
between like 200.300. Um, but yeah, I think this is pretty good and we're still
quite low for our scene. I like to double-check and go through and make
sure that I've actually lowered all of
the policies that I can.
7. Tall Trees: Okay, so maybe now
we'll add some, let's add some
trees to the scene. And cheese are very
simple, very difficult. So we'll add low
poly trees at least. So we'll add a sphere. We bring our sphere up and
we can actually solo it. So now we have our sphere. Let's go ahead and stretch it
out a little bit like this. Now we want to, we want
to spread out the bottom, but we want to do it evenly. So let's go ahead and validate. Let's go to our
symmetry and then we want to bring in that blue line. We can use move. And then we can make sure
that we turn symmetry on. That way. We can stretch it
out from the bottom. Let's make it a
little bit bigger. We can stretch out
from the bottom. And it'll be fairly even. Something like that. Can use drag to, if you want to get
a little bit more. So we just want to
make something kinda like this for a tree. I think that looks pretty good. Now let's add the tree trunk. So let's, let's
rename this tree. So we have our main tree
and then we'll go ahead and add a tree trunk will
use a cylinder for that. So we'll shrink it, will
stretch it out, like so. And we can validate
it. Let's 3D mesh it. I like to 50 I think is fine. We mentioned it to 50. We'll do the same
thing with the tree. Will voxel Ramesh at 02:50? I know I don't know why I keep
going back back-and-forth. I feel like I need to do
it here for you guys, even though I've been using
this most of the time when I'm not recording
or not teaching a class. Okay, So now we've done that. Let's go ahead and round
this out a little bit. Not that this really needs it, but since we didn't raise the, we didn't do the multi raise. That's why you have
these little ridges. If you ever, if you ever wonder why you get these ridges
when you voxel Ramesh, It's because there's
not enough vertices. So you just go to more tirades
and you sub-divide it. And that will get rid of this. So you sub-divide it a couple
of times and then you do the carboxyl Ramesh modulus. Just show you the tip now. E.g. multirate. If I
sub-divide it a couple times, then I go to voxel and I
do the same thing to 50. You get none, you
get none of that. So just a little tip. All right, so a rounded edge. I'm gonna do this
a couple of times for the trunk as well. So we'll go ahead
and round it out. The trunk. I actually
don't mind for it to be. It doesn't have to be perfect, but I want it to be less
perfect than I'll just bring this down and
then refresh it. And then I can, if
I want to really, really rounded out than the
lower voxel Ramesh you go, the more softer clay will be, the easier that will be. What's there all smoothed out. Let's just decimate
both of them. And it's just a tree. So we don't really need much, much detail to 32s, a little too small,
so we'll do 462. Same thing here. We're
just trying to get it down if it's under
1,000, I'm happy. This is the tree trunk, so it's really doesn't
need a lot of detail. So 128 is fine. I think. So Let's un-solo. Let's put these together
so we have the tree. Let's rename a tree trunk. Otherwise things will
start getting lost. Sometimes I'm worried
that I didn't do the autofocus or the manual
focus, our focus lock. That's like ruins
so many videos. Like I look, I send them to my computer and then they
keep focusing in and out. And I just like it's the worst. Okay. So now we have our little
tree that we can make. Bigger or smaller.
Maybe this is good. Okay, So, um, one thing
that I like to do with, with trees, this is a good
way to use our first array. So let's make sure that you have both your tree and
your tree trunk. Then we'll go add
and we'll do array. Now, the tree and the tree trunk is underneath is
connected to our array. I'm just gonna rename it tree. Array. Okay, so now here's
our array menu. And what's really helpful. As you see, we're in world. I guess it doesn't really
make a difference now, but gizmo has these
different arrows, like red is pointing this
way, blues this way. Green is up. So that will
be your cheat sheet. So let's say we want a couple of trees to go along the side.
We want to use the red. Here. There's our trees. Offset just brings them closer
and further away. Simple. So we have some
trees in the back. And I did like, I think I thought the
fence was kinda fun. So maybe we will maybe
we'll keep the fence, the fence in there as well. Let's move all of these over. Like so. And then maybe we'll maybe
we'll add a fence in. We also, it might
be nice to have some different shaped
trees as well. So that's also something that
you can be creative with. Let's add, let's take our tree and our tree
trunk. Let's clone that. And we don't want
to end the array, so I'm going to drag
it out of the array. So now we have another tree
and another tree trunk. So let's make sure
that we bring them somewhere else so
they don't get lost. And now you can tap on
the individual if you want to kind of adjust. Sometimes you have
to separate them. To adjust them the right way. You can. You can kind of adjust things
but you get the point. But this is another place where you can be really creative. You don't always have to
have the same kind of plant. I'm gonna go ahead
and clone the trunk. And the trunk. I'll bring the trunk app. Then if you want to, you can make something like actually you know what,
we'll just use this one. I'm not going to clone
it. I've changed my mind. Let's just clone this
one again, hoops. And to clone you have to
make sure that you go into it and you have all, let me delete this extra one. So you want to go into it and you want to make
sure you have both of these selected clone. So now we have a proper clone. And let's just make
this one really, make it really small. Like this. Almost looks
like a little mushroom. But you can add little things
in like maybe we'll put another one on the
other side as well. Oh, man, I forgot the trunk. Alright, now we're just
getting confusing. There we go. So here's the original one. I'll clone. Hopefully it will. Okay, Now it clones everything. Can make it a little
bigger if you want. There's lots you can do there. You can sort of be, be
creative with that. So for this tree, I think
I'm going to make this one smaller because I really had fun doing the fence
that went along the back. So I'm gonna make this one
smaller and maybe taller. And I'll kinda just
took it in here. That way I can still put
the fence around the back. This one isn't even
touching the ground. And I want to make these
trees taller because they're, they're very short, Israel, especially compared
to the shack. They're very, very short. So I feel like I just want to
make them a little taller. Like this. These these things that
are more like mushrooms. So maybe I'll go back and make them look
more like mushrooms. Let's just use like move. We solved the same symmetry. So like it's kinda cool. They look like
mushrooms I think. I coin. All right. So I'm just kinda
mushroom these, these up. And let's take a look. Make them small. They look
more like little mushrooms. So maybe we'll just,
I'm just gonna join them together and call it a mushroom. How big is it? It's 590. Yeah. So maybe
I'll just put like another little one here. And maybe another one over here. Something, a little
goggle of mushrooms. Something like that. This one I'm just gonna
get rid of for now. Feel like it looks silly. Okay, so now we
have our mushrooms. I'm just going to join them
via these little arms. That way they don't get lost. So we have our tree. Wherever little random tree
there are other trees. Okay, So we're
looking good for now. I'm gonna put the,
I'm just gonna move this up so the trees
are close to each other. Mushroom box shelf. Okay. So these are all these
were all looking good. Little mushroom
family. I like it.
8. Three Fences: All right, so let's do some, let's make our
little fence here. So that should be decent. Want to make this trunk
a little smaller? Anytime I see something that
needs to be changed, I guy, I can't help it but to just
go ahead and change it. Okay. So let's make the little
fence and we'll start with, I'm going to tap ground again so that the cylinder doesn't get lost in one of these branches. So we'll add a cylinder. And we can, I will
leave it here. Sometimes I solo, but
sometimes it's nice to be able to have the correct The size as
compared to everything else. So we'll make it a little
bit smaller. Let's use edit. This is a good height
for the fence. We don't need a too
high. It's kind of fat. So maybe something like this. Okay, so I think this
is a pretty good size. Maybe make it a little
bit chubby here. And I don't even think we
have to do, Let's validate. I don't think we have
to do remeshing. It will just use the roundup, round edge brush and
just kind of rounded out because it's
just a fence posts. It's not really
that complicated. So then we'll just go
ahead and decimate. And I think 156 is good. Okay, Let's bring
that into the ground and just stretch
it a little bit. I think that's pretty good.
So this will be our fence. We'll just call this fence and then we'll, we'll clone it. And if you're in
the gizmo, you can just use the quick clone. So something like this. And you know what? It is kind of annoying
that this stuff is here, but I think it's fine. Let's grab both. Let's grab them both and
bring them out front. There we go. So we have two. Let's
clone this one now. The snap is at 45, so we'll just make the actual fence post. Maybe we'll make it
a little thinner, a little longer, like that. Then maybe we'll clone this
one and you like that. Go. I think that's nice. Now we can take all the fences and we can just
join them together. Let's see how big that is. 624. That's not too bad. And if you can always
experiment and just like decimate again
and see how it looks. I think 64624 is good. Let's move it over. We'll move this
one to this side. So we'll just spin it. I mean, by now you must kinda see that it's not really like, it's not really complicated. There's so much
stuff in the gizmo. That's, one thing
that annoys me, is I don't need these
planes, are these cones. I just want to be able to
slide it back and forth. All I need. It's
all I need. Okay. So now we have our
little fence there. Looks good. I like it and let's put two
on the other side as well. So let's clone. And we'll drag it over. We can have one there. We'll clone that. And then we'll put
one back here. Hence, why I wanted to move
that tree up a little bit. And it might actually
be nice to even make this like maybe it's like a bigger tree
than the rest. And think about
that. But why not? I think that looks nice. So there we have our fence. And for these fences, I'm just going to
connect them for now. We could always just in case you want to change
something later, but you can just
connect them that way. They're both, they're
all individual. If you wanted to add more
fence, then you can use it. But eventually I might just join them because they're all going to be colored the same. And I'm not really
going to do much more with with these
little fences. But I think they look good. The only issue is I
might have I might have made these too low, but I guess I guess it's okay. I guess it's fine.
Sometimes I really just overthink overthink
when I'm making stuff. But I guess I will take it as a learning opportunity if you, because maybe you
feel the same way. So let's file this under
tips and examples. Like I was saying.
So for the fence, I do feel like these
might be a little low. The two middle ones. So you have to go to
each one and separate. You find those two. Luckily, it's the first two. So that's good. Hey, let's
just do it all manually. Because I was going to try to do all of them at the same time, but then it'll
just be confusing. It'll just get confusing. So that's good. So let's
go to the next fence and we will separate goods. The first two. We'll bring them
up a little bit. And then we'll go to
this fence separate. And we'll just bring
them up. In part of me wants to add an extra. No, I don't need
that extra. Okay. Okay. So now we're good. You can join them all
back up individually. Now we're back to where we were. We have all of our three fences.
9. Barrel Buckets with Belts: Alright, so now let's
make a little barrel, will make a little
barrel with too little like barrel belts. I don't know what
they're called, but you'll recognize them
when you see them. So let's go ahead
and make a cylinder. So we'll make our cylinder. I'm just going to bring
it out to the front. Bring it out to our front
yard. Don't forget to save. The cylinder is great because there's a lot of
options when you're, when you want to sculpt, whatever you're
trying to sculpt. Let's tap on edit, and then we'll tap on radius. Now you have these
two dots here. So now we can bring
the top one out more. We can bring the
bottom on anymore. And you can do this until you, until you feel content. You can make your bucket a
little taller if you'd like. I think I'm okay with that. You can also tap hole. So now we have a
hole at the top. And you can adjust the you can adjust how wide
it is at the top. And also at the bottom. I'm just going to adjust this. So the ends come in
because when I fill it, I don't really like
having a deep bucket. Because you don't
really you just want to fill the top when you're
filling a bucket, that'll be it takes
up less space. I just want to make a clone of this so I can make the belts. So here we have the cylinder, which I'm going to
rename a bucket. And I'm going to clone
it and then validate. Okay, So I want to see
what it looks like if I just do the round edge brush. Oh, this is happening because
I'm not going further. I'm not going far
enough when I do that. And it actually
looks pretty good. The only thing is it doesn't really like a bucket anymore. So I think I do
want that flat top. Which means that I will
voxel Ramesh at 200. That we, we get that nice
flat top and we can round it. It's just the top
won't be so round. But you saw how
important it is to actually bring out quite far to make sure that we're
getting the whole bucket. Now I'm just gonna do
it a bunch of times because I don't really want
those ribs in the bucket. And those details would be nice. But when we're doing
low poly stuff, I really just want to keep
it nice and simple and cute. And I'll save those details for things I really want
to be detailed. Okay, so I think
that looks great. I guess we can we'll make
the will make the the belts. So now we have the same thing. It's the bucket again, but let's make it a
little bit bigger. And then we'll shrink it. And you kinda see
what's happening here. So right now, we made, we made a duplicate
of the bucket. So we actually have to
bring out the bottom part. So let's use the orange and just bring out
the bottom part. And then we have the these
were all the holes in it. So those are okay,
let's just shrink it so it's a little bit
tighter on the bucket. I think that's fine. So that's all we're doing is just making like a nice some I don't
know what they're called, whatever the belts are that
go around these things. So I think that's pretty good. I'm going to validate it. And probably Boxer we mesh it will stick with you and you stick with 200 random brush. I can make any mistakes, but actually make
them all the time. And it just takes repetition and just getting better
and remembering. I need to clone it again. Because once I validate, I lose those tools. So you just have to
clone it again and then you might have to repeat. This actually looks good.
So I may have been, may have been able to get away with just cloning after
I validated this one. I might have gotten
away with it, but I don't really like to. I might not have
gotten away with it. So now I can just
make it making, kind of make it a
little more perfect. I'm just shrinking
it. Whoops, I'm just shrinking it and, um. Making them a little more thin. Since there's two of them, you don't want them
to be too fat? Like keeps doing it to me. Bring these out a
little bit further. Okay, I think that looks I
think that looks perfect. Now I can validate both of them. The size is a little
off on this one though. Bring it down a little bit. Okay. Alright, so we have the
bucket and we have these two, which I'm going to join. And then we're going to
validate them at like 200 K. Then the bucket I think
we already validated in an already did the
round edge brush. So we just need to do the
rounded edge brush on the little loops on these. And again, I'm not going
to be too precise. I just want to round
them out a lot. And I will just bring
down the Polygon, poly count of these two. Let me save just to
be on the safe side. That might be a
little too grimy. I'm not sure. It does look okay. Because it's like a bucket. It's like a wooden bucket, so we'll bring it back one step. So then the bucket
will decimate as well. 400 would have been good
at button. I'll take 800. Okay. So now we have our little bucket bucket belt. I do wish I could get
it a little cleaner. I must say I wish I could
get it a little cleaner. So I'm actually
going to go back. This one. I'm gonna read mesh. I might eat it 200.
I'm going to do 250. And then I'm gonna do the
rounded edge brush again. I feel like I just want it
to be less of a number. And I've been making
these now for awhile. So I feel like I can see when they **** when like like I've been able to get
things fairly low. So when I can't get
things that low, I sort of notice that it's not really a couple more
rounded edge brushes. And let's try to disseminate
this year it looks like 959. Okay. So I'm going to name
this one bucket belt, the little belts. Now we have that. Let's clone. And for now let's just, let's just leave one here. And we'll leave the other one
on the other side for now. We can dress them in later.
10. Build -A- Bench: Alright, so now
let's make a bench. So we'll go ahead and add a box. Then we'll make it small.
And we're just going to turn this into super simple. Bench. Flatten it up. So something like that. And I'm gonna go ahead
and validate this. And maybe I'll box or remeshing it really low though,
maybe like 60. See what we get. Let's see
how low we can get this. That's actually a great Okay, so that's quite low. I'm gonna go to my
gizmo and then clone, and then we'll clone. Now we kinda have
like a double bench. And I think that's, I
think that'll be good. So let's join these. And let's rename it bench promotion of weighted to join. But that's okay. We can enjoin. When we're ready. Make
a little bit bigger, maybe just a little bit fatter. No longer. Okay. So I'm actually going
to enjoin or bench. Some are separate. I'm going to separate the bench because I want to
clone one of these. Actually, you could
clone them both. Let's take both of
them, clone them. Let's put these two together. And let's rename these
leg and leg one. So now we have leg and leg one. So as long as we
have both of those, we can spin it a couple of way. There's probably an
easier way to do it, but I'm just trying to do
everything very simple. Try not to use like symmetry, a lot of like symmetry
tricks and things like that. We're going to have to
do that for the awning. But for this, we can
kinda keep it simple. Okay, I think this is good.
Which is shrink them up. We have some nice
bench lay eggs. They need to be fatter this way. And then we will clone them and you can bring
them to the other side. That's a national convention. Now I'll just go to
the top and just join everything and
we have our bench. I'll make sure it's right
up against the edge. I think that it looks
good. So let's small. Make it a little bit bigger. Okay, so now we have
a little bench there. Alright, so for the table, we're just going
to use a box and we'll make it a little
bit round and, um. Yeah, nothing too fancy. So let's go ahead and add a box. So it'll shrink it. That looks pretty good. Now we'll just validate that and we can voxel,
remeshing it around. Let's try. Let's just
do 15150. Is there? Let's try that. We'll do rounded edge. And we'll just give
it a bunch of swipes. Because I want the I don't
want I don't want the table. It will be very sharp. So I'm kinda just taking liberties with the
amount of swipe, some given it with the
rounded edge brush. So now let's decimate. See what we get today. Envelope thousands.
So I'm happy. I'm at 03:38, which I
think is pretty good. So now let's just lower it to
a more table, like height. Maybe something like this. Okay. I want to use I want to use
the table for the lakes to, so I'm going to clone it. And I'm going to name
the top one table. And this one is
gonna be the leg. Let's bring it down. And we'll just we'll
just mold it into leg movements would be
nice and chubby still. Okay. That looks pretty good. And now we can just
fashion them to the table. See what happens if
we do a rounded edge. I don't want to mess them
up too much, but again, it's like the R would, so it doesn't really
have to be that pretty. I kinda like him with a
little weird to them. So let's clone will
drag this over. I'm just going to spin it
so they're not the same. Now I'm going to clone
both of these are amino, join them and then clone. And then we can just drag
them to the other side. The bottom owner. Okay. You can just sort
of match it up. Make sure I joined. Okay. Maybe I want them in the middle, a little bit more in
the middle and go. Okay, So here are the legs, so we'll join and just
rename them legs. I'm not sure how this
will look later. I'm just gonna do a quick check. Not too bad. But later on we could
always just do that, kind of hide the darker parts. Now we're just link
our legs to the table. And then we're pretty good
to go with our little table.
11. Chair Bottom: Alright, so now let's
make our chair. So we'll use a
cylinder for this. I'm just going to
solo it for now. So for the chair we're going
to shrink, it will validate. And then we will box
or a mesh it at 01:50. Then we'll take our
round edge brush. And actually, before I do that, let's go ahead and kinda
sculpt this to how we need it. So this is the
seat of the chair. So we're gonna go into
symmetry and we want the red, but we also want the green. Because whatever we're
doing to the top, we wanted to also
happen on the bottom, left and right, and
top and bottom. We just don't want
whatever we do back here to happen
in the front. So then top view will use move. We around 310 or so. And we want the back to be
flat because in chairs, the back is flat. So kinda like that. And the front is pretty rounded. Make it a little smaller. So we can make a little rounded
and then we'll make the back nice and flat like this. So I think that's a good
seat for our chair. And I'm just going to voxel
emerge it again at 150. Now we'll just do rounded edge. I'll just do 12345. Okay. Now let's decimate
and see what we get. Okay, for 44
actually looks okay. But I'm gonna move back
a step and do 887. I think that's better. Alright, So this is a
good-looking chair seat. And now we can add
another cylinder. And we can use this for the leg. Let's bring our legs over. Okay, can't move it. I think my Apple Pencil died. Play those games. Pull out the avocado pencil. Alright, so let's
shrink this up. And let's make it
kinda Peggy, Peggy. So that's looking good. And we can actually mirror it. We can mirror it. That makes a little
bit more difficult because the mirror goes off of the center of the canvas. But let's take the C, go to our gizmo and
do move origin. So now that's at
the center as well. So let's hit Solo and
let's bring in the mirror. So let's tap the mirror
and the cylinder. And then we'll tap the
chair seat as well. Then once they're all
selected, tap on. Oh, come on. Don't tell me it's not
going to know what it is. The mirror is not
letting me do it because I'm in solo mode. Likes to be annoying sometimes. So I'm going to hide
everything else. Maybe except the ground. In the table. Here's
the chair seat. Now we can work with these. We can bring the two legs in and we can move
them to the opposite. Let's move this to our legs. So now everything's else hidden. Moody's have our legs and
we have our chair seat. And their mirror to
everything we do on one side will happen
on the other. Some of them in. It's a little hard to to manage,
but we'll manage. That looks pretty good.
Let's see how it looks with a kind of let's see what it looks like
with everything else. So reluctantly I'm going
to bring everything back. Looks okay. It's kinda low. So let's bring our
chair seat up. Let's make these a
little bit bigger. And let's bring him in a
little bit closer together. Which is always hard to do
with because there's, again, there's so much on the gizmo
connected to the gizmo. Okay. Alright. And I
think that it looks okay. Although it looks tilted now, I don't know how it got tilted. So I'm just going to
bring this back to center and then bring it up again and hopefully
it won't be tilted. I don't understand
why it's tilted. We need to reset it
and move origin. Very confused. Okay, well, this is straight
now, so I had to reset it. You probably don't
have to do this. But sometimes you
can just hit reset. And then it will
illustrate now and again. So that's better. So there is one step that I
wanted to do before I validate these is I want the bottom to be a
little bit wider than the top. So let's tap a radius. So we want to, we
want to tap radius. We want to bring the top. And a little bit about
was actually good. Let's just bring the
top in a little bit. Yeah, something like that. So now we'll validate and then
we'll use our smooth all. And I'm not even going to, I'm not even going to remeshing. I'm just going to smooth all and just make the bottom's
nice and round. Okay, let's decimate and
see how low we can get. I think 155 is good. I'm happy with that. Okay. So if we hit symmetry, we should be able to actually
still use it the same way. Now around gizmo. Now, if we hit symmetry, we should be able to
continue loops. Let's see. Oh, that's odd. Maybe we don't need symmetry. Here we go. Yeah, We
didn't need, when you need to click symmetry. So we can still move
them independent of each other, which
is what I wanted. So let's tilt this a little bit. So that's kinda tilted out and maybe tilted
back a little bit too. So something like this
feels, feels kinda cherry. I don't think that's weird,
but that's okay. Clone. And we can actually spin this. Let's turn pivot back, Let's turn to snap back on. And let's just move. Okay, So now Snap is back on. Now we want to clone, and we'll just spin the clone around and move it
up to the front. Okay, I think that's good. So now I want to take
the whole mirror and the chair seat and let's
put in a position so we can see with MS. Have something else. I think it's okay. So I just want to move it into the general position
that it looks good. So it looks like a very small
see what it looks good. So now I'm going
to raise the seed up because these definitely need to be longer. Stretch these up a little bit, and check it out. Okay, that looks a
little bit better. Now I'm just going to grab
everything and just bring everything down to ground level. We would away a little bit, just see how it looks. That looks okay. And we actually we could actually
just use them as stools. But I think I'm going to think I'm gonna I said I
was going to make a chair. So we're going to make a chair.
12. Chair Top: Alright, so let's make the
back of the chair now. So here's our mirror,
Here's our legs. And I'm just going to validate and we'll
just join children. So this can be chair legs. Okay. So we have chair
legs and chair seat, which I will put together. And you know what? We can
actually keep this as a stool. So I'm gonna take these
two and clone it. And I'm gonna just gonna
change the name to stool. Oops. And I'm just going
to join this together. Of course it changed.
I don't understand why it takes this name. Like you would think if this is the parent that this is
the name, it would change. Maybe it's the I don't know. Let's see. Do I tap that? If I tap this, then this and join, it takes chair legs. Start with the chair
legs and I type this. So you have to you have to tap whatever you want
the name to be last. Okay, so let's file that
under tips and examples. Examples and tips. So we have a stool. Nice. Let's move it somewhere. So we'll move it over here. So to make the chair seat, we just need to make like
the pegs in the back. So hopefully you can
hear my stomach. Okay. So I'm gonna hit Solo. And then hopefully I
can bring the chair into the solo view. I thought we figured out that. I thought we had that
all figured out. I guess not. That's okay. So let's make the peg. Okay, So solo view, I really like some of you. I think I figured out how to, how I can do this
and so love you. So we have the chair
and the cheers, cheers. Seat in the chair legs. We have the cylinder. And before I was
tapping on here, whoops, Before I
selected them all. And then I was tapping here. And of course, now it's
working when it wasn't before. But I know that if you tap them all and then you tap
with your finger, then you can adjust them. So I still need to. So we need to do the pegs
on the back of the seat. So let's take the chair
seat and the legs. And let's move them, move origin to the very center. So now we'll take the cylinder and I'm just going to tap
the cylinder like that. So now we can adjust
the cylinder in solar solo mode with the chair. You can see I'm taking very slow relaxing voice because I've been messing
with this for so long. And for some reason solo view, which is always gets
very confusing to me. But I think I've managed
to, managed to get it. Okay. So now we have our one peg and I think we
just want maybe four of them, kinda like go out like that. So let's mirror this one. Like so you can kinda spread
these out a little bit. So I think that's pretty good. So let's validate these
and then we can use our a round edge to just
kinda round them out. And then we can go ahead
and decimate these. Pretty good. 82, That's good. So I have to stop using solo. I really want to use solo, but it's just not. It's just too confusing. Even I'm super
confused with solo. I wish it would just let
you do what you wanna do. So I'm going to
take all this away. Now we don't have to be in solo. And I can just we
can just see what we're doing. I apologize. Sometimes I'm
always running into certain issues and I guess
that's just the game. Okay, so we have both
of our pegs here. And They still mirrored. Okay, there's two
mirrored, so let's just take off snap loops. So now we can just sort of want to give them a
little bend like that. And we want to take this
mirror and clone it. Okay, so now the bottom one, the one that we just cloned, we can move them apart. That's interesting. I had
to go to the cylinder. Now we should be able
to move them apart. Then we're going to turn
it a little bit like this. So I think that works. This one maybe we'll just
stretch up a little bit more. So now we have to make
the back of the chair. I think these look good. The only thing is
kinda wanna make them equally little bit
further apart. And I think that's good. So now let's take the
seat of the chair. And we'll clone just the seat. And we'll name it chair back. Okay, so let's
turn snap back on. And then we can just adjust this as the back of the chair. I mean, that's I think
that's cute chair. Okay. So now the pegs. So each one is it that is, it looks like it's
1000/1000. So you know what? Let's take all the pigs. We'll take each one
individually and just voxel will validate them. So we'll validate
them, join children, and then we'll just
join them all. Now we have are these
pegs, but there are 5,000. We can definitely do
better than that. So I'm just going to decimate. I thought we had decimated
them pretty low before, but I guess not. Okay. So 169 for all of the
legs, I think that's good. These legs are at 06:20. I don't think we can
decimate anymore. I'll start, start looking
a little too crazy. So I think that's
pretty good for now. So just make sure
that everything is lined up how you like. It will put this up a
little bit like so. And if we needed to make all
of these things a little bit bigger, we can take the mirror, which I'll rename to chair pigs. Okay, So we have chair
back and share pigs. So if we felt that we didn't want it to make this
a little bit bigger. We can just do that. You can also just stretch
out these as well. Shrink this a little bit, feels a little big. Okay. So I think that's pretty
good for our little chair. So you might want to
change some of the colors. I'm not going to change
any colors for the chair, so I'm just going
to join them all. And we have our little
chairs that 2000 I do want to see if I can
get a lower than this. As usual. For our chair thing, I'm going to voxel
remission around 13, 30, but it looks bad. So it's not really worth it. Okay, It's good to try. And we can also see if sometimes you can
try it individually. E.g. these chair legs,
they looked really bad. Why they look so bad? There are 76. Supreme them down to 133. Let's see what we can do now. It actually looks okay. Backup one to 267. That actually looks okay. So it's just the seat
in the back that are quite big. But that's okay. So we'll join them and we'll
just rename this chair. But I'm glad that we got
the legs down a little bit more because they were
looking kind of rough. I forgot. We're not in solo. Now. I'll just uncheck
everything else. Grab the chair. And I'm going to set the pivot
to ground level. That way I don't have to. I can kinda move
it around a little bit easier, resize it. If I need to. I think
that's okay for now. I'm happy with my little chair. Don't forget to save after
each video. Make sure to save.
13. Storage Shed Box: Alright, so let's make
a little storage, said a shed on this side. And we will use a, okay, so let's add a box. And let's slide it over, basically where it will be K. And I'm actually going to
move the pivot to the wall. I think that'll make it
a little bit easier. I'll just line it up
with the wall like this. Tap pivot again. So now I can
just want to make changes. Scale the size. It'll
stick to the wall. So they don't want it
to be longer like this. Maybe a little flatter and stretch it out. Because I think we want to
like cut like a current like we wouldn't give it like a slant on top. Okay, so let's validate
that and let's rematch this. Remeshing it. Let's remember that we undo, which we measured at 02:50. Okay, So now which we meshed. Now let's grab the trim tool. And there are some
settings that you wanna do with trim tool. So just make sure when
you go in here that these are down all the way, that this shape line is at five. And I can't seem to save the
settings for my trim tool. So I always have to
every time I start, I have to make sure
that those are done. Now we can use the line. And we'll start
right at this edge. And we'll just pull
the line down. You can kinda make it however
you want it as shallow. But it's just like a
storage shed kind of thing. So maybe something like this. I think that's probably fine. Then let's use the split tool. And with the split tool, we can also use, Let's see, do we wanna do
something fancy with this? I don't think we really
need anything fancy. I was going to propose to
go into the symmetry and then doing the blue, the blue symmetry line, which would be in this
case these halves. And you can do some fun stuff. Like you can go to the top. You can take the trim
tool again and then you can you can do some
lines like that. Hawaii did not cut
the other side. Or you know what, a pitcher, I didn't have symmetry. Ticked off. I always do that. Okay, so now let's see if we
wanted to make the line, then it should show
up on the other side. So you can sort of
change the shape of it. I'll just refresh it again. You know, something like that. Just kinda, but you can get
us be as fancy as you want. So let's do split now. I'm gonna do the front view. And I'll do the line again. And I just want to split the top so we can make
like a top cover. So maybe around here, go down like that. So now that these are split, so I'm going to voxel merge the bottom half
and the top half. And I'm going to round
the edge, them both. So let's start with
the bottom half. So we just want a rounded edge, those and then the top
when do the same thing. Just give it a
nice rounded edge. I'm going to do this
one a lot because this looks kind of jagged
for some reason. It might, it might
just be the angle. So let's stretch out
the top a little bit. I want to bring it down. I want to make it even
a little bit bigger. So it really looks like a top. So there's lots of
things you can do. And I think I might've
just like to normal. I think I might like that. So let's decimate the shapes. So we'll start with
the bottom one. Hopefully we can get it
down to a decent size. Okay. 571 is good. And then the top
will decimate that. Oh, that's not bad. I was a little worried
about the top. The 3D one I think is okay. I kinda would like to make
a little handle on it. First, let's label this. So let's label this side box top this. So we'll just label
this sidewalks. And let's change the order. And this is linked
them up together. So now I'm going to add a, I kind of want to
make it a cylinder. I kinda just want to
make a cylinder handle. This is just me satisfying my, my detail, My
longing for details. So let's turn this K, shrink up the size and put
it in the general spot. Right? So something like this. I know it looks funny now, but I think we can make it work. Alright, so I'm
going to validate this and then what's the
box will re-emit shed. Let's walk, Sorry, Mish it. Around 200 for now. I think I want to I want to use symmetry
with the move tool. And you know what, we
probably should have just used a box instead,
but you know what? Let's stay the course. So I want green because I
want the front and the back. And I'm going to turn the
read off and I just want the, um, the front part
and the back part. So the green and blue is what we're going
to use for move. The Sol LeWitt actually. So for move, make
sure symmetry is on. And we're just going
to stretch this out. And I want to bring this down because I want my handle
to be sort of like that. Okay, so now I'm going to clone this cylinder and I'm going
to stretch it out this way. That's just so I can
see it eat more easily. So then I go like that and I'm just going to make
it in the middle. So just something like this. I'm just gonna say really quick. And now I'm gonna do my
favorite a Boolean operation. I can actually do tool to Boolean operations at once
if I just add another box. So I'm going to add another box. Big. I'm going to bring
it over to my cylinders. In other way would
have been to just do it with the ones and then
just use the trim tool. But I don't know, I felt like doing it this way. So now we have these
two shapes that we can extract from this and
make our little handle. So we have a cylinder,
we have the cylinder. Want to keep this as one will
cut in the box, will cut. Let's go ahead and
validate this box. So select them all,
hide these two. Then we'll, I'm
going to save again. And then we'll do a voxel
Ramesh route 400. Nui. So that looks good. So let's round, skip it
the whole round edge. Give him omega
nice and thorough. Okay, Let's un-solo it. Arise. So now we can bring it down, figure out where we want. This thing will make it
right in the middle. I'll use the top view and
just kind of eyeball it. And I think I want to just, I'm going to take it
off snap and I'm just going to clock it a little bit. Let's do pivot, reset pivot. And I just want to clock
it a little bit like this. Maybe shrink it a little bit. Sometimes it's tough to
maneuver these things. I'm going to take it off world because I want to
shrink it now this way. So I'm going to tap world. And that way I can just
kinda shrink it like this. Although I don't
know if I maybe it's better if it's a little thicker. That's okay. I think
I like it smaller. I think that's good. So
let's go ahead and decimate. Once you're happy
with your handle. If you even decide
to make a handle. Okay, I'm feeling good about this because it's not
taking up much space. To 32, I think is good. Now, this is the
sidewalks handle. Yet, 12 min, okay, so
I have to end this. So there's our handle,
There's a box, I'm just going to
put it in sidewalks. Now we have all these three. Boom.
14. Striped Awning: Alright, so now let's
go ahead and make the little rounded
slats that are gonna go on the top of
our little shack here. And what we're gonna do
is we're going to use a cylinder and we're
going to stretch it out. I'm going to lay it on
an angle so that the, so that it kinda kisses
this edge right here. So it's going to have
a fall off like this. And then at the
very end is going to flap down and you'll have those nice round awnings
on him kind of situation. So the first thing that
we need to do is make a new cylinder. I'm
gonna go up to the top. Add cylinder. So let's bring this
up. Shrink it. And the only thing that's
important now is pretty much how wide you want each one
of your awning colors. Because it's going to
be alternating colors. So e.g. I'm gonna go ahead and line this up with
the edge, pretty much. I'll bring it up here. So I
think this is pretty good. You can make them, you can
make it bigger or wider. But I think something
like this is good. Now it'll just be those
repeated all the way across. But first we have
to stretch this out to make it a board
with a round edge. So let's go ahead and
validate it. Had symmetry. And we want to make sure
that we're on the right, the correct symmetrical lines. So I think it's the
blue, the blue z. You want to just be able to
stretch it out like that. Always hitting something
random one, Gizmo. So this is essentially what we want and we'll just
repeat this all the way across once we've
prepared this one. And it's how we like it. Lets one thing I forgot. So if you want, you want
to move the whole thing, just tap symmetry again. You'll be able to
move this back. I think this is a good distance. This is going to be curved, so we have to figure out
how we want it to curve. So let's move the, move the pivot back
here, but that's easy. Just go pivot, rosette pivot and it will
reset to the middle. Let's change the snap 210. So once you change it to ten, will have more increments
that we can move. And I think we'll just
go maybe one or two. I think that's good.
We'll raise it up just so it's sort of kissing
this edge right here. I think that'll be
good for the awning. It's not coming back
that far and it doesn't cover a lot of these. So this will be the end,
it'll be pointing down. But right now we can see it
doesn't really cover much. So it's actually in a
good, a good position. Alright, so now let's
voxel remiss this. We'll just do 200 or it
Let's do 250 instead. So now this is voxel
re-emerged at 02:50. Let's look, take a
look at this edge. I wonder if I need to change
the multi-resolution first. I need to subdivide it. If I subdivided once. And then voxel Ramesh, two-fifths, Let's see if
there's any difference. It looks a little bit better. Probably doesn't make that much of a difference, I suppose. So now we want to
bend this part. We want to bend this part down. So now let's turn it so we can kind of see
the whole thing. And we're going to
place a mask over most of this shape here. So let's do select Mask. Here, my mask
settings just in case something happens with yours and it might be
different than mine. Here are my mask settings. We're using selective mask
and we'll use the rectangle. And I'm going to select all the way down until about here. I think that's pretty good. I'm gonna go back
to the side view. And I'm going to need
to adjust the pivot. So we'll go to our gizmo, will go to the pivot. And we want to move the
pivot right about here, where that mask is
just cutting off. Tap pivot again. And then we want to adjust
this and just kinda rotate it down to maybe about there doesn't have to be
straight down, but it could be. But I think this is
this feels right. So just make sure
that it's not like, kind of like jetting
out like this. You just want to
make it a natural. So it looks more like a notch as natural a bend as it can. So you don't want it like
up like this or something. So that looks pretty good. Sometimes you have to
kinda squeeze it together. Okay, that's good enough. I'm happy with that. So let's take the mask off
and then let's remember it. Okay? Alright, I think
that looks good. So I think this looks
good enough for us to use our rounded brush. Let's use that a few
times and hopefully we can smooth out
some of this edge. I think it looks pretty good. Okay, so now let's go
ahead and decimate and see how it actually before
we decimate, let's crop it. So let's take trim
and our rectangle. And let's just crop
it because we don't really need that much of it. Because what we'll
put a roof on it. So I think that's good. And I'll go over it a
couple more times with the round brush just to kinda
deal with that backend. Okay, so I think that
looks pretty good. Let's see if we
can decimate this. Okay, that looks all right. Let's go back a step to 354. I think that looks okay. So once we have that, once you're happy with that, Let's go ahead and
we're on our cylinder, so I'm going to
rename it awning. What does put on for now? Add array. So you can see right now we
have two of these slats, but we want to make it. First of all, we want
to put them closer together by you
changing the offset. So that's more like
what we're looking for. Something like that. Now we can increase this number to maybe something like that. Let's move them all over. I think that looks pretty good. So now we just need
some sort of roof. And for that we can
do similar to what we did with, with this. We might actually be
able to use that. Let's see how this
looks if we clone. So we have the side box. If we clone that side box, Let's see what happens
if I bring it up here. Let's put our snap
back to like 45. We spin it, and then
we stretch it up here. Just want to see what this looks like if we put
this in the front. It's not terrible. I mean, that's kinda how I come up
with different things in different different ways of
using whatever already made. I don't I mean, I don't know
if all if I'll use this, but it's not terrible. So I think we just want like a normal triangle
up here or maybe like a box with
some carvings out. So let's add a box. So we'll bring it
all the way up. We don't want it inside
the array though. So let's bring the box
outside of the array. Let's rename it roof. Put it back in the
middle of origin. I'll bring it up again. Spread it out. Okay, I'll stretch it this way. So we can probably do
something like this. Maybe it will stretch it
a little bit this way. And then we can kind of
figure out how we want it. So I'm going to validate it. Will voxel Ramesh it. I think 300 is good. And then we'll take our trim x. Then we can figure out the shapes that we want
by using the line. So let's say we want, Let's do a line here. And then from the front,
Let's do something like this. So maybe something like that. Bad. But of course you
could do something more triangular if you wanted. You could always set the
symmetry. The wrong symmetry. Let's use the blue. I think. If you wanted to
set the symmetry, you could use your line and
then we could go like this. Would do both. If you think
it's a little too tall, you can do that. So
it's really up to you. Maybe even one a
little bit more. Yeah, something like that, I think is good for the top. We'll just do more of
a slant like this. I'm okay with that. Alright, so now we have at least our
Shack has a little top on it. I do want to raise these trees. I think I might have
stretched them out in a different unit
and other video, but I want to make
them a little bit taller because our Shaq
is actually quite tall. Is really tall. That's okay. I kinda like it.
15. Lathe Tool Extras: Here's another little extra
thing that you can do. I'm going to take
split rectangle. I'm going to split this like so. And now you have two halves. I'm going to remember each half, so I'll tap Ramesh on the bottom and then
remission on the top. And then we go to work with
the rounded edge, 2345. We'll do a couple more
just for good luck. The same thing with the WHO,
in other words the top. So let's do the same
thing for the bottom. Either way, you
just wanted to make sure that you do it for both the top part of the
roof and the middle part. Because splits splits them. Trim cuts one part. Split just splits
them, gives us two. Now let's see how we can
do with the decimation. We want to decimate both pieces. I think that's a little too. I think 811 is the is good. Wish it could be
lower, but, you know, you work with what you can, what you can do. I think that might be it. It's a little wonky. It's not perfect. Unfortunately. So I think
we'll stick to 1,000. We won't push our luck too much. I think it looks good. So I'm going to put
the roof under there. And then all of this I'm
going to bring to the shack. So here's the shack. And all of the things that are in the shack I think
I want to put together, so we have the box shelf. I'm going to put under Shack. We have the box.
So this is this, this is the, we'll call
this the shack shelf. So we're just gonna do a
little bit of organization. We have the book is the
bins, we have the counter. So that can go in the shack. So we have the counter. Then we have the array,
which is the awning. Let's bring that
down into our shack. Then we have the roof
In the side boxes. We can leave that on
the side for now. But all in all I think
that's, I think that's good. Let's just say our progress. Alright, so let's make
a few simple things using the latest tool. One of my favorite tools. You can make a lot of great
stuff with the latest tool. So let's actually do solo. Let's go, let's go too late. Don't worry about
the roof for now. So we'll go to
leaf and we'll use curve. Let's see if we can. Okay. Alright, so I'm
going to tap front. And the first thing that I
think is good to make as a like a flower pot or
like a, like a big pot. And we can place some
plants around the scene. So this is a simple one, will come out like this. Then will come up. And then we'll just make
that little lip on the end. You come down and I come over. I usually don't make
when I make a pot, I don't make it as deep as the pot because you
don't really need it. So now go to Edit and you'll
see the little points. And this is how you can adjust your life wherever
you want it to be. You can adjust these
little points. You can tap on them if you
want them to be a little more kinda like that, you can just drag them into one another to kinda get
them to go away. So the top, I want to be flat. So I'm gonna go to, I'm just gonna go to the top. And back to life. And back to curve for it. Okay? So we'll do pretty
much the same thing. And it might actually be
easier to use the path. Let's go out once to about here. And then we'll go up
here, a little here, up here, once, down
and then over. So that's a good start
for our flower pot. Even though it looks crazy. So now what I
figured out sort of works is to go into the settings and turn
down the topology. So now it's at 08:42. I don't think I can
get it done any lower. We'll try for 42. But then it gets a
little hard to manage. So let's tap on those so that, that is fairly flat. Tap here. And we'll just sort of try
to make it into something. Actually think that's
pretty decent. I'm being honest, I think
that's pretty decent. It's kinda looks crazy when
you're trying to model with such low polygons. But let's make this a
little flatter like that. So I think this
actually might work. So let's validate it. And let's just see how it looks. In PBR. It actually looks okay. What was the color it? Something like that. It actually looks okay. Let's go back into met cap. And this length is 452, which is very good. So I'm going to rename
this plant pot one. So un-solo it. And now it's actually huge. Pivot, reset pivot. And now we have like one
flower pot that we can kind of figure out
what we wanna do with it at some point in time. For now, I'll just put it
on the ground with Alibaba, all of our other
stuff that we need to figure out what to do with. So let's go back
to the late tool. Let's do solo. And
we'll do curve. And now we really need
to do a jar and a bowl. A jar, a bowl and maybe a mug. I think those will
be very useful. So leaf curve, I'll
do the same thing. I'll come out, come up maybe
a little something here. And then I'll do the
inside of the glass. Let's hit the edit so we
can kinda see what we have. And let's bring
down the topology like we did on the other one. Because I think that's the
easiest way to get rid of. Otherwise the leaf
is just too big. Okay, so let's tap on
these so we can get a little bit of detail. Let's actually, I'm
okay with that. I mean, I actually think
that it looks pretty good and it's pretty much like
what I'm trying to go for. I'm just dragging these into one another when I don't need, because some of these
nodes I really just don't need and they're just
kinda taken up space. Okay. So I'll go ahead
and validate the jar. I think that should
be fine and let PBR. Okay, so hopefully that's good. Whoops, I didn't mean
to put that in there. Let's put the jar will put
the jar on the bottom. What else did we just make? The plant plot, plant pot. Let's put that in
the bottom two. And then will un-solo. Chars. Big minds will place this on steps if
I can find them. I'm going to stretch
it a little bit. Can you so we have that there. We have our flower pot. This a little smaller. And I'll save. Go back to Mac app so you can
see a little bit better.
16. Lathe Night Bowling: Alright, let's try to
make a bowl and a mug. So let's go back to solo. Leaf will use curve. So let's try for the bowl. So this one, we just
want to do a nice curve. Then something like that. Make it a little wider. Something like that. Just make the bottom
part straight. I think that's pretty good. Okay, So right now, this bowl, Let's do a little test. So this bowl is 4,358. Let's go ahead and validate it. And let's make a new one. Or you know what, let's
before we validate it, Let's duplicate it.
Let's clone it. This will be the bull decimate. This will be the full low poly. That's fine. Let's
get both of them now. Let's find out which is which. So this is both decimate. This is bull low poly. So for this bowl, I want to use, I want to
do what we did before. I'm going to use the
topology to get it down. So renounce at 05:54. And I just want to
kind of get it to make make it look like a bowl. It's my main main
objective right now. I mean, it looks okay. Like that. So that's 602. This might be the best that I'm going to
get in terms of a bowl. I don't think I can
lower it anymore. I lowered the division again. It's actually okay to not terrible tool, a little tricky to maneuver. But I think this might be the
best that we're gonna do. And even so, you can see these, you can see that
which is in great. Seemingly it's the only problem. I'm just trying to adjust and see if there's anything
that you can do. 602. Okay, so that's probably the best that
we're going to do. So we'll validate that one. So this is the low poly ball. So now for this one, let's just make it a
little more round. If that's acute or bowl. Will validate it, will voxel, Ramesh it and like to 50. Let's go ahead and
chat and subdivided once more gyrase sub-divide. Now let's try to walk so
we measured much better. So now let's take our
rounded edge and go to town. Here we go. So all the edges should be
nice and we calibrated. Now let's see if
let's see if we can. Oh, you know what? I
didn't have symmetry. I don't wonder if
that had an effect on why might the bowl
was tilted before. So let's see how much we
can decimate this now. 672. Who read 37? Back up a step. 672. For 56, 72. Yeah. This one looks better. It looks better. Just
looks more rounded. So yeah, I mean, that's
what happens. Sometimes. We'll delete the low poly one. Will keep the bowl decimate. When. Let's go ahead and put
it on the table for now. It's mighty big. So let's take the pivot
and just put it down here. Then we can scale it. Okay, that's good.
Alright, so for the mug we will go to
leaf and then curve. So it makes her I tap front. So this will be pretty simple. Come out. Nice round curve goes straight up and then just come
straight down like this. We want to make a
shape like this. And then we have a
nice-looking mug. Nice-looking mug. I
think that's great. So I'm not sure how
this will look. If I, if I reduce the constant density, we'll take a look. It's below 1,000. That actually looks pretty good. Little crazy on top. But I actually think
that looks pretty good. So there might be
a pretty good mug. Let's see if we wanted
to lower it even more. Let's see how crazy we can get. That's actually not bad. Let's go ahead and
validate this. I think that looks pretty
good for a low poly mug. So now I want to add a tourists. The tourists is
actually in the middle. So I'm going to take
the mug and I'm going to move origin tourists. I'll make small,
I'll move it over. If it will. Let me go. I'll flip it. And I
just want to make a little handle on the side. Let's use the green here to
make it a little bit thicker. And then we can adjust
the size a bit. I don't know why
everything is so big. Who let me move this
in and be perfect. So we just want to do
something like that. So let's take the pink, pink dot and it's
sort of opened it up. And then we can rotate it. Okay, that looks good. So now we haven't
validated this. So let's see if we
can actually lower the topology of this as well and get this
as low as we can. Before it starts looking crazy. Rio to actually
looks pretty good. Jumps 302-80. Interesting. I wonder if I could take it off constant density. I wonder if I can I can get
it down a little bit more. So 266. Think that's pretty
good for a low poly mug. So let's validate both
of these theories. Er, Let's join them. And then we'll name this mug. Okay, so now we'll un-solo and let's just
put our mug on the table. Okay, Good. So I want to say congratulations and good on you from
getting to this point. We've already done
a lot of work. And if you want to just take a quick peek at how
far you've come. Just kinda turn them
out a little bit like this so you can
see a lot of it. And then go to the lights, change it from
Metcalf to lit PBR, turn the environment off. So it should be black
and then add a light. And even with that, you can see how
much you've done. It looks good. If you really want to go crazy, you can even turn
on post-process. You can see it looks
great already. So we're in a great spot. Now. It's just a matter of just
building this and putting in small fun details and
things like that. So let's go ahead
and do that and really just kinda fill this
out and make it pretty good. So I'm going to turn my
render resolution down. I didn't realize
it was up so high. What else do we need
to do? Turn off. We can, we can kill the light. You can turn these
off and we can turn our environment back on. And let's go back to my cap. So go back to our
trusty met cap. And let's let's build
some more stuff. Kinda fill out our scene
a little bit more.
17. Bread Basket: Alright, so let's make, let's make like a
basket for our bread. I'm just going to
save. Let's make a basket for the bread. And I think I want to use, if you have a lot of
stuff now we're ready. Let's add a box. Bring it up. You know
what, we can solo it. So this will be like a box. This would be like a
basket, like for bread. So let's make it probably
around here is good. Maybe we'll stretch
it a little bit more. So something like this. So we'll go ahead and validate
it and we'll refresh it. We can box will be measured
at 01:50. That's fine. So let's take the Select Mask.
Let's have friends again. Rectangle. And I just
want to go like this. So something like that. And now I want to take the gizmo and we're going to shrink this part of it like this. So we have something like that. Now we're going to take the sphere and we're
going to stretch this. And it looks like it
might be a little bit too high for a box, but let's turn the mask off. So we'll go to the selected
mask and hit Clear. And let's see if we can just
squat this a little bit. Yeah, we can make we
can make that work. I think we can make this work. Okay, So that looks more like a, more like a bread basket. I'm going to Bob, so Ramesh it. Notice the sides are a
little wonky already. Wonder why that is
why that happened. We measured at 200. Anyway, so let's go
ahead and copy and clonus tap front.
So we've cloned it. I'm going to bring
it up and we'll make this a little bit smaller. Skinny it up a bit. So that should be pretty good. So we're just gonna do a Boolean operation like we have been. We have the box one
and we have box. So we'll select those and
then we'll hide Box2D. Should be good. So let's
go ahead and voxel Ramesh that. Let's see how we do it. 200. That's fine. Now let's do our rounded edge. Will round, round
this basket out. Make these edges nice and soft. Okay, I think
that's pretty good. Now let's go ahead and decimate. Hopefully we can get it to a decent spot below 1,000. So we feel good. We can go
one more. Can we do one more? I think that's good. For 28. I'm happy with that. So maybe we should
go ahead and make the bread right in here. That'll be fun. Let's use, let's use a sphere. So we got a good old sphere
and move origin for this. And let's shrink this sphere. We can shrink this year. I wasn't on the sphere,
so let's shrink this sphere, will bring it up. And let's just
smush it this way. And then we'll validate it, and then we'll voxel
Ramesh it, 200. Now let's trim it. So
we'll take our trim tool. Let's use the rectangle. We can trim it like this. Then we can voxel remarriage, remeshing something
really low like 60. Will voxel remission at 60, and then we'll go to town
with our rounded edge. Might even be able to
go a little bit less. Really get it nice and bread like get those edges
nice and round. Okay, I think
that's pretty good. So now let's go to crease. And I want to make some
big creases in it. So here's an increased
tool symmetry is on. And let's just divide this. Like cell will make some
deep creases in it. And then we'll go ahead with
our round brush and do that. Then we can decimate
and hopefully we get it to a nice spot. Which really not nice at all. Is it? I mean, it's not bad. 3100 now it starts getting bad. I still wish I could get
it a little bit lower. So let's just, let's let's try. I want to decrease again. So I want to decrease again, but now I want to read
mesh a little bit higher. So I'll refresh it like 200. Now I'll do the rounded edge. You know, I, I probably
should have subdivided. And I want to make sure
this is before I decimated. So I want to change the, I want to go to more tirades. I don't want to sub-divide. You want, I'm going
to sub-divide again. We're going to live crazy. Then I want to read
mesh at 02:50. Okay. So now am I
on my decimate? I had changed it because I
was playing around with it. I'm gonna put it back to 50. Let's do it this way.
So it's back to 50. So now I'm gonna go ahead
with our rounded edge. Bunch of times k. Now let's see what we get. We decimate. Come
on, stay together. Stay together. For 58. I think for 58 is the best that
we're going to do. So we'll just leave it at 04:58. But now we can put the
bread in the bread box. This will just take time because
you'll just have to kind of get used to the
let's take it off snap. You kinda just have
to get used to adjusting in putting
this in there, putting the bread in there,
and placing it just right. Make it a little smaller and maybe stretch it
out a little bit. Okay. That looks pretty good. I really wish. See if I can. So you don't know if I
can increase it now? I can smooth it. Well, I can smooth
it a little bit. Doesn't look terrible. I don't usually do anything
once I decimate it, but that actually I feel like that made it look
a little bit better. I just never really
tried to smooth it. Just like I don't
really try to like make new crevasses like that. But I was just kinda
curious, would it would do. Okay, so let's take
this in clone it now. Clone. Okay, So we'll just kinda
put that in the basket too. Let's clone it and
let's make another one. We can sort of make it
sort of laying down a little bit pivot. Pivot. It's easier when
the pivot moves to the middle of the bread. Can make it a little smaller. They don't have to
be the same size. I think that's pretty good. So we have bread and a basket. But now we have to
organize everything. So the box will be
the bread basket. And then we have these three, which would be the bread. One. Bread to read three. And we'll branch them underneath
bread basket on solo. And then we'll just place
this on the counter for now. Okay, so now we have bread
basket slip and good. To be lower the
size what we did. Okay. I just want to make
sure I load the size of everything. I'll be good.
18. Jar Top & Wine Bottle: So let's actually make
a top for the jar. So I'm going to tap
the jar and then go to solo just so we can see it. And we'll use the length again. And we'll use curved end. It's not really necessary,
but sometimes I just like to line up the symmetry line with what,
whatever I'm working with. So now we'll just use the curve. And I'll come straight
up like this. Maybe come around. We'll do a little bit of a do a little bit of
a top like that. I tend to like these
these types of tops. I think they're cute. So we'll just move this in
place because why not? So it can be
something like that. Can even make it
bigger and we can just totally cover the top like that. I think that looks pretty good. Let's just see what it looks
like if I lower these. I'm actually not sure, but it's kind of interesting to experiment with this and see
if we can get a decent size. It's hard to get a decent size. Okay. So I want to put it
back where it was. But we did try. So now
I'm going to just walk, so I'm going to validate it. And here I'm going
to sub-divide it. The nominal voxel
Ramesh it at 02:50. That looks good. And
just test it out. Let's see if we were to just decimated without
doing the round brush. Just to play it. Interesting. Starting
to get a little Genki, but still not bad,
and that's 619. So that's good to know. So let's see if we do a
little round all magic on it. So do a little round all magic. Let's see how low we can get it. I'm gonna do a little
more sometimes I like to just do a few more
once it's down to like 20 K. I think I'm constantly experimenting
and trying to find ways to just get better quality
with whatever I'm doing. I think 619 is the
best I'm going to do. I can't do it anymore. Yeah. I think that's the best
that we're going to do. It's not that
different from Thanks. 619 is okay. 619 is good. And I'm just going
to position it a little bit better over r. I can't really see it. Now. I can see it. Here we go. So this
can be jar lid. And I'm just going to
connect this underneath jar. So I'm gonna go back
to leaf incurred. And we're going to make maybe like a wine bottle or
something like that. Alright, so for the wine bottle, Let's go ahead and
start out here. Then we'll go up and we go over. So I think it's
something like this. There would be a little
bit of a hubbub up there. So something like this. Let's get rid of that one. I don't want it to look like a 40 wine. Oh, isn't it wouldn't
it be round here? And then kinda go straight up. I think that's more of a wine. Sort of look. Clearly, I don't drink. Again. Somehow I built this and it's not
straight, but that's okay. So let's see if we can
lower the topology of this. For 34. I'm okay with I mean, I think that actually
works pretty well. I don't think I need
that much detail in it, so I think it might be okay. That looks straight enough. So let's go ahead
and validate that. And the only thing that I would do is I want the top to be less
sort of poking out. Yeah, that's better. I think that looks pretty good. Let's un-solo it and
then we can start to just get the right size of it. Are all turned around here. I'm thinking these would go
like in the maybe down here. I saw no, I didn't
make this street. But that's okay. Okay. Yeah, something like
that I think works. And we can put a couple
more of those in. Good. Let's go ahead and save.
19. Oranges & Organization: Alright, so now let's make an egg carton with
them, some eggs. And we can also make some
spheres for the buckets. Let's put the buckets
where we might want them. For this one, I think. Maybe just right alongside here. It's actually quite big, so
I'm going to make it smaller. I think something
like that works. In this bucket. Maybe I'll put it on the bench. It will push on the
bench like that. Let's go ahead and array this. So we have one bottle, and let's rename it bottle, so we don't get confused. Let's slim and wine bottle. That's better. So wine bottle and we'll
add an array to that. So we have three,
but they're all we will be here so we
need to offset it. I feel like I want to do for. So let's shrink a little bit and then move them
all over like this. I don't think I
have enough red for another row or probably do
have enough for another row. The other row would be blue. So I'll just do two here
and change the offset. Then we have a nice little
row of those in the back. I'm going to change
the name of the array to wine bottle array. That way I don't get
confused. Now for the jar. So we have the jar
and the jar lid. I think that actually
looks better. We can make these smaller. And we can excuse me. So we can we can
put a couple here. And it's it's up to you how
you want to divvy this up. You can make like a few big ones and then a bunch
of smaller ones. That might be kinda cute. So let's say e.g.
we did an array. Actually, let's, let's
wait to do in array. You can hear discord. Let's wait to do an array because I think I'm
going to put some, we're going to put
some maybe honey or syrup or something
in the jars. So let's wait till
we have that done. And then we'll go from there. Even though it won't
really matter, because as long as we bring it into the array it would match. But for now I think we'll just, I think we'll just hold off
just to be on the safe side. I don't want to
place this further back because I think it might be cute with a
couple of big ones. And then like a row of
little ones in front. What did I first mentioned? Oh, eggs and spheres. Yeah, let's do that. So I find that Sears
are very difficult to they're very hard to get a low poly
sphere unfortunately. So here's our sphere. Let's go ahead and
place it in our bucket. So maybe they're like oranges or something in there
about that size. So if I adjust the size of it, post subdivision, once
I bring it down to 98, it gets a little wonky. And three is 386, which is a little bit too much. So it's a bit tricky because I guess that looks
okay, but I don't know. It's a little bit hard. 98 would be great if I
could get it that low, but it just seems like
it's a little bit too. And if I validate
it, a unify use, if I do two more tirades, I subdivided and then do that. And then decimate it. Still hard to get it that low. That looks better.
17878 I can deal with. It might be a little bit better. I think that's the
best we're gonna do. So let's go ahead and
position this in here. We'll make it a
little bit bigger. So now we'll just do a
bunch of clones, right? So we'll clone this one. We'll do some a little
bit lower alone. And this is the, this is
the reason why you want to make sure that the
sizes are low. Because if they're not, then these clones will
add up real quick. So it, so all of the
sizes are very important. We kinda keep them nice and low. I feel like we need
another one. Right on top. Oops. Looks pretty good. Maybe we'll do like a
little a little baby one. Okay, so I think that
looks pretty good. And again, that's
a lot of spheres, but fortunately that's what, that's what it takes. So I'm gonna take
one of the spheres and I'm just going to clone it. And I'm going to hide that one. So now we have, we have one extra and
these I'm going to join, and I'm going to
name these oranges. Okay. So so now I can
take the oranges. These at 14:24. Yeah. I think that's the best that we're going
to do for those. So let's clone the oranges. We can put some in the
other bucket as well. We really could just clone the whole bucket,
but that's okay. Since we already have
this bucket made, we can switch this
up a little bit. Okay, I think that
it looks fine. Now we've got a two
buckets of fruit. Let's go ahead and save. But do we want this? That's
the, that's the question. Do we want the same
fruit in there? We can always make this smaller. And I stretch it out. Because if we stretch it out, that makes it like a
net-like a different sort of fruit or something. So it looks like something
a little different. We did with stretch it out. So I like that. What is our size and our size is at
30 k, So that's not bad. I would say wished her doing it. We're still doing pretty well.
20. Petit Plants: Now let's make like a
fun plant for the pot. I'm going to clone this pot, plant pot to hide that one. And let's just deal
with the plant pot one. Let's make it a little bigger. So I think I want
to do something like maybe I'll use a tube. And let's use a curve and
let's just kinda make, will make one curve like this. Going down in there. I want it to be fairly straight. But I also want to
do another curve. Maybe like this. Then maybe we'll do another
little baby one here. Well, that means that crazy. It's bringing all
these nodes closer. Learn how to control this thing. Absolutely bananas. Sometimes. I wish I could tell
you a easier way to get it to where you need it. But she's sometimes this tube
just has a mind of its own. But I just want to make another little thing like that. So now let's take
the middle one and let's hit the radius. So we can have two
different radiuses. I want to make the base thick. I want to put a little little, little little curve in them. I'll do the same thing
for those side ones hit radius because I want the basis to be nice and thick when they go
into the main plant. Make this a little smaller.
Same thing with this one. We'll hit radius and make
this base a little thick. Is kind of buried in
that and bigger plan. So we'll take all these tubes, one to receive, one here. And we'll walk. So rematch them together. Like 300 plant trunk. And then we'll go ahead
with our round brush and decimate. It's all about the decimation. That's good to 13. Alright, so the only other thing is we can probably
add a plane in here to make it look like
something. Let's do a plane. Because we can make that
the least amount of size. Oops, definitely don't
want to turn it in. But of course, the
gizmo loves to turn and flip and anything
but move in this direction. So let's solo this so
we can just see it. I'm looking at the top view. Let's change the
parameters here. And let me see there's a, oh, here we go. Disk. Here we go. So bringing the topology
down till it's really low. It's only like 25. So we'll
validate this un-solo. This, we can just
reposition here like that. Perfect. So we'll name this plant soil,
plant trunk, plant-soil. Now we do have these
other plant pot. Let's hide this one. Because now we have
this other one. So right off the bat. Let's just take the
disk plant soil. So let's clone that one and
bring that to part two. So we'll turn that on and we'll
just bring that right in. Because we can use
this for this plant. Will make that easy. Now for this plant, let's, let's use a cylinder. Or I guess we can use
it. Um, you know what, we can use it really is an
attitude that was fine. But we don't have
to do the same. We want to make a crazy thing like we did the last tree
because that was the, that was too much,
that was a doozy. So we'll just do something
simple like this. Radius will do something like that or validate it.
21. Re-Planting: Hey guys. So this is just, I just put on some lights, some quick lights just to kinda see so you can see what
we've made so far. It's nice to kinda
take a look and realize how far you've gone. The only thing is
I'm gonna do is I'm going to change these, these plants because I spent
a lot of time making them. They're a little,
they're a little much and I don't really like them. So I think that's
where I'm gonna start. I'm gonna go back to the pots and actually
have this video. Actually, you've probably
already watched this video. Actually, I don't know
when I'm going to insert this in the class. Let's just go back and start from making this first
little bit from the plant. And I just want to
use something really simple for the plant. So let's just take a sphere. So we'll add a nice
little sphere. Of course, spins and
we'll shrink it. Okay, so now we
just want to place it so that it looks like, sorry, this thing moves
around so quickly. And maybe we'll be able to
pull it up a little bit. How validate it. And
let's take the symmetry. And let's use the
red and the blue, the x and the z. This way we can sort of push the bottom-up and give
it a nice like a flat. Actually, let's
turn on symmetry. I always forget that.
Let's turn on symmetry. I think something
like that is cute for a little tree or a little
plant, I should say. Alright, So I think
that looks pretty good. And let's go ahead hand. We wanna do multi-resolution. Do we want to sub-divide it
first before we decimate? Because I think
decimating it will. I don't know how
far we'll be able to get before it looks bad. 386 actually, it looks okay. I think that looks okay. I'm okay with 386. So this will be, we'll just
call this P1 will clone. And we'll call this P2. Will make this one a
little bit smaller. Now we just want to
dress the ends of those limbs with these
cute little puffs. And if you don't want them too, you can always kinda
put them off and make it more flat depending
on how you want them to sit on the on the ledge. I kinda hard to see so
much, so much going on. Maybe it maybe will
just flatten it out and make it a little longer. This way it's not completely touching the other,
the other one. So let's just close this one and we'll figure out where to put it on this little thing to it. We'll make this one
a little bit bigger. And actually don't
mind if they if it touches the the top
part of the plant. I don't think I
mind that too much. Okay. So we have
something like that. Let's name this one, p3. Okay. One. So all of these I
want to join them. Yeah, let's just join them. And I'll bring it up bring
it up to plant pot one, just so that everything
is together. That plan is is good. Now I could have I probably
should have just taken this and made a copy of it. But what does the
sphere actually, let's see what this fear is. I actually don't
know what that is. Sometimes I'll oh, this
is the this is an orange. That's my extra orange. So let's name this extra orange. It's when it's good to
them to name things. And I'm actually
going to clone that. Let's bring it over
here and see if we can turn this orange into
a plant all in itself. Now it looks kinda silly. Might look better if it's
like just straight up. This is 178. That's
actually not too bad. Let's name this one as well, just to kinda keep it. So we'll name this one P1, and this is plant too. So we'll bring it
up to plant two. Alright. Now we can kinda have some
fun with it if we want. Might be fun to make. And a lot of times you just
have to kinda, you know, just kinda play and see if you get anything that looks
like it can work. But it kinda I mean,
I kinda like them. I think they look I
think they look nice. So I'll go ahead and
I'll go ahead and join these implant part two. I'm going to put back
here course tilts. So we'll put that
one back here and maybe sort of
in-between those trees. This one, plant pot one. I might even put it right here in-between and bring
the mushrooms up. That might be a better because I really
liked the mushrooms. And I feel like they kind
of get lost in the back. They might be nice
like right here. This tree or this plant. So I'll place it down. Maybe I can make it
a little bit bigger. I kinda like that. I don't even mind it a
little bit bigger. I think that looks great,
better than what I had before. And I loved the
little mushrooms. But I might move them somewhere, maybe over here,
something, but we'll see.
22. Eggs-ellent: Okay, But onto the
eggs, forgotten. So let's use which is
termed the bottom. So we'll add a box. This is for eggs, so we'll make it kinda narrow. So maybe something
like this or validate. And I'll do select my, actually that's a voxel Ramesh, it should be fine. I'll do selective mask
with the rectangle. And we're going to do very
similar to what we did before. So I'll highlight that, make this smaller
and then do this. I think that's pretty
good. So let's take off the Select Mask. And I think that
looks pretty good. So I'll run it over
a few times with the smooth brush on
things really hurting. So it looks like
it's really hurting. So I'm going to voxel
re measured at 200. And I will hit it with the
round, all round edge. Okay, so now let's add our eggs. So we'll just add
spheres or one sphere. It's named this
egg carton sphere. So for the egg shape,
we can validate it, will go to the symmetry
and turn on the blue, will use the Move tool. And then we will first, let's stretch this out a
little bit. That'll help us. Then we go back
to the move tool. We just stretch symmetry on. We just stretch out the bottom. We just kinda go that's
like a proper take shape. We have to turn it to
the side though and just kinda match it over here. Okay, so that's
looks like an egg. So I'm going to hit it
with the sub-divide. Then our voxel, we measured
it tens to hundreds. Good. To see you. Let's see how much we can we want to decimate yet
he has decimated. We'll go ahead and decimate. Come on, give me under
1,000. There we go. That's what I would like to see. 238 for an egg. I'll take it. Now we just want to
fit them in here. So let's do an array. Let's name this sphere egg. And let's add an array. You can see that one is
all the way over there. So we'll bring this back. And let's make this three. Okay, that looks good.
And then we want blue. So we'll do two rows. Go. Move this over. We can make everything
a little bit smaller until it fits. Here we go just a
little bit closer. We'll bring it to the middle. This we can actually
squash a little bit to make sure that they fit. So I think something like
this works just fine. Okay, Then I'd estimate this. Let's decimate the carton. Or 1,000. I'm good. To 95 even better. Now this is another interesting
thing that I want to do is I want to take the eggs. Here's the egg carton.
Where's the eggs? Oh, that's in the array. I need to name this egg array. Egg array. Almost forgot about that. So now we have egg array and
we have the eggs. And we're gonna put that
with the egg carton. So let's clone the eggs. Let's hide one of them. Okay, The me, this to the
front and then I want to trim want to trim
these like that. So we're bringing
back the regular Oh, wait a minute, what happened? Let me make sure
we're still good. Oh, we're still good. Okay. Now I want to take the eggs we trimmed and I want to bring them down. Come on gizmo. Bring them down like this. So it just gives the carton, It just makes the
cart and look a little bit more mannequin. I'm going to take
the egg reach out because I just want to
flatten the curtain a little bit taller I
want to do is flatten that a little wider. Let me get the perfect
shape for a little eggs. And these are very high, so let's bring them
down a little bit more. So something like that. Cute little, cute
little carton of eggs. I'll put these back with the egg carton. And
I think we're good. Alright, so egg carton, let's move this
into general place. Turn on snap to make
it a little easier. And can make it really small.
You can put them here. We can add an array to that whole thing. Here we go. We got two little egg
cartons looking good. Alright, let's see. All
right, It's looking good. So the only other thing
I want to make is maybe some other types of bread, some other types of bread, pie. Then after that, I think
I'm pretty much done, maybe like a little clump of grass and maybe something
else over here. But we're pretty close to doing. We're pretty close now. So only a few more
things to finish up.
23. Pie in the Sky: Alright, so I'm really excited
about making this one. We're going to make some pie. So let's try to do this in solo. Solo makes me nervous, but let's try to do it in solo. So first let's add a cylinder. So we want to add a cylinder. Here's our, here's our
cylinder will shrink it to maybe about,
maybe about there. And let's tap radius
so we can make the top a little bit wider
because Pat has wider. The bottom is a bit wider, so we'll do something
like that. I think. Now let's see if
we can just lower the topology of this and maybe get it to be low so we don't really
have to do much with it. I think that might work. 170. Let's leave
this here for now. I think it looks pretty good. So let's add a sphere now. Let's make sure it
actually, let's, let's just label this pie base. Let's say crust. We're going to name it pi base. So now let's add sphere. So this will be our path. So let's shrink it up. Bring
it down to are in here. So something like this. Think that looks pretty good. So we can actually,
let's validate this. And let's go ahead. And because we're going to
wind up doing a UV bake of the pie just to get the amount of details
that I really want. So let's voxel 3D mesh. This path had like 300 for now. Let's go to multi-rate is, Let's subdivide it first. There we go. Let's subdivide it once. Auxiliary mesh and 300. I don't care about
your multi-resolution. Okay, So we're looking good. So the only thing
that I wanna do with this part of the pie is
bring the middle down. So like always, I want to kinda keep it even so we'll use the
red and we'll use the blue. And we'll use the
Move tool and we just want to bring the middle
down a little bit. Turn symmetry on. So let's just bring the middle down and make it a
little bit bigger. We'll just bring the
middle down a little bit. Something like that. I feel like that. I feel
like that works good. Okay, so now the real fun part, I'm gonna go ahead and save. So we're going to
add some little. You'll see, you'll see
what we're gonna do. So let's take, How did
I do it the last time? Let's take a torus. So we'll take a tourists, and let's take our
snap, snap so at 45. So we'll go ahead and
turn our tourists, make it a little thicker
and then we'll shrink it. We want to make it thicker
still, maybe around there. So something like that. Okay, so let's go ahead
and validate that. So now let's have our
tourists. This is our Pi. So let's just name this
pie sname up high. And this will be,
we'll just put it, we'll just call
it crust for now. And how does it look like crust? But that's okay. We'll,
we'll make it work. Now for this one, we want to go ahead and
add an array to this. Now unfortunately, I
think I'll have to get out of solo mode. But let's go ahead and add, I always say array radius. We want to add a radius. Oh, maybe it works. Maybe it worked. Let's pull it apart. There is one thing
that you should know about the Radial tool. So now we have we
have four of them. It looks like we have for that one thing that's important is to go to the radial and then goto crust. And we'll do that when we
want to actually move it. But again, it gets really
confusing with solo. So let's just take
it off of solo. So let's take our pi, pi base radio and let's
just move everything. We can move it up or down. Up is better. That way we
can kinda see the top view. So now we have our
pie in the sky. I'm definitely Lynn naming
this pie in the sky. We have our pie in the sky. So this is our radial. And let's make a bunch of them. So let's take, Let's take this and just make
a bunch like this. So let's, let's try 17 for now. Now let's go to, go to crust. Then you can you
should be able to pull it apart from the middle. Looking good. So let's move it down. And let's pull it
apart even more. Now let's take the blue. I think it's the blue. We can take it off of snap
so we can move it freely. And then we'll look at the, look at this pie already. Look at this pie already. So now we'll put it like this. Look at this Q pi. Sorry, I'm I I'm I get a
little too excited actually. The way I made it. And the other one was I actually
turned these like this. And I think I needed to add some work because
it didn't look. They're not all touching and
they need to be touching. So we'll just go back to the
radio and then we'll just add some more until they're
touching like this. Then we can go
back to the crust. We can adjust these until
they're how we want them. You can stretch them. And this is kinda fun because
it's literally just making, you just make your
pattern with the crust. I think I actually might like, I do like it like this, but I also like the other crust. So part of me wants to do
like two different versions. But I think I liked I think it might even like
this crust a little better. But I mean, you can kinda figure out which way
you want to do it. I don't know. I kinda like them both. Maybe we'll just
turn it a little bit and just add a few more. See what happens if I don't want to stretch them too much. I pull it out a little bit more. Here. Maybe I'll
add a couple more. So I'm gonna go back to the radio and just add
maybe a couple more. Maybe 20. Just fill it out a little bit. Okay, I think that looks good. So now I do want I kinda
feel like the bottom. I kinda want the bottom
to be a little more flat. So I'll go to the crust. And let's just see
what happens if I let's see what
happens if I trim. So if I'm looking at
the front and I trim, just see what happens. Okay, trims a mall and it looks a little funny. Okay. I really liked making pies. I never knew how much I
like making pies, 3D pies. Okay, So now for the bottom, does a couple of things we can do to sort of make this
look a little bit better. We can maybe make this wider. Yeah, I think that's the key. So we just made that
a little wider. I think that looks really nice. It feels like it
feels like a pie. So I'm pretty happy
with pretty happy with this and share anything else
that I wanted to do with it. I think I'll just validate that. And I'll go to my radio. And I'm gonna go ahead
and validate it. Okay? And for the Pi, I
still wanna do. So we still have those, both of those symmetry lines.
So that works. I think I might
want to use layer. And let me just do
a little test here. So using layer, I
think I want to get close and just do
a notice I'm doing it in the middle here
that way we have four of them. Here we go. That's better. Let's fox will merge
this again at 300, sort of solidify it, and then use the rounded edge a couple of times just to make
everything nice and soft. And also for the crust. I do want to, I do want
to blend them together. But I think this is where
I want to go ahead and change it from
Metcalf to let PBR. I think I want to color
them separate first. So for the pie, I just wanted to do like
a nice golden Pi color, like maybe something like this. So maybe something like
that for the Pi color. And then for the crust. Just wanted a little bit darker. Just like a little bit darker. Yeah, I like that. I think I might want
this a little darker. Just a little bit. Little bit darker.
Yes, there we go. Little. It looks a bit overdone, but it still looks nice. Like if it looks
like if it tastes good, I be excited to eat it.
24. Baking Pies: So let's talk. So remark
VMS, both of these together. So the radios, the
crust and then the pie. So let's just do it at like 300. Okay, so now let's
do our rounded edge. So now they're like together, it looks a little bit
more natural to me. I love that. I think pies are so fun. Okay, So I do like
these details, but we're not going to
be able to decimate. And it's just, it's not gonna
look good if we decimate. I'll just show you really quick. If I decimated and get it down to somewhere I want to be it
just like it looks too bad. So instead we're
gonna do a bake. So the way, the way
that we do this is so we have our pi here. So let's just name this. Hi, we're going to clone this. So we cloned Pi and then
we hide, hide one of them. So now we have the one pie
that we're working with. Now for this Pi we can decimate. Let's decimate down to the colors you're gonna get
is gonna get really ugly. But that's okay. For 32, might not be excuse me. We'll try for 32. We might have to backup, but let's try 432 first. So we go back into this menu. We go down to UV, unwrap, and we do unwrap atlas. So now it's unwrapped. So then you just go down here from high-res texture baking. Now we're going to move
this all the way up because I was moving all
the way up from high res. All of these are gonna be ticked except for the bottom one. So now you can just
do from high res, but I'm going to save
first just in case. Now from high res Pi. Takes a minute. Okay, and now I'm going to
turn off the UV. And it actually is still
looks pretty good. It's still looks pretty good. And this is four this is 432. If I wanted it cleaner, like see how the edges
are a little bit hard. If I wanted to clean her,
I could back up to 862. And then we just
repeat the process. So we go to the
decimation Window and then go down here, unwrap atlas. And then from high res,
bake from high risks. So it's basically taking the high res version and it's baking it on the
low-res version. So we'll tap UV, also. This UV thing if you
don't see this here, I think this is a shortcut. Yeah. So this is the shortcut. So if you don't see
it, just go up here to these three lines and you can make sure that
shortcut is there. So we'll turn that off. And that looks better. It's a little higher,
but it looks better. Okay. So I guess we'll just
leave it here for now. I think it looks it looks good. So now we can go to the
original one and we can just delete it because we
don't need we don't need it. We have the low. We'll put it. Let's put the Pi base. Will arm that underneath Pi. The Pi base, we can just, I don't know what color
we want to make that. I don't know if we want to
make it like a tin foil color. Maybe we go gray and
then up the middle in this kind of thing. We can do that. You can have, just
have fun with it and figure out what
color you want it. Maybe I'll leave it like
a light pink for now. That's our Pi. There's also another thing
that I wanted to tell you about these kind of things. So for the Pi and the Pi base and all of
these other things, like all of these things
that we're making, it's really important to
start keeping a like a file. Just keep a folder on
your iPad or wherever. And just keep all of
these individually. So if we made another one
of these and you're like, oh, I want to bring a pie in. You can just bring the
pie into the scene. So really quick, we'll
do that with this pi. So you just go here
first, let's just see. So you go to the project window, you go down and Export
and Export As nomad. So right now it's only include selected objects and
there's only one. But there should be two
because it should be the Pi and the Pi base. So you wanna make sure you
have all of the layers, all of the messages that you
want to export together. They don t have to be attacks like I could pick
some other ones. But it's just important
to otherwise, it's just going to
take the whole scene. So we'll go back here now. Include only includes
selected objects to. That's the base and the Pi, export nomad, save to files. So I have an assets
folder and I have food. I think I already
have a pi here. So I will just save pi two. Then I'll just save
that in this folder and now I have it so I can always, I can always use it and I
can always bring it in. And if you want to practice, I'll include, I'm going to
include a bunch of things. But you can bring
something into your scene, sorted the same way you just
go to Import had to scene, and then you just go to
wherever you saved it. Let's bring in a lantern. Okay, so now we have our lantern
and we can move it over. And now we have a lantern
in the scene as well.
25. A Nice Pudgy Loaf: Okay, so we have our pi. Let's bring it back to Matt cap. Where is it here? So we'll bring it
back to my cat. And I want to do a piece of bread because I
think I want to do some pies, will put some pies here. Maybe we'll put like a, just like a flat slab and then we'll put
some bread over it. It could actually just use
this. How big is that? 354. So I use a lot of things
that I previously used. So this isn't
shack, shack shelf. Let's clone that,
will bring it out. Now and go. I don't know why it
won't let me go. So shack shelf. Let's move it first. And I just want to put it
in front of the bread. So first I'm going
to flatten it. I want to make it a
little bit thinner. Almost like a little like
carving board or something. I want to put it in
front of the bread. I kinda wanna make
it a little softer, a little more round. Okay, So in order
to make this work, Let's think we might just
be able to sub-divide it. Let's see if that still
looks a bit wonky. So let's just remember it
will be measured at like 200. Then we should be
able to, there we go. Just wanted to make
it a little softer, a little more round the edges. Now hopefully we can
just estimate it right, right back down to a low
number where we had it. Hopefully. I got it
even lower, 129. So I'm gonna make it a little thinner and I'm going to move it down and make sure that
it's on the surface. Skinny it up a little bit more. So just something like that. And I'll rename it breadboard. So let's put a piece of bread, a different style
of bread on it. And I think we can use, Let's go back to the sky. I think that works
better than solo. So we'll use our trusty
Laser Tool and we use curve. So it makes sure I tap front my one I think I
want to come out. I want to do like a loaf, something, something like that. So it looks funny now
actually this is like a really cute mushroom. This point, I don't really
want the top to be pointy. So yeah, when I make it
when I tap on it and it goes had the black dot and
that's a little bit better. It's a little bit more
what I'm looking for. So I'm going to validate it. So the next thing we'll do is
we need to stretch it out. This is we want to make
it like a loaf and not like a muffin type of thing. Although we might make
some more muffins. So let's hit front
and let's just use the Select Mask with the rectangle and we're
going to mask one side. And then we'll just
take our gizmo and we'll do it manually. I think that looks pretty good. So let's clear the mask. So let's go ahead and use
our rounded edge brush. Just rounded off a
little bit more. Then let's go ahead
and decimate. Hopefully we can decimate it
down to a decent red size. I think that's fine to 65. So now we can just
put it in place. It turns symmetry off. Symmetry is a killer. I think that looks pretty good. I'm going to put like a
little thing of butter, a little thing of butter
and a little knife. And I think that'll
be really cute. And while we're here, let's
go ahead and erase this pi. So we have our path. So I'm just going to
shrink it a little bit. Actually maybe we don't need to pies or maybe we will need for a kinda like the pie
a little bit bigger. I can maybe slide
this stuff over. And I might have
room for two pies. So I just want to do array. So here's our py, and we'll
add and we'll do a ray. And one of them
should be somewhere. Yep, there it is. So we just want to
bring the offset back. Either a little big. We have our ellipse, then we have our two pies. The bread I can, I might be able to bring over a little bit to the bread basket. So that'll give our
pies plenty of room. And we could even do,
We can even do this. Let's have some fun with it. Let's take the pies
and let's clone it. And let's name this
baby pies array. So the big one is
gonna be this one, the new one is gonna be baby. So let's bring this out. Let's make this. First of all, let's bring that. Let's move the pivot
down to the counter. Actually, it looks
like we have to bring the pie down a little bit. I don't think they're actually
touching the counter. There we go. So let's do the same with this. Pie. Can't really see it, but I want it to be
touching the counter. Okay. So this one, the little one, baby pies. I want to shrink. I thought I set the trend
to move the pivot again. I want the pivot there. So when I shrink it
worked, it still worked. Okay. So we'll do baby pies. Maybe we'll do three. I don't think we can fit
four. Well, we can fit four. We have four little pies too, too big pies and for little
pies. So let's save. And I think this
might be a good time to put some honey in the jar. So let's do that. So we'll
need to change this to let PBR will make sure
that we have the jar. We want to change
that to refraction. Let's put the index of
refraction to like one for now. Pink glossy reflectance. We can turn that up a bit. Now let's just add a cylinder. So this is the jar. Let's add a cylinder. Think it's okay if it's
actually in the jar thing. Okay, so here's our cylinder. I think it's quite big. So we'll shrink it,
will bring it up. And you could do like a
Boolean operation if you want it to be really
perfect with the jar. But I'm not really that
concerned with it. So I'm just bringing
our cylinder inside the jar. Looks pretty good. This looks good enough. So
I'm going to validate it. Let's lock it that way we don't accidentally touch the jar. Let's do rounded edge. I'll just smooth it out. So now you can kinda
see it in there. And let's take move. And let's make sure that we
have red and blue symmetry. You can see that it's
not quite perfect. So I'm just going to
move it until it is. Whoops, I forgot to
turn symmetry on. So I'll move it there. Let me get a little bit. Something like that.
I think that works. I should unlock and
that's gone the glass. Let's just see what
works best here. So index of refraction. Let's see what happens if
we make the cylinder small. That's actually
good to the works. So as long as it
looks like it's in a jar and I think it looks
like it's in the jar. A little bit lower. You
go back to the cylinder. Want to move it up? I think
that's actually pretty good. If you're on the
glass just made, you can adjust all these things instead of just, you know, until you get something
that you really like to wear, it looks realistic. Look something in a glass. You can play with all
these other options. There's a lots of
things to play with. Two-sided. We turn that off, then
it kinda does this. It looks a little funny, but that might
actually look better. So let's see. Like if I, if I have two-sided off
and I can make it bigger, How do I feel like
it's not centered? How would it not be centered? But then you could do
something like that. I think that looks good too.
26. Syrup and Muffins: So while we're on the cylinder, Let's make sure we're
on the cylinder. Let's name this. I'm syrup. It on, I made honey. It could be honey or syrup. But if it's syrup, you want to make it glossy. Syrup is a little darker. Still a lot of mental illness. So you can just play around
with it and just get it to wonder if I can turn the
reflectance up on that. So you can also go to
the materials and turn the reflectance up on
the syrup as well. And remember that's opaque. Only the glass jar
is refraction. Because I don't think, I
don't think we can make the syrup also refraction. It might be a little too much, but let's, let's,
let's experiment. First, I forgot to press
panel. Here we go. But if we were to make
this a refraction, let's see what happens. It's a little, little weird. Return two-sided off where
you can see it at all. Index of refraction. Still can't see anything. See it obviously
doesn't look good. Choline, Lu, inverse choline. So we used inverse cooling. I wonder if I can
see through that. That's what I'm wondering
you pretty much. Can there we go. We learned something new. So essentially all I did
was I went to the syrup, which is just the cylinder
that we had inside. I turn that too. I went to the materials. I turn that into refraction. Then I went down. Oh, we can probably
turn this back on. And then I went down and
I tapped inverse choline. Not sure why it
works, but it works. I don't know what
inverse cooling is, but I think it looks great. So I'm going to keep it. And it's nice that you
can still see through it this wonderful little bit. So we'll come back and we'll
paint the top of the jar. Right? We have to
decimate the syrup. Almost forgot to decimated. So let's decimate. Alice. Won 59 is good. Yeah, that's good. I just want to experiment
with the class again. I know we did two-sided, but if we do auto, want to make sure I can get
it as perfect as I can. Yeah, I like it where it was. I think it will keep it there. Sorry, I'm getting like Okay. I just want to make sure
that the syrup is still 13. Okay, 159. Okay, we're good. So now let's just see what
color do we want to make the top feels right? A little bit of shine on it.
Maybe something like that. Once you're happy with your jar, we can actually make
some other jars. So let's go ahead and add, I want to add it to the
jar itself, to everything. So add an array. There we go. Let's save. So now with the array
one is way over there. So we'll just realist back in. I think there's enough room
to maybe put four jars. So maybe we'll do,
Let's use the gizmo. Looks like blue is the
correct direction. And we'll use the offset
to just bring it back. And now let's just go in closer so we can see what we're doing. Let's make them all a little bit smaller so that they fit. Maybe we'll do three instead. I think I'll make some muffins. So let's do the same thing. Let's go back to, let's go back to my cap. And let's save. Let's go back up
in the sky and use our latest tool and
curve. So tap front. Now I want to make, I want
to make a nice muffin. I feel like it
would be like this. I mean, it feels like
the perfect muffin. You know, maybe this needs to be a little
wider, the bottom. That's a good look
at muffin. I think. I think that's a nice look
and muffin will validate it, will give it a good sub-divide, maybe two and will rematch it will do 200, shows a muffin. So we re measured at 200, few little smooths with
our favorite tool. There's a couple of ways
to do like the packaging. So one way to do it is to
just do select mask with a rectangle and go like this. And then go into the mass
settings and do the shell. So extract shell. I think shell thickness. Let's bring it down to like 0.4. And let's extract. Okay. So I probably should
have done it. I approached it in the
mask a little bit lower. So let's, Let's just do unmask and we'll do it
a little bit lower. So let's see what
it looks like now. Like to tap on mask,
otherwise I'll forget. So we go back into the select Mass settings and we can extract, let's
make it a little bit. It'll, actually, it's fine. So we'll extract, you know what? So first let's tap on
the original muffin, go back to the Select
Mask and clear the mask. And now we'll go here and
we'll voxel remeshing. 160 is fine. And then we'll use
our round brush. Which is see how that looks. It looks kinda funny, but I mean it looks like a new
age like muffin thing. Alright, so let's just see
if we can decimate now. Let's see what we get. Okay, we're below thousand
to 63 it looks okay. But we also did decimate this
little thing that we made, which I feel like it's not going to do well AT. I mean, that's actually okay. So there's our little
muffin or cupcake. Cupcake, I guess. Cupcake. What did I just named cupcake. So confused. Cupcake. And this is Cupcake. This called the Cupcake base case. And how we're
bringing these down to kinda want like
a little tray. Cupcakes are large
and in charge. I want to make sure I'm
right on the surface. And I feel like the cupcakes
might be a little small for that bottom shelf. But maybe they look
good over here. What keeps wanting to turn? Nope. No, I can't see. Nope. Gizmo wolves. So of course we're going
to put a nice array on this. Like we always do. The one is here. Four is good. And then we'll just do blue. And we have a nice
little row of cupcakes. Are ever looking good.
Let's go ahead and save.
27. We're Doing Well: Okay, So I just got this
crazy idea to do a well. So I think we're
gonna do, uh, well, let me just let's take this lantern and let's
just scale it down. Sure. Where we're going to
put the lantern for now. We'll just kinda scale it down. Put it over here for now. So let's make, let's go
back up here in the sky. And let's add a box. So we're gonna do like
one of these sort of like old-style wells sort
of similar to this. There's a bunch of them. These are just like
Google Images, but something like this. We'll keep it really,
really simple. We have to keep it simple. We're doing so well, but
I can't I don't know. I just it needs to look. It needs to look great. We can create some
really amazing things. And I just can't bring myself to like not make it as good as
I know that it can look. Okay, so that's like
a decent brick size. Once we have our brick shape, I'm just going to go
ahead and validate. And we don't even need to voxel. Remember, let's just go right to the round brush,
tool, rounded edge, and just round out and just make a nice little cute brick,
rounded edge brick. So now we'll go decimate it. We should be able to get
it down nice and low. 53 years. That's okay. I headed down to a
different number before, but a little how I got there. It could be like
the size of it too. Let's decimate again. Okay, let's do so 53 is good. Anything below 100 is good. That's what we want. So
I got it down to 53. So that's where we're
going to take it. So now we have our, where's it at R? This is it. I'm
going to bring it out and just call it brick. So here we have our brick. So the next thing we
need to do is make a radio and make it round. So we'll go to our scene. Add radial. Alright, so now we can
add a bunch of them, maybe like ten to start. Then we need to go to
the brick underneath the radial and the gizmo. And we need to take,
let's just take the red and just pull it out. Like this. Beautiful, I know. So then we just need to turn
it so that the bricks are like pretty much maybe we can move it in
a little bit more. That's not bad. Bricks just need to be touching. And I think that's, I
think that's pretty good. Let's just validate
both of them. So we'll validate join children. Like so. Then we need to name
it brick again. Okay, so now let's clone this. So let's clone. And with our gizmo will
pivot, reset pivot. I don't know where the pivot Coast will be able
to clone it again, clone that pesky pivot is
always hiding somewhere. Okay, so now I'm
going to turn it. You might have to
turn off, snap off. I'm going to turn it like that. And that's the start. These two we can
just join together. And then we can clone that
and we can bring that up to see what it did there. See what we did
there. Looking good. So let's join these. We don't really need to
make it go too high. So now let's just figure out
where we want to put it. I'm thinking I feel
like it would fit in this area down and put
down on the right. So I'm gonna do the whole pivot. I'm going to do the pivot
on the surface, deal. So pivot and then we'll bring
this down to the surface. Like so we can tap that. So now I can scale it and it'll
just stay on the surface. So maybe the well
will be about here. Let's move this store. Smooth this tool a little
bit closer to the table. So we might want to even
make it a little smaller, but maybe make it taller.
I think that's okay. Yeah, so I think
that's a good spot. It's not really
blocking anything if we look at the front view. So now let's see if we can
quickly build the top part. So we'll just add, let's rename this to Rick. Well, let's add a box. And you know what? We'll just do
everything by hand. We could do things
with symmetry, but that might make it easier what we actually
know where the well is. So we could actually, we could actually do that. Let's move this up. And let's take the well and
do move origin. And we'll move that up as well. No pun intended. So the reason why I'm doing
that is now we can sort of make these things and
we can use the mirror. Let's go edit and let's
pull this really high up. And let's mirror it. So we can do things like this. I don't know if it
should be here. Maybe it should be here. Let's take a look at the
well, I think this is fine. We don't we're not gonna
get too crazy with it. I think that's fine. So let's go ahead and I feel like there should be a little
bit like skinnier. And it feels a little
bit better to me. Maybe not that tall. I want it to be like a
little a little well, let's make it a
little wider here. Okay, so let's validate. So this is mirrored. So we just have to work
on really one of these. I think we can probably do
the same thing that we did. Just use round all because
it's gonna be woods. So I'm not really I
don't think it has to be that detail or anything. So we do a bunch of
rounded edge and MS decimated and get into
something really low. That might be too too low. So 139 I think is okay. So this is the mirror. I'm going to clone this, the box and I'm going
to take it out of the mirror because we don't
really need it in there. So we know that the
mirror is the two sides. So this box now I can tap move origin when it's kind of annoying
way to bring it back up. But that's how I know it's
completely in the middle. So move origin, that's
kinda like my little cheat. So I know it's directly
in the middle. So we want to snap because
we want to use the 40th, we want to use clean, we want to be cleaned with it. So there we go. This is on top. That's pretty good. And I also want to, Let's clone knees. Let's take the mirror
in the box here, original box, and
let's clone them. Okay, so I know it's kinda like why am I
making all these clones? But I want to take
the new clone. I think I want to make
pivot reset pivot clone. Where's it at? The new clone? Why is it will
be down there, pivot reset. I don't know why they why this
is all the way down there. I'm just going to go
ahead and validate this and joined children. Pivot. We sit. There we go. Now the pivot
is where I want it to be. Okay, so let's shrink this up. Because I, I kinda wanna make like I have to think about the the
slats for the top. So I think if we have this here, I think this will actually work. If he had that one there. Then we clone this. So we'll clone this one. And then we'll flip
it to the other side. We have something like that. I think that's good. So now we can how
much time do we have? We have I have less than a minute for it to
move to another video. So we need to make a top. Let's clone this one. So let's clone that middle one is a lightbox is we're
using, but that's okay. So we'll bring that one up. I think the easiest
way to do that is to just add this to
make this a mirror. So add are not mirror array. So let's add an array
for this one box. And we don't want this way, we want, we want this way. I can see it. So let's
bring them closer together. We'll continue this
in the next video. Let's just save, just
to be on the safe side.
28. Well Wishes: Alright, so this is not bad. So we can add a couple more. We can adjust, I
can adjust that. So now we can pretty easily. If I go, if I'm on the array, is that the word
I want to be on? Yes, that's what
I want to be on. I'll take it off snap. And then we can just rotate. And we can make
this little piece. It needs to be a little
bigger, maybe like that. If you take it off world
right now it's in world. But if you take it off,
well then it's a little more true to its own angle. So I think that's
pretty good actually. Alright, yeah, I think
that's, I think that's good. So I'm going to validate that. And I'll join children. Then. Just clone this. And
then with the gizmo, Let's do pivot, rosette, pivot. I'm going to use my
snap that we can just spin it around. Easy peasy. And then we can just slide
it over to good spot. We can sort of make it. Yeah. I'm not too worried about it being like,
absolutely perfect. So these I'm just going to join. Okay, What is this? So we have is this. So all of these we
can join those, those are like the we also
have this side thing 0s, which I can't see
for some reason. Okay, So this mirror, Let's go ahead and
oh, there we go. So let's validate this. I do not know what this is. I'm not sure what that is. We'll get rid of it. I think they look fine
as is this top one. Yeah, they start to look
really crazy if I do that. Although that looks kinda
good, kinda looks like wood. So that is an option. I'm not even going
to bother naming all these because I think I'll
just join them altogether. But let's add a cylinder. Let's move it up. Now let's stretch it out. Make it a little smaller. Let's validate that. It's in the middle. You can make it a
little smaller. And we'll use our rounded
edge brush and we'll just go like this. And then let's just decimate it. Really small AT is perfect. Alright, so gizmo,
Let's clone this one. Will make it smaller and we'll
stretch it out even more. So it should start to
make sense what this is. And let's actually
take this one clone. Let's move it over here and
the shrink it like that. Let's just make it big like this and stick it on the side. We can use this
that we just made. Maybe we clone that, will bring it over to
this side but make it smaller and wider. And then we can take
this original one, will clone it, will
bring it over. We can skinny it up. Just make like a little handle because it needs
it needs something to like so you can roll
up and down the water. So that's kinda like
what I'm thinking. Let's take that one, clone it and bring it down. We can turn it this way. And we can do the
same thing here. We can clone this little cone, this one, and then turn it, put it down like this. And we can even make this
a little bit flatter. As though it's just
like it's got a little bit a little more swag to it. Make sure
it's in the middle. Okay, That looks good. So let's take, let's take
this cylinder that we made. Let's clone it. And we'll bring it and just
make it a little bit bigger. And we want to kind of pretend
like it's like a rope. So we'll do that,
we'll clone it, will do this a couple of
times. Actually, that's okay. We can vary the
size a little bit. Maybe they should all
be a lot thinner. So these three want to
make sure that we have separate because
we're probably going to have a different color. So these three, I'm going to join and I'm going
to call that rope. That way we don't
get it confused because we made a lot of shapes, but we definitely don't
want to get those confused. So maybe it will clone
it and then we'll, we'll kind of adjust it a little bit so it doesn't look
like it's just matching. So I think that's, I
think that's good. And then we'll just join these. Then we can just, we can probably use this thing. So we'll just clone
that and we'll call this rope long 9 min. And we'll bring that over. And then we'll
just make a really skinny and we'll stretch it out. Like this. We've got to just figure out the
right place for it. People will put on the backside. I think that's fine. It doesn't need to
be like, too crazy. I think that works. And
last but not least, I just want to put his desk
inside of there so it's like so it will look dark regardless. So in order to do that, let's just add a plane. The plane we can change this
to a disk and then we can, let's find it first. Let's bring it up. There we go. So now we'll just go
back here and lower the topology. We
don't need much. 25 will do. And then we'll just shrink
it and bring it down in. There. Doesn't need to be
any lower than this. So we'll validate that. This will be well, bottom. Okay, So this is all would we just need to sort of get this stuff
a little bit together? So that's word, we just need
to find everything and it's gonna be even
though most of it's probably gonna be
the same color. I like to I like to try to keep things
a little bit organized. Okay. So this mirror, this mirror, this are
definitely together. So I'm just I'm just taking all of these and
putting them together. I don't know if I want this
to be a different color yet. So we'll join those. And I'll just change this to wood beams, something like that. I think would beam sounds good. What is the cylinder? This must be like the handle. Okay, So let's connect all of
these little handle things. So we have the wood beams. So we have this. Now we just have to find the other
cylinder, that cylinder. The cylinder might
be different color. We have that long
one and there we go. So let's do the handle, this little cylinder
and then the thin one in the middle. Let's join those. So now let's do, let's just call it pulley. So now we have all, we have all these
little joint cylinders. So let's try to get those. Is one more. One more, right? I guess I guess I
connected it with that. So you know what, I'm just going to connect
these with with wood beams. I'm just going to connect
all that together. Okay. Pulley array, so we can change the name
of the array to roof. Well, roof. Rope long. I mean, you just
connect the ropes. So this rope with rope long. Okay. And then we have
that cylinder in there. So I'm going to put all
this with the brick. Well, alright, and that's good. I think we're good to go.
Yeah. Got everything. I think that's great.
29. Bits and Bobs: So now let's just go
ahead and position this. Let's make sure we save brick. Well, so let's go ahead and
position this down here. I don't have to be careful. You just want to be careful
with all these other things because it couldn't move
move it off center, and then you'll just be off
center and not even know it. So yeah, I think that
looks good and we have a little little well, I like that. Let's make like a little
plump of grass or two. And that's just something
that I like to do to kinda give the grass a little
more, something. That's pretty simple.
We'll just add. Let's see. It's easier to it. Let's do it above the ground. So add a sphere, bring it up here, flatten it, will flatten it this way too. Alright. So we'll validate said sphere. Then. What do we need to do? So symmetry, I think we should
grab the blue one as well. We should just make them bottom. Let's turn on symmetry. And we just need to
squeeze the bottom in. Okay, so let's though we we had a pretty pretty
squeezed together. So that's pretty good. The main thing is
you just want it to be nice and round and plump. Like that. I think that's good. Alright,
so we might not have to do, let's just do a few of
these for good measure. Let's decimate this down. I think 98 is fine. They're going to be
very, very small. But if you want to keep some of the detail than what
you can do when 94. But I think that's fine. So let's clone this one. Let's go to gizmo
and then clone. And we'll kinda just make like
a little buddy next to it. I'll do world so I can just
go straight down with it. Now, go off world so I can
sort of pull it a little bit. Okay, I think
that's pretty good. So this is just like
a little plump grass. You can take these two Join. And maybe we'll just stretch
them out a little bit. And if you want, you can take move and you can
turn symmetry off. And you can like, you can
give them a little bend. If you think they
need a little bend. I kinda like that. Just gives them a little
little something. And I'll just call
this grass clump. So let's shrink it
and then you can just place them
sparingly around. Just kinda breaks up the
ground a little bit. Of course you can
make them smaller, but they just kinda break
up the ground a little bit. Maybe we'll clone and put
one over here as well. You can even change the size to, you don't always
have to be the same. Because when can be
a little bit longer. Maybe it's clone. Maybe we'll put one back here. For funds 0s. Make it this one will go thicker. Just gives it a
little something. So let's make sure we save. Okay, So the only thing
is there's a few things here that we should
put on the shelf. So I'm thinking to
make that easier, let's just use this basket. So let's take our
gizmo and clone it. And let's bring it out and
bring it will flip it, make it smaller and
maybe I'll just make it more shallow as well. We can kinda put
it on the shelf. And let's try to find
this okay, breadbasket. So let's just take this out. We can put it above,
above the other ones, but let's rename it
to lower baskets. What does put some
green things in there. So it looks like there's maybe veggies or
something like that. Let's do cylinders for this one. So we'll flip them over. Maybe something like that. So we'll validate. And then let's, let's
do our little trick. So let's use our select mask. We'll do our little trick again. Where we, we mask it and
then we shrink a part of it. Then we go like that. So that's kind of interesting. So just to make it a little
bit of a different shape. And then we'll take our
rounded edge and go over it. And if it's not the top
seems like it's being weird. So I'm going to bring
it down at 85 and remeshing it again and that should make it nice and round. Okay, there we go. So
now we'll move it over. Down into here. I'm going to use world
and I use worlds. So I, so I can just
move it straight back, take it off snap, and
then we can just kinda figure out where
we want to put it. For these, you can do any shape. You don't really have
to do this shape. But, well, let's decimate. Let's make sure that we
can get this nice and low. So 37 is good, so I'll clone it. So now we have another one here. We'll put. So I'm just going
to clone a bunch of them and I'm going to just slightly make them a little off so they're
not all matching. Clone. And then maybe one more. And it can be like
a smaller size, maybe onto another one. Okay. So now we have like
another little tray of stuff that we can color later. Okay, so actually we can
make this the lower basket. We can actually
make that an array. So lower baskets add array. And let's bring it in. Let's make three of them. Okay? And let's just name the array lower baskets so
you don't get lost. Okay, So I'm going to think about what I want to
fill these things with. We could probably use like
the muffins or something. But yeah. Oh, you know what, we
can probably just do like a sphere as well. So like if we just add, we add a sphere. Here you go. Here's your sphere. So as fear is good because
you can really manipulate it. You can validate it,
and then you can just take a move or drag. Drag is probably better. What was I just moving just now. You also have to be careful. Like if you go to move
something and nothing moves, definitely go back
and make sure. So let's continue this
in the next video.
30. The Last of Sculpts: Okay, so back at it. Let's use drag. Why is
it not letting me Oh, did I already know I
didn't already subdivided. Well, I need to validate it. So we'll validate it. And now I can drag this in here. And it just looks
like it's filled with stuff, which
is what I want. So now let's just decimate it. 50 is just fine. I'm actually going
to take this over. I mean, clone it
and take it over. I'll make it small. Clone it. Just kinda squash it
together. Clone this one. But since that's
so low, like, um, I don't mind cloning a bunch of times and
just sort of filling the space because we have
plenty plenty of space. So I'm just sort of filling this up into nothing too fancy. There we go. It looks like
some other interesting things. I like it. What do we put here? Maybe we'll make like
a little characters. I have to, I know that
I can keep going, but I have to keep
you guys in mind. And I think that we're good. I think that we
have enough stuff. So let's take this. Oh, where's it at? There it is. So let's take the lantern and let's just move it up and put it
on the ledge right here. Let's make it a little smaller. So it fits a little
better on the ledge. Okay, so let's clone this. Maybe we'll put one
on the bench as well. Towards the back end
for this little area, I think maybe just like
a cute little walkway because that won't
be too hard to do. So let me just save. So let's just add all we have to take care of these lower. What is all this stuff? Well, these are the, this
is the basket and stuff. So this is pretty easy. Let's just join these cylinders. Then let's take the
spheres, will join those. So we'll rename this
one, sphere one. This can be sphere
balls. Weird name. This can be a veggies. Well this will make a green and they'll look like veggies. What is this? Was just an extra
cylinder that I missed. Yes, it is. So we'll put
this in with the veggies. Veggies that, that
good lower baskets. So we'll just sum, we
can't really put this into lower baskets because it's just not going to work
because of the, the array. Or you know what,
let's just take it and let's just validate
join children. So now we have the
lower baskets and we can just put all
these in there. So now that's all together. The lower LDL over
basket sulfur here, this little thing, I think
we should just take some of these spheres and clone them. And I think we'll just kinda
put them here like this. Maybe we can make them small, small and flat, and
maybe we can clone it again and spin it around. I think that works. I just want to put like maybe a little like step or
something. I don't know why. So I'm going to add I'm going
to start doing this on top. I'm just going to add a box and maybe I'll use the box for the other walkways as well. So we'll validate and then
we'll just do our round all. And then will decimate. All right, I guess 104. Let me this one long. Now we have just a little
something going on there. We don't really know
what, but that's okay. I just want to make
like a little walkway. But I think I wanted to add, I think I want to
do like cylinders, like almost like
cylindrical stones. So I'm just going to
validate rounded edge. And then I kinda wanna
like just altered, alter it a little bit. So it's not super perfect. So let's decimate it down low. Actually it looks alright. Okay, so we'll have one here. We'll clone it and we'll
just sort of move them. Turn it. Then we'll clone. And maybe I'll just like I want them to be a little bit
different from each other. So I'll clone this woman. Make it a little bigger. I'm sorry, I look
here, that looks okay. And I will clone this one. Cone. She suggested. Okay, so now we have like
a little little walkway. I'm going to join them,
rename it walkway. And I think I might just want to raise it up a little bit. Here we go. Okay. It looks good. I feel like when you'd
like a little rock there, something only put haven't really put any rocks
and the scenes. That's a valid date. And now let's, let's
just take the lasso and like we will just
trim it a little bit. She's kinda gave it something
like rock-like trimmings. Not really sure. And then
we'll do a rounded edge. This is real odd. Walks on it a little lower
so we can round it out. I don't want neat edges. Don't want any crazy edges. Sign actually looks more
like a rock on decimated. And then clone it. And then we'll just make a
little rock buddy. Okay. So we have to name our rocks. So we'll just join. Name these rocks. Alright, clone. Like some rocks could be
useful over here as well. Some little stones. And let's save. Alright, so I think I'm going to call it, feel free to add some more stuff if you have anything else that you want to put in or
you wanna make do that. You have some space up here, you have some space back there. You can put stuff on the table, make a little flower, a little vase or something, add whatever you want. But on the next one,
we're going to excuse me, I guess super-excited.
The next one. Then we'll start. We'll do some lighting
and we'll make it will just make it pretty
and make it perfect. But it looks great.
31. In Plane Light: Alright, so we have
come a long way. Let's put a plane
down underneath, just so we can get
those nice shadows from this onto the plane. Just a visual thing. But I kinda like it. So I'm just gonna
go to the ground and I'm going to add a plane. And I'm going to expand it. Pretty big like this. And actually before I validated, we don't need all
that extra space. So we will lower
the topology of it. I think actually zeros, okay? Okay, so now we have our plane. Put it at the bottom. Alright, so now let's change
it from Metcalf to let PBR. Just going to save. And it's kinda nice too. I like to put all of my meshes like a more
matt white color. I wish there was a
select all but I have to just manually select everything. The only thing I
really don't need to color the the lanterns. Lanterns. I don't
know where they are, so they're just gonna
get colored too. And I also don't need to
really color the jars. So I'm going to uncheck
those are the syrup. So everything else, I'm
going to just make white. But I want to do the roughness
will do to about 0.6. Alright? So you want kind of a, an angle like this where
you can see everything. So we want sort of
an angle like this. And let's just tap
that as our angle. So we go to this little camera
and we'll just call that, we'll just call this
11 is to orthographic. But I kinda feel like these look better as orthographic,
to be honest. But we can experiment later. So now let's add
our first light. So let's turn the environment
off. It should be black. And then we'll just
add our first light. Then you really get to
see it for what it is. Which is great. So that's our first light. And we really don't need
to just tap on something. I don't know why all
these eraser here, it's a bit strange in
somehow I must have hit this because that's why the arrays were like
showing very weird. I'm not sure if I want
it to be day or night, but I usually make it a
little bit of a darker seen. Since that's the
case, I'm going to make the background darker. So maybe we'll do like a
kind of a color like that. We'll see how that works. Okay, so our first light, I thought we change this
to just tangent to w1. So this is like world light one. Move it over this, put it over here so you can feel
free to adjust it. Usually it's a pretty good spot. This is our view. This might be pretty
good for now. So we also want to put a light in here shining
down on everything. So for that, we'll add a light. And we have W1 and this will be, we'll name is Juan top-down. And we'll change this
to spotlight. Okay. So we changed it to Spotlight and I just want to
point it directly down and then move
it underneath. I'm probably going to
put it so it's facing forward a little
bit, if anything. And then we'll move it back. Let's see how high we can get. So that looks like the
top of the height. Back a little bit. And it's awfully bright, so we'll turn it down. Some will turn the softness up. The cone angle can
be a bit wider. Let's turn it down. Maybe
something like this. We have two more lights. Which we could use
for the lanterns. But for now, let's just use another light coming
from the back here. So we'll add another one. And let's call this one edge. So for edge, Let's tap
on our favorite view. I'm actually going to
adjust it a little bit. Maybe around here,
a little smaller. Now, update this setting
by just pressing the Down button with Edge. I want it so we
have a nice edge on all of our stuff that we made. This gives everything a
nice little edge coming from the back when you can
see all these details. So that's what I'm looking for. And just so you
know, I'm I'm using this little you can change the lights with these
little shortcuts. And I think I want to change this to softness in the shadow. So I'll just change
to make that soft. I might make this soft too. But let's go into post-process. And let's tap post-process. And we can leave the
render resolution down a little bit so it
doesn't take up so much. So Sasso taxing on,
on this system. And let's take a look
through this real quick. Global illumination. This all looks pretty good. Okay, so now we can just have a better view of
what we're doing. It looks like we can turn
this light down a little bit. So that's top-down. It looks like we can
turn it down some. And we have the
lantern over here. So maybe we'll just add
the point light over here. So we'll add another light. And we'll name this one lantern. And let's change it
to a point light. So they're always really
bright to start with. Oops, not sure if
that's the right light. So lantern. Move over here to where
our little lantern is. Turn it down even more. And actually let's do screen
space instead of shadow map. And I just want to put this in lantern, It's really bright. Really bright. So something like this. I think. Okay. So I think it looks pretty good. The only thing is it's
still a little bright. So I might actually, I'm going to actually turn
W1 down a little bit. Okay, so I think this
looks pretty good. I'm going to save. And now we
can kinda just color these. We can color all of
our, all of our things. Let's get the main, Let's get the easier things out
of the way first. We also want to change everything
to sub-surface as well. But for right now let's
just color everything. For these, I kinda
wanna do like a brown. And let's, let's actually
turn on the environment. We could turn it down. So it's not so bright, but just so we can
see everything. Well, I want this to be brown. So maybe something like that. Then I have to figure
out all the things that I also want brown. So I think I want this
counter to be brown as well. The countertop can maybe be either a white
or a light brown. Maybe a little more shiny. So maybe something like that. Shelf I think can
be brown as well. So in order to get
that color back, I just tapped on this little
circle here for the color, except tapped on the eyedropper. And then you can
touch it wherever and it just takes that color. So I think we're still on that. So we'll paint that brown. And then this box will make
it a different color, brown. Something like this maybe. All right, so then we have the table table legs. Table legs. I'll make a little bit darker. Not I want to take the color of
this because that's the main color of the
scene, I think so. I want to make the
bench that color. And this would the same color. Okay. We have our fences
so they can probably make those the same
color as well. References where
together they are, will shine them together. So we have our tree trunk here. Maybe they can be
like a darker wood. Then we have all these
other tree trunks. So we can probably paint
them in the same colors. Then we have the ground. I'm actually not sure
what color I want that. Thinking maybe something like
this. It's a bit tricky. Trying to figure
out these colors.
32. Paint by Polys: The chair maybe actually maybe it should
match this stuff. I think that's a good color. Maybe I'll make the table
that color to let's see. I feel like the table needs
to be a little bit lighter. I don't know why, but it
just makes sense to me. So I'll match the stool with this color for the buckets. I don't know where
the other bucket is. All the other
buckets there. Okay. So the bucket the barrel
can probably be brown to should probably just
match this color here. And also this side box will
just match this would color. There we go. That's weird. What's up with that?
That's really strange. It's almost as if there's
two of them together. There's another one somewhere. It's got to be
That's what it is. There's another
random one somewhere. I was going to say that
was really messed me up. Okay. So for the plank, we'll make it this color. For the pump grass will
make it a similar color. We'll make it maybe
a little lighter. So these stones tones can be like a gray color. Maybe a little, maybe a
little spool shine to it. Maybe hasn't really
worked for that. I don't think. So. We get some
stones over here, paint those the same color. Okay, let's make this the same color as the surrounding wood. Then for this part, you will just make that
a little darker. The rope, the lighter, more yellow. Okay. So the room
we just wanted to regular brown, maybe bricks. Okay. Just a little more gray. I did like a greenish gray.
I think that looks okay. So then we have these
barrel barrel things, which I think we can
just make look dark. Maybe a little metallic. Take some of the roughness
off. I think that works. The same thing for these. Just kinda like a
dark metallic color. Let's grab the color
from the other barrel. And then color this
barrel just like a nice brown matching bowl. And the Morgan I think, can
be like a lighter color. Let's make this a little
glossy too. Just a little bit. The mushroom family, they were altogether
but I guess not a mushroom family. These guys can be something like that. Alright, well, I can enroll in. So for this tree pot, this would normally be
a terracotta color. So let's just keep
it as just do with that color. Let's
do the other one. Then. The disk inside that can be
just a little bit darker. That can be a little bit of a lighter brown because
I think the trunk of the trees select them both. Make my life easier. Trunk too. I think that's the trunk. Right? Yeah. Okay. So for these will do to like collider, little bit of a different brown. Maybe, maybe it was
something like this. Orangey brown, but I don't
wanna make it a little light. Then these can be seems sort of like kind
of washed out, green. Kinda like That. Kinda like it for the trees to turn in the awning. And already it looks
like it's not. How is this not the perfect, Okay, now it looks straight. So this bottom part
of the awning, let's see what happens if
we match it with the walls. I feel like this should
be like a color. I don't know what
color to make it, uh, kinda like that, yellow. And then for these maybe we'll
do like yellow and white. Okay, So let's take, so we have to go back into
this array. What is this? Okay, So this array, I want to validate, but I want to keep instances. There we go. So now we have the on. And keep instances just means that all of these
are still separate. So let's start from the top. We just need to find this one, this one, this one. And so that's what we want. So I'm going to join these. And then we can also join these. So now we have two, we have the other offset
and they're joined. So now we can figure out
what color we want them. So maybe like a yellow
and a it could be white, but something like that maybe. But of course you can play
around with the colors. You don't have to
do my exact colors. So the lanterns, Let's
do like a dark kinda like like darkish,
reddish, brownish. But let's turn the metal this up and turn the roughness
down a little bit. So there's a little bit
of shine on the lanterns. So they're kinda like metal
ish, kinda like that. The same thing with this one. And inside for the
candle I dislike to do. It's kind of a waxy
ish, yellowish. Let's take the
metal and this out. So something like that. And as do the same
with this one. So turtle like I don't
know, like a yellowish, muted yellow with
a little gloss.
33. Final Painting Details: Alright, alright, right,
so the bottles can be, I'm going to keep them glossy. I think they should be kind of a reddish, kind of like that. I'll do pane off. And then
I want to go up here to the materials and I want
to raise the reflectance. So they're very reflective. For the muffins. Can raise the roughness backup, give them a nice
light situation. And actually, what we could do is make them a little more, a little darker, pink. And then go to paint and
raise it up a little lighter. And then just paint in
the middle. Let's solo. And you can just
paint in the middle. And then use this smooth color, which we haven't used yet to
smooth it out on the solo. Now they're looking good. Then you have the little thing. So we can make this a, you can choose whatever
color we want for this. K. I think I had like
a light pink for these kinda like that. But like a mint green for
the little baby ones. Okay, So this I just kinda want a nice brown. You
didn't make a little. For this bread. Let's do a similar thing. We'll make it kinda dark. But then we'll paint maybe along the bottom and make the
bottom a little lighter. It's gonna be kinda difficult. Let's solo it. Because
it's such a low polythene. So that's the reason why it's
kinda difficult to color. But I think that's good. Let's make this like a cream. Actually can make it
more of a wooden basket. Alright, these breads,
we'll call him, I want to make these coil look pretty good. So paint these
breads this color. And I kind of want, I kinda want to paint
the undersides. Let's see if I can even do that. Let's see how that looks. So I'm going to try to grab
all of these and sold them. So grab this one and just
paint. Grab this one. I know it's a little hard to see because it's a
little dark in here. Let's see if I can raise this. Now we can use the
trustee smooth. All this. One thing I like about
like the low poly stuff. Smooth so well. And I love a good blend. Okay, Let's un-solo to
rewrite outside now. Right? So we have these cartons. I think these are always kind of a little bit more grayish. Paint those in the bottoms because it just wants
to be connected. Not able to join those. I'm leaving know where they are. Anyway. The eggs, I
definitely want brown. I definitely prefer brown eggs. You can put a little
bit of a shine on them. Just to touch. These little trays will
make them a little lighter. And I'll even know
what these are, but these should be green. Let's do a little
paint job on them. So I had solo make the tops. It's really isn't
working for these guys. I'll try to do a
little smoother. It's interesting. It's
actually not bad. Just going to I don't
know what they are, but they look a little
bit more organic. Now. I kinda wanna make this
a little more like radish. Then all these little things which I have no
idea what they are. We want to make them
up believable color. Okay, So we'll just do
something like this. So we have all these rays. So these are all these extra
oranges that I want to join. I'm going to bring out.
So I'm just going to rename this shelf oranges, even though they're probably
not going to be oranges. I don't know what color I should make these really struggling. We'll make them like
lemon and colors. Okay. So let's make the oranges. Oranges, right? The other basket, these can be inserted. Greens. I'm just like avocados
or something. All right. We have everything. I want to make this
a little darker. Alright? Think
everything is colored. Okay, Let's turn the
environment down. Back down. All right, looking good so far.
34. Lights & Subsurface : Alright, so let's just change
the color of the plane. We'll just see what looks good. Kinda like just like a
random color like that. I'm honest. I'll try the other colors, but I think I'd like
I think I like this. We turn off the environment. I just want us to
check out the lights and check out the
light situation. So we did have the lantern
all of a sudden really dark. And let's change the change the temperatures of
these lights too. So this top-down
light should be warm. And let's do softness. Actually. Let's do softness and make
it a little brighter. I've seen that. I don't like what it's
really doing with that. It's very strange. So we
have that land turned on. The only other thing
it'd be nice if I can, if I make this w1, if I make that sort of bluish, might give it a more night feel. It gives it a more night feel. But do I like it? Let's change the shadows
of w1 to soft. Softness. I think it looks better
or a little bit cool. But again, I just want to
make it nice and dark. I like my, I like
these scenes dark. Let's take a look without
the other lights. So top-down, that's really dark. This can actually
also be moonlight. Which moonlight would
be a very light yellow. And if we were gonna do
that, that color, we could, we could also add another C. How does this look? That makes it very bright. So let's delete this one and let's make a duplicate
of the lantern. And let's put it in
the other lantern. I think there's gray. Is it a little bright that
I can't tell because the light icon is too big. I wonder if this one is
actually still screen space. Ode is. She's really bright. I'm moving it up
helps a little bit. Because without screen space
than it looks way too crazy. Actually, it looks okay. I take that back.
That looks all right. Oh no, but I think it's
shines through the unknown. It's not, it's not
shining through. Kind of is this the only thing about this is it's
shines through. Meshes, unfortunately. I mean, just the rent or
that is the correct light. So let's take another
look at screen space. We raise the intensity. I kinda like it. I
love it actually. I think it looks good. So
we do have the environment. Let's bring it a
little bit lower. And the environment
is good because it allows you just to be able
to see like all the details. Because we have a lot
of beautiful details that we do want to see. But I think this is, I think this is really nice. I'm going to take the plane. I'm just going to clone
it and then move it back. And then tilt it. Actually, you know what? Delete that. Just make this one bigger
and longer that way. The only other one thing
that I wanna do is change everything to subsurface. So which is kind of a lot, but it does make
everything look good. So I usually do subsurface and
then I change this to 0.1. So that's like, that's
like normally what I do, I'm going to turn
the lights back on. And I'm going to
turn post-process off because we don't
need it right now. Let's save. Since everything is colored now. Now I'm just gonna go
through and change everything to
subsurface. And 0.1. All the fences. Oh,
yes, It is good. I actually can't believe I
forgot to do it this long. I don't know why I
keep pressing pain. Subsurface 0.1 rocks. And I guess I could really to an easier way could
take everything. But not the wine bottles. I just saw the wine bottles. Not the wine bottles. Lower baskets, bred plants
are not the lanterns. The brick work, brick
wall might be okay. Not the jars or syrup. But I think everything
else is a girl. Mushrooms. They don't need to do
anything with the lights. So yeah, we already
did the fence. We already did the rocks,
and we did the walkway. So everything else. I think we don't do
the plane either. So everything else
I think we can, we can do it all at this way. Subsurface 0.1. All right, cool. So let's see what
everything looks like. Post-process, full resolution. The stupid array things
came back and I want, I need to turn this
array thing off. Bane of my existence knows
not going off this time. Okay, So I would say, I'm calling this done
for my night scene. I love it. I think it looks really,
really fantastic. I'm very happy with it. And I hope you guys had
a good time making this. The only other thing
is now though we, now that I have to
make another video, I might as well do
a lite version. So I'm calling this
the night, night one. Now. I'm gonna do save as, save as this is going to
save a different one day. So now we'll have to, so if you go to open,
you'll see two of them. Forgot my Apple Pencil died. Okay, so now we
have two of them. Now, I'll try to do a
really quick day time look. Trying to render resolution
down that should allow us to maintain so we can
see what it looks like. But everything should
work a little bit better. Yeah, it works a lot better now.
35. Sunny Side Up: So for a daytime look, let's change the back. Let's change the
plane first off. Maybe something like this. Let's, let's turn
the environment off. Then let's just get rid of all these lights and
add a new light. In this way, we need
to make brighter. So we'll start at like three. This over here. So
this will be w1. So add another light,
this will be W2. So for this one, I'm just going to angle it from the back. My goal is to get like
an edge on these trees, which I can't really see. I see it a little bit. Kinda, kinda difficult. Alright, so we can probably
still put a, let's see. We'll probably still put
a spotlight inside. Here. I can find the spotlight. Where is the
spotlight and space? This is the most
elusive spotlight ever. Will lower the intensity. We might not even
really need this, but we'll see that light. And we might just want a light
coming from up above two. So let's add another light. We'll call this one top down. And also I want to change all
of these shows to softness. Not that it doesn't really
matter where this light is, but I just like to see it in the place where
it's like shining from. Let's change this
to soft as well. Right? So now let's turn on
the environment as well. Now it feels very, very bright. So now we can start,
It's kind of scaling back until it looks a
little more natural. Okay, and it looks nice. I'm going to turn the resolution up a little bit so I can see
it a little better. So let's just do a check. Without these lights. Maybe I just need another
light on the front. Maybe I'll even do it
with the new shadows. I don't usually do like
the late with no shadows, but I almost feel like
it makes sense for this because I just want to
kind of light everything up. So it's sort of makes sense. But it's not something that
I've ever really done. I like the light
inside of there. Actually make it a
little brighter. And top-down. See that there's something too. Okay, so now we have a
daylight scene too as well. At least you got to see
kind of how I would do it if I was gonna
do a daylight scene. Let's take a look
from this angle. Alright, so I hope the, hope you enjoyed that. I had a lot of fun making this. And I think, I think that's it. I might play around with
this a little bit more. Be sure to check out my YouTube. I'll probably go into this and change stuff around
and experiment more. But that'll be just class extras because I think we've
done more than enough. Okay, so now we have
are both versions. I'm going to export, I'm going to render this, and I'll render the other one. And I will see you in the
last and final video. So as I'm editing this, I remembered that there is one small thing that
I wanted to tell you. Obviously you're going to
want to render your creation. So when you're
rendering, oops, sorry. So when you're rendering and
you're in the post-process. So I have an iPad Pro 2021. You want to make sure
that your render resolution is all the way up. And also max frame sampling. I have mine at 04:06,
which is very high, which means when this
renders is gonna be very, very slow. So e.g. if I go here and I want
to render it for K, when I export, it
tells me that it's, the resolution is
going to be high. And look how slow this is. So this is up to 406 and this count is
very, very, very slow. So just keep that in mind and make sure that you
save before you do this. Because depending
on your system, you don't want any crashes
and things like that. So make sure you have everything saved before you render it. Set those, those
settings so that everything is the highest
quality you can be. And then you can just render. And then you can get a snack while it goes
through and renders. But it does wind up looking
really, really good. Once you turn those max frame
samples and all that stuff, once you turn that up,
really has an effect, especially since we have
all these lighting and soft shadows and
shading and everything. So there's a lot of
elements and that's really why it takes so long to render. But yeah, I just
wanted to add that in because that also affects the quality of your
finished work. And remember, I really
want to see you guys add your own little
character to this. Like if you have something like figure out a way to
decimate it as much as you can. Work on those skills
and making everything the smallest size again and
put something in the scene, make it make it
really, really unique. And I think that's it. Yeah, I'll see you
the next video.
36. Thank You! : What's up, guys? So you actually just
finished a lot. That was a lot of work. That
was really a lot of work. And I'm really glad that you stuck with me the whole time. I hope that you
really happy with your isometric diorama.
What have you? I don't know what the technical term for these scenes are, but I loved them by bad, been pretty obsessed with them, and I love doing
character design. But it's really nice
to have a place, the setting for your designs. So that's one thing that
I'm really interested in these four is because I make
a lot of cute characters. But now I can give them a home. I can give them a
setting, a background. And I just really, really enjoy making all of these things. One thing that I want to press upon you that's really good to do is save each
individual thing. Just make a folder and you're
on your iPad or whatever, your tablet, just make a folder and save
all of these assets. So if you're building a log cabin, you can
say, Oh, you know what? I have a wooden chair,
I have a wooden store. And you can just
bring it in because of course you can
model it again. But the more you do, the more you just wanna
do it efficiently, you'll always be
able to model it. Or you can come back and
watch this video again. But if you already have it, this is going to save you time. And you'll be able to make more and more and better
and better things. So I'm really interested in hearing your feedback
on my classes, things that I can do, better, things that you liked
about the class. Both of those things I'm
really interested to hear. My teaching style is very, I feel like it's very
relatable because I don't pretend to know everything and know
exactly what I'm doing every class I'm
learning as I go. There's a lot to this program. And every time I make a
class, I learn something new. Every pretty much every day I work on it. I learned
something new. So there is a lot
of trial and error. But I think that's the
beauty and the way that I teach because that's the way
that I create art myself. Once again, I'm
really happy that you guys are choosing to
spend your time with me. I'm really happy
that you're taking my classes and
enjoying the classes. Be sure to check out my YouTube, youtube.com slash
drug-free, Dave, because I'm going
to take this class and I'm going to keep going. I'll probably make some
new things and put in some new characters
and things like that. I always do that for
my Skillshare classes. So be sure to check those out and be sure to be sure
to take part in those. I might do some live
videos to do a lot about live videos
on YouTube as well. Also follow me on
Instagram, drug-free, Dave, TikTok, drug-free
Dave as well. So I let them make
a lot of time-lapse videos and things like that. And yeah, please upload your 3D work to the
projects and resources. I cannot wait to see
what you guys make. Feel free to add your
own stuff in afterwards. Make it really fun. You can make any sort
of day and night, changed the lighting,
just have fun with it and do your thing. Once again, I
appreciate you guys. I love teaching. I love having
students that I can teach. So if you have any suggestions on other classes and other things
you want to learn, then that's another great
thing to add into your review. And also tag me in your stuff. If you tag me on social media, then I'm happy to
share your work on my Instagram stories
and things like that. Alright. I've talked a lot. I appreciate you. Keep drawing, keep sculpting, and I'll see
you all in the next video. I don't know why that
one was so extra.
 Dave Reed, 2D & 3D Illustrator - Brooklyn, NY