Transcripts
1. Introduction: Whether you're a beginner
who wants to learn three D face painting to
elevate a costume design, or you're a professional
artist looking to explore a career or a side hustle
and special effects make up. This class will guide you
through essential skills to kick start your special
effects, make up journey. Empowering you to explore your creativity and
create versatile looks. Greetings. I'm Smith
from sunny California. With over 20 years experience, I've had the privilege
of traveling the world on diverse projects, teaching basic beginner
level make up to captivating special effects that you see in theaters and films. I run a successful
Youtube channel with over 3 million followers, where I teach the
mastery of make up from its foundational roots to professional make up artistry S effects
or special effects. Face painting is a
form of art that goes beyond traditional
designs and involves creating
realistic effects and often fantastical make up
on your face and body. It's commonly used in
films, theater, cost, play, and Halloween, or any event where dramatic make
up is desired. Throughout this class, I will demonstrate the use
of basic material. Most of these are
found in your home. To craft professional
looking SFX looks. We will explore a range
of exciting techniques, including three D face painting, where we'll dive into creating depth and dimension
using colors. Master the art of creating lifelike illusions
on human campus. And then we'll discover
how to combine liquid latex with paper to create three
dimensional looks. That will leave everyone in all. We will then unleash the artist in us crafting prosthetics from scratch and then
creating a certain look with it to bring the
impossible to life. During the class,
I'll be teaching these techniques while we
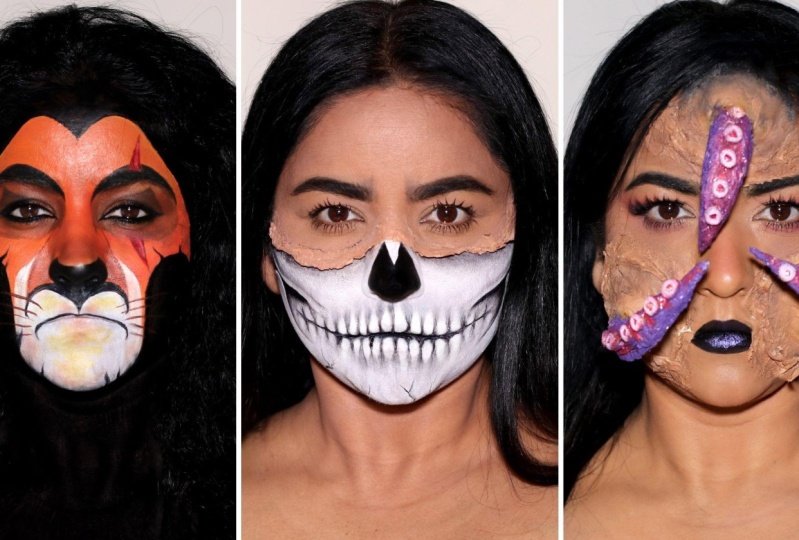
create three different looks. Lion kings, scar,
half way skull, and a fantasy creature
that we will create with the prosthetics that
we make from scratch. Once you've learned
these easy techniques, you can use it in
finite number of ways. Creating anything from
zombies, and aliens, and wounds and scars, or even aging, make
up special effects. Make up is not your
regular make up, but mastering it can
be a game changer. And I'm thrilled to
share budget friendly, accessible techniques
with all of you. If you're ready, let's begin.
2. Class Project & Materials : Welcome to our thrilling
class of SFX make up. I'm so glad you're here. This class is broken
down into four projects. Lion King's scar, half face
skull, prosthetic making, and a fantasy creature using the prosthetics For
the first look, which is Lion King's scar, we'll be learning
three D face painting, including b***ding
and adding effects. For this we will need
face panes and make up. We will need make up
brushes or sponges and we'll also need water
to activate the face panes. For the second project,
which is half face skull, we will work with
liquid latex and tissue paper to create
three D effects. For this, we will need
face paints and make up. We will need some water to
activate the face paint. We will need some tissue
paper or toilet paper. We will need some liquid latex. You can purchase liquid
latex online on Amazon, on camera, ready cosmetics
on maroon make up. Or it's also readily available in many of the Halloween
supply stores. Always be mindful
of allergies and skin sensitivities to
make up and latex, and make sure to perform a spot test before you
use it on yourself. For the third project,
we will learn to create prosthetics
from scratch, and for that you
will need aluminum. Food foil will
need liquid latex. We will need flour. I like to use all purpose flour, but you can also use corn
flour or even rice flour. You will need a sealant
like a glue or a mort page. We will use some Cheers to add texture to our prosthetics. We will need some makeup brushes to paint over the prosthetics, and we will need some paint. I'll be using face paint. You can also use spray paints. Always have a pair
of scissors handy. We'll also use a
disposable mixing stick. And some disposable
bowls for the fort Page, as well as liquid latex. For the final look, which
is Fantasy creature, we will use the prosthetics
that we crafted from scratch. We will use some make up, some make up brushes or sponges, and we'll also use liquid latex to attach
the prosthetics. Throughout this class, you
will observe that I have this clean white
background to keep the focus on all the colors that I'll be using on my face. Now let's get ready to
immerse ourselves into imagination and we'll bring
that to stunning reality. In the next lesson, we will
learn three D face painting, where we create jaw dropping dimensional
artwork on our face. Let's make this experience
want to remember?
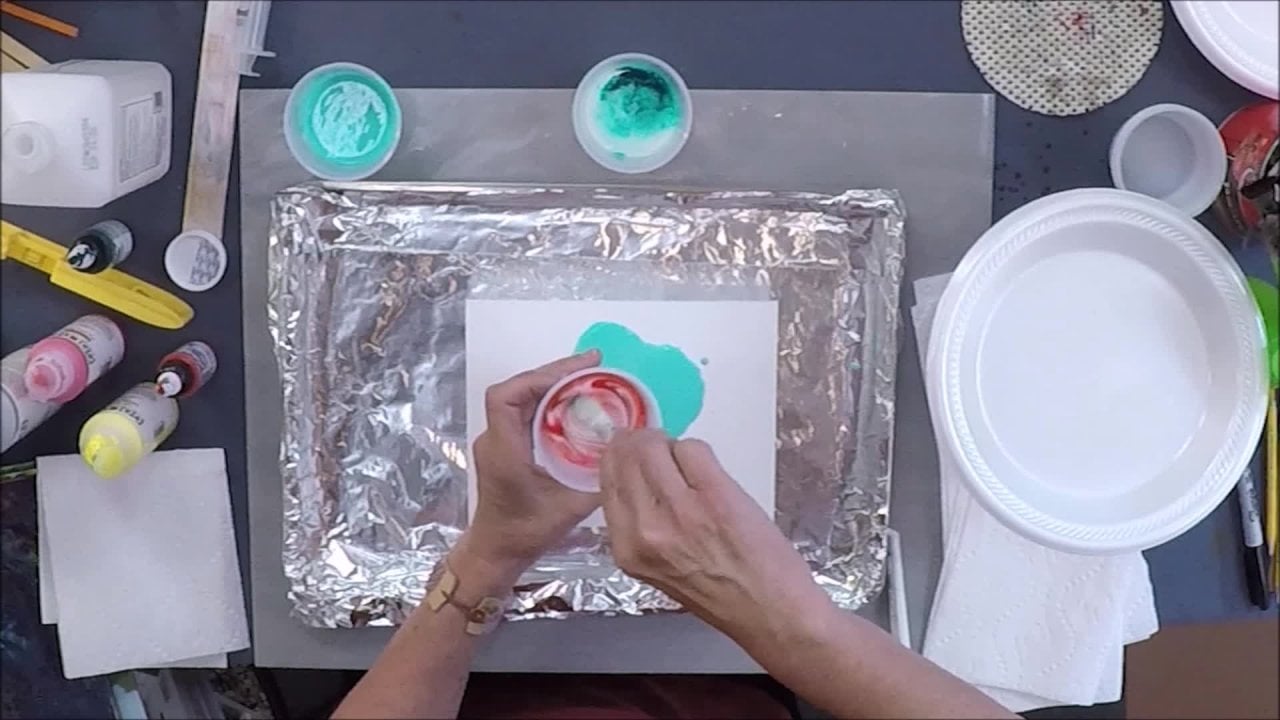
3. 3D Face Painting, Pigmentation, and Blending: In this lesson, you will
learn how to correctly use face paints to create different
characters and illusions. In just a few easy steps, we will convert ourselves
into Scar from Lion King. First, let's gather everything that we need in this lesson. A nude eye pencil. Some face paints and water
to activate the paints. Some basic make up and paint brushes start with a clean
face free of any creams. Have a mirror in
front of you and the picture of the character
you wish to paint. Today we are painting
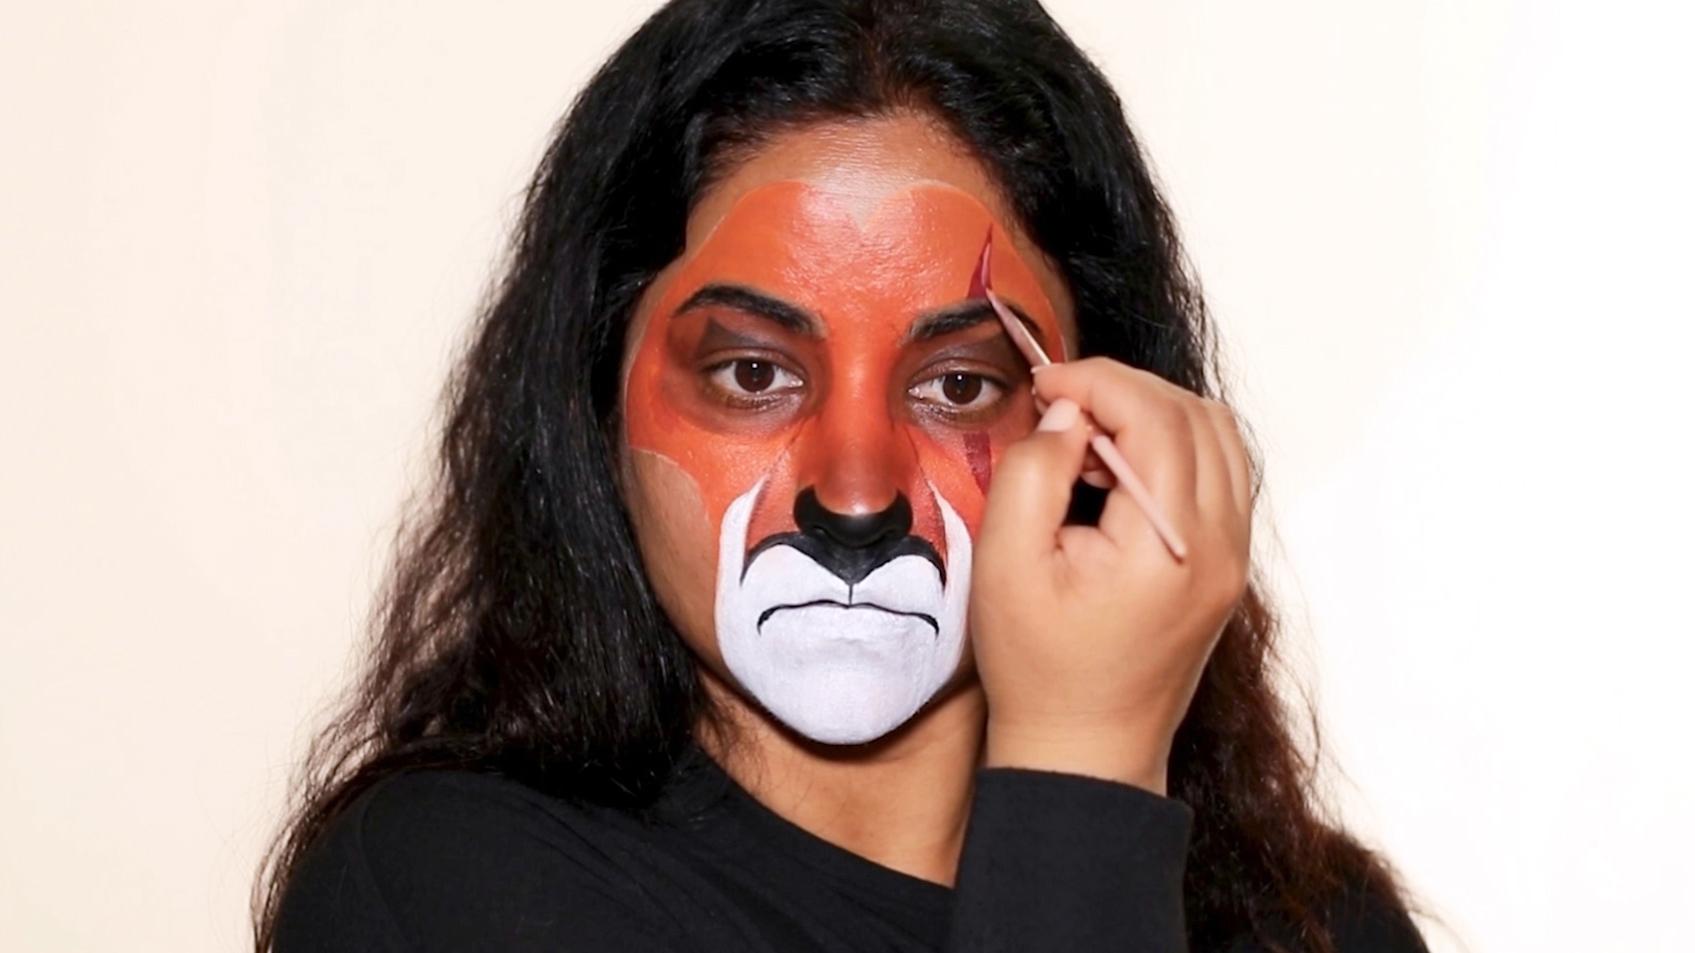
Scar from Lion King. For the first step,
I like to use a nude eye pencil to outline
the picture on my face. I'm starting with the
V hair line on top, bringing it all the
way down to my cheeks. And then I'm going to draw a curve leading up to my mouth. And as Scar has a wide nose, I'm going to widen my nose and attach it to the
sides of the curve. And then I'm going to pull the curves all the
way down to my chin. Because Scar has a
long mouth and chin, I like to use a nude eye pencil to outline because it's easier to erase it and redo it in case there's a mistake
for face paint, I'm going to be using the
Meron Paradise palette, which has all the colors
needed for this look. I'm going to start with the
sunset shades of orange and red to paint within the borders on the
top half of my face, starting with a
lighter orange shade. And I'm going to mix
in a little bit of the red till I'm happy
with the intensity. I'm using a flat
shading make up brush. You can also use paint brushes. I use very little water to paint That way the paint
show up more pigmented. Always remember, more water
will dilute the paint. And then I'm going
to go back and forth between the
orange and the red. Now I'm dipping into
the white paint with a fine liner brush. And I'm going to start
outlining the mouth area. And then I'm going to paint
the entire mouth with the white paint using
a flat shading brush. I'm using two coats of
paint to make it opaque. Next, I'm going to
dip into brown to outline the tear
ducts and the nose. And then I'm going to use
a dry b***ding brush. Dipping into the brown. I'm not using any water here. The brush is completely dry. And then I'm going to
use that brown shade to shade around my nose. It's easier to shade with a dry brush because the
color b***ds right in. As opposed to a wet brush, which will dilute the colors. Next, I'm dipping
into black with the same fine liner brush to carve out the nose and mouth. Looking at the
picture, I'm going to paint a curved nose outline. And right beneath that I'm
going to make a large M shape. I'm going to join
that to my mouth. And then I'm going to draw a
thin line across my mouth. And I'm going to point the ends downwards to show a sad face. I'm going to now paint the
nose and make the M thicker. I'm making the face sad
because carp was never happy. Now I'm going to dip
into the brown with a flat shading brush and
paint around my eyes. And once that's a
little bit dry, I'm going to mix in a little bit of black with the brown to make a deeper brown to draw pointed eyelids with
an eye line or brush. Now for the scar, I'm going to dip into the red and pull out a long triangle above my left eyebrow and another inverted
triangle below my eye. And then using this flesh color, I'm going to highlight the scar. Scar has this raised eyebrow, so I'm going to
first mark a point above my brow and
join it to the ends, elongating it in the
inner and outer corners. Using the black
paint to clean up. On top, I'm using
the orange paint, and at the bottom I'm going
to be using the brown paint. And that leaves us with
thick raised brows. And now on to creating
that cat eye. I'm going to first start
with a black eye pencil. This is the make up
Forever Aquas pencil. I'm going to use it
in my water line. And then using the urban
Decay liquid liner, I'm going to line
my lash line and pull out a wing in
the outer corner. And then I'm going to extend my inner corner joining it to the lash line to
create the cat eye. I'm going to further thicken
the lower lash line using the black eye pencil
and then using the site, Wonder warned mascara. I'm going to finish
up this look. As you can see, this
look is coming together. Now that we have the expression, let's go ahead and paint the outside of the
border with black paint. I'm going to be using
a flat shading brush by Milani to paint
the larger areas. And then I'm going
to fine tune it with the fine eye liner brush
in the borders to, to cover larger areas like
my neck and shoulders. I'm using a larger
foundation brush and applying two parts of
the paint to make it opaque. If you prefer not to paint
your neck and shoulders, you can either
wear a turtle neck or a high neck black T shirt. Now for the finer details, I'm going to be using
the liner brush to pull out some strokes
that look like hair. And I'm just going with the flow looking at the picture
in front of me. Feel free to use your
imagination to alter the image according to your
style and imagination. I'm going to make the
mouth a little bit thicker before I use this yellow paint to start
shading in the chin area. I'm also going to use a
little bit of orange paint to shade that should give
depth and dimension. And then using the brown paint, I'm going to start adding shadows by shading
around my face, so that should add more
dimension and depth. Before I use the brown paint, again with the fine liner
brush to pull out whiskers, I'm using brown
instead of black, so you can see it on both
the white background as well as the black
background on my chin. I let my hair down to go with the theme to make
it look like Maine. And here is the finished look. Remember that special effect space painting is an art form that allows for a lot of
creativity and experimentation. Don't be afraid to
try new techniques and have fun with the
colors and designs. Patience and practice is key
to improving your skills. Make sure to take photos
of your creation from different angles to showcase your work and share
it with others. In the next lesson,
we will work with tissue paper and liquid latex to create magic while we craft another
extraordinary artwork.
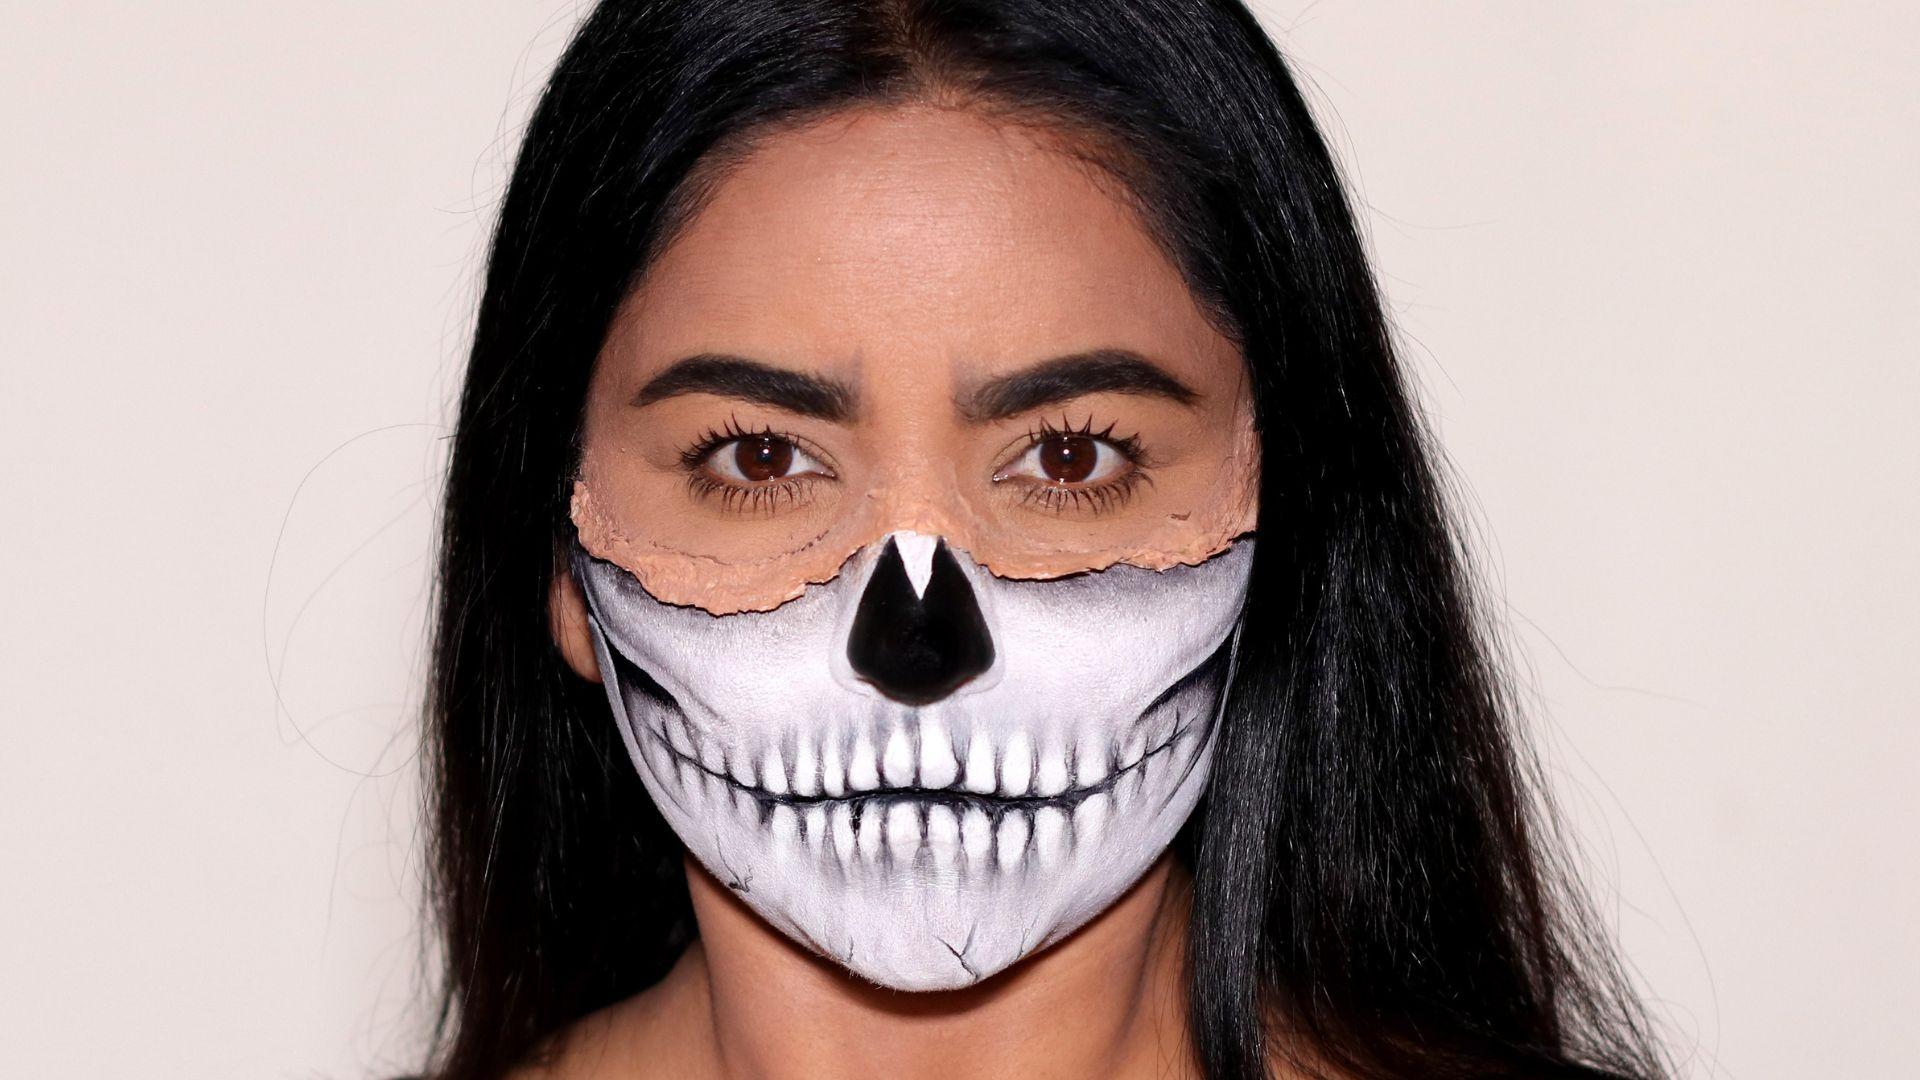
4. Create Realistic Skin Texture with Tissue Paper & Latex: When it comes to
special effects, make up liquid latex and
tissue paper are two of the most common and
versatile materials you can use to create
texture to your skin. In this lesson, we
will explore just that to avoid skin sensitivities
and allergies, make sure to perform
a sport test with liquid latex before you
use it on your face. In this lesson, we will
create a half face skull. It'll almost look
like your skin is peeling off and revealing
the skull beneath. For this look, we will need
tissue or toilet paper. Some liquid latex
face paint brushes, and some basic make up. I'm starting with a clean
face free of any creams. In the top half will
create the skin texture, and in the bottom half
will create the skull. I'm going to use
a nude eye pencil to roughly draw the
border and divide my face and also outline the hollow of my nose for the skull. I'm going to be using the men paradise palette
for face paints. Starting with the white paint, I'm going to fill in the
lower half of my face. And I'm going to
be doing two coats just to make it as
opaque as possible, but I'll be leaving the
hollow of the nose untouched. And then with a fine
eye liner brush, I'm going to clean up
the corners and hard to reach areas using
the white paint, and it should look
something like this. Now using the black paint, I'm going to first
outline the hollow of the nose and then I'm
going to fill it in. And then I'm going to paint
a thin line inside my mouth. And I'm going to extend it
on both sides of my mouth, towards the hollows of my cheek. To paint the bone
structure on the sides, I'm going to start
with my hair line, pulling it towards the
hollows of my cheek bones. And then I'm going to
draw another swirl going toward my jaw. And I'm going to mirror the same on the other side as well. Using a bit more black paint, I'm going to deepen
the innermost corners of the curves where they join. And then I'm going to use some black eye
shadow with a dry, flat shading brush to further
shade and soften this. Whether you're using black
pains or eye shadows, make sure to take very little at a time while you continue
to shade and b***d. Because if you take too much b***ding becomes a nightmare. So the key is to keep
on layering while you b***d till you're
happy with the intensity. I'm going to do the same
on the other side as well. And now we have the bone
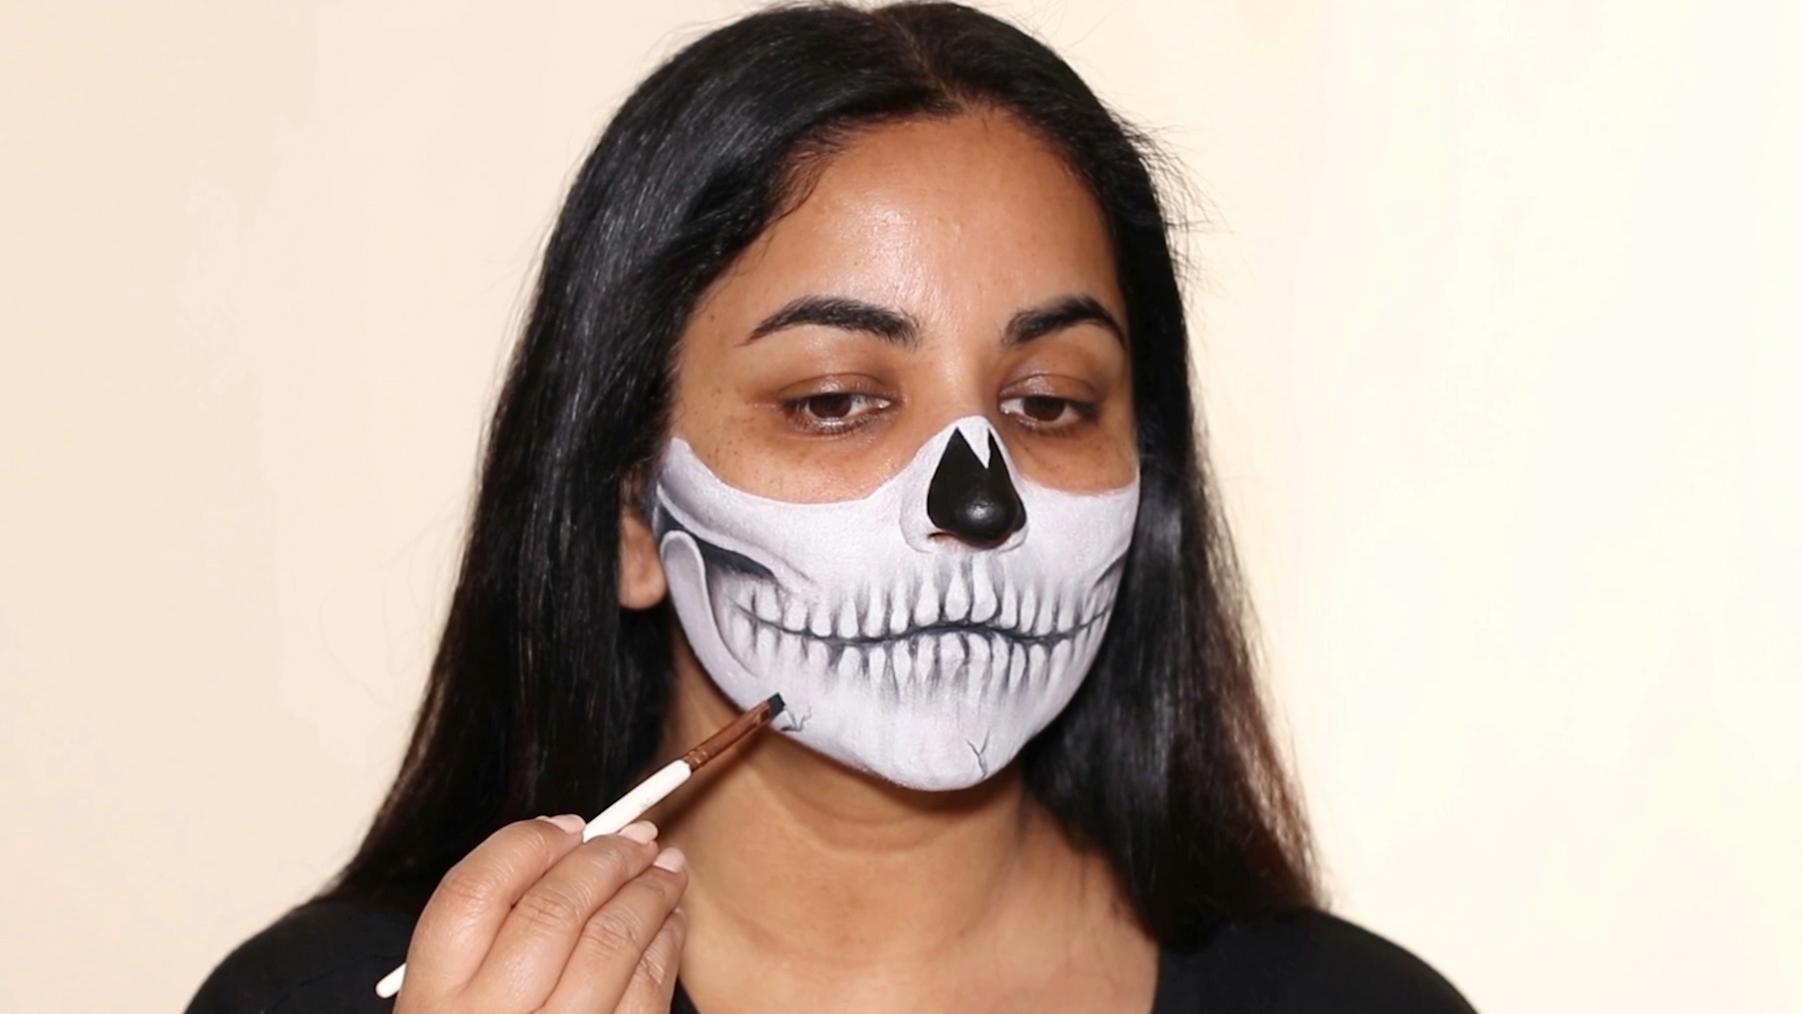
structure on the sides. Taken care of teeth is probably the most important
part of the look. And to do the
teeth, I'm going to be using black eye shadow. I'm going to first draw a vertical line right in
the center from my nose, going all the way down. And then I'm going
to start marking where I want the rest
of my teeth to be. I'm going to further
make these lines longer on the top and at the
bottom as you can see I've kept the longest
lines in the center and I'm going to taper it down as I move towards the side. They'll become
shorter and shorter. With the finer eye liner brush, I'm going to start curving
the teeth closer to my mouth. So basically I'm giving my teeth some shape by making it
rounder close to my mouth. I'm going to do this
for every tooth, both at the top as
well as at the bottom. Take your time to do this,
and it's okay if some of that black eye shadow
gets in the white area, we can always correct
it with some shading. Then I'm going to start
carving out the teeth. And the easiest way to give it some shape is by keeping it closer to the mouth and
tapering it as it moves away. Then I'm going to shade
a little bit more, making the black part wider
on top to reveal the teeth. Again, the teeth part is the most important
feature in a skull. Next, I'm going to be using a bit more of the
black eye shadow to start shading and adding
depth around the cheek bones. Then I'm also going
to be shading in the chin area before I use a thin angled brush to
make some cracks in the skull. Adding the shadows in
the cracks gives it so much more dimension and
makes it look closer to real. And this is the
completed half skull. Now let's work on the
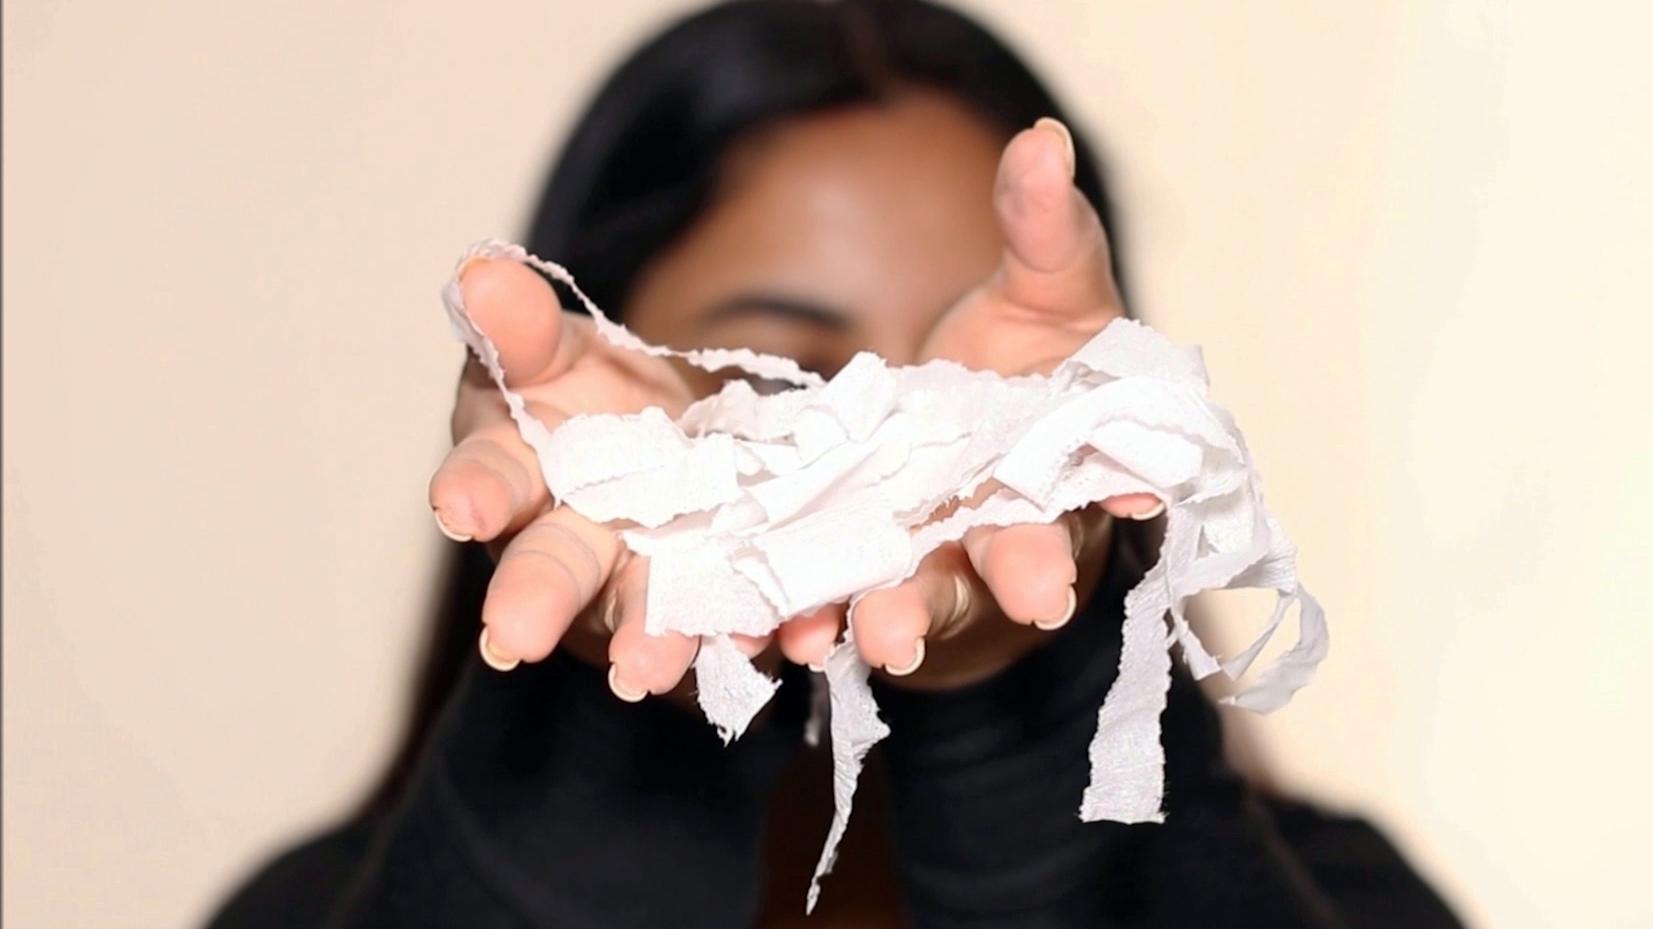
top portion of this look for which we will need tissue
paper and liquid latex. You can also use toilet paper. Now whether you're using
toilet paper or tissue paper, they usually have two layers. So I'm going to separate it out, making it a single
layer before I start ripping it
into smaller pieces. And then for latex,
I'm going to be using the kangaroo monster
brand liquid latex. I'm going to pour it into
a small disposable bowl. And then with a b***ding brush, I'm going to start
painting right on top of the border of the skull
which we just created. And over that I'm going to start sticking the
tissue pieces. You get the best
results when you work in smaller sections. Over this, I'm going to paint another layer of liquid latex. And I'm also going to
bring it down to my skin. So the latex on the tissue
paper b***ds into my skin. I'll repeat the same on my nose and the other
side of my face as well. And if you observe, I'm keeping my eyes closed while applying latex because the vapors from the latex can
irritate the eyes. You can also wear glasses
while applying latex, and once it dries, it doesn't
irritate your eyes anymore. I'm going to let this dry. It takes about 20 minutes, and once it's dry, I'm going to start separating
out the lower portion, so just the bottom
part by lifting it. And then I'm going to
apply some white paint under it because it becomes
a part of the skull. And now for the top half, I'm going to start
with the foundation. And the one that I'll
be using is the make up forever HD skin with a
small concealer brush. I'm going to apply
the foundation. We're going to apply the
foundation on the latex as well. But before application, make sure to have some
kind of a card or paper underneath so when
you paint over the latex, it doesn't get on
the white part. Now I'm going to add
some dimension using the fenty beauty
contour stick in the shade truffle by using it in the circumference
of my face. Next, I'm using
some concealer to cover up my dark
circles and patches. I'm using the Milani
conceal in the shade, warm beige, which is a true
match to my skin tone. Using the Huda
beauty brow pencil, I'm going to fill in my browse. I'm just filling in
the spar series. And then I'm going
to finish up with the Milani highly rated mascara. The last step is to apply
some finer details. So I'm going to be
using a little bit of black eye shadow with
a flat shading brush. I'm first going to use it in my browse to give
that angry look. I'm going to apply the shadow underneath the latex to
give a shadow effect. And then I'm going to use a b***ding brush to
b***d everything out. And here's the finished look. It almost looks like I'm lifting my skin to reveal the
skull underneath. As you can see, you can create skin texture with latex
and tissue paper. Remember, practice
is key to achieving more detailed and
realistic skin textures. I hope you enjoyed this
lesson and in the next one, we will create prosthetics from scratch. Please stay tuned.
5. Create SFX Makeup Prosthetics From Scratch: Creating prosthetics
from scratch using aluminum foil and
liquid latex is a fun and budget
friendly way to add three dimensional effects to your special effects make up. And this lesson is going to guide you on how to
do it step by step. For prosthetics, we will
be creating tentacles. And here's what we'll need. First, we'll need
some liquid latex, which is the most common
material to make prosthetics. I'm also going to be using
aluminum, food foil. You'll see how flexible this material is to
create prosthetics. I'll be using Cheerios. You can use anything
similar like fruit loops to create the
texture on the tentacles. Then we'll need some
Mod podge or a sealant, some all purpose flour. Any kind of paint
or spray paint. I'm going to be
using face paint. I like to cover my work
desk with either some re, usable plastic or paper, because these projects
can get messy. I'm going to start with
some aluminum foil. And because I'm creating
three tentacles, I'm going to tear up
three pieces of foil. And these will be
molded into tentacles by crushing, pressing,
and molding. Aluminum foil is so flexible that you can
shape them into anything, and you can make it as big
or as small as you prefer. I'm going to do the same with
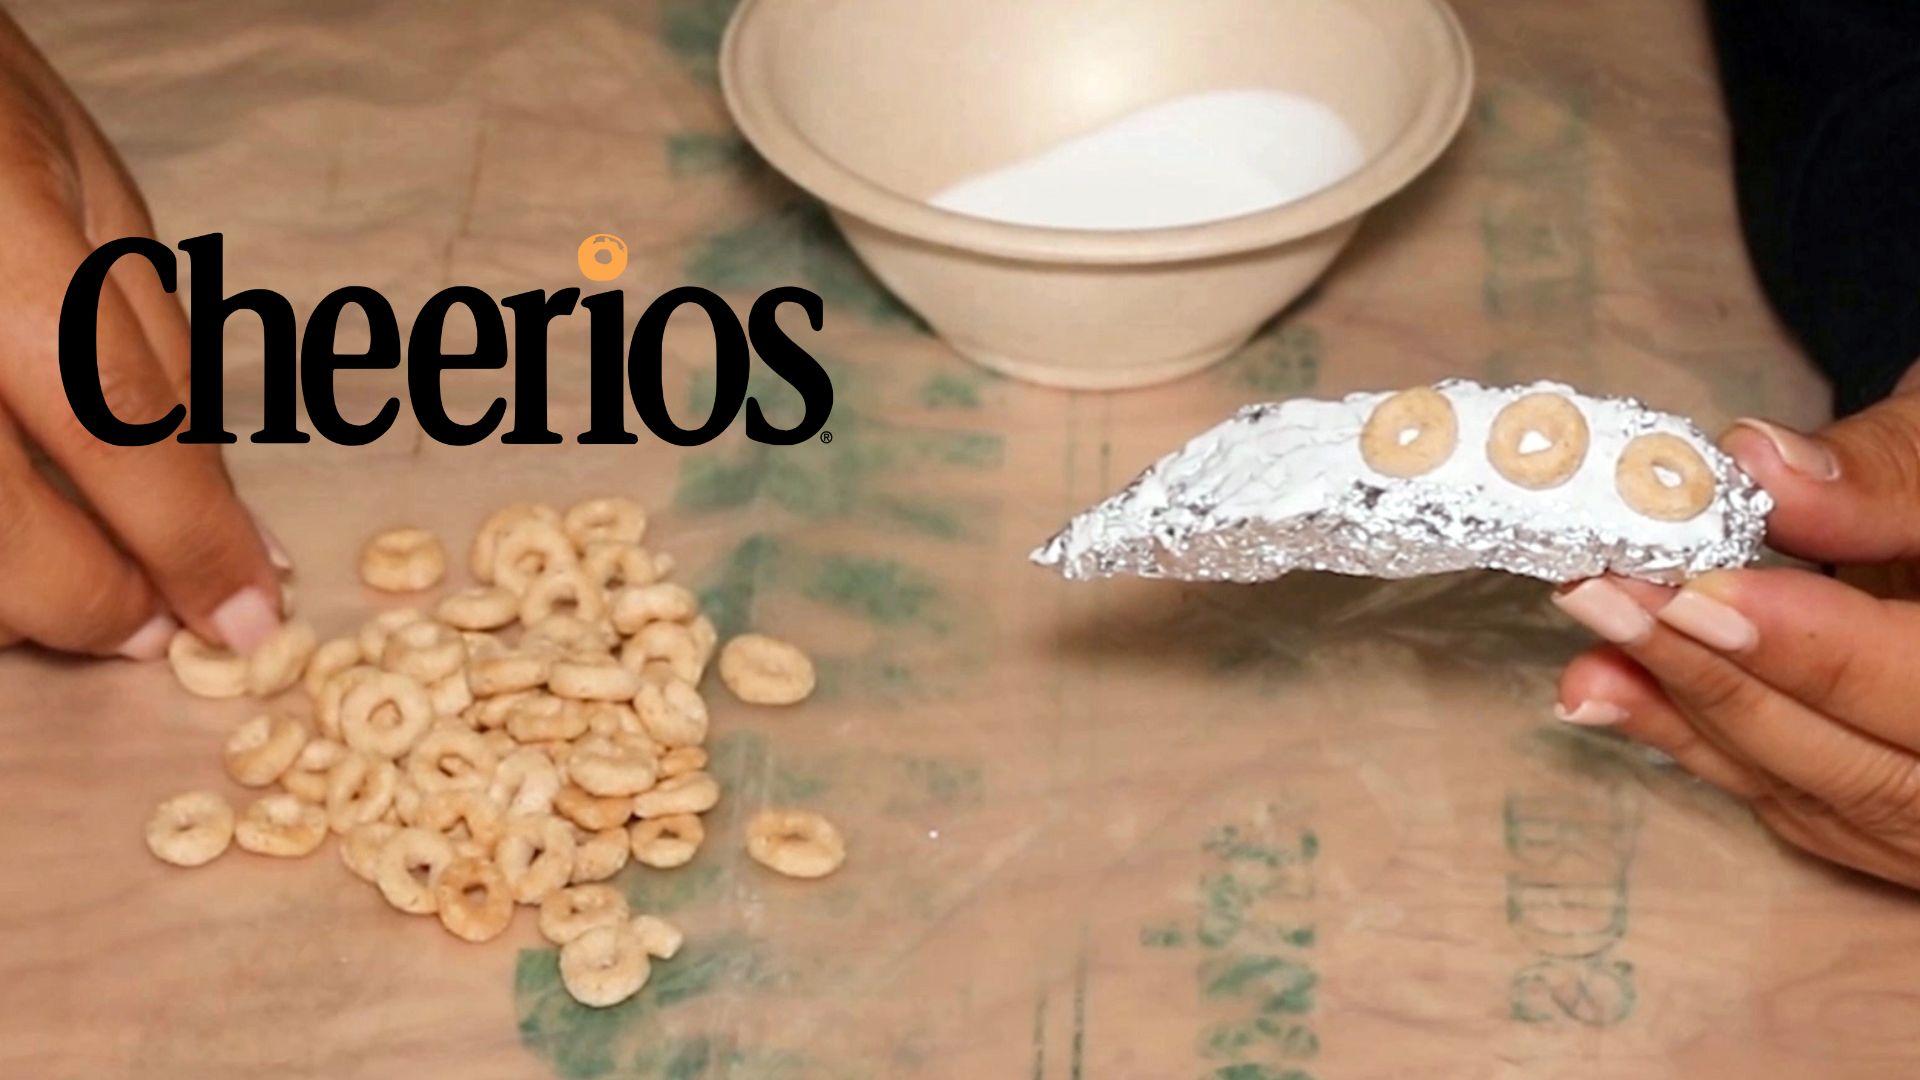
all the three foil pieces. So we have three tentacles. Next, we need to add some texture to the
tentacles using Cheerios. These tiny circles will make
it look like real tentacles. I'll be using mot patch to stick the Cheerios to the foil. I'm going to pour a
little bit in a cup and paint it to the outer
side of the tentacles. Before I stick the
Cheerios over it, I'm going to do the same with the other two tentacles as well. And then I'm going to
let it completely dry before I go over each
tentacle with the mot porch. Again, as a sealant, this is not only going
to seal your tentacle, but will also form a
smooth surface layer. And it becomes very easy
to paint over this. If you have residue of mat
page left on your brush, you can simply use a makeup
remover to wipe it clean. And then you can wash
it off with some soap and water and it comes
off very easily. The mart page will dry
transparent in about 20 minutes. You can also speed up
the drying process by using a hair dryer. The next step is to
paint the tentacles. And for this, I'm going
to be using face paints. This is the men
Paradise palette. Face paints are usually
water activated, so I'm going to have a bowl
of water beside the paints, and I'm going to start
with this purple shade. And start painting all
over the tentacle, leaving the center for
a different color. Although we did not use any mot page in the
back of the tentacle, I'm still going to paint it, although the back
is usually covered. I like to add a little bit
of paint there as well. And then I'm going to
use this bright red in the center and over the Cheerios Now to
paint the tentacles, I'm just using a
flat shading brush. You can use any kind
of paint brush. I'll make sure to get the
inside of the Cheerios as well. And I'm also going to b***d out the sides with the purple shade. I'm next going to use
white paint to highlight the Cheerios that should give a nice texture to the tentacle. I painted all the
three tentacles and I'm going to let it
dry for about an hour. And now it's time
to make these into attachable prosthetics for which you will need some liquid latex. The one that I'm using is the
Monster brand from Amazon. I'm pouring some liquid latex in a bowl to mix
with some flour. I'm also going to pour a
little bit on the side, which we will use for molding, to mix in the latex and
to make it thicker, I'm going to be using
some all purpose flour, which is the most
common flour to use. You can also use rice
flour or corn flour. I'm just taking it in
a bowl on the side. I'm going to keep on adding
and mixing the flour into the latex till I'm
happy with the consistency. And when I say consistency, it should almost look
like toothpaste. And that mixing ratio is approximately two parts of
latex to one part of flour. Next, I'm going to
scoop out a teaspoonful of latex and make
three equal parts. Almost like three small hills. And with the extra latex
that I took on the side, I'm going to start thinning and flattening the
sides of the latex. I'm going to do that
for all the three. And then I'm going to insert the backside of the
tentacle into the latex, making sure it's completely
attached to the latex. If needed, you can use a little bit more latex to attach the base to the tentacle. After attaching molding
and flattening, it should look
something like this. I'm just going to let this
dry and set overnight. It's the next morning, and once it's dry, it should look
something like this. It should feel very
soft and squishy to the touch and should
be completely dry. Now, I'm going to slowly lift on the sides and start detaching
the latex from the plate. You can use some dry flour to dust it right
underneath the latex. That helps to slide
it off much faster. And the way to do it
is to start slowly loosening the latex while you dust some flower underneath, while slowly detaching it by
gently pulling it upward. And once you detach it, you can now cut and separate
the three tentacles. You don't have to
attach the tentacles, you can make them as
three separate hills. I like to always attach
them because you can cut it as big or as
small as you prefer. I personally like to leave
an inch off the flat surface around the latex to secure it to my skin so it stays intact. And here are the finished
latex prosthetics that can be used
to create a look, which we will cover
in the next lesson. Keep in mind that
crafting prosthetics may involve some
trial and error. Be patient and
enjoy the process. In the upcoming lesson, we will use these
prosthetics to create a fantasy creature and
leave everyone mesmerized.
6. How To Create a Seamless Look With Prosthetics: In the previous
lesson, we learned how to make prosthetics
from scratch, but how do you
create a look with prosthetics and how do you
attach it to your skin? It's a process in itself to make it look seamless and realistic. And this lesson will teach
you how to do exactly that. The look that we'll create is of a fantasy creature with tentacles
coming out of the face. First, let's gather everything that we'll need for this lesson. We'll need the prosthetic
tentacles that we prepared in the
previous lesson. Then need liquid latex, some toilet paper
or tissue paper, some basic make up
and make up brushes. Let's start with make up first. I'm going to be using
foundation and the one that I'm using today is the make
up forever H D skin. I'm going to.it around my face and b***d it out with
a foundation brush. You can use any foundation that you have and you can either b***d it out with a brush
sponge or even your fingers. I'm next going to be
using a concealer. And the one that I love and use quite often is the
Milani conceal. And I'm using the shade, warm beige or 145 because it's a true
match to my skin tone. Which will help me cover
the uneven skin tone and patches around my mouth
and around my eyes. Once again, using the
foundation brush, I'm going to b***d
everything out. Now let's add some
dimension using contour. This is the fenty contour
stick in the shade truffle. And I'm going to
use it to create natural looking shadows
under my cheek bones, on the sides of my nose, as well as in my jaw line. And that should help to add structure and
dimension to my face. Make sure to b***d everything out before you set with powder. Today I'm going to be
using a translucent powder from Lor Mercie with
a large powder brush. I'm going to dust it all
over my face and neck to set the make up using the house
labs eyebrow pencil in black. I'm going to fill in
my browse to give it some shape before
I use eye shadows. The eye shadow palette that I'm going to be using today is called culture palette
by Julia's place. And I'm going to start
with this pink shade called Bo to define
my outer corner. And the crease, b***ding it
out with a b***ding brush. I'm also going to
smoke it out in my lower lash line because we used purple in the tentacles. I'm going to pick up this
beautiful purple shade called Ecowas and apply it right beside the
pink eye shadow on my lid and in my lower
lash line, smoking it out. Using a highlighter,
I'm going to highlight my inner
corner as well as brow bone before I finish up with a coat of
mascara and lashes. For mascara, I'm
going to be using the Milani highly rated mascara. And for false lashes,
I'm going to be using Lily lashes in foam ing. And here is the
completed eye look. Next I'm going to be
using some blush. I'm using the Patrick Ta
blush in she's a doll. I'm going to apply a generous
amount to my cheekbones and a little bit around my face just to add some color flips stick. This one was especially made
for Halloween by color pop, and it's called Hello Boys. It's a liquid lipstick. And to add a little bit of
drama to this black lipstick, I'm going to highlight it with a shimmery purple
shade called Katanga. And here is the completed
makeup application to this. Of course now we will be
attaching prosthetics. I like to use a
head band to push all my hair back
before I attach it, before I actually use a glue and start sticking the
prosthetics to my face. I like to place the prosthetics without the glue to
see where it fits. Then with the note pencil, I'm going to mark those areas
around the prosthetics. I know exactly where I
need to apply the latex, which will be the glue to
stick the prosthetics. Again, I'm going to be using the Monster liquid latex
with a flat shading brush. I'm going to start
painting the latex around the area that I just marked
with the nude pencil. I'm also going to paint the
prosthetic with the latex. It sticks well to my skin by using prosthetics
around the hair line. Make sure to paint only
the area that sticks to your skin because you don't want the latex to get on your hair. You don't have to
worry about it. It's going to be
pretty strong and it's going to stick
really well to the skin, even if you paint half
of the prosthetic. Then I'm also going
to apply some latex around the borders of the
prosthetic to seal it. And I'm going to
repeat the same with the other two
prosthetics as well. Now if you want to smooth out the borders of the latex
further on your face, you can also use acetone. It melts the silicone
or the latex. You can definitely do that when applying latex below your eye, anywhere on your face, always keep your eyes
shut as the vapors from the latex can go up
and irritate your eyes. It's completely safe
to use latex on your face as far as you don't have any allergies to latex, most of the movies
that you see with special effects use latex to build and attach
the prosthetics. To b***d the prosthetic
in with your skin. You can use acetone around
the prosthetic to melt the latex and b***d in with your skin before you
use the foundation. But today I want to show
you a different method. I'm going to be using
foundation directly, and I'm going to use
the one that I used on my face to b***d
everything together. And then I'm going to be using a bronzer to add
some depth around. You can also use a
brown eye shadow for the prosthetics
to b***d in my skin. I will add shadows to all the prosthetics and also around the
prosthetics on my skin. This is just one of the
ways to attach prosthetics, but today we want to create some texture around
the prosthetics and make it look like
these tentacles are growing out of my face
and out of my skin. To make it more realistic, I'm going to be creating some texture around
the prosthetics. As we know, the easiest way to create some texture
on the skin is to use latex and some kind of
tissue paper or toilet paper. I'm using toilet paper
here because it's cheap. I'm going to separate
the layers of the toilet paper so I
get a thinner layer. And then I'm going to
start tearing it into smaller strips before I attach it around the
prosthetics using latex, I'm going to first apply
the latex and then I'm going to stick the
tissue paper over it. As we learned in one of
the previous lessons, the tissue paper and latex give a nice texture to the skin. Over the tissue paper, I'm going to paint a second
layer of latex to seal it. I'm going to continue to do the same around all the prosthetics, letting it dry before
I add dimensions, again using foundation
and brown eye shadow. Now that it's dry,
I'm going to add a little bit more
texture by opening up towards the prosthetic
so it looks like the tentacles are actually
growing out of my skin. The next step is to use foundation and b***d
it with the skin that gives an illusion
of textured skin that's peeling off To this, I'm going to apply
the brown eye shadow, shading it to give dimension. For the final step,
I'm going to be using some gel eyeliner. If you're going to
be attaching the prosthetic closer
to your hair line, you can either use a gel
eyeliner or a black face paint to paint around the headline on the prosthetic
and shade it off. Before using the hair to cover up the top
of the prosthetic, I'm going to part my hair on one side and secure
it with a Bobby pen. And here is the completed look. Once you get a hang of making
and attaching prosthetics, you can create any kind of prosthetics and any
kind of look with it. And how do you remove
the prosthetics? It's super simple, just
like you see in movies. Lift off from one end
and slowly pull it off. It comes off very easily and then you can wash
off with some water and cleanser to remove
any make up and any latex residue
that's left behind. Prosthetics, in few
special effects, make up with life
like authenticity, evoking genuine emotions with
a little bit of creativity, some prosthetics and make up, you can bring anything to life. I hope you enjoyed this lesson.
7. Conclusion: Bravo for completing this
thrilling S effects. Make up class
unlocking the gates to your wildest imagination. But hold on, it
doesn't stop there. I dare you to venture
beyond your imagination. Creating spell binding S effect looks that leave
everyone mesmerized, showcasing the tools and techniques that we
explored in this class. Remember, imperfection
is the key to art's myschievous allure. Let your imagination run wild
without fear of perfection. And don't forget to
post your project to the project gallery
God burning questions. I want to chat further. Head on to the class
discussions page where the magic of creativity
knows no bounds. If you're spellbound by this
class and hungry for more, hit the follow button
next to my name, and the enchanting
journey shall continue. And I'd love to hear from you. Also, please share
your thoughts. In a review, my heart raises an anticipation to witness
your masterpieces. Please share your creations under the class project staff, starting with day one, revealing the evolution of
your artistry day by day. And if you want to find
me, my handle is Smith, the put, that's S, M, I, T, H, A, D, E, K on Youtube,
Instagram and Tiktok. This was an incredible
experience and I'm so glad you were a part of it and I
hope to see you soon. Bye.
 Smitha Deepak, Pro Makeup Artist & Content Creator