Transcripts
1. Introduction : Without an environment
to play in, video games would
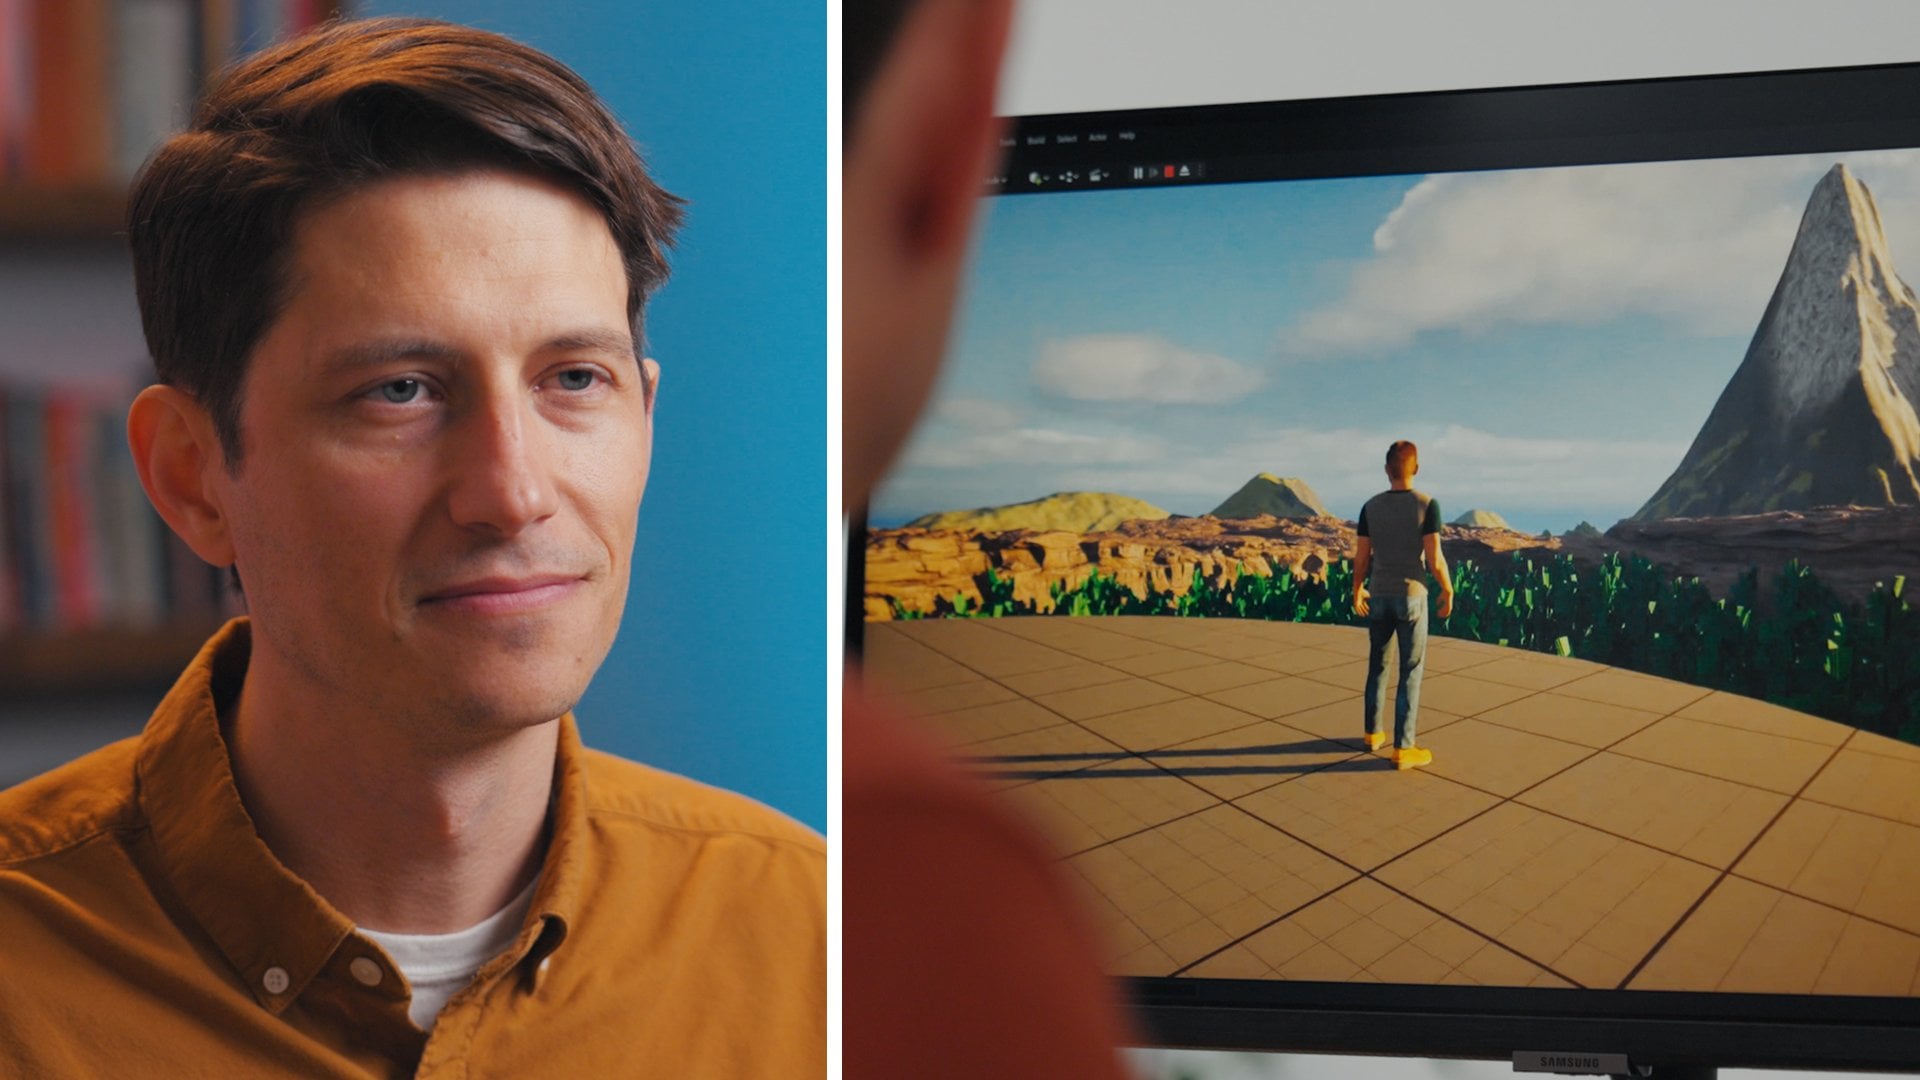
be pretty boring. Hi. My name is Lucas Ridley. I'm a professional
3D animator and filmmaker and I've
been working in games, films, VR, and commercials. You might have seen some of
my work in games like The Last of Us Part
2, Suicide Squad, or films like Avengers
Infinity War, The Little Mermaid
or Disney's Aladdin. In this class, you're
going to learn how to create a landscape
from scratch, texture it with a procedurally generated texture so we can easily texture that
huge landscape for our video game character. We're going to end on some level design
concepts for video games. I'm excited to teach you about
this because this is where our character gets to interact with a world that we design. By the end of this
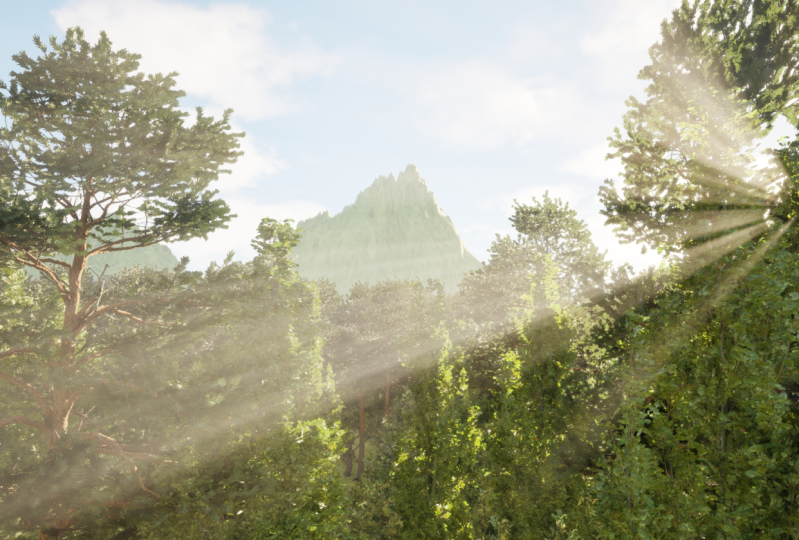
class, you're going to have a playable landscape with foliage and cliffs and mountains all textured
and ready to go. You should take this
class if you're interested in
creating worlds for video games and you have
a basic understanding of Unreal Engine and how
to navigate around it. All you need to follow along with this
class is a computer, a three-button mouse and Unreal Engine installed
on your computer. Want to travel to a whole new
world? Let's get started.
2. Getting Started: Welcome to this class.
I'm excited to be teaching you about environment
design and creation. It's vital for our
playable character and video games to have
somewhere to interact with. I've been doing it for
the last 12 years, and I always take
inspiration from real life. It's helpful to have some
reference from even places like Google Maps because you might be isolated with where you live, or if you want to take fantastical approaches to
creating environments, you can always take references
from films and video games to take into Unreal engine and create your own
unique environment. You can take inspiration
from the world around you, and you'll be expected to if you want to pursue
this as a career. One example of that is when
I was working at Nati Dog, they had to justify
every decision about environment
creation to make sure it was grounded in reality. They would actually
get on Google Maps and investigate something as
mundane as a parking lot and making sure that a culvert or the sewage drainage
system around a parking lot look the same
as it would in real life. This just proves that you
don't even need to leave your house to get inspiration
for your landscapes. If you want to do
this as a career, it's good to have
an awareness that there's two roles
you can go into. One is called level designer, which uses simple shapes
to block out basically a puzzle of the environment that the player to
navigate through. And then the environment artist, which is the second role, actually fills that level
design with details, like foliage and other
textures and in this class, I'm going to teach you how
to do both of those roles. For this class, you're going to want unreal
engine installed in a computer and have
a basic knowledge of how to navigate around it. Now that you have
everything you need, meet me in the next lesson, we're going to begin sculpting our landscape from
scratch and lighting it.
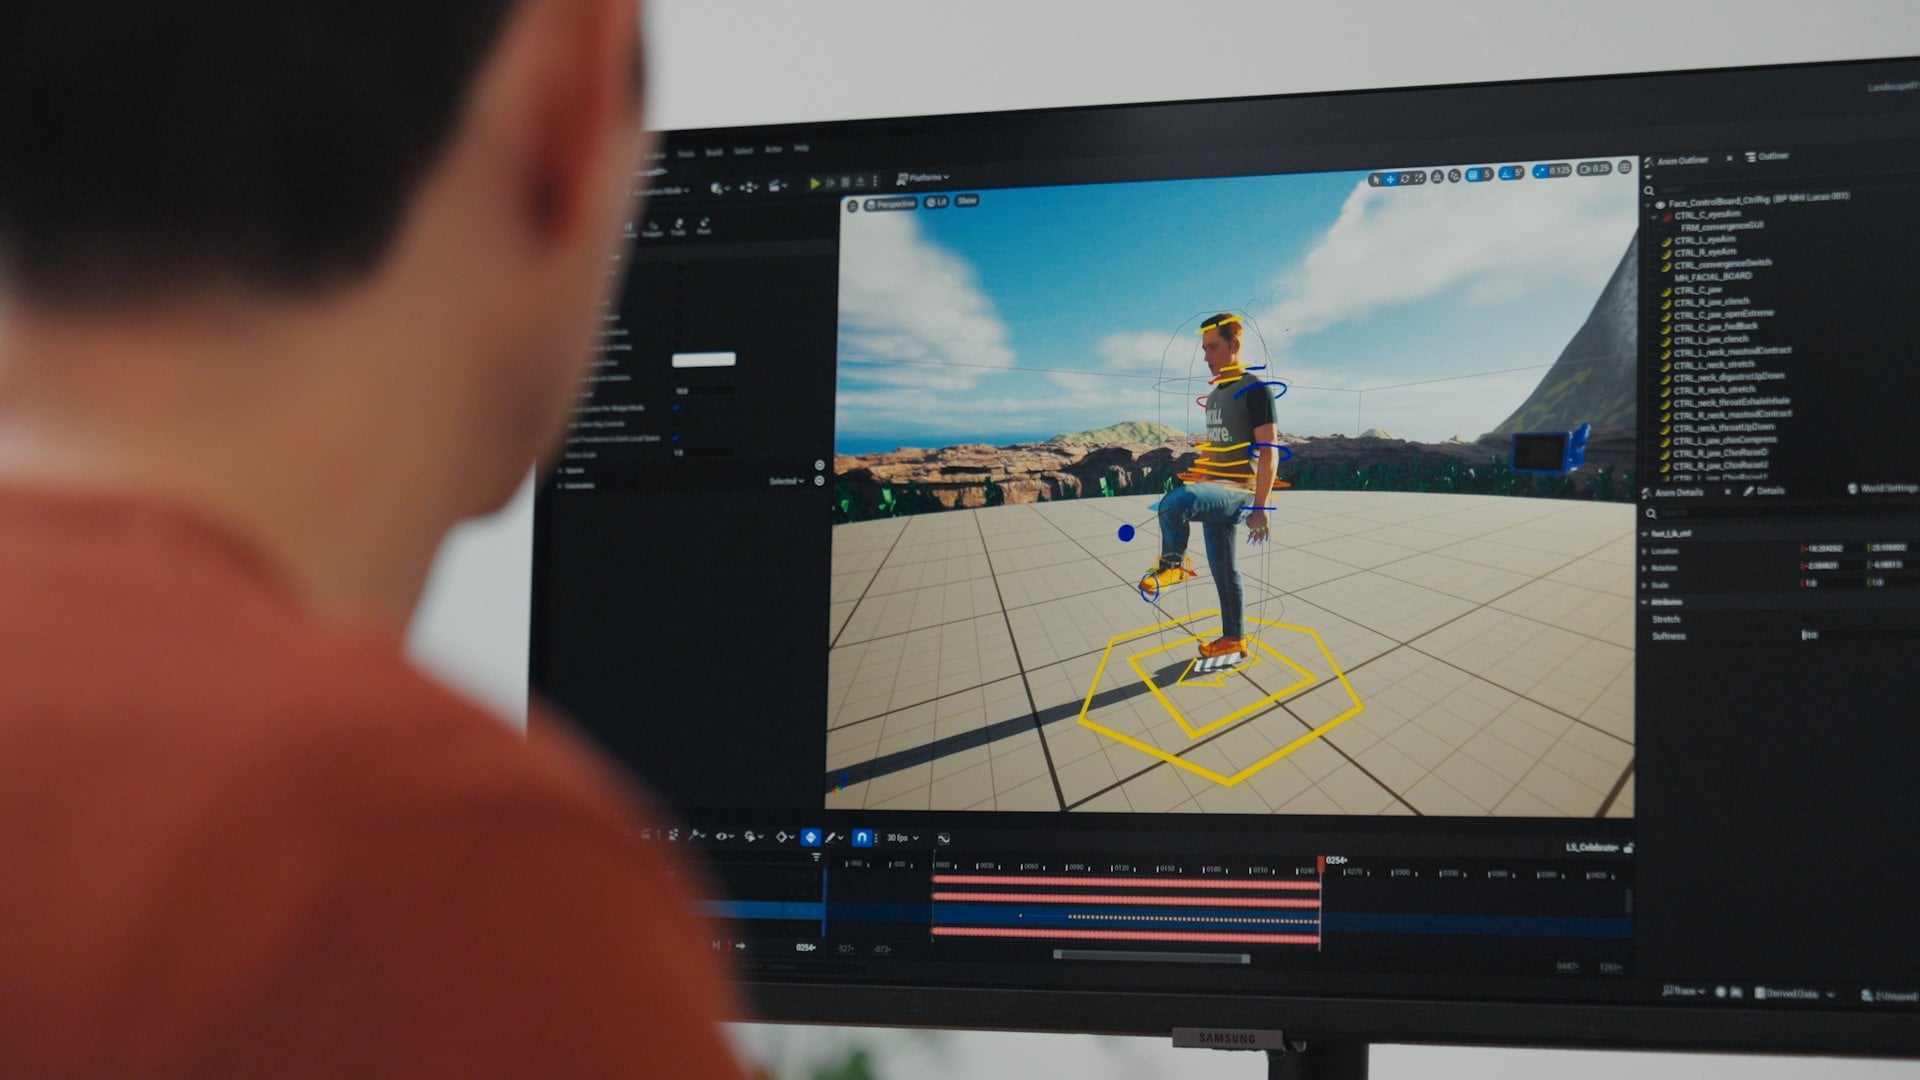
3. Sculpt and Light Your Landscape: Welcome back to this class. In this lesson,
we're going to learn how to sculpt a landscape from scratch and
how to light it. Let's get Unreal Engine
open and dive in. I'm going to create
a new landscape from scratch by launching
Unreal Engine 5.4. I'm going to choose a blank
games project to start from. Make sure you have
starter content on and choose where to save it. Even in a blank scene in Unreal, we get given a landscape, but I want to create a
landscape on our own. Let's create a new level. Open up the Content Drawer by clicking down here
in the bottom left, hitting Ctrl + Space, or going to Windows
and Content Browser. It's a little weird they choose Content Browser and Content Drawer, but
they're the same thing. Let's right click and
create a new level. I'm going to name
mine NewLandscape. Double click, and
it'll ask us to save. Click Save Selected. Now we're inside our new level, but we can't see anything
because there are no lights. Let's first create the lights. I just need to click
anywhere outside the content drawer for
it to be minimized. Let's go to Window,
Environment Light Mixer. This gives us each one
of the elements that creates the default
sky and lights, as well as the clouds and fog. I'm going to click
each one in turn, and this is the default lighting
setup inside of Unreal. I'm going to close
that, and now we can create our landscape by going to the modes up here and
choose the landscape mode. Now we get given some
landscape options, and we can create
a new landscape. I'm going to right mouse
button click and use the W, A, S, and D keys to get a
better view from the top. I'm going to accept
the default settings and create our landscape. Now we get switched into the
sculpt tab where I can use all the sculpt brushes they have available to adjust and
create our landscape. I can very quickly
just start creating hills and mountains
however I would like. Using the combination of
brushes here you can get different effects and
even add more detail. We could use the erosion
brush to sharpen the edges, for example, as if
they had been eroded. We can add more detail by
choosing the noise brush, and choosing the amount of
noise to add even more detail. I'm going to reduce the scale
so there's finer noise, and I can drop it down even
more to add finer detail. Then, for example, we
could smooth all this back out by going over this area
with the smooth brush. We could also flatten areas, since that's important
for game play. We can click and drag to
flatten out areas here with that brush so we
can see that it is actually flat for our
characters to run on, which is important for games, because sometimes
there's limitations on the slope angle and where a player can travel if
it's not flat enough. If you ever want to get rid of this
landscape and start over, you can just click
Landscape in the outliner, and click Delete
on your keyboard. That puts us back in
the landscape mode, and we can create a new one. I'm going to create a larger one using the section size
and click Create. I want to create a
mountain. I'm basically going to use a height map. In the sculpt tool I'm going
to go to the brush type, and I'm actually going
to use an Alpha brush. Now I have the option to
insert a texture here, and I can use that to
help shape the landscape. You can see how this
works just by even using the checkerboard
texture that's placeholder. I'm going to Ctrl + Space and dock this content
browser in my layout, and I'm going to go to the content folder
and right click, and I'm going to
create a new folder. I'm going to call
this Materials. In that folder,
I'm also going to drag and drop in a
texture that I'm also providing to you in the
resources for this class, so I can click and drag the texture into the
content browser. Now I can see I have this
digital elevation model brush. I can click and drag that
into the texture slot, and now I can just paint the mountain directly on the
landscape with this texture. I want the mountain
to be bigger so I can increase the
size of the brush. I'm going to hit undo and just increase the
size of the brush. The brush size amount
is a soft limit. I can actually type in something bigger to get an
even larger brush. I'm going to zoom out now to see this larger
mountain get created. I want to put it in
the corner over here, so I'm clicking and holding
down on my left mouse button. You can see we get a
lot of detail from a brush like this just
by using textures. This is the same thing you can do for the entire landscape, and you can actually use a height map for the
entire landscape. That would be a square image
and cover the whole area. We're just going to
keep sculpting on this section using this brush. Take a minute and create your own landscape using this digital elevation
model brush. You can smooth out any of
these rough borders by just using the smooth brush and
dialing down the brush size. Just running a quick
smooth brush over them to even out
these rough edges. Take a minute to make
this a bit more polished. It's a little hard to
see the scale at which we're working if we don't
have any reference. Let's bring in a character so we can see how big
our mountains are. I'm going to click Add
and Feature Content Pack. I want to use third person
and add it to the project. I'm going to jump to the content folder and close this down. Double click the third
person blueprint folder, and click and drag this
person into the landscape. I'm going to go to
the world settings by going to Window,
World Settings. In the game mode override, I'm going to choose the
third person game mode. When I click and play now, I should have my character
playable in our landscape. Now you can get a point
of reference for how big our landscape actually is
relative to a character. This is important so
that you can create a landscape that's
at the right scale. It seems like the scale this is working for how big
that mountain is. But if we want to
adjust our lighting, we can hit escape to get
out of the game mode, and we can hit Ctrl + L
and keep that held down so that we can actually
adjust the direction of our lighting to get a more dramatic effect
for our lights. We can see how the
shadows cast on the floor and get
something that we like. Now we've created
a basic landscape using brushes and
other sculpting tools. We've put a character in there to make sure the scale is right, and we've adjusted the
lighting to make sure it's dramatic or however we want
it to appear in the level. Now just take a little time and make this
landscape your own. Use all the landscape brushes, experiment around with
different lighting, and see what environment
you want to create. Meet me in the next lesson,
we're going to learn how to apply textures
to this landscape.
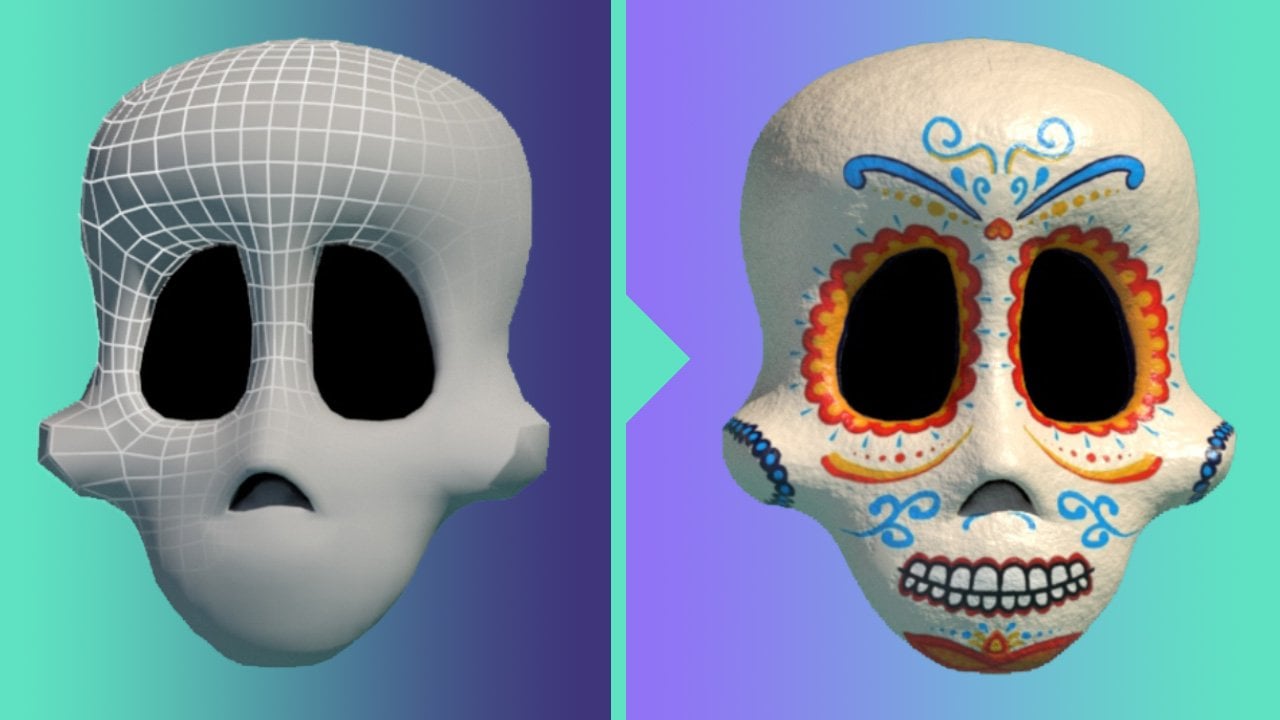
4. Apply Textures and Materials: Welcome back. In this lesson, we're going to
learn how to apply textures and materials
to the landscape. We're going to cover a few
more technical things, we're going to move some nodes around and connect some dots. Don't be intimidated
by that interface. We're going to walk
through it step-by-step. Let's time back into real engine with the landscape we created. Let's jump into making material so we can get rid of
the checkerboard. I'm going to apply
material first, so I'm going to
select the landscape and go to the details panel. You can see that there
is no landscape material yet, so we need to make one. Let's jump to the
Materials folder and right Click
create New Material. I'm going to call this MM for
Master Material Landscape. I'm going to double click this, and we're going to start working using the starter
content material. We can always replace
these textures later. But for now, this
is enough to go on using the starter
content textures. I can hold control and
middle mouse wheel to make the textures bigger or smaller in
the content browser. Now I can jump to using
the grass material. If I just pipe that into the base color and
hit apply and save, we've created this material, but we haven't applied it. I'm going to navigate to
where my material is. I'm just going to click and drag it into the material slot. You can see it becomes
available and highlighted. Now we have our
material in grass. You can see that it's
fairly repetitive and it doesn't look very good. But this is just
a starting point. Let's improve it. Back
inside the material editor, I'm going to go back to
the contents folder. Starter content. I can also navigate to where
this is by clicking the magnifying glass
and folder icon. It will jump me down to where
this ground texture is. I'm going to pipe it into
the normal map as well. I'm going to click and
drag the normal map in, so I'm using the normal map
and Hit "Apply" and Save. You can see we get a bit of
texture now to our ground. I want to reduce
the brush size just so it's not in the way as much. That adds a bit more detail, but everything is
still repetitive. The first thing we can do
is actually steal some of the starter content and there complicated
material set up. I can go to the starter
content materials and open up the gold material. I'm going to navigate
to the top part here where it says macro
texture variation, and I'm going to
click and drag select everything and also shift
click and drag the multiply. I want to control C, copy
this and close this down, and I'm going to control,
paste this here. I'm just going to move it over. Now watch what happens when I add this variation,
just to the base color. I'm going to pipe in RGB of this texture into the B
of the multiply node, and then click and drag
that into the base color. Now watch what happens
when I click apply. We've added a ton of detail, and we're using this
preset material setup. This shows big medium
and small detail, and I can adjust it with these textures
that you see here. There's not much more
we need to do here. We can always change this value if we want to adjust
the contrast. I'm going to change this to 2.8 and click and save
to see the difference. You can see it subdues that
contrast a little bit, so this is a value
you can adjust. For now, I'm going to turn
that off so we can see the other changes
we're going to make. It's really obvious that
this is a tiled texture, but it just repeats so much that it's very repetitive.
Let's adjust that. I'm going to do something
called texture bombing. I'm going to right click and start typing for
texture bombing. This node creates non uniformity and how it tiles the texture. When I try to pipe this into the RGB value,
we'll get an error. We need to add a different type of node to pipe into this. It's asking for a 2D texture, so what we can do is right
click and say texture, object. For this object, we can pipe in this texture that
we already have. I'm going to
navigate to where it is by clicking the
magnifying glass. I'm going to click the
texture object and click and drag this grass into
the texture object. Now, I can put this into
the texture bombing node so when I pipe this
into the base color, you'll be able to see
an interesting result. But first, I need to give it a tiling and an offset value. I'm going to hold down one on the keyboard and
left mouse click. This gives me a parameter value. I can pipe this into the tiling. For now, I'm just going to
give this value of 0.3. I'm going to organize my
graph a little bit here. I'm going to hold down one on the keyboard and
left mouse button, click again and pipe
this into the offset. I'm just going to give this
a value of one for now. Watch what happens to
this repeating texture when I Click "Apply" and save. Now you can no longer see
the tile texture repeating. If I zoom out, it becomes
harder to see a pattern emerge. When we combine this with
our previous adjustment, it'll be really hard
to see that this is one small texture
just repeating. Instead of multiplying by
this old texture sample, I can just get rid of
that and delete it. Now we can pipe it into the previous adjustment that
we made into the base color. It save and see how much
more variation this creates. Now you can really tell that there's a ton of variation here, and it's not really
clear that there's just one small
texture being used. Let's do a comparison
with what we had before. I'm just going to bring this in just for a moment so we
can compare the two. I'm going to pipe this in and watch the difference
we've made just in a few simple steps. We went from that to this. That looks much more natural, so let's continue
to improve this. Now, you may have been
able to tell that the normal map hasn't
gotten the same treatment, so it doesn't match the grass. We need to copy this node. I'm just going to
delete that for now. We need to copy this node and do the same thing
for our normal map. For this to work, we need
another texture object here. I'm just going to copy
and paste it here, and I'm going to use this to navigate to where
this normal map is. Select the texture object and
click and drag it in here. Now I'm going to click and
drag like this, copy paste. I'm going to connect the texture object to the correct location, and now I can get
rid of this one. Now we can pipe the
result into the normal, and now these values
should match. But we want to make sure that we can control them together, so I can actually just
get rid of these two and pipe these two in into
the same locations. Now, if I adjust one, it'll work for both the diffuse, as well as the normal map, which is what's giving us
some of the detail here, and now these should match up. If we look at the
reflection of the surface, this doesn't really
look like grass. That means we need to adjust the roughness value
of the material. If I look at the
value over here, we can see that the
roughness is set to 0.5, and if I turn that up to one, and we can see the difference
between 0.5 and one. Now, this seems very flat and it's maybe gone way too far. Let's see how we can use
the texture to adjust this. We're going to take
one channel of this grass texture and
use it as a roughness. If I double click this, I can isolate each
channel on its own. This is a blue channel,
this is the green channel, and this is the red channel.
Why is that significant? Because the roughness
is a zero to one value just like this white
to black go 0-1, so we're going to
use one channel of this texture to
drive the roughness. I'm going to close this, and I want to isolate the red
channel from this texture. How do I do that? I can use what's called
a component mask. I'm going to click
and drag off of the result and start
typing in component. This gives me some
options here to only select one of the
channels that I want. I'm going to deselect the green, and we're going to pipe through the red
channel from this. Now, I want more
control over this. I don't want just
the red channel. I want to have more or less of that channel and clamp it, so I can use a
multiply or divide node here to adjust the
value of zero to one. I'm going to type in divide. I'm going to pipe this
into the roughness. But before I do,
let's just see what the texture does from
the red channel. You can see the roughness is maybe related to the texture, but it's just way too much. That's why we need some
other way to adjust this. That's why I'm piping
in a divide node. Let's click and save now. It's getting better, but
we need to go further. I'm going to divide by
0.2 and click Save. That's starting
to get somewhere. You can see that we have some
highlights in the grass, and you can see it's related
to the texture itself. As I move, you can
see the reflection relative to the direction of the light and angle of the sun. Our landscape has
more than just grass. There's a big mountain
over here, so how do we add rocks to this? We're going to do that
in the next lesson. In this lesson,
we covered a lot. We created a material
for our landscape, and we used a grass texture with some procedurally
generated variation so that you can't tell it's just one single texture
getting repeated. Now, keep in mind, you
can replace that texture. You can go find your
own grass texture and swap it in with
the one that we've used from the starter content. In the next step, we're
going to do the same thing, but for rocks so that
we can actually paint on the mountain rocks
into our landscape.
5. Apply Materials with Paint Blend : Welcome back. In this lesson, we're going to learn about
landscape material blends. We're going to blend
between the grass material we already made and a rock material we're going
to make. Let's get started. So our landscape has
more than just grass. There's a big
mountain over here. How do we add rocks to this? Let's take the setup we
have here and duplicate it so we can add a rock
material to it. We'll be able to blend these
two materials together. I'm going to move this out of
the way because that's not related to this
texture specifically. I'm going to group all of this by hitting C so I can comment it
out and call it grass. I can move this over
and I can select all of this, copy and paste. I'm going to move this over and put this right underneath. I can go grab some of the
other starter content. These are textures we can
always swap out very easily. I just need something
to test with. I'm going to click
the texture object, and I'm going to find one down here that works and
click and drag it in. I also want to grab
the normal map related to that texture that's
of the same name. We can see that didn't work, so I'm just going to click
and drag and let that go. Now, when I click and save, nothing is going to
happen because we haven't piped the result of
this into anything. We need to create another
material slot for this. To do that, we need to change
how this material works. We can say Use Material
Attributes, and now, we can pipe things
into an end result. We can right click and
say "Make material". This is what we're going to use. This goes into base color
as we had it before, this goes into roughness, and this goes into normal. Now, we have something that
we can copy and paste, and these are going
to be what we blend together into this final
result right here. We can also apply
this variation to everything and we don't
have to do it to each one. I'll click this to cancel
out of that connection, and we're going to
connect that later on. I'm going to line
up the base color, the roughness, and
the normal map. We have our three connections
for both grass and rock. Now, we can blend these together with a
layer blend node. I'm going to right click and
start typing layer blend. You might be asking, how
do I know all of this? How do I know which
nodes to click? It just takes trial
and error and reading some documentation and going
through tutorials like this. This isn't just knowledge
I was born with. You just have to spend
some time with it to know which nodes to use. You may have seen that this
came in with no input. I can't put anything into this, so it's not super
useful right now. If we look at this node, we can see that there's an
option to add something here. If I click plus, I
get the option that I can toggle this
down and name this. I'm going to name this grass, so it corresponds
with our grass layer. I'm going to pipe this
material into the grass layer. Now, we also have a rock layer, so I can add another one
by clicking plus again, and now, we have
another index that I can rename and call this rock. You can see that up
here, and we have somewhere to put
this rock material. When I pipe this
into this result, and I save this, it jumps me over here
into the paint option, and everything went black. Why is that? It's because it doesn't know how to
blend things yet. We don't have any way to
blend between these two. It's expecting me
to paint value. So what I can do is
click on this plus and say, Weight Blended Layer. It's going to create a node, so it has somewhere to save the painted information.
I'm about to paint. I'll click "Save". It's
going to reapply everything. I can also choose rock
and do the same thing. Nothing's happened,
but if I select rock and with the
paint option selected, and increasing the brush size, I can actually paint
rock onto my mountain. It'd be very time-consuming
if I tried to paint the entire mountain rock
in all the little details. What we can do is create an auto landscape material
that will actually use the slope to blend between where to put grass
and where to put rock. Since grass doesn't really
grow on steep slopes, we're actually going to
use the slope itself to determine where to place the
rock and grass materials, and we're going to do
that in the next lesson. So meet me there.
6. Apply Materials with Autoslope Blend : Welcome back. In this lesson, we're going to
learn how to create a landscape auto material that's going to
automatically blend between the grass
and rock materials we've already made based on
the slope of our landscape. Let's get started. Let's dive back into our project
in Unreal Engine, and I'm going to start by creating a new slot
for our layer blend. Toggle these two down and create another plus and
call this one Auto. Now we have somewhere to
pipe in the auto layer. I'm going to create a
world aligned blend. This is what we'll get, the
steepness of the slope. This is the most important
node for this step. I'm going to hold down
one and left mouse button click to create another value parameter that
we can pipe in. I'm going to do that
twice so that we have one for sharpness and
one for the bias. I'm going to type in value of 30 for the sharpness
and a -12 for the bias. These are just good default
values for the step. Now we need a way to blind
these two materials together. We're going to do that with the blind materials attributes. We're going to
blend the grass and rock together in the blend
material attributes. I'm going to use the
slope as the Alpha, which means one
material is going to be masked out by the
other using the slope. We're going to pipe this
into use explicit normal. Now, I'm going to
take the grass, and I'm going to put it in B.
I'm going to take the rock, and I'm going to put it in A. Now I can pipe this
into the layer auto. I'm going to click "Save". Now we're going to see that auto popped up here as an option. But we don't see it
taking effect yet. What I need to do is clear
these two painted layers out. I'm going to right click
and say clear layer. I'm going to right click on
this one and say clear layer. I'm going to click
on this to say weight-blended layer and
click "Okay" and "Save". Now we have our auto material, and it's actually already done all the rock
painting for us based on the angle of the
slope. How cool is that? Now if I wanted to make
adjustments to this, I can do so with
these two nodes. The problem is every
time I make an update, I actually have to hit
"Save" before I can see it. Let's create a material instance of this so that I can make these adjustments and
see them update in real-time without having
to save every time. That's the power of a
material instance and why having an instance of a master material
is so important. I'm going to close this
out. Yes, please save. I'm going to go to
the materials folder. I'm going to right click on this master material and say,
create material instance. I'm going to call
this MI underscore for material instance. Now I need to apply
that instance to this landscape instead
of the master material. I'M going to jump back to the selection mode and
choose the landscape mode. Now I get access to the
landscape material, and I can click and drag the material instance instead
of the master material. I'm going to replace that. Nothing should change. But now when I open up
the material instance, I get a different view. You can see, I'm just
going to pull this over because all we care about are seeing
these parameters. When I look at all
the parameters, there's nothing that I
can actually adjust yet. What we need to do
is actually convert to parameters that we want
to adjust on the fly. I'm going to open up
the master material. I'm going to go down to the sharpness and
bias of our slope, and I'm going to promote
this to a variable by right clicking and saying,
convert to parameter. Now I have the
option to name this. I'm going to call this
slope blend and I'm going to right click this and say convert to
parameter as well. Let's say slope bias. Let's call this slope
sharpness, actually. I can change that
name over here. Once I save this and I jump back into the
material instance, we have these new parameters. When I toggle this down, we now have these two that I
can adjust and not have to click save every time waiting
for things to update. I can check both of these on, and they're using the
same default values that the master material was. Nothing should change. The only time something
will change is when I start to click and
drag this and let go. You can see now I can see
my updates in real-time, so I can do small
incremental changes and do them quickly without having to save every time
just to see that. This is a really great
way to gain control over our master material by
using a material instance. Now, if I still wanted
to adjust this and paint grass in certain
areas, I can do that. Let's jump back into
the landscape mode. All I have to do is click on the layer that I
want to paint with, and I can begin painting. If I want to clear
this out, I just need to right click
and say clear layer. If I wanted to paint rock somewhere
where there wasn't rock, I can still go ahead
and paint that in. I can use this Alpha here. This Alpha doesn't have
as big of an effect. But if I did something
like the checkerboard, it will be more obvious, or like the Unreal Engine logo, and now you'll be able to
see this very clearly. If it's spinning around, I can actually turn off auto rotate, so now it won't rotate around. Now we just made the unreal
engine logo in rocks. As always, I can clear
this out by hitting right click and clear layer,
if I want to start over. One thing we're missing is
getting that variation that we put in the first time
back into our material. Let's get that back in. You can see this piece
that we copied and pasted in at the very beginning
is not hooked up yet, and we need a way to do that. We can create a break
materials attributes. We can pipe this one
value into this input. Then we can say make
material attribute. Now we can pipe everything
that we need back into itself. This will be the end result now. But what this allows us to do is insert this multiply right here. Now I can get this variation
back into my material. It's a big improvement. Now all we have left to do is
to clean things up and convert everything
to a parameter that we want to be able to control
in the material instance. In the future, if we want
to replace these textures, we need to convert
this to a parameter. I'm going to call this
texture A diffuse. Right click, convert to
parameter, texture A normal. Convert to parameter,
texture A tiling. Convert to parameter,
texture A offset. Now when I save this and I
open the material instance, we'll be able to see these values in the
material instance. Now we not only have
the slope and bias, but we have texture A
offset and texture tiling. We also have global
texture parameters like texture A diffuse
and texture a normal. Let's organize this a bit better because these are in
odd groups right now. If I jump back into
the master material, I can click this and
look at the group. It doesn't have a group right
now, so I can give it one. We can put everything
in the texture A, and I'm going to type in
texture A. I can also give this a priority of one and the
normal priority of two. Now, I don't have to type this back in because we've
already done it once. This will give us the
order up in the grouping. This sort priority
will give us the order of the objects in
the group itself. Now and I save and look
at the material instance, everything should be
much more organized. Under texture A, for example, we have all these and none
of them are selected. But if we ever wanted to
adjust the landscape or even have multiple different
landscapes in different levels, we could use this
one master material and make multiple
material instances so they can each have
their own texture and values based on the landscape
that we're creating. Now, if I wanted to
add more to this and paint snow on top of the
mountain, for example, all I would have to do is just copy paste everything we've done here and add it to
the landscape layer blend. I can go to the
landscape layer blend. I can add another layer to
blend to and call it snow. Now you can see we
have that option here. Now I can copy paste all of
this and call this snow. I can pipe this one into snow. Now we have grass, rock, the auto, and snow. But I want to route this
around all of this, so I can double click on this node and control
click to move it. We can try to keep
this a bit organized. Now I'll have to do is
adjust the textures here. Save. Now you can see we have
snow as an option to paint. I want to click this and choose weight-blended layer
and click "Save". I choose this. I'm going back
to reduce the brush size, and now I can paint snow
on top of my mountain. If we look down
on our landscape, we can see that maybe
this grass is too big. We can adjust that in
a material instance. I'm going to jump into
the material instance. I can just find it through
the landscape material here. Double click it, and we
can adjust the tiling. I'm going to turn on tiling, and I can adjust this value. Now, we only promoted things for texture A, but, of course, you can do all of that with
the other textures as well and promote them all to a parameter and give
them their own group, so texture B, texture C, whatever other parameter
you want to promote so you can have access to it in the
material instance over here. In this lesson, we created a fairly complicated
landscape material that auto generated the differences
between grass and rock, and we were still able to paint our own materials like snow
on top of the mountain. Meet me in the next lesson.
We're going to learn how to paint foliage
onto our landscape.
7. Paint Foliage: Welcome back. We're
going to learn about painting foliage in
this lesson as well as pulling in other assets
like cliffs from a built in asset library called Megascans inside
of Unreal Engine. Let's get started. Let's
begin learning about how to place foliage in other assets like
rocks and features. But before I do,
I want to change my default level that opens
up every time I reopen my project to be the
landscape that I'm actually interested in working in instead of this
blank default scene. So let's go to Edit
Project settings. Then down to Maps & Modes. In the Editor Startup Map, I can change OpenWorld to my landscape level
that I created. I'll click that, and
I'll close that down. Next time, I reopen, it'll open the level I'm
interested in, which is the one
we've made together. So now inside our scene, we can add foliage
to this landscape. Let's do this in
two different ways. The first way is to paint it in; and the second way is to do
it in a more procedural way. So let's first learn
how to paint foliage. So I'm going to go
on the top left and change my mode to
the foliage mode. And down here in this
little blank window, I can drag and drop assets here to be what is
going to be painted. The most obvious place to add assets from is the
Quixel library. This is the built-in
asset library inside of Unreal engine. So you'll need to
be logged in to your Epic Games account
to access this. I'm going to type in fern. You can grab whatever
fern you like. Just make sure that
it's a 3D plant. We don't want textures by themselves or materials
like you see here; we actually want
a 3D static mesh. So with the common
fern selected, I'm going to click and
drag it into my scene, and I'm going to let go. It created a new folder
called Megascans, where the static meshes and the textures and
materials are all stored. I'm going to close this down now and to begin painting
with the foliage, I need to drag and drop it here. The easiest way to
do that instead is to just go back to
the selection mode; and we can click
this single fern and actually just delete
it from our landscape. We can see it in the outliner
here where we actually want to just paint foliage in and
not just place them by hand. So now that we've removed that, which is really just to
import it into our project, when we go back to Foliage Now, it'll have loaded these
three varieties in of the common fern from
the Megascans library. Depending on which ferns we
want to add to our landscape, we can use the checkbox
here to turn them all on, and they will all be
painted at the same time. I'm going to leave
one on for now; and I'm going to turn
on the paint brush. So I've got a paint brush, and I could change the
paint brush size and density here and paint some ferns down
onto our landscape. So when I click and let go; you can see I've
painted some ferns. Now, the first issue we run
across is the fact that the level of detail is changing as our camera
zooms in and out, which isn't ideal for a
landscape as big as this one. So we can change
that by adjusting settings in the static
mesh of this asset. So if I click on this asset, I can find which one
of these varieties it actually is and navigate to that asset by clicking
the browse to asset button. Now it's selected for me, and I can click and
open this asset. So when I zoom out, I can see the LOD
actually changes in the preview as well or
the level of detail. And if I look at the LOD here, I can see where the LOD is zero, and as I zoom out, the
LOD goes to three. And it's only four triangles; which means it's just
basically a plane. And as I zoom in, we
have way more triangles, which means geometry
and complexity. So I want to try
to maintain an LOD of zero for all
camera distances. That will be more
difficult for my computer, and it may hurt performance, but it will ensure the
highest quality of representation for
that foliage asset. So if I scroll down
to LOD Picker, I can turn on the
Custom LOD Picker, and I can turn all of them off. And on number of
loads. I can just scroll this down to
one and hit apply. Now when I zoom in and out; the LOD stays the same. I can see by this
number up here. I can double check
that by zooming in and out of the
landscape as well. And I can see that they're
staying the same static mesh. So if you were to turn
on multiple ferns here, you'd have to do that
for each static mesh. We can see the other
varieties here. I'm going to click "Erase" and I'm going to erase the ferns that have already painted. So down here, you can
see different attributes that can affect the paint brush. I want to make sure
that we're back on the paint brush
before we begin and choose a different kind of scale variation to add
variety into our painting. Maybe increasing the
density as well. And now when we paint; we'll be able to see a
lot more dense ferns. And if we zoom in a little bit, we'll be able to see that they should have different
and varying heights. And instead of uniform, we can actually
turn it on lock x, y if we only want it to be
the height that's changed. So if we only want the height, I can reset X mean and max, and I can only do this
on the Z, for example. So I'll erase these and
paint another patch with a scale isolated to only the Z axis,
which is up and down. So now when I zoom in, I
should be able to take a look across and see
a variety of heights. And let's just make it even
more exaggerated here. I can click "Erase
this Patch" and I'm going to increase this to
10 and paint some more. So now you can see there's a huge difference in
the value of scale Z. So if we do this
just a little bit; it'll add some variety
to our landscape. If I click on the
other varieties, that'll add a ton more variety. But let's just tone
down the scale a bit back to something like 2.5. And now I'm going to paint
all three varieties. So when we inspect this
patch we just painted; there's not a ton of continuity between each fern. There's
some variety here. The one thing that
we didn't change though was the density
of the other two. So you can see the
number of ferns was very high on the first one where
we increased the density, and it's very low on these
other two variations. So we can erase this and try
to make them evenly dense. This has a density
of, let's say 1,000, and then we'll make these
other to 1,000 as well. Now, when we paint and we look at the numbers of each fern, we should see a fairly even
distribution of density here. And that's because it's using equal amounts of each variety. So that's also a way to control the kind of distribution, and this isn't limited
to just ferns. You can have 20
different varieties of foliage here painting
at the same time. Now, when we have a big
landscape like this, it may not be the
most efficient way to paint all the foliage in. We have these big broad
strokes like this. But in the next lesson,
I'm going to show you a procedural way
to place foliage. But before we move on,
let's take a look at some other assets
that we can add to our landscape that
isn't foliage. I'm going to click on "Add" and go to the Quixel content again. I'm going to choose "Cliffs", and I'm going to click and drag this western cliff
into my landscape. I'm going to close this down, and let's go back to the selection mode so
I can move this cliff. Click "W" on your keyboard
to get the move manipulator. It seems to be
semi-transparent right now. The reason for that is because the cliff itself
is only one sided, and we're looking at the
back side of it here, so we'll need to spin it around. Hit "E" on your keyboard to pull up the rotation
manipulator. And I'm going to type in
a rotation of 180 here. And now we can see
that it's spun around. I'm going to zoom out by using the middle
mouse scroll wheel, and we can see it's a
fairly large cliff. I'm going to scale
this down a touch by hitting R on my keyboard to pull up the scale manipulator and put it maybe
behind my ferns. Now, the one thing you'll
notice if I was to rotate this away from the sun that is actually not
blocking the light. This is a fairly common
asset for Unreal, and it's a way to
be more efficient. And the easiest way, if you find yourself with
the sun behind the cliff is, to cast a shadow with
a light blocker, which is just a
simple extruded cube. So we could go to
Shapes & Cubes, and we can just p.lace this I'm going to hit
"End" on my keyboard, and the end button will
place this on the ground. And then I can scale this up by hitting "R" on my keyboard to pull up the scale manipulator
and put it where I want it. So that is going to be the shadow caster and
basically block light from the backside of where we ideally wouldn't
be seeing this from. If you're going to have to
see this from both sides, then you would just
duplicate the cliff and flip it around and
mirror it on itself. But if we're only seeing
it from one side; we just need to create
our own light blocker. So now you can see
that the cliff is fully blocking the light, and we don't see the
light blocker as well, especially if we were to look at the cliff
from this angle. But if you needed to see
the cliff from both angles; you would just duplicate this. And the easiest way to duplicate something in
Unreal is hold down "Alt". And while holding down "Alt", I'm just going to rotate this, and it will actually
duplicate it, and I can just rotate
it around 180 degrees, and I can see that this is
in fact blocking the light. And I don't necessarily need
the light blocker anymore, so I can just go in
here and delete that. And it should still
block the light. You can also get
a sense of scale. Remember by having our
playable character here; you can see that I brought in a lower resolution
version of the cliff. If we're going to get
very close to the cliff; then I may want to replace this with a higher
resolution texture. So if I click this, I can see I was actually
on medium quality, and I would just
want to change this to high quality or nanite. And that'll bring in the high resolution textures
with that asset. So in this lesson, you
learned how to paint Quixel assets right
onto your foliage, change it with
variation and density, as well as place other
assets that aren't foliage like cliffs from the
Quixel Megascans library. In the next lesson, I'm going to teach you how to do all
of this procedurally, so you don't actually
have to manually paint all of this in.
I'll see you there.
8. Place Foliage Procedurally: Welcome back. In this lesson, we're going to learn how to
place foliage procedurally, which is just a fancy way
of saying automatically. Back inside our Unreal
Engine project, where we've learned how to place foliage manually by painting it. Now let's learn how to
do it procedurally. To be able to do this, we need to make sure we have a plug-in enabled called PCG. That stands for procedural
content generation. We want to make sure
that you have the same plug-ins enabled. Once you have those
plug-ins enabled, you may have to
restart Unreal Engine. I'm going to create
a folder called PCG, and the first thing I want
to do is add a PCG volume. This is where all of our
assets are going to be added. I'm going to search
for a PCG volume here, adding assets, I'm going to click and drag
it into my scene. Now, nothing has happened yet. It's just an empty volume. We need to fill it with
certain characteristics that are going to place our
assets on our landscape. That's the PCG graph. I can right-click in
the content browser and choose PCG graph. We'll leave it at
the default name, and I'm going to open it. There's also nothing happening here yet, either,
and that's okay. We first need to sample
our landscape and tell it to grab our landscape
and then add things to it. Let's just move these
out of the way for now. Right-click and
type in landscape. You have gate landscape data. We can only have one
landscape in our level, so it knows which one to grab. Now that we have
the landscape data, we need to sample it. We need to sample the
surface of this data. Let's pull out a node from here and let it go and
type in "Sample." We can click "Surface sampler." We're going to sample the
surface of this landscape. Now, nothing is happening yet in our volume that we
can see over here. I'm just going to move this to the side so we can
see it in the shade. I want to make sure that it's actually in contact
with the ground. I'm going to move it
down and scale it up. I'm just going to move it
over our mountains so we can see how it interacts with
slopes of different angles. Right now it's empty, and
we need to tell this volume to be filled with information
coming from this graph. To do that, we need to
go to the PCG component. This is something that
can get confusing because there's components
within components, and you would think
just by clicking the PCG volume here in the outliner or here
in the details panel, that we would access
the things we need to tell it to use the
graph we're building. But it's actually specifically the PCG component is where
we enter that information. Now we have a graph attribute
in the details panel. This is where we want to
click and drag that graph. Now, back inside that graph, we can press D or
right-click and choose Debug to see sample
data on our landscape. But first, we need to
generate the PCG to see that. Now that we've generated it, we can see these points that we have sampled on the landscape. These sample points are what is going to get replaced
with foliage, rocks, trees, whatever we
want to add to the surface. Let's go ahead and
swap it in with a static mesh that we
have in our library. I'm going to click
and drag this out and choose static mesh spawner. Now I need to add
a mesh entry so it knows that we
can accept a mesh. I'm going to click
the "Plus" button and toggle down the first index. In the descriptor, I get
access to a static mesh. Now I can search for
whatever static mesh we've imported into our scene, and that includes
mega scan assets. For example, we still have
the common fern here, so I'm going to choose
the common fern. Now, we're still viewing
the debug of this node, and we can see that because
of this blue dot here. I've hit D again to disable it. We should be able
to see our ferns, which are very small
in the volume. We can see them all the way down here because the scale of
our scene is quite large. How do we adjust and create a greater density of
points on our surface? If we go to the surface
sampler and we go up, we can see that there's this
points per square meter. If we increase this, we can
see we can reach a limit, and no matter how much
higher I pull this, it's not adding more points. That's because of
the point extents. If we click the debug menu, we can see that we've filled out this volume with the
size of these extents. I can just drop these
down to be much lower. The extents are smaller,
and we can add more points. Now you can see that I'm
able to add more points, the higher I pull up the points per square meter attribute. Now if I turn off the debug, you can see we've added a
lot more ferns to our scene, and we could go even more dense. I didn't have to
paint any of this. This is the power of
procedural content generation. For example, I could add
a minimax rotation values so that not all the ferns are
rotated in the same angle. So if I look at them,
even though they're placed not necessarily in rows, they're all facing
the same direction. What I could do is
actually just place a transform here and I'm going
to transform the points. I can increase the max
rotation to 360 degrees. This didn't work because
I'm trying to transfer points when we don't
have points anymore. We have meshes. I need to
reverse the order of this. I can click this
to disconnect it and the nodes can swap
in this direction. I can pipe the order of
operations correctly. Now I can see that things are rotated at different angles. By resetting this, now you can see they're all
facing the same way, and now they all have variety. Now, of course, this
doesn't have to be ferns. This
could be anything. We could add any
type of static mesh. We can add an array of them. I could keep hitting
the plus button to add more and even more variety
of kinds of plants. In the transform points, I'm also going to
increase the max scale just so that we can get
these a little bit bigger. I turn off uniform
scale so that I can have the z-axis be taller. I need to unlock this so that the non-uniform
scale takes effect. Now we've created a much
more dense fern forest. But what if we want to
match the slope angle? There's actually a filter
that we can add to do this. I'll show you how to do
that in the next lesson. In this lesson, we learned
the second way that we can place assets and foliage into our scene that we don't
have to do it manually. It kind of automatically
places them for us, and we can affect the
minimax values to add that variation using
the PCG graphs. Now in the next lesson, you're going to learn how to add even more variety
by matching where the foliage is
placed procedurally with the angle of the
slope. I'll see you there.
9. Control Your Procedural Foliage: Welcome back. In this lesson, we're going to learn
how to take the procedurally
generated fern forest and remove ferns from the
slopes of the mountains, as well as replace
those ferns with trees and even cut a path
through that forest. I'm going to jump back
into Unreal Engine and dive into our procedurally
generated graph. I'm going to Alt click this pin for now
and type in normal. We want to get
normal to density, so we're going to use normal to dictate what the density is. I'm going to press D on the keypad to see how
this affects the density. The density is really
represented as a 0-1 value, which means white to black. We can see these kind of gray-shaded areas here versus
the very stark white areas. That's because the angle
that's being chosen as z, and that's directly up. The z direction is up. If I turn this to zero, we would see a different result. If I turn something like y, we would see this side. Imagine you're
creating a biome or an ecosystem that is dependent
on the angle of the sun. We would have more shade, sun-tolerant trees based on the angle they face relative
to the sun direction. We don't have to always choose the angle of the slope
to dictate the density. How can we use this data? We need a way to filter it, so I'm going to type in filter
and choose Density Filter. I'm going to pipe this
into my static mesh. I'm going to turn
off the debug of the normal density so we
can see our ferns again. You can see that they've been excluded from the rocky areas, just like our auto
landscape material. Those two can start to
line up between where the ferns are and
where the grass is. I can also adjust
the lower and higher bound so that these are
affected in more drastic ways. Now, think about it if
we had trees up here. Trees grow straight up,
something called geotropism, where they actually
act against gravity, and so it's not
growing outward from the slope like this.
How do we do that? We can actually do that
with a transform points. With the Transform Points, we actually have an
absolute rotation. If I turn that on, you can see that it messes up
our density filter. Actually, we want
the Transform Points to come after the
normal density. I can disconnect this,
slide this down, pipe this in at the end, so it does matter the order in which these things
are happening. Now with the Transform
Points selected, I can choose absolute rotation, and we should see all
the ferns point straight up and not relative to the angle of the slope
that they're on. This is how we could
recreate real-life biology. Now, there is an
option to have this limited to just the slope. We could also do height, so there's another one that we could add to the
blueprint filter. We just want to grab the
height to density filter. We just need to grab
another density filter to filter that high density, and we'll use this to
adjust the height. I can debug this by
clicking here and pressing D. I can disconnect this temporarily because
in the height to density, I need to adjust the
offset because it doesn't know how high the height that we're going off of is based. I need to increase
the height until I see that there is a
gradient being formed here. Here I can see it, and I can
just go as high as I want to stop generating the static
mesh of the foliage. Now I can reconnect the ferns, and you'll be able to see
when I turn off the debug that now the ferns are only being created at
a certain height. Well, I can actually
invert this, so I can go to the density
filter and invert the filter. Now we're actually controlling
where the height of these are also placed without having
to move the entire volume. I can just adjust
the offset here and keep moving it up
or moving it down. These are the two
most common filters you might want to encounter. You can also choose to have
an unbound surface sampler. If I check this, it would actually use the
entire landscape, which could crash Unreal
because it's a lot of assets, and this is a big landscape. If you want to choose
this, use it wisely. Like I mentioned before, you could use something
else besides the fern. All we need is a static mesh to enter in the
static mesh spawner. Here, under the mesh entries, there are free assets in the
Unreal Engine Marketplace. That includes trees. If you go to Free, Megascans, you can see that
there's actually trees in the Megascans' assets. Just be aware that
these are larger files. They're are even
several gigabytes, so importing these
into your project may slow down your
machine and the project, so just be aware of that
before you import them. But they are free assets, so I encourage you to
have a play with them. All you have to
do to get them is add them to your
cart and check out. Now, inside your library, you just need to navigate to the Megascans' assets and
add them to your project. You have to choose show
all projects because they may not be compatible
with your version of Unreal, but because they're
only static meshes, they should still work. You can click "Okay",
and we just need to make sure to choose
a version that they do work for to add to our project of a higher
version of Unreal. You can see here that this one asset pack is eight gigabytes, so
it's fairly large. Once the asset is
added to your project, we can then swap it in
with a static mesh. First, let's turn on
the frames per second to see if we have any change
in our frames per second. When I click off of this, I should see what my frames
per second are over here. We're getting a decent amount. Let's see if it gets affected by changing the static
mesh that we're using. Let's choose the
EuropeanBeech_Forest_07. You can see how it's already slowed down our
frames per second. It's taking a long time
to load, unfortunately. The scale of this asset is clearly different
than our ferns, so we need to go
back and adjust. You can also see
how much that has affected our frames
per second here. In Transform Points, let's
reset the max scale value. You probably also don't need as many points because
it's a bigger asset. Under surface sampler, I'm
going to change this to one. I'm going to change this to 0.1. The other thing to keep
in mind is we have our skeletal mesh over here that we can pull closer
to our trees to see if the scale is
still making sense. This looks about right. Now that we have
our tree set up, I can adjust the range
where they're created. If I click the scale option
between these two scales, I can actually just scale
outward and let go. It's going to
create more points. Finally, by adjusting the
minimum and maximum values for scale and the
transform points, I'm able to create
varying heights of trees that even with just one tree, there's a ton of
variation in this forest. If I look at the canopy, the canopy is at
varying heights. Now, what if I wanted to cut
a path through our forest? We need to create
some way to subtract from this procedurally
generated forest, and we're going to do
that with a spline. I'm going to create a
new blueprint actor by right clicking
in our PCG folder. Go to blueprint class and
select the actor blueprint. I'm going to rename
this spline subtract and double click this blueprint. Inside this blueprint,
I want to add a spline. I'm going to click
"Add," choose spline, and the type of spline I
want is a utility spline. Now, in this blueprint, I want to create a tag so the procedural
network can find it. I'm going to click
"Plus" and then type in spline subtract, it inner and hit
"Control C" to copy it. I'm going to press compile
and save and jump back into our graph where I'm
going to get the spline data. This will get spline data, but we haven't put our spline
into our landscape yet. We can just simply click and drag the blueprint
into our scene, and we can put it anywhere,
but somewhere over a tree so that we can see
it take effect immediately. Now we need to tell
this get spline data, which spline to get there could be multiple
splines in the scene. We can say, out of
all the world actors, select this actor by the tag, and we can paste in our
tag that we just created. Now we can sample this
spline by typing in sampler and choose
spline sampler. Now we can modify this spline
and increase its bounds, because the spline itself
right now is just very thin. It's one pixel
across, basically. It's just very thin spline, and we want to
create a whole path. We need to modify the
bounds of that spine. Let's type in modifier and
select the bounds modifier. Now with these selected, I can debug the bounds
modifier by pressing D. You can see that
this debug pop up, it shows that the bounds
are just very thin, and we want to create
an entire path. What we want to do instead
is increase the bounds, especially on y, which is
the side to side, 50 and 50. That goes equally on
either side of the spline. Now we only have one
section of the spline, and we want a whole path. We can do that by positioning
the path where we want it and selecting
the end spline point. We can hit "W" on
the keyboard to pull up the move manipulator, then hold alt and click to extend this spline even further. To get a smoother
representation of our spline, we can go into the
spline sampler and adjust the subdivisions. We can also increase
the bounds forward and backward so that we
get better coverage. Now, we need to tell it to take this spline and subtract it from the points we're sampling from the surface
of the landscape. We can click and choose
difference mode, and this automatically
puts it into the source, and we don't want
this in the source, we want it in the difference. We're subtracting this, so we're going to pipe
the bounds modifier into the difference and
the surface sampler of the landscape
into the source. I'm going to all
click this to get rid of that and
pipe that back in. It has this little extra
helper node that it needs, and you can see that we've
subtracted from the landscape, but only that first one. We can see that it's only
affecting the first tree, and we want it to
affect everything that's happening in the spline. We need to change the
difference to binary. Now it's an either or, and
it will totally remove them, and we can continue to
move and adjust this, and it will update
when we let go. If we turn off the debug, we can get rid of that
mesh that we're seeing, and so that's how you can subtract areas from your forest. Because we've scaled
the trees down, the amount the wind
is affecting them has essentially increased
relative to their size. We can either turn off or
reduce the amount of wind that's happening on the trees
through their material. To find their material,
all we have to do is go to where we input
this static mesh in the mesh entry descriptor and navigate our brows to
asset with this button. Once we browse the asset, we can double click it
to open it and then find its first material here and browse that
asset and open it. To turn on and off the wind, we need to go to the wind
parameter and turn it off here. You can see the wind is still
affecting the branches, so we need to go to turn off the wind in the
branches as well. Let's find the branch material and make sure that the wind is turned off on those as
well, and click "Save." Now we don't have any
under watery look to our trees with them
waving too much. Finally, if we want to create
some drama for our scene, we can turn on god
rays or what I'm real calls light shaft blooms. If we select our directional light from the outliner and we can scroll down to the
light shafts area, we can simply turn on
light shaft bloom, and now we suddenly have
these really pretty god rays. Congrats on getting
through this lesson. I know it was a long one,
but we covered a lot, and it was important
because even though we're creating a procedurally
generated forest, we still have a lot of
ways we can control it and direct how we actually
generate that forest. You learned how to
adjust it based on the slope and even carve a
path through the forest. If you ever feel like
you're getting overwhelmed about what node is
affecting what, always remember
the debug option, just make sure you have the node selected
that you want to debug and press "D" to
toggle it on and off. Meet me in the next lesson, where you can begin prototyping
a level for a video game.
10. Create Level Design Prototypes: Welcome back. In this lesson, you're going to learn
how to prototype a level for video games. Up till now, we've been creating an environment with
finished assets. But in video games, when you prototype a level, you actually use unfinished
assets or prototype assets. Let's jump back into
Unreal and get started. Back inside Unreal, we want to use prototype assets, and you can find those
in level prototyping. We have these assets
because we added the third person
project to our scene. If you haven't done that yet, you can do that by clicking "Add" and choosing the
third person template. You can add that
to your project, and that will give you this
level prototyping folder, which has meshes inside of it, and we can adjust it
in a modular fashion, especially if we have
snapping enabled up here. You can see all of
these blue boxes here. That means we have snapping
enabled on our move, which is the Y shortcut and E, which is rotate and scale, which is R. These
are the shortcuts. I can scale this
at even intervals, and it will update
the box shape. Now, why is this important? It's important because our
character can only move and jump at certain
speeds and intervals. For example, if I created
a box here that is 100 centimeters high,
which is what this is, one meter high, and I grabbed another cube and I scaled
it upward two meters, I wouldn't be able to
jump on top of this box. You can see the importance of
having the modular snapping on so that we can align objects exactly the way
we'd expect them to be. If you haven't changed
the world settings to be the game mode override
of your blueprint, then you want to
make sure you do that so that when
you press Play, you'll actually spawn
your character, then we can play in the level. If I try to jump on top
of this box, I can. But if I try to jump on
this two meter high box, I won't be able to. This is important to know
when you're prototyping a level design for a game
that you want to create. We want to make sure
that we're designing the game in a way that
we can actually play it. It's important to do that
because these prototype assets, they work so much
more quickly and easily than if we were to try
to use high quality assets, because we can always
go in and replace these prototype assets later
with higher quality ones. For example, if we
wanted to go in, I'm going to hit "Escape"
to get out here. If we wanted to replace this now with some finished asset, we can add a Quick Sole
Bridge rock, for example, and navigate to
the three assets, nature rock, and we
can grab a boulder. I'm just going to click and drag the sandstone boulder
into my scene. I'm going to close
Quick Sole Bridge. If I hit "Play" now, the
one thing that you'll notice is it's not just
that the size is wrong, but that I can walk
right through it. There are no collisions by
default on mega scans assets. We need to create
that collision, so I can't just walk
right through it, and that I can actually jump
on top of this boulder. Let's create that collision now. I'm going to hit "Escape" to
get out of the game mode, and I'm going to
navigate to this asset by hitting "Control B"
to browse to asset. I'm going to double
click the static mesh. In the static mesh, I can view the
simple collisions. You can see that nothing changes because we don't have
a simple collision. I'm going to drop this down and add any one of these
simple collisions here. We'll create a collision
mesh that we'll be able to jump on top of
and not go through. Now when I press Play, I won't be able to walk
through this object. Now I can actually
jump on top of this. Now all we have to do is
just modify this so that is the same size as the objects
we're trying to replace. I can modify this with
the typical tools at my disposal using W, E, and R shortcuts to make
sure that it roughly fits the prototype asset
that we've created here. Once I've replaced it, I can just delete
this from my scene, and now we have a
final asset that we can use to replace
our prototype asset. This is the general idea
that we're going to go about when we're
prototyping our level. Now, obviously, it doesn't have to be a rock. It
could be anything. You could leave it as is with these prototype boxes and cubes. One thing that's
helpful to do though, is to try and stay organized
in our outliner in case we ever want to navigate
to things in the outliner. You can right click and say, Move To and Create a New Folder. We can call this new
folder something different by right clicking
and choosing Edit Rename. Now anytime that
we create a cube, we can have it in this level, especially if we duplicate it. If I hold down Alt and
just move this out, you can see that we've created a new cube in the outliner. This is another one
that I can just scale things down and adjust them. Now that we know how to
use prototype assets and prototype out a
level for video games, we can actually
create entire puzzles for our player to
navigate through. Let's do that together
in the next lesson.
11. Design Level Design Puzzles: Welcome back. In this lesson, we're going to learn how to use all the prototyping
knowledge that we have now and actually design a whole puzzle for our
player to navigate through. Let's begin prototyping
this game dynamic out with these level
prototype assets. I'm just going to delete these, and I'm going to start
with this one cube. I want to create a
jumping moment where our character is forced to
jump across a distance. From testing, I know
my character can jump forward a span of 400
centimeters or four meters. The link that I create across here can only be
four blocks wide. I'm going to create
another set of blocks by holding down Alt and
pulling this one out. I'm going to scale this in in this direction
by four blocks. Pull this out, scale it back
down to the right size. This is the distance I know
that my character can jump. I'm just going to move this down and use it as
a measuring tool. Now I'm going to hold click
and drag this other cube, so this is the in position. Now I just need to create walls on either side so
that the character can't just access the in
position from any direction. Now we've created a situation
where the character has to go through this
section and jump across it. What we'll create is like
a danger moment here. How do we signify this dangerous zone where we don't want our
character to arrive? We can use the starter content, particles, and we
can bring in a fire. If I just click
and drag that in, now we've created fire using
some of the pre made assets. I just need to move this into the right place
and move it down. This indicates to
the player that they shouldn't probably
go into this pit. If I hold down Alt, I can make
multiple versions of this. If I want to see this
without all these icons, I can hit G on my
keyboard to hide them, and it'll also hide other
icons like the volume box. If I play this now, I should be able to
prototype this and test this idea before I
take it any further. If I get to this platform, I can see that I need to
jump across it safely. If I can actually time
my jump correctly, I can make it across
to the other side. We can add some more complexity here by creating a
puzzle dynamic for this. That puzzle could actually be something like
pushing a piece in to get this platform to
land on. Let's do that now. Let's create a gap
for a block to go here that we're going
to push from the side, and that will be the
platform that we land on. We can remove this one for now and we can make
space for this here. We want to look at this from the side and make sure we
don't give it too much space. We can actually
use this block to block the player from
entering this area as well, so we can slot this in and move this up
and move this over. We can also move this one back just to touch
so that there's a little play and
the block doesn't have to be perfectly pushed in, but can roughly be pushed in. I'm going to push this up
one little notch as well. The block we can use comes from the level protyping meshes, and we can bring in
this hampord block. I'm going to pull it up and then press an end
on the keyboard, and that'll snap
it to the floor. I want to put this exactly
where it needs to go. That way, there's no
confusion for the player, they just need to
actually push it in. The only problem is if we, the player pushes this in, they're only going to be able to push it in as far
as they can walk, which is here, which isn't
far enough for the platform. We need to get it to push
in another block distance. We need to put two
of these here so we can put two of these here. I'll click this to put
a second one here. This one will push
the next one in. But we need to make this
to be a physics object. Otherwise, when we hit play, nothing is going to happen, we're just going to run into
this and we can't move it. We can't actually push this
until it's a physics object. To make this a physics object, we need to just check one
box in the details panel. I'm going to select
the one on the inside first and go down to the
simulate physics option here. Check that on, and I want to choose the
same for this one, and we're going to want
to change one setting. But I want to show you the
effect this has already. If I hit play now, I can effect where these are,
and I can push these in. Now when I come around here,
I have something to land on. If I run and jump and I do it correctly just at the
perfect amount, I can land, and then I can access the
higher levels of the maze up here and continue on and create more and
more levels to this. One final parting tip of something that I think
I'm going to include in the level design
that I'm creating is a staircase that spirals up
and goes above the trees. Because when I make my level, I want to make it on the
inside of the forest. I want to end and have the in position be somewhere
where it feels like you've been victorious
that we've achieved some higher status literally by being above the
trees in this world. I want to create a stairwell
that goes up that high, but I don't want to have
to place every block. We can use the pattern tool and the modeling
tool kit to do that. I'm going to pull out
a cube so that we can use this as our base stair, and I'm going to the
modeling menu here. I'm going to venture over
to the transform option. There's all different
options that we can use to transform
static meshes. For this case, we're transforming an instance
of a static mesh. I'm going to create a pattern. I'll click pattern here because I want to create
a pattern of stairs. The stairs I want, I want
to be a spiral staircase. Instead of a line, I'm going to choose a circle, and I want to choose
an in position that's higher above
than the ground. I'm going to choose 2,600. I found was as tall as
my trees need to be. If I look at the top block, this is about where
the top trees are, and I could always go higher
and adjust this as well. The problem is, I need to
create the distance that's relative enough that I can actually jump from
here to there. This is something you
might have to play with, just to increase
the count number so that these blocks
get closer together. Now, we don't want them to be too close to that
so that they're overlapping that much and that there's no danger
element involved. For example, you might want to create enough distance that your player could
accidentally slip between each staircase block. What I want to do is
increase the spiral. You can see the end angle here
is limited to 360 degrees, but that's just a soft limit. I can actually just
click here and type a bigger value and
it will accept it. Now I've created a little
gap between each block, and it goes all the
way to the top. Now I can actually play this
with my player in the level and go to the highest hopefully
level of the staircase. There's some skill involved
here because I could potentially fall off and
then have to start over. If this is a timed
course, for example, then that would have penalty
of taking longer to go up. Use this creative problem
solving to create fun obstacle courses
that you can use in a later class
of the series. What we covered in this
lesson is how to create some nice puzzle dynamics for a player to
navigate through. Take some time to consider this and brainstorm
things for yourself. You don't even need to be using
unreal engine to do that. Just sit in how to
think about what might be challenging for
a player to overcome. Maybe think about
video games you've played and what you liked
and found challenging, but still we're able to be
successful because we have these technical
limitations of how high the player can jump,
how far they can jump. We want to be mindful
of these when we're creating these puzzles to make it challenging
but achievable. Take some time to think
about this, have fun, think about what you
would like to play, and try to implement
that inside of unreal engine with
all the skills you've learned in this class.
12. Final Thoughts: Congratulations on
finishing this class. You've learned a lot. We started with
having no landscape at all, to sculpting one, to adding procedurally
generated materials, procedurally generated
forest, but still having enough control over
it that we could even cut a path
through that forest. And then we finished
on thinking about creative problems we could
make for a video game. So, with these skills that
you've learned in the class, keep in mind that these
are two different kind of paths you can
go on in a career. So we have the
environment artists, which uses high
quality assets like we had at the beginning with
the ferns and the trees, and then at the
end of the class, we were covering more prototype
level design aspects, which would be a level
designer career path. If you want to pursue
this even more, keep in mind that these
are kind of the two specific career paths
that you could go down. So now take some time and
actually apply these skills you've learned and
create your own level design and environment. I'd love to see what you make. So, please take screenshots
of your project, and you can put them in the
project gallery on Skillshare and leave a little
description so I know what kind of
puzzles you've made. If you enjoy this class, there's two more in the series. The next one, we're
going to learn how to animate our character, and then the fourth one,
we're going to learn how to create a
finished video game. So I hope you continue
learning with me, and I'll see you
in the next class.
 Lucas Ridley, Professional Animator