Transcripts
1. Introduction: Hi there, everyone,
and thanks for coming to this new
JavaScript project. In this project, we will
learn how we can create a temperature converter using
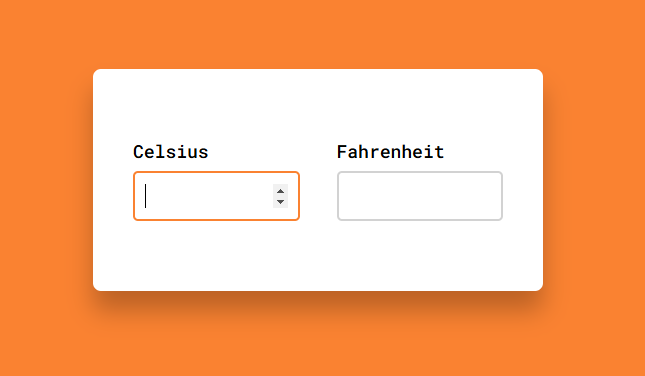
HTML, CSS, and JavaScript. You can see here we
have two inputs, one for the Celsius degrees and the other for
the Fahrenheit. So if I come here and
add any Celsius degrees, you can see it's
automatically converted to Fahrenheit and displayed here
in the Fahrenheit input. Also notice that we have
these two up and down arrows that we can use to increase
or decrease the degrees. We can also convert the
other way around from Fahrenheit to Celsius by entering a Fahrenheit
value here, and you can see it's
converted to Celsius and displayed here in
the Celsius input. This course is ideal for students who have
learned the fundamentals of Javascript and want to apply their knowledge
in a practical way. By building a simple yet
engaging to do list app, students will gain
hands on experience, deepen their understanding
of core Javascript concepts, and boost their confidence in developing real world projects. To gain the most
out of this course, students are encouraged to build the project
on their own and upload their completed work as a zip file to the
project gallery.
2. Temperature Converter UI Design Using HTML & CSS: Okay, everyone, let's see how
we can create this project. I will start here in my
HTML by adding a div, give it a class of wrapper. Then inside that, I will add another div with a
class of container. And this container
div will contain the Celsius input and label. So I will add a label
and say Celsius. Then below that, I
will add a new input. Give it a type of number because temperature degrees are
obviously numbers, not text. I will also give it
an ID of Celsius. Then I will go here inside
the label and say four, then add the ID of
the input Celsius. So this container will
hold the Celsius input. In order to create
the Fahrenheit input, we will copy this
container dith, paste it again, and change
Celsius to Fahrenheit here. And here. And here, as well. So now you can see we have these two inputs here on the top left corner
of the browser. Okay, now I will go to
my CSS to style them. First, I will target the body. And add background color, this cool orange color. Then below that, I will target the wrapper div that contains the two containers and set
its width to 450 pixels. Then add background
color, white, padding, 70 pixels
from top and bottom, and 40 pixels from
left and right. Then I'll add box shadow, zero as a horizontal offset, 20 pixels as a vertical offset, 25 pixels as a blur value, and this semi transparent color. Then in order to have
some rounded corners, I'll add border
radius, eight pixels. Now we want to center the
wrapper div inside the body. So I will go here and add
display flex, justify content, center to center it
horizontally, align items, center to center it vertically, and height 100 VH. And now you can see
the wrapper div is centered inside the body. Okay, now let's target the divs with the
class of container. And add width, 45%. And now you can see
they are taking up 45% of the wrapper div. Okay, let's now target the
inputs inside the containers and add width 100%. So it will take up the full
width of the container, which is 45% of the rapper dive. Then height, 50 pixels, border radius, five pixels,
border, two pixels, solid, this light gray
color, then outline, none, then padding, zero
from top and bottom, and ten pixels from
left and right. And finally, margin top, eight pixels to add some spacing between the
inputs and the labels. And now we want to position the two containers next to
each other on the same line. And we can do that
using Flexbox. So I will go here inside the
wrapper div and add display, flex, and justify
content space between, so the two containers will be
separated from each other. And now, as you
can see, everyone, the two inputs are looking
exactly the way we want. But the only thing
left is to change the border coolor of the
input when focusing on it. So I will go here and say
input and when focusing on it, I will add background
color, our orange color. And now when I focus
on the inputs, you can see their border
color changes to orange. And that's it, everyone,
for this lesson. We have finished the HTML
and CSS for this project, and we will learn how to make it function in the next lesson. So, see you there?
3. Adding Functionality Using JavaScript: Okay, everyone. After finishing the HTML and CSS of our
temperature converter app, in this lesson, we
will start to add functionality to it
using JavaScript. So basically, what we
want to do is when we add a specific value
in the Celsius input, we want to take this
value, do some math on it, to convert it to Fahrenheit, then display it in
the Fahrenheit input. And also, when entering
a Fahrenheit value, we want to take it and
convert it to Celsius, then display it in
the Celsius input. So first of all, we want the equation that converts
Celsius degrees to Fahrenheit degrees and the
other one that converts the other way from Fahrenheit
degrees to Celsius degrees. And as you can see here, I have added these two equations. So in order to convert from
Celsius to Fahrenheit, we will use this equation. We will take the Celsius degree, multiply it by 9/5, then add 32 to the result. And we will use this one here to convert from
Fahrenheit to Celsius. We will take the
Fahrenheit degree, then subtract 32
from it and multiply it by 5/9 to get
the Celsius degree. Amazing. Now, let's start
working on our Java script. First of all, I want to
select the two inputs. So I will create a new
variable, name it Celsius. Then I'll say document
Get element by ID. Then I will target the input
with the ID of Celsius. Then I'll duplicate that, name the variable Fahrenheit. And target the input with
the ID of Fahrenheit. Then below that, I
will say Celsius, dot add Event Listener. And I want you to think
a little bit here, everyone, about the event
that we should listen to. Up until now, we've
only dealt with click events on
specific buttons, but now we have no
buttons on our example. We actually want to listen to the change of the
input value here. So each time we change the
value inside that input, we want to detect that and tell JavaScript to take some
action in response, which is, of course,
taking the new value and converting it to
Fahrenheit to display it. And we will see how to
do that in a second. But now back to the
event that we should use in order to detect
the change in the input, and that event is
simply named input. So I will add input here. Then I will add our callback
function that should execute whenever the
input value changes. And for now, let's just try
some simple action in order for us to understand how
the input event works. I will just say console dot log, and I will print
input value changed. Then I'll go and see the console and watch what we get in the console when changing the value of
the Celsius input. You can see each time
I change the value, this phrase here is printed, and you can know that
from the number on the left here. All right. Now let's remove this line. And now, each time we enter a
value in the Celsius input, we want to take this value, multiply it by 9/5, and then add 32 to the result. So I will go here and say Celsius dot value to grab the value inside
the Celsius input. Then times 9/5 plus 32. By doing that, it's
converted to Fahrenheit. So now it's time to display
it in the Fahrenheit input. We can do that by saying that Fahrenheit dot value is
equal to all of that. And now when I go and try
to add a Celsius value, you can see it's converted
to Fahrenheit and displayed. And each time we change
the Celsius value, the Fahrenheit value
also gets updated. Let's try to add negative
12 here as a Celsius value. You can see we got ten and all of these numbers to the
right of the decimal point. But this doesn't
look nice at all. Instead, we want to display only two numbers after
the decimal point, and we can do that using
the two fixed method. I will go here and
add two fixed, and that excepts the number of digits that we want to add. So I will add two. And now, when I go back and
try negative 12, again, you can see it's now
displaying 10.40, and all the other
digits were erased. Amazing, everyone. Now,
let's try something else. Let's just remove
this value here. You can see we have 32
on the Fahrenheit side, even though we have no
value on the Celsius side. And 32 here actually is
equivalent to 0 Celsius. So if I add zero here, you can see it doesn't change. Now, when the Celsius
input is empty, we want the Fahrenheit
to be empty as well, and we can do that really
easily in Javascript. I will go here and say, I exclamation point
Celsius dot value. And that exclamation
point just means not. So it denies whatever
comes after it. So this code basically means if there's no value for
the Celsius input, this happens when it's empty. Okay, inside that we'll
add Fahrenheit dot value, and set that equal
to empty strings. And now, when I go back
and try any value, then remove it, you can see the Fahrenheit value
is also removed. And with that, everyone, we have finished the first
half of the project. The good news is there's
nothing new on the second half. We can just copy that code. Paste it here and start
to tweak some things. I will change Celsius
here to Fahrenheit. I will also change it here. Then remove this formula and add the formula for
converting Fahrenheit to Celsius. I will add Fahrenheit
value -32 times 5/9. Then I will add two
fixed, two as well. I will also change
Celsius here to Fahrenheit and Fahrenheit
here to Celsius. So when the Fahrenheit
has no value, the Celsius input will
be empty as well. And now, when I go and add any value in the
Fahrenheit input, you can see it's converted to Celsius and displayed here
in the Celsius input. And with that, everyone,
our app is finished, but I want to add a
small thing here. When loading the page, we want the Celsius input
to be focused on. So I will go here and say
window dot add Event Listener. Load. So this event triggers
when the page is reloaded. Then I'll add a
callback function. And inside it, I will
say Celsius dot focus. And now you can see each
time I reload the page, the Celsius input is what
is focused. And this is it. For the lesson, everyone. I hope you like this project and learn something from it
that you can use in any projects you may
do in the future. And I will see you
in the next one.
 Ahmed Sadek, full stack web developer, freelancer & t