Transcripts
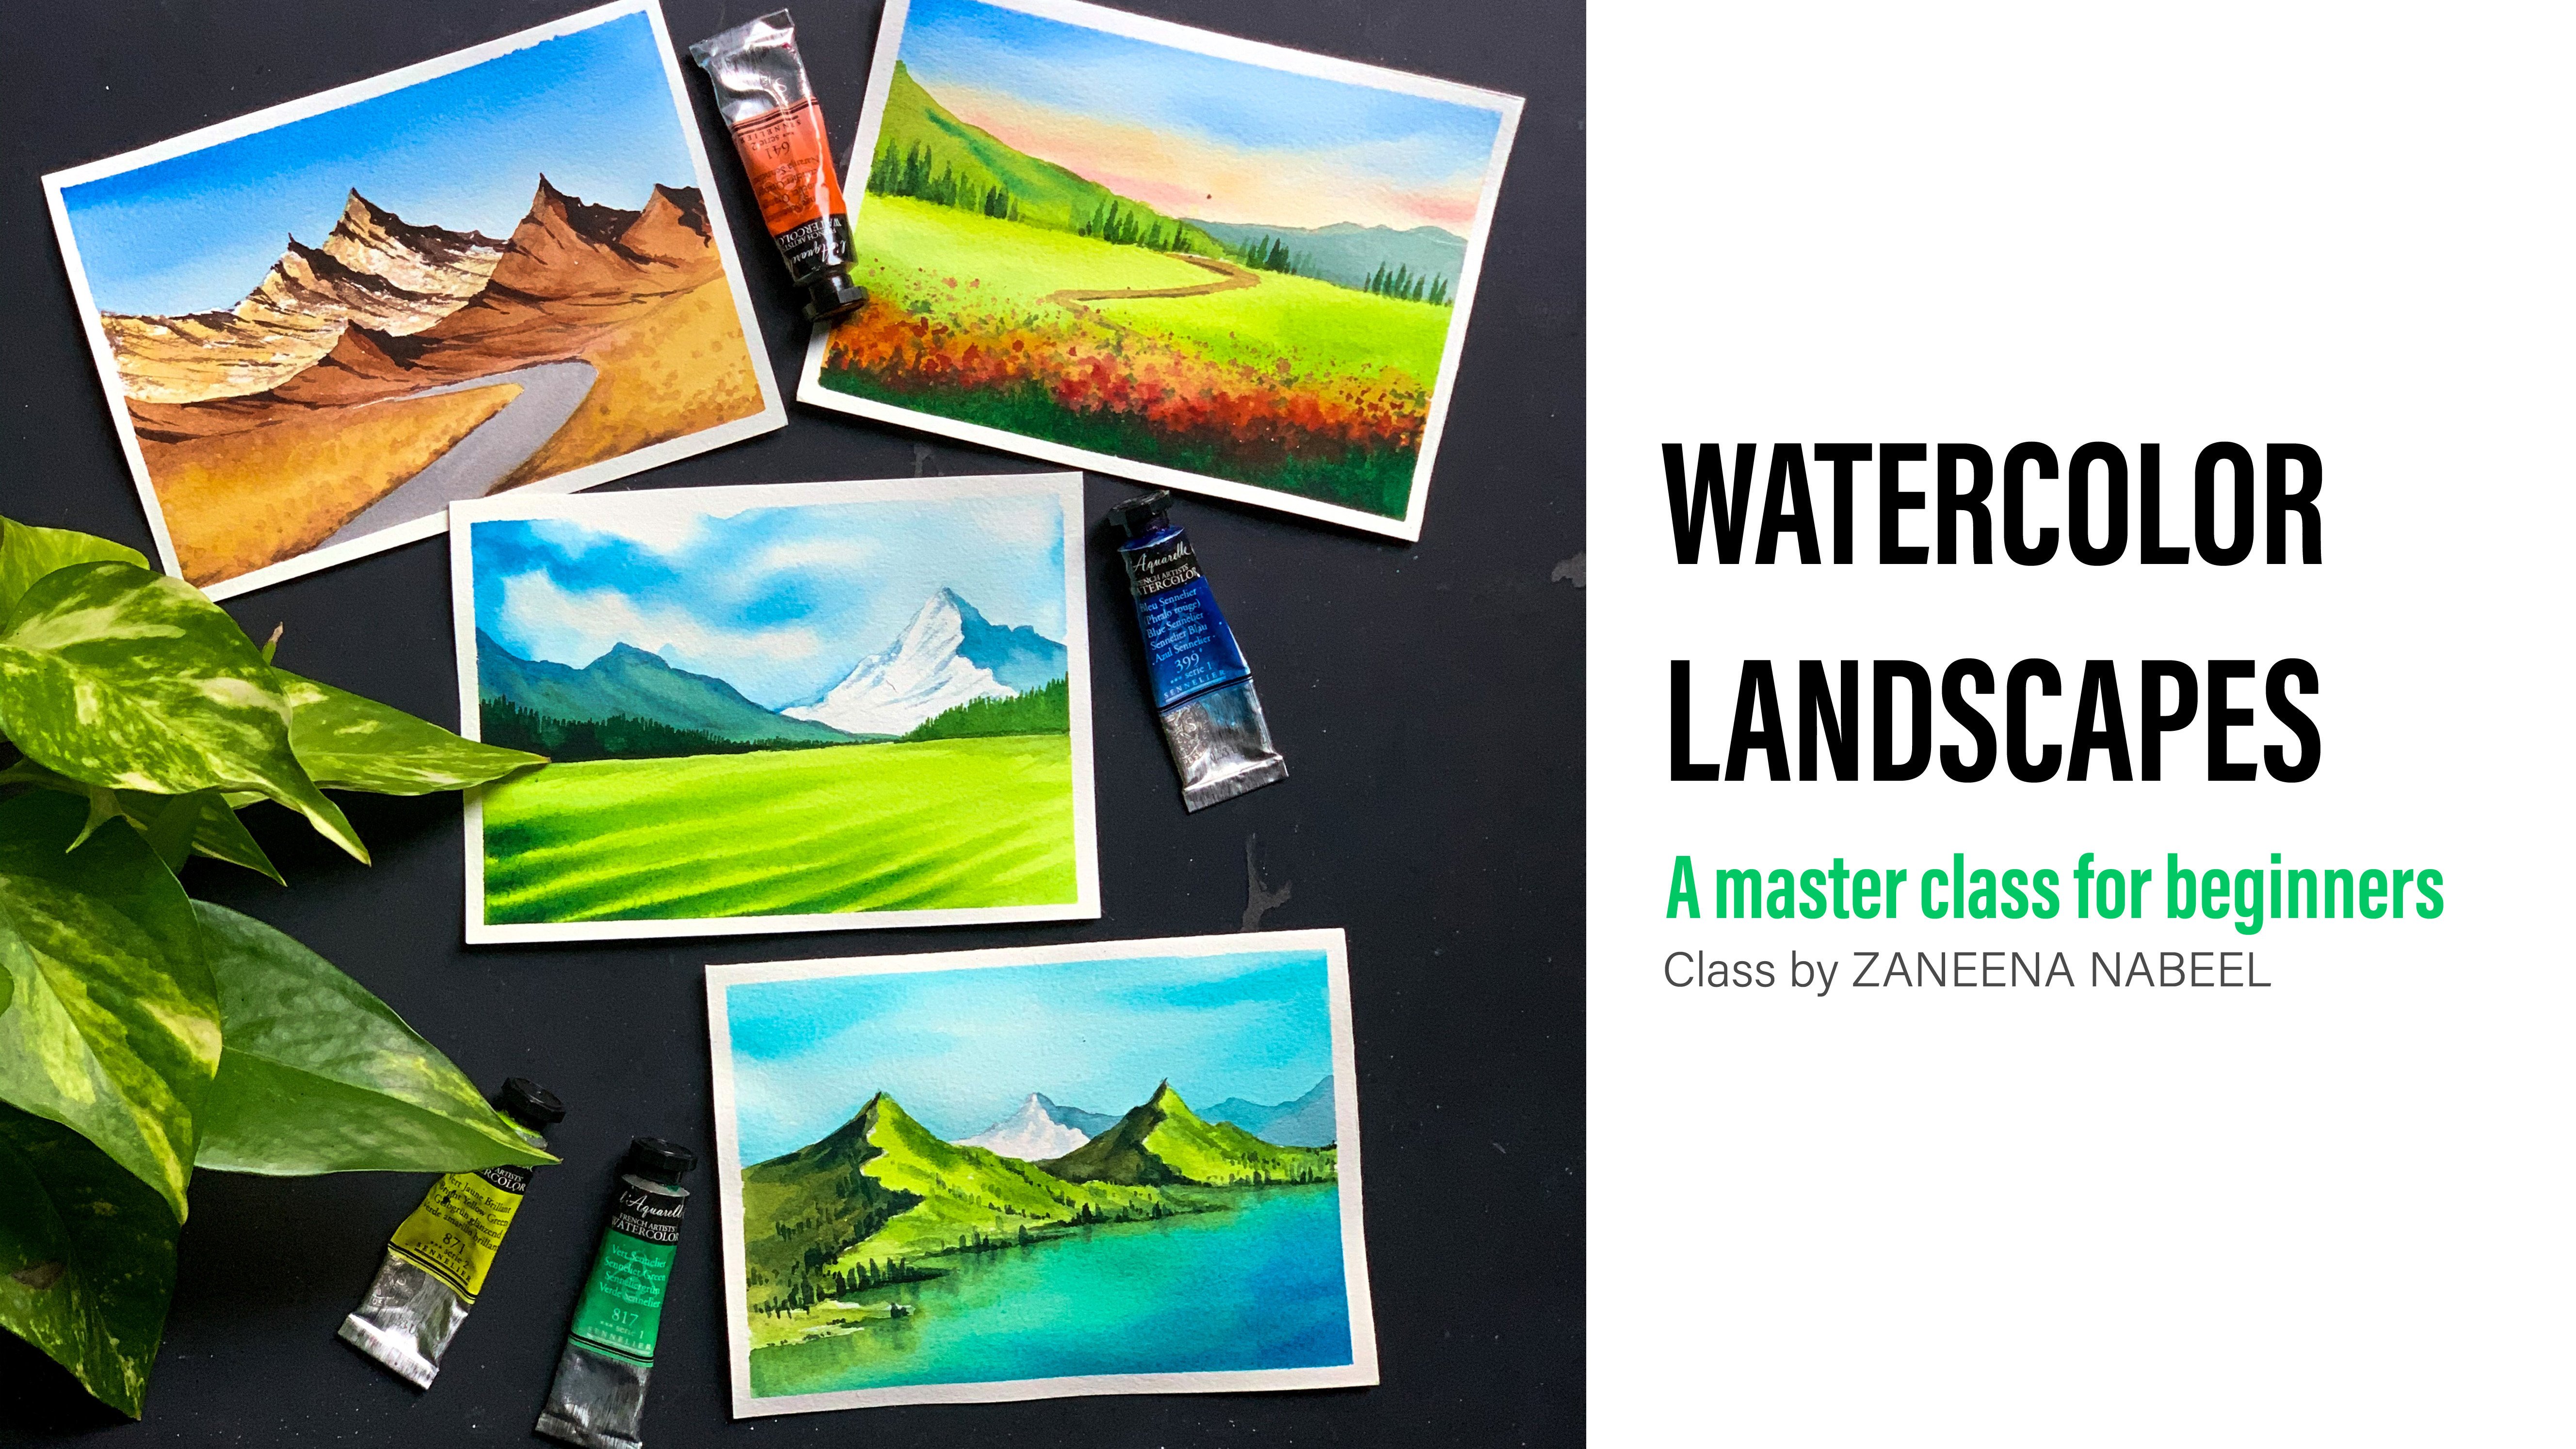
1. Hello & Welcome back!: what color is one of the most versatile medium, which has been around since the 18th century. You will be able to create beautiful effects just by changing the amount of water you use. It is an unpredictable medium on for the same reason most of the people who are starting out with Water Girl consider using word killer to be a difficult task. But that's not true all only to do to master watercolor as respecting the medium on letting go off all the control that you have on the medium and allowing it to perform in its natural weight. If approach watercolor by understanding and respecting its qualities, there is no other medium which you can in charge of list. Hello, everyone. My field onion and a green, an artist in structure and an absolute arc enthusiast I create out for my living I create are when I am bored when I'm happy and when I have nothing else to do, creating artist part of my everyday life or I would say, creating artists part of me. Creativity is a human quality, that excess and every single one off us. It could be expressed in different breeze, the way I express my creativity is through art allow how fascinated untilled I get when I challenged myself to pain, something out of my comfort, too. I love to push my boundaries and I allowed to explore different possibilities. Not all of them work out. Sometimes I still feel after multiple attempts, but my love for the medium watercolor and my enthusiasm to take up challenges remains the same. I'm so portal to invite you to join me on our journey for 30 days. Challenge yourself to create an artwork for the next 30 days. Starting from today, it's gonna be a 30 minute watercolor workout. Every day. Every day we will be exploring different subjects. Different techniques on by end of the day will be creating a beautiful painting. I have already planned 30 days. Considering an absolute beginner, we will start off by simple subjects and simple techniques on gradually from a single progress jewelry, more difficult and complex subjects. The first set of paintings will be based on grade inversions. This will help you master the planting technique. Knowing how to create a perfect blend in particular will help you in many ways, right from learning to hold your brush properly. Toe. Understand the amount of water you need. You will learn a lot of things from the blending technique. I don't want to kill the curiosity. If you join me, you will get to know the rest of the subjects will be exploring in the coming 30 days. So if you are looking forward to level up your watercolor skills, join me for a 30 minute water. Colombo called for the next 30 days on Let's discover the Master Arkestra New.
2. Before we begin!: I am a mom. Ah, homemaker and an artist I perform multiple. Do this today, right from taking care of my little ones, doing the dishes, laundry and every single thing which makes the house the whole. For me, it is much needed to spend some creative time to satisfy my inner self. No matter how bc My dais, I make sure to spend at least 30 minutes a day doing some creative task. It is not always painting some time. I spend time decorating our home and rearranging paints are maybe a D I Y project. Spending a little creative time makes me come and combo throughout today. I believe it is very important for everyone to invest a little time doing some creative tasks. Maybe 10 minutes is all you should invest. It is this thought made me come up with a 30 day particular challenge. All of the paintings take somewhere between 20 to 30 minutes. If you are someone who gets free time everyday, chime me for this 30 minutes. Vertical A book out. If you're someone who's working on never find any free time on a everyday places, you could take the class on your P's. Maybe you could do one painting today and maybe you can take a break awful a few days or a week on. Do the next painting later. It's totally up to you. I want you to take up the challenge back to your place, nor the pace which I have said here. Now I won't discuss a few little things which may have a huge impact. It will be a great idea to go with similar sized paper for all your 30 day paintings. This way, By the end of 30 you will have a nice collection off similar sized paintings which you will be proud off. It is a great idea to go with the sketchbook Castell display. You have a collection off your paintings and a sketchbook compiled together. This will be a diary off your 30 day project. So you can either go with similar size to be self paper or a sketchbook. This choice is up to you. I would suggest you to go with our size off a five to a maximum. As we're going with very minimum details. It will look beautiful than the size of the papers. More now, if you're fooling your instagram for a while now, you will know I had a masterclass on watercolor landscapes where we had done this extensive exercise on mountains. We tried different type of mountains. We tried snowy mountains. We tried mountains off green tone on. Then we tried. Mountain sells brown tone asphalt. If you are new here, or if you haven't tried my master class in particular landscapes, I would suggest if you have little time, go back and check out Just exercise section. These X ices will make you a lot more confident with particular landscapes. On also will help a lot as the progress. Next, I want to talk about having the importance. Often organized watercolor palette. This is my ballot, which I use for watercolor landscapes. Mostly, it has all the colors, which I normally use. I just refill the colors whenever they get empty. I go with the same organization on, although for my colors on Venable, my mixing area gets dirty. I just cleaned bad using a clean cloth. I just did my cloth in a little of water onto by for photo pain, which I have on the mixing media. Every time I started the new painting. I make sure I clean my palette, so I have my close already in there and I just clean the mixing media on. Make it ready for the new painting. You could say I have arranged all the blues and the greens at the bottom on. I have my pillow and the rate Brown's at the top line. Having an organized particular palate will make your painting experience a lot more easier on my planet is ready for our 30 day watercolor challenge. Using a cart and rode is always better than a people trouble. It is just that you need a little more effort to wash it every time. But we can be little responsible towards several Earth and switch to cotton cloth from people travel. You could see how beautiful this piece of clothes looking. It looks like a nice dyed fabric on. Dad goes for washing. Now the last thing I want to talk about, it's about the importance of having a scrap is off people when you paint. This may sound very silly, but then it is very important to test out your clothes on. A scrap is off people before you apply that on your main sheet. This way, you will be quite sure that the color that you're going to apply on your main painting is perfect on will be making any mistake all you need. A few tiny bits and pieces of people are right now without anymore do Let's get on to over 30 day with collections.
3. Materials you'll need: Let's have a look at the material super lead to follow my class. As I always mention, it was absolutely okay. Not have the exact same material that I'm using here. Join me with water where you have don't stress out the Lord on having the same brand in the same material. I will be giving you Artemis shades if you don't have the same one that I'm using here. Let's talk about the water club people first. To me, the most important part of any watercolor projectors having the right kind of paper. The one I will be using for this class. A skansen heritage Cold press particle of paper which is born 40 l b and it is 100% Corton asphalt will be working with multiple layers, so it is best to have off 1 40 l b paper, but it's 100 person carton on for landscapes. I always prefer a cool press paper. So if haven't art is great. Watercolor paper pitches school pressed great. Otherwise joining me with water for people. You have just take it as a learning experience. But always remember if you could invest in a good quality watercolor people that will have a huge impact on your painting. You will certainly see a wonderful difference on you will realize for the good quality people can duty. A watercolor paintings on This is the kind of texture of my people has caught. It works perfect for watercolor landscapes the size of the people I will be using for a particular challenges. 18 by 13 centimeter. I will be using the same size for all level projects. My people Paris 26 Enemy toe by 36 centimeter Isis Combatant to full equal pieces on. That is how I caught the size you can go with any size that you perform. It would be great if you could go with similar sized people for all your 30 days, so that by end of the 30 days you will have a nice collection off similar sized paintings. It is just a sedition. It's totaling up to you. Now let's talk about the brushes. The first pressure will need as a wash Brush the soon. Hear this Princeton, A light wash British, which is 1.5 inch. If you don't have wash brush, you can use any off your bigger size flat brush or even around fresh. This is to apply and even called the water onto the entire paper, so any off your bigger size to brush would work. If you don't have a wash fresh, the next fresh we will need as a medium sized flat brush the soonest again. From Princeton Allied series, it is a three by four inch flat brush. This is to apply all those even rushes the next gray. She will need a surround crunch mrs Again from Princeton Delight cities at a size number eight. You can use any off your medium size round brush on. Finally, you will need a detailing pressure to society's number two. This is to add all those tiny details on those are the full British suitable need. Now, talking about the watercolor, I will be using a variety of colors from Brady's brands. You can use your watercolor pans or your particular tubes. It doesn't really matter. I will be explaining each and every shade while we paint at the beginning off every painting, I will be putting up the colors you will need for each of them. Now, if you want to know how I created my watercolor pilot you could check out my class on particular landscapes. Monster class. There I have explained the section on how I created my watercolor palette. I have explained each and every color I have on my palette in that section, so if you want to know more, you can check out that section. As my colors are already on a pallet. I will be using the same one for mixing. So if you are squeezing out your paint freshly, you will need a mixing palette. There will be some places where I will be adding by to detail. So for that I will be using a white water color. You could use Whitewater color or wide quash. Now we will have to our little sketches. So we will need a pencil andan. You're a so you will also need a masking tape to fix your people on. Do you will need two jars of water. One has to stay clean on the other one. A servants off the pain from your brush. If you're only having one jar of water, you will have to keep changing your water in between whenever it gets dirty. Andi, you would also need a people travel or according plot to remove the excess amount of water from your brush. Last but not least, you will need a boat to fix a paper onto. You can use our writing, poured a magazine or a piece of cardboard, anything that you can fix your paper onto. This way, you have the freedom to keep moving your people around. You can till 10 tone and create beautiful results. This will make your whole painting experience much easier on. That's all about the materials you will need. Go grab all the materials enjoying me in the next section. Let's together start over 30 day were tickle a journey.
4. Day 1/30: Hello, everyone. Let's start the first projector for 30 day we particular challenge. The first predict I have chosen for you all as a very simple yet beautiful landscape. Here are the colors we will need to follow along if you are going with the same color competition which I'm trying kill for the sky I'm using crimson That is the only single color you will need to paint the sky on for the mountains are making my own violet where I will be mixing crimson on bright blue. If you don't have bright blue, you could use Prussian blue or any other blow to create your violet are if you have a while it in your palate. You can really use that without creating one. All right, let's begin with our first landscape. So I have my piece of paper and a bold here. Now I'm gonna fix the paper onto the board. You think I'm asking tape? This is a very basic stationary bought masking tape. You can use any of the masking debut normally use. We just need to fix the paper onto the base properly. Without any caps, we'll be working with multiple layers of water so to get a clean edge and also to prevent your people from buckling, it is very important to fix your paper formally onto a base. Once you have applied the tape, just run your fingers across three or four times to make sure there's no gaps in between. Let me quickly fix the masking tape. All right, so there is my people fixed formally onto aboard. Now I'll be starting by applying a quart of water onto the entire paper, and for that I'm using my Princeton a light wash brush. This is a 1.5 inch thick wash. First, you can use any off your because sized flat brush, so don't worry. If you don't have a wash brush, you can use any off your bigger size, round or flat brush. We just need a cling and even called the water on the entire paper. So which will brush works fine for you. You can use that on when you're applying the water on your paper. Make sure the court of Waters, even if you feel like their sports of water in between, just run your Bresch few times across the paper on to make it even now to apply the paint. I'm using my three by four inch flat brush by Princeton Allied cities. You can use any off your flat brush. We need a medium sized flat brush for this exercise on the shade. Amusing screams. And I guess it's a very common color, and you all will have that new palette. I'm diluting the color by adding a little water. I need a light own off crimson on. I'm gonna apply that onto the entire paper so you could see here. I'm taking my brush in a back and forth movement and horizontal manner. I'm not adding any other kind of strokes. I'm just taking my brush back and forth and holds on the way. We just need to get an even coat off crimson onto the entire paper. We'll start with a lighter tool on will slowly start building the color. If you're working on a bigger scale, it is good to prepare your pain in advance. Otherwise he won't get the same shape. Twat. If you prepare your painting different batches, the tour may differ. So depending on the size of the paper that you're working with, please remember to make your painting and hands. Now on to the top. I'm gonna add a bit more, doc adorn of crimson over the bottom. I will be leaving the shade. Acid is just onto a top. I will build the color on to make it more intense. Now would be the same exercise. Take your brush in a horizontal manner, added Iacobelli. On the top on Leave the culo acid is as you come down. We don't need to make it dark at the bottom as the background is completely. Bet it was easy to blend the color. You could also do the same thing together. Maybe you can start with the doctor June 1st and then dilute the color on. Make it lighter as you come down. Ah, you can follow the technique that I used Your start with a clean, even coat first. Then slowly start building your color, which will be the way we just need a Grady into one off crimson dark on the top on light. As you progress to home, you can follow any technique that you normally use Now, when you're painting and grading wash, it is always good to start either from top to bottom or from bottom to top. If you start from the middle or any other 80 on, you won't get a clean and smooth bland. So it's always good to go in an order either from top to bottom are from bottom to the top . That way your plant will be very smooth. And even I think I kind of God O Grady and right I'm going to stop it there. Now I'm gonna bait for this to dry and after that we will be adding mountains at the bottom . If you want to make your color more intense, go ahead and add another layer on the top. Now, if you have taken my watercolor landscapes, masterclass the mountains are going to be very easy for you. We have done an extensive exercise on different type of mountains. If you have some time, I would really recommend to go back to my particular landscape masterclass on Do the exercise of mountain. This will make her overall experience throughout the class. Very simple. So our background has beautifully dried. You can see the nice creating we have got there. Now I'm gonna try something similar to this mountain now to play in the mountain. I'm switching to around fresh the society's number eight trump brush by Princeton I'll be using while atone for the mountain. I'm creating my own violent by mixing a little of blow to the crimson I have there on my palette. Amusing Brian Blue. You can use any blue and create your own Violet if you have already made to you before I let you could use that. Also, you don't really need to make a violet. I'm going with a more off a reddish violet. This is the color I'm gonna use for the mountain. Now I'm gonna create a rough shape off mountain, and I'm gonna entirely feel that with this color I made so we'll have this mountain in a lighter tone in the background on later will be adding another mountain in the foreground, which will be a bit more Darko than this one. So at the shape off your mountain, first on Philip, that entire shape on this color, we just needed even wash off the color being made here. You can take it entirely to the other end just for a little. Yeah, on That's my first mountain. Now, once the strives will add the taco tones to add the doctor to. I'm going, Ah, one dawn, brighter than the color we used in the background. I'm mixing a little more off crimson and blue to make the color a bit more darker. That's try out the she'd be made. It's the same color it is just that I'm going with a bit more brighter, too. I'm not adding too much of water, So this will be the color that I'm gonna use for the Darko tunes. So what will be the shame that you used for the background? You need to go with one tone brighter than that. We'll be using the same violent for the second mountain, which will be painting the food crown for the background wash will be using the same color . So I'm making a little off extra close with hats I could use to try to even be a painting the second mountain. All right, I have the colored ready. Now, the first step you need to do us from that tip off the mountain, you need to add an irregular nine on on the right side of that line will be adding the taco tones onto the left side will be adding some random lines with the same culo. So you can see how I'm feeling up the right side of the mountain. Ardent Utica lying like this, starting from the tip off the mountain. Now, Philip, that patch we created here so you can try the same mountain in different colors. It will be the same technique you have to follow for the base layer. Go with the lighter tune on toe. Are the taco tones go with one tone brighter than the base color. No matter which color you're going with, you could use the same technique to paint Ecologist mountains. I'm just cleaning up the shape of the mountain. Now on to the left side. We're going to add some random lines to give it more textures. You could see how I did that. Here, to some random lines, you just need to add very few off them. This will make the mountain look more realistic. Now, whenever you're painting with different tones of a single color, it is a great idea to try out the colors on a sample piece for people so that you know how your tones are looking. You shouldn't be going with a much darker tone. You can see the two when I'm using Q. Now, once this dries, this will look even more like toe. So when you try this on a sample piece of paper, you will already know how we're tones for look once it is dried. That is why I try the tunes on a sketchbook earlier just to make sure the color that I will be using us. Perfect. Now using the same color, I'm gonna paint the mountain in the foreground. This will cover apart off the mountain in the foreground. And that is why I didn't add a lot of lighter tones onto the left side because this will take up more than half off the space. You could see the darko tones we applied for. The mountain in the background is kind of drying on. The color is looking much lighter. Now it will be the same with the mountain we are painting now. Once the strives, it will also look a little lighter so you can decide on what kind of color you need for your mountain. If you only amounting to look more pride to when it dries. You need to go with a much more taco tune. And this is why it is important to try. Oh, color on a scrap is off people so that you're quite sure the kind of colors you will get once the painting dry says what you need. I'm giving my brush in a little water and I'm gonna Philip that remaining part of the mountain Now, once this tries, we will add the darker tones. All right, let's wait for that to dry. Everything has perfectly dried now. Well attired the dark atones for the mountain in the foreground. They're going with the same technique we used for the one in the background. We need to make a one tone brighter while it than what we have in the background. So I'm gonna mix my bright blue and crimson to make a brighter tone of why let if you're using a while in which you have already it is the same thing you need to do, which will be the color used for your background. Just reduce the amount of water and go with a brighter tone to arrow Dakotans. Let's try of the color we made this looks a lot. Try to. I think I need to add a little water on to make it a little lighter. Want to have your color? Already? It is the same exercise that we're going to follow from the tip of the mountain. We've allowed an irregular line on. Then we'll Philip that patch on the right side in that Colombia made. So if you did this Darko pat on the right side of the mountain in the background, you need to fool the same for everyone and that you're painting. This means the light is hitting on your left side. Very have the lighter tunes on. You have your shadows on the right side, very hapless light. So no matter how Maney mountains your painting, whether you're going with three or four, you have to be consistent. The DACA don's you're adding should be on the same side for all the mountains. This is a very simple way off. Painting a mountain. Want to have that irregular line in the middle? You just need to fill up that bat you created on the right side where you have all your taco tunes on. Then we'll add the lighter tones on your left side. This could easily give you a nice mountain I'm gonna change the shape of. But I'm going to take it a little towards the left side so that it will look slightly different from the one I have in the background. Now, I've allowed those lines onto the left side. Just few random lines. You don't need to add a lot of light of tones. Oh, right. I have my foreground. Moment was already here s a closer look. I'm quite happy with those two mountains. Now I'm gonna add some boards onto the sky, the skies looking quite plain. Now, once we add the boards, it will look more interesting. So I'm gonna add a group of boards to add the board's I'm switching to a smaller size brush . This a size number two round brush. I will quickly show you how you can paint boards. You start by an inclined line, then you add another line towards the opposite direction. So this is one time now we'll try something very similar. You add an incline line on at another inclined line towards the opposite direction. So this time the wing salary move wide. Oh, it is little more open now. Just by the same technique, changing the gap between the wings, making it closer and making a divider, you can add a variety of boots. Now we'll try another one. I added two lines. Then I added, Oh, dark in the middle, which will represent the body of the board. Now, in a similar way, I'm gonna add a group of boards onto a was sky. You can choose beautiful, kind of bored to one. Add on variable you wanna add? Just try out these boards on us. Crap is off people a few times. If you're not confident, I'm going to kid conference. Add them onto your sky. I forgot to mention I'm using pains. Great to add the boards. Make sure to use a detailing brush or any off your smaller size. Pressure, which has a nice tip we need were written on delicate lines. Now, when you're adding the boats, make sure some of them are a very tiny on. The lines are very thin on light. This will give a sense of distance to your painting. I think the boat excites is quite clear. I'll quickly add fuel, more boots I added some teeny tiny boots to create that sense of distance. When I think I'm done with her birds, there are quite a lot of but on the sky. I'm really happy with the way our painting is looking on. I think there is a bold missing on the sky. When I started off, I was not relating into at the moon. But now when I see the boots and the greedy in sky, I think it would look more nice if I Adam one and I'm losing my way toward a clear here. I'm not using wash. If you have guards, you could use that, as I said in the material section. So wherever I need to add any white details, I will be using whitewater glow around the class you need to go and a tickle consistency just to make it look opaque. You should be adding burial to water on go in a pickle manner. You can see even the white water color looks quiet. A big it is just because I didn't add a lot of water, I went in with a thicker consistency. This is how you can use your white water color in sort of a wide quash if you don't have one. If you have one, feel free to use tat. No problem. Now we'll hear. I think I've allowed a little more taco tunes as the lions, which I have added, faded when it dried. I just make it a bit more bride to. It is not really visible, and that is why I'm adding these lines right now. If you also is looking perfect, you don't need to go one more round. You can leave it there all right, but that we are done with double painting. I'm really, really happy with the way this oneness looking very happy with the radiant sky. Andi the mountains. Now let's quickly remove the masking tape. When you're removing your masking tape, always remove it at an ankle on. The first thing is, you have to wait for your painting to dry completely. Otherwise, the people can rip off along with the masking T. You can also use a blow trial. This will losing the glue off your masking tape on to make it easy. Wild removing on disassemble painting. I hope you all enjoyed our first day. Give it a try either with the same colors. Are any off your other favorite color combinations? Thank you for joining today. I'll see you tomorrow with another exciting predict.
5. Day 2/30: I hope all off, you're doing well. They are on the day to off over 30 Watercolor challenge. Today we're gonna try a simple Grady in night sky. You believe a violent sheet. I will be using permanent twilight for the sky and the water on for the mountain onto our those pine trees. I will be using paint scree. You could go with black, also on display to the stars. You will need either white, water colored or white wash. Let's start with the bow painting. I have fixed my paper onto aboard using a masking tape. As I mentioned a little. Make sure there is no caps in between. Your people should be formally fixed onto the base without any cap. As we're trying a bit on technique, this is very important to get a clean edge and also to prevent your people from buckling. Now, for the first painting, we did a Grady in wash off single Calo. We used to crimson. We went in with the light one off crimson first and then we started adding Doc Oto onto the top on. We made it more Indians just on the top and left the bottom accidents we've ended with two layers. We started off with the light on on then event on top of that with the Darko tune. Now for the painting they're doing, we're again going with the great unwashed of single color. But this time we'll go with the darker tone first, and we'll dilute the color by adding water on Bring it to a lighter toe the color that I'm gonna use this permanent violet this oneness from the brand PWC. You can use any violet or any other ship off your choice. You can also make your own violet by mixing any red and blue the colors. Absolutely. Your choice was a very vibrant and pretty while it I really love this color. Let's start with a pencil sketch first. I'm gonna add a line somewhere at three. Food off the paper. Now I'm adding fuel mountains on the top. I'm starting with the taller and and reducing the height as I reached the middle on doing the same thing on the other side. No, I'm adding the ground bod. This will be covered in snow. I've allowed a similar patch on the right side as full on that several skitch Now let's start with the whole painting. I'm using my Princeton light wash Fresh on. I'm gonna apply and even goto water onto the sky and the lake. I have my jar of water here. A player clean, even coat of water just onto the sky onto the league. Don't add water onto the land and the mountain. All right, so we have a plan in even called a water. Now I'm switching to my flat brush. This is a three by four inch flat brush. It's the same brush I was using earlier. I have already taken permanent Violet here. I'm going with a darker tone. First ongoing. Apply that on the top part. Now, as I come down, I will be making the color lighter, going with a very intense color on the top. I'm cleaning my brush. Washington talks in the water on making the color lighter. As I come down Now, I will be doing the opposite thing onto the water. On the top, I will be having a lighter tone on. As I come down, I will be having a darko tomb. It will be a mirror image of the sky, so you'll have a lighter tone on the top on darker tone at the bottom. Just take your brushing back and forth movement in horizontal lines on. Give it a small to blend. Now let's quickly apply a light or violet onto the entire water on slowly will start building. The color will make it intense at the bottom building. Careful than you are, adding paint onto the water, especially when you're applying paint onto these lines. We'll be going with a spoonful ground, so we want that to be white. We don't need any color onto that, so be a little careful. Now. I'm going with an Indian stone off while it and adding that on to the bottom, I'm trying to blend the lighter and the darko tunes. I like the calamity, more Indians just to the top line on the bottom line because we know what Tikolo tends to fade a little after it tries. I want the color to stay bright and my brand. That's why I'm gonna go with a bit more bright or tour. Now I'm again blending these color. If you're happy with the tune you have got, there can leave a tacit ER's I'll quickly clean my brush and try to blend it before the background tries. So you might have noticed. I'm doing this exercise for over three minutes now. Andi, I'm still able to blend the colors, my background, the still bet. One of the main reason is that my papers 100% quarter on it stays with for quite long time , and that's why I'm able to blend it quite easily. If you are not using 100% courting vertical of people, the water mind dries up very quickly, and you might to find it a little difficult to blend the colors. So, depending on the kind of people that are using, make your exercise faster. If it's drying up, apply you grading wash very quickly. So this is, however, sky and the water is looking. I'm quite happy with the blend. Now. I'll wait for this to drive, all right, so everything has beautifully tried and you can see the color has faded a bit. It is not looking acid in size. It was looking when the people was wet. So that's why I asked you to go with a brighter tone in the only wash it, sir, because when it dries, you will have a Don't lighter now I'm gonna go with white water color. I'm not using Wash your as most off. You may not have ID Kouachi. Now, if you have glasses when you start new problem. So here is one of my very old brush. I use this for just splattering. I have kept this for the splattering exercises. I don't want to spoil my good brushes. Now I'm adding a pinch of water onto the white water color. Andi, I'm wiping off that on a paper trouble to remove the excess water. I want teeny, tiny stars. I don't want them to be big splatters. And that is, by removed the excess pain from my brush. Now I'm tapping with my brush to create stars A little onto the water. Asper. Andi Quite a lot onto the sky or right. I think I got enough of stars. And they're now I'm gonna add fuel Bigger ones. You can also use your wife Children to do this. Just pick very random spots on add white dots. All right, so the stories car is done, I'll add fuel onto the water. Aspar here is a closer look and This is how our sky and the waters looking right now our next task is to pay in the mountains on the ground. I think I'll start with the ground. I'm switching to my from fresh societies Number eight round brush by Princeton Go with any off your medium sized from fresh. Now I'm going with a light tonal violet A very light tone. Now, using this color, I'm gonna add a few lines and strokes onto the ground just to replicate the snow. Are you need to do with after ranting lines using a light on a violet, we need the majority to be in paper, white on. We will be adding some Darko tunes on to this later. Now we just need a light in the violet something like what you see on the screen few random lines here and there. Now let's pain the mountain for the mountain. I'm going with pains, Gree. I'm feeling the bottom part in the solid color On the top I will be adding some snow. No, I'm gonna get my people toe. Andi, I'm dabbing my brush on the people will remove the excess water. Now I'm gonna add some dry strokes just under the top of the mountain to create a snowy effect. So having bare minimum water, Condon on your brush is the key to get a good dry strokes. So never forget to remove the excess water from your brush. Using a P. Put our So we got a little snow cover on the top of the mountain. In a similar way will be adding snow onto the mountain on the right side, Aspar. But then, for that they won't be adding a lot off Dakotan at the bottom. We will be making it an entirely snow covered mountain with some pine trees at the bottom. Now I'm gonna take this line across on made the other mountain. Now, when I'm taking this line across, I'm just adding some teeny tiny lying on the top so that it looks like there are a lot off trees. Just had some random lines. All of them can be off different heights. Hamilton can be told over, and some of them can be shorter. So it gives you a nice cluster of trees. I'll show you a closer look or what I'm doing. You can see the kind of lines I'm adding to some teeny tiny lines close to each other. If you're medium sized, Ron Bridge doesn't have a nice stuff. You could switch to a small sized fresh. It will look more beautiful than the lines are thin and delicate. So it is good to switch where detailing brush. If your brush doesn't have a good point Now let's pain the other mountain. I'm gonna again at some try strokes to that. I took paint on my brush and I'm grabbing my brush on a people travel on I removed the excess water. Now I'm just crashing my brush on the paper to create those. Try strokes. It is okay for dry strokes are looking messy. Just make sure the dry strokes are not going out off the shape off your mountain. Just limit those try strokes inside the shape we had drawn earlier. Now on to the bottom, I'm adding a line off pine trees. I will continue with the line where I had stopped from there. I'm gonna add some more lines on. In between, I will be adding shape of pine trees, so I don't know. I was just adding lines close to each other now in between, I will start to hard by interest successful. This is very far from you. So you don't need to focus a lot on the shape. Go with a very weak shape. We just need to see that little pop up on the top. The bottom will be covered in a solid dark color. I have allowed a solid line at the bottom onto the top. I've allowed shape off pine trees and little lines to create that forest. Kind of an effect. I'm starting to my detailing brush That's a size number two round brush. No, I'm gonna add those lines and shape off pine trees. I will be adding lines mostly somewhere in between have allowed some pine trees on. That also will be a very weak shape. I'm not going with the detail shape. Some of your lines could be Toller, and some of them could be shorter. This will make it look more realistic. Now, over to the other end. I'm gonna add a few pine trees. You will see the kind of shape that I'm adding que so so very weak. You don't need to put a lot of effort and adding this trees start by adding a line. Andi, I will simply take my brush in his exact motion on Add the foliage. We just need that shape on the tip off the tree. The rest off the bottom will be a solid color, so you don't need to focus on the bottom part. You just need to add that shape on the top. That's it. You can see how easily I created that shape. You can add these shapes in between. Come on, that one, Hugh, and we'll be under a sheep with us. Well, that's it. The next task is to add some dry strolls onto the snow cover. We haven't the Parton. I'm again going with pain screen. I'm using the same brush. I'm dabbing my brush on a people travel from all the excess water, so I have very less amount of water on my brush on. That is why I'm able to get us dry strokes easily. Now, I'm gonna do the same thing onto the other side as well. If you're doubtful about the paint only brush, it is always a good idea. Toe. Try it out on scraps of paper before you go with your main painting have a little more darko dry strokes Now just very little on to either side, You can see added, are a lot just few random strokes here and there. Now I'm going with a bold ozonoff pain scree and just adding some scruples and thoughts and little patterns very randomly. You shouldn't go overboard here just to fuel scruples. Andi, that's it. The next task is to add the reflection now, when we and the reflection, our main focus is going to be on the right side, where we have out of those pine trees and all those forestry, Edie A right below the mountain, onto the left side. We will just add a line right below that snow cover. Just a word. Ethan Line on. Starting from here, we will add the reflection off those trees. So whatever you have about that horizon line, we're trying to create a mirror image of that. You can add those lions close to each other, try to replicate what we have about the horizon line. You don't need to be 100 wasn't exact, but obviously there should be some similarity as this is a reflection. Keep adding glue. Staller and shorter lines close to each other, just like elevated about Andi Philip the entire line. This exercise is quite simple, but because the leaders are too small, it may take a while. This exercise needs quite a lot of patients. I'm already bored. We had some toner lions here so that the reflection looks little more interesting. Now we need to do the same thing on the right side. As for the right side, it will be a little more bigger details as we have some toiletries over there. I think we're done with the left side. Now I'll fill up this line with pain scream, but that we're done with the top line. Now we need to add the reflection on the right side. I'm going in a similar pattern, adding shorter Andi taller lines just like how I have them about now. Variable. I have added those pine trees. I will replicate that as well, So when a similar pattern, I will take this across to the other end. The beauty of the spending totally lies the reflection, so don't rush. You have to be very patient. Hill. It's a very simple exercise, as I mentioned earlier, but just because the details are quite small and we need to make it asking, perceived as possible, it may take a while. That's odd that solitary over here are a line first, then take abrasions. Exact motion to create the foliage. We have 23 smaller trees over here, so I will be adding the shape over the bottom line on the area, which is closer to the snow. I will be adding a solid color, very similar to how it it about. It is just that now we're adding the details in the opposite direction. Had those lines close to each other and add the point respectable, you have added them. Now quickly fill up the entire lying in a similar way on that we are done with our second days painting. It took a while, but it's really worth it. I'm really loving the glow in the sky and that reflection. So for Dave Anasco prevented with agrarian bush off a single tone, we went in with crimson. We added a layer off a lighter tone first, and then we slowly started adding dark. Oh, don't At the top for today s painting, we went in directly with the dark Odom first, and we slowly made the color light. Oh, as he came down by adding water. So to apply a great and wash off a single color, you can go. But either off these two ways. Either you could go with the lighter tone first and keep on building the color on the top. Or you can start with the dark Oto. Andi. Make it lighter as you progress. So whichever way fits for you. Who could use that in your future? Protects but for your painting to dry completely before your remote masking tape. Otherwise the people may come off. Aunt, Here's the finished painting I hope you all enjoyed day to give it to try, either with the same color, are with any other color off a choice.
6. Day 3/30: Today we are on the day tree off over 30 A particular challenge. It was a bit of challenge yesterday, but today we're going to paint a very simple painting here. Other colors you will lead for the sky. I will be going with a grating bush of too close. I'll be using pride Blue and turquoise blue. If you don't have bright blue, you could use crushing blow our any other blue Interrupt that for your sky for the ground I will be using yellow ocher as the base color on for the darker tones will be using yellow orange, one million trade and Mancina. Now for the barn in the background we need born Sina and four million trade on for the detail ing We will need pain Scree Also wide Croushore by two article I have fixed my paper already. I'm gonna add a line somewhere at the three food off the paper. So does this my horizon lying? Now I'm gonna add a small bond. I had a point a little above the horizon line from this point at the lines inclined lines on either side, the line should be symmetrical. Then add lines on either side and make it me the horizon Line on now at some doors and being does. It's a very simple sketch and this is on the sketch. We need another door over here on that set that the sketch. Make sure the two sides testing metric ill. All right, So without wasting any time, let's start with Hubble painting. I'm using bright blue for the sky. On this is the same fresh my Princeton light wash fresh three by four inch. You can use any off your medium sized wash brush on the two shades that I'm using us turquoise, blue and prime blue So this time we're gonna try a radiant sky off to close I'm gonna start by applying even called the water onto my sky I'm using my wash fresh It is okay. If you add water onto that bar, we'll be adding a taco toe onto that which will cover of the color of the sky. So don't worry about that. Now. I'm searching to my flat, fresh Andi, I'm gonna go with bright blue. You can you certainly in blue crushing blow or any other blew off your child's. It doesn't really need to be bright blue, just like the name sees. The color is very pride turned by print, and that is why I love this color, but you can use any other blue, as I said at the beginning, will be doing a Grady in wash of Too Close for the Sky. So I'm starting with bright blue. Andi, I will be taking the still somewhere in the middle on. Then I will switch to turquoise blue, so those are the two shades I'll be using for the sky. We'll be going with the bright tune off blue at the top on as we come down will be making the color lighter. Let me clean my brush now outfits to turquoise blue I'll be adding to your guys blue from where I stopped a bribe low on. I will mix those colors together on Make It a clean blend on. As I come down, I'll be making the color lighter. This is a very gorgeous color competition if you want to make your sky moon lighter. If you want to go with a pasted tone that thoughts of possible you could go with Cabal Crane, Campos blow our any other baster blue. Now I'm gonna clean my brush on. I'm gonna make the tune light over the horizon line. Now, don't worry about the bar. As I said, we'll be adding a more dark goto onto that which will cover of the color of the sky. So even if you add color on top of the barn, that it's absolutely OK, so feel free. Just take your brush. And now back and forth movement and horse under manner. Andi, get a clean blend of these two colors darker at the top on lighter at the bottom. Now I'm gonna make the tool a bit more brighter at the top. I'm going with all tried toe. Try blue and we can get more brighter so you can decide how Indians you want your Skype to be. I'm quite happy with the colors. I think I'll stop it there. I'm not gonna make it any more intense. I'll wait for that to dry, so we know watercolor tends to fade. A good actor tries up, So if you want to make it more brighter, do it before your background tries. You shouldn't be waiting for too long, otherwise they won't get a clean blend. You will have some strong Pattison between. So if you want to make your Skype righto, make use of the time. When the papers fret, Andi, add more layers on the top and make it more brighter. No, let that dry. Meanwhile, let's bring the bottom part. I'm going with the yellow Joker. You should be waiting for your sky to dry. I'm being a little impatient, so I'll be a little careful when I reach the horizon line. Um, but Lacey to read for my blow trial. But please wait for your sky to dry before you apply your Loker onto the border on applying and even good of your local to the entire bottom part. You can see there is nothing else. It's a cleaning, even Barshevsky. Loker. I am reaching the horizon line. I should be a little careful now. Otherwise the color been bleed into the sky and make it dirty. We're trying to create an abstract weed field at the border, so yellow joker is the best color for that on that goes well with the bribe through intercourse blow sky Aspar, and if you don't have your Loker, you can use your gamble, jello and makes a Tinto bones in. After that to get a similar sort of color, it will look 100% similar, but it will be kind of OK, Don't use lemon yellow or gambles. Yellow asset is now I'm going to switch to my size number eight round fresh. Andi, I'm gonna go with the color yellow orange again. If you don't have this color again, makes a little off one million Drive to your gambols Yellow on. Get a similar kind of shade. This is a yellowish orange. Now, using the shade, I'm gonna add some lines on the bed to background. If you have taken my watercolor landscapes Monster close, we have done our landscape using the same technique. I'm using the same technique you're So if you are somebody who watched my class earlier, this will be very you see for you use a light a toll on add inclined lines with a little off gap in between. It will look more beautiful if we can see that you know, poker in between those orange lines. So remember to live a little love gap in between. Many are these lines. These are just some freak on lines in an inclined manner. We don't need to put a lot of pressure. So all you need to do with start your lines from the left end, drag it in a free hand manner and leave it somewhere in the middle. You don't need to take the line entirely to the other end as the Bagram to spread the lines will start to blend into the background and create a beautiful effect. Again, make sure you leave a little gap in between. When you're adding these lines, you can see how I'm adding my lines. Now I'm going to repeat the same with a boulder orange. I'm using Vermillion Orange directly on with that color. I'm repeating the same process you can see. I made these lines in a free hand style without adding too much of pressure on. That's why my lines are looking so subtle. It's not looking too sharp. Now I'm gonna ask some more taco tones. We went into the base layer off Loker. Then we added a light orange lines, then be blended with vermillion orange and made it Ah, bit more brighter. Now I'm gonna go with Mancina on, and I'm going to repeat the same process. We just need the doctor tunes on the important part. We don't need a lot of Darko tones closer to the horizon line, because this is the part which is closer to you on this area needs to be talker to get that sense of distance. The idea closer to you should be darker on the 80 averages. Far from you, which is closer to the horizon line should remain lighter. This will make it feel like that horizon line is Do far from you also the bomb, so make sure you're adding the doctor turns only onto the bottom area. Repeat the same exercise of adding freehand lines. If you are too much of pressure, your lines will start to look very sharp. We need soft and certain lines, and that's why I asked you to go with freehand lines. Now repeat the same exercise under you. Happy with your Darko tunes? I'm kind of happy with my colors. I think I'll stop it there. On a while. I wait for the entire painting to try. I hope you guys are happy with the painting so far. I quickly used to blow trial on everything has beautifully dried. You can see the Colo's sister looking bride as I went in with the brighter tune when I applied the colors. It hasn't faded a lot. Now let's paint the barn for the barn. I'm going with a brownish orange. I'm gonna make swarming 100 bones enough to get a brownish orange. I'll add some bones, you know, toe that on. This is the kind of color that I'm gonna work with. Maybe I'll make it a bit more brownish. All right. Now, let's apply that color onto the entire bond. Now, if you want to speak to a smaller size brush, feel free to do that. Even though my brushes size number eight, it has a nice step, so it kind of works for me. Here's a closer look off the color will be using. It's a nice brownish orange kind of a more room. Now I'm gonna apply that color onto the anti Obama. You need to leave this windows and door. You shouldn't be adding paint onto that. We'll be adding a docket onto that later once the base layer dries. I was actually trying to something else. I wanted to do a little more complex subject. But then when I tried this for the first time, I really loud how simple and beautiful this competition on the subject. Everything was looking. So I thought, Why not? Let's begin with smaller subjects and slowly will advance toe complex subjects. You can say I'm leaving the windows by Applied to paint. The one on the top is fine. We'll be adding details onto that to using wide quash or Whitewater girl so you could fill up that. That's okay. I really loved the color of the barn against, though yellow ocher field and the blue sky. It is really standing out. This is several main focus subject, and it is really standing off from the rest of for painting. Here is a closer look up for painting so far. Now we need to apply some taco tunes, so I'm mixing paints. Great. The color we prepared to get a darker tone off ground. We just need a color which is one tone darko to the color be applied. Now I'm gonna apply that shade onto the top line just under the roof line just to replicate the shadows onto the other side. As for now, you can add fuel lines just to give it some textures. Just a few lines are enough. We need more off that color in the background. You shouldn't be covering up that when you add these darko tunes, it will make it look but rustic on old on Also, it will replicate the shadows. So this is how it is looking so far Now, using the same color, I'm going to fill up these doors. We need to live a little wide gap, and we're applying the color for these doors and windows, so it is better to switch to a detailing brush. I'm using my size number to brush from Princeton on. I'm taking the same color. If you don't have pains for you can also use black. We need a dark brown, which is very close to black, and using that color beyond going to fill up the doors and windows. Here, you might have noticed that little white paint on my palette, so that is not glass that is just white to particular. We need why gua sha Whitewater color in some time to add a few details on Toho Bond. So even if you don't have wide quash. It is fine. I'm using white water cooler here. Let's fix those doors and windows and we'll talk more about that. You can see him leaving a little white gap when I'm applying the color onto these door on. That is why I asked you to switch toward the healing brush with your media. More smaller size, British. This won't be possible now if you missed to leave this little white gap, that is fine. You can use wide watercolor or a wide Children and apply a white outline around the doors and windows that tall with the windows and doors. No, I'm sweating toe white world clover. Try to color are my palate and I'm taking that in a bit off pickle consistency. I'm not adding a lot of water. I wanted to look to a peak, so I'm going in a tickle manner now. Using that, I'm adding a roof line Now. If you have watched, you can go with that, as this is a big, differently class, I thought, meaning off. You may not have a white quash, so it is my duty to go with the majority. If you have white guards, feel free to use that you don't need to use your white water color. So for those people who are using white water color, you shouldn't be adding a lot of water. We need a thicker consistency to make it look more big. Oregon totally ditch white to article ran by Wash and go with the white champion. That also works perfect. And I have applied a white line over the rules. Now we need to draw that window we had here. Please use your detailing brush on at our squeal box like this, and then at a cross mark inside that, make sure the lines of Britain and Delegate you can book with the size number zero fresh so that your lines are very thin and that certain they're done with the bomb. Here is a closer look off our painting. I was actually planning to leave that horizon line Asset er's I didn't want to add anything , but then now I feel it looks little plane. So I'm continued to add a line off mountain. I'm going with a very light on off integral Andi. I will be adding a line off mountain over here, a very light tone. Just have some tiny mountains. Ask. This is quite far from you. You shouldn't be adding become mountains. You can go with a similar height. I will do the same on the other side. Asphalt. If you're happy with how your paintings looking right now, you don't need to add this. I kind of fell to just looking into a plane on that looks likely incomplete. Actually, I wasn't planning toe add this mountain over here. I was thinking to leave a Tacitus, but for some reason, I'm not happy with the way it was looking. So I thought I have a lot of line of counter. Andi certain. I think it looks better now. I don't know how you feel. Now, as the final step, I'm gonna add a few boats onto the sky. I'm going with pain screen on. I'm using my size number to brush. I will act toward three boats onto the sky. One here. You know, first painting. We already tried. How we can paint boards. Just start few boards You don't need to limited to three. You can add as many as you want. You can go with a group of boards. Like how we did another first painting, or you could just do with three like I'm doing. Q. It's all up to you. All right, I have are the tree boards and that's it. We're done with the whole painting. Let me quickly remove the masking tape. As I always mentioned, When you removing your masking tube, do without an ankle Andre for your painting to try completely. Otherwise he won't get our clean edge lighters. Feeling off the masking tape is one of the most satisfying part of any watercolor painting . It makes you feel great if you get a clean edge hand. It is frustrating and annoying. If you're just are not clean, so always wait for your painting to dry. You could use a blow dry Oh, on your masking tape so that it will loosen up the clue and you can easily remove the masking tape. And here is about finished painting. I'm quite happy with the way this one is looking. It looks so common beautiful. I hope you all enjoyed about a three as you tomorrow with another Cartas project
7. Day 4/30: Hello and welcome back. We are on the day for our 30 day watercolor challenge. Today we're going to paid a beautiful sense. It's guy on the colors you will need are yellow orange gambled yellow on one million dread for the sky Then Bonzi Now and Payne's gray or black for the mountain. So we started off the board ago challenge by exploring radiant sky using a single color We went in with crimson than we tried a greedy in sky off violet on Then we tried a great in sky news in two colors. Today we're gonna try a radiant sky Using three colors will be creating a very beautiful sense it So let's start. I'm keeping my jar of water aside on dime starting off by applying an even coat of water clean, even wash of water onto the entire people for the sky. As I mentioned earlier, I will be going with three colors. I will be using yellow orange, then gamble Jello Onda brighter turnover 1,000,000 dread on. I'm using my flat brush Now I'm gonna apply Ah, I'm starting with the yellow orange and I'm going to apply that on the top of the people. I'm going with the brighter tune now, using my flat brush, I'm going to apply this on the top. As you could see, I'm taking my brush and no horizontal manner. Now I just want to help the pain from my brush on. Now I'm switching to gamble Jello. If you don't have, you know orange Don't worry. You can mix a little of formally and drag to your gambles yellow and create a similar color . But before you apply the color on your people, please try it out on a scrap is off paper. Now I'm applying to gamble jlo next to the yellow orange and mixing those colors together to get a clean planned. Now going back to yellow orange Applying data, the boredom. I need a yellow in the middle. I'm not going to add a lot of orange over there, so I have orange at the top, yellow in the middle, that again I have orange at the bottom. Now I'm going with vermillion dread. I'm going to meet the color much more intense at the bottom. So addio woman Android Innocent! No way on! Try to blend the yellow, orange and the war 1,000,000 drug together on may get a clinging blend Wear Those colors are meeting I hope by now you all are confident with your clearly in bushes This time we went in the tree Calo starting with yellow, orange, yellow on a brighter orange at the bottom Mix all the colors really well on Try to get a clean blend Make sure not to are a lot of orange tones over the middle area where we have the yellow We want the yellow ass It is because we already have a lot of orange Don's at the top and the bottom Now I'm going to make the orange at the bottom a little more intense I'm going with a much more brighter tonal Formerly in trade Just at the bottom to make us guy letter Move I print now I'm gonna take a people toe You can see the way I have folded my people toe No, I'm just pressing that onto the people. My people were still a little wet. Andi, I'm gonna lift off the pain to using the paper. Travel in a circle shape to create the sun. Just press it against the people Now when you're doing this. Make sure your Papadopoulos not touching any of your friends. The technique we tried here, its car lifting technique and particular you could lift off the paint using a paper towel or even a damp brush. Now let's try that with a damn fresh. I have very little water container. My brush. It have a lot of water. The water can spread into your sky and create a messy bleed, so make sure there is no water on your brush. Now, if you're not confident enough to do this, you could go with your wide kwacha. Why? To articular on add the sun just like how did in the first exercise? So here is my setting sun. This is the shape by created using of people travel by the lifting technique. If you are not confident enough, don't do the lifting technique. You can just add your son using white water color or bike wash. I'm saying this just because I don't want you to spoil the beautiful sky You have created Aldouri. So add the son in a way you think is best for you. My sky has dried. Now I'm gonna go with the mountains, make sure your sky has completely dried before you go with the mountain, we're going to add a line of mountain over here. I'm using Bond Sina. I'm drawing the shape first. Now, once I'm reaching almost closer to the sun, I will stop adding the brown tour on I will switch to orange So when my mountain is reaching over most closer to the sun I'm gonna leave a calf in between on. Continue with the mountain with the other end. You can clearly see the gap I left in between. We'll be filling that gap with orange. The rest of the modern will be in brown. We're adding orange to create that glow where the sunlight is hitting, I think. Now. Well, switch to orange on. I will a little off orange over that gap we have left on Then Philip the remaining off the area and drowned. Go with four million dread on Applied over here using orange, connect both the mountains now makes your orange with brown on either side our mountains, already glowing blend the orange in to be brown which we have on either side on. Once we have done with that will switch back to brown on Philip, the entire mountain and brown tool. - So we have a nice brown mountain, but some orange glow? No. I'm going to add some more taco tones on to either side, just onto the outer ends and switching to pain. Scree. Um, adding that over here on in a similar way, I'll be adding that one to the right side Haskell on to make that blend into the background . This will make your mountain look more beautiful with orange glow the brown on the taco tones. Now let's wait for this to dry. Then we'll add another mountain in the foreground. All right, so everything has beautifully tried and the colors are looking very intends. They haven't faded a lot. Now I'm going with black particular, and we'll be adding the mountain in the foreground, losing black. I will take a pinch off black on my palette. If you are someone who don't use black, you can use Spain screen. Okay, so let's add the mountain before ground. We'll be going with the same steps we followed earlier. It was just that instead of Brown were using black. We will start with black on when I'm reaching the area closer to the sun. I will switch to an orange stone on again, go back to about Darko tone as a race to the other end. - So I have raised the area closer to the sun. Now I'm switching to a more off a brown ashore orange stone to replicate the glue. I will wash off my brush. Andi, I'm switching to a more awful brownish orange tomb and I'm going to apply that over here on . Once I have done that, I would switch back to Black on, Finished remaining off the mountain. Oh, right. We're nearly done with the mountain Now. After this, I'm thinking to add fuel boat onto the sky. I'm still thinking, Should I go with that, or should I stop it here? Maybe it's a great idea to add some boards. That's a sensitive guy. So all the boards will be flying off to their nest. Okay, Well, had some woods. I hope you all enjoyed the process so far. Beeping denies glowing sense it In less than 10 minutes, I'm thinking to change the shape of this mountain in the foreground. This is my problem. I never get tired. I always keep changing things till the last moment. I know it's a very bad happened. I should somehow get off that. Anyway, we're done with the was sky and the mountains. Now I just push my brush on going to switch to my d dealing brush my thighs nable to round brush on. Using that, I'm gonna add the boots We need fine and crisp line. So go with the healing brush or any other brush, which has a nice point to add the board's I'm using black. We had other boards in the other painting SAS for, but then they were quite small and not too detailed. Once this time, we're going with a little more detail kind of boards. I will quickly show you how I will be adding that now having a brush with the pointed up is very important to get those fine and crisp lines and the basic shape of a board First, this is how we used to drove or from the childhood. Now, at a circle in the middle, it could be like a messy circle. It doesn't need to be like a perfectly round shape or anything, just a rough shape that is the body of the board, so the first type is done. Now let's try another one. I'll be going with in border you, which is little wide open on the middle. I will be again adding a dog. It's more like an oval shape, so that is the second type. Now let's try another one. This time I'm going with a week, which is wide open on onto the middle. I will be adding that little will shape when you and boat. It allowed a lot of character to your painting. So if you could please drive these boards few times on, master them. This will be quite useful for you in your future project class, for I had taken a reference image to add the boards so I would be following the same pattern, and I will be adding the board slightly about the sun. The board's I demonstrated earlier work answering this picture. You could see those three we tried in the middle. Now let's get on to our main painting on at these ports. I drew one board. Also, I have added the reference image about so that it is much easier for you to look at the reference on draw the board, we added two boards. Now let's go with the 3rd 1 which is this one we tried. You can see a symbol, a bird in the above reference picture. So if you could type in and Google evening sky or birds flying or some keyboard, you will get to see many gorgeous pictures on. You can get inspired from that and try and replicate that in your painting. Look for reference pictures. Andi jewels. Three or four types of board, but you're comfortable with practice that on master it. The simple exercise is really going to help you. Boards are a good element to add a lot of character to painting, so just give it a try. Now I will go with the fourth board. The 3rd 1 we tried Hell on. After that, I think I've allowed another tiny one at the bottom. On with that, we're done with a bow painting cures a closer look off the port. I hope you guys are happy with your boots. This is what we tried. So whenever you're feeling doubtful, look for a reference image and try to replicate that Now. Let's quickly, remotely masking tape and have a final look at a painting. Since it is one of my most favorite subject to paint, you can paint an easy sense it and also you can paint a very difficult dramatic sense. Addressable. So this one wasn't easy. Take, I think maybe in the coming 30 days, one day we could paint a little more dramatic sense. It there be how, ah, little more intense colors. What's a? That would be a great choice, right? Okay, so that's decided. We'll be doing a little more dramatic sense it in one off the days Now Let's take a woman to appreciate our current painting. I really loud The radiant sky, the growing mountains on the boats. I hope you also had a great time painting this easy sunset. Give it a try and let me know how you found the whole experience off painting this easy Sunset. I'll be back here soon with another exciting project
8. Day 5/30: we are on the D five off over 30. Rewarding challenge to Rabia Going to paint this beautiful green landscape on Dhere at the Colossi Will need will be going with three colors for the sky Permanent violet woman and red and yellow orange Andi for the mountains on the meadow at the bottom You belaid indigos have cream on bright yellow green. So all this while we tried different Grady in skies We went in with simple subjects. Now it's time to level up the king. Today we will incorporate the techniques we alone so far on we will paint a beautiful green landscape with some mountains, pine trees and nice greenery. So this is the kind of color combination I will be using for the sky will cope with three shades will be doing a great in wash pre colors for the sky. I tried a sample competition earlier just to make sure the color doesn't greet a Mardi mix . Now I'm gonna go with the pencil sketch. We have a meadow at the bottom. Then we'll have to our three mountains in the background, one over here on, then have a lot one more mountain right over here. Maybe you can go with a little more taller mountain now over to the left side of a lotta hill. I will quickly erase off all those on Mrs Re lines. There. Now, let me Adel's irregular lines in the middle of the mountain. Starting primitive you could Are these lines if you want. Or you could Adam, while you paint. Okay, so that's a pencil sketch. Now, let's start painting. I'm gonna start by applying and even called a water onto the sky. Just like, coveted another earlier pendants. I'm using my Princeton light wash fresh, which is 1.5 inch. Now, don't add water onto the mountain. Just follow the outline of the mountain on. Add water only over the sky to add a paint. I'm going with my flat bridge, which is three by four inch for the sky. The first shared. I'm going with this permanent Violet. This is the same shared I used for our second painting. The second shared is four million dread on the 3rd 1 is Gamble Cello. I'm going to start by permanent Violet. I'm gonna apply this on the top. Then I will switch to four million trade. So we're going with three sheets for the sky and we have a wedding little area there, so you need to manage your space accordingly. You shouldn't be adding while it only on the top. We need space for the rest of colors. Asphalt. I'm stopping my wife there. Otherwise I wouldn't be able to accommodate the other to close. Now I'm cleaning my brush washing off all the violet. Now we're switching to four million trade. Now I'm going to apply this next to the violet and I'm going to mix. Those colors fell to get a clean blend. Mix them well on. Try to get a clean blend where the colors are meeting. So that's my second color for the sky. Next I'm switching toe yellow orange. Now, if you don't have a low orange, you can mix a little off gamble shallow to your four million trade on Get are similar color . Now I'm applying this color just following the line of the mountain, so these had appreciates I'm using for the sky. Now I'm going to make the color intense. I'm going with one more layer on the top. Let me squeeze out some more violet. Now let's go over the next layer just to make the color more intense. I'm starting with Violet, adding that on the dog Okay, the wide it is looking brighter. Hand Beto. Now let's switch to one million trade again, going with the Darko tune and applying that closer toe, let on mixing them well to get a clean blend in a hole. So, as I mentioned, owner, always take your breath from one end to the other in a horizontal manner so that it gives you a clean blend. Now I'm going to switch to your look orange. Let me wash my fresh properly. Let's apply that over the bottom on, but that will be done with the whole sky. That's Ah, sky. Now let's wait for that to dry. If you want to make your sky look more intense, go ahead by one more layer. On the top on here is my sky. Everything has beautifully dried. It is not looking ascendance as it was when the paint was wet. So if you want bolder colors, go ahead by a very vibrant tomb when you're applying the paint so that you have a vibrant painting. When everything dries. This is why it is very important to try the colors on a scrap of paper. Now let's go ahead with the mountain for the mountain in the background. I'll be going the blue screen, where I will be mixing interco and sap green on for the wonderful ground that Healey one. We'll be going with sap green, so I'm taking into cool. I'm going with a medium tour to get that forest green and mixing into co and sub bring together. And this is the color I have got. It's a great culotta paint, mountain sandals, dense forest. We're going with a medium tool and applying that color onto this mountain just a solid color. I will be filling up these to London's in this color. If you don't have Interco, you can also use Prussian blue on Mix that with a little love. Viridian green, our sap green. Your color may differ slightly, but that's okay. We just need a bluish green. - Now I'm gonna apply Saptari onto that hill on the left side. I need to refill my sap green. Now onto this hill on the left side, I'm going with sap green. I'm directly applying sap green onto the entire hill on mixing that with the other mountain . It's OK. Even if you're blend is no couple here. We'll be adding pine trees over this line so it doesn't matter whether you have got a clean blend or a massive land that's absolutely fine. So without any fear, just go ahead and fill up that entire killin sap green. Now on to the top of this hill, I'm going to add some lines and grassy pattern, which will make it look like their trees over there, just some tiny projections on the top before that green background rise. There are few things we need to do now. I'm gonna drop in some dark Oh, don't onto the green be applied. Now I'm offended. Love into court to sap green, and under this bed background, I'm going to drop in some color that will blend and bleed into the background, creating some textures over here, just dropping some random shapes, some Dodds and little lines on debt that blend into the background. Now, don't worry, even if it is looking messy will be adding pine trees in before crown, which will cover up all that so don't worry at all. Even if you're mountains having a messy look that's absolutely OK at this point. So whenever you're painting has more check shows and different color tombs that have allowed a lot of character to a painting. Once we add the point reason before crown, all these textures and different color tones will be seen in the background, which will make your painting look more realistic. So that's done. Now I'm going to apply more details for the mountain in the background. We mixed into go and some cream to get our bluish green on the applied that color on the entire background. Now I'm going with want own taco than that. And using this color, I will be adding the doctor tunes. Start with an irregular line at the middle, then Philip the right side using a taco tomb. I'm going to do the same thing for the second mountain. I had only regular line in the modern, starting from the two party mountain. Take it down on Philip, the right side of the mountain in a Darko tour. Now, as we're reaching the bottom, take clean water and blend the color into the background. Okay, so that the first step. Now we're going to take a lighter Donata shade and you're adding some lines onto the left side for they wouldn't be used. The same technique to ping tell mountains. This time it is just have the colors different. The technique is all the same. Just by changing the color on using the same technique, you can create beautiful mountains on with that. We're done with a bow background, mountains. You can see the difference Those darko tones made Our mountains are really standing out now , and also it is looking more realistic. Now let's wait for all that to dry. Meanwhile, everything drives. Let's paint the medal with the bottom. Now to paint the meadow, I'm using bright yellow green. I'll be filling up the entire middle in this color. If you don't have bright yellow green, you can mix a pinch of suffering to your lemon yellow and get a similar shade. It's a very nice green to paint those fresh and tender greenery. Okay, now let me quickly fill up the entire meadow and this bridal look green. Okay, so I have filled up that entire area and that she'd Now I'm going to switch to sap green using sap green, just as in random lines onto the wet background. We just need few lines at Random Media's. You shouldn't be covering up the entire lighter shade. We want the different tones of green to be visible. Now I'm going to repeat the same, using a tackle of grain and mixing little indicative sap green. Andi was in that shed. I'm adding some more lines. Just a few lines are enough. You shouldn't be adding a lot. So we have a lighter tone in the background and we have a medium tone of green. And now we added some more doctor tunes. Now, using the same shade, I'm gonna add the pine trees. We'll start from the right end, which is far from you on the left end is more closer to you. So over the right and we'll be going with very tiny trees. Andi as become closer to the left end, we'll start making the trades bigger and more detailed. Now all you need to do over this end, as at some shapes like this, a droplet kind of a shape which has had to put the top on, has little thickness over the bottom. You could add some lines also in between. So these are your trees. I'm think burrito almost a middle. You can keep adding these kind of shapes on. Then later we will make the trace more detailed. I forgot to mention If you want to switch to a smaller size brush, please to that my size Number eight brush has a nice tip on. That's why I'm able to make these tiny lines using my size number eight brush. You can see how easily be created those shapes and how they're looking like trees. Now in between, I'm adding some wake shapes off point recess ful along with those sheep Sarmadi. The trees over here are very tiny, so you don't need to put a lot of effort just a very big shape us enough. You can see the kind of shape I'm hiding. I'm adding a line that I'm taking my brush in a zigzag motion on creating on on, creating a shape off a pine tree just on to the left, and I will be going with the detailed shape. Rest off my pine trees will be like this. I had a line then take your brush in his exact motion on That's Your Tree. It's quite simple toe paint. I will have a few more tiny trees. Then I will switch to bigger and detailed once. All right, now, let's go over the detailed ones are the line first. Then take your brushing his exact motion to either side. Now, were you taking those lines to either side? You can add some doors and little lines and patterns in between, which will represent the fully age as you come down. You need to take those lines little more outward. The overall shape off your pine tree should be a conical one. I'll do it again. We'll start with the straight line on a thin and delicate lines towards either side. When you start from the top on, as you come down maker lines closer to each other on also a little more wider, you just need to take your brush in a prissy movement. On are those lines. I will quickly show the pine tree in a little more detailed manner so that it is easy for you because we'll be using this in the future projects ass for so we'll start with a straight line. Now take your bridge to either side. The 1st 1 has less foolish. There is a lot of gap in between the one we're going to try now. It's a little more dense tree where the foliage is close to each other. So take a brush in oppressing movement, creating these kind of patterns on. Take your brush to either side and as you come down, make your lines. Let me move, Ida. You can see the way I'm taking my brush. I'm just pressing my brush against the people to create the full age as you're reaching the bottom. You can make the foliage more dancer by creating more and more patterns on. That's how I do the pine tree. It's quite easy. You just need to do it a few times to get a hand off it. Now this is the kind of woman I follow to create those patterns. I just take my brush in a process moment, creating these patterns like I'm just adding some dots and little patterns close to each other. On when you have that tree trunk in the middle, it will look like the fool each of your country. Give it to try on a scrappy sof people on when you're confident, Come back toe main painting. Now let me continue with all painting and quickly finish this line off pine trees. - I added three big trees. Now I'll go with some smaller ones onto the right side. I'm doing the same thing, starting with the line, then taking my brush onto it'll side on, adding some scruples and dots and patterns in between. Two great before the age I learned about Moultrie were here, and I think that that this area will be done on maybe have allowed one or do onto the left side. People. All right on that's done. We have other enough off pine trees. We added smaller ones on the right hand on as we came closer towards the left side, be venting with hollow trees. I'm quite happy with the whole painting. The sky, the mountain and the pine trees it's giving me are very fresh. Wiebe. I hope you guys had a great time to. Now I'm going to add few boards onto the sky on, but that will be done. I'm using pains. Great to add the boards. Andi, I will be adding some quick ones. If you want to go with a very detailed and nice board. Maybe you could look at some reference pictures aspirated and the sunset painting on at some detailed birds. And we had done the double painting for D five. I'm really, really happy with the final result. Let me quickly remove the masking t. I know I keep repeating this, but wait for your painting to write completely on. Remove your marking tape at an ankle so that you get clean sides. Oh, my God. Look at this car. Just fainting. I hope you all enjoy painting this green landscape. Thanks a lot for joining today, Ali. Back here with another exciting class project. Take care and go by.
9. Day 6/30: welcome to Day Six of our 30 day we particular challenge. Today we are going to paint this beautiful patient sky. The colors you will need are for the sky will be using two shades turquoise, blue and crimson on to add the clouds will be using a while. Atone. I'll be creating my own violet. Using bright blue and crimson, you can use any other blow to create your violet. Andi, we'll need black or pains. Great. Are those details on the white water cooler or white? Quashed? Adamant. All right, let's start. There is no Pantelis gets required. I'm going to start by applying a clean cold water to the anti. Okay. Make sure you have garden. Even Varsha water. All right, so I have applied a clean even called the water onto the entire people. Now the two shade I will be using for the sky is turquoise, blue and crimson. I'm switching to my glad brush. To apply the base layer of colors, you will need a flat brush or a bigger size Round brush is also fine. Now I'm going with turquoise blue. I'm gonna apply that onto the top area on over the bottom I will be adding a light tune off crimson. Now, if you don't have to requires flu, you can also use cobalt blue, Prussian blow, cerulean blue or any other blew off your child's Don't stress out if you don't have turquoise blue. Now you can say I'm deliberately leaving little wide caps in between. As the background has bet. The colors will nicely planned and create a beautiful effect at those areas, so feel free to leave little gaps in between. Don't be scared at all. It's going to be OK. I'm gonna apply a little more brighter tone on to the top, just a little brighter on before the background drives. I need to quickly at the crimson shade over the bottom. Now we're going to switch to crimson. I'm washing my brush on removing all that your guys blue tones from my brush. I want a clean brush because I don't want the crimson on the turquoise blue to mix together and create a violet or purple shade. In between. I want the colors to look as fresh as possible in their individual tones without mixing with each other. Andi will be going with a very light on of crimson. I want to be still being sort of a color. If you have a pair a pink, you could use that instead of the crimson. Hope you're a pink and turquoise blue creates a nice competition to use for your peaceful skies. I'm applying a light on of crimson over the bottom, and you could see I'm not mixing the colors together whenever I'm getting closer to the turquoise blue. I'm not adding any color there. I'm just leaving a tacit er's so that the crimson on the turquoise blue will nicely blend into the background without mixing with each other. The sky is already looking so pretty now I'm going with a little brighter tone of crimson. Ah, one tune brighter than what we applied earlier on In fuel streaks onto the light only applied just a fuel. Streaks are enough. Don't corrupt the entire background layer. We need that lighter. Don't often to be seen. Just fuel streaks here and there is all we need. I'm allowing the calm look off the sky now when sometimes they are going to make this little more dramatic. I feel like having a little more turquoise livable here let me quickly do that before the background dries on. That will be done with the bass player for sky. Now, to make a sky little more expressive onto this background will be adding some clouds. I'll be using a while. A Toronto Addo clouds Andi I will be creating my own violet by mixing bright blue and crimson. You can use any blue, which you have instead of pride blew. It doesn't really matter. We're going with a more bluish tone. A while it so makes more blue and less right. This step is fairly. You see if you let go off all your fear and control that you have, take your round crash. Load your brush with enough off by Allah. Tune on. Just drop that onto the victor background. Let's have a closer look how I'm adding those clouds. You just need to drop in the paint onto the background, and they will nicely blend into the background, creating clouds. So all you need Er's your while a tone in advance around brush on. Most importantly, the trust on yourself. Now add the paint under the vet background without hiding the entire turquoise blue. We need to see that blue in the background, which will make the whole sky more beautiful. So don't cover up the entire turquoise blue, which we have in the background. Now I'm adding some water onto the wild should be made on making my color more lighter. On using that shade, I'm going to add few clouds onto, though they still pink background just a few at this area. I'm not adding any clouds over the bottom. On to the top. You can add more taco tours on over the bottom. We just need some light or tune. The only thing that you need to keep in mind is the kind of people that you're using. If you're not using 100% courting watercolor paper, the background may not see went for a longer time, so you need to be very quick and consistent with your. If you're using a good quality watercolor people, it can hold water for a longer time on. This will make your painting experience much easier. You don't need to rush when you're applying your paint on. That is the main reason why I wanna be struck him into going with a good quality particular paper and it's expensive, but you will surely see a huge difference in your paintings anyway. With that, we're done with our sky. You can see the wild clouds and those right streaks at the bottom. Everything's looking just perfect. Now let's wait for the background to dry. Then we'll add some birds into the sky to make it look more interesting. You can paint gorgeous guys using the same technique you can jeans, the Kahlo's on tried seen technique to create different effects. This is one sky I had tried earlier, using blue yellow on four million trade. I was actually planning toe include this and the lessons. But I went little overboard with the mountains, so I thought I would include it. I was really happy with this kind, but not with the mountains. Anyway. Let's wait her out back home to drive, and after that we will be adding some boots. This time will be going with energy detail kind of bored, So I have tried it earlier on a piece of paper. I had also tried the color combination before I went in the double main painting, So testing all those colors and those little details before you cope with your main painting is very important. Take your detailing brush or any breastfeed, Chava, NYSE pointed tip Adam Inclined Line Now from the end of this line, had another inclined line towards the opposite direction. It doesn't need to be symmetrical. Now add that little oval sheep on the murder on the top, would you see? Is the head on on the bottom? It is the body of the board, So that's the first board. Now that's cool with the 2nd 1 Be very patient when you draw the words I saw somebody posted on Instagram about our sense. It's guy. She was very happy with background on the mountains and on when she added the board. She kind of hated it, So that shouldn't be the case. Be very patient. Follow my brush lines very carefully. It is not a difficult task. I added arc first than over the right side. I added an inclined line, which is a little Coe on. Then I added that little sheep or with a medal. So we have a second board. Now let's go with the next one. If you're finding it difficult to add Dustin Line school, but a size number zero brush or a fine line, a brush which will make it a little more easier when you're paying the boats. So I added an incline line on another inclined line over the right side, which is kind of symmetrical. On added a dot on the top, which is the head of the board on a decline at the bottom, which is the tail off the board. That's a water board. Now let's go with the food one. You can see the difference when this guy was playing without any boats on. Once we started adding the boards, the sky is getting a lot of character. So this is why I mentioned earlier. It is great to master a few types of birds, which will help you make your paintings look more gorgeous for the next one. I'm going with an involved did you? Which is a little wide open, the 1st 9 on the second line in a similar way. Now on to the middle, I'm starting with the dog on towards the bottom have allowed a little decline on that so forth board. I think I'll go with one more over here, something similar to though one about Oh, right, So we have added five boards, so we are done with the sky and the boat. Now you can either leave your painting. Lassiter's is already looking so beautiful. Oregon adds a mountains, some grass with some plan to the bottom. I'm going to simply add a rough plants allowed at the bottom. You can either follow me with this detail, or you can add any other data off your choice. You could add a windmill, a tree, a mountain or any other subject off your choice. You just need to take your brush in a daughter pattern on the top to create that grassy pattern on over the bottom. You can just fill up that with a solid color. Go with either black or beans. Great. I'm using black here onto either. Ain't I will be making my grass little taller on towards the middle? I will be taking it in a lower profile. All right, let me quickly take this to the other end and finish it off. - We are nearly done. Two days was a quick painting. We hardly took five minutes to paint this beautiful sky, tried out with any other shade off your childs. Now I'm going to add a Christian to move on to the sky. I'm using white water cooler here on them, adding a Christian shape. Use any off your detailing brush to get that crisp and clean lines. You can also use a wide Children if that's more convenient to you on right on, but that we have finished our painting for day six. It was a quick one, but a bit off challenging to I very well understand that you need to let go off all the control that you have on the medium. Andi, just enjoy the process. Want to have the vet background just dropping the colors and that will give you a nice cloud effect. Give it a try. I'm very sure you will be surprised by the result Now, just like him. Mention every day. Remove your masking tape on leaving. Your painting is completely tried, Andhra. Move it on. Uncle, You can also use a blow dryer to loosen up the clue. So keep those things in your mind. I want you all to be exports in everything. By end of the 30 days on Dhere, Izabal finished painting. You can see about peace till sky. It is looking so calm and pretty. Thanks a lot for joining. I hope you all anti painting this candy sky. I'll be back soon with another exciting project.
10. Day 7/30: Hello everyone. I hope you all are doing great on welcome today seven. Off our 30 day watercolor challenge. Today we are going to paint this beautiful evening seen on the colors you will need are for the sky I'll be going with turquoise blue on are the clouds I'll be using those off Ultra marine Now most of you may not have Roestoff ultra marine that gives you can go with any proper You can mix your own purple asper but make sure you're going but more red and less blue because we need a reddish purple to anti palm trees I will be using Blackwater color You can either use black or Paynes Creek. I'm starting by applying and even called a water onto the entire paper just like how I do On most of the paintings, there is no pencils gets required were directly going in with the color. So applying even called the water onto the entire people. Now for the sky I will be using turquoise blue I will be applying creating bush of turquoise blue using my blood brush bright to shade on the top on As you come down you can make the tune like toe, so I'm gonna apply, are even wash of to Christ blew onto the entire people. Then I will slowly start making the colors indent on the top. So that's the base layer. Now I'm going with a brighter tone off Turkey's Prue on making the top area more darker. I guess by now you all will be exports and paint ingredients. Guys, we did quite a lot of ex ice is focusing on ingredients, guys. So we need a trading wash after cause proves that Start at the top on light at the bottom. I'm going to make top area a little brighter. Okay, that looks perfect. Now I'm sweating to my round brush. Now we're going to add clouds onto this turquoise blue sky. The shade I'm using here is Roestoff Ultra Marine. This is by Daniel Smith. I have tried assembled PCO I was trying the colors together to know how well they go to KEDO. If you don't have also fell Drama green, you can mix Quinn Knockaround rose on ultra marine blue. If you don't have those shades also, you can go with any off your blue and red. We just need a reddish purple. So which will be the colors that you're using? Go with more red and less blue and get a reddish purple now, just like how we greater the clouds yesterday, I'm going to drop in that shade under the victim background. Don't put a lot of pressure. Go in a very loose and free manner on. Just drop in the paint onto the background on debt on, let it blend and bleed by its own. Don't try to control the way the pain is spreading now the size and shape of the clouds totally depends on the way How you're dropping in the paint. If you're adding bigger, pattern statue will eventually end up in pickle clouds. On. If you're going with smaller patterns, they will get smaller clouds. So we are depending on how we want. Your clouds to me, go with smaller are bigger patterns. Now let's add more clouds, so I'm adding a bold Oh, don't off this poeple on the top on over the bottom. I'll be going with a lighter tone Drop in those shapes. You can see the way I'm taking my brush. I'm adding some battle in some lines and little daughter in between so that it will give a natural look off the clouds. Do you worry a lot about the shape? Just drop in the paint and let that spread into the background and greet off natural shape . Now I'm going to make the top eerie, A little more in debts. I'm going with a darker tone off Bruce off Belgium rain. You can see how pretty that color was looking. So you just need a reddish purple. You can mix crimson on any of the blue that you are caught. If you have any other kind of rose Opare arose clinic around rose or any kind of rose. Use that one instrument. The crimson, which will give you are very similar color. All right, so this is how our skies working so far. Now I'm going to drop in some more clouds under the bottom media allow that purple and I want to see some more of that color over the bottom. And that's why I'm adding this right now. Feel free to strawberry in the cloud at any point. You feel satisfied old right on. But that we're done with the was sky. You can see how gorgeous Our skies looking Let's wait for us guy to dry main bile I'll quickly show you how we did the sky for one more time in a very rough manner So the only two shades we used where Roestoff ultra marine Andi turquoise blue We just took fine ones to pay This entail sky. You can explore the same technique using different colors. You can add more clouds and make your Skylar more dramatic. Or you can go with the lesser clouds and make it look little calm and satyr. So all I did Waas I applied a grading wash of turquoise blue on. Then I went in with Roestoff ultra Marine. I just drop in the paint onto the better background to create this clouds on that was it. This is how we painted this guy tried to let off people first. If you're not too sure about the colors are the technique to make the sky more expressive. You can also add some taco clouds in between. The only thing you need to keep in mind is that you're a back room, needs to be wet when you're applying the clouds. So if you're not going with the good quality watercolor people. You will have to be very quick and consistent with your strips, right? So that's about sky. Now it's time to add the palm trees. Make sure your background has completely dried amusing my size Number two wrong brush to add the palm trees well under taller one. Here I'm starting, but a little group Good line to add the palm trees amusing black. Here, you can also use pain screen. I'm going with a very simple kind of palm tree, as my focus is more on a big dinner. If you are an intermediate level artist or an advanced artists you can go with, you can go with a more detailed country. Oregon totally skipped the idea off adding palm trees and go with any other subject. I have added the tree trunk. Novelists are the palm leaves will start by adding the crown from the top of the tree trunk . ARD. Coby Lines like this. You can add five or six starting from that tip, but is drooping. You will find plenty of reference in majors and Google. If you type in palm trees allowed on, you can go with a detailed one or a different type of a palm tree. This one is a very basic one. I'm gonna have to more curvy lines like those which is hanging downwards so altogether there are six lines. Now we're going to add leaves onto these lines. Use the smallest express to get those crisp and clean lines. Now to add the leaves, all you need to do us add lines close to each other. You can see how I'm adding them. I'm taking my brush from top to bottom on, leaving it free as I'm reaching the bottom. It's just a free hand line. I had a line on. Leave it free. So similarly, I'm gonna continue adding these kind of lines along the kombi line. We have added Please use a brush with a good pointed tip on add lines like these, which are close to each other. You can see my lines are looking very crisp. Panton, if you go with a bigger size, especially would be able to get this thing lines. So go with a fresh Batasan. Eyes pointed tip headlines like this close to each other. Following the Kobe line, you have added Andrabi the same for all the other six lines. Now, when you're reaching the top, two lines will be adding this leaves on to either side of the line. So for these lines here, the same set off leaves will be on the other side, which won't be visible from the French people. And that's why I'm adding the sleeps only on one side. But on the top ones, it will be with civil esto. Leaves are facing upward. It's not facing downward. I know these things are common sense, but it's my duty to explain every single thing. They shouldn't be even a one single person. But any doubts anyway, I'm John with three lines now I'm on the 4th 1 now. I'm going with the ones on the top. I have added Lyinto on one side. Now I'm going with the other side in a similar manner. So this time your lines are not drooping. It is facing upward now. Similarly, let's add leaves onto the other one hospital on, but that will be done with one palm tree. Following the same steps will be adding five or six palm trees, some shorter ones and some taller ones. I'm really loving the sky and the black trees. It is making us guy look more gorgeous. Now to add the lines on the side. I'm just turning my board. So this is the reason why I told you to fix your paper onto aboard so that you had the freedom to turn around. This will make your painting experience a lot more easier. So that's a tree number one. Now let's go with another one Over here. I'm going with a bigger one. So the tree trunk is going to be a little more ticker and I'm adding this Just turn to this corner. I'm not taking it down. Whenever you're doing a painting, it could be any painting. Matassa, mountains, trees are some plants. It is a great idea to go with different heights and different sizes. This will make the whole composition looks more interesting. Never add them in the same height and seem spices. I have added a victory trunk. Now I'm going to add the palm leaves on to this. So the tip off the tree trunk is not possible. I will be just adding fuel leaves on to either side. I wouldn't be showing the entire crown now. Please one. No fuel will be feeling like What does she mean by the crown? So by the crown, I mean that entire thing on the top of the tree trunk, the entire palm leave structure, But is now crown sort of a shape. I think it is called the Crown and real. I need to Google and see this, but that is what I mean by crown here. So if you had any doubt, I just wanted to clear that out. Now, let me quickly finish this palm tree. I'm adding one more over here. And similarly, lad, a tiny but on the left side has full. We're not chewing the top of the tree, so you just need to add a tiny bit. And that one is done. Now I'm going to add a smaller one over here. This will create a sense of distance in your painting and create. Although step, I'm going with the same steps we did earlier. Start with the tree trunk. You can choose whether you want a straight tree or an incline tree or a crook. A tree. You can decide on the shape of the tree trunk, then are the crown. I went in with six lines. Now I'm adding those lions close to a Chado following the curry line. I guess it's quite simple. Maybe you just need to try it a few times to get a handle isn't now. Let me, Philip, All these cov lines in a similar manner on finish this palm tree. You can stop it either here but these three palm trees. Or you can add a few onto the right side. Ospel. I'll be adding two or three on the right side. If you want more, that is also up to you can add more. Trace me. We have a lot more more tolerant over here so that you have a different kind of heights. I'm drawing the trade trunk when I'm taking it somewhere till here. So tall tree on after the tree trunk. I'm gonna add the crown. Then I'm gonna fill up all those gov lines with lines close to each other on finish after Palm Tree. One coffee line. One of the one Andi for more on the top. Okay, so that's the crown. No, I'm adding lines from top to bottom. Let me quickly show you a closer look off the palm leave start by adding a cov line on fooling the line you have added. Add Freehand lines from top to boredom like this, which are close to each other without much cap in between. Just right out. Want to get a handle foot? It is quite easy. All right. Now let's finish the rest of the palm trees. It was a little late when I sat down to pain. Today, it's 50 clock in the evening. Cure on. It's already getting dark outside. I love to paint in the morning, but I never get time in the morning to sit down, even for 10 minutes. With all the household works and the little one, my time just flies. I think we'll show the mamas. You will have a symbol, a story, but no matter. But it's night or morning or midday. I love to spend a little creative time. It's like a time I gave myself. I really wait for this little time every day, the previous night when I'm off to bed. I already used to dream about or try pain tomorrow. What kind of color combination should I try? Maybe I would have seen some reference photograph. Or maybe someone's painting which kind off state inside me on. I used to wait for the next day to paint that out. So it's more like a refreshing time for my brain and my mind. I know each of you have a similar story, and that's why you're here with me for the 30 day we particular challenge. I know many off you're pushing your boundaries a lot, too. Paint with me and I'm really grateful for that. Okay? And that's about four tree. Now I'm going to add some smaller trees onto the right side. I'm starting by adding the tree trunk. One tiny one there on a bit more taller. Wanna work your now? I will add the crown on the top then so that Abbott smaller lines close to each other on finish off the tree. Quickly, Liani only done. I know this took a while. The sky we did quickly. I think we took less than five minutes for the sky where all the palm trees to color love time. I hope you guys are happy with your final painting. Let me quickly removed the masking tape. Now I feel like I should have added Atala Tree on the right side as well. Just like that Big one on the left side. Anyway, maybe I could do that later. But for now I'm really happy with the result. You can see that nice, pretty pink loud over there. I hope you guys enjoyed our two days painting. I'll be back here with another exciting project.
11. Day 8/30: Hello, everyone to Rabia on day eight of over 30 particular challenge. I guess at least some movie had some challenging time yesterday and day before painting the sky in the clouds. So I thought, Today we'll have a fun time with watercolor. Let's play with the colors. We're going to paint a beautiful and simple northern lights guy. Why does my most favorite subject to paint? I think many off. You know what already. So the colors that I will be using for the sky are taylor blue, turquoise blue on bright yellow green. If you don't have Taylor blue, you can go with Elgin wearing blue, Prussian blue, are any other darker and try to blue on for the bottom area, where I will be using the bright yellow green. If you don't have that color, you can use lemon yellow to paint the mountain. You will need black watercolor, and to add the snow, you will need either wide quash or by 20. All right, let's start. I'm gonna apply and even called the water onto the entire paper for this one as well. We don't need any pencil sketch were directly going in with the sky on later will be adding mountains onto the bottom, which doesn't really require a pencil sketch. We can do that by the brush itself, so apply a clean and even called the water to the entire people. Make sure the water has reached everywhere for the technique will be using. Today you will have to fix your paper onto a board, which is very important. Now I'm switching to my flat Trish on. I'm going to start out in the pain from bottom to top. I want a bottom media to look very fresh on twi print, and that's why I'm going with the sculler first when my brush is clean and gradually I will work from bottom to top. Next, I will go over to Christ blue on. After that, I'll go with tale of you. So as I mentioned earlier, you could go with lemon yellow directly, or you can mix a pinch off saccharine to your lemon yellow to get a similar kind of Rashid . I have added the shade or with the border, so that's bright yellow green. Next, I'm going with turquoise blue. You might have noticed my painters little watery. We want the pain to float around the paper, so go with a little watery consistency over the middle. I apply turquoise blue. Now on to the top. I'm going with Taylor Blue. This is a very pride on bold blue. If you don't have paler blue, you can use algae, marine, blue or any other interns blue. So at this point, your colors may not be well blended. You can see three band of colors. I have a tailor blue color at the top, then turquoise blue on over the bottom. I have this bright yellow green on none of the colors. How mixed? Well, it's really like a band. Now what I'm doing us. I'm taking my board on. I'm tilting my paper in all directions so that the pain will float on. Blend into each other, living a nice planned. What's the Saudi? You're going to love this process, so you need to keep to the your paper in all directions to get a clean blend. So this is one reason why you need to fix your paper onto aboard so that you have the freedom to tilt your people around. You can see the way the turquoise blue on that pricey Lokeren has mixing. If there is some excess pain floating like this, you can wipe off that using people toe on. Keep repeating the process off. Tilting your paper. You need to tell your paper in all directions. If you're just tilting your people from top to bottom, all the paint will flow down on. We won't get that nice bright green at the bottom. My background is still wet. I'm making use off the time on I'm going with a brighter drone off Taylor blue over the tall I'm adding a watery paint onto the top. Now again, I'm going to tell the people so that the glue will flow town into the turquoise blue, creating a nice blend. Over there, you can see how beautifully those colors are floating down, creating a beautiful blend. The turquoise blue and the bright yellow green has already blended. Now I'm going back with your Christ pool. I'm trying to make this 80 are little more even now again tilting my paper so that the blue will flow down. So all you need to do this apply and even goto water to the entire paper. Choose any colors which create a vibrant mix. Andi, make your paint in a watery consistency and dropped out onto paper on. Once you have the paint on the people, keep building your board in every direction on to make the colors float into each other, creating a beautiful blend. Keep adding more and more vibrant tunes until you're satisfied with the Carlos said You have got I applied another band of turquoise blue. Now I'm just mixing that with the right a little green. I will go with the final round of Carlos. I will apply. Chill guys blew over the murder, and after that I have allowed some more tea. No blue over the top. So if you're painters bartering, no matter how you told your paper, the paint will flow down and create a beautiful makes. I allow how Indians explores. This is Taylor Blue, red from drum Brandt. You can see the blue bus floating into the turquoise blue on the turquoise blue was floating into the bright yellow green. I was thinking to go with the blue and purple combination. Then I switched to this bright aloe cream on. I think this is one of the best competition ever for a night sky. So there are two things you need to keep in mind to get a beautiful, even that sky oneness use watery paint on. The 2nd 1 is tilting your paper in all directions, so try out the colors and make sure they don't create a muddy make show on. Go ahead with these two steps and you're going to get a beautifully blended sky. I don't want the turquoise blue to float entirely down. I want that bright yellow crane over the bottom, so I'm blocking the way on stopping the turquoise blue from floating down. I'm really happy with the blend, especially the blend on the top by the Taylor blue was floating down to the turquoise blue . This is a very fun and cool technique in watercolor. I do paint onto the people, which is in a watery consistency on Just enjoy the process. Let go off all the control that you have on your paint on. Let it blend naturally. If you try to control the way the paint is floating, you won't get a smooth and clean blend. You will have some rough partisan between, so apply a paint and keep tilting your paper and let it flow down naturally. Let the pain flow in its own way. Don't try to control it. All right now I will be to the bathroom to dry on. After that, I will be adding some mountains on to the bottom. I'm not adding any stars. So this is the color combination I tried earlier before this fun when it dried. I'm kind of like hit. They will might when back row has completely dried. Now I'm going with the mountains to add the mountains. I'm using ivory Black. You can use black or paint screen. If you don't wanna add mountains, you can also add pine trees or any other subject off your choice. You don't really need to add mountains. I will be adding a snowy mountain. So once I add the basic shape of the mountain, we'll be adding snow onto that. I'm taking a little off black water colors on my palette. Now I'm going to paint the mountains, go with any shape that you want taller or shorter mountains. I'm adding a taller one on the right side, then other Just go with the flat shape. I won't be adding any taller ones onto the left side. So the child is yours. If you want to add toe tall mountains, you could go with that. So what will be the shame that you're going with? Apply that entire mountain and black color on Once we have painted the mountain, we'll have to wait for this to completely try. They shouldn't be even one single area of the test and dried. You will understand why I'm saying this vile. We apply the snow onto this mountain so we'll be getting onto that now. Let me quickly fix the mountain. All right, So I have added the mountains on This has completely tried. Now I'm switching to my size. Number two around. Fresh on. I'm using a little white water color to add the snow. You can also use wide quash. So which will be the medium you're using? We need a people trouble now, Onda, we need toe Remove the excess water from the paint by dabbing the brush on a people tower. No matter whether you're using Barschel Whitewater clerk, we'll have to do this step. Now We have white paint on a brush which has a bare minimum water content. Now, with that Irish. I'm just going to scratch over the Black Mountain to create this dry patches. You can see how beautiful our drag strokes are looking, and this is how we'll be creating the snowy mountains. If you remember, for one of her early painting, redid the right opposite ing onto the plain paper, we applied dry strokes using pains. Great, Now we're doing the opposite thing. We painted a black mountain. We waited for that to dry. Now they're applying. Why Dr Strokes onto that? To create a snowy effect. So all of me to do will stick white paint on your brush, no matter whether it's squash or particular. W brush on a people travel on. Remove the water content. We'll just need the paint on the brush without much of water on now. Using that brush, just scratch on the Black Mountains we have painted and greed the strike strokes. You cannot ask me ask wound, Just topping of Leo. Satisfied now? I had said you need to wait for the mountains to dry completely. Why? I said, this is just because if you are applying the white paint onto a wet mountain, you won't get this dry strokes. You will be getting a great tone in between. Your white will get mixed to the wet black in the background on that will create a gray tones in between, which is no what we need. We need this dry stroke. So to get this you will have to wait for your black to dry completely. But this is horrible, mountainous looking. Right now, I'm quite happy with the Smoky Mountains. Maybe have allowed some bowler don't a white just onto some 80 years to give it a little more tech show. - Old Right on that we're done with the lower not only lights kind. I hope you guys enjoyed this process. I'm going to remove the masking tape and this is a little messy process so your table might can get a little dirty after you're done with your painting. And also, if you haven't fixed your masking t properly, you won't get a clean four sides because we're working with lots and lots off layer off paint and water. So if there are gaps in between, the pain can sleep in true on create a messy side. So whenever you're using this technique, make sure you have fixed the people properly on Dhere. Several painting. This is one of my favorite technique. To be northern lights. You will get a small, truly blended a natural looking sky very easily. Try it out. Using any other color competition, you are going to enjoy this truces.
12. Day 9/30: Hello. Everyone. Hope you all are doing great today. I'm gonna take you along tow, watch a corgis and set. This might be looking a bit challenging for you, but trust me, it's going to be very easy to paint the sky. I will be using gambles yellow, bright yellow, orange on one million trade on our the DACA tones. I will be using Bon Sina on paint. Scrape now for the mountain. I will be using bones in a on Are these details I will be using paint great and a little white. All right, let's start. I have already taped on my paper onto the base. Now I'm going to add the pencil sketch. We just need to add a mountain. I'm starting with the flat area over the left side. Then I will be adding the mountain on the right side. That is just one tall mountain. Now I'm going to add that irregular line in the middle. We might cover up this while we are the paint. So this is just a guideline for you. We'll be following this guideline on will be out in the darker tones. Okay, so that's the pencils. Catch now without wasting any time. Let's start painting. I'm very excited to show you how I painted this gorgeous sunset. So I'm using my light wash fresh on. I'm taking plain water and I'm going to apply that of the sky. You can apply a water onto the entire people. You don't need to link the mountain. We'll be adding a taco drawn onto the mountain which will cover up all the color of the sky will be going with a yellow tone over the bottom. Andan orange too Over the top on for the mountain will be going with the doctor No brown. So that will automatically cover up all the lighter tone to the background. Now I'm switching to my flat brush on bond The first shared I'm going with us. Gamble Jello. I'm loading my brush with campaign shallow and I'm going to apply that onto the back to back ground. I'm living a little of white space at the bottom. Now I'm adding the you know on now I'm washing my brush on I'm switching to bright yellow orange. If you don't have bright yellow orange, you can mix a little off world 1,000,000 dread off. Scala tried to your yellow Andi, you can kind of get a similar color. I'm going to apply the bright yellow orange onto the remaining area on the top just for let abusing this orange. Now, you don't need to worry about having a clean blend at this point. It's absolutely okay. No, to have a proper blend will be our team. Otaku don't onto the sky. So don't worry about that now. I'm playing my brush. Andi, I'm taking a little water on my brush on just by taking my brush back and forth, I'm making those yellow lighter. Okay, so that's the first wash. Now, before the background dries, we need to add a ball medium and taco tunes, so I'm quickly switching to my round brush on. I'm going with four million dread. The Vermillion drill is to Indians. We can drop in a little off brighter orange or Campbell Jello to make it a little more orangish. I'm adding a little brighter orange. You can also use Gamble J. Lo. Now I'm going to drop this color onto the vector background. I'm just adding some lines, some thicker lines on the top and something a lines on the bottom ask. My background is bread. This lines will nicely blend into the background, making a dramatic effect over to the bottom where I have more yellow. I'm going with bright yellow orange on repeating the same process off adding lines. Okay, so that is my medium tones. Now I'm going with a little more intense orange. I'm using one million dread, and I'm dropping that on to the top area off the sky. So over the top, I will be going with more off doctor and indeed, storms on over the bottom. I will be going with some medium tones. Now I'm mixing bones in our to my woman and orange to get a more darker orange on. Using this color, I will be dropping in more taco tunes over the top. This is the color I made. That's a dark, brownish orange. Now let's drop that color onto the vector background, especially on to the top. You can see the orange lines, we added earlier, has nicely blended into the background. It looks so beautiful now. Similarly, I'm going to are these lines on. This will also beautifully blend into the background, making our sky more dramatic. The key here is having a better background. You just need to drop in your paint. You don't need to put any effort and blending them. The wet paper will automatically do that now for this painting, their only adding, these lines were not going with those sheep off clouds. Now our didn't ask many lines as he want darker at the top and lighter the boredom. So first we went in with the background wash of yellow and light orange, then, using four million, dread added, the medium drones over the top on slightly over to the middle on. Then we went in with a brighter tone off orange by mixing Bonsignore toe that and again, we added some lions over the top. Now I'm going with a much more Indian stone off orange, I added. A little bit of pains create the color we created earlier on. I got a very vibrant and pull tone off brownish orange on. Using that shade, I'm adding a few more lines over the top. I'm adding them only where I have that bright orange tones. I'm not adding them over the bottom where I have yellow. All right, I'm done out in the taco tools on Dhere A salvo sky. There are two streaks in the middle, which is looking a little rough. So I'm taking a little of gambled here. No, Andi, I'm taking my brush very lightly on top of that and I'm trying to soft in that Don't put a lot of pressure. Just take your brush in a very light manner. No, I will soft in this line. Aspar. So we got rid of all the shop lines. Now let's wait for the entire background to dry. Ask eyes looking so bold and beautiful now to paint a mountain. I'm going with Mancina. My background has almost dried. Please wait for your background to write completely before you go in with your mountains. Now I'm adding an even wash of branzino onto the entire mountain just onto the left side. I will be making the color lighter for the rest of the mountain. I'll be going with a Balto off brown. You can see I'm going with the very dark turn off Mancina full of the entire mountain in Bonn. Xena leaving just a bit off the left side, where we'll be adding a lighter tone. - GNC . I went in with a very bored Donald Baan Sina. Now, with that little lady of it I had left, I'm going to apply a light on off orange. So this is where the sunlight is hitting. And that's why this isn't an hour in shed. We went in with a light on a very low for the sky, right about this area. We're trying to make it look like the sun is setting right behind this mountain on. That's why we have a bright, glowing sky, right about this idea on the sunlight is sitting this part on. That's why we went in with an orange store were here. Okay, Now we'll have to wait for this mountain to dry before we go in with the Darko tools that may quickly use a blow dryer on and make the process faster. Okay, My background has completely tried. Now I'm going with pains, agree? I'm using my size Number eight wrong fresh, and I'm loading my brush with enough off pain scree. Now take out your paper tower on dab the brush on the people traveled multiple times to remove the excess Porter. We're going to add some dry strokes onto the mountain now just kratcha brush on the mountain. Now to the entire mountain are dry brush patterns like this. It is the same technique we used olio Yesterday we painted our mountain and black on. Then the added tribal strokes. Using white to date, we painted the entire mountain and brown just over to the left side. We add a little off orange. We waited for the Bagram layer to dry. Now they're adding dry brush patterns onto the mountain. I'm just randomly filling up the entire mountain. With the strike strokes, you cannot ask many as you want. There is no limit. You can stop adding them whenever you're satisfied. So your satisfaction is the limit. Now I'm going to add some more bigger and brighter patches. This time I'm going with a very dark turn off pain scree. I'm not adding a lot of water onto the paint. On using that dark tone, I'm again adding some dry brush strokes onto the mountain. Okay, now, when I'm adding this dry brush patterns, I'm taking my brush in that line we had added in the middle. Just add a rough shape over there. We don't need a sharp and crisp line district. You brush along that line and add more Dakotans over there on. You can also add some random patterns. You can see. I have no guidelines. I'm simply taking my brush in a random manner. Andi are different. Locations are marrying those dark patches. So we're doing this exercise to add more and more textures onto the mountain, which will make it more realistic. Now keep repeating this exercise until you feel you have caught enough textual Orania Mountain. If you want to go with the last check shows, you can stop somewhere in between. Or if you want more and more Texas keep repeating the process. You should be the best critic off your paintings. So what do you like? And what I like will be different. Maybe I like more and more textures. Maybe you are someone who like minimalist details. Whenever you feel like you are happy with yourself, Loan to stop it. They're never go overboard with any details. Now I'm adding more taco patterns in the middle, and I'm trying to create that irregular line. You can see. I'm not going with a very sharp onto detail line. I'm just dropping in some taco tombs to create a rough pattern in the middle. So unlike other medium with watercolor, you cannot hide your mistakes. So whenever you feel you are satisfied and you have got a great percent, you should always leave your painting there. There are many instances where I have spoiled beautiful paintings by going overboard with details. I always feel like maybe if I had a little more, it may look a little better. So this thought get me going on and I have spoken a lot of paintings, So never do that loan to stop your paintings whenever you feel satisfied. Now I'm switching to my smaller sized brush, and I'm making this line a little more visible. Before I bent in with the main painting, I had tried a sample piece earlier. This is one exercise I always recommend to do. You should always try your color combinations and the details on the scrap piece of people so that your results will be better when you do it the second time on your main sheet. Now wait for those darko tones to dry on. After that will be adding white, dry strokes onto the mountain just like we did yesterday. Now take white watercolor or wide quash. Take that on your brush. Dab your brush. One of people travel to remove the excess water. Now add wide traced walks onto the mountain again. Go in a very random manner. We don't eat a lot of white patches. Just few here and there is enough. There's no rule or there is no pattern that you need to follow. You can go in a very random manner. Someone the top, some on the bottom. But make sure you're black parties has dried. Otherwise, you will end up getting some great patterns in between. The black and the white will get mixed together and create a gray if you don't wait for the black too dry, so make sure you're black has entirely dried. You can see our mountains looking so gorgeous right now, with all those darko patterns on Dwight patterns, everything is giving it a lot of texture. You can use the same technique just by changing the color. You can greet mountains with different character. On that, we're done with double painting for day nine. I hope you all enjoy the process. I'm really loving it I love the dramatic sky and the mountain, which has a lot of character. As I said earlier, it looks a bit challenging, but when you try it out, it does not ask. Difficult as you think. Now let me quickly bill off the masking tape on Dhere a several final painting. I'm really loving the sky and the mountain. Let me appreciate myself. Resident Janina, I hope you guys also had a great time painting this gorgeous sunset. Tomorrow we will hit dating off a water. Did a watercolor challenge on I have a super gorgeous summer beach ready for you. I'll see you tomorrow. Take care and by
13. Day 10/30: today we are on the Dayton off over 30 day watercolor challenge. Andi, we're going to paint a soft and beautiful summer beach. Now let's look at the colors he will need. I will be using bright blue for the sky. You can use survey in blue, Prussian, blue, cobalt blue Are any other blue that have got Then for the beach We will need two guys blew on for the sure we'll need Mancina Aunt, To add those tiny mountains in the background you will need sap green To add the details you will need Paynes Creek. So those are the colors we need. I'm gonna start by adding the horizon line a little below the centre off the people So that's my horizon line. Now I'm gonna add and even called the water onto the sky. So far, we haven't done any blue sky invented with very by print and multiple colored sky. So this one at Or Bill go with a blue sky with some clouds. A very simple minimalist one. So I have applied water onto the entire sky. Make sure you have gotten even cold interest excess water, please wipe it off. We don't need a lot of water on the people. Just a shiny coat is all you need. If there is too much of water, only people, the pain that you're applying will start to spread a lot. Okay, so I have applied a even called a water onto the sky. Now I'm taking bright blue. You can go with any blew off the child's prussian blue cerulean blue palpable which is what I have got Now I'm gonna apply blew onto the sky leaving some white space in between Relax and just watch out how I'm doing it I added the blue color on in between I'm leaving the shapes again. I love some shape in between Now I little bidding the same exercise, adding some plane leaving some shapes in between. Now this white spaces are going to be our clouds. If there is a lot of water on your people, the blue will start to spread a lot on. We'll take up all those fights bases. You won't get clean, wide, fluffy clouds. That's why I said earlier to go with the body even on to light wash of water. I have created enough of clouds in the middle on over to the bottom. I went in with a lighter tone off blue, and that's it. That's the whole sky. Now let's wait for that to dry on After that will paint the beach at the bottom. All right. Our sky has dried. You can see how easily regard those white clouds now to paint the beach. I'm going with your guys blue. I'm going with the doctor after card blew over the horizon. Line on. As I come down, I'll make the color lighter. I'm using my round brush on time, adding the paint and on the horizon line. So I applied a bright one after cars blew over the horizon line. Now I'm taking some water, and I'm going to make the color lighter as to hit the bottom. Make it as light as possible. I'm taking clean water on my brush, and I'm trying to make the color as light as possible. We started with a bright own off turquoise blue on. After progress down, we made the color lighter on over to the bottom. We've ended with a very light one off turquoise blue, which is almost close to white now, before the turquoise blue drives I'm gonna go into the mountains. I'm using sap green on by mixing a bench off indigo to get a bluish green. Now I'm going to add the mountains in the background. I have a lot of our noble. He'll you might have seen those long, tapering kind of mountains in the tropical beaches. I'm going with such kind of mountains Now. The turquoise blue hasn't dried. It is still wet. So when we are adding these sap green mountains, the color will automatically bleed into the sea on. Create a reflection. We don't need to add any extra reflection as this is quite far from you. We just need a greenish door right underneath those mountain. Now, in a similar way, I will be adding a few more moments onto the right side. - We have added the mountains. Now I'm switching to my smaller brush my size number two round brush. Now we're going to soft in those grain reflection, which is bleeding into the turquoise blue. I'm taking a little off turquoise blue on my smaller sized fresh. I'm just taking my brush over this green color, which is bleeding into the sea on soft, earning that now I'm gonna do the same for the one on the right side. As for take a little off turquoise blue on Tried to blend the sap green into the sea When you have a little of turquoise blue when you brush It is history to blend as the background shares. Also turquoise blue. So our indigenous to get a soft reflection rather than having prominent lines My Bagram has always dried. I think I need to switch to my Bickell brush on to make the colors look a bit more softer. I will lose my bigger size fresh on will soft in all the sharp lines Maybe I'll take a bit off your guys blue on Make the top video look a bit more even I have been a huge painting almost similar to this one in a click on, I have put that in our living room. The soft close and this painting is really a great one for your white walls. So maybe you can dio bigger sized watercolor painting itself and hang it on the walls. Okay, Now over to the bottom. I'm taking clean water on blending that and making the color a lighter one. Okay, now let's other DACA tones onto the mountain. I'm going with pains. Great. I'm using my smaller sites. Brush now at the doctor Tunes have allowed some here on have allowed some on the right side . I'm just dropping in some dark Oto tone grand area. Andi, I will be smart genders into the green background. I will do the same. Or to the right one. Just dropping some Darko tunes no longer left side Onda Little on the top on now, some onto the right side asked for Okay, Now I'm gonna just march that into the background I am drooling decks this pain from my brush and I'm just scratching my brush. It's merging that into the background. Now you don't need a clean blend or you don't need any specific pattern here. You just need to smudge that this way you will have a lot of tech show on your mountain. It's you can clean the shape of the mountain if needed. Now I'm going to add fuel. Tiny mountains in the background. Very tiny one on this are very far from you. So I'm directly going. But pains Great. I've loved Varna. Wish you on one or two tiny ones onto the left side. Aspar, you can see the mountain talk to tiny. You shouldn't be going but Biko ones. So when you add in this tiny ones on when you have those bigger ones in the foreground, this will give a sense of depth to your painting. Dini to anyone here. That's it. Now, using plains Cree on my smaller sized fresh, I'm going to add some boards onto the sky. I know most off you're still having problems with the birds on some off. You recommended me to add a section where I will be showing only boats related. Rhino, I'm thinking about that. Maybe I would have to listen in one of the coming days. Meanwhile, just practice with the one speeded earlier, or you can go with the pencils. Get first go with a very light sketch on go with a pointed pencil tip because the boards were adding, are too thin and delicate. The pencil lines shouldn't stand out when you finish your painting. So if adding a pencils get us a good option for you, you can do that. Maybe for the bigger ones, you can go with a pencil sketch on for the tiny ones like the one I'm adding now that could indirectly go in with your brush. I'm wondering, should I add Oh, sure at the border Or leave it like this I felt like to this way. But maybe I can add a lie to social branzino over the quarter. So if you guys, like, did this where you can leave it, here are you can add a light wash of Valentina over the bottom, just like how I will be doing to replicate the sand. I'm going with a very light wash of Mancina. I wouldn't be adding a lot of color at the bottom. Just attend of Bon Xena along that line off masking tape. Andi, once I have added that I'll take clean water on blend that into the sea so it will be a seamless blend from turquoise blue to that bond scene, huh? I really liked how simple and beautiful this little pieces looking. If you want, you can add more mountains, or you can add some palm leaves hanging from the top, just the leaves without showing the tree trunk. I hope you guys are enjoying the 30 day watercolor challenge. It was really quick. Were already on Dayton. We have 20 more days to go on. I'm already loving the progress. You guys some weekend, many off you message me saying you guys are seeing the way you are improving and I'm really happy to hear that. If you are posting your class projects onto Instagram, it would be great if you can use this hashtag so I wouldn't miss your work. I hope it was simple. Let me quickly remove the masking tape. This one was a very simple sky. We didn't add any shadow or anything to the cloud switches went in with the blue color on left. The people, why to create the clouds in one of the coming days will try a little more dramatic clouds where we'll be adding shadows to make it look more realistic. This one was super quick. We hardly took 12 minutes to finish the entire painting on. I really hope you guys enjoyed being in the straw Picula sama beach. I really enjoyed spending it. Sometimes it is nice to pain something with just really simple. Give it a try on. Don't forget to post your painting in the class. Predict gallery. I would love to see them. All right. Thanks a lot for watching. I'll be back here tomorrow with another exciting class project.
14. Day 11/30: Hello, everyone. Welcome to day 11 of over 30 day watercolor challenge. I saw many off you message me saying you have difficulty in painting clouds Now there are two aspects to get to overturn the technique. Right? Oneness using a good quality watercolor people, which is 100% quarter on the 2nd 1 is working with the right amount of water on. This can be a little tricky for the beginners. You will have to do quite a lot of practice to understand the right amount of water that you have to use depending on the people you're using. Anyway, we'll get to see all of those things and two days. Listen now, having a good quality watercolor people has a lot of impact on your painting. I mostly go with arches. This one here is only 90 lb. For my practice pieces, I go for 90 Obie people because this one is much cheaper than the 1 40 every paper on. I kind of love the rough green paper and also the court press people. Now all of these blocks here are 100% quarter on. That is one thing I love about arches. No matter whether it's 90 l B or 1 40 lp their papers 100 person carton, which makes a huge difference in my paintings. Most of the time you might be doing the technique right. There's just because of the people you're using. You won't be getting the right result, so it is very important to cope with the right quality watercolor paper. Now, after Arches, my next favorite brand awarded Laura Skansen heritage. There are many other variations from cancer is the only one I allow. They have got mixed media paper 25% quarter on paper and there are so many other varieties with cancer. This is the only one I allow on does the kind of texture my people has caught for the entire set of paintings throughout the class. I will be using this paper on. You have already seen the result. This paper works grateful wet on wet technique. So we spoke about the first thing which is the watercolor. People will start with the painting on as the progress. I will talk more about the amount of water you need to use. I have already taped on my people. Now I'm adding an even coat of water now, once I have added this coat of water, I'll show you how much water I have got on my paper. I'm taking my brush across the people multiple times to make the court of water. Even I don't want bowls of water in between. I want an even goto water. Now, when you use a big wash crush, you will get an even coat of water. And also you won't miss out any area. When you use the smallest size pressure apply and even called the water, there are chances the water may not reach everywhere. So that is one great thing about using because I expressed to apply the water on your paper . When I start applying the paint, you will get to know how much water I have got on my paper. I'm using my flat precio on. I'm going with the Shed Russo's ultra Marine and I'm going to apply that she'd onto the top on down to the bottom. You can use any off your proper We need a reddish purple. I'm loading my brush with enough off Russo's Ultra Marine. This one is by you die announcement. Now, I'm gonna apply that onto the top off the people. I'm going with a medium tune on. My pain is not too watery. Now I'm going to drop this onto the top of the paper so you can see my pain is bleeding down that it's not floating. It is just spreading into the background. If you have a lot of water on your people, your paint will start floating. It won't be like this if you remember, we had done this painting where the paint was floating down. Where we had a lot of water on our background on the pain was too watery. But here it is different. The paint is not floating. It is just a bleeding down compared to the other painting. We have a lot of control on the way the painters spreading. Now I'm gonna apply the shade onto the border. Master can see how the shade is bleeding into the background, and you can also see the kind of water I have called on my people. It is just a shiny coat. I don't have any running water. I'll make the top media a bit more intense. You can see how that color is blending into the background. I'm not putting any extra afford here. This is just because my paper s right. I will add some Indian stone onto the border mass. For now, we have the center area remaining for this area. I will be going but four million trade. I washed my brush on. I'm switching to one million trade and I'm going to apply this onto the middle area and I'm gonna blend the bottom and the top So we have a nice Grady int off a purple on the top of a 1,000,000 dried in the middle on again, a purple at the bottom. So I have a nice Grady in bush over there. Now I'm again going back with Rose off Ultra Marine. So I have freshly applied paint on my paper. It is not bleeding. It is not floating. Now under this, I'm going to drop in some dark. Oh, don't off roofs off. Ultra Marine on you will see how my paint is reacting on the wet people. It is not spreading a lot. So if your people has a lot of water, your paint will start to spread on bleed in a very fast manner. You could see the pain that I'm adding now it's not spreading a lot. It is just in in the place. You can see a little spread around those lines for term marry, but it is very limited. Before you start with this class, predict, take off the tiny piece off the people that you're using on. Apply any color onto that on our fuel lines for the French, it on top of it and see how you're paying the spreading. Now I'm going with the much more intense tone of purple on, mixing a little love integral into my gross off ultra marine on I'm again adding some lines onto the sky, going with the board on on the top, I won't be adding them on to the bottom. Just a fuel you can see my pain is not reading a lot. I have a lot of control over the way my pain is spreading. That is just because my background is not too watery, the pain that I'm adding on the backgrounds all tone or that watery. So this competition gives you the perfect sky. So the way your pain spread totally depends on two factors. The amount of water in the background which means how wet your papers on Secondly, the kind of pain that you're using. If it's too watery, your pain will start to spread a lot. And if it's not a tall watery, it will stay in the same please, without treading on creating those rough patches. So you have to work around different kind of consistency. To understand what works the best for you. You can see the way my paint has spread out. Wherever I applied a larger amount, it gave me a bigger clout. And wherever I have applied these lines, it just spread into a little idea on state us lines itself. On That's my sky. Meanwhile, my sky dries. I will quickly show you a few more examples off how much water you should have on your paper. I will put this for drying on. I'll get a lease off people. So it is the same people that is the backside of this painting greeted. Okay, so I'm gonna quickly demonstrate few examples on this paper. Um, hiding all even wash of one million trade. You could see the pain that applying us not toe watery. The pain time applying is not floating down does just ing where I have applied it. Now, under those vet orange background, I'm gonna drop in some rows of ultra marine sheet. I'm loading my brush with the sheet. Andi, I'm going to drop that into the background on You can see the way the pain is spreading because my background is not that but it was staying where I have applied. It was just creating a little spread around where I have applied those lines, just not creating any big atoms. I haven't add a taco tune so you can clearly see my pain does not spreading a lot. This is just because the background she that have applied it's not at all watery. Now again do the same excised this time I'm going with the yellow on. I'm going with a little more loser consistency. My pain is a little more what read and what I have applied earlier. Now on to this I'm again going with Rose off Ultra Marine and I'm dropping that she'd onto the yellow background and you will see the difference. Now I'm going with the same consistency which I applied on the orange background. Oh my God! That is how water droplet fallen on my background, creating ah moon automatically. I was not country into at a moon. So now maybe it'll just cover up that mistake by adding a moon. Anyway, let's focus on this yellow background. I'm adding the paint onto this wet background and you can see the kind off straight I have . Gardner was totally different from the 1st 1 on this one, the color that I applied a spreading onto a larger area, creating Biko patterns. Because my pattern this little watering than the 1st 1 the 1st 1 was in water. It was just right. So everything to really depends on the kind of witness your background has called on. Also on also the consistency of the pain you're applying on that wet background. So they cut a piece off people and try out all possibilities. Go with the wet background and go the watery back now on, apply paint on the board the background and see how they're spreading. This way, you will understand what kind of results you warn and what kind of consistency you have to go. It I'm quickly adding on, even wash off turquoise blue. Andi, I will drop in somethingto blew onto this background when it's a game, took our with the same exercise. Now don't worry about the shape of the clouds just dropping your paint and brutal manner You want to. You can add in some little pattern for some lines, and that will automatically spread into the background if you're back on this bet on giving you a nice dramatic sky. If your paper is not 100% quarter on, if it's not in our discreet one, your result may differ. How much ever you try. Please don't get frustrated and keep up. Take this as a learning experience on Whenever you get a chance to buy an artist, great people give it to try a king. Now let's go back to our main painting. My background has dried. Now there is a moon that I need to make on the top on. Also on the right corner. My paint has created or dirty bleed that also I need to cover up so other add some landscape onto the right side to cover of that mistake. I'm quite happy with the sky, so I'm not going to change the painting just for this little mistake on the right side. I'm using Payne's gray and I'm going with my size number to brush, and I'm going to add some plants and some leaves and some kind of foliage over here. So my intention is just to cover of the mistake I made. If you want to go with any other subject, you could do that. Maybe you can add a pine tree or a mountain or anything off the choice. I saw somebody had added a printable onto the pixel sky, which was looking so gorgeous so you can improvise and pain better subjects than mine. I just want to cover up this mistake, so I'm adding these plans on to this corner. I told her one on the right just to cover up my mistake. Then I'll take it down, covering up all those blotches. So let me quickly finish this. - Go with any subject off your choice. As I mentioned, you don't need toe go with the same thing. What I'm doing here. Maybe you could just add some words and leave it there. I'll add some more over here. After that, I will just add a moon, adding these plans are quite simple We just need to take your brush and a daughter pattern and keep on adding them until you fill the entire line. You can see over the boredom I have a solid color on. Just don't atop. I'm adding his daughter patterns to make it look like leaves. In between. You can go with some taller plants and in between they can be shorter. This will make your painting look more interesting. Here's a closer look off how I'm hiring the plans. I'm just taking my brush in oppressing moment on adding some dots in between. You can leave some gap. It will look more beautiful. If you can see that sky color in between those leaves, I will quickly take my brush along this entire plans we created Andi. I will add some gods to make it look a little more interesting. Just add dots onto that outer idea, and with that we are done. Now it's time to add that more. I will be going with white water color. You can use either wide watercolor or gosh, if you're adding a moon, please make sure your sky has completely dried. Now, using my smaller sized fresh, I'm adding a circle. A white circle. But it's my moon. Actually, you don't need to follow this location. I just added the moon over here just because of that water drop. I don't know. When did that happen? Anyway, the location is not that bad on. Luckily, I only had one drop of water. Imagine if I had to. Hard three. I can't act about three moons, right? So that would have bean disaster. So I should consider that as a luck. So choose any location that you want to on Dario Moon. If you want to go with a person moon, you could do that. Or if you're at a moon at all, that is also up to you. All right, now, I'm gonna go with a bit off pain screen a very light toe on onto this white background. I'm going to drop in some lighter tones of great to make it a little more realistic. Moon. Just add some random patterns and smart sat into the white background. That is all you should do now. Our moon is looking a lot more realistic. All right, on the dot we're done with double painting. I hope the clouds exercise are a little more clear now. You need to practice a lot to get it right. You may not get it right the first time, but don't worry. If you got the Grady int right, you're actually going to get it right and one or two tries on. Also try switching to a good quality. Were tickler people on? Try to King. You will surely see a wonderful difference, I bet. Want to start using a good quality watercolor people, You will never go back toe a cheaper paper even if you go with the cheaper quality watercolor that is to locate. But the kind of paper you use has a lot of impact on your painting. All this frustration off not getting the results right will go away in a single try. If you go with a good quality people, Andi will start loving wet on wet technique. Okay. I hope you all enjoyed to raise painting. Go back to paper on, get to know your paper on your watercolor a bit more before we proceed with our next projects will be going with a more dramatic sunset tomorrow. So before that, I want you all to get good with your butt on the technique. All right? I'll see you tomorrow.
15. Day 12/30: Hello. Hello. I hope you all are doing great today. We are on the date. Well off for 30 ideological challenge on there are still few people struggling to get a bit on. Tried? I was actually planning to do this one for today, but I gotta tell personal some of photo on we'll go, but some more simple ones for the next few days. So yeah, let's do a simple desert landscape which doesn't require any button where technique it will be mostly even washes off a single color, which is going to be a really easy and quick one have take down my paper onto aboard. Now we need to add some sand dunes. I'm going to start with the pencil sketch. I'm going to add a big Sandhu onto the right side. So the sketch is more or less similar to the one we did for the mountain for the mountain beaded irregular line in the middle for the sand dune. It should be a flu. Ekho. Ah, very nice flu ico, which doesn't have any break. So that's one Sandu There. Now I'm going to add one more to the left side. Asper. This one is going to be a little flat 10 okay, so that's a second war now a tiny one in the background on that's of a pencil sketch. Now let's start by painting the sky. I'm going with bright blue on. We'll be adding a Grady and wash off Bright blue will be going with a very light toe. The color that we're going to start with is also going to be a lie to one on towards the bottom will make the color even more lighter. So I have prepared a little off pain in a loose and watery consistency. I'm going in directly with the paint. I'm not going to add water onto the paper now. You need to be very careful when you're applying paint onto thes lines, as the sand dunes are in a very light on. We don't want any blue shade onto that, which will be very difficult to cover when we paint the sand dunes. So be very careful when you're adding paint onto this line. I'm putting my paper so that the paint will float backwards and I can prevent it from going into the mountains. I'm adding a lighter tone off pride blew over this line. Then, as I come down, I'm going to make the color little more brighter. - So on the top, I have a bit brighter blue on towards the bottom. I have a very light one off blue. All right, now let's wait for this to dry. We need to reach for the sky to dry completely before we go in with the sand dunes. Otherwise, the paint can blade into your sky, which will be very difficult to cover up. So take a walk and come back or use your blow dryer on. Make the process quicker. This is a sample one I tried before I went in with the main project. I always have the habit of doing this. I I do a composition sketch or I do a miniature painting like this on my little sketchbook , just to be sure that the color that I'm going but on the composition is looking great. It's actually a good habit to do this always before you go in with your main painting. This will boost your confidence, and you can paint on a because kill without any doubt because sometimes when you start on when you are halfway through. You feel like maybe I should have changed the color, or I should have changed the subject a bit. So all these doubts will go away if you do a composition sketch. Okay, so that was a little tip. My sky has completely dried. Now I'm going with the sand dunes. I'm going with Mancina. I'm taking a light on of Bon Sina, and I'm going to apply that onto the left side off all these sandals. - Okay , so I have full that section with the light on off Mancina. Now I'm going with a little more pride to total Mancina on. Before dispatch dries, I'm going to drop in fuel, wood Darko tones of bonds and into that so that the color will blend into the background, creating some textures. Now, when you're adding this lines, they get along the shape of the sandals so that it looked a little more realistic. You can see the way I'm taking my lines. I'm just fooling the profile of the San to on adding lines in a similar manner. Okay, now I'm going to repeat the same exercise for the other two sides. Now I want to talk a little more about the watercolor paper because the last few days, many off you're facing a lot of problem with your people. Now there are two type of paper available in the market. Wanna sell loose people and the other one is courting people. Even if you're having a 300 GSM people, it doesn't mean it is an artist. Great quality. The 300 C ism is just a representation of thickness of the people, it just say's how thick your papers. So if your people say is 1 40 beauty 100 Jason, which means the paper is off good thickness on if it say's 90 l B. That means the people weight is less, which is the paper thickness. So this has no connection with the quality of the paper. Now most of the brand say's at US 300 GSM on. They don't specify whether it's Corton. Most of the cases that may not recording that people will be a said. You lose many off the big brands like cancer. They sell cellulose paper and also cotton paper. So be very sure when you're buying your people, look for the text 100% Corton Solutions papers basically struggling. Read people. They cannot be considered as an artist. Great quality. They work okay for the single washes, but they don't absorb the pigment and the water well, which makes it difficult for a bedroom technique on. This is the reason why meaning off your brain on getting the clouds and the sky right? I'm assuming you were using our cellulose paper, and it's not 100% quarter. The good quality watercolor paper is very expensive, so I'm not insisting you to buy a good quality paper. It is totally up to you. You can take this as a learning experience on understand the process and also get to know the watercolor techniques on later, when you feel confident on when you're ready to invest, go get a good quality watercolor people. Okay, now let's go in with the shadows on the people tones. Looks like this has tried. Now two other depot tunes I'm going with burnt umber. If you don't have burned ample, you can mix a little off pain scree or a pinch off black to your parents, enough to get a dark overshot brown. If you have Bontempo, you can definitely go in the cat now on to the right side where we're going with shadows on the Depo tunes. I'm going to start with the point. Ample. Now, when you're doing this, make sure you're following that line. You have drawn their We need a clean flowing cool here. So did you brush along this line? This line is very important. You have to have a clean flu. Ico Otherwise it won't look like a Sandhu. So started born number now, Philip, almost half off the section on the towards the bottom Switch to Bonn. Sana on full, the restaurant Agreeable points, you know. Now I'm switching to Bond. Seana, I'm going to corrupt the restaurant, the area and bouncing. You need to blend these two she ate Well, okay, so I have applied born number on the top and bones, you know, over the bottom. No, I'm cleaning my brush and I'm just dragging the born on both towards the Mancina. Just dragging down Only in one direction. The's lions will replicate. Oh, slope on. Give it a more realistic look. All the shape of sand dunes are made by the movement. It's very interesting to read how the big shape and how it keeps changing. I'm living in to buy for nearly six years now, but I have been to Desert Onley three or four times. I'll just clean the stop shape on. I will repeat the same on the 2nd 1 I will start with born number on towards the bottom. I've lied, Mancina. Then I will drag the born on book into bones in our creating these lines. When you're adding born Dumbo, follow the line. We need a free flowing line here. This is very important to get that look off for Santo. If you have a broken line, it won't look like a Santo. I added Born Tampa Now I'm switching to bond scene up now Just drag the born on board down, creating these lines So we're done with two sections we have on your left On the top. I just want to make you all relaxed with this lesson. So many off You are already frustrated with your particular on baton technique on many off your on the wards off giving up. I don't want you to do that. Let's finish this 30 dates at born number on the top, Andi, as you come down switch to Bonn, Sina. Once you have added that on, just drag the Beaumont on both towards of Mancina to create a slow Just drag it down. Okay, so that's also done. Okay, we had done with double painting. I want to tell you I'm quite enjoying the discussion section. You guys are really doing a great job helping each other on many off. You have a good knowledge about watercolor. It's very interesting to read everyone's take on vertical er and the techniques also take out your friends work using this hashtag on instagram on Try toe, engage with your friends. This is how you build connections. But I started my instagram account. I used to take part in all the water glitter and just happening Andi people used to recognize my work and things to follow me through the hashtag on. That is how my account started growing. So if you haven't been time going to that instagram hashtag check out your friends work. Appreciate them. Start a conversation If you like their work, follow them on share. They work also they will do the same for you on Let's together start growing. So this is a finished painting. I hope you all enjoyed bringing this easy desert landscape. Give it a try. Maybe you can go with a different color sky. Maybe you can add some clouds or do a dramatic sky. All right. I'll be back here tomorrow with another easy one.
16. Day 13/30: Hello, everyone. I hope everything is good at your aunt today they are in the day 13 of over 30 day watercolor challenge on today we're going to paint this beautiful lavender field so the colors you will need are for the sky. I will be using permanent violet and crimson on for the bottom to paint the lavender field are abusing crimson on Joseph Ultra Marine. You can use any off your public She intra pros off ultra Marine on for the mountains in the background I will be using in Deco and to add all the details have abusing pain. Scream So those are the colors you will need. There's going to be a very quick abstract washing for lavender friend. This is going to be a very quick wine, but it's going to be really gorgeous. So will it start? I have already taped on my paper on I'm starting with Depends is kitsch. I'm adding a line a little below the central to people. Now I have a lot of mountains over the left side. A little wine on. I'm gonna add another taller warm on the right side on. That's my pencil sketch. Now let's start to paint. I'm starting by applying analytical the water onto the sky Today they're going with the sky . We just quite different will be doing a pixel sky on the shades Are we using our Violet and crimson will be going with a light or Toronto bought a shed. I'm switching to my flat brush and I'm going with permanent Violet. You can use any well that are caught. I'm going with a very light toe. I took a light on a violet. Now I'm applying this onto the top of the sky towards the bottom. I will switch to crimson on. We'll go with a light on again, which looks more or less like a pink on washing my brush and I'm switching to crimson. Your brush should be thoroughly clean before you switch to crimson. We want a very fresh pink without any dental, while it now in a similar manner I'm going with a light one of crimson and I'm applying that from the other end. I'm not making the too close meet against a I'm deliberately leaving a little old white space in between. Now I'm cleaning my brush and I'm blending that pink into the background, so we have a soft basil sky. You can try the same thing but different clothes. Maybe you can try it with blue and crimson and also can do it with just blue alone. So we will have a nice blue and white day sky, so explore the same technique with different clothes. It's a very easy one, just by Lindows Bide capsule between you will get a very realistic sky. Now let's find the bottom. Once the sky drives between the mountains now we'll be doing a very minimal of ocean off a lavender feel. It's not at all detailed. Maybe in the coming days. One day we'll try a very detailed version of a lavender field. Today, let's go with a very simple one. I'm starting my agreed in wash of crimson light on the top on more brighter and bolder at the bottom. So this is the lighter tone that I'm following over the bottom. The color will be very pulled and bright, so just fill up the bottom with a simple trade in wash of crimson light on the top, on brighter at the bottom. If you have any kind of pink shade, you can use that word instead of crimson. That will look do bright. So if you want a more right to result, you can use that one. So we have a nice Grady in washing crimson there now to paint. Allowing the field will be using the same technique used for this painting for that one. We went in with yellow joker and brown tones. Now, using the same technique, we're going to paint a lavender field amusing rolls off ultra Marine. Here you can go with any purple that you are God, just like how we did in the previous painting are inclined lines like thes adama freehand manner in one go, Don't break the line So you just need toe drag from one end to the other and it doesn't need to touch the other end. You can leave it somewhere in the middle So we applied a braiding wash of crimson. Then we applied medium tones using goes off ultra Marine. Now I'm going to add some more deeper tones. I'm going with a much more doc. Oh, don't off roofs off ultra marine At the same technique being used here, we applied a yellow car back on first. Then we added lines using orange. Then we went in the bond. Xena Now, to hit a neighbor door of rows of ultra Marine. I'm gonna makes a pinch off into going to this so that I get a deeper tune off Roofs off Ultra Marine. Now, using the deeper don't I made, I'm going to drop in some Darko tunes on the outer edge of all these lines. I'm adding them under left end. I will be out in the dark. Oh, don't only will heal The lions are looking very prominent. I want a soft finish. I'm washing of the pain from my brush and I'm gonna take a little off crimson and I'm dragging these lines into the background so that I have a small to finish Now the lights are looking much softer. It is not really prominent. It is merging into the background, all trying. So that is our EEC lavender field. Now let's pain the mountain for the mountain. I'm going with a light one off intercourse I've learned and even wash off into court on the board, the mountains, the one in the foreground and also one of the background. It's a very light. One off indigo. I'm gonna fill up the anti amounted in that shade. I'm loving about painting already the pixel sky and that bright pink love in the field. I think it's the perfect competition. Now I'm gonna fill up this mountain also an integral for the warning, the background. I won't be adding any shadow so deeper tones for the big one. We will add more details, spawns the back earlier dries. We'll be adding more medium on deeper tones onto this one will also be adding some driver strokes. So it is absolutely okay if your background washes, not even for the one in the background. I went in with a very light one off intercourse on for this one, which is much closer to you on a sniffle crowd. I'm going with allergy. More dark, atone off integral compared to the one in the background. So you get that sense of distance. Now I'm going with the depo tone off into Go on. I'm going to randomly drop in some deeper tones onto the sweat background so that it will blend on to keep us more. Take shoes. I had some lines following the profile of the mountain. You just need to drop that in on that that blend into the background. Even if they don't blend. It's fine because we'll be adding more. Try strokes onto this. Now I'm sweating my smaller brush. I'm continuing this line to the other end, and I'm adding some tiny mountains, some low lying wants. - Now it's time to add the dry brush patterns onto a mountain to give it more textures. I took my people trouble. I adapt the brush on the people trouble to remove the excess water, and I'm just cracking my brush on the mountain to create all those dry brush patterns. I'm using this more brush because I wonder textures to be too small. This mountain is quite far from you, so you don't need very prominent textures. We need some light textures. We use this dry brush technique and many off horrible other paintings. We tried snowy mountains, and also we tried a brown mountain, which had a lot of textures. Almost everyone off your guarded right. And I guess you guys are already exports and dry brush technique. I did a blunder. I forgot to click on the record button while I was drawing these boats. So sorry for that. I went in with few quick ones. Maybe you can post a video on, try to replicate them, or you can go with some detail. Boats are. If you're not confident with adding boat, you could skip that. All right now, I'm going to have a line off Greece along this line. So that's going to be the final step. I'm adding some lines close to each other, taller wants and shorter ones just to replicate those trees. Ask. This is very far from you. You don't need to put a lot of effort here. I'm awfully adding those lines on bond making it look like trees. I'm using my smaller size pressure so that the lines will be very thin and delicate on. I'm using pain Scree. - All you need to do with our lines close to each other. Some of them can be longer and some of them can be shorter now, in a similar manner. Fill this entire line. - All right, on with that, we're done with our day 13 Spain Ting. I was actually thinking to go with a bright blue and yellow sky because many off you allowed the pixel. Skybridge it Polio. I thought I will do something in that line on. That is why I decided to cope it all. A lavender Oh, and a pink sky. Andi, I hope you guys allowed this one hospital O K. So here is the finished painting. They hardly took 15 minutes. Look at this gorgeous painting. I hope you guys enjoyed this easy lavon toe field. We'll do some more simple paintings over the coming days on Maybe Once we cross day 20 we can focus on a little more detailed and complex ones. I have a handful of subjects to explore. We'll do some Seascapes and we lose some detailed meadow and some more mountains. Capes. Alright, guys. Now it's your turn to paint this car, just landscape.
17. Day 14/30: welcome to Day 14 and I hope you all are doing great today. We're going to paint this gorgeous mountain and meadow landscape. When I was going through all the things yesterday, I realised we haven't done much of crane landscapes, So this is going to be a very quick one. Let's have a look at the colors we'll need for the sky. I will be using right below. You can use any blow that have got on for the meadow. I will be using gambles here, Lou. Sap green on to get the deeper don't green. I will be mixing sap green and intercourse for the mountains. Also you need in Deco and sap green on to add the final details. We will need beans, gray or black. All right, let's stop. I have taped on my people already, and I'm adding a line. This is the model that we have at the bottom. Now I'm going to act. You mountains have allowed one huge one over here. Now another one in the background. Now, similarly, I would like to move mountains on to go right side and we have the pencil sketch ready. Now I'm switching to my wash brush on, I'm applying and even called a water onto the sky for this one. We will be using some techniques which we tried yesterday for the meadow of abusing. The same technique we use for the lavender field for the sky also will be using some techniques we tried yesterday. We tried a pixel sky. We left some white caps in between. For today's Kymmene, just use blue on. We live some paperwhite in between, which will automatically make the clouds. I'm using bright blue. You can go with any blue that have got the one I'm losing Curis from the brand white nights . You can also use cerulean blue, cobalt blue, Prussian blue or which were blue that have got to apply the paint onto a sky. I'm using my three by four inch flat brush. I'm going with the medium tour of blue. Now let's drop that shade onto the vet background. I'm not filling up the entire sky and blue. I'm just adding fuse creeks some longer warm and some shorter one. Now the color will automatically blend with the background, giving us some nice white clouds. Now you can add some streaks from the other side Asper. So you need to drop in the color of in your background respect the normally you will get a soft looking sky. Otherwise you will have some blotches. It won't look the soft. You will have rough look to your sky If you're using a good quality watercolor people, you will still get some time to apply color because the paper will stay Went for a little more longer time. Come back to the normal cellulose paper. So if you're not using a good quality paper, be very quick. Okay, so that's my sky now. Want to sky advise Been paying the mountains. Meanwhile, the sky drives will pay the matter with the bottom for the mountain will be just going with some even washes off in tico and green All right, let's bring in the middle I'm going with Gamble Jello Adam using my Flatbush I'm going to apply and even wash of Campbell Chilo onto the bottom. Just fill it up once we have a yellow shade over the bottom The abuse in the same technique we use for the lavender field. The only difference is this time we're not going with inclined lines. No I don't some yellow onto these mountains. Ask for just a little over the bottom. I will be adding some grassy pattern over the bottom, and I'm painting the mountain, and that is why I'm taking the load a little into the mountains. Now I'm switching to my round brush and I'm loading my brush with sap green, and I'm dropping that into the yellow background. You can underlines in a random manner. It doesn't need to be inclined if you like the lines. So if you like the incline lines better you can opt for that or again randomly atom lines, just like I'm doing here Now I'm going with the much more deeper tone off sap green on adding lines became you can see. The lines are nicely blending into the background, giving us a soft look so there is no limit. Your you cannot ask me lines as you want. If you're adding more lines, just be sure that you're not covering up the entire you yellow background. We need to see those lighter tones on the medium tunes. Everything in between that will make it look more beautiful. Now I'm going with a much more deeper to know sap Crane. I'm mixing indeed good sap green to get a deeper toe, and I'm again repeating the same process off adding lines. I'm just adding the people don't onto the out the end. I won't be taking a deeper tones closer to the mountain. I will just be adding them over the bottom. Our meadow is already looking so beautiful, but those different tones of yellow and green you can see all my lines has a soft look. They're not very prominent and they're not looking very rough. This is just because my background is still a little bit. So, depending on the kind of people that you're using, manage your time. If they're not using 100% courting particular people, be very quick. Now I'm adding some more deeper tones over to the outer end. This time I learned more in to go to a sap green to make it more deeper and again, I'm dropping them onto the outdoor end. She'll start this bottom line. You can see we use the same technique and three paintings Now, just by changing the color because a different look toe all our paintings. I think it was Day three, we painted our golden wheat field using L. A Walker on for day 13 we painted a gorgeous lavender field. Now we are painting a brain meadow just by tweaking the technique a little bit. Okay, so we are done with the bottom part. Now it's time to pay in the mountain, and we have a gorgeous green meadow over there. I was thinking to go with the flowery meadow, but then that might be a little difficult for at least some off you. So I thought our Day 20 Bilko. But simple paintings are after two, and table quickly jumped onto complex ones. It will be a little challenging and also fun to try out new techniques, so we'd hold a 20. Okay, now let's play in the mountain. I'm going with Indigo for the warning. The background. I'm going with a light one off into cool. Now the ones which are closer to this. But on the right and the left, I'll go but a little more tackle during intercourse. So that's the one in the background. Now for this one. I will be going with a bit more pride to turn off intercourse. Just a tone brighter to the warning. The background on for the mountain on the left side. Aspen. I'll go with the same shed. You can try out the colors on his crappy SOF people just to be sure that you're going with the right tunes. We need just a tone brighter to the one in the background. It shouldn't be too dark now when you're adding the color onto this mountain. When you're reaching the bottom, make sure you're adding a little grassy pattern. Don't Philip it in a straight line. It's just a rough pattern. Good. You need to put a lot of effort here. This is very far from you, but still we need a grassy pattern at the bottom, which will have a lot of impact on your painting. You will get to see that once we finish the painting. OK, so that's my second mountain Now in a similar manner, I'm going to fill up the mountain on the left side. Aspen. - Okay , so that's my modern The left. Now I'm switching to my smaller sized fresh, and I'm going with a little more deportment off intercourse on, making this crossing pattern a bit more prominent. I'm adding that pattern at the bottom on Double Smart. Start into the mountain now I will repeat the same on the other one. I'm adding those crossing pattern using my smaller brush. Just take your brushing those exact movement. That pattern doesn't need to be perfect. Now I'm Adams and dry brush patterns and smarting this into the mountain. Just kratcha brush on the monitor, using the same turn off integral on Crete striped patterns. If we don't know the step, the grassy pattern we applied at the bottom will be very prominent on. It may look a little odd. Okay, now let's go with the last of mountains. I'm going with the depo green. I mixed into cool with my secretary to get those depot tomb. These two mountains are much more closer to you than the ones in the background on. That's why we're going the taco tune so that your painting has a sense of depth now over to the bottom, just like we did for the other mountains. I'm creating those grassy pattern on for the rest of the mountain. I'll simply at this deeper green. It would look really nice if we have some red flowers at the bottom. No mind. We can do that in one of the coming days. I have plans to paint the flowery meadow, and also I promised to paint. But more detailed lavender flee last for we're almost half done with our challenge. Now I feel like 30 days off Harry lies, so we'll be helping irritable first mountain in the foreground. I just made those grassy pattern look a bit more certain. Okay, now, in a similar manner, I'm going to paint the other one on the left side. I'm mixing in dico and sap green to get a report on a grain. I'm simply filling up the entire mountain in that shade on over to the bottom. I've allowed those little pattern to replicate grass when and a color and a street flat line. When you're reaching the bottom where you are touching that meadow, it will look really old. When you're hard in the paint in a grassy pattern, it will make it look a lot more realistic. These are very minute details, but it has a lot of impact on your overall painting. You can use this in your future paintings, aspirin, whenever you're painting a meadow and a mountain. I'm adding those patter on. I'm feeling the rest of the mountain and there's deep green. I'm loving this deep green. Be meat. It's an easy one to make. We just mixed indigo and sap green, and it looks perfect for horrible mountain. That's a nice one to paint forest and pine trees. Okay, now I'm going with a bit off Dipoto on. I'm just dropping that shade onto the bottom, just like how we have on the right side. Adding fuel depot tombs O K. Everything has properly dried. Now I'm switching to my smaller sized fresh and I'm going with pain. Scream Onda. I'm adding our friends at the bottom. I'm starting with the 1st 1 a night in a post hill now under the warm right next to that, when you're adding this pose to go with a slightly inclined man, you don't Adam and a body straight and perfectly finished way that's the 2nd 1 Now have a lot more noble here, A little more tico one. So play the different heights and thickness so that it looks a little more realistic. Now we can connect these two pools to using a string you can use a detailing brush to add this line. We need a thin and delicate line. Now I'm connecting these two posed. Now maybe I can add one post over here on connect the other one and this one with a string . You can't even be out of this. Friends are painting houses. Got a lot more character. It's the same thing when you add boat onto the sky When you add words, your painting will start to look a lot to friend and how it was earlier. So those little things really matter. No other land one here and also a tiny one onto the left side O g. But that of offense is done now, Last but hardly least I'm gonna add some boards from the sky. If it all at the boards, you can leave the sky. Asset is I will quickly at few boats onto a sky. - Old rights On this The last board I think I went a little overboard with the birds. My share of attitudes toward three on with that, we're done with the painting for Day 14. I hope you all enjoyed this quick green landscape. I think the only thing took time was the birds and the friends. The rest was quite quick. Let's remotely masking T. As I always mention, when you're removing your masking team, remove it at an ankle so that your paper won't ripples on. Also wait for your painting to dry completely. Okay, so here's of a gorgeous meadow and mountains. I hope you had a great time painting this quick landscape.
18. Day 15/30: guess four guys. We are on the day 15 off of water, daily vertical, a challenge, which means we're already halfway through. So today I want to make it a little more special. I'm going with one of my favorite topic today. We'll paint the corgis and vibrant night sky. So to paint this gorgeous guy, you will need to colors mainly, which is Taylor blue and turquoise blue. If you don't have a low blue, that's absolutely fine. You can go with any other bright blue that have got. You can either use Prussian blue Indra tone blue, ultra Marine, blue or any other vibrant blue. To add in the reflection, I will be using integral on to paint the mountains and to add those birds, I will be using pains. Great. You can either use Payne's gray or black on to add the final details. I will be using quite particular. Okay, lets start. I'm going to add the pencil sketch arm, adding a line little below the central to people. Then I'm gonna add to mountains of bigger one on a smaller one next to that, Then I'm going to add a piece of land over here on that. So pencil sketch for two days, painting will be using to techniques mainly which you guys are. Very Tara. What? One is the Grady in Wash, and the next one is a dry brush technique. We have tried both the techniques and other previous paintings, so I guess this will be an easy one for you all. Okay, lets start to paint. I'm going to apply even social water onto the sky. So I was keeping a track on the discussion section on. I'm seeing many off. You are improving on many if you're happy with the results, you are getting so many office fits to accord on watercolor paper. And I'm very happy to know you guys are enjoying the process when you change the people. This is why I kept repeating Go with 100% court, in particular, people now to a planet Greenbush. I'm using my flat brush and I'm starting with the little blue. As I mentioned earlier, these are the two shades I will be using Taylor blue red and took ice blue booth sheets from the brand from front on the top. We will be applying a very bright one off Taylor Blue, Andi towards the middle will switch to turquoise blue on. As we reached the bottom will again switch back to Taylor blue. So that is how I have planned the sky and the water. Okay, let's start with Taylor Blue. I'm going with a very bright own and I'm a blank that onto the top of the people, I will take it a little more down than I will switch to turquoise blue. This is a very pretty, vibrant blue. I mostly used it for water. I'm deliberately leaving little of white caps in between. Not really gaps. A little tint of white. I'm not going with a very smooth radiant, but it's totally up to you. I'm washing my brush now. I'm spitting to turquoise blue. Make sure your brushes properly cleaned. The were sweats. Tutor. Quite blue. We need a clean and fresh turn off turquoise blue. Now our datin blend the colors well. You can see the kind of tone I'm adding. It's not too bright and it's no to light. Also, if you go with a very bright toe, you won't get that glowing affecting your sky. So go with a similar color. It shouldn't be too dark. Okay, now, over to the bottom. I'm going to switch to Taylor Blue at the tailor blew over the bottom. Andi blend that properly with the turquoise blue. So we have a low blow on the top on over the middle. We have to request blue on again at the bottom, we have till a blue. Now blend those three sections properly before your Bagram dries. Okay? Now I'm going to take the blue a little into the turquoise blue to make my sky look a little more dramatic. Now, this step is totally up to you. If you're not too confident, go with the soft blend. I'll do the same thing over the bottom. Okay, so that's this guy and the water. Now I'm going to quickly at the reflections before the bag unwashed rise over here on right underneath the mountain test will. So we'll get done with the background washing the reflections and one goal. Usually what I do us after everything dries, I apply a coat off clean water on. Then at the reflection as a second layer, we'll try this technique later. At the moment, I guess it will be a little difficult for at least some off you. Okay, now I'm sweating to around rush and I'm taking into cool on my brush. Have allowed to tell you blew into that so that I have a deeper don't off Taylor blue. I'll remove the excess water from my brush. Now I'm going to add some lines over the bottom. This will nicely blended into the background, giving us reflections. So this is a ripples in your water. When you're closer to your masking TV, an article lines on. When you go away from that masking tape, you need to add thin lines. So if you upto water, all those reports which are closer to you will appear very tar can take on the ones which are away from you. They will appear very light and thin were trying to grab the same here. I added my thick lines. Now I'm adding something lined right and don't need this piece off land Now If you read for too long, your Bagram layer will try on. You won't get the soft lines. Your lines will look too prominent and sharp. We want some soft lines. You can see the lines on adding they're not looking too sharp. There's likely blending into the background now, right underneath the mountains And also underneath this piece of flan the shadows and reflections would be too dark. So go with the doc. Oh, tune just at these a Diaz. Now, when I'm adding the reflection for the mountain, I'm not making it pretty prominent. I'm not adding too many lines to go there. I'm just having a shed right underneath the horizon line. So if your background the stool but you will get these soft lines, so do it before you're back on dry so that you have a soft reflection. Also, don't use too watery paint if you paint is too watery, Tabby oppression of people travel Onda all the excess amount of water. Otherwise your pain will bleed into that background and create blotches. Water, Condolezza. Tricky subject. That is something that you will loan gradually when you progress. It was just a matter of tractors and it will automatically get it right now I'm going with the Bordeaux tone off Interco. I'm adding some deeper tones right underneath the mountain on also underneath that patch of land. Just a little doctors once you have added those Dr Drag your brush from right to left on me . Those lines less prominent. You can remove the excess pain from your brush on bond. Smart Start into the background to give it the most after look. Okay, so we're done with our reflection. Now we'll have to wait for this to dry. And the next task is to paint the mountains and add the snow. So the colors I used our fellow blue and turquoise blue for the sky on to add in the snow. I used Antico. Everything has nicely dried. You can see the kind of color I have here is very vibrant, even after the painting dried. That is because I went in with a very bright tone on the first layer itself. Okay, Now let's pain the mountain and that piece of land. I'm going with things gray and I'm using my size number eight charm brush. Now I'm going to simply fill up the land on the mountain and this color, I'm going to apply a solid color. - Now , once you have reached you, you need to reduce the size of your mountains. I'm going to switch to my smaller size crush. I'm going to add some very tiny mountains. Go with the late illing brush or any of your brush, which has a nice pointed tip and fill up the rest of the line with tiny mountains. I'm writing a line first and then I lied. Some little bombs here and there, our skies literally glowing. When we ara does black mountains, you can do the same thing with different color combination. You can go with blue and proper. That makes a great company. Shen, you are Gilo and Blue Army. Were you can add in some green. You can try of the same subject with different colors. Okay, with that, we're done with the mountains. Now we have to wait for this to dry before the art in the snow. Meanwhile, I'll pain that little patch of land on the right side. First, I have allowed in the shape with my smaller brush. Then I will Philip that with the Spain's gray shade. So if you don't have pains creative and use black, absolutely OK now to add a snow will be using the drivers technique for that, meaning to wait for the mountains to dry completely. Meanwhile, I'm going to act imports into the sky. This time I'm going with some big boats, which is little more detailed. So by now, you might have understood how well you can draw the put. So if if we like, you might spoil your sky when you paint the boat. Don't, Adam. Maybe you can add some tiny ones. All you can try all the same on a scrap is off people. And when you're confident you can pin them onto the sky or you can add a pencil sketch, then drew on top off it using your brush. So which one works best for you? Choose that. Don't spoil your sky. Actually, it is a difficult task. You can challenge yourself to get your boat ride by the time we finish our 30 days takeover off people on. Just follow the lines. I'm hiding here on go one by one. Don't rush. So first you are an arc line, but to stand when you begin on, then you're taking it to the other end. You can make a little tika, then add a similar line on the other end. On to the center of that, you can add a tiny dog, which is ahead of the board. On over the bottom, we can add a pick, tiny line. So that's the bird. Is he right now? Just by changing the space off that art line, you can create different type of boards. For the 2nd 1 I made them little more closer. It is not hanging down, so it's facing upward and a similar way. I added the third board. Now let's go with the food one. I'm adding the food board, also in a similar manner. I added the Ark line than added a daughter on the tiny line in the middle. Now I'm going with a slightly different bird. The sport likes toe, take challenges. It's flying in a different manner, winding up on, born with down. So all you need to do is change the spacing off the wings and also change the alignment. One can well up. One can be a little down, or you can go with symmetrical lines. So try out the same using different kind of arc lines. I have allowed one more using the same technique and after the civil are few tiny ones in the background. All right, I have added enough of boots on. Now let's add the snow onto the mountain. My mountain has completely tried. I'm switching to my size number to brush on. I'm loading my brush with Whitewater color. Take your people trouble. W brush on a people told multiple times to remove the excess water. We need a dry paint on the brush. We don't want any water content. Okay, before I add the dry brush patterns until hotel, I'm going to do something else. This is going to make a painting look more interesting for all this. While you're adding black boat onto a sky. Now I'm going to add a whitened under the wings off all these boards on. You need to see the kind of impact that's going to add toe painting because we have a nice growing dark sky on once we add in this light on. Once we added this whitened under the wings, it is going to make it really beautiful. So we're leaving a tiny black line on the top. I added white paint under the wings, following the line of the things we added, doing the same onto the other wing. That is all you need to do now let's go to the next board. You need to use a very thin brush. Go with your size numbers, grow brush or any detail ing brush to do this. So I'm done with my tote board. Now I'm going to repeat the same for all the other words. You just need to add a white line following the shape of the bull you have added for the ones in the background. Go with the super thin line. These are already worry tiny boats. You don't need to add a prominent white line. Go with the very delicate line. Okay, so we're done with the boats. Now it's time to add snow onto a mountains on. That is the last time I'm using the same brush, and I'm dabbing my brush in of people trouble to remove the excess water so that I have dry paint on my brush, and it's easier to get this dry brush patterns now. I'm scratching my brush on the mountain. We did this exercise quite a lot of times, and I think you guys are quite confident with this technique. Now. Add enough off dry brush patterns into the mountain. I'm adding them on to the top so that we have a snow capped mountain. I just want to make sure I'm using white water clock here. I'm just dipping my brush inside the tube and taking out little whitewater color If, how bad choirs you can use that if it was, invite vertical of grammatical consistency. Don't act too much of water. Otherwise you won't get this topic. Look, now I'm adding some solid she'd onto the top. I'm done without in the dry brush patterns. Now I've allowed some pickle white just on the top to make it look like snow capped mountains. So at a solid white on the tall and smart start into the background with dry brush patterns , you can use the same technique on a Blue Mountain draw. Mountain Green Mountain any color that you want to. It's a very easy way to make a snow capped mountain. Okay, now let's have some dry patterns onto that patch of land, just one or two lines on the top and the bottom on, but that will be done with double painting. I really like the color combination of this painting, those black and white boards, the mountain on the sky. Okay, so my Bresch fell. Andi, I had to extend my patch of land on anymore. So that's why you're seeing. But Blackwood hair anyway, here, a several finished painting. I hope you all in charge. Meaning this night sky. Maybe you can go with a much more dark o Donnell Flew over the top on make it really looks like a nice guy And drop some stars Anyway, I'm really happy with the colors on overall painting. Thanks a lot for joining me. I'll see you tomorrow.
19. Day 16/30: I cannot believe we made it today. 16 there. Halfway through our 30 day particular challenge, I was going through the class projects. And I must say, each of you have done a wonderful job. Each of you are making me so much power on. And I'm grateful that you guys are being killed with me supporting my 30 day challenge. Today we're going to paint the snowy mountains on You will just need a blue Onda black or pain scree. So for the sky I will be using to a guy's blue. You can use any blue that have got on for the mountain. I will be using Interco on pains. Great to add in the details till now we went in with very vibrant Carlos. So today I thought, we'll go with a limited color palette where we will only use a blue and a paint. Agree we'll paint a snowy mountain landscape. This one is going to help you in your future projects as well. You can use these mountains as a background element in your paintings. Okay, so I'm out in the pencil sketch. I added a small mountain on the left side. Then I went in with a bit more bigger one on over the right side. I'm going with a much more tall A mountain. No, I'm Adam that irregular. Lying in the middle, I learned of adding, A slope will heal. So we have three moments and we have a little off land on the bottom. I'll just make this mountain a bit more hollow. I raced off that bit to the center. I made the mountain taller on. Now I'm adding that Eroglu line now, seeing with this mountain. Okay, so that's of a pencil sketch now, without wasting any time. Let's start painting using my wash fresh. I'm going to apply and even called the water onto the sky. I'm not adding any water on the mountains, so here the snow is going to be your paper. White will be just adding some dry brush patterns and a little off into Go don't under the mountain, your people white will represent the snow, so it is very important to have them clean. I'm using turquoise blue for the sky. I'm going with a medium tour, and I'm simply adding some streaks on the wet background. I'm adding some streaks on time deliberately leaving some white caps in between. It is the same type of sky used for about green Meadow. You can go with any type of sky that you want to. If you want change the color, you could do that as well. Oh, you can go with a Gary and wash after Christ pool or purple, pink or any shape that you perform. It doesn't matter. So that's my sky. Maybe have a light, some taco tones on the top. So all I did was I applied and even Russia water onto the paper on, then added some streets after cause blew into the sky. And now I'm going with a bit more brighter. Turn off turquoise blue and I are in the same. So I have some white gaps in between and I have some lighter guys blew on a medium term of turquoise blue. So we have multiple don't of blue on the sky, and it looks nice to me, and now I'm switching to my round brush. It's a size number eight wrong brush, and I'm going with a very light on off into cool. My sky has already dried. It is 40 degrees lives. Yesterday and whenever I'm applying water on my paper, it is drying up in few seconds. Anyway, now it is just a matter of adding dry brush patterns. We don't need to apply any water on the paper, so I'll be OK. I'm going with the light on off into go, and I'm going to add that onto the right side. Very created those patches. Now, if you don't have indigo, don't worry. You can use crushing blow or any other blow that have caught and doesn't really matter. But what will be the blue that you're going with? Go with a light own on. Add that on the right side, off your mountains on when you're reaching the bottom. Leave it in a very rocks, man. Oh, you don't need to take it entirely home. It is okay, even if it's looking a little messy now I'm doing the same onto the bigger mountain we have here, adding a light on off into cool. I'm fooling the line be added in the middle, and I'm applying the light or have allowed that onto the smaller one. Ask for now, other clean my brush and I will just much that color we have on the bottom, I'll do the same for the bigger one. There. You can see. I'm not putting a lot of effort here. I'm simply smudging it on just looking. Very messy, but that's absolutely OK. Don't worry about that. Okay? So that the first step now using the same cologne, we're going to add some random lines on the left side, off all these mountains. I'm again to bring my brush in a light one off into cool, and I'm gonna add some lines. What? It close? Me? It was just random lines. Some tiny one, some bigger ones. Some little scribbles. Make sure you're not going overboard. We just need few lines here and there. Now, onto the become mountain, I have allowed fuel lines. Old right, so that's the first step. Now I'm going to add some similar lines on the ground we have at the bottom. So the line I have added now it is looking quite sharp. You shouldn't be adding such sharp lines. If the lines are looking to sharp, dip your brush in a little water on smarts, the color into the background and make it look soft. Okay, I added some lines on the border. Mass food. So our first wash is done. Now we're going to add more details to make our snowy mountains look more realistic. Next, we're going to add plenty of dry brush patterns, the mountain using into Go on, Asprilla. Spain's great. We'll start with into go first. I'm going to the same tune I used in the background. I adapt my brush in a people teller to remove the excess and on the water. Now let's add plenty of dry brush pattern onto the entire mountain. We can add someone to right and from the left you just need to cover up the mountain and dry brush patterns. Describe your brush on the people white on our dry brush patterns like this. Make sure to remove the excess amount of water from the brush. Otherwise, you won't get drivers patterns. Tap your brush had in the dry brush pattern. You shouldn't be covering up the entire white. We need that right in the background. Um, adding fuel on the right side at school. Okay, so that is the indigo layer. Now it's time to add in the dock. Oh, tunes using pain scree. I'm switching to my smaller sized brush, and I'm going to again at dry brush patterns. You think pains Great. Take the paint on the brush, double brush or a paper towel on the dry brush patterns. We'll start with the left side. It is the same technically followed earlier. Take paint on your brush. Dubya. Oppression of people travel. Removed the excess amount of water on. Have a dry kind of paint on your brush, then scratch your brush on the paper to create those dry brush patterns. I wonder the doctors to be little tiny, and that's why I went in with a smaller size brush. If you go in with the bigger size brush, you won't have a lot of control on the way. Have your adding those drivers patterns. I want some Chinese scribbles and patterns, and that's why I'm going with the smaller sized brush. So we're done with the left side. Now I'm going to the right side. I have considered the shadows to be on the right side, so I will make this area but more Darko. Compared to the left, we have all the greater battle. They're using a light one off into cool. Follow that patch on out in the dry brush patterns. Okay, so that is the first mountain. Now I'm going to repeat the same onto the other two mountains. Pick Edo Payne's gray or black on your brush. Dappy. Oppression of paper Trouble. Remove the xom underwater. Now to Cuba. Along that path we created adding the darko tones. You can add more on the right side and less on the left side. I have considered my shadows to be on the right. You can either go with left or right. It's totally up to you. But which will be the side of following? It should be contesting for all the mountains you're painting. OK, so that is the right side. Now let me quickly finish the left side at school. - I by mistake, at a big sport there, which I will be covering up later using a pine tree. Now let me go with the third mountain a mad in the pattern turn to the left side. Now in a similar liner Harvard, it for the other mountains. I will be adding Darko tunes on the right side. So that's the left side. Now I'm going the right side. I'm starting by adding Dakotans along that line. Be added, I'm making that irregular line prominent, but Nor with the shop line you can see my line is not a solid bore line. I'm following that line using drivers patterns. Now we add more Dakotans. Want to help out the dry brush technique? Right? It's a very easy technique to paint snowy mountains. If you're using a people with good texture, the dry brush patrons is very easy to make. If it's the people which doesn't have much texture, you have to be very sure to remove all the water from your brush data. Tonio. People double multiple times and make sure the excess amount of water is gone. Maybe you can try on a scrap of paper before you are the drivers patterns on your main painting. Okay, we are done with the mountains. Now I'm going to add a little off patterns onto the ground. As for we just need a little darker tones along that line. I hope you guys are enjoying it so far and you're getting a good present. I really love the mountains. Everyone did, especially that one where we had a sunset and a brown mountain. Everyone has done an amusing job. I really love the take show. You all have garden you moment and that is why I decided to go with the snowy mountain. Alright, it's time to add the pine trees first. Have a lot of big one right here just to cover up that big black sport I have got there. It's not a very evil detailed pine tree. I'm starting by adding a line. Then I'm taking my brashness exact moment to either side to greet that foliage. Andi, that said, That's a tree. I will go with the next one. I'm starting by adding a line when taking my brush. In this exact movement to either side, it's an easy pine tree with no much details. I think anyone can paint. This fund can actually to again, I'm starting by adding online. Take your brush to either side and his exact moment on the top. He would have shorter lines on as you come down. You need to make your lines longer on. By the end you will have a conical shape. Okay, so that's my point tree. Now I will be adding some tiny ones and some bigger ones in a very random order as they're adding tiny trees. It's good to go with the detailing brush. Go with any off your brush. Batasan eyes pointed. Andi adding your pine trees. Okay, I hope the pine trees clear. Now. Let me quickly fill this up. So just over here I will be adding the bigger ones now on to either side. I will be adding smaller ones. I wouldn't be adding any other picker trees. This will give us a sense of distance. - We're done adding the trees. Now let's add shadow for all these freeze. I'm going with the light to turn off pain screen on time, adding a shadow for all the trees. You just need to Arden inclined line on the ground, right from the border, on the truth or drunk. I think I've allowed a few more trees some time. He wants next to that big trees to make the combustion look a little more. NYTR over. I added fuel extract rings over here. Now let me add the shadow on right on that we're done with the snowy mountains and the pine trees. Now, the last task was to are the boots. We'll have some eagles flying about. The Smoky Mountains will be going with something similar to these bigger ones we painted yesterday. I'm using my smaller size pressure. That's a size number two round brush. Go with any off your brush with a nice point tip. I'm starting with an arc line. Similarly, Everland another arc onto the other side. Now I'm making that 80 a closer to the head, Little tico on or to either end. My line will be very often so. That's my first board. I will be adding two or three more boats into the sky, all right, on, but that we're done with a painting for Day 16. Let me quickly removed the masking tape for a change. We played with very little color story, and I hope you guys enjoyed it. Dry brush technique is one of my most favorite technique and watercolor. Allow painting mountains using dry brush technique. Allow how easily we can create a lot of textures and character. Toe Mountain on Dhere. Several final piece you can see the kind of texture we have got here, so the snowy mountains you can use for ending a few other paintings. For example, this one we tried the other day. Maybe you can addle snowy mountains in the background with our buddy Little details. Maybe you can reduce the amount of the darko tunes and go, but the very subtle kind off storey mountain right over here on for this one, the Green Meadow Asper. Instead of this plane indica mountains, you can use so Storey Mountain so you can use the same in your future paintings and make your painting look more coaches.
20. Day 17/30: Hello, everyone. I hope you had a great time painting the snowy mountains yesterday. Today we're going to paint a very quick sunset. Now let's have a look at the colors you will need for the sky. I will be using crimson one million dread on a bit off yellow orange over the bottom on to have the darker tones. I will be using a little violet. You can use purple or any other wild that you got. We'll be using the same shades for the water. Aspirin. Andi finally toe, adding those details. You will need either black or pains cream. All right, now let me quickly start with the pencils. Kitsch. I'm adding a line little below the central to people on. That's the only thing you need to add. Now you see my Princeton a light wash fresh. I'm gonna apply anyone go. The water onto the sky will be in the sky first. Then after that, we'll be in the water below. Okay, so I have added and even wash water onto the sky. Now I'm switching to my flat brush. So as I mentioned earlier, the colors I will be using for the sky are crimson were 1,000,000 dread on a bit of yellow orange over the body. Then I will be adding some taco tones using Papa. So I'm starting with crimson and I'm just dropping that on the top. I'm simply adding the paint wherever I feel like. I'm not really worried about the result. I want a dramatic sky. Now I'm sweating toe one million trade. Add that so basically we need darker tones on the top on. As we are closer to the horizon, we will leave lighter tones, which will be our yellow orange. So I'm deliberately leaving some white caps in between so that this guy look more dramatic . And now I'm sweating toe yellow orange Harding battle with a bottom. Just let go off all the condolence feel that you have on the medium. Make your back from vet on. Drop in the doctor tunes on the top on the lighter tone over the bottom on dry toe the heist online. And can we get even more lighter by adding water? So all I did was I just dragged the pain from either end towards the center because the background is bet all those lines which I was adding God nicely blended into the background . Now I'm going with another round of darko tones just of the top amusing permanent. Violet, you can go with any purple or while change that you got on at Philadanco tunes right at the top. Again, I'm taking my brush from either side towards the sender. I'm just driving the paint in. Okay, that set. Now let's pain the water. I'm starting with the yellow orange, adding a light on off yellow orange right below that horizon line. Now, as I come down, idols fetched a one million dread. Now I'll fill this up with four million dread. You can see I'm going with a very light room just by making the color lighter right about the horizon line we already caught on sunset feel okay, Now I'm going with a bit more pride to turn off Formerly in trade. I didn't that try to the bottom. You can say I'm adding some lines so we'll get done with the water in one go. We can add some try to tune. I went in with proper, so everything will be done in one. Go. Okay, So I added a Grady in Wash of yellow orange on Bowman 100 at the bottom. Then I added few lines of one million. Drain on also few pope lines. Okay, now I'm running my clean brush on top of those lines to make it a little softer. My background is still a little bit on. I'm making use of the time. Okay, so we're done with the water and the sky. Let's wait for this to dry and then we will add in the details to add the details. I will be used to my smallest ice brush on the shed. I will be going with Spain. Great. You can either use paints, create or black on. Here is a photo which I court inspired from. I hadn't followed the colors exactly, but I'm going toe are does branches right toe heel. That photograph has a lot of details. We are going with a minimalist abortion. So when adding one branch hell, when you add in the branch, take your British as a few hand of shivering, so you will get a nice result. It will look more realistic when there is little grooves and little ups and downs in your branch. You can see how slowly, our painting is getting live. When we added that tiny bit of a brand itself, the painting was looking so gorgeous. I have added the photograph here, so if you want to follow the same, you could do that and district my brush. Howard, I feel like I'm not exactly following the lions and the photograph. When you're starting the branch, it can be a little pick. But when you add in those tiny little branches, it is good to switch to your detail in brush or a brush, which has a nice pointed tip so that you get thin and delicate lines, which will make it look more beautiful. - So I added three branches. You can add more if you want to. Maybe you can add some hanging from the top. Feel free to add them. However you want to know, I'm going to add two more branches onto the right side. On that photograph, we have the branches only on the left side, but I'm adding one or two branch on the right side. Also, it's totally up to you if you like to leave the right side free, you could do that on that. We're done with the branches now using my same small size pressure on things. Great. I'm adding some tiny mountains over the horizon line. - You can see how over painting is getting on life when we are adding all these little details the mountains and those branches. Everything is giving our painting off very vibrant. Look, I will finish this up quickly, and after those, we will add some rock onto the water. All right. I have added the mountains and I'm just cleaning that rice and lying. So I'm using my smaller sized fresh on pains. Create a cane and I'm adding fuel. Rocks or what? Here I will be adding them just onto the right side. If you want, you can add some onto the left side. Asked for one dry till on fuel on the top. I will go with the scattered look, Just add fuel rocks here and there. Very randomly. You can add some smaller ones and some bigger ones so that it looks more natural. - All you need to do is out of shape and fill it up with Payne's gray or black. You can see the way I'm adding them some 80 s I'm giving little projections on I'm going with a very irregular shape so that it looks more natural and realistic. Now it's totally up to you. How many want to add? I'm going to stop it here. I think I have got enough there. Maybe you can add some smaller ones onto the left side as well. That's totally up to you. All right. Now, the last time was to add some reflections will be adding some very light reflections for these rocks and also for the mountains in the background. So to add the reflection, I'm going with a light on a war 1,000,000 dread. I'm washing my brush properly on spit into woman you dread I took a light on over a 1,000,000 dread on I'm going to add some lines right underneath these drugs But I'm adding a reflection. I'm leaving a tiny cap in between You could clearly see that little gap. I'm adding there now I'm just adding lines. You think we're 1,000,000 trade? Just a few lines are enough. Okay, so I added reflection for all those rocks. Now I'm switching to the mountain again. Go with the light on over 1,000,000 right? Leave a little cap had a bit decline. Losing woman in trade along the entire horizon line after that will take clean water on its march, those lines into the background so that it looks less prominent and goes well with the background. So I'm halfway through. Okay, so I have added the line. No, I'm taking clean water and I'm just munching that into the background. I have got a self reflection there. You can see the kind of dawn's I'm going with. I just went in the darko tones just on the top, off the sky, The rest. It's all very light tones. Okay, so that we are done with double painting for D 17. This was a very easy and quick one. We hardly took 12 minutes. Next measure. Moody masking tape. Oh, to last one. There on Dhere. Several final painting. Thanks a lot for joining today. I hope you all enjoyed being this quick sunset
21. Day 18/30: Welcome to Day 18. It's been a while since we did a green landscape so well, let's do this easy and quick green landscape with a blue lake. Now let's have a look at the colors you will need to paint the sky. I will be using your guys blue on for the mountain I will be using in Tico and sap cream on for the lake. I will be using combos prove, which is a nice based or blue aunt to add in the shadows of abusing sap green. Finally, to add in all the details of abusing pain screen. All right, let's start with the bullpen to sketch. We need to act the mountains, so I will start with the one and the foreground. I was missing green landscape, so that's why I went in with the green landscape. Today, this one is a very soft and subtle green landscape, doesn't have much details, and it's a very simple one to do so That's my second mountain. Now I'll add one more in the background, which will be a snowy mountain, I must say, I'm pretty impressed with everyone. Snowy mountain I did. Somebody had ridden, she thought it's going to be a mess when she started. But then, by the end she allowed the result. So that's why I kept repeating in between. Your mountain may look little messy, but and it's absolutely OK. By the time we are those Darko tones and all the details, it's going to be really pretty. So don't worry about that mess. A look when you paint your snowy mountain next time. So I'm starting Lee, adding a little water on the sky. I'm using my flat brush itself Good. So very little area now for the sky. I'm going with turquoise blue. I'm adding in a medium turn off turquoise blue wings and white capsule between. I'm just taking my breath from one into the other, leaving some people white. Okay, now I'm going with a bit more brighter tour on Adam. That will heal. Oh, right. That's my sky. Now I will switch to my round fresh on. I will clean all those hard inches. I'm just my jingles. Harder agenda the background to make them look soft. Okay, so that's the sky on my sky has completely dried. Now let's go in with the snowy mountain, just like overdid Annable Previous painting. I'm starting with a light one off into cool on with my brush. I'm adding that irregular line immediately on now, filling up that patch on the right side in the light, one off intercooled. So that's the first step. Now I'm going to add fuel random lines on the left side, using the same tone off Interco. Okay, so that's done. Now it's adding those little lines. That's a bit sharp. I don't need that talk tone. I'll just much starting and make it lighter. Now it's time to add the dry brush pattern. Using pain scream. I know you all would have realized how much I allow the dry brush technique. I allowed to paint snowy mountains using dry brush technique. They also try the same technique on a brown mountain. On, we created a beautifully textured mountain on. Also, we try the same on a black mountain and created a snow caped look for the mountain. So I loaded my brush with paint scree on by dabbing on a piece of paper towel. I removed the excess amount of water, and I'm just crashing. The brush on the paper to create was try brush patterns. It's the same technique. Before Lord, I added the dry brush pattern on the left side. Now I'm going with more taco tunes. On the right side, you can try the dry brush technique on differently colored mountains to create different seasons. The technique is the same. You just need to have a background color on adding the Darko tunes. Make sure you remove the excess water from your brush using a people tower so that you get nice dry brush patterns. I didn't kept repeating the same steps just because we tried a very extensive snowy mountain earlier. So if you haven't tried that, go today's 16 and try it out. No for that other mountain in the background, I'm going with a bit more brighter to enough intercooled, and I'm going to apply that on the top on over to the bottom. I will be spitting to sap green, so that's indigo. Now I will clean my brush on. I will switch to sap green, and I'll fill the rest of the bargain in sap cream and also ill blend those colors together . So you have a nice bluish green mountain. I love to paint the mountains the background using intercourse and sap green. I love how subtle on to come. They look you could use the same folio adult paintings, aspirin for the backer mountains you can use into go. Andi can also makes a little of saccharine to give it a more greenish tone. So we got to second mountain now we have wonderful ground. I'm gonna fill this with sap green. Just fill it up in a solid culo. Once we're done with, the base layer will be added. Increase on it. So over to the top. When you are in the paint, take your brush and a proceed movement and create these kind of patterns just from the top . The remaining You can just fill it up with sap green. We don't need to worry about anything. Just fill that holding in sap green. Okay, let me quickly do that. - Okay , so I have filled it up and green. Now I'm switching to my smallest ice Bresch on mixing a little off into cool with sap cream to get a deeper down off sap green. Now, using the shade, I'm just adding some lines into the red background. You can see the lines on adding is nicely spreading into the background. So these are my trees as the mountains quite far from you. You don't need to add a detail kind of trees. We just want to create a forest. He looked to the mountain and that's why they're adding this lines. So are indigenous to cover up the entire mountain and shorter and longer lines so that it looks very Foresti. All I'm doing is adding lines in the wet background. Some of them are longer. Some of the Bashar Co I'm randomly picking sports and adding these lines. So this is the color amusing. It is more greenish. I mixed indigo and saccharine, more submarine unless into court. To get a more greenish tone, you can keep on adding these lines until you're satisfied with the forest. You look off your mountains Was your smaller sized fresh asked one does lying to be Britain and duplicate little one big trees So the tender and delicate lines will make it look like it This far from you. It will give that sense of distance, so use your swallow size brush, please. It looks like my back Oh has dried. I'm going to apply a little of sacrum again to make the area wet. Then I'll again to pay the same price off, adding lines. Now, Don't worry if you don't have a clean blend in the background or if there is some patches or anything. Those things are absolutely fine as well. We wanders more talk shows, and that is why we are out in these lines. So in case if you have some rough patterns or some hard edges, that's absolutely fine. In fact, that is going to make a penny look more beautiful. Sometimes those imperfections are what makes your painting look more beautiful. So never worry about perfection. So take it easy. Let go off the control that you haven't the medium on, enjoy the process to the fullest. Now, when I'm adding the lines over this bottom line, I will go with a bit more deeper tune. This time I added more in tico on less green. I love this combination of a green mountains in the foreground and a snowy march in the background. It just takes me dough. Some mother, please. Okay, so just over to the water. I've ended with some tea platoon on with the top. I have a much lighter tone of green on. That's a will mountain. I've allowed few more taco tones over Hugh on after that will switch to over water. Okay, Now for the water, I'm going to use a paste, all blue, The one I will be using this composed blue from Majuro machine. You can go with any peace people that have got. If you don't have a place of blue, you can use you to Christ blue. I'm starting my adding and even called the water. Be sure you're not touching those mountains or any other details. When you're applying the water, we can leave a little of cap and you're nearing all those areas. Now I'm taking my round brush on. I'm loading my brush with this couple's blue. Now at the color along the line of Whole Mountain, you can leave a tiny gap so that the colors won't spread into each other. No, apply the same color over to the background where we have the other mountain. Take it along this line, making, if possible, live a little gap. If you don't have this campos blue or a pistol blue, you can go with a light to turn off turquoise blue. I'm going to fill up the entire lake in this color. Now, to add more deeper tones I'm spitting to Turk eyes blue If you deport owns over here and also underneath this mountain I added a few turquoise blue tunes. Now I'm spitting back to my pistol blue on filling up the rest so that I have ah, clear blue lake. I allow how fresh and beautiful discolor is looking. It goes well with the sap cream. Okay, so that's my leg. Now I'm spitting to sap green and I'm going to add some reflection enlightened off sub cream. Andi, I'm going to add that we're here. My background is red So the color that I'm adding in its nicely blending into the background. So when we're adding color on double deck Hello. Be very sure that you're the region. Do with your brush movement. Don't put a lot of effort. If you put a lot of effort, the color in the background will come up. So don't live the color in the background. You just need to take your brush in a very soft and gentle manner. I'm going to add some more reflection over here. I'm just taking my brush from top to bottom. Just drag you brush from top to bottom on at a tick freehand line. This is going to give you a beautiful reflection for that mountain. You don't need to follow the profile of your mountain. All you need to do us add lines from top to bottom in a free hand, man. Oh, be very gentle. You shouldn't be lifting off the paint in the background. Okay, Now, switching to my smaller size brush, I'm taking a little off the sky's blue on adding fuel lines on top of the green reflection , they added just a few lines on top of the green layer. Oh, so that looks nice. I really love to paint water using the space shuttle blew on saccharine. These colors has got some magic. I feel fresh while painting with these two colors, our latest looking so calm and pretty. It is the magic off those two colors the Russell wide gaps in hue. I'm feeling that using sap cream. Okay, we're nearly done with the reflection. As a final step, I'm going to add some taco tunes. I'm using in Deco. And I'm just dropping in some taco tunes underneath this bottom line. Just a work here and that's it. Now I'm going to drop in some sap green onto this little patch of land at the bottom. Fill that up in sap green on. Before that dries will drop in some taco tones using indigo. Okay, so I have added green. Now I'm spitting to intercourse. I'm using my smaller sized brush on. I'm just dropping in that taco tones right at the bottom now adding some grass on the top, I think a lot of but more taco tones. Alright, so that's done. Now, using a light on of that deeper green be created, I'm going to add another line off mountain here just too low lying one so that our painting looks more interesting with all those different layers off mountain. To start a sheep with a lighter tune, you can take it to the other end. Finally, I'm going to add few little trees along very added those Children mountains. I'm losing my smaller size brush and I'm going with sap green and I'm simply adding a droplet kind of a shape. So this my tree. You can add some tiny ones on bond, but pickle one successful. Keep on adding them. Go in a very random manner. At some places, you can create a cluster and some places you can. I just borrow, too. Some of them can be bit taller and settled can be shorter. You just need to add a line, which is a little thick at the bottom, on thin at the top. These are pine trees which are very far from you on it has a conical shape, and that is what we're trying to create. You were nearly done. Now the last step is to add some boards on the sky. Now, is this optional? If you have not confident with adding the bullet against, give the strip okay, and with that we're done with the whole painting. Let me quickly removed the masking T. I cannot tell you how much I love this color confirmation. You can try the same with different elements. Maybe you can add some pine trees and have all blue late like this in the background on some silly mountains. Jaspal. So try and explore different possibilities using the same color combination on different elements. Okay, so here several final painting. I hope you all had a great time painting this green mountain and Blue Lake. They're nearing the last 10 days, and I'm super excited to show you the rest of the class protects.
22. Day 19/30: Hello. Hello. Welcome. Today, 19 and I'm back with another sensitivity. This one is going to be very simple. Let's have a quick look at the colors you will need to pay in the sky. I will be using yellow, orange, one million dread and rows of ultra marine Israel Rousseff, our Children. You can go with any purple that have got to paint the trees on the ground. You will need born Xena and pain scream. All right. We don't need to add any pencils. Get so let's directly start by adding and even called water onto the people. This one is going to be fairly symbol. But over the coming days we will be trying some advance and set on the biggest technique will be the one which will be trying today. Okay, so I have a plan and even called the water onto the entire paper. Now I'm switching to my flat brush and I'm starting to the bright yellow orange. This is a very nice orange. You can useful sense it. This one is from middle omission on a blank that over the Porton you can see I'm using a very light toe if you don't have the same color. You can use a local on campus, you know? Now this is fair. I will be adding the sun, so I'm making that area in remote lighter. Now I'm going with a little more Bordeaux tone off yellow orange. Now, to make a similar color, you can actually makes your Campbell Jell O on a very time, but of four million trade. So you will get a nice yellowish orange now going with four million trade. A very bold on off four million trade. So I went in the lighter drones over the bottom on. As I went up, I made the colors more brighter. Now I'm switching toe Bruce off Ultra Marine. Andi, I'm gonna apply that on the top so that I have more taco tones. You can use any of the people that have got. We need a more reddish purple. Now I'm adding a few streets using drugs off ultra marine so that my sky look a bit more dramatic. Will be feel Hinds, I'm not having any clouds or any big patterns as such. I'm just riding some random lines and that will blend into the background making my sky look more dramatic, and I'm doing that just over the top. There. I have that try to a 1,000,000 trade. Okay, that's the base bush. Now, if you want to make your sky look more dramatic, you can add more taco tunes over the top and also with a partner that's totally up to you. But make sure you're not adding too many DACA tones over the bottom, where we will be adding the sun. If you have too much of Darko, don't over the bottom. We won't get that glowing look, so it is good to leave that area in a lighter tone. I'm going with a few more taco tunes. I'm using four million dread. Andi. I'm very careful not to add Dakotans towards the center, where I will be adding the sun. So the key here is having a good quality watercolor people. You can see how nicely my colors are blending into the background. I'm just adding some lines on. All of them are nicely marching into the background colors, giving me a body soft look. So money off you already upgraded to a good quality watercolor people on. I'm really seeing the difference in your work and I guess you are also realizing the same. Now I'm going to get my people travel. Actually, this one is a soft equation to shoot that I'm using. Now, before the background dries, I'm gonna quickly left some color and create the sun. You can also use a masking fluid on to cover up your son. First on at the color on top off it on. Want your background drives? You can remove it. And also you can cut your masking tape in a circle shape based that on your sky on remove it one so background tries. So there are several techniques you can use, but for me, I personally Lau Ah, soft look for my son when you apply the masking tape and when you apply mask include the edges of the sun doesn't look that soft. You have a very strong outline, which, personally I don't perform. I always love to get a soft look for my son, and that is why I always looked the pain using a people traveled to greet the sun, So all you need to do is while your background is wet, you just need to tap your paper travel on the sky and create a circle shape. So that's my son. Now I'm gonna get my round brush and I'm going to Soft in the outline of the sun Clean a brush to Rony on W oppression People travel. You shouldn't be having any paint or any water on your brush along that outline and clean it up. Give it a soft look. I'm repeating this again. Your brush shouldn't be. But if there is a water container, no brush when you're taking it along the outline that water can straight into the sky and create a blotch. It came a little damp, but make sure it's not too wet. Don't forget to clean your brush. And also don't forget to dappy oppression of people travel to remove the excess water when you're about to soft in the outline. Okay, so my sky has completely dried and can see that glowing sky I got here. Now you see my wrong brush, I'm going to add a piece of land of the bottom. The area, which is right underneath the sun, should be light because there will be sunlight hitting at bacteria on or to either side. We can make it darker, so I'm starting with Mancina. Okay, so I'm going to add a piece of land on the bottom. I'm simply filling that up in balancing, huh? Once I have the piece off land, I will be using the lifting technique on. I will lift off some paint to create that sunlight effect. So I have added Bernstein over the bottom. Now I'm cleaning my brush dabbing. I don't People tell us, Andi, I'm going to lift after paint from here, which is right underneath the sun. You said damn brush. Lift off the paint, clean your brush on our people trouble and repeat the scene so that you get a lighter to over there. Okay, Now let's make the outer edges mo taco. We have got a lighter tone at the middle. I'm using a pry to turn off Mancina on. I'm going to add that on to either side. So I added a medium to move brown. Now I'll again lift off some pain from that center Andan, I'll make the outer area, but more Doc. Oh, I'll go, but pains. Great. And I'll make the out there just more talk of so that we will get a lot more focus for that center area. I'm explains Great bond. Xena on GoDaddy Put on off Mancina on I'm adding that on either side. Now I will blend us into the background. Wash off all the pain from your brush on using your damn brush. Smart tapped into the background so that you get a soft look. Now I'm going to repeat the same process using pains create so that I have more taco tones on the outer edge. So you have a nice, sunny little media and the murder. Then you have some lighter turns around that on under the outer edge you have a more taco toe. So that is what I'm drinking. I went in with a very deep tone off pains agree. I had a dime tone to either side. All right, so what that's done. Now it's time to absent trees Now for the tribute are closer to the sun. I will go with a brownish orange. So I mixed her love one million dread with my bone Sina and I'm going with that she'd I'm starting with the first tree, which is the one closer to the sun. So I'm adding the tree trunk. Now when I'm hitting the son, I need to make the color light to So I'm washing off the pain from my brush and I'm going with the light on one of the shade I was using. Now continue the tree With that lighter tone off brownish orange, you can see I have a boulder tone at the bottom on when I'm crossing the son I have a lighter tool. Now I will again continue with the same June I have at the bottom. We had done a sense of painting on a tree. On it is the same technique. Before there, we've ended with an orange doom where the sunlight was hitting the mountain and the rest of modern prevented the DACA tune. So here I am fooling the same vile am painting the tree. I started the tree with an orangish tone on When I'm crossing the son, I went in with the light to turn off the same sheet. Now, as I'm going away from the sun, I'm making the color Darko. Now I'm going with burnt on book on finishing the rest of the tree on the top. Now you need to follow the same technique. When you're painting the little Brian, just ask for if the brand is closer to the sun, you need to make it an hour orangish tone on When you're away from the sound, you can make them in burnt umber Orban Sina. Now I'm going with the second tree. I'm using that oranges brown to add the tree trunk now over to the top. I'm going with born sample, but it's a more deeper turn off brown because I'm little away from the sun. We added two trees. Now I'm going with a toad one over here. I'm really starting with Born ample on When I'm closer to the sun, I'm going with a brownish orange. Now again, I will switch back to burn ample and finish the rest of the tree in the taco tone. So I think the idea is quite clear. You can add as many trees as you want to make it a seer. I'm distorting three trees closer to the sun. After this, I will be adding few trees onto either side directly using born number. Now I'm switching to my smaller size brush is the size number two around push. We need a brush with has appointed. Can you see a detail in crush Now, losing those brush I'm going to add in all those tiny branches I'm using the same technique we use for the tree. Whenever the branches are closer to the sun, you need to cope with orange is strong on. Whenever you're away from the sun, you can add a minute depot tone. Okay, so these ones are closer to the sun. So I'm adding them in that oranges problem toe. And here also, I'm going with the same shade. So that is the technique. You can use the same to paint, pine trees, mountains or any other subject that you want. Oh, whenever you're closer to the sun, go in with an orange is strong on. Whenever you're subject was away from the sun, you can use Darko tones no matter what subject are you painting? This is the technique that you have to follow. Okay, Now let me add in some more tiny branches. Please use a brush which has a nice point, a tip or your size number zero brush or a dating brush. Otherwise, you won't get this thin and delicate lines. Now I'm going to have the branches which are away from the sun. So I am really going with born sample. So those are the Cinque histories. Now we can add more trees using burnt ambo. If you don't have born Dumbo, you can make the little off pains great into open Sina to get a deeper don't off. Mancina on to add in the rest of the tree is using that Darko tune. Okay, so I'm don't add in the trees. Now it's time to add the shadow for these trays here. That's a lasting. I'm going with a light tunnels Mancina. Now all you need to do is add inclined lines like this following your tree. So wherever you have a tree, you need to have an incline lying like this on the ground. Now when you're going to the other side, the inclination should be in the opposite direction. You can see how God is our paintings looking when you paint, Son said. There's a lot you get to explore right from the color combination, the subject that you can choose. There are so many things that is exciting about the sunset. We displayed a different moral values and even see how easily we caught A glowing effect in the coming days will use the same techniques and a little more advanced manual on. We'll try a bit more advanced sunset, all right, and we are done with a bow painting for day 19 to more of your own T 20 and I can't go to show the restaurant the projects I have planned for you all or right, let me remove the masking tape on Dhere. Several final painting. I really love the clue we have got here. So our main focus was on the area of it is closer to the sun. They played with different tonal values. Just trouble here on. We caught a growing effect. This was assembled. Besides, just to try out the color competition so interrupted creates you could do pine trees or mountains or any other subject. The technique is all the same. The area which is closer to the sun. You need to play with orange and brown stones on the rest, which is away from the sun. You can add more taco tones. That's a lot for joining today. I hope you all will enjoy painting this quick sense. It
23. Day 20/30: Hello, everyone. I hope you all are doing great. We are on day 20 off of our 30 day watercolor challenge, and I really can't contain my excitement. We just have 10 more days to go. Today we'll be painting this gorgeous poeple night sky, and the colors you will need are woman in tow. I let in Deco I will be using those associates for the sky and also for the water. Then, to paint the mountain, you will need Payne's gray or black on adding the details You will need White. You can use either white watercolor or would quash. All right, let's start. So I'm going to start with the pencil sketch. We need to add a few mountains on a patch of land of the boredom for the next 10 days. I have planned a little off and plans topics for you, also, that you get to explore a little more complex optics. Whether you get it right on on, that's a different thing. Let's enjoy the learning process. So during I thought, we'll go with the lights upped. It will paint a gorgeous night sky. This is going to be ready EEC, and it's going to be really is turning. So that's a pencil sketch. Now I'm going to add uneven called the water onto a sky. I'm using my Princeton ally to wash brush. It's okay for our water onto the mountain on the patch of land at the bottom. We'll repainting them in black so it doesn't matter if you have water or paint on top of them. Now for the sky, I will be going with two shades in dico and permanent Violet. I'm starting with Violet and applying that over the bottom now over to the top. I would switch to Interco. I will be adding a very dark turn us into cool over the top over two indigo, applying that now I'm trying to blend the colors well. Other also keep tilting my people so that they naturally planned on blade into each other. I'm going with the doc coatroom again, adding that on the tall I went in with a little lose constancy. Now I'm going to the people so that the integral will bleed into the violet. Now, don't worry about getting a perfect plant. We need a dramatic sky. Even it doesn't have a perfect plan. That is absolutely fine. I want this guy to be more talk, so I'm dropping in some while it right underneath where I applied the indigo, dropping more violet just because I went in with a loose consistency. I'm building my people so that the color will float into each other. So our indigenous to create a dramatic sky with a lot of Darko tools. We don't really need a clean plan like we did for this painting, for the one we're doing today will be adding a Milky Way ask for so it is absolutely fine. If you don't have a clean and smooth plant, I'll just run my brush around all those hard edges. I will drop in bit more darker tones off intercooled so that my sky look more dramatic. Now you seem a round brush, I'm adding, and some more into go. I'm just dropping in the color onto the bed background. You can see they're spreading into the background, but then it's not really soft or even, but that's absolutely OK. When we add in the white Milky way, everything is going to be fine. Okay, now I'm switching to white or dickler on. I'm going to add a multi way right to the middle. Now drop in that white were tickler onto the bed background. You can see the color is spreading. Take it around those pattern to created. As I mentioned earlier, I'm not really worried about having a soft and smoothly blended sky All I need us a dark. Oh, don't at the top, Onda while atone at the bottom. Once you have applied your indigo and violet, be very quick with your white water color. If you're Bagram layers kind of drying the white one spread like this so we'll have to be a little quick. I've learned some more pride to tone of white on that. My base layer of the sky will be time now once everything dries. Bill, Combatant Plateau. Those towers. Okay, so that's a sky. Now I'm gonna paint the lake on a light on a while. It This is the kind of tone I'm going with. And I'm filling up the entire lake in this trouble. And after that I will add a little of Darko tone right underneath those mountain. I'm kind of obsessed with this violet. I use it a lot for my nights guys. This one is permanent. Violet by the brand PwC. That's a very vibrant and bold violet. Okay, so I have filled up the entire lake in a light on a while, it now just underneath the mountain, I'm going to add a brighter toe. For now, this is all we need. Later we'll be adding the reflections. Once we paint the mountain on, we're going to have some tiny rocks. So once everything is done, will be adding the reflections. Now, we'll have to wait for everything to dry before we proceed with the next steps. Okay, so my sky and lake has completely dried. You can see the kind of color we have here. It is very much lighter than the one we had before when the paint was right. Okay, Now I'm going to splatter my stars. I'm using What would it look here if you how wide quashed you could use that. I'm taking my paint and ethical consistency on I'm tapping on my brush to grade the stars. Make sure your white bean does not toe watery. If it's to water, you will end up getting big splatters. You won't get these tiny ones on if you're not sure about the consistency, Tabua brushing of people trouble on. Remove the excess among the water so that you get tiny stars. Now, if you're still not sure, you can check out any off my class on watercolor Galaxies where I have explained how to make those Chinese plateaus. All right, now I'm taking my tiny brush again and I'm going to add the biggest stars. Now, if you closely watching sky at some places you can see there s a little faded white areas. Now I'm going to produce a Diaz and Adow because they are over there. This will make your stars look as if they're shining. You can see that one there. Now I'm gonna pick all those places where I haven't defeated white area and I'm adding the biggest house over there. Add and ask Many stars says he won't. There's nothing like too many stars. I'm dont adding the stars. Now it's time to paint the mountain to pay the mountain. I will be using pain Scree Andi, I will be using the same technique as we tried olio. I'll be adding a solid black based first on once that dries. I will be adding by dry brush patterns onto it to create the snow. We have already tried the technique in one of our earlier painting. I will quickly Philip all those mountains in pain scree if you don't help pains. Great. And also use black. Okay, so that's my mountain. Now I'm going to paint that crowd on the bottom altering pains. Great. Now we'll have to wait for a letter cry. Meanwhile, let's are the rock. I'm switching to my smaller size British and I'm again going with pains Green. At some places, you can extend the mountain on dat tiny patterns like this in between again a drugs hospital. You will see these kind of little patches off land right underneath the mountain. We're trying to create dispatches. Keep on adding them. This is going to make a penny look a lot more beautiful. I'm falling the bottom line of the mountain. I am literally adding them everywhere. Okay, now I'm spitting toe white worker and I'm going to add the dry brush patterns. Aunt, I'm going to make up for murder. Look more snowy. I'm taking whitewater color on my brush. I'm directly taking it from my tube. This is from artists. Now I'm gonna dab my brush on a people trouble to remove the excess and underwater so that I will get nice dry brush patterns. You can see the kind of cartoons I'm getting killed looks nice and dry. So don't forget to remove excess amount of water by jabbing your brush on a people travel. If you paint us to water, you won't get these textures. So to get these kind of patterns, you should have bare minimum water coming on your brush. You should be just having the paint so remote acres among the water on scratch your brush on the mountain to create these kind of patterns. I'm just correcting the shape off the mountain. I think I didn't like that. Cool. Be top. Now, the things I'll have to read food had to dry before I add in dry brush patterns on that area. Never mind. I'll finish the rest and come back to that later. All right, now let me continue with the drive wish patterns. I hope the idea is quite clear. All you need to do is take white were irregular, are white question your brush if you paint us to water it, remove the excess amount of water and then just take your brush on top of that black background on ad in the dry brush battles to make your mountain on Does land looks snowy - now the laughter asked us to are the reflection. I'm switching back toe while it I'm going with a medium toe violet. The color you're using should be one tone brighter than the color off the league. Otherwise, your reflections won't be visible now to you. Brush along the bottom line of the mountain on add a Tinto violet. You can see how those reflections are making off painting. Look complete. We just need to run your brush along these lines on Add a tinto Violet. Okay, we have nearly done. I'm really loving. The league does little drugs and the reflection, and it's making our painting look more beautiful. You can explore the same subject using different color. You could go with a very bright blue sky like the one we tried for the other night sky. Okay, I'm done adding the reflection. So wherever I have this little rock and those patch off land, I took a medium toe violet on. I just followed that line and added a volatile Antony does a Diaz. It was very easy and quick step, but it made a lot of impact for rubble painting. No, I think I'll add fuel. Forget the Porton. This happens to me all these. Whenever am nearly finishing the painting, I always go back and add something or the other. No Mind if you're quite happy with the way your painting is looking right now, you can stop it there. I'm just adding fuel. Tiny but son pieces. Okay, I'm done. I'll just stop it there now. Let me quickly removed the masking t. All right. And here, several final painting. I'd really entire pain, this one. I kind of love the colors and the mountain on that lake over there. I hope you guys enjoyed it too. So with this painting, we're finishing over 20 days of 30. They were tickler challenge. We just have 10 more days left on for the remaining 10 days. Will be going one step ahead on will be trying a little more complex substance. Thank you for joining today. Take care and anxiety
24. Day 21/30: Hello, everyone. Welcome to date when they went off about 30. Ideological challenge guy. Just 10 days away from hitting 30 days on. This is the painting we're going to do today. All right, let's have a look at the colors. So for the sky of abusing to a guy's blue on permanent violet on for the water again reviews in turquoise, blue and intercooled. Then for the cliff, you will need pains. Gree sour cream on Mancina. All right, let's chat. So the pencil sketch may need to add is just a cliff on two mountains. The background disassemble one. I tried just to make sure the colors. I'm going with this kind off perfect for the competition, especially the C. I want to try and get that washing colors without going with my marine blue, our fellow Turk guys and other blues, which you might not have. So that's my cliff. I will be adding few mountains in the background. If you want to go for a bigger cliff, you could do that. And if you want him reference, you could type in Cliff and see on, get some reference pictures and try and full over off the picture that you see on Google, you will find so many reference pictures like this. So if you want to go with a more detail or a more Bickell club, you could do that. Now I'm adding some mountains in the background, one right here on the tiny wond behind that. Okay, so that several pencil sketch from all those ones who painted for the last 20 days, the Scotus my most for your rate. When I did that trample on my little sketchbook, I was so impressed. And I was very sure this should be born a for class project. Now for the sky, I'll be going with a similar color combination. I won't be using the pink unjust that your guys and the pope. So I'm going to apply and even called the water onto the sky. You can also take it down. We'll be painting the water and the sea together. Now I'm starting with turquoise blue and I'm applying that on to the top. Just a few streaks on the top. You can see the color is nicely spreading into the wet background. Now I'm washing my brush. I'm cleaning my brush and I'm just taking that color town, and I'm applying a very light toe over the bottom. Okay, so that's my sky. Now I'm sweating to permanent via Let's and I'm going to apply some taco tones of the top. This will make my sky look more dramatic. Make sure you're not going with the very talk tour. We need a soft and subtle sky. I'm adding a fuel right here. Okay, that's it. Now I'm gonna again clean my brush on. I will make all those patterns a little soft by taking my damn brush on top of those patterns. So my brushes perfectly clean. I have no paint on my brush. I'm taking my brush on top of those patterns in a very gentle manner. I'm not putting too much pressure. And I'm just softly those patterns there so you can see the kind of color I went in with. I played with very light tones. We want a soft looking skies, so make sure you're not going with to brighten were colors. Now let's paint the water. I'm going with the light to turn off turquoise blue, and I'm adding that on the top, actually, you can fill up the entire water in the shade on. Later we can add the taco tones so that your bagger will stay wet on. It is easy for you to add the taco tunes, so apply the light to turn off their cars to the entire water. Now start making the bottom docker covert a brighter tone up turquoise Add Latin So we need a nice grading off turquoise blue here, lighter on the top on as you come down. It should be DACA now to get that car GIs ocean blue. I'm going to makes turquoise blue and in tickle other love turquoise mix that with Indigo Aunt. Here's the kind of color be how you can see how gorgeous that colors. Okay, now we're going to apply that shade over the bottom. My background is still, but I'm just starting the Darko tunes at the port. Um, I wouldn't be taking them to the top on the top. I need a lighter tone of turquoise blue on the bottom. I want this deep sea blue color. You can see how off a C is taking shape. I'm going to add more taco tones. I'll first at the reflection of a hero so are in the dark atones right underneath that cliff. You can make the Syria a bit more taco. Just drop in the dark CO two. That is all you need to do. We are not going with any solid and trauma headlines. We want a calm looking see So we're dropping your Darko tunes. Let that blend into the background. Now I'm switching to my round brush and I'm going to soft in all these lines I have Applied Hill. I'm just taking my damn brush on top of those lines and I'm soft feeling it. I have no paint on my brush. Make sure your brushes clean. Now just drag those lines on. Give it a most softer look. I don't know how many if you're using a good quality watercolor paper, if you're using a good quality work, low people or your background would be still wet on. It will be easy for you to track the lines on to make the lines looks after there was a little off pain dropped you. I'm just cleaning that, but But you're only to add any lines over the right side. We just need those taco tones on the left on a little on the border. Okay, Now I'm going to add more taco tones. A little under the cliff. So the color used worse. Turquoise, blue and intercourse. I'm exporter sheets together to get my ocean blue color. Now I'm going to drop a little more taco tone on fuel lines over here, just to the bottom. I wouldn't be adding them onto the top on the top. I want a calm sea. Now. I want to have applied those lines. And Dakotans clean your brush. Andare new pressure on top of those lines. In a very gentle man, you be as gentle as possible. Your paper shouldn't know you're running oppression. Top off it. If you're too gentle with your brush movement, the base layers won't be disturbed on. You will get a softer looking background. Okay, so that's my see. Now let's wait for that to dry. The next task was to pay in the mountains and the club. Everything has completely tried. I'm gonna start with the cliff on for the cliff. I will be using born Xena and sap green to apply the base layer. I'm using my round brush on time, starting with Mancina I'm going with the light off Mancina. We want a medium to lie. Toto don't use attacked. All of Mancina will be adding more darker tones and textures on top of this. So the base layer has to be a little light. Now, Philip, the entire border part inborn Xena on over to the top. I will be adding some sap green. I'm switching to sap train, adding that on the top so that it looks like there is some greenery. Andrea, some plants on top of the cliff so we don't need any solid separation between sap green on blue Encina. You can add little off saccharine tones onto the brown background, and similarly, you can drop some brown tones onto the green area. Asper. So everything looks a little more natural than you have these two colors together. And also don't worry about having a clean blend here. You can have a rough and messy kind of background that is absolutely okay. We'll be at remote taco tones and textures on top off it. So no matter how your background looks, it is going to be absolutely fine. All you need a slight background so that the textures will be adding will be possible if you have a dog background, and if you're adding a darker tone on top off it, it wouldn't make any difference. So you need to have a light background. Now I'm cleaning my brush and I'm simply taking my pressure on. Does brown spots you can see? I'm not really worried about having a clean blend. I'm simply running my brush on top of those patterns. Now let's wait for that to dry. Meanwhile, let's be in the mountain, Dipak. So I'm going with a light on off into Go for the one in the background now full of that tiny mountain deep Akram using light on off, intercooled. You can see the color, I'm going, but it's very light now. The other modern we have on the left will be applying a bit more pride to turn off intercooled. We'll have to wait for this one to drive before we go in with the other mountain. Okay, I guess our cliff has dried now we can add in the taco tones on top. Off it, we'll be adding dry brush patterns to create more texture on the cliff. You guys are already exports and dry brush technique. I'm switching to my smaller size pressure so that the patterns I'm creating will also be a little smaller. To add Anadarko tones and mixing bond Xena on a bit off pain screen. You can also use your born on board. Now remove the excess amount of water by tapping impression of people trouble on. Create the tribe Rush patterns. You just need to simply turn your brush on top of the cliff on Create patterns like this using a taco toe brown would be the same and add more and more textures. You will slowly see how our cliff was getting alive from a very messy pack ground to a very texture, Beautiful cliff. Now I'm switching to a more taco Tony Brown. This time I'm going with more pains, great and less buoyancy now, and I'm again creating dry brush patterns. Using that doc kowtow, I'm tapping my pressure people toe and repeating the process of writing dry brush patterns so there is no rule or no pattern here. You simply need to take your pressure on top of the cliff. You can apply variable you want toe. There's nothing like you should be applying on the top or you should be applying on this side or that side. You just need to run your brush mindlessly and create as many pictures as you want. You can see how beautiful our clippers looking already, and I will explain that second mountain in the background and a price total off into cool. So I'm going with one doing brighter than the one in the background after those will come back to the truth. So that's done. Now let's go back to our cliff Now I'm sweating to sap green, and I'm going to repeat out of the dry brush pattern to sing sap green. I'm dabbing my brush, one of people toe, and I'm adding the dry brush part owns at the same way I did earlier. It has just had the colors different. Right now, you can see slowly of a cliff is getting a more realistic look, so the green textures that we're applying right now represents all those plans and greenery on the cliff. Add more on the talk on less on the lower part. Keep on adding them until you're satisfied. What you need to keep in mind is that you shouldn't be covering up the entire base, Leo. You should be singular. Laugh light brown. Those medium tonal problem on the grain tones, the different kind of touring values and different kind of colors is what may cover Cliff look more beautiful. Now I'm switching to paint scree, and I'm gonna add the final round of dry brush patterns. So this time I'm going a little more different manner than how we applied earlier. I'm dropping in some taco tools on the top, a little on the bottom, along the line off the cliff. Okay, now I'm going to take my dry brush pattern in a horizontal and vertical manner to make our cliff look more realistic. So what's this Closely at a slightly different from how we did earlier. The technique is exactly the same. It is just that I'm taking my brush in a horse on your manner, and I'm creating some divisions in between. I'm not going with a very prominent line. You can see the line I'm adding is very wake and dull. You can see the seam in this picture. Hell, this is what I'm trying to create using those dry brush patterns now After I'm done on the horse on the line, I will add vertical lines. I'll be full in the same metal and I will be creating very big lines. So we have those divisions here, but and it's not very prominent. It looks very naturally formed. Please make sure you don't have any water cannon on your brush. You should be working with dry paint. Otherwise you lines will look very sharp and prominent on it won't have that realistic look . Oh, came with that. We're done with the war, Cliff. You can see the kind of textures we have court you. You can really feel that depth of this painting. It is just because we played with different tonal values. We went into the lighter tone for the sea, which is at the back on towards the bottom. We went into the body board and dark Odo. So it feels like the other end, just like Drew far from you. And you can't really get that sense of distance. Finally, I'm going to add some boards onto a sky and with that will be done with the wall painting for Day 21. - I really can't believe we are in the last few days of the water did a watercolor challenge. It was a good exercise for me. Yes, well, brainstorming the topic and exploring new color competition. All these kept me on my tools on. I really enjoyed it on somebody who feels nice. When I am to see I allowed going toe the discussions. The rubio on the class protects I may feel empty ones. We finish the 30 day vertical a challenge. Anyway, I'm super happy with the way you guys are improving your skills on. That was my ultimate aim behind this watercolor challenge. I'm glad we're waiting there On Dhere is the final painting. Look at those gorgeous textures we have got here. I'm really loving this. I hope you guys also had a great time painting this beautiful cliff on DSI.
25. Day 22/30: Hello and welcome to Day 22 off about arterial article. A challenge. So this is what we're going to paint today, and the colors he will need our taylor blue, red and yellow orange, then added those wooden sticks on that little mountain in the background. You believe pain scream on to add a moon you will either need by gradual white worker. There is no pencils gets required. So let's richly start by applying and even called the water onto the entire paper. Make sure you don't have ports of water in between. Just turn your brush two times across the paper on. Make sure the court of water us even now, this of the two colors I will be using pillow blue, red and yellow orange now be used to close her compliment regulars. There, on the opposite side of the color wheel, the complementary colors make each other's looks vibrant, but when mixed together, they create a medical. So even though these are the two colors will be using for the sky, we won't be mixing them to cattle will be adding them separately. I'm gonna start by applying Taylor blue onto the top, so on the top and bottom. I will have to deal a blow on over the middle. I will be adding the laugh look orange You can see the way the color is spreading asked my packed room to spread it. So I applied a lot Love blue onto the top on down to the bottom. Now I'm switching to yellow orange I'll keep my flat brush aside because we'll be adding more taco tones of blue I haven't used my round brush to add together orange. Now I'm adding a light or a yellow orange or to the middle where I had left little space You can see the way I'm walking I'm not making my orange touch the blue I'm just starting fuel streaks off orange in the middle. Okay? No, I'm gonna clean my brush now. Using my clean fresh I'm going soft on all those hard lines Every time I pick the color on wiping my brush on a people travel so that the colors won't mix and create a muddy color. Make sure to clean your brush every time you're on your brush on top of the paint You can clearly see my orange and blue hosting separation each other. I didn't allow them to mix. So when you leave that white space in between, when you are in your next color, you shouldn't be applying that closer to the blue. You should be adding your orange number in the middle so that even if your color spread, it doesn't reach the blue. Now, before the backbone drives, let's add in more taco tones of blue when you add the first layer of blue. And when you're closer to the middle media, make sure you're not going with a taco tone of blue. Now I'm going with a light one of blue, and I'm going to add a few streaks in the murder without disturbing the orange Leo. I'm going with a very light. Oh, I was very gentle. I applied a light on a blue over there. Now, every time you turn your brush, make sure to clean it before you use it the second time. Otherwise, your clothes might can get mixed and create a muddy green, which we don't need. We want the blue and orange to stay bright and fresh. You can see how bold and beautiful of a sky and the water is looking. That is just because we worked using complementary Close. Now, if you're not confident working with complementary colors, you can use blue on purple or blue and pink, which doesn't create a Mardi mix, so the risk factors a little less. Okay, I'm almost done with my sky. I think I'll add one more light blue streak over here and maybe a tiny one over the murder last will so that it looks a little more interesting. If I don't add, these little streaks in between my blue and orange will be completely separate from each other on it. Might can look a little horn, and that is why I'm adding this light streaks in between. Okay, so that is my sky and the water. Now let's wait for that to try. So these are the two colors I used Taylor blue, red and yellow orange. This are two of my very favorite shades. I have used these two colors quite a lot in about 30 vertical challenge. So if you want to get the same, these are the prince. Now insert off orange. You can go with yellow and do the same sky again. Make sure you're not allowing the colossal mixed together. Otherwise, you will have a green color in your sky which may look very are So That's why I'm asking you to work in a separate manner. Don't allow them to mix. Now I'm switching to my size number to brush and I'm going to add a line off mountain in the background to add the mountain on the rest of the details. I will be using pain screen. This one is from white nights. This is the one I was using. A novel earlier painting Sassuolo. Okay, so when it's add the mountain, I'm going with a light tone of pain Scream. It's a very light toe. This is the tour I'm going with. Okay, let's add the mountains now. I will be out in the mountain only on the right side, and I will stop it somewhere in the middle. I won't be taking it across to the other end. We're going with very small mountains, so switch to your smaller size brush. I added a line. Now I'm going to add a mountain. You can see the door I'm working with and also the size. No, I'm gonna big the line on. I'm under the tiny one. We're not going to our reflection for these mountains. Assad is quite far from you. Okay, so the mountains are done Now The last task is to add the wooden sticks in the water. I will be going with a taco tone of pain scream which is very close to black. If you don't have pain to create, feel free to use your black water color You can see then be added. That little mountain are sky and the waters looking source turning now once we are in the wooden six and reflections It is going to make a truly look beautiful. Now, when you're adding these wooden sticks Never Adam, in a perfectly smooth line go in an irregular manner just like I'm doing here. This way, your warrant sticks will look more realistic. Some of the lines can be inclined towards either right or left, and some of them can be taller and some of them can be shorter. So work on all kind of competition. We added two word and stick. Now I'm going to the 3rd 1 You can see the way I'm adding them. I'm not going with the straight line. We have raised a 22 on. We just have eight more days to go. And I really hope you guys were able to follow the paintings tweeted earlier. Many off you message me asking if I could do a more detailed his kid, which has a lot of reflections. But if I do that, it may go beyond 20 minutes to independence is what I said for each painting. If you took out the other paintings waited, I haven't crossed 20 minutes. So if I really want to talk about everything about a Seascape painting, I really have to go pee on 20 minutes and it will go a little longer. There's a lot of techniques and exercises you need to do before painting a proper Seascape . If you're still interested in painting a Seascape, you could check out my earlier class. I have released two classes on Seascape. One is a big, no friendly class, and other one is a little more advanced class. So that might be off a little help. Start with the big No. One and want to have done those exercises. You could check out the advanced form. Okay, so I have added all those wooden sticks. Now I'm going to add the reflection. Amusing pains, Great for the reflection Asper on. You need to have a smaller size brush right now because we're going with thin and delicate lines. It's a very easy step. Maybe first you can have a closer look off what I'm doing, then to see that you're painting. So I'm loading my size number to brush with paint, scree and all. I'm doing this adding those exact lines right underneath the wooden stick. I'm just taking my brush to either side. Now you don't need a perfect continues exact lying to the bottom. In between, you can break the line on also some off your lines can be longer. You can see the week I have added it. Now I'll do the same on to the other one, so you will have a better understanding. Just take your brush in his exact moment. You can see at some places I'm taking a little more outward. It's not a similar Gilles exact line there. I broke the line. Now I'm again added this exact line. Okay, you see right. Maybe you can take out her off piece off people on. Try out the scene before you proceed with your main painting. Now I'm gonna go with the Toad Barn, so I'm not really worried about, um I wouldn't stick a straight or inclined or but it has some irregular grooves or something. I'm simply adding his exact line at the bottom, so you don't need to worry about all those minute details. Just take your brushing. His exact Mineau. You can see the lines I'm adding was read Ethan on some of the lines are little longer. I'm taking a little more outward, so don't worry at all. Go ahead. Take your smaller brush at this exact line on. Trust me, it's going to look beautiful. I have three more left. I'm going to repeat the same for the other wooden sticks. Haskell, I'm reaching almost the bottom on. I'm just stopping my line there. Okay, the next one, I'll just had few lines on for this. Also, I will be adding a little lines so everything will make it look more natural if I'm not doing the same thing for all of them. Because everything depends upon the water movement on the reflections. Keep changing. It doesn't look the same all the time. Oh, case would That's Ah, sky mountain, Wooden stick and reflection. Everything has completely tried. Now the last task was to add a moon. I'm going with the percent moon. If you want to add a full moon, you can do that. That's totally up to you. And I'm gonna use quite water. Glad to add a more. The one amusing here is from artists after actually dipping my brush into the tube and taking a little off paint. Andi, I'm going to add the percent move. If you have y gorse, you could use that now pick us part, but has more darker tones. So for me over the left side, I have more doc atones over to the right, the ram or lighter tones. So if I add a move over there, it may not stand out. So I'm going to add the moon over here our ride, but that we are done with double painting for day 22. Now, let me remove the masking tea, and then you're removing your masking tape, removed it at an ankle so that the paper won't come off on. You will get a clean side. Okay. On Dhere a several final painting. It was a very quick one and we caught a beautiful result. I really love the colors we have here on those reflection. Everything has come out very nicely. Thanks a lot for joining today. I'll be back here with another exciting project.
26. Day 23/30: Hello and welcome to day 23 off 30. Ideological a challenge on today. We're going to paint this board and fear sunset. Okay, so this one is one of my most fair rate with it so far in over 30 day with a collect challenge on I've been waiting to upload this one for a while now, but you guys been are confident with the bedroom. Where technique and some of it. We're not using the right kind of people. So I kept postponing it. And here it is. So the two colors you will need for the sky is four million dread and crimson being single's two colors together to get that bright red aunt to add in the details are using the same color on average the mixing of love purple into that. And to add the moon and the reflection, you will invite bars or white worker. All right, let's start. This one is a sample decided just to be sure, but the colors. So I'm gonna start by applying and even goto water onto the people. Playa clean called the water onto the entire people. We don't need any pencils. Kitchen. We'll be painting the sky and the water together. I misplaced my whoosh pressure and I couldn't find it when I was about to film. So that's why I'm using my flat brush. Okay, so I have a plan and even go the water on the entire paper. Now that start painting now to pay the sky and the water, I'm gonna mix one million trade and crimson, So I have a nice reddish orange or orangish red water where you want to call it. It's a very pretty red which has a pink tone and an orange doing together. I will show you a scratch of the color. I made the specific color. You could see how gorgeous that shade is. So I mixed. Formerly in trade on Crimson. I used equal amount of both the shades on that she will be working with. Now let's add that color onto the people first. We need to have a great and worship the scholar be created. We need a doctor to on the top and the border on over the middle. We need lighter tone. Looks like my waters kind of tried no more might I will quickly dip my brush in a little water. Andi, blend that well. So the first step is too great a small to creating of this color, but his dark on the top and the bottom on light over the center. You could also try the same with purple or a blue If you are someone who don't like red so you can follow your favorite color. Okay, we have a Bagram boss treaty. Now I'm going with a little more pride total off the same grade. And I'm going to apply that on the top and on the Barton just making the color a little more intense. Oh, right now, you could see we have a lighter tone in the middle and a brighter drew with the top on the bottom. Now that lighter area is very have a horizon line on imaginary horizon line. Now I'm going to switch to my around, brush on. I'm going to add the clouds so onto the same color. I'm going to mix my Roestoff ultra Marine to get a dark Odin off this raid on using that color, I'm going to apply the clouds. You can go with any of the poeple that have got to make sure you're going with a more reddish purple. We don't want a bluish tone on the sky, so that's a shade. Before adding the clouds, I will quickly show you was patch of the color I made on the specific color you can see. It's a nice around which has a purple tone. Okay, now let's add the clouds. I need to be very quick. Looks like my background is kind of drying. I was touched from the top. I'm simply dropping the paint onto the red background on creating the drought. So just like carpeted, another early protects. I will be going with the Darko tune just over the top, on over to the bottom, where I have the light to turn. I will be going with the light of drawing off the same shade when I'm adding the clouds. I made the color intense by adding a little more Roestoff Ultra Marine Andi. I'm going to add a darko tone just over the top. Otherwise it won't stand out from that bright red background. Now let's go with the lighter clouds. But before that I'll just make my background bread. Looks like everything has dried on. If I are the clout on this layer. It wants player it. I will get a dry and rough patch. Okay, so I'm taking my flat fresh. I did my brush in a little water on time trying to blend that color with that middle area now because I started blending the colors from the bottom. My brush will have a lot of paint, so make sure when you're reaching the top, you need to clean your brush properly. Otherwise he won't be happy. That lighter tone in the middle The beauty of this painting lies in that creedy int. We need the price iTunes over the top in the bottom on that lighter tone in the middle to get that see and the sky merging effect. Now I'm spitting back to my round brush and I'm going to add remaining off the clouds. I in order my brush with that publish right on time. Removing that excess water from my Bresch now are in the clouds because I don't want the clouds to spread a lot when I'm applying here. I want some smaller sized clouds and that's why I'm grumbling the excess water from my fresh. If my brush has a lot of water. It will spread a lot and create those bigger clouds. I want very tiny clouds over here. You can see the way I'm dropping them compared to the ones on the top there. Very tiny. I just had a few more hill with the bright or toe or tried, so that's a was sky. Now, before the bottom part tries, I'm going to add in the reports so the size of the clouds totally depend of the amount of water. Your brush has God. So if you want a smaller size cloud, you can always tap your pressure on a paper towel. In Andhra movie excess among the water, the color will stay the scene. It was just that you'll be working with the lesser water content now. Using the same shade, I'm adding the triples. I'm just adding lines like this onto the wet background. You can see there nicely, spreading to the background on making them Look what he solved. My lines are not looking too sharp. That is just because my packing respect again don't work with too watery paint. If you feel like you're paying those two watery, the opportunity people tower on work with the pain which has less water content. If you paint us to watering than you're adding this lines, they will spread too fast on it. Won't appear like lines now gonna adding this line to make sure you're leaving a little gap in between. So you can see here between every line. I have a love red cap. This is what makes your see look more beautiful. Don't apply them close to each other. Make sure you have a little red cap in between. Now I'm cleaning my brush and I'm going with a light or tour, and I'm adding few lighter lines over the background. So wherever you have a Darko Baisley Oh, you're going to the dark 02 and very well. You have a lighter base, Leo. They're going with lighter tones saying for the sky and for the water and also the size of your lines and the clouds onto the top. I added bigger clouds on when I'm closer to the horizon line. I went in with smaller size clouds, same with the water over to the bottom, which is closer to me. I went in with Biko ripples. I added a decline on When I'm over to the horizon line, I'm going with Britain and delicate lines, which is light and tone. You can see how bright and bold of a sky and walkers looking Now everything has completely tried on. I'm switching to my smaller sized brush, and I'm going with a much more depot tone off the same shade by mixing more rows of ultra Marine. Now, in between those big horribles we created, I'm going to add in something lined Aspar just over to the bottom. I'm deciding few lines because these lines will give your see a more finish. Look, don't add them closer to the horizon line to start a few lines towards the bottom. Go with a very thin line. I'm really loving this color company. Shen, when I tried the sambal Please, I didn't like it much, but still, I thought, I'll give it a try. Now I'm really loving the colors. It looks so bold and fears okay. I'll quickly show you how it added ripples. A cane. You could see how easily we agree to that depth. The noble painting. I'll take a scrappy soft people, Andi. I'll just apply the ripples on those dry people. Whenever you're adding the reports, make sure your background this little wet and you paint is not toe watery on add lines like this. Press and release your brush on a gain. Add aligned and press and release your pressure. So walk on this competition at some area, you can go with a tick, a line on at some places. You could go with a Tina line. So these other pills without close so to you over to the horizon line you should be going within and delicate lines, so it to the bottom Europeans will be a competition off the camp in lines on In between, You can add Justin lines, which we did right now to make your see look more refined, just our distant lines, but a more dark Oto. Now you could try the same thing on any color competition to paint a C. Okay, now I'm going to switch to white water color on. I'm going to add a tiny moon. I will be added. The moonlight asked for on That's going to be the last tip on the Todd will be done with the bow painting for Day 23. I'm going to add it right at the center, a teeny tiny moon. OK, so that's our tiny moon. Now it's time to add the reflection. That's the last step remaining. I'm really loving the way the spending is progressing, and I think I'm gonna try this aching, using my royal a cheat that bold and pride permanent twilight I used for my second painting . Now let's add the reflection. This will be the way I'll be adding the reflection I just tried it with, though by chip in I'm using my smaller size brush, the society's number to go with any off your detailing brush or size zero R Any other brush , which has a nice pointed tip. Add in some white lines right underneath the moon. We need something on delicate lines, and that is why I asked you to go with a detailing brush. We don't need any thick and bold lines. You can see the way I'm adding the lines. They are very 10 over to the top. You can go with a little more ticker on and Boulder White, and as I come down, I'm making the lines. Morton on delicate to come back to the top on. That's it. We are done with double painting. Now it's time to remove the masking tape. And here is have a bull and fear Sunset. I hope you all had a great time painting this one with me. Now we have to seven more days to go and I'm super excited about the rest of the class. Protects and I'll see you tomorrow.
27. Day 24/30: Hello, everyone. Welcome to Day 24. Off of water, Daily vertical A challenge on today we're going to paint this beautiful floral medal. I'm in love with those violet flowers, so let's quickly look at the colors Will need for the sky will be using turquoise, blue and permanent violet. Then for the mountain, I will be using a light one off integral on for those green mountains and the meadow. I will be using sap green, permanent violet and rose off Altimari. OK, so will it start now? Don't yourself. If you don't have the same color, you can use any purple on any violent at half court. Or you can make your own purple and violet. So we need to act three mountains. These are our green mountains. Now I need to add one more in the background, which will be a snowy mountain. Okay, so that's a pencil sketch. Now let's start painting the sky. I'm going to apply anyone called a water onto the sky, fist on the shades. I will be going with this turquoise blue and permanent while it I'm missing my Flatbush to add the water because it's a very literal area Okay, Now I'm switching to my round brush and I'm going to apply the turquoise blue on the sky. This is one of my most favorite combination to paint the sky turquoise blue on white clouds . I'm adding a little on the top just over the top. I'm going with a bit off medium tour and over to the bottom. I will be using a light to turn off your guys blue. I'm not really going with the clean blend or a great inversion or anything. I'm just adding the paint onto the bed background on living a Tacitus. Let it blend by its own. Now I'm switching to permanent trial it and I'm dropping in a little of that on the top. I'm not really adding the shape of the clouds. I'm just dropping in some random shapes and again let battle to blend into the background, creating a natural pattern. I'm not controlling the way it is spreading. Let it do its magic. Okay, so that's a was sky. Next we will pay the flowery meadow on After that will be in the mountain. So will the sky dry Me inviolable pain the meadow. I'm gonna start by applying a coat of water, a clean even called the water. Okay, now switching to my drama brush. Now I'm taking a light on a permanent violet, and I'm gonna drop that into the better background. I'm just picking some random media and I'm dropping in the light of Donald. Why? Let now I will do the same using gross off ultra marine asper so that I have a reddish purple in between. So if you're creating your own violet, make a mix. Protests more blue onda mixed with has more red. So you have a more reddish violet and a more bluish violet on door. The same Now over to the bottom. I'm going with a medium tour again I'm dropping. And now medium tonal violet in between, I'm dropping some taco tone test. Well, you can see my background is bed and the colors are nicely spreading into the background. Now I'm gonna wash of the pain from my brush and I'm switching to my bright yellow green. Now, if you don't have bright yellow green, you can makes a lemon yellow and a pinch of sap cream and you will get a very similar color . You should be using more yellow unless green. Now, where were we have left those little white cap? I'm going to add this lighter green over there. I'm just taking my brush around those violet, but don't be applied. You can see I'm not adding anything on top of it. I'm just taking my brush around them. Okay, so we have filled all those white caps. Now I'm gonna fill up that remaining idiot over the border. You can clearly see I have a lighter tone. Oh, Violet and Rose off ultra Marine over the top on or to the bottom. I have a motor co two. No, I'm spitting to sap cream, and I'm going to simply drop in some dot onto the light green background we applied. My sapin is little watery, and that is why I'm getting those big patterns there. When my brushes starting the white paper, it is spreading fast on creating a big pattern. So I'm gonna drop my brush into people, travel on you could see the size of those patterns are looking to small compared to the only one. This is what we need, especially over the background. Okay, So simply drop in that sap green onto the light green background. Just be relaxed. Feel free on dropping that beamed onto the background. At this point to your Bagram, we look a little messy, but that's absolutely OK. Now I'm gonna clean my brush and I'm switching to wide it again. My bathroom hasn't completely dried. It is still a little wet. I'm making use of the time on time, adding few taught off while it a bit of Dakotan. I'm adding that over the bottom, where I have applied a taco tone violet have allowed fume or and removing Texas and on the water so that I get tiny dots like those. Otherwise, my pain might spread too fast on create bigger patterns. Okay, now I'm going to switch to roast of Ultra Marine. So go with any off your reddish proper on load your brush with a medium tool off roofs off ultra marine, or which will be the color that you're using. Now I'm going to cover the sky, and I'm going to drop the shed onto the red background and covering the sky using a piece off people tower. Now I'm going to splatter that Roestoff ultra Marine onto the bottom. I dropped in some lighter tool. Now I'm spitting toe medium tune. Make sure you're not adding anything on to the sky. Tap on your brush and create this. Tiny is plateaus. Make sure your pain does not too watery. So at this point, your background would be at the world job drying. But that's absolutely OK. You can see the dots that I'm adding. They're not spreading too much. They're staying. Asset is Be sure you are not going with a dark Oto. Go with a light on. First on, drop in as many as you want. Then go with a medium tool on dropped out again. Now I'm switching to Violet and I'm going to drop that over the border. So over to the top I went in with a lighter tune. Now over to the bottom. I'm going with the doc 02 and also onto the top. I added very few splatters. You can see the difference between the bottom and the top. I have very little flowers on the top on to have a lot of them over the border. So this is where we have Reese right now. Now I'm switching to my smaller size brush on. I'm loading my brush with sap green, and I'm going to add this grass over the Porton just at this bottom line. When I started with this painting, I thought I was cool with orange flowers. But then when I painted the sky and when I added that while it onto the sky, I thought it would really look nice if I go with some poeple and violet flowers on. That's how I tried this color and I'm really loving the result. It is just because we played with different tonal values of Violet and green Armada was looking this beautiful. If you rented with the same tone for the top and the bottom, there won't be any sense of depth. So your painting will get that depth only when you play with different tonal values. Your background should always be light on what orbit is closer to you, which is at the bottom. She'll be more dark in color. Okay, so now let's make the pardon part more DACA. I'm gonna makes little off into go to my sap cream to get a darko tonal green on, but that she'd I'm going to add in some more grass just onto the bottom line. I won't be adding that anywhere else. - Okay , so this is where we have reached. Now I'm going to switch to Violet again, and I'm going to add some daughter with the bottom with a dark go to one. I will be repeating the same using Roestoff margin Marine husband. I'm just having some dots at the bottom. You can see the way I'm adding them. I will be adding this only over hell. I won't be adding them over the top. - Andi , that's a gorgeous middle with violet flowers. Now let's pain the mountain. I'm going with a light one off intercourse on, just like how we did earlier. I'm going to add that irregular line in the murder, and I'm gonna fill up the right side with a light one off intercourse. Then I will be adding some random lines onto the left side. So this time I'm not going with the variable detailed mountain. This is quite far from you. So I wouldn't be adding the dry brush patterns. I would just add the color onto right on have allowed those lines on the left side on the tired I will stop my mountain. Now it's time to paint the other two mountains. But how? For the one on the right side, I'm going with the darker green. So I'm mixing indigo and supreme to get a doctrine of grain on. I'm gonna fill up that entire shape in that shade. - So that is the one on the right side. Now for the left side. I'm going with clean sap Green. I'm not mixing any color with the sap green. I want that first saccharine kill. Now I'm going to fill up that entire shape and sap green. Looks like the other one we painted on the right. Need to be a bit more Dhakal because put the mountains are looking more. Listen, no were not really able to differentiate between the one and the full crown and one in the background. No mind. We'll add a doctor, tune onto the one on the right side. So to the same share created earlier on mixing more integral to make it more darko. Okay, so douche looks for a fight. No, I'm gonna fill up that entire mountain. The shed Also adults which to my smaller brush and create those trees on the top. I'm just adding some lines close to each other. We used the same technique. Quite a lot of novel. Earlier projects are married lines close to each other, or some of them are taller. On some of them are Shorto. So you have a nice confirmation off dollar and charred oak trees. Now, I'm gonna do the same thing to the other end. Some of the lines can be longer and some of them can be shorter. So woken a competition so that your trees look more realistic. Okay, Now I'm going to switch back to sap green when I will just blend the doctor tune into that back room we had applied there earlier. Okay, With this step, you're actually done with double painting. But for some reason, I feel like adding some more splatter onto the meadow. I'm thinking to go with some greens plateaus. Okay, let's try adding some more splatters. I'm going to cover up my longan on the sky. Andi, I'm going with sap cream. I'm going to split or some submarine onto the bottom on also a little onto the top where I have those green background. So if it already happened that your results. You can stop your painting there. You don't need to address plateaus. I don't know. For some reason, I never get done. I always go overboard. The details. But don't be like me. If you feel like you are done, please stop it there. Okay, I'm done. I didn't spy in the painting with two months of dance are painting was looking so gorgeous . I'm really loving the violet flowers we have there that removed the masking team. Okay. I wanted to add some trees in the background, which I forgot to add. No mind. Adam wants it removed. The masking tape, some teeny tiny pine trees in the background where we have those like Green Mountain. I will just fix this one. Hell, now I'm going to add those teeny tiny trees. I promise this is the last thing I'll be doing. But that will be done with a painting for day 24. Okay, so that's done. Now it's time to add those teeny tiny trees. I'm just Harding, that droplet kind of machine. I think we did this in one of four earlier painting to create those trees in the background . All right. So I'm really done with my painting. I'm not going toe. Add anything other than this on look a tubal floral meadow. I'm really loving those violent flowers against the green background. Here is a closer look. You can see those plateaus. We created everything Inciting a lot of character to go painting You could try the same thing in orange or yellow are maybe blue You can create a bluebell card in. So this painting is a combination of many techniques. We tried olio. We try the same mountain on the same sky. It is just a splattering technique. We did new today. All right. I hope you all enjoyed painting this beautiful floral metal. I'll be back here tomorrow with another exciting project. Take care and by okay.
28. Day 25/30: Hello, my friends. Welcome to day 25. Today we are painting another gorgeous night sky. So let's quickly have a look at the colors for the sky. I will be using permanent Violet Taylor blue and integral aunt to add the mountains and those little trees have abusing pain scree. And to add the final details several abusing white or tickler. All right, let's that I'm gonna apply and even go the water onto the entire paper on a first, I'm going to start with Taylor blue to apply the paint onto the sky. Amusing my flat brush this history by four inch flat brush. Now I'm adding the painted an inclined manner. I'm taking my pain from the top right corner towards the bottom in an inclined line. I'm just dragging my breath from that corner on adding some lines like this. You can see I'm not taking my brushing back and forth. I'm adding them only in one direction. So from the top int, I'm dragging my line. Andi, I'm taking my brush off. Then I'm again repeating the scene. Now I'm going to switch to Violet and I'm going to do the same from the bottom corner to what's the other end? So the key here is to drag a brush only in one direction. Never take it back. And for it after every move you dough, you need to take your brush off and then go with the next one. So just drive the paint, take your brush off, then cool with the next one. Please keep that in mind. Now I'm gonna clean my brush Now we need a people travel or according cloth for a few minutes. Just relax and watch what I'm doing. I'm dragging my brush from the bottom corner towards the blue And every time I am dragging the paint I'm cleaning my brush by dabbing it on a people travel you can see every time I clean my brush My brushes having blue color You can also see I have dragsholm blew into the violet. If you don't clean a brush after every move there will be a lot of blue in your violet which we don't need people in the violet and blue to be separate. Now I'm going with a much deeper turn off Taylor blue and I'm gonna do the same from the other end. I will be driving the pain from the top right corner worth the left corner. So at this point, my paper is just damp. All the water that we have a plight has kind of dried on. The pain that I'm applying is also not too watery. You will see that when I'm dragging the paint. Okay. I'm gonna start drinking from this corner to the other corner. You shouldn't be taking it throughout. You just need to track and clean your brush, dragged clean your brush and repeat the same. You can see when I'm dragging those lines. The pain does not floating. Also, it is not spreading a lot. If you paint us too watery, you won't get this lines. Your pain will start spreading even though I don't have a smooth blend here. My lines are not looking very sharp or prominent. They're having a very soft look. Okay, so that is the first year. Now I'm going to drop in some integral onto that top corner where I have pillow blue. Now I'm loading my brush with indigo and I'm going to repeat the same process off adding lines. I won't be taking it towards the violet Leo. I'll just limited over the blue. We just need a little of Darko tunes on the top to make other sky look more interesting. Drac it this time. I'm not kidding my brush because I'm just playing with blue tones. I'm not mixing it with violet or any other sheet, so we're fine. You don't need to clean the brush when you're doing this, but then, if you're taking it to your violet Leo, you'll have to clean it. OK, so that's our sky. Everything has completely dried. You can see the kind off Carlos we have got here. There's a little off light tones in the murder, which is making us Kai look as if it is glowing. Ask eyes looking so soft. I'm really loving the color combination. OK, now it's time to split of the stars. Amusing whitewater color. I took white paint on my smaller brush and I'm tapping one accusing other brush to create this tiny is plateaus. Now, as I always mentioned, work with our consistency, which is somewhere in between loose and take ever still tick. Nothing will show how the new splatter on when it's to water, you will end up getting big splatters. Which one looks like stars. You will end up spoiling your sky, So if there aren't too sure about the consistency, try it on a rough piece off people. And also you can dab your brush with people travelling to remove the excess water. If there's any. Now, I'm going to randomly pick some sports and add because towers, but that will be done with the blue sky. Then we will add a mountain on the bottom on. We will add some tiny pine trees on top of that. Okay, they're done with. It was sky. Now it's time to add the mountain. I'm switching to my size Number eight Ron Brush and I'm going with pain. Scree. Now I'm going to have a huge bone on the left side. You really don't need to follow what I'm doing. Q. Once you're done with the sky, you can add in any subject that you want for your foreground, so feel free to go with any subject that you prefer. Let me quickly add this mountain. Then I'll come back and add in the tiny pine trees. Okay, so everything has completely dried. I'm switching to my size number two around Rush. Andi. I'm going to add some snow onto this mountain. I took white water on my brush and I'm dabbing eternal people trouble, and I'm going to create some drive fresh patterns. The step is totally optional. If you don't want to add snow, you against give the step on joining me back. But I'm adding the pine trees. I won't be adding a lot of dry brush patterns. I just had a little war here. - That's it. I'm done adding the white patterns. Now I'm going to switch back to pain scree, and I'm going to add some teeny tiny pine trees onto this mountain as I'm going with tiny pine trees. Thes won't be very detailed. I'll be adding pine tree something similar to what we did for that snowy landscape painting . I'll add a line, Then I will take my brush in his exact movement on greed. Fully each of the pine tree. We have already tried the spine tree. Now I didn't ask many. As you want, start by adding a line which is your tree trunk, then take a brush to either side knows exact movement. On Create the foliage is he right? No. I'm going to add a few more pine trees using the same technique. - So this is where we have reached. Now I'm going to add some on the top. Now you can decide on how many pine trees you want. I will be adding few more along that remaining area on. After that, I will be adding fuel onto the right side. Espo. So feel free to decide on what you want for your painting. - Now I'm going to add fuel onto the right side. Asked for this is a very easy way to paint those little pine trees. You just need to add a line. Then take your brush to either side. In this exact movement, you can use this technique to paint the pine trees in the background for your future projects. Haskell, I always keep repeating this whenever we are painting pine trees. Never. Adam and the same height always play with different heights. A month, um can be drunker on some of them can be shorter. This way, you're painting will look more beautiful. So whenever you're adding trees onto your painting, remember to play with different heights. All right. We had done the double painting. Now, let me quickly removed the masking tape. If you want to try some other color combination, you could do that instead of the violet. Maybe you can use some turquoise blue or maybe a green. So go with any kind of color competition that you want to try. You don't need to stick to the colors I have used here. I have seen meaning off. You're trying so many gorgeous color competition on using the same technique we learned in the class. And I really appreciate that. I love it when my students put a little effort from their side and implement with the loan . So try out the same with different color competition. Explore every possibilities. Thanks a lot for joining today. I can't wait to show you work your painting tomorrow. All right. Have a great day. I'll see you tomorrow.
29. Day 26/30: Hello, everyone. Welcome to Day 26. We just have four more days to go on Today we're going to paint this beautiful, proud mountains and wheat field with our ready limited color palettes for the sky Amusing cerulean blue You can use any blue that have caught on for the mountain and the wheat. We'll be having the bottom you will lead Born Xena Burned ambo, yellow ocher paint scree on to add in the final details have a lot to be using Whitewater color. Let's start with the pencil sketch. We need to add few mountains. I'm going to add one hell Onda taller one next on a tiny one in the background. Okay, So what? That is about pencil sketch. Now I'm gonna add a quart of water onto the sky using my flat. Trish, there's a little of blue from my brush. Never mind. I'm gonna go with the blue sky. So it's OK, but this is a reason why you need to have a separate brush to apply the first coat of water . It has to be always a clean court without any color. Anyway, for the sky, I'm using civilian blue. I'm going with a Grady in sky, a medium to long on the top on lighter at the Porton, you can go with any blue that have got cobalt blue, Prussian blue, ultra marine blue. Any bluer, which you prefer. Cerulean blue is one of my favorite blue to paint sky. It's the most commonly used called Blue. Okay, so that is my sky. Now let's wait for that. You dry. So for all this wild, we've ended with very bright and vibrant color competition. This one is going to be a little muted combination. We'll be going with bones enough for the mountain on using my round brush. I'm going to apply an even coat of Bon Sina onto the mountain. I'm going with the medium tone. It's not a very light room. You will see that when I'm applying the shade. Okay, so this is the don't I'm going with and I'm going to fill up all those mountains we have there. Just fill it up. If you are someone who have taken my watercolor landscapes masterclass, we have done and exercise on brown mountains. So I'm going to paint something similar here. Like the mountain waited for our domain project if you haven't taken that class, it's absolutely okay. I will be explaining everything you need to follow this project E o. So don't worry if you haven't taken that class. But I would really appreciate if you could watch the X. If I section it's really going to help you in your future. Protects. Okay, so that is my mountain now. I will make this line straight. Now for the bottom. I'm gonna switch toe yellow ocher and I'm gonna fill up the rest and yellow Walker. You can blend those colors Well. Bernstein and yellow Ocher and Philip, the bottom area in Gila Walker. Okay. Now or what? To the bottom. I'm against putting back to Bon Sina. I'll fill up the rest. Inborn Sina. I'm going with a bit of Darko tune and I'm going to add that over the bottom. Once I'm done adding bond, Xena, I will add some bone from book I nobody dark bottom. So from yellow ocher, your gradually progressing to a doctor Brown. Okay, so that is born Sina. Now I'm spitting to born ample. If you don't have born tempo, you can mix a little off pains. Great to your Bonsignore. We just need a darker tone off Brown. Now I'm adding that with the bottom. So don't worry about having a clean blend at the bottom. It absolutely okay, if the colors having most properly over here. But very your mountain. And that Gilo occur meets. Try and get a clean blend over to the bottom. It doesn't matter because we'll be Alamo. Details will be adding some plants over here. Okay, I added enough of born on bull. Now I will work from boredom. Toe up. I've allowed some more Bon Sina. And after that, have a lot of little more Walker. And then try and mix that with the packed room. Yellow Kobe. How? Don't worry about having a clean blend. Even if you pack in this little rough on a party, that is absolutely OK, I added in Bonn Sina. Now I'm switching to your Loker, dropping a bit of that. So that's my base layer. You can see I have yellow color on the top. And as I come down, I have a taco. Donald Brown. Andi, I'm not really having a clean blend here. Okay, so that is the first step. My background is still a little wet. Now I'm again going to drop in some more bond. Amber over to the bottom. I'm going with a very bold tomb on my pain. Does Noto watery? Okay, you can see the kind of doctor I have at the bottom. Now I'm switching to my smaller size brush. I apply this new layer of the bottom because I wanted that paint over here. You will see why I need that in the wine. I have no paint on my brush. I'm just dragging the pain which I applied on the bottom and creating this grass. Just take it up at a free hand line, just drag it from bottom to top and create these kind of patterns along the entire line. Some of them can be longer on. Some of them can be shocked. Now, this is a reason why I applied a new layer of paint at the bottom. You can add an ask many grass as he warned. Now I'm spitting toe Payne's gray and I'm going to repeat the scene. I'm loading my brush with pains, Cree on time again, adding some grass at the bottom. Now we're going to keep on building the density of the Parton. We have some brown grass in the background and add in the tackle ones in the foreground, so everything will keep on building the density off that field at the bottom. Okay, now, from the next ones, I'm going to add a button on the top. Maybe you could country. This has a wheat field. I'm not really going with the shape of the wheat. I'm adding a leave sort of the shape. So at this point, my Bagram was still a little wet. It shouldn't be completely dried. You should be adding all these. When your paper is still wet, you can see the lines on adding Q. They're not having a sharp and crisp look. They're kind of blurry. That is because they are slightly spreading into the background because my back industry wet. No, I didn't ask many as you want before your background tries. When you're adding this grass, some of them should be in Bonn. Xena on some of them should be in pain scree. So you really will have that sense of stepped in your painting. So this is something I tried, or Leo, just to be sure about the color competition. I just want to show you a closer look off how I will be adding that in part on the top, so does how I will be adding it overall, the leafy she. But I'm just adding lines on creating that leafy shape. So all this while they added this grass on a wet background. Now let's wait for all that to dry will be adding the remaining when everything dries. Meanwhile, let's are the details onto the mountain. I'm going with a deep It'll of bon Xena. Ah, one tone brighter than would be applied for the mountain. Andi, I'm going to add that irregular line and I'm going to fool the right side the same technique we used for the other mountains. I'm gonna food that batch from the first painting. We were using the same technique to paint the mountain on. I hope you guys are quite confident in painting the mountains Now. Now, when you're reaching the bottom, make your color lighter. Andi, blend that into the background in a rough manner. Your own era clean blend here now would be the same for the other mountains. Now the same tone of Brown. We're going to add some dry brush patterns onto the mountain to make it look more interesting. I took bones enough on my brush a medium tone. Now I'm dabbing my brush on a people travel on drooling the excess among the water on. I'm just scratching the brush on the mountains to create these tribals patterns. Just a little. I'm not hiding a lot. Okay, now, on to the one on the left, we explore the drivers technique also quite extensively. We use that in most of Hubble. Protects. We created different kind of textures using dry brush technique. Okay, let's add the finer details of the mountain. I'm going with a deep water runoff brown a mixing bone, sina and pains. Great. You can either use bond onboard directly or make Spain's great to your Mancina to get a deeper to no problem. Now add that dark wood on the top on Make that patch little more prominent, ambling with this mountain kill. I'm not to get and telly down, you can see I'm stopping it somewhere in the murder on to the remaining I'm leaving the shade, which we had applied earlier. Just some taco tones in the top to make our mountain look more realistic. Now I'm gonna go with the doc O Donnell Brown on. I'm gonna add in some more tribe dress patterns onto the mountain using that taco tone again. Just a few. I'm not adding too much of details as the mountain is quite far from you. Just that much Our little onto the left. One ness will. All right, no. Adding few final lines onto the left side of these mountains. Some tiny lines. I'm just creating some pockets by adding these Dakotans, You can see those little lines are making a huge impact on the mountain amount of look so gorgeous. Okay, so that several mountain. Now, let's go back to level wheat field. No, I was switching to paint. Agree on, Just like how I showed you earlier or my sketchbook. I'm going to add those wheat plants. I'm not sure if there is any other word for that. Anyway, you called what? I meant it. So at a line first on, on top of that line, you need to add a leave kind of a sheep by adding lines close to each adult. Okay? At a line then on top off it. You need to create that shape off the leave. Now, when you're adding this plans make some of them longer and some of them shorter on also, some of them can be co we and baby so create a composition where everything looks different from each other so that it looks very natural. Now I'm gonna quickly add a lot of them over the bottom. I didn't ask many as you want. Whenever you feel like I have got enough, you can stop it there. Okay, lets talked. - You can see slowly, slowly are painting is starting to look so gorgeous. I'm really loving that mountains and the wheat will be happ you. I hope you guys are enjoying it too. These are not really my colors. If you know me well, you know how much I love vibrant colors. Muted colors are not really my thing, but we explode quite a lot off paintings with vibrant colors and multiple color competition . So it's nice to explore something with a limited color palette, but I'm really loving. How do painting is progressing even though that it's not my colors? Okay, now I'm adding fuel grass at school without those barred on the top. Just a few at the party. I always have the habit off trying out the sample, please. Before I go in with my main painting. And this is a sample I did before I proceeded. The double protect. It could have it. Actually, you will have very little failures. One to start doing this. And, most importantly, no basis of people. You know how expensive art is. Great. Watercolor papers. Okay, now I'm switching toe white water color, and I'm just adding some details on just randomly picking some beat plants. And I'm adding a delicate white line, a broken line. I'm not adding a line following the entire shape on the entire plant. It's just a broken line. Owned random plans, especially on the bond. Okay, that's it. Now I'm gonna hide the mountain. Andi, I'm going to split us. Invite onto the field. We have at the bottom just a little. This will make up painting look more interesting. All right, that sit. You could try the same using a greenish competition. Maybe you can go with only green, which is a more muted green on trial. The same now, I'm switching to Payne's gray and I'm going to add some boat on the sky on the that will be done with a bow painting four day 26 or my car because have four more days to cool. And I'm super excited about the rest of the protects. I have a gorgeous night sky coming on. Also a beautiful sunset. I want to thank you all for joining me for all these days. It's not an exit has to paint every day. Most off you're walking and most off your mom on. Most of you have your daily task finding even a 30 minute. It's a hard time. I really know that because I myself was a mom. You all are the reason behind the seconds off the 30 day watercolor challenge on I'm really grateful to each off you here. Okay, let me remove the masking tape. I hope you all had a great time painting this brown mountains. It is quite different from our other class. Protects. I really love the texture we have on the bottom. I'll try. Thanks a lot for Chinese. I'll see you tomorrow
30. Day 27/30: welcome to Day 27. And I hope you guys are keeping safe and well, we just have three more days to go, so I told will again try a limiter color palette exercise today we're going to just use sap cream, bright yellow cream pains, great. And a little of blue. Any blue that you have caught us Fine. You don't need to have any specific clue. Yesterday we painted this one we explored burns enough to the fullest. So today, I told will explore another shade. This is really going to help you understand working with limited color palette. So we're going to paint a very simple green forest thing. This is a sample when I did all right, So well, let's start with the domain painting first. I'm going to apply and even called the water into the entire people. This little sketchbook is very dear to me. I think this one a small precious and my paintings because I have all my ideas, the color combination. I explore everything in that little sketchbook and I cleaned my palate after ages. I keep showing my sketchbook. This is just to encourage you to have a habit off doing the same thing. Venable, some idea strikes you or whenever you see something, just get you down or try out the sample competition or you can even write it down. So start building a habit off keeping a sketchbook for your inspiration. Now I'm going to switch to my wrong fresh on. I'm starting with pride. Yellow Green. This is one of my most favorite culo. I used the one from similiar. If you don't have bright yellow green, you can mix a little off saptari into your lemon yellow and you get a very similar color. So don't worry if you don't have a bright yellow green. Okay, let's start now. We're going to paint Oval Base. Leo, I'm going to create a lighter area over here. So this is where I have my sunlight. So compared to the other area, I'm going to make this area later. I'm not going to have any paint over there as the Bagram does wet the light green that I'm applying will smoothly planet on and create a soft white space over there now, living that bite space in the middle. I'm going to fill up the rest with the slide cream. Now you don't need to have a smooth planned or even wash. You can have some 80 a doctor and some lady a lighter. It doesn't really matter. We just need that white space in the murder that is all work matters. So that is bright yellow cream. Now I'm going to switch to sap green. Now, a battle is completely wet because we apply the court off like green onto the entire background. Now, all only to do was dropping some Cyprien onto random area again. Some media can be like toe. Some media can be dark, but make sure you're not adding any paint onto that white area in the middle, you can see how nicely of a sap green is blending into the light green background, creating a nice texture. Now, just toward the bottom, everybody adding more taco tools. So that s Saptari. Now when a similar manner will be adding a little off blue on, once we're done with, all the medium tones will be going with the taco. Drawn off green will be mixing blue on Sac Ri abusing In Turku, you can go with any blue that have caught mixed avatars have cream to get a darker tone of green. Now I'm dropping in some blue. I'm using little blue here. We don't need a fresh and clean blue. We are applying that onto the green background so it doesn't matter which blew you cool but you might be wondering what I'm doing. I have a messy background here, but that is what I really want. I want a background with us different Don't a green on blue. So first I went into the light O Toole, Then I dropped in some sap cream. So we have a light background at the moment. Now I'm going with the Depo Tono sack cream and I'm dropping that in a very random pattern . You can see I am not fooling any shape or any particular order. I'm simply dropping in the taco, too at random sports so that I have more textures and different tones. The key here is having a vet background. If you're Bagram, does not let the colors you're adding in wound spread into the background. It will stay as a rough on strong patch. So that was a medium drone of grain. Now I'm going with a bit more Darko tune on mixing a little off in Tico into sap cream to get a taco tune. Now again, I'm going to drop in that paint in a similar way. You can see I'm not adding any paint onto that white area I had left. I'm destroying my brush around that area on adding the taco tones. Maybe you might have gone in a more fast to place and have added more taco tunes and medium tones. If you're quite happy with your background, you don't need to add it again and again. Now I'm going to switch to blue and I'm going to add some blue into the background. That's a Stella Blue. I'm keeping my brush in a little water on dime soft feeling that I had applied there. Okay, now my last tip is to add more taco tools to get a deeper don't of brain. I'm adding more into going to sack cream, and I'm going to add that at the bottom you can see the shade, and you see that's a very deep green. Just randomly add that into the background. We need a darko bottom, but don't cover that entire light green you have in the background. We need that. Also, I'm going to add some green over here in a similar way. I've laid on the other side Aspen, just to make it feel like there are some plans were here. If you have so many different tonal values of green in your background, your painting will look more and more beautiful on that is the reason by I'm dropping in different kind of stones off green. I went in with the light, own a medium tone, a deeper tune. Now I'm going with a much more deeper tune. This will be the last round of green that I'm adding. I'm granted Lee dropping in that depot tune when you're keeping on adding different want of green your Bagram Thursday, but for a longer time on it makes it easier for you to add more and more taco tones. You can see whenever I'm adding the paint. I'm ignoring that white space in the middle. I'm not adding any pain toe whether I want that area to be light and pride. I don't want any taco tunes over there. This is where my son lighters hitting this is like a never ending process. It really depends on the way you want your background to be. I can go on and on for maybe another 30 minutes more by topping in more and more taco tunes . So whenever you feel satisfied, you can stop your Bagram there on. Let's wait for that to try, All right? Everything has completely dried. Now we're going to add the trees. You can see how colleges of all backgrounds looking Now. I'm going with a lighter tone of grain, and I'm just adding some lines. I'm stopping it where I have added the plans. Now I'm going with the next one. You can see I'm using a light on of cream the same way. How we added the background will be going with different tonal values of cream. Be lad trays and lighter tuned. Then we'll add trees with medium tone of cream. Then we'll go with the Taco Tomb on. Finally, we'll add some trees and pain screen passport. So we're going into some No way how we did the background. You can idea trees by simply drawing a line. Some of them can be inclined, and some of them can be straight now over to the middle you need to be a little careful. You need to go with a lighter tune on. When you're hitting that wide space in the middle, you need to clean your brush on. Make the color lighter, which is so close to white we don't need any taco tone over that center. There you have the sunlight. I'm sure another one. This is the same technique we used in our sense of painting when we were close to that sun be went in with the lighter tool. The rest was a document of problem. So that's my second tree. I'm not typing. You need green with a middle, um, dipping my brush in water and I'm making the color lighter, and I'm connecting that to ends. This way, you're painting will look like the sunlight sitting that central area you need to follow the same for all the trees you're adding. Over there, you can create beautiful light ful forests using this technique. It's a time consuming technique, but then it's a buddy. Easy one. You can create car just effects. What are you adding? Whether it's a tree or an animal or a board, water would be whenever you're hitting that lighter area, you need to make your tone lighter. That is the only thing you need to keep in mind. No matter whether you're going with Doctor doom or a lighter to you need to bring down your color toe are lighter tomb, which is so close to white you need to do it for everything you have at the murder. If you miss one tree, the whole effort will be spoiled. So be a little careful. When you're hitting this area, you can see how beautiful our paintings looking already there is a lot of light in the middle on. We have a nice background as full. No, I'm going with the Darko tune and I'm adding the taco trees. When you're reaching those plans, you can stop your tree on, take your people trouble and just drop it so that it will nicely marsh into the background . It won't stand out now. I didn't ask many trees as you want using the same process. Dabbing that end. Using a people travel is a very good technique. I randomly found out this technique when I was doing some low painting. All you I had done a mistake and I told have adapted. Using my paper trouble, Andi, I realized this could be an easy technique because sometimes when you add in the tree that can't really stand out, the end won't really merge into your background. You can see that while you're painting your trees. If that border mint doesn't merge into the background, your travel look very all. It will look as if it is floating in the air, so go ahead and add in as many trees as you want. You can add in some brand disaster, just like I'm doing right now on whenever you add in the tree, make sure your dabbing the bottom end using a people travel so that your tree will beautifully merge into the background. The left side is looking so gorgeous be added trees using a lighter tour and a meeting tone of green. Now I'm going with pain scree, and I'm going to add the darkest tree. I'll be just adding one or two using paint screen, maybe one on the left side and one on the right side. You cannot ask many Tree says he won't once you have your background treaty, go in and add, asked me trees as you want, but make sure you're going with lighter tone and medium tone. Play with different values of green. This will make your painting looked so beautiful and says, What brings that kept in your painting? Now I'm adding one on the right side. One. At this end, I'm really loving the way this painting is progressing. It's a time consuming technique, but then it's very easy to do. As I imagined earlier. You need a little off patients ask for because you're playing with different world values, you need to keep on changing from one town to another. Now, just to make the ideal it more clear. I've had a few more trees over the middle. I'm going back to sap dream, and I'm going with a lighter tune. Now I'm going to add lines, which are my trees. It is good to have a broken line first so that you won't miss too. Make the tune light in the middle. If you do it as three parts, you may tend to forget to make your own lighter, so at a broken line living on captain between, then dip your brush in a little water on make the tone light over there, O k, We have added enough off trees. Now I'm switching to my size number to brush, and I'm going back with pain screen and I'm going to add those tiny branches. We need something and to ticket branches. So make sure you're going with the brush, which has appointed Tip. I'm gonna add one more tree over here, a tree in beans. Great just to make the composition a bit more interesting. Otherwise, it will be like one tree on the left and country on the right. It will look very uniform, and that's why I'm going with this tree here. Maybe you can add one or two more. If you want to have a dental looking forest in the background, you can add more and more trees. Now I'm again, adding those tiny branches can't. They had done with the left side, and I'm really loving the depth we have guard over here now, before doing the same onto the right side. We'll add shadows for the trees in the middle to add the shadow. I'm going with the Willie Green sort of a color. I already have really green, but I'm not really sure if you have a live cream. So I'm gonna make my own olive green before I go with the shadows. I'm going to add one last street over here. I'm really sorry. I felt like there is no enough taco trees on the side. So I thought of adding one over here. I promise. This is the last three. Okay, Now let's make our woulive cream to make the only grain and mixing a binge of Bonzi now to my sap cream. If you have a well of green indirectly used that we need a brownish green. You just get a very little of brown makes tied with your sap cream on. But this is the color. Okay? Using that shade, let's add the shadows arrived from the bottom of the tree. We just need to add an incline line on the ground now saying for the other one, Espo, Now the opposite side will be adding the shadows in the other direction. You can use your paper total technique to make it march into the background. The speed they will have a seamless blend, and it would look odd. So we're here. I added the shadow to the other direction. Andi, that's it. Now, finally, I'm switching back to paint scree, and I'm going to add some time new project on the right side, passport on. But that will be done with our painting for 27 on . We are done with the whole painting. I'm really, really loving, though. Effect. We have got here that some light and was different. Tonal values of cream is giving a fresh and refreshing Why So let me quickly removed the masking tape. You can paint the same using initiative for choice. You can go with Mancina or blue blues, agree choice, but make sure bearable. You have that light. You need to make those media lighter compared to the remaining off your painting. That is the key here to get this effect off light, which will be the shape that you're using. Play with different tonal values, okay, and we are done with double painting for day 27. We just have three more days to go, and I'm super excited. Onda bits had also the 30 day challenge was keeping me on my tools, and I was super excited every day to bring new color combinations and new subjects which you guys will allow. I will really miss all those brainstorming sessions which I used to do for every day who be all entire painting with light filled green forest. Thanks a lot for joining all these days. I really cannot wait to show you the rest of the class protects spent time creating time on enjoy the rest of beauty. I'll be back here tomorrow with another exciting project. See you soon.
31. Day 28/30: welcome to Day 28 were just two days away from hitting over 30 days. Today we're going to paint this beautiful, not on light sky. The colors I have used here are Bowman. Violet, Turquoise blue onto Cabal Green. You can use any of the pastry blue you have caught on. If you don't have one, you can skip that color. We just need permanent violet and turquoise blue. All right, let's start. I'm gonna start by adding an even coat of water onto the entire paper. Now to do this guy will be tilting and turning our paper around so you will have to have your people fixed onto aboard. Don't fix that onto your table. I'm gonna start by Cabal Cream. This one is from middle Omission. It's a nice based on blue. I'm gonna start by adding a cool we lying. So that is Cabal cream. Now I'm gonna sweatshirt your guys blue, and I'm adding your car's blue next to compile green right over here. Blending the colors well have allowed him to request blue on the other side of that Kobe line at school. Right. Well, here again, Abol blend cabal, crane and turquoise blue tuxedo. I've allowed a little more turquoise blue and a brighter tour. Okay, now I'm switching to permanent violet. I'm cleaning my brush on dying. That a word. This Cornel. You can see the consistency off my paint. It's a little watering, but not too watery. These three colors go well together. You can create any kind of patterns that you want toe. I added a swirl off violet in between. Now I'm just holding my paper so that all the colors will blend bleed into each other, creating a soft blend. So I'm not looking at any reference picture, or I don't have any particle image in my mind and simply dropping in the color according to whatever I feel at that point, the key here is having a bit background on adding a little watery plains onto the background. Then you will just need to keep telling your people so that the color will float down onto blend with the other colors, living up your beautiful and soft blend. Now we shouldn't be taking your brush over and over on top of the base layer. Just go with one single layer on, then keep telling your people if you take your brush on top of it again and again, you won't get a small plant. You will end up having blotches and some dirty passes in between. I think this is happening with most of the people. Somebody message me saying they are getting some or off practice in between. This is because you are taking your brush too many times on top of the base lier. So go with the bright one of the color in the first layer itself dropping that onto your butt background on. Don't distilled that, Leo. Want to drop in your pain and that's it. Never ran you oppression Top off it. Okay? I kept tilting the people you could see for the last one or two months. I was just holding the paper. I took less than I'm going to apply the paint, but I kept telling the paper for two minutes and more on Dhere is my sky. You can see that beautiful blend I have got here. I'm really loving the colors. It's a gorgeous color competition. Okay, so, Adam, the pain Don't you bet. Background. Keep the thing of people until you get a small plant. Your color should float and mix into each other. You need to keep telling your paper in tow all direction. So we use the same technique on day eight. Asper. There we created that green and yellow, not on light sky for that. When we apply the paint and different sections, we went in the, um, horizontal sections for this one. We applied sums, worlds, we venting with the more Kobe Patil. We apply the paint in a cuvee manner on. Then we kept holding the people. So the decadence of the scene, it was just fact. The way we apply the pain, the slightly different. Now I'm going to add some pine trees onto the right side using paint scree. I'm using my sizeable toe brush. Go with any detail Ingber. Study our God on that at some pine trees. Now the subject choices totally yours. If you want to add to mountains, that's totally up to you. Whenever I pain the Northern Lights guy, I always prefer adding mountain, a snow capped mountain. That's my favorite thing to paint. It's quick and easy, and it looks very gorgeous to the pint. Drinks take a lot of time, so I always go with the EEC fun, but I want to show you how I do the pine trees. And that's why I'm marrying pine trees for this one. So I usually start by adding the pretrial, which is just a line. Then I take my brush in oppressing movement like this on create a fully age. I'm just having some darts close to each other, so you just need to take your brush in a Kobe line on Philip that Cooley nine using dots. That's the only thing I'm doing here. You can see it's already easy. One. Tomorrow will be doing a sense of painting, and I'll show you how to do a more detailed pine tree. This is a very quick one. I'm just taking my brush in a process crumbly patter on creating that fool each. Now, when you add in the full lead as you come down, you need to make sure that you're making them longer. You need to take them allergy more out so that you have ah, triangular shape overall, a conical shape or triangular shape. Whatever you want. Call it so that's my first re now over to the bottom. I'm adding a solid pains Cruciate now, adding another tree or he'll I will be just adding a few trees onto the right side. I won't be adding trees onto this entire bottom line. That will take quite a lot of trying, and I'm not patient enough to do that. So it's totally up to you. If you want to add pine trees over the entire bottom line, you could do that. Are if you are somebody who likes to add a mountain, you could go in with a mountain. You can check the pine tree, so that's my second tree. Now I'm going with under the warrant or he'll again taking my brush in a proceed movement, you can see my lines are short of the top on. As I come down, I'm making them a little more wider, so by the end you will have a conical shape for your tree. I'm adding some more dots and making this victory. 11 more dancer just to the bottom. Now back at my tree. Number three. I cannot tell you how much I love the sky. It's very rare. I call with basil colors and softer shades. I think I should do this more often. I'm loving this more than my talk looking skies. My brain has already started thinking about more competition while I paint this pine trees . So if you were full in the on instagram, you'll get to see more of my exploration using based of shades. In becoming days now over the bottom, I'm going to add a solid pains Cree sheet, just a little of the bottom and not adding a huge tall mountain here. Just a little off taco tune at the bottom because I don't want to hide the sky. I'm really loving it. I want this guy to be seen as much as possible. I don't want to hide it now to make this bottom line more natural and realistic, you can add some little ups and downs in between so that it looks like there are some plants over there. Now I'm going with under the tree a tiny one O Kane. So that's my 43 Maybe I have a lot one or two little ones. One. Hugh. You know, the one Q to some tiny ones. Okay, I think I'm going to stop it there. I'm quite happy with the sky and the pine trees. She had been here. Maybe a lot normal here just to make the composition a little more interesting. If you check my instagram account and reject my paintings, you will see very less off pine trees. And somebody was very lazy to being to find trees. No, I'm gonna quickly clean the bottom line. Just adding some more palms in between. Okay, I'm going with one more tree right over here on inclined one. This is gonna be the last one I will be adding. So, as I mentioned, if you want to our trees onto the entire bottom line, go ahead are if you're Lacey and impatient like me, you cannot just two or three at the bottom on live the remaining with the solid line, just like I did here. Now let me quickly finish the street, - okay ? And with that, we're done with double painting. Now let's remote the masking tape. I think this is a painting which took the least time so far on the most beautiful 12 on. I hope you all enjoyed painting this gorgeous night sky with me. Bye bye. Take care. I'll see you tomorrow.
32. Day 29/30: Hello and welcome to Day 29 which is how one more day to go and I'm super excited about hitting over 30 day mark. Anyway, we are going to pay this garden center today. Let's start by adding anyone called the water onto the entire people. We don't need to add any pencils. Catch all those mountains we can paint. Ask your progress. We really don't need to add a pencil sketch. So I'm starting with bright yellow orange. So I will be having my sky almost well here a little about the central people. So considering that imaginary line in my mind, I'm going to add the paint onto the people. I'm going to add in some streaks off yellow orange onto the better background. I just feel random lines now. This is the location where I will be adding my son on at this area. I will be focusing on the sunlight now add in the lines double back around his bed. So the lines were adding in is nicely blending into the background, giving it a very soft look. So that is my yellow orange. I went into the lighter tomb. Now I will go with a little more pride to tool and again other lad. Some streaks onto the wet background, just one tone brighter than the shave used earlier. We wanted the sky to look little soft, so don't with to practice tones. We just need to add some random lines in between. You can see the colors I'm using here is very soft and subtle. I'm not going with two. Pride turns off orange, so that's the bottom part of the sky. Now on the top. I'm going with some while a tomb, Mrs Bowman and Toilet on time, adding a light to turn off permanent violet on the top. I'm not making the colors meet each other. I'm just taking the wild around the orange. I'm not really mixing them because thes two are complementary colors, and when mixed together, they will create a muddy mix. Now I'm adding a little of blue asshole again. I'm not really mixing that with orange because these two also will create Ahmadi mix. I'm gently applying a lighter tone of blue. I think we could add a bit more brighter. Tune off blue on the top on make it a little more brighter Go key so that's I was guy. Now let's wait for that to try, and we'll start with the first layer off mountain. My sky has completely dried and I'm going with the first layer off mountain. I'm going with Roestoff Ultra Marine. The first layer will be a lighter one, and then gradually as become down, we'll be making the colors darker. I'm starting with the first mountain. You can go with any reddish purple that have got Oregon mix and make your proper by mixing more red and less blue. So I left a little off gap in between. This is where I will have my son over there. I'm switching toe really orange and applying that we just need a light off orange. Apply that over there on mix Dad with, though Roestoff ultramarine you have on either side. Now fill up the remaining off your mountain so we'll be using the layering technique and watercolor for this painting will be adding layers off mountaintop off each other. So every time we paint a mountain, we'll have to wait for that room to dry before we go in with the next one. Now I'm using clean water and I'm just making the tune light over the bottom on merging that with the background. Now, once this tries being cool with the next layer of our mountain, I'll just make that color allergy more. Even so, we applied a puppet on on either side, Andi, over the middle, where we are adding the sun. We went in with orange and over the bottom. We went in with clean water on me, the color lighter. Now let's wait for this to dry on. After that will go with the second layer off Mountain with the same technique will just make the colors more talker and the next one. Okay, so let's go over the second layer. I'm going with Bowman and Violet. This is the shed I'm going with. Okay, let's add the mountain now, just like I did earlier. I will add a little off mountain over here. Then when I'm hitting the son, I will leave a gap and then I will continue the rest of the modern onto the other side. Now, over to that gap I left, I will add an orange stone and the remaining I will fill up with permanent while it on over to the bottom. I will switch to clean water. Andi. I will make the tone lighter and will blend that into the background at the same procedure I'm going with. It was just that the stand. The colors are a bit more pricier than the previous Leo. Now I'm taking a little of woman in dread, and I'm going to apply that we're here on either side so that the colors will be that mud. Even I makes the orange and Violet together because this time we went in with a little more brighter tune than previous Leo on. There are chances that the Mahdi callable really stand out now, using my clean damn brush, I'm going to lift off some pain from that model. You can see that idea is getting little lighter in tone on. It really feels like the somebody sitting over there. OK, now I'm going to switch to clean water, and I'm going to blend that mountain into the background by making the true lighter over the bottom. So late in. Technicals were not the most commonly used technique and watercolor. You might have seen people painting mountain during this using layering technique. They play with different tools off a single color or multiple color on great beautiful mountains with this technique. So here were complaining multiple techniques. We are going but different tonal values where using the layering technique on also, they're creating some light on the mountain. You can see that beautiful sunlight effect in the middle. Now I need to wait for this lady to drive before I go with the next layer off mountain. To make the process quicker. I'm using a blow trial. If you want, you can use a blow dryer, or it can be true each layer to dry. Now I'm going with a much more deportation off permanent violet on. I'm going to add my toward Mountain. I'm going to the same steps I followed earlier, adding Permanent wanted to go there. Now I believe, a little off cap. Then I will add the rest of the mountain on over to the mirror. I'll go in with orange and yellowish tones to replicate the sunlight. Okay, I added my thought mountain. I left a gap in between. I'm adding normal in trade, a lighted or a woman, and right over here now, when I'm reaching that center area aval Switch to Yellow Orange. If you don't have yellow orange, you do. You can directly use your gamble jello, or you can mix a little off four million dread or scholar tried to your gamble Chilo on Get a light, yellowish orange tones. Now other Just Brendel's colors Well, so that I have a lighter tone in the middle. This will make it look like sunlight of sitting over that area. We did the same for all the three mountains when we were reaching that. Same, please. We went in with an orange tool. Okay, so that layer also has dried. Now let's go with the 4th 1 This will be our final layer off mountain. Now, after this, under the bottom will be adding some pine trees if you want any. This topic here on Adam Pine trees directly. Oregon. Good warm. Earlier, Off Mountain, this is the shade I'm using for my foot layer. It's a little more people don't look forward and try let compared to the previous one. Now combat another London's. This one is much more closer to you. So for the same reason I'm going to add a little lines on the top to replicate. There are trees far away, just like Harvey out of those lines on top of the mountain and never previous paintings. I'm doing the same here, Adam in on Philip, the remaining off the mountain and permanent toe. I let now before I switch to orange, I'm going to use clean water on by making the tone lighter at the bottom. Okay, Now I'm going to switch to Orange on our better with a murder. Then I will continue doing the same for the mountain onto the other side. I'm using a lighter tone of one million trade, adding that we're here blending that with the permanent violet now cleaning my brush, going with a light tone off yellow orange, adding that in now I will switch back to four million trade again. A lighter tomb now going with my violet on finishing off the mountain. I'm gonna lift off some pain from here so that it looks every more lighter. All right, so that's my fourth layer off mountain. Now that's wait for everything to dry. Then we'll add the pine trees to add the pine trees. I'm using my size number two around fresh now for the fine dreams which are closer to where the sunlight is sitting on going with an orangish tool on using that shade. I'm going to paint the pine trees over here. Now I'm using the same technique we use for that son keys trees we painted earlier. We paid a sunset where some trees were hit by the sunlight and we added a light. It'll where the sunlight was hitting on the rest of the tree. We went in with a dock Oto. I'm using the same technique here. So the 1st 1 I venting with an orange stool. Now I'm going with a taco tune for the next one because we're away from some light Now I'm going with permanent brown on. You think that she'd I'm going to add the next pine tree. Now, according to video, we are close to sunlight or not will be playing with colors when we are so close to those on light will be playing with lighter tones We'll go with light orange Now when you're every from this in light will be going with more brownish on blackish stones. Let me show you how I'm adding the tree. Have a start with the tree trunk. So go with any brush, which has a nice pointed tip, Or go with any off your smaller sized fresh. Once you have the tree trunk at a kombi line like those and then Philip that tiny lines, tiny inclined lines hanging down would now repeat the scene as you come down. You can make your lines longer. Now, if you want a very dense tree, you can reduce the gap in between. On add these inclined lines close to each other so that you have a very tense and thick tree. Okay, so that is the way I will be out in the trees. Now that's cool. But though next one now, this one is small, closer to the sunlight, so I'm going with a much more lighted runoff orange. Now let me quickly add battery in. Now for the next one. I'm going with a bit more pride. Children off orange. Start with the tree trunk. Add those Kobe lines smaller on the top on as you come down, you need to make them removed wider so that overall you have a triangular shape. Now I'm going to keep on adding fine trees lighter when I'm closer to the sunlight on Darko when every from the sunlight for this one here I'm directly going and with permanent frown on I'm adding the tree with the same steps we followed earlier, over to the bottom. I used a taco tone of permanent round. Now for the rest of the tree on the right side, I'm going with pains. Create directly. I'm going to add a taller one. Hell, I added the tree trunk. Then I'm adding those curvy lines on to either side, then feeling of that Kobe line but tiny inclined lines close to each other to create the foliage of the tree you could see as I'm coming down, I'm making the line move wider. Okay, Now, using the same steps, let me add few more trees. I hope you guys are quite clear with firing the tree. It's an easy step. You just need to be a little patient while adding those tiny details. Okay, now, if you want, you can add some more trees. I'm going to add another one over here. A bit more, Tyler One. - I think I lied. One last re onto the right side because we have quite a lot of space left over here. One medium sized tree. You guys already know how lazy I am to paint pine trees. If you're going with those details once it really take some time. If I went in with an invalid off mountain, I would have finished the painting by now. No mind. This is my last re. I'm not going to add any more. So, my friends, we have just one more day to hit about 30 day mark on. I'm super excited about it. Once you finish the challenge, I would love if you all could poster 30 take a latch. I would love to see your paintings. Now I'm going to create little upside down. So we're here on day. I'm going to finish out the painting by adding ghosted your bombs at the bottom, maybe one last tiny tree. Sorry, I broke my promise. I said I won't be adding any more tree. Okay, The writer looks complete. Now let's finish off the left side hospital by adding a little ground at the bottom to add the ground on the left side. I'm going with an orange stone now at a tin bottom line to show your ground over to the left, and I'm adding some pain. Scream, okay? And with that, we are done. The couple painting for day 29. If you don't want to add pine trees, you can add another layer off mountain, which can be in a taco tune on. Then you're about to hit that sunlight. You can make it like to buy, adding an orange door on that several final painting. I hope you all and charge painting the sun kissed mountains. I'll be back here tomorrow, but about 30 of painting.
33. Day 30/30: welcome to day 30 off over 30 day water can challenge my card. I can't believe we're hitting the 30 day mark on this last day we're going to paint this beautiful, clear blue lake surrounded by mountains, The colors you will need Archer cars blew in Tico sap green cabal green or any other piece of blue or green The cabal green I will be using for this glasses from Majola Mission on That is a shade I will be using for the lake to get that clear Blue lake. So if you don't have cabal green, you can use a lighter washing off turquoise blue. You will also need born sina and pain scream. Let's start with the pencils. Kitsch. I'm gonna start by adding a line under to have all the center of the people. Andi, I'm going to act the mountains over Hell. These are our snowy mountains. Maybe one more on the right now adding another big one in front of those mountains on the right side. Similarly, I will be adding one more on the left. Okay, so that's the one on the left. Now in front of that, I'm going to add another one. Now, from here, I'm going to add a road very thin cov road, which is just enveloping that mountain. Now I'm gonna take it to the other end. So that's of a pencil sketch. We have a lot of tiny mountain over here. Take your time. Maybe you can pause it here on draw the sketch on. Join me once I start painting. Okay, So I'm gonna start by applying and even go the water onto the sky. We're going with a very dramatic cloudy sky. Okay, so there isn't even cold water on the sky. Now I'm spitting to my around fresh Andi, I'm going to add a cloud first. The color that I'm using here is Indigo. I'm going with a lighter drawn off in Turku. Now, this is actually the shadow off the clouds. You just need to take your brush in any kind of pattern or shape you want toe. Maybe you can add a bigger cloud like I'm adding here. Or you can go with some tiny ones. I'm adding some onto the top password and that's it. Now I'm gonna clean my brush. Aunt, I'm going to switch to Turquoise Blue. I'm going with the medium toe, and I'm going to apply that around, the shapely added. You can see in between I'm leaving some white caps. That is my clouds. What we added earlier was a shot off the clouds. You can see how nicely over clouds are taking shape. Earlier, we just added the shadow on the left. That white cap in between and we're adding the sky color and slowly of a sky is transforming. Okay, so that is I was sky. Now let's wait for that to dry. Meanwhile, let's pain the water. I'm adding a clean called the water first. Now the two shades I'm going to use for the water as turquoise blue on cabal cream, the turquoise blue amusing Curis from white nights. I'm going to add that right, Antony, the mountains. You can see the tone amusing. I went into the medium turn off turquoise blue, so this is going to be our darker turn off the lake. We won't be adding any reflection. Now I'm going with the spacer blew. This one is called Al Creen by Mitchell. A machine. It's that perfect color for those tropical lake on beaches. Now blend those two colors well on as you come down, you can make the color lighter by adding a little water. So I was googling about this tropical beaches and legs by. Don't they reflect it? Seems there temperatures below four degrees socials. Andi, When a treatise a particular temperature, it is no longer flat. The tops. Office off. The water is solid, Andi, It is not flat anymore. And it loses the property off reflecting. So this is what I read. At least some of you would wonder why I'm not adding reflection. So that is the reason why I shared this little information. You could read about it more. All right. About sky has completely dried. You can see those fluffy white clouds there. Now I'm gonna paint those mountains again. I'm going with Integral. I'm going to paint some snowy mountains, so I made a light to turn off Indigo. Now I'm switching to my smaller size brush as the mountains are quite far from you. And the details you're adding should be Britain and delegate. Now, using a lighter tone off into cool, I'm going to add some tiny lines on the top. So this snowy mountainous not like the ones we did earlier. This one is going to be a little more detailed. One. The first step is to add some tiny lines using a lighter tone off into go onto the top 80 off the mountain. You can do that for all the mountain to have their. I just had some must see tiny lines. Make sure you're going with a lighter tone off in Deco. We have one more mountain left on the right side with me. Do the same for that one. Ask for. Okay, Now we need to add the taco tunes. Now I'm going with a much more taco Turn off into cool, Andi, I'm going to add that over the bottom off this mountains, I'm going to add a solid shed over the bottom. I will be taking the shed almost till the middle of those mountain. Now I'm gonna take out my people travel, and I'm gonna dab my pressure on people tell us to remove the excess amount of water. Now I'm again adding some lyinto here so that it smoothly goes with the lines we have added earlier. Now over to the bottom. I'm going to make my in tickle a bit more deeper. I'll just drop and die toe were here. No smart start again. Either you against more Start with drivers patterns or you just need to add some teeny tiny lines. This doesn't need to be perfect. We don't need a small blend over here, um, adding a little more deeper to over the border. Okay, so that is my first mountain. Now I'm going to repeat the same for the other three ones we have there, starting with the anti Putin off intake over the bottom. Now over the top, I will make the color little more lighter andan using tiny lines and dry brush patterns of its much that with the lions, we have our gear on the top so that we don't have a clear separation between those new and the bottom shade. I added the Depo Tour. Now I'm gonna dip my brush in a with a walker. Andi, I'm gonna wash up the Darko tune and I'm going to make the tune lighter. Now, using that lighter tomb, I'm going to add some tiny lines. So all I need to do was at some teeny tiny lines so that you have a natural progression from the snow to the bottom shed. As I mentioned earlier, you don't need to have a small plant or a smooth progression here. It can be rough. It can be more texture which will make your snowy mountain look more realistic. Okay, so that is the second bar. Now I'm going to repeat the same for the other two mountains for the next two mountains. I'm going with one toe lighter than the integral we use for the 1st 2 mountains. After I add that she'd over the bottom, I will repeat the same process off adding lines. The previous ones we did were completely covered in snow. The ones we are doing now. It's a snow capped mountain, so I have added a made him turn off into cool over the bottom. Now I'm adding lines on smudging that into the background so that the top and the bottom doesn't look like two separate divisions. Okay, so that is a snowy mountain. Now let's pain the other two mountains. I'm starting with the taco Turn off indigo on the top. I will be doing the same for the other mountain Aspar. After I'm done with this, I will be switching to sap green. Andi, I will be adding saccharine over the bottom now rather than taking your mountain and smoke . Oh, you can add some lines on the top so that it looks like there are some trees far away the remaining I'm gonna add Tap cream. Brando's colors well on. Just fill up the bottom and sap green. Do the same for the other mountain Aspen. No, we are those lines for this mountain using in Deco. Just some random lines go over different heights. Okay, so does arable green mountains. Now, I was knowing motors has completely dried. I'm going to add some dry brush patterns onto that to make it look more interesting. Amusing pains. Gree Andi, I'm using my smaller sized brush. I'm dabbing my impression of people traveled to remove the excess amount of water so that I will get perfect dry strokes. You just need to add very little drivers pattern 20 mountain. Don't add a lot. This is just to give a Finnish look to your mountains. We don't need a lot off lines. So most of the techniques we're using in this painting as what we explode earlier. It's actually an implementation of the techniques we learned. So the Spain is not complex. It is just that we have more elements in this painting. Okay, so the mountains are done now using paint agree. I'm going to add some teeny tiny trees at the bottom. So ordered me to do was just at a drop kind of a sheep on These are the trees which are very far from us now. Adam asked when Yes you want. You can go with some taller ones and some shorter ones. Don't fill up the entire line in trees. Leave some gap in between. Now. Once you have done adding them on the bottom line off the mountain, you can add them on the surface of the mountain. Just some teen it. Any lines, you can see the size of my lines. They're very tiny. This will make it look like there are so many trees on the surface of the mountain. Okay, so that Isobel snowy mountain, I'm going to add a tiny patches land over here on getting some trees on it. Okay, so these kind of little details will add a lot of character to your painting And that is why I added doors. Little trees on top of the mountain. Now in a similar whale attacks and trees onto the Green Mountain Aspell, I'm going the deportation of green I mbixler love Interco into sap cream to get a deeper tune. Now, in a similar way, I'm adding those drop kind of a shape over the bottom line. In between, I will go with some pine trees. Also some weeks shape off pine trees. Remember, we try this Earlier we added a line on. Then we added those exact lines to create the full image of the tree. I think it was that story mountain exercise. We did the same kind of tree. I'm going to have similar kind of trees over here. You can see how gorgeous of a leak and those mountains are looking already. Now I'm going with a light tune off pain scream and I'm going to paint the road and a grace tool Philip, that anti road in a great Kyllo I used to lie to don't off means Great. Now the last typist ripping this mountain of the bottom. I'm going to start with the light of one of Bon Seana. I'm going to add that on the top off the mountain we have on the left side. When a Matic Mancina, I'm deliberately leaving some gaps in between. Now over to that gaps, I will be adding sap cream. I'm loading. My brush would sap cream now adding that onto the brown background, Just dropping that in now that will smoothly blends into the brown background. You can add in some taco tones in between. Okay, so that is the base layer off a whole mountain. Do you guys remember the cliff on the ocean we painted? I'm going to use the same technical here once I'm done with the base layer. But sap Green and Bon Xena, I will be adding more taco tunes. And also I will be adding some try patterns onto this. So my intention here is to create more and more textures on this mountain because this one is in the foreground. We need to have more details on this. I'm going with a much more depot doing off sub cream on. I'm going to apply that over the border. The background checks are still wet, so it is easy for me to blend us into the background. You can see it's a medium tone. It's not too deep. Now over here, I'm going to add those lines to replicate the trees to sub teeny tiny lines. Okay, so that is my base layer. Now, once this dr will come back with the try patterns. Meanwhile, let's bring the other between the bottom. I'm going with the same strips. I'm starting with born Sina, adding that that in between, I'm going to add some sap cream. - Okay , so that is the base layer. Now I'm going to drop in more taco tones of green onto this bet background to add more textures over here. Just have some doors or tiny lines for some patterns or whatever you want to add, it doesn't matter. What are you really adding? Over there? Our Bagram is wet, so whatever you're adding will nicely blend into the background, leaving more textures. And that's done. Now it's time to add the dry brush patterns. I'm going with a medium drone of sap green. I'm dabbing my brush on a people total. I'm using my bigger size pressure so that I can create pattern on a larger idea and a single time on them. I didn't lose drivers patterns on the left side of the mountain Go in a very random man. Oh, on ad and as many as you want Be a little careful not to add any patterns onto the lake. Now, in a similar manner I'm going to our dry brush patterns on that section on the right, as full So on the side I want to make my land look like it a sloping So I'm taking my brush in an inclined maino Okay, Now I'm spitting to my smallest ice Bresch on I'm going with a deport one off cream and I'm making this line more prominent. Hanadarko Tune over the bottom line. You can add some teeny tiny lines in an inclined mono on march that into the background. Now the last step is to add trees over this lying I'm going with the depo tone off green on mixing saccharine with intercooled. Now, just like how we added those drop shape earlier, I'm going to add similar shape on either side of the road. I'll start with the left side first with this painting we are finishing over 30 were particular challenge. I'm really grateful to everyone who joined me so far. Don't worry at all. If you didn't get a perfect result. It took me three years to reach this point where I am right now on I still consider myself to be an intermediate artist. You don't give up. Keep trying until you get your results perfect. It might take years. I'm not saying you will get it right and five or six tries. Maybe it will take 10 or 20 times. But don't keep up. Now I'm adding some tiny ones to the other side of the road. You can see I'm simply adding a tiny line. I'm really loving the way this painting is progressing now, just like we added those tiny trees from the snowy mountain. I'm going to add some low trees on either side, just some teeny tiny lines with a medium tune of sap green. So if I talk a little more about me, I became a career artist. Exactly your your back. This month, I'm actually celebrating my one year anniversary off becoming a career artist. I'm an architect by profession, but last year I chose to quit my job and try my hands on being a career artist, and when I look back, I couldn't be more happy than this. I made the right decision by quitting my desk job. So your choices are just like the rule BC here. You never know what is waiting for you on the other side, whether it's a dead end or but it's a more scenic place, you never know what is there. I know it is one person watching my class right now would be thinking off becoming a career artist, I would say Take a chance and try it out. But before that, be confident with your skills. Please ask money as you can. Tired all the techniques, be the best version off yourself and create a unique identity. I mostly each of you have done a wonderful job on. I love the way each of your progressing. I was looking at some of your profiles just to know how much you improved from your previous paintings toward your painting. Right now on it is giving me goose bombs. Really, I'm allowing the way you guys have progressed. I'm very sure a consistent practice can make you reach your goals, so don't quit. Keep practicing here. Several finished painting. I really love the colors in this painting that clear Blue lake candle, snowy mountains and the green mountain. I'm really happy to finish our challenge with this pleasant and beautiful painting. Thank you so much for joining me on this 30 day. Our journey. I hope you had a great time doing this vertical work out with me.
34. Here's all 30 paintings - Thank you for joining :): By any measure. And that's the way it is.
 Zaneena Nabeel, Top Teacher | Artist | Author