Transcripts
1. Hello & Welcome back!: Bokeh is one of the most popular photography effects, which is very much admired among professional photographers. You might have seen photographs with soft background which are so pleasing to look at. Those glowing lights in the background are simply stunning. Achieving a bokeh effect in your photographs isn't an easy task, but painting them is quite easy. My class is all about how you can create beautiful bokeh effects easily with watercolors. Hello, my dear friends. My name is Zaneena Nabeel. I'm a mother, an architect, an artist, and an art educator. Typically, artists use opaque mediums like acrylic, oil, or gouache to create bokeh effect. Watercolor is a transparent medium, and for the same reason that a certain topics which people doesn't explore using watercolor, bokeh effect is one of them. Today, I'm going to show you some simple tips and tricks with which you can create beautiful bokeh effects using watercolor. I will walk you through the materials you will need in detail and we'll have a look at some techniques. I'll also be talking about different layers in bokeh effect and how you can simplify that into simple steps. Incorporating the techniques we learned, we'll be doing four beautiful projects. Trust me, creating these paintings are really fun and easy. Even if you are starting out with watercolors just today, you'll be able to create these paintings. If you want to give it a try, join in, and let's together create this beautiful glowing lights.
2. What is BOKEH effect?: Bokeh is one of the most popular subjects in photography. Bokeh makes photographs visually appealing by blurring the background, and the focus will be on a particular subject or an object which doesn't need foreground. The word Bokeh comes from a Japanese language, which literally translates as blur. If you're a photography enthusiast or if you have some photographer friends, there's a good chance you have encountered the term Bokeh or you might have seen the images where you have these blurry lightly background. This is exactly what Bokeh means. I have some photographer friends and I have seen them searching for a perfect place to take their Bokeh photograph. Photographers who are interested in Bokeh photography, they look for locations which has colorful light sources. The perfect places for Bokeh are in urban locations. Lights from building and street light provide interesting visual components for the background. So that is what Bokeh means. We are going to create some beautiful paintings in this class. I showed a couple of images here and you might have noticed for all of them, we have a darker background and there are some blurry circles. To capture a beautiful Bokeh photograph, there's quite a lot of things you will have to learn. You'll need to learn about different lenses, the aperture, the distance, and so many more things. But to create a painting, that is quite easy and that is what I am going to teach you today. There is no difficult techniques involved, it is really easy. I guarantee you, even if you're a beginner who's just starting out with watercolor, you can create a beautiful Bokeh watercolor painting.
3. Materials you'll need: Before we dive into the class, let's have a look at the materials you will need. As I always mention, it is absolutely okay to use whatever you have got with you, don't worry about the brand. Just go with something which is similar, don't put a lot of pressure on you worrying about the brand and the colors. I'll be giving you [inaudible] cheat which you can use if you don't have the exact same color that I'm using here. So take it easy. Now let me show you the watercolor paper that I'm going to use for today's project. According to me, watercolor paper is the most important aspect of any watercolor painting, and the one I'm using here is Canson Heritage cold press watercolor paper. There are many varieties of paper from Canson. I love this one particularly. This one is cold pressed, it is 140lb, and it is 100 percent cotton. A 100 percent cotton watercolor paper is specifically designed to handle all the layers of water being done or the techniques. If you're using a 25 percent cotton watercolor paper or a cellulose paper, you may not get a perfect result even if you are following the techniques and the process right. So if you can, try to go with the watercolor paper which is at least 140lb, which is 100 percent cotton. The size of the paper that I am going to use for today's project is 12 by 12. It's a square sized. You can go with any size that you prefer. You can go with the landscape orientation or a portrait orientation, it doesn't really matter. This is the size that I'm going to use. Now to fix my paper, I'll be using a board. This is just a cardboard piece. I have just a piece of wallpaper onto it. When you fix your paper onto a board, it is really helpful. You can turn around your paper while you are adding the details. You can use a writing pad or a piece of cardboard, or even an old magazine, something you can fix your paper onto. Now, to fix your paper you will need a masking tape. This one is a very normal masking tape I got from a stationery shop, it's not any fancy painter's tape or anything. You can either use a masking tape or a washing tape, or any other tape that you normally use. We spoke about the paper in detail, now let's have a look at the colors. For today's class, I'll be using watercolor tubes. This one is from the brand ShinHan. It's a Korean brand. This is the premium artist grade watercolor tubes. You can use any brand. The colors that I'm going to use for today's projects are really common. They are just like some yellow, orange, and red, and I'm very sure you all would have some red, orange, and yellow. I will recommend to go with watercolor tubes instead of watercolor pads because we'll have to create a paint of a creamy, thicker consistency. With watercolor pads it won't be that easy to create such a creamier washing, so it is best to go with watercolor tubes. I'll be talking about the colors in detail at the beginning of each project or we can find a list of colors at the resources section. Around all of those, you will also need a white watercolor or white gouache. Just like how we talk about the main ingredient in the recipe for today's painting, the main ingredient is white gouache or white watercolor. Without these, you can't proceed with this recipe. White watercolor or white gouache, both will work perfectly, so don't worry if you don't have a gouache, your white watercolor is more than enough. Next, you will need a mixing palette to mix in your colors. This one is a ceramic palette. You can either use a ceramic or a plastic palette. Any palette will work, or you can grab a plate from your kitchen and use that as your palette. Now let's talk about the brushes you will need. I'll be using only three brushes throughout this class. The first one is this big brush. This one is a one-and-a-half inch wash brush from Princeton. This is to apply a coat of water onto the entire paper. I love using bigger brushes for applying water onto the paper, because you can apply water onto a larger area in a single wash. If you have taken my other classes you would know I only use this brush for applying water onto my paper, I don't use it for painting, so this brush is always clean. If you don't have a wash brush that is absolutely okay, you can use any of your bigger sized round brush or flat brush to apply a coat of water onto your paper. Now let me show you the brushes that I'm going to use for the painting. I'll be using two round brushes. One is size number 12, and the other one of size number 4. Both of them are from Princeton. I'll be using the bigger brush for the background washes, and for the smaller details I'll be using my size number 4 round brush. I'll be using the same brush for some little detailing as well, because it has a nice pointed tip. I don't need to switch to any detailing brush to add in those thin lines. Those are the three brushes you will need for today's course. For one of the project we'll need to add a sketch, so you will need a pencil, and if there are some mistakes to erase that off, you will need an eraser. Then you will need a paper towel or a cotton cloth to dab off the excess amount of paint from your brush. Last but not the least, you will need two jars of water. One has to stay clean, and the other one is to rinse off the paint from your brush. That is all about the materials you'll need for today's course. Get them ready and tell me in the next section.
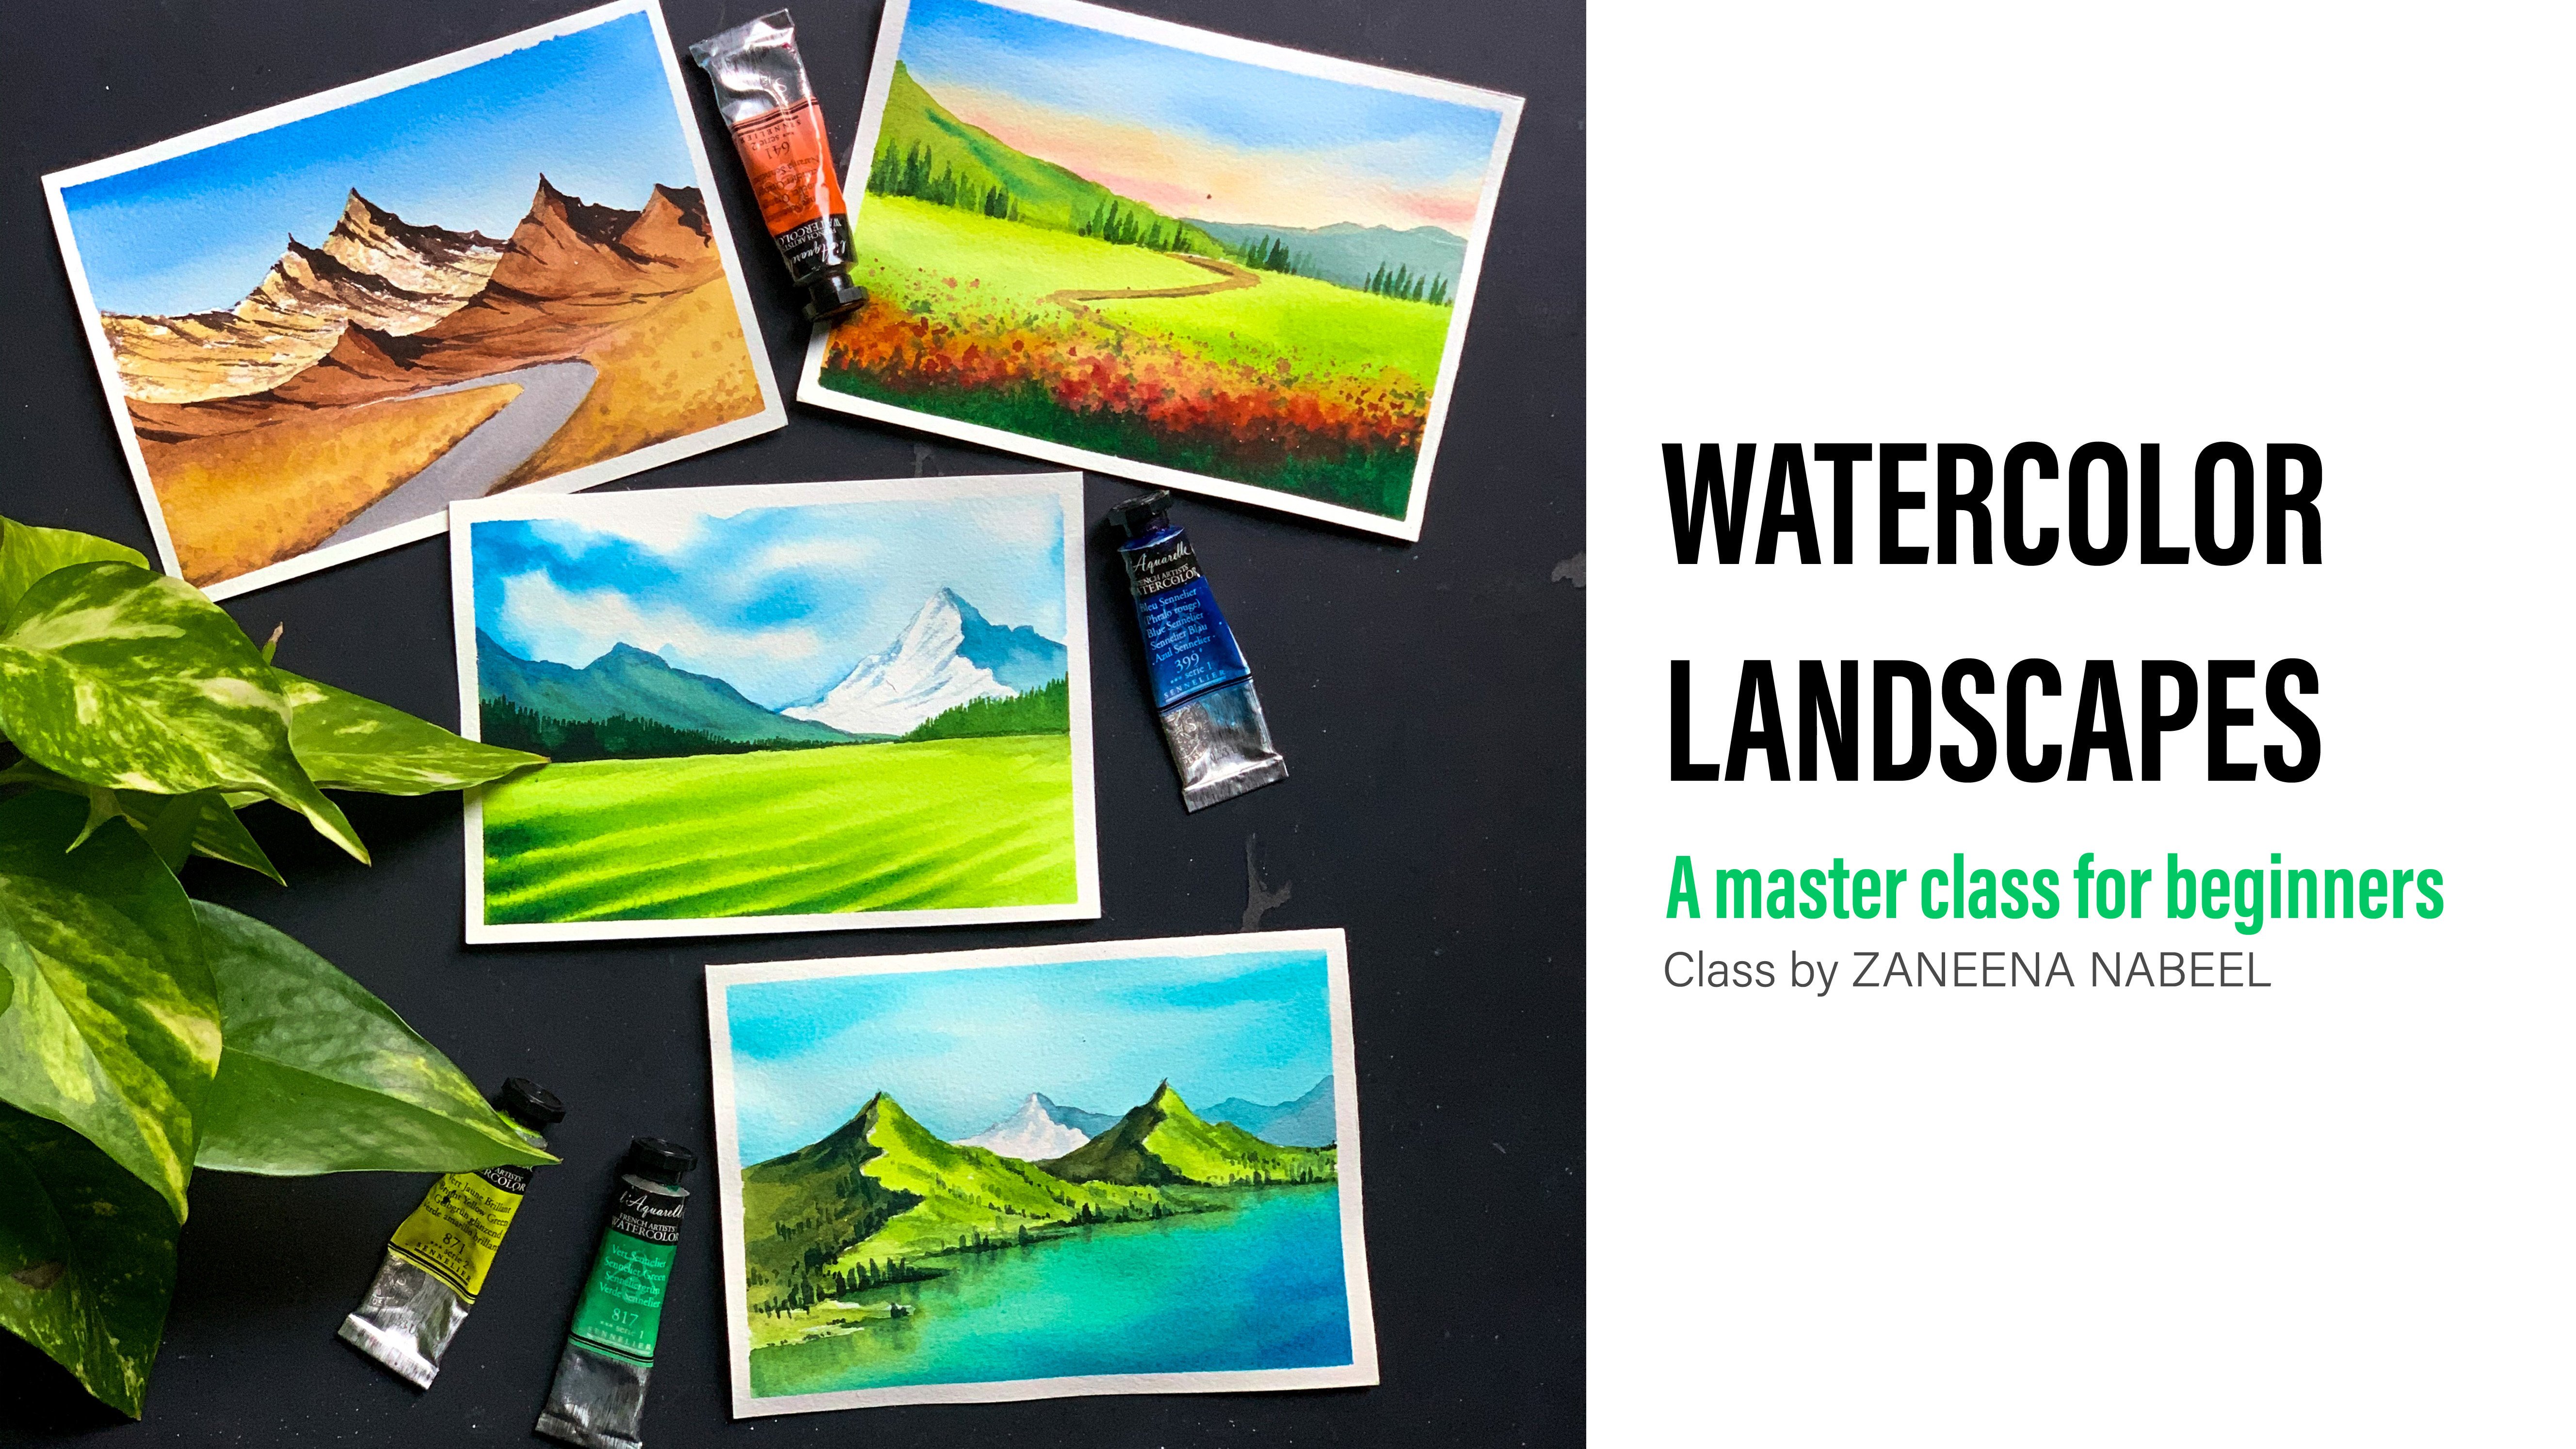
4. Let's take a look at the Class Projects: I hope you guys are ready to explore the bokeh technique using watercolor. Before we start with our first this project, let me show you the entire collection that we're going to create today. Here is our first project. We'll be simply creating a background with some bokeh effect. There won't be any foreground subject to it. As you can see here, it will be in a red, yellow, and orange combination. Once we're through with the technique, we'll go with the 2nd project where we'll be using the bokeh effect in the background and we'll have a full crown subject, which is a street light. This one is also in some color combination. For the next two projects, we'll go with a different color palette. We'll work on an entirely different color palette from these two. We are going to create some beautiful bokeh effects using the color blue. Here's a 3rd one. We'll be creating this beautiful bokeh effect using just three colors. You'll just need black, white, and any blue. This is going to be a wonderful exercise. You will be able to understand the bokeh technique in more detail and you can create the same with any other color combination that you like. From there, we will go to our last project, which is this one. With this project you will learn how you can introduce bokeh effect with many other elements. As a streets [inaudible] you have some buildings far away which is looking blurry and you have a road, you have some reflection. We'll be ending the course with this project where we'll be incorporating almost all the techniques we learned throughout the class. That was a quick overview of the projects that we're going to do today. Now, without any more due, let's dive into the class.
5. Understanding the layers in Bokeh effect: We had a look at some photographs. Now, I'm going to break down the idea of bokeh effect into simple steps. Before we go any further with this class, I want you all to have an idea about bokeh effect and how you can easily create them. You just need to get that logic behind the bokeh effect and you can create the same using any color of your choice. Okay, so let's have a look. I have a black image here, a plain black image. Now onto this, I'm going to add some yellow circles. Now I'm going to add some orange circles, a light orange. You can see I use circles of similar size and I added them vary randomly, and also some of the orange circles are overlapping with the yellow circles. Now onto the same image, I'm going to add in some red circles. I'll be going with a similar sized circles and I will be adding them in a very random manner. You can see here some of the red circles are overlapping with the yellow and some of them are overlapping with the orange. Now onto the same image, I'm going to add in some white circles, and there you go. We have got a bokeh effect here. This is exactly what you're going to do in today's class. I made these images on iPad, and it's digitally made. But forget about the main theme, the logic is going to be the same. Just like how we did here, we'll be starting off with the background, which is going to be very dark and intense, otherwise, your light wouldn't have that illuminating effect. To get the best result, you would have to have a darker background. Then onto that, we'll be adding circles of different colors. We'll be going with the yellow, orange, white, and red. We can also play with different tonal values of yellow, white, red, and orange to make it look more realistic. Here I used a yellow, orange, red combination. You can do the same thing with any other color combination you prefer. The logic is going to be the same. You will have to have a darker background and onto that, you can add in circles. If you're using blue or green, you can play with different tonal values of blue and green. Some of them can be too intense and some of them can be lighter. Now for this image here, I used plain black for the background, just a solid black color. I'm going to change the background into a combination of red, brown, and black. You can see the result. The circles are the same. I haven't changed them at all. It is just the background which has been changed and you can see the difference. In a similar way when you're creating your bokeh effect, you can either go with the plain black background, or a darker brown, or darker red, or any other color depending on the color charts that you're using, or you can go with a combination of different colors. Okay, so that is how you create your bokeh effect. Now without wasting any more time, let's have a look at some tips and techniques.
6. Tips & Tricks: First of all, let me tell you this class is going to be really simple. We won't be using any difficult techniques, anyone and everyone can follow this projects. Honestly, if you know how to draw a circle, you can paint this beautiful bokeh effect. It is just a matter of adding hundreds of circles onto your paper. You don't really need to know any technique, but you will need to have a lot of patience. Even though it is a very fun and simple process, but it is going to take a lot of time as you will need to add too many circles onto your background. Now let me show you the trick that will help you achieve this beautiful result. Typically, artists use gouache, or acrylics or oil paint to create their bokeh effect because they are opaque and you will be able to create beautiful results. There are very less people who have explored the same technique using watercolor. The main reason for that is watercolor is considered to be transparent and you can't really achieve that opaque character just like gouache or acrylic or oil. That is the main reason why people don't use watercolor for certain topics. I have a piece of black paper here. Now onto this, I'm going to add a circle using yellow watercolor. The one I'm using here is cadmium yellow light from the branch in hand. Have taken yellow paint on my brush and I'm just adding a circle onto the paper. You can see how dull that yellow circle is looking. Now I'm going to repeat the same exercise by adding a bit of white gouache into the same yellow watercolor. Let's see how that is going to look. Here is my white gouache. I'm going to squeeze out a bit of that onto my palette. Just a teeny tiny bit. Now, I'm going to mix that with my yellow water color. The same thing can be done with your white watercolor aspects, so don't worry if you don't have white gouache, you can use your white watercolor instead. I'm mixing white gouache and yellow watercolor. Now I'm going to add a circle onto the black paper. I'm adding the circle. You can clearly see the difference between this two. The second one is looking really opaque. The same thing can be achieved by adding white watercolor asphalt. It doesn't really need to be white gouache. This is the only technique we'll be using throughout the class. Whenever we are adding the circles we'll be either adding white gouache or white watercolor to it. The painting you see here, this is created using just three colors, blue, white, and black. For these two projects, I have used whitewater color. I haven't used white gouache. It is rarely achievable using your white watercolor. Yellow is a lightened bright tone. Even if you add it directly onto a black paper, it will still be visible. But there are colors like blue. if you want to make it lighter, you will need to add more water and that will make the color more transparent, and it won't be visible at all. When you're working with colors like purple, violet, blue, adding white watercolor or gouache becomes very important in order to get that lighter tone. I'm adding a bit of white gouache to my blue and you can see the result here. We got a nice opaque blue circle there. You can add more white to the same mix and make your blue more lighter. You won't be able to achieve this result by diluting your watercolor, by adding water. It will fade away when it dries. Now I'll simply add some circles onto this paper by modifying the amount of white gouache. I will add some lighter ones and some brighter ones. This is the only technique you will need to know to follow this class. No matter which color we're using, whether it's yellow, orange, or red, you'd be using the same technique to make them look opaque. By controlling the amount of white watercolor or gouache we're adding into it, we'll try to create different tonal values of red, yellow, and orange. That is how we we'll be creating that bokeh effect. Now I'm adding more white into the same blue, I'm adding some light blue circles. I have added three different tonal values of blue circles by changing the amount of white gouache. For this exercise, we haven't painted any background, we simply added them onto a black paper. But for the pretty card we're going to do today, we'll be having a background and onto that we'll be adding this circles. That is how all the projects are going to be. Easy busy height. Here is the main ingredient of the secret recipe that we'll be creating today. You will either need a white gouache or a white watercolor to follow this class. The rest of the colors is totally your choice, but these two are very important. Are you guys ready to go the first project? I'll see you in the next section.
7. Project 1 - Red lights: Before we start with our first project, let's have a quick look at the colors you will need to create this beautiful bokeh effect. You can clearly see it's a combination of red, yellow, orange, and white. Let me show you the exact colors that I'm going to use. For the background, you will need black, it can be peach green as well. If you don't like using black, you can use peach green, then you will need brown. I'm using brown here, you can also use brown burnt sienna or any other brown shade. Then you will need a red. The one I'm using here is called pyrrole red. Again, go with any red that you have got. It doesn't really need to be the same color. Next one is permanent yellow-orange, you can use any orange that you have got or you can mix and create one by adding a little of [inaudible] into your gamboge yellow. The last one is a yellow. This one is cadmium yellow. Again, you can go with any yellow. You can use gamboge yellow, Indian yellow, primary yellow, or any other yellow, It doesn't really matter. Now, along with this, you will also need a white watercolor or white gouache. Okay. Those are the colors you will need for the first project. Feel free to go with whichever color you record from whichever brand, we just need some yellow, orange, red, brown, and black. So we had a quick look at the colors we are using for this project. As I said earlier, you can go with any red, orange, yellow, brown. It doesn't really matter which other colors you're using because there are so many varieties of red, yellow, and orange available in the market. You'll find primary yellow, gamboge yellow, Indian yellow. There are so many varieties of yellow, same goes with red and orange. We just need some yellow, red, and orange. It doesn't really matter which is the exact color that you're using. I'll quickly fix the paper so that we can start our first project. Once you have applied the masking tape, just run your finger or a ruler on top of it just to make sure there's no gaps in between. We are going to do a wet-on-wet technique here. Your masking tape has to be properly fixed, otherwise, you won't be able to get that clean border. I have fixed my paper. Before we start, I'll quickly show you the colors one more time. Here are the colors that I'm going to use, I have a black, a red, brown, orange, and yellow. We'll be using this first four colors to create the background, then we'll be using yellow and orange to create the bokeh effect. Those are the colors you will need for the first project. Now, along with this, you'll also need a white watercolor or a white gouache. I hope you guys have your colors ready. Now let's start with the project. I had done a quick trial of these color combinations, so I have some colors on my palette. I might need some more black and some more brown. Let me squeeze out some more brown as well because our background need to be very intense and dark. We need some extra paint for the background. The colors are ready the rest of them, I have already on my palette. Now, I'm going with my 1.5-inch flat brush and I'm going to apply a clean coat of water onto the end of your paper. You can use any of your flat brush, just make sure water has reached everywhere you can run your brush multiple times just to be sure there is no part left. Now, I'm switching to my size number 12 round brush. Depending on the size of your paper, you can use any of your medium typical sized round brush or flat brush. We're going to randomly drop all the colors onto the wet background. We're not going with the clean blend or any particular kind of technique here, so it doesn't really matter if you're using a flat brush or a round brush. I dropped in red, now I'm going with the brown adding that in. I'm randomly dropping in the colors, you can go with any order. I just want to create an intense and darker background. Now maybe onto that corner, I will add some orange so that I have some lighter tones. I'm brushing off the paint from my brush and I'm switching to that orange. Just on to this corner, I will add some orange. Just under this leftover area, I'm adding some permanent yellow orange. Now our task was to make the background more and more darker and intense so I'm going to drop in more deeper tones onto this wet background. As I said earlier, you can go with any order, It doesn't really need to be the same way I'm adding the paint here. We just need a deep and intense-looking background with some darker colors, it doesn't matter at all the way you're adding them. On to this corner, I'm going to add in some more red because I don't want a lot of lighter tones in my background. Just a bit of orange is all I need. Now I'm going backward with brown, adding that in. I think now I can switch to black and make the background more and more darker. You can see how randomly I'm adding the colors and I'm not really worried about getting a clean blend. You don't need a perfect background, so don't worry about that. Go ahead and add a new color however you wish. Just keep in mind, we don't need a lot of lighter tones in the background. We want the background to be as intense and dark as possible otherwise when we add those circles, there won't be any contrast. That is the only thing you will need to keep in mind, the rest is all up to you, adamant without worrying about perfection. You can see how randomly I added the colors. Just over the border, I have a little of orange, the rest is all dark and intense colors. I added brown and red, then on to that I added some black and made the colors more intense and deep. We have the background ready. Now we don't have to wait for this to dry, we can readily go with the next step. For that, I'm going to take out a bit of white gouache on to my palette. Now the only task left is to add as many circles as we can using yellow, orange, and white. It is going to be a fun but a time-consuming task. Now the trick here is to make those circles really opaque so that they will stand out from the background. For that to make my orange and yellow opaque, I'm going to add some white gouache onto it. By adding white gouache into your yellow and orange, it will lose its transparency and it will become more like an opaque water color or gouache. In short, we're going to add more opaque properties into watercolor and turning it more like a gouache. Let's give it a try. I'm going to use my size number 4 round brush. You can go with any of your medium to small-sized round brush and adding white gouache into your orange. This one is permanent yellow-orange. You can see that opaque color I have got here. Now using this color, I'm going to create some circles. Just a really basic circle shape at random places. Again, just like how I said earlier, go with any organization and order that you want to follow. Insert a white gouache, if you don't have one, you can use your white watercolor as well, It works exactly in the same way. In the next project, instead of white gouache, I'll be using white watercolor so that you guys can be confident in using white watercolor as well. At random places, I have added two orange circles, now I'm going with the third one. Onto this, I have added a bit more extra gouache so it is looking more opaque and the color is lot more lighter than the first two, adding another one here. Now as the background is still wet when you're adding these circles, for some of them, the background color may pop in and it might turn your circle into a different color. Don't worry about that, that's absolutely okay because here we're applying the same color palette. We have similar colors in the background, so even if that colors are getting mixed with your circles, it doesn't really matter. You can see here I have a darker brown and the background, and then I'm adding the circle, instead of that orange, it is turning more into brownish tone. I'm going to leave it as it is. It is absolutely okay. We can always come back and add another layer on top of this. I'm going to randomly add in more circles using this lighter tone. I will add one here. At some places, you can make them overlap. You can see I have an orange circle in the background. Now, I'm adding a lighter one on top of it. These two colors are overlapping. You can see I'm creating different tonal values of orange from the same permanent yellow-orange. All I'm doing here is I'm changing the amount of white gouache that I'm adding on to it so that some of the orange will be lighter and some of them will be darker. The bokeh effect will be a lot more prettier if you play with different tonal values of yellow and orange. For some of them, you can add more white gouache and make it lighter, and some of them, you can reduce the amount of white gouache and make it more brighter. Now, go ahead and add as many circles as you can. You can add them wherever you want to. At random places, you can make some of them overlapping, but you don't need to do it for all of them. Just feel here and there. The reason why we are adding this onto the wet background is that when it dries, it'll be looking a little blurry. This is a time-consuming step. As you progress, the background will start drying. By the time you finish your painting at the end, you will have some blurry circles and some brighter circles, which will automatically make your bokeh effect more beautiful. Now onto the same orange, I added more white and I'm going with some lighter circles. When I'm done with orange, I'll do the same step using yellow as well. I'll be adding some white and cadmium yellow. I will be adding some yellow circles at random places. Then, I will go with red and also with a bright opaque tone of white. The step here is really simple. All you need to do was add in circles onto your background using orange, yellow, white, and red. They can be of different tonal values. You can modulate the tone by adding different amount of white gouache into it or white watercolor or which will be the one you have with you. We'll have to fill the entire background with as many circles as we can. Try not to add the same color close to each other. If you're adding orange circle next to that, you can go with a lighter orange, white, and yellow. Don't play with the same tonal value close to each other. The cluster I just created, you can see three different tonal values of orange. I have a brighter orange in the background, and then I made the color lighter so that I have different tones of orange in that cluster. Until now, we only played with orange. Now, it's time to go the rest of the colors going with white or red. I'm going to add in some red circles as well. That looks really intense. I think I will add some orange to it and make it less intense. Now, just like the previous ones when you're adding your red circles, some of them can be overlapping with the orange and the white ones. You can see the one I added right now, it is slightly overlapping with the one below. Let's leave this one as it is. For the rest of the red circles, I'll make it a little lighter. I'm going with my second red circle. That looks perfect. Now, I will add few on the top as well. Let me remind you, our only intention here is to fill up the background. There is no particular order that you need to follow. Just simply play with different tonal values of red, orange, and yellow and add in circles onto your background. Just by changing the amount of white gouache or white watercolor, you can get a variety of orange, yellow and red. Some of them can be too intense and some of them can be lighter. When you have different tonal values of all the colors, the bokeh effect will be lot more realistic. I'm yet to add yellow circles, but if you like to have more rough yellow and white circles, you can limit the amount of orange and red and add more of yellow and white circles. That is also totally up to you. We have a dark brown area on the top. Over there, I'm going to focus more of yellow and white circles so that they would really stand out and you'll have a nice contrast. Let me squeeze out some fresh white gouache onto my palette. I will add some white circles then some plain white circles. Along with the white, I'll also be adding some yellow circles just like [inaudible] with the orange. I'll be adding some white gouache on to yellow to make it look more opaque, and I will add some yellow circles in a very random order. We can add more onto this darker area we have on the top. I hope the idea is clear. It is a very simple step. It's fine but it is time-consuming. All you need to do was create a darker and intense looking background using red, brown, orange and black. Then onto that, you just need to add in as many circles as you can using yellow, orange, white, and red. To make the colors look opaque, you will have to add either white gouache or white watercolor into it. Otherwise, it will be transparent and when it dries, you won't be able to see those circles. To bring in that opaque characteristics, you will either need to add white gouache or white watercolor. Then, you can play with different tonal values by changing the amount of white you add into your colors. Now, I'm going to add some yellow circles. I'll be concentrating more on the darker area so that I can bring in that contrast. Okay. The yellow circles are in. Now I'm going to switch to white, some clean white. I'm going to add some white circle as well. Just like how we added the other ones, make it as random as possible. Some of them can be overlapping with the ones below. You can see at some places we have created a beautiful cluster of white, yellow, and orange. Now there are some circles which is looking really dull. It has faded away when the paint dried. I'm going to make them a bit brighter. We can see the circle here. It is looking really dull, so I'm adding other coat on top of it. Similarly, the ones which is looking dull, I will be adding a second coat to make it look a bit more brighter. You can see how beautiful our background is looking already. It is really the magic of different tonal values of yellow, orange, and red. You just need to keep on adding as many circles as you can onto the dark background. Just keep on playing with different tonal values of yellow, orange, white, and red and simply adding some circles. The yellow circles are looking perfect now. I think I would need to make the orange also a bit more brighter. Squeezing out some more permanent yellow-orange and I will add some white gouache to it. Then I will add another layer on top of those orange circles. There's one here, it is looking really dull. Now there are few on the top. If you're happy with the intensity of your colors, you can leave it there. You don't need to go with one more layer. Mine is looking really dull, and I'm not so convinced. That is a reason why I'm adding another layer on the top. Now when I'm adding a second layer, I'm leaving a lot of gap around that outer shape. For the circle, I added just now, you can see there is a little of gap around that outer shape. I left a little of offset. I'm going to do the same for the other orange circles as well. This is just to get a more blurry look for the circles. Okay? When you're going into second layer, add in that brighter tone only towards the center. You can leave a little of gap around that outer shape to make your light source look more blurry. Okay? I'm going to quickly repeat the same step for all the orange circles here. Maybe I will add some more orange circles in the background, especially on to the top where I have that dark-looking background. We haven't added any on the top so I may add some yellow, orange, and white circles over there. I think that to fill more circles will be done with our first project. Now I'm switching back to white and I'm adding some more circles. As I said earlier, make it as random as possible. Don't add too many white circles at the same place and also some of them can be overlapping with the ones below. This will make the composition look more realistic. I'm really happy with the way this is turning out. This is one of the most effective color combination for bouquet. You can never go wrong with this color combination. You just need to play with different tonal values of yellow, orange, white, and red. Also, the background is quite easy too. You can create a pretty dark background with just brown vermilion and black. The colors we use for this project are pretty common. Most of the beginner-friendly watercolor sets will have yellow, orange, red, and white, and black also. It is a very common and easy combination. None of the colors we're using for this project will create a muddy mix. You can be very confident while adding your circles. This is a very safe color combination to play with. For this project, which is our first project, we're just exploring the bouquet technique. We simply created a darker background. Onto that, we added some circles. We didn't add any foreground subject to this painting. It is just a background and the lights. I want you guys to be clear about the technique. That is a reason why I didn't add in subject to it. Now on the projects we'll be doing next, we'll be adding a foreground subject, and we'll have a bouquet background. That way you will learn about the bouquet technique and also you will understand how you can use the bouquet technique in your paintings. I'll add few more red circles, and I think with that, I can call it done. There are very few red circles in the background. This one is pyrrole red. It's a beautiful red. It is very intense and bold. There are many artists who add signature on the watercolor paintings using pyrrole red because it is too catchy and it is too intense. I really love this color. It looks beautiful, even if you bring down the color to a lower tonal value. I use it quite a lot when I'm painting that evening sunset. Some streaks of intense red will make the sunset look more pretty. It's one of my most favorite color. I think you might have seen me using the same color in few of my other classes as well. I'm going to add one or two more red circles over the bottom, maybe I'll add one here overlapping the white circle. I think I'm going to stop it there. I'm not going to add in more red circles. Here's a closer look of our painting. I'm really happy with the way this has turned out. I think I may go with one more round for some of the yellow circles. The ones which are looking really dull. It's totally your choice. If you're happy with the colors, you can leave it there. Just have a look and pick up the ones which are looking really dull. This one is looking dull. If you're using gouache you wouldn't need to go with multiple layers like this. Gouache is still a fairly new medium to many of the big knows. I didn't really want to give out an impression that you can only get beautiful results with gouache. There is a main reason why I attempted this topic using watercolor instead of gouache. With gouache, it is very easy. Everything will turn really opaque so you wouldn't need to come back with multiple layers. You can add in your background, which will be the colors you want for your background. You can add in that. Then on top of that, you can again add your circles. As gouache is opaque, you can add lighter tones over darker tones, and darker tones over lighter tones. Both of them are possible. I've tried the same thing with gouache as well, but for some reason, I liked my watercolor bouquet effect more. I think the reason is that it has more of a transparent and opaque look together. But for gouache, there is no transparency. It is looking all opaque. If you look at the background here, it really has that transparency and blurry look. We were able to create it very easily onto the white background. We simply dropped in darker tones like brown, red, and black, and we created a beautiful blurry background. It was a quick and easy step. We weren't worried about getting a perfect blend. You can see when the background dried, everything was looking so beautiful. All right. With that, we are done with our first project. If you want, you can add in more circles wherever there is some empty space. You can see I have some darker area on the top, but I'm going to leave it as it is. I won't be adding any more circles. As this painting technique doesn't have any particular rule or any particular order, you might be a bit confused to have when to stop. Adding these circles is rarely a never-ending process. It is fun, it is therapeutic, but it can be boring too if you keep on doing it. Whenever you're happy with your background, you can't stop it there. Maybe you might feel more happy with lesser circles. All these takes breaks in between, get up from your seat, and take a step back and have a look at your painting, and decide on yourself whether you want to add more or whether you want to stop it there. Be confident enough to make decisions. Just because I'm adding so many circles, you don't need to do the same. Whenever you are happy and satisfied with your painting, you can stop it there. All right. With that, we're done with our first project. This project was more to make you understand how you can create that bouquet effect. In the next projects, we'll see how we can incorporate the bouquet effect into our paintings.
8. Project 2 - Street light and bokeh background: I hope the first project gave you a basic idea on how you can create a bokeh effect. Here's the second project that we're going to do now. It is almost of the same color combination, let's have a look at the colors first. Just like the previous one, you will need some darker colors like black, brown, and orange, so here, I'm using neutral tint. You can either use black or Payne's gray. Now the second color is brown. Just like the previous one, you can use burnt sienna or any other brown shade. Next, you will need a darker orange. I'm using vermilion. You can also use scarlet or any other orange, and finally to add in the light in the background, you will need permanent yellow-orange and yellow. Feel free to go with the colors that you have got with you. We just need some similar colors, the brand and the exact same shade doesn't really matter. Now, along with this, you will also need a white watercolor or a white gouache. For the previous project I used white gouache. For this one, I'm going to use my white watercolor. This is just to make you guys understand. You can use both of them, either white watercolor or white gouache will work. Those are the colors you will need for our second project. I have my piece of paper ready here. First, I'm going to tape down my paper. We'll be using [inaudible] technique, so if you're someone who is so much into that clean border, make sure you have fixed your masking tape properly. You can run your fingers or a ruler on top of it to make sure there's no gaps in between, but even if you didn't get a clean border, you can always come back and add some gouache on it and make it clean. That's a trick I always use. I have fixed my paper. Now, we'll need to add a pencil sketch for this one. It's an easy pencil sketch. We're going to add a simple street light, which is the foreground subject of our painting, and in the background we'll have those bokeh effect. I'll be just adding one street light. If you want to go with one or more, you could do that. Let's add in the sketch. I'm starting with an inclined line. Now, I will add another inclined line from this point here, onto the top, and from there I'm adding a straight line, bringing it down. Now, on to the other side, again adding another line. Now I'll bring that line down and connect all the lines using a parallelogram. That is a basic shape. Now, we need to add that metal post. Start with a straight line, then leaving a gap, add in another one, so that you have that thickness of the post, and finally, we can add a covering on the top. As you could see here, it's a very simple and basic street light. I haven't gone with a difficult one. If you want to go with a more ornamental or a decorative street light, you could do that. Maybe you can look for some images and try to recreate that. I'm adding a few rings here so that our street light will look a little more interesting. We have our sketch ready. The first step is to paint the background, but unlike the previous painting, here we need to concentrate on the street light. That area needs to be lighter and the rest of the area in the background has to be darker. For the street light, I'm going to use cadmium yellow and permanent yellow-orange. You can use any yellow and orange that you've got. It doesn't really need to be the same colors that I'm using here. This is cadmium yellow and permanent yellow-orange. First, we'll have to apply a coat of water onto the entire paper, then we'll start adding the paint. Before that I will get the colors ready. This is brown. I will need this for the background, so I'm squeezing out some brown onto my palette. Now I will need some neutral tint. You can use Payne's gray or black instead. I'll be using the same color for the street light as well. I already have some paint over there, I'm squeezing out some more. We have the colors ready. First, we'll be adding paint onto the light, then we will add in brown and black onto the area around it. We'll be starting with yellow. We'll add yellow onto the light. Leaving a little gap over the middle, where you have your light source and around that, we'll add some orange. Then onto the background, we'll be adding brown, and to make it more deeper, we'll be adding black, so that is a step. To make it easier, you can use your smallest size brush while you're adding paint onto the street light, and when you're filling up the background, you can use a bigger brush. I'm going to apply a coat of water onto the entire paper. I'm using my one-and-a-half inch wash brush, and I'm dipping my brush in some clean water, and adding a coat of water onto the entire paper. Just run your brush multiple times to make sure there is no puddles of water. We need a clean, even coat of water. My paper is evenly wet. Now, I'm going to switch to my size number 4 round brush, and I'm going with the yellow first. This one is cadmium yellow. You can go with any yellow that you've got. Go with the medium tone of yellow. Now, adding yellow, leaving some paper white over the middle. You can leave a little of area in white like this and fill up the rest in yellow. Now I'm switching to orange. This one is permanent yellow-orange. Now, adding that around the yellow. The background is wet and when you're adding your paint, it will go out of that shape. That is absolutely okay. In fact, that is what we need. This is how we'll be creating that glowing effect for the street light. Now, I'm going to switch to brown, and adding that around orange. You can see the way we are building those colors and creating our beautiful light effect. See, it is already looking like the light is on and it is glowing. Now wash all the paint from your brush, and with a clean, damp brush, gently blend the colors into each other. Now we need to apply the colors onto the background before it dries, so I'm switching to my bigger size strong brush. This is size number 12 and I'm going with brown. Now, I'm going to fill the entire background in brown. As I said earlier, you can use any brown you have got. You could use burnt sienna, burnt umber, or any brown shade. Leaving that light, simply fill up the entire background in brown. Our intention is to make the street light lighter and the background darker. When you're adding your colors, make sure not to add darker colors around the streetlight. Maybe we can add a little bit more of orange here, and make this area more lighter. We retain lighter tones over the middle. Now we can go back with brown and fill up the remaining area. I have added brown onto the entire area. You can see I didn't really go with a clean blend or anything. I simply added the color onto the background. Now it's time to add multiple tones. Don't worry about the background, let it be as it is. The only thing you need to keep in mind is that we'll need this area to be lighter, don't add a lot of brown over there. Especially onto the area right next to the streetlight, we want this area to be lighter. Now it's time to go with your darker tone. It can be neutral tint, Payne's gray, or black. Add that onto the wet background, especially onto the four corners. As I'm using a bigger brush it is quite easy for me to add paint onto a larger area. You can clearly see here, I'm not at all worried about the blend. I'm simply dropping in a darker tone onto all the four corners and I'm making my background look more dark and intense. The black lines are looking a little rough and sharp right now, but that's okay. Once we are done adding with black, we'll come back with brown, and we'll try to make it a little better. But just remember, the way your background is doesn't have any connection with your end result. We are not at all focusing on getting a clean and smooth blend here, but if you have already got a beautiful and clean blend, don't mess it up. My intention is to motivate the people who are not really satisfied with their background. However your background is, let it stay, we'll make it more beautiful. Now, I'm switching to a bit of brown. Now, just run your brush along the area where you have that strong lines of black. Just keep pulling the colors into each other so that the transition from brown to black wouldn't look too strong. It doesn't need to be a clean blend. You can see the way I'm doing it here. I'm just pulling and pushing the colors into each other, so that there won't be any strong patches of black. This is how our background is looking right now. You can see the street light glowing in yellow and around that, we have an orange. I think onto this area, we have some darker tones missing. I'm adding some neutral tint over here, and with that, we're done with our background. Now, we can wait for this to dry. Here is a closer look. I'm pretty happy with the background. Now, let's wait for that to dry. When the background dries, I'll be going with the street light first. We'll finish that off, and then we'll be adding those lights in the background. Here is the background when it is dried, you can clearly see the colors have faded a lot. It is looking a lot dull than before. Anyway, let's start with the street light. Let me squeeze out some brown. You can use burnt sienna as well. To paint the street light, I'm using my size number 4 round brush. You can go with any of your medium to smaller size round brush. Now, take brown on your brush. Using burnt sienna, I'm going to add these lines. Onto the line over the middle, I will break it in-between and leave a gap. We need to make that area lighter when we are adding the line to get that glowing effect. I'm going to wash all the paint from my brush and I'm switching to a lighter tone of orange, and I'm going to fill that little area over the middle using a lighter tone of orange. It will look like the light is sitting over there, and that is the reason why that part is looking a lot lighter. This is how you create that illuminating effect. The lines to the left and right you can add that with a lighter tone of brown. You don't need to break it in-between. Now, I'm going back with brown and I'm mixing a little of neutral tint to that to get a darker tone of brown. If you're using Payne's gray or black, you can mix your brown with that, and get a darker tone. Now, add that darker tone onto the top and the bottom end of these lines. Just on the top and bottom. Over the metal, you have a lighter tone and onto either end, you have a darker tone. Now we can fill that parallelogram in this darker tone of brown. You can see how beautiful our streetlight is looking already. Just because we made the color lighter over here, that is looking like the light is illuminating. Now, the same darker brown, you can apply that onto the top cover. As I said at the beginning, if you want to go with a more ornamental streetlight, you could do that. Maybe we can just change the top cover into our decorative shape, and make your streetlight look more interesting. Now I'm going with neutral tint, and I'm adding that onto the top, just a little, so you have a darker tone on the top. I use neutral tint, which is more or less like Payne's gray. You can use black as well. Now, add that onto the top. You have a darker tone on the top, which is looking more like a metal, then you have a darker brown. Then we made the brown lighter, and onto the middle, you have a lighter tone just to make it look like the light is illuminating. Then as we come down, we made the colors darker again. Now, the last step was to fill up that post in this neutral tint, or black, or Payne's gray, which will be the one you are using. Carefully fill that in. This is how our streetlight is looking right now. I'm really loving the glow. Now, finally, we can add those rings. That will be done with double straight lines, and the only task remaining is to add those lights in the background. I'm adding the first ring, the second one. Now, I will add another one a little below this one. This is just to make my streetlight look a bit more interesting. I don't want to leave it like an empty post. If you're typing [inaudible] or streetlights in Google or Pinterest, you will get to see a lot of images. Maybe you can try to recreate one of them and add in more details onto your streetlight. We are done with the streetlight. Now it's time to add the bokeh effect. Now I'm going to squeeze out some white watercolor onto my palette. As I said, for this painting, I'm going to use white watercolor instead of white gouache. I just want to show you even a white watercolor will work perfect for this bokeh effect. Gouache is in the market for a few years now, but still it feels like a new medium for many. I'm using titanium white. You can use Chinese white, titanium white, or any other white you've got. Let me squeeze out some on to my palette. My intention is to show you even if you only have watercolor, you can manage to create a beautiful bokeh effect. You don't need to skip the exercises thinking you can only achieve beautiful results with gouache. It is possibly with watercolor as well. First, I'm going with white, I'm not adding too much water into it. I'm going with the creamy, thicker consistency so that those circles will stay opaque. Now for the previous project, we added big circles. But for this one, we already have a foreground subject, so we don't need to add such huge circles on this one. You can go with the similar size or even smaller. Depending on the size of the circles you are adding, choose a brush accordingly. This one is size number 4 round brush, the same brush I was using for the street light. Now, I'm adding the second light circle. You can see how opaque my white is looking. It is just because I didn't add a lot of water. I'm going with the thick and creamy consistency. Now, adding the white circles in a very random order, you can add them wherever you want to just like how we did earlier. There is literally zero rules you need to follow while adding these circles, it is totally your choice. I added three white circles. Now I'm going with yellow. I already have some white watercolor on my brush, now I'm just mixing that with cadmium yellow, which I have on my palette. I'm adding some random circles in a similar size. The only difference here from the previous project is that the size of the circles are quite smaller, and also instead of white gouache, we are using white watercolor. But if you have gouache, you can go with that. It will stay more opaque than watercolor when it dries. If you have gouache, you can use that, if you don't have, you can use your white watercolor. Now, go ahead and add in as many yellow circles as you want. I just mixed cadmium yellow light and white watercolor, and that is how I got this opaque yellow. Now, as we were discussing the first project, add them in a scattered manner. Don't add too many yellows in the same location, and also you can make some of them are overlapping with each other. It's a really easy, fun, but time-consuming process. Depending on the time availability, you can limit the number of circles. You can always come back and add in as many as you want later. I will add one or two more yellow circles, then I will switch to orange. I'm adding one here. You can see how opaque my yellow is looking. I simply mixed it with white watercolor, but you'll have to make sure you're not adding too much water. Now, I'm just mixing color with some orange I have on my palette and I'm going to add some orange circle. If your paint is too tight, you can dip you brush in water, but just a gentle dip, don't add too much water. If you added a lot of water, your paint will be more transparent, it won't have that opaque properties. So limit the amount of water you're adding. I hope the idea is clear. Now, let me quickly add in some orange circles at random places. We added circles using yellow, orange, and white. We used a lighter tone of orange. To make the composition look more interesting, we'll need to add some darker orange circles as well. I'm taking a bit of [inaudible] and adding that with a little of white, and I'm going to add some random circles using this darker orange as well. Again, clearly see the different tones of orange I have here. If you have enough patience, you can play with more and more different tones. Just make sure you have at least two different tonal values of orange, this will make your lights look more pretty. I'm already loving the vibe of this painting, maybe I will add few more orange circles. You can clearly see those three different tonal values I have here. I have orange, I have yellow, and I have [inaudible] , so with three different tonal values and we have some white in the background as well. Everything is adding a lot of beauty to our bokeh effect. Now, after I'm done with this orange, I will go with a darker tone. I will add some brown to the scene mix and make it a more intense and dark orange, and I will add some circles using that color too. Whenever you feel your paint is too tight, you can add a drop of water. Just make sure not to add a lot. Also, don't forget to make some of them overlapping with each other, this will add a lot of natural look to your painting. I will add one circle here, overlapping with the one below, so I have a cluster of three different tonal values here. You can add in more darker tones and more lighter tones and make your composition look more interesting. Finally, I'm going with brown. I have some orange on my brush, I'm just mixing that with the brown I have here, so I have a darker orange. Now, with that color, I'm adding few circles in a very random order. Again, I'm intentionally making some of them overlap with the ones below, not all of them. I'm quite happy with the way this has turned out, I think I will add few more circles and I will call it done. Here is our painting. Now, there is one last step you can do to make your painting look more pretty. It is not really a mandatory step, you can choose to stop it here or you can follow along. I wash all the paint from my brush. My brush is clean and it is just little damp, it is not too wet. Now I'm running my damp brush along the circumference of all these circles. This step will make the outer shape of your circle look blurry, and it will automatically add a lot of beauty to your painting. The step is really simple; thoroughly clean your brush, make sure there is no paint on your brush. Now, just run your damp brush along the outer shape of the circle. I just finished doing it for one circle, let me zoom in and show you the difference. There you go, you can clearly see the difference between this yellow circle and the top one. Now, I'm going to repeat the same step for all the orange and yellow circles, especially the ones which are looking too bright. I don't want a strong outline for these circles, maybe the darker ones we can leave it as it is. Just for the lighter yellow, the white, and those lighter orange circles, we can do the step. The major thing you will have to keep in mind is that your brush shouldn't be too watery. If you feel like is too watery, it just dab it on a paper towel. It should be just damp, it shouldn't be too wet. If your brush is too wet, it will destroy the background layer, so make sure your brush is not too wet and is just damp. Now repeat the step for all the circles. We just have the last two circles left, you can clearly see the difference the step made. Our circles are looking a lot blurrier than before. Over the middle you have a brighter tone, and onto that outer shape, it is looking a lot blurry, and this is how exactly the bokeh effect looks like. With that, we're done with our painting, I'm going to quickly peel off the masking tape and I'm going to show you the final painting. For the first project, we used bigger circles for the bokeh effect. Now for this one, as we had our foreground subject, we made the lights a lot smaller. Now for the next project, we'll make the size of the lights even more smaller, as we'll have our main foreground subject. It won't be just an object. Here is the finished painting. I'm really happy with the way it has turned out, I hope you guys enjoyed it too.
9. Project 3 - Glowing blue lights: Ready for the next project? Now, we're going to try this beautiful bokeh effect using blue color. It's going to be really easy. First, let me show you the colors that I'm going to use. You just need three colors, any blue. I'm going to use cerulean blue here. Then along with that you will need either Payne's gray or black or neutral tint. Finally, you will need white, it can be the white watercolor or white gouache. Those are the only three shades you will need to create this beautiful bouquet effect. You can go with any blue that you have got. It can be Prussian blue, ultramarine blue, or any other blue, it doesn't matter at all. I have fixed my paper to the board already. Now, I'm going to squeeze out the colors onto my palette. First, we'll paint the background using neutral tint, cerulean blue and white. Then we will add those lights onto it, I have some paint over there, but that may not be enough, I might need a bit more. I'll be using quite a lot of blue for the background. Now, I'm going to need neutral tint. You can either use Payne's gray or black instead of neutral tint. That is also [inaudible]. Now, we need some white. I'll be using white watercolor. You can either use white watercolor or white gouache both of them will work. I don't have any space on my palette, I'll squeeze it on this corner. We have the colors [inaudible] , now, I'm going to apply a coat of water onto the entire paper. I'm switching to my one and a half inch wash brush. Apply an even coat of water onto the entire paper. Run your brush multiple times to make sure there's no puddles of water. Don't add a lot of water. We just want a nice shiny coat. If you feel like there's a lot of water on your background, keep running your brush multiple times so that it will be even. Our background is wet. Now I'm going to switch to my size number 12 round brush. I'm starting with blue. This one is cerulean blue. I'm going with an intense tone of blue. I'm going to drop that onto the wet background. Just randomly, I don't have any particular image in my mind. I'm simply dropping the darker tone onto the background. Go with a very intense tone of blue. In between you can leave some white gaps like this. Just some random shapes. It doesn't need to be a circular shape or anything. You can see how random those shapes are looking. We are going to read in the paper white and onto those areas we'll be adding whitewater color. You can see I have left some space in between. Now I'm going to wash all the paint from my brush. Clean your brush thoroughly. Now, I'm going to switch to white watercolor. I'm dropping that onto these gaps. Just add them in. Don't worry about the shape. We have added white onto all those gaps we have in there. Now, again, I'm going to wash all the paint from my brush. I'm dabbing my brush on a paper towel. Now run your clean brush along the outer shape of these patches and just merge that into the blue to make it less prominent. You can see at the moment, those shapes are looking to prominent. We don't want these shapes to be really visible and prominent, so you can keep pulling your paint in and out. Just merge that into the blue, making the shapes less prominent. Now you can repeat the same step for all the patches here. You can see I'm not putting a lot of effort or concentration into this. I'm simply merging that color into the blue background so that it looks less prominent. That is the only thing I'm doing here. I'm not really worried about the shape or the perfection. Now I'm going to switch back to blue, and I'm going to drop in some more intense tone of blue onto the wet background. You can just make use of the time. Your background is still wet, so you can add as many intense tones as you want. You can add more intense tone of blue around the white patches. After this, we'll be adding black onto this wet background so that our background will look more dark and intense. I think I'm done with blue. Now let's switch to neutral tint. I'm dropping that onto the wet background, especially onto the corners. I want the corners to be too dark and intense. Also, I'm retaining those white patches. I'm not adding any black onto it. I'm just running my brush around those patterns. So you have a lighter tone at some places and around that you will have some blue and again around that you will have a more darker tone. Automatically those white patches will look like it is illuminating when we add in those circles. You can see how messy my background is looking. I'm not really worried about getting a clean blend here. It is absolutely okay to have a very rough and messy looking background. You don't need to worry about that. Now, let's wait for this to dry. My background is still wet, but it has dried at some places. I think I will add one or two circles and see what's the situation. I'm switching to my size number 4 round brush. I'm going with a very thick wand creamy [inaudible] white watercolor. I'm not adding a lot of water to it. I want it to be really opaque, so I'm not adding a lot of water. If I add a lot of water, it will lose its creamy consistency, and it won't look opaque. So I'm adding my first circle here where I have that white patch. Looks like my background has to dry, because it is spreading into the background, I don't want that. So I'll be patient, and I'll wait for the background to dry. I'll take a break and I'll join you soon. I'm back. Our background has completely dried. Now. I'm going back with the white. I'm starting with the same circle that I added earlier. I need to fix the shape of this one. That is a full circle. Now in a very random manner, add in as many white circles as you want. This is the kind of size I'm going with. You can decide on the size you want. As we don't have a foreground subject in this painting, you can go with any size that you prefer. Whichever it'd be the size you're going with, try to be consistent. It is okay to have slight differences, but not a lot. It can be a little bigger or smaller but try to be as consistent as possible. Now go ahead and add as many white circles as you want. You can concentrate on the white patches first. First add your white circles onto these patches, after that you can add them wherever you want to. If your white patch is a little bigger or longer, you can add two or three onto the same patch. Once you're done adding white circles onto those patches, you can go ahead and add them wherever you want to. You can add them on the darker area or lighter area. It doesn't matter at all. Just go as per your intuition and add them wherever you want to. There is no rule or there is no order that you need to follow, just follow your mind. My white paint is over, I need some more paint. Now I'm again repeating the same process, I'll add some more white circles, then I will switch to blue. Onto the same white watercolor, we'll be adding a little of blue, and for the next round of circles, we'll be using a lighter tone of blue. After that, we'll add in a little more blue to the same mix and make the blue more brighter. In a similar way we'll be adding circles using different tonal values of blue to make our background look more beautiful. As I said earlier, there is no limit here, there is no rule that you need to follow. You can add in as many circles as you want and wherever you want to add. The more the merrier, if you have a lot of patients, you can add in as many circles as you want using different tonal values. This will add a lot of beauty to your painting. Now, I'm going with a lighter tone of blue, I'm used to adding a lot of blue to that whitewater color. Using that color, I'm going to add in some circles. If your paint is too dry, you can add a pinch of water, but not a lot. You still should have that creamy consistency so that your circles will look opaque. If you add in a lot of water, it will lose its opacity. If your paint is too watery, it will just fade away after your paint dries. So go with a thick and creamy consistency so that those circles look really prominent. Now just like white, you can add in as many blue circles as you want in a very random manner. Adding the circles is really a time-consuming process, but the more you add, the more beautiful you are painting will be. If you're bored, you can come back and add in your circles later or you can have your [inaudible] CDs or a movie playing on the background. Again, adding your circles when you're watching something because this is a very simple and fun stuff. You don't need a lot of concentration to do this. You can see here, I'm making some of the blue circles overlap with the ones below. I'm not even halfway through. I need to add a lot more circles to bring in that real bokeh effect. In short, there are three things you will need to keep in mind when you are painting a bokeh effect. The first thing is you will need to have a dark and intense-looking background. Then you will need to add as many circles as you can. If you just add in two or three, it doesn't really have an impact. It will have that impact only if you add in a lot of circles, so that is the second thing. Now, the third thing is playing with different tonal values. Here, you can see I added white circles first, then I went in the blue. I used a lighter tone of blue. Now, I'm going with a bit more darker tone of blue. After this round of circles, I will go with a slightly more darker tone of blue. Now, I was squeezing out some more blue onto my palette to go with the darker tone. I want to add few darker circles in a very random manner, just maybe three or four of them so that I have different tonal values of blue on my background. You can see I'm going with a very thick, creamy paint. I'm not adding a lot of water because I want these circles to be opaque. I think when you add in your first round of circles, you will automatically get the idea about the [inaudible] that you need to follow. It does not that tricky. Now, the same thing can be done with any other color combination, maybe you can try the same thing with purple, or green, or even pink. For this project, we only use neutral tint, blue, and white. You just need to replace blue with any other color of your choice. I really hope the idea is clear to you. Let me quickly add in few more circles. I'm going to add more and more circles using a lighter tone on a blue. Then after that, I will switch to white and add in some more white circles as well. I'm really loving the way this one is progressing. The color combination is really looking nice. For the rest of the circles, I think I'll go with a lighter tone of blue and maybe some white. I really want to try the same painting in a purple or violet color. I still remember my first attempt in creating a bokeh effect, and that was a total fail. That was maybe a year back. After that I never tried creating bokeh effect. I always had that feeling in my mind that with watercolor, you can never achieve this result. But very recently, I was exploring some techniques to paint a [inaudible] , and for that, I used the same technique, I mixed white gouache with violet and blue to create some beautiful flowers. Because gouache is still a new medium to many, especially the beginners, so I didn't want to give out that impression that you can only achieve great results with gouache. I want to try the same thing with watercolor so that it is 100 percent beginner-friendly. That really work, the [inaudible] medal created with gouache and with watercolor was almost the same. Just like how I'm using here, I went in with the thicker and creamier consistency. It doesn't fade yet. It is still in the same condition. I was pretty sure the same technique can be used to create bokeh effect as well. We don't need gouache for this. But the same thing can be done with gouache as well. If you have gouache, maybe you can use gouache instead of mixing that color with white watercolor or white gouache. You can really go with your yellow and orange gouache colors. Again, add these circles using them. Adding these circles is really a never ending process, because when you start, you will never get satisfied, you will keep on adding them. That is what is happening with me. I don't know when should I stop. I'm keeping on adding these blue circles. You really don't need to follow every circle I'm adding here. At any point, if you feel satisfied, you can stop it there and you can call it done. Whenever I'm adding a circle, I'm telling in my mind, I'm going to stop with this, but I don't know, for some reason I'm going with the next circle, and that is just going on and on. Maybe I will add few more white circles, and I'm going to stop it there because I feel like there are very less white circles, there's quite a lot of blue. You can see how beautiful our paintings is looking. They have really got that bokeh effect. It is just because we played with different tonal values of blue. For the background as well, we added a little of white in-between to create that glowing effect. I hope you guys are happy with your painting too. You can see it is a very simple process. We just need to paint a background. We'll need to add some intense tones in-between,, and also we need to add some lighter tones just to create that glowing effect. When that dries, we'll need to add some circles onto it. If you're using blue, you will need to play with different tonal values of blue. If it's purple or green or pink, you should be playing with tonal values of that particular shade. That is it. Is really simple. It is fun. It is therapeutic. There is no rule or order that you need to follow while you're painting a bokeh effect. If you're yet to try, do give it a try I'll see you in the next project where we're going to paint a beautiful streetscape with some bokeh effect.
10. Project 4 - Streetscape: We're on the last [inaudible] of this class, and we're going to paint this beautiful streetscape. We'll be using bouquet effect in the background, and we'll have this mesh in the foreground. Let's have a look at the colors you will need. For the sky, I will be using cerulean blue. You can use any other blue of your choice. It could be ultramarine blue, Prussian blue, or any blue, or you can even go with purple or red or any other color that you prefer for your sky. You can follow the rest and choose the color for your sky, if you prefer that. Next, you will need a darker tone, like black or Payne's gray or neutral tint. I'll be using neutral tint. Those are the two colors you will need for your first background layer. Now, to add in the light, you will need yellow. The one I'm using here is cadmium yellow light, but you can use any yellow of your choice. If you don't have red, you can also use your [inaudible]. We just need a darker red or orange. We'll also be adding lights using orange and green, but I'll be mixing and creating those colors. Finally, you will need either white gouache or white water color. Those are the colors you will need. Let's start with the last [inaudible] from this course. I have my piece of paper ready here. Now, I'm going to tape it down to the board. For this painting, for the sky, we're going to use blue. You can use purple, red, or any other color combination that you prefer. It doesn't have any connection with the bouquet effect. It is not like the previous painting. In the previous project, we entirely used blue, we created bouquet effect using blue, but for this one, we're just using blue for the sky. If you want to use a different color combination for your sky, you could do that and follow the rest. I have fixed my paper, now let's make the colors ready. For the sky, I'm going to use cerulean blue. You can use any other blue or you can use purple or pink or any color combination that you prefer and along with cerulean blue, I'll be using neutral tint. You can also use Payne's gray or black. That is neutral tint, now, I'm going to squeeze out some cerulean blue onto my palette. These are two main colors we'll be using for the background. Then to add in the building, we'll be using black. Let's start. I'm adding a line a little bit to the center of the paper. This is just a reference line for us to understand from there we should be adding the darker tones. Onto the top of this line, we'll be adding blue and over the bottom, it will be the road and for that area we'll be switching to neutral tint. Now, the first step is to apply an even coat of water onto the entire paper. We'll be using a baton wet technique here. There's a bit of orange on the right corner never mind. I'll cover that while I'm adding the paint. I I applied an even coat of water on the entire paper. Now, I'm switching to my size number 12 round brush, and I'm going with cerulean blue, going with a medium to intense tone and I'm dropping that onto the wet background. Feel free to go with any blue of your choice. It doesn't really need to be cerulean blue, you can use Prussian blue, ultramarine blue, or any other blue. As I said earlier, you can even use purple or red, if you want to create a sunset sky or evening sky. Now I'm switching to neutral tint. We can also use indigo or Payne's gray. We'll be adding neutral tint onto the rest of the area. Before that, we can add in some clouds. I'm going with a very dark tone and adding some clouds onto the sky, just some random patterns. Now you can fill up the rest of the area in neutral tint or Payne's gray or indigo. Over here, where you have that horizon line, you can go with a lighter tone. As you come down, you can make the color darker. I'm going with an intense tone as I'm coming down. Just filling that up. This is the background You can see it is entirely different from the rest of the projects we did. We painted the sky first, we used cerulean blue, then onto that, we added some clouds using neutral tint. Then onto the leftover area over the bottom, we added neutral tint. We started out with a lighter tone, then over to the bottom, we went in with a darker tone. Now, we need to add some buildings onto the same wet background. We want those buildings to have a blurry look so we shouldn't be waiting for too long. I'm squeezing out some black. The one I'm using here is pitch black. You can also use ivory black or Payne's gray. I'm using the same brush and I'm going to add in some buildings, if you read for too long, your background will dry, and when you add in buildings onto the dry background, they will it look really prominent. It wouldn't have that blurry look. We want that blurry look here. I'm adding some random shapes some of them are taller and some of them are shorter. You can see how they are spreading into the background. Now, you can take it to the other end. Onto either ends, I'm going with taller buildings and over the middle, I'll go with some shorter buildings. Now, we can simply spread that into the background. You can see here the buildings are looking really blurry. This is really far from you, so you don't need to put a lot of effort in getting them clean. Don't go with sharp lines. Simply add some boxes of different sizes. When it dries, it will all look okay. Now, there is one more task we'll need to do before the background dries. For that, I'm switching to my size number 4 round brush. You can go with any of your medium to smaller size brush. I have no paint on my brush. Now, I'm simply lifting off some paint in a linear manner. Make sure there isn't a lot of water on your brush. If your brush is too watery, the moment your brush touches the paper, you will start getting some bleeds and those bleeds will start spreading in a very rigorous manner. We don't want that, we just need some lines like this. So we'll just pull the paint down and dab your brush on a paper towel, then repeat the same. We just need five or six lines like this. I think I have added enough of lines. Now it's time to add in the light. I'm going to squeeze out some white and yellow onto my palette. We can use white gouache or white watercolor. Both of them will work. I'm going to use some gouache. That's white gouache. Now, I'm going to squeeze out some cadmium yellow light. Go with any yellow. I have the colors ready there. I'm going with white first. If you're using watercolor, go with a creamy and thicker consistency and adding some white dots where you have these reflection. Focus on these lines first, we can add some more circles in the background later. We are trying to create the reflection of the light on the road. We have added some white lights, now, I'm going to switch to red and I'm going to add some lights using red as well. The red I'm using here is spiral red. You can go with any red that you've got. But again, make sure the paint is not too watery. If it's too watery just like I said earlier, it will start spreading into the background. It won't stay as a circle. Just make sure your paint is not too watery. If you're still confused, you can dab your brush on a paper towel and then add in your red dots. We want some of the lights to have a blurry look, and that is the reason why we are adding them on a wet background. The rest of the lights we'll be adding while the background has completely dried. You'll have a beautiful combination of blurry and brighter lights. These are all lights of the vehicles on the road. I will add some more red circles then I will switch to yellow and orange and add in some circles using those colors as well. Now, just like how we did for the white, I'm going to pull down some of the red circles to make it look like there is some reflection of these lights, just to drag it down a bit. That is all you need. Don't do it for all the circles, just one or two randomly. Now, I'm switching to yellow, mixing that with a little of gouache. I'm going to add some yellow circles onto the background. We need to follow a similar size for the circles. Add in as many as you want in a very random manner. That is yellow. Now, I'm going to do the same thing using orange. I'm too lazy to squeeze out some orange, so I'm just using that red and mixing that with yellow, and I'm creating an orange. Now we can add in some circles using orange as well. Okay. That was orange. Now let's add some blue light as well. I have my serene blue here already, I'm going to take a pinch of that and mix that with white gouache. We'll need a light blue, so just a pinch of blue solving it, and mix that with white gouache or white watercolor. Again, in a similar way how we did earlier, adding some blue dots randomly. Some of them can be closer to the horizon line, and some of them can be on the buildings. You can add them wherever you want to. As you can see here for this project, we used such small-sized circles, it is not like the previous projects. This is just to create that sense of depth in our painting, these are really far from you, and if you are viewing the street from a far-off place. So to get that sense of distance, you will have to go with a smaller size circle. Now, I'm going with some clean white, and I'm adding some white dots. The white dots we added at the beginning there on our wet background, and you can see here they have faded away. They're not looking too bright. Right now, I'm adding some bright white dots, onto that white blurry circles, you can add a teeny tiny dot right onto the center. Also, you can add some random white circles as well. As I said earlier, some of them can be on the building, and some of them can be on the horizon line. I have added enough of circles, now it's time to add the road marking. For the road marking, I'm using white gouache, and I'm using the same brush. It doesn't need to be a sharp, clear line. Go with very little paint, which is not too watery. Simply add a line on either side. First, I will start with the left side, I'm adding a line, and I'm dragging towards a vanishing point. Only on the left end, you will have a clear line, then you can simply drag it free. You don't need to show the other end. Same goes onto that right side as well, start from the masking tip, and simply drag it towards the vanishing point. Now you can add those road markings at the center of the road, a dash line, that's it. I'll be really honest with you guys, I was about to stop this painting here, but then I wasn't really happy with it. Then I thought of adding a mesh onto it to make it a bit better. To my surprise, I was really happy with it when I added a mesh and this easily became my favorite project from the class. So if you're happy with the project, you can leave it there or you can add a mesh-like how I'm doing here. I'm starting off by adding some wavy lines, like a curvy zigzag lines. You need to take it to the bottom. I'm using my face number 4 brush Yo you can go to any of your smaller to medium-sized brush, which has a nice pointed tip. Try and get a similar spacing between these waves. Okay. I have done adding my first wavy line. Now I'm going with the second one. I think I forgot to mention I'm using black here. You can use black or faint green. Now I'm going to add in a loop here when I'm adding my second line so that it will look like all these metal wires are connected together to create this mesh. If you're not too confident about adding this mesh, you can go with straight lines instead of sort wavy line. You can use a ruler when adding your mesh. Or maybe you can go with any other simple pattern. You can go with some simple checks, or some simple exact lines. I haven't added any reference lines. I'm simply adding them freehand. I hope I won't mess it up. So here's the pattern that I'm using. I'll be adding wavy lines like this until I reach the other hand. If you want, you can add a reference line using a pencil and then go over it using your brush. Now here's another simple pattern that you can follow, if you're not confident enough in adding this wavy one. It is a very simple checkout pattern and at the intersection of all the lines, there was a diamond shape. You can use a ruler and a pen and easily add in this pattern. So feel free to choose the pattern that you are more comfortable with. If you want to go look for more options, you just need to type in mesh patterns in Google or Pinterest, and you will get to see a lot of options. So just use any pattern that you feel you can draw and add that onto your painting. I'm nearly done. I have space for one more baby line here. With that, I'll be done with the mesh. You can see how that mesh made our painting look a lot better than earlier. I was not planning to add this mesh, but then the painting didn't turn out the way I was expecting it to be. That's the reason why I add this mesh. But now I'm happy. As we have a foreground subject which is the mesh here, we are shifting the focus of the painting to the foreground element. The perfection of the details in the background doesn't really matter. Now you might have noticed the lights we added earlier, the bokeh effect we created in the background. It has faded a bit. Once I'm done with the mesh, I will add in some more white thought into the background. But this time I will go with a more intense and try to tune so that in the background we'll have some blurry light and some brighter lights. That is a mesh. I think I will need to come back and fix the shape at some places. Anyway, now I'm going to go with white gouache, and I'm going to add some white dots onto the background. Add them in a very random manner, and just like how we did those bigger circles, you can make some of them overlap with the ones below. Some of them can be on a building, and some of them can be closer to the horizon line. Add them wherever you want to, but I don't add them on the sky. I'm done with white. I have some white on my brush. I'm just mixing that with the yellow I have here, and I'm adding some yellow dots as well. Again, just like how we added the white go in a very random manner. Actually, when you're painting a streetscape or an urban setting, you can use any kind of color for your bokeh effect. There will be different sources of light. There will be some holdings, there will be Waco, and there will be streetlights and so many other light sources. Technically you can use every color for the bokeh effect. We added some white lights and some yellow lights. Now I'm switching to red and I'm going to add some red lights as well. I'm going with pyrrole red, the same red I used earlier. I'm adding some dots. That was red. Now, I'm going with blue. I'm mixing a little of white gouache with my Sadolin blue, and I'm adding some dots using blue as well. After this, I will add some green light. I think that is the only color missing. We have added light using the rest of the colors. We have white, yellow, orange, red, and blue. I don't want to squeeze out any new paint onto my palette. I'm just mixing that blue with yellow and creating a cream. I'll just pick a little of Sadolin blue and mix that with yellow. That's a gorgeous green. Now adding some dots using green as well. It's like that neon green. It's a pretty color, right? Now adding some green dots in a random manner. With that, we'll be done with the lights. I'm trying to make some of them overlap with each other, adding one here and one here overlapping with white, another one here. That one got overlapped with the blue. You don't need to make all of them overlap with each other. Just pick a few here and there, and add them close to each other so that it will look like it's overlapping. Here's how our painting is looking right now. Now I'm going back with black and I'm going to fix the shape of this mesh. You can see at some places it is looking really messy. I'll quickly run my brush along the whole pattern and have a fixed shape. I have fixed the shape of my mesh. It is looking a lot better now. Now it's time to go with the final step. For that, I'm going to switch to white gouache. I'm going to add some highlights and reflection on this mesh, just to give it a more natural feel. I'm taking white gouache on my brush. You can use white watercolor as well or you can go with the white chalk pen if that is more convenient for you. Now I'm adding some simple lines, especially where we have those loops. The line you're adding has to be very thin and delicate. It shouldn't be too thick. If needed, switch to a detailing brush or any other brush which has a pointed tip. You can see how I added that white line. I added that onto the outer side of the loop. Now I will add another line towards the inside as well. Your line has to be really thin, if you can make it much thinner than this, it would be great. But don't make it bold. Now we need to do the same thing for all the intersections here. I'm just adding a white line onto the inner side and the outer side of that loop. This is how you'll need to add that white line. Now let me quickly go around and finish the entire loops. We're nearly done. We just have a few more leftover [inaudible] and onto the left corner as well. With that, we'll be done with the whole painting. I'm really happy with the way this one has turned out, especially the bokeh effect and those reflections on the road. I may try the same painting with a different color for the sky. A purple might look nice, or even a sunset sky. You can introduce a lot of brown tones onto the road to make it look like an evening. My dear friends, and with that, we are done with the whole final painting of this class. I really hope you guys enjoyed painting the streetscape. No matter how your background has turned out when you add this mesh, everything is going to look okay. Because you have seen the background that I had painted. It wasn't looking that great. In fact, I wasn't really happy with the outcome. But when I added this mesh, I really love this painting. If you're not happy with your background, don't scar. Add in a mesh and see the difference. Now let me quickly remove the masking tape and show you the finished painting.
11. Thank you for joining: Thanks a lot for joining this class. I cannot tell you how much that means to me. I hope you guys enjoy meeting these beautiful glowing lights. If you have any questions, do feel to drop your questions at the discussion section, I'll be happy to help. If you have tried these projects do upload them to the project gallery. I'm eagerly waiting to see the wonderful projects you guys will be creating. Thanks again for joining, and happy painting.
 Zaneena Nabeel, Top Teacher | Artist | Author