Transcripts
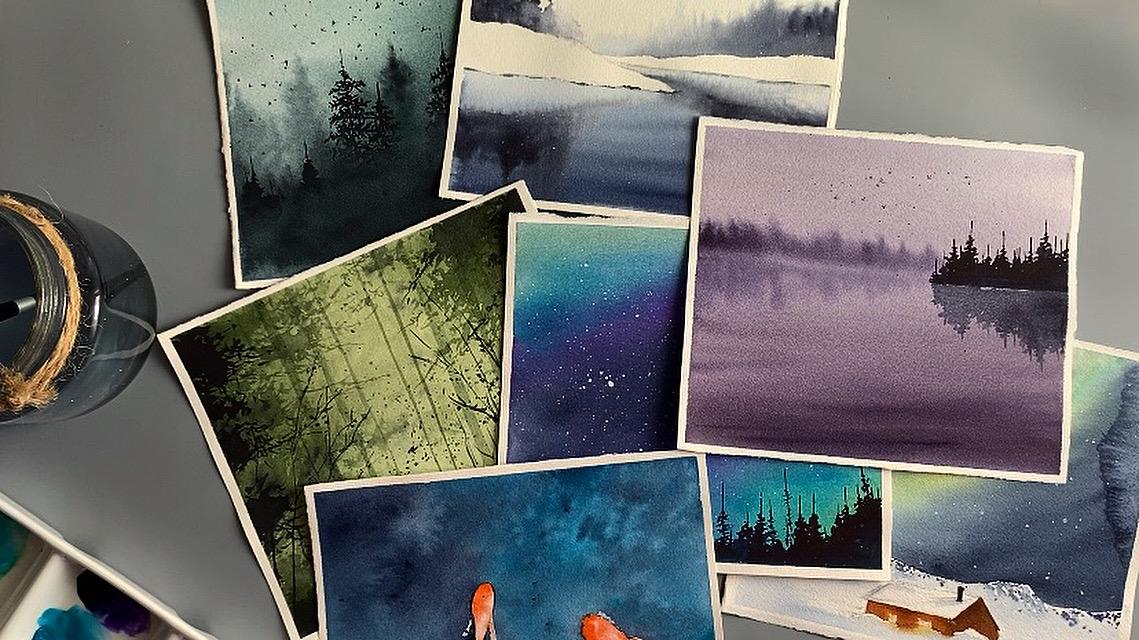
1. Hello, Welcome Back !: Hello, my dear friends. Welcome back. Are you ready to start your watercolor
therapeutic practice? In this class, I will take
you through ten days of watercolor exercises filled with relaxing and calming landscapes. This class not only helps in
learning different subjects, but also helps in building a fulfilling create your habit, which we all know is
essential to distress. We'll begin by discussing
important art materials. I will explain all about my supplies that
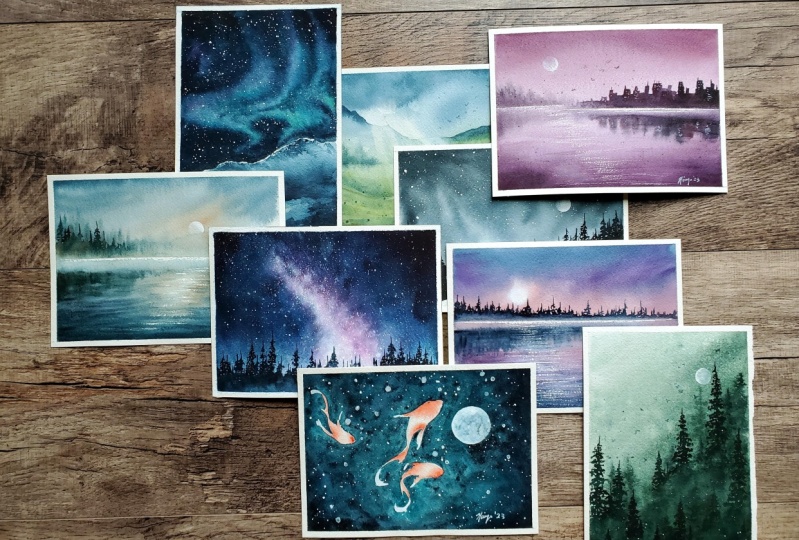
I prefer and why. Then we will paint a class project each day
for the next ten days starting today. That's not all. Before painting
each class project, we will have a small practice session
where we will discuss all the techniques
that are required to paint that day's
class project. Hi, I'm so glad that watercolor, artist and add instructor, you can find me on Instagram
as well as on Skillshare. I have been teaching
watercolors for the past four years to the
students all over the world, teaching watercolors and helping fellow students in finding the joy and passion in art
pills my life with purpose. I have designed this class
in a way that anyone with basic knowledge of
watercolor techniques like wet-on-wet and
wet-on-dry can join in. And if you are an
absolute beginner, you can join in as well. I'm sure you will learn
so much in this ten days. If this class is something that interests you, then
without delay, let's jump into the next
video where we will discuss all the art materials
that we're going to need. So I'm gonna see you there.
2. Materials You will Need: Let's now discuss the art supplies that
we're going to need. I'm going to get started
with the paper first. This is arches, 100%
cotton, 300 GSM paper. By the paper in
roles and cut them up into roughly a
full-size papers. Alternatively, you can
purchase paper blocks as well. I have this acrylic board
that I stick my paper. And I bought this from Amazon. And of course I use
my masking tape to stick my paper to the board. It's not discussed brushes. Brushes here that I did not use. So I'm gonna remove them. And this is silver black
velvet hockey brush. I use this for initial washes. And you can use
any flat brush for this round brush if you
are comfortable with that. These three are
the round brushes. Silver black velvet number 14.6, and DaVinci round number six. Use these tree brushes
a lot to paint, backgrounds, to paint
pines are the water here. E.g. I. Have used these three round brushes
for most of the landscape. So if you're having
any round brushes, you might want to use them
because they are very useful when painting subjects
as well as the background. These two are my rigger
brushes, Casimir and co-linear. And I use these two brushes
for detailing work, e.g. in this landscape you are
seeing this detailed leaves. So I have done this with cosine of brush that is
right now in my hand. And this one is a rigger
brush from collinear. So you can see how
sharp this is. I mostly use this
to paint. A bird. Won't have all these brushes. That is perfectly alright. Just make sure to have
a larger round brush for washes and a smaller round
brush for detailing work, then you are good
to go to wattages. Mixing palette. I use this palette
for all of my works. And this is ceramic
palette, by the way. And I used an old sketchbook for all of the
practice sessions. I used three brands of
watercolor paints, Sennelier, white knight, and
the new one that I just bought in only
two shades, PWC. It's quite good. The
color is very vibrant, as you can see, this
is Taka is blue. Now palate is different for
all the class projects. So I thought I would include what colors to use before
we start the class project, especially in practice session. For today's class project, you're going to see
the color palette in the next video where we will discuss the
practice session. I almost forgot the
most important part of the art supplies
is paper towel. So keep those on your table. Alright, that's all for the materials that
you're going to need. So we're going to jump into next video where we're going to discuss about the practice
session for the class project.
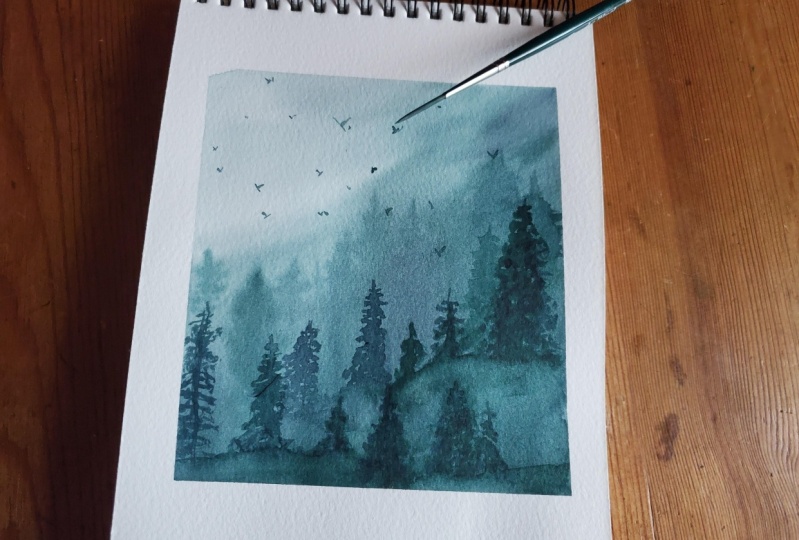
3. Class Project 1 - Practice Session: This class project
is a misty forest. We use wet-on-wet and
wet-on-dry techniques here. I'm using my one of my old
sketch books here too. For these practice sessions. We will begin by practicing
how to paint the background. And those are light
shaded pines, which are done wet on wet. And later we can start with
those dark color pine trees, which are done Wet on Dry. Fast. We will
discuss the colors. So I always go for
limited palette, you guys know that? So today we are using
only two colors, pines gray from White Nights, and forest green from Sennelier. Let me take these colors
onto my mixing palette. Now I'm going to swatch
these colors out, starting from a forest green. Now, pines gray. I'm going to make spines
grave with forest green. And I get this beautiful
dark green color. This is the color that I mostly use to paint this class project. That the colors are sorted. I'm gonna begin the
practice session. First, I'm going to
paint the background using dark green color. That is the mix of virus
green and Payne's gray. On the wet paper, we're going to add a
few blobs of paint. Remember the paper is wet here
and our brush is also wet. So this is called wet
on wet technique. I have taken a smaller brush and the same paint,
the dark green. And I will start
adding pine trees. But the paper is still wet. So you don't see the detailed
picture of the pine. You just see the shape. And this is exactly
what we're going for. We have to let the paper dry. And while it dries, I thought I'd show you guys
how I paint the pine trees. You need a smaller brush to paint a very detailed pine tree. So I have taken
my colinear brush that I've talked about
in materials video. So I'm using the dark, dark green color and I'm gonna get started on
painting the pine. My technique of painting the
pine tree is very simple. First I'm going to draw
a line in the middle. I will move my brush
in a zigzag manner. So that gives me a pine tree. It's that simple. Don't have a colonial brush. It's okay. You can
use any round brush. So here I'm using my Da Vinci round brush number six to paint the pine tree. Don't let that applies. Limit you to try out these different
techniques in watercolor. You can start with what you
have and then upgrade later. Just to recap, you can use
collinear brush like this one. Are, you can use any round
brush that you have. Make sure it is a smaller brush so you can get the
detailed pine tree. I think the paper
has dried up so we can paint is wet
on dry pine trees. Now. So let's get started. Since these are wet
on dry pine trees, and I want them to look
darker and in the foreground. So I'm gonna be using
the darker color that is more Payne's gray. And I'm using colinear brush. The background. Pines that are light in color
should be visible as well. So do not cover the entire foreground
with dark pine trees. So place these pine trees in-between the pines that
are in the background. I hope I'm making sense. Now. While these pine
trees are still wet, I'm gonna be taking my silver black velvet
number 14 brush. It is a wet brush
and I'm going to blend it with the background. So what I'm doing here, while the paper is wet, I'm adding a few blobs of paint and I'm blending
them with the background. The keys to not
leave a hard edge. You have to blend it either with a color or with a wet brush. This is basically what we're gonna do in the
next class project. So I hope you guys understood the basic concepts of wet
on wet and wet on dry. And I hope you guys also practice how to
paint these pine trees. Just have small round brush and it'll be very
easier to paint. You will see if you go
for a practice session. I'm gonna see you in the
next video where we're going to paint our
main class project.
4. Class Project - 1 - Misty Morning Forest: Okay, Let's begin. I'm going to take
my Arches paper. It's neatly taper
down to my board. Now I'm going to
take my hockey brush and I'm going to wet the paper. Use generous amount of water. And also make sure you are
wetting the paper evenly. That means do not
leave puddles of water at random places. Make sure the code is even. Like we have discussed
in previous video, I'm taking dark green color, which is a mix of forest
green and Payne's gray. I'm going to add
the color only to my right in this diagonal way. Now, without taking
any extra paint, only with a wet brush, drag the paint from
light right to left. So this kind of cues the
light coming from my left. This is one of the easiest ways to add a light in your painting. I think you guys already
know the next step to add blobs of paint
onto this wet surface. If you can add these paint
in a vertical lines as well, it gives the illusion
of trees being there. Only at the tip of
these vertical lines. You, the shape of a pine. Without adding too many details. Can see my paper is still
wet and you have to paint all this background binds only when
the paper is wet. If you think that your paper
is getting started to dry, you can stop the work, let it dry completely,
and then re-wet. And then you can continue work. That's one way to go. And now I'm taking my silver
black velvet number six, brush the small one. And I'm going to paint the
larger pine trees wet-on-wet. Now I'm going to take a
bit of light shade of green color that is more
water and less paint. And I'm going to paint
a few trees here because all of these
are looking darker. I want a few pints to
look lighter as well. I think my paper
has started to dry, so I'm going to stop
adding pine trees. I'm going to just add a bit
of paint here at the bottom. We're going to have to let
the paper completely dry. And later we're going to
paint wet on dry pines. My paper has
completely dried up. So now I'm going to take my silver black velvet number six, brush the small one. And I'm going to take Payne's
gray and I'm going to get started on painting
the pines wet-on-dry. In the previous video,
I have explained about my method of
painting pine trees. So if you haven't watched it, I'm going to repeat it again. First, take a smaller brush
and dry straight line. More your brush in
a zigzag manner. So you will get the pine tree. You can see a lot
of people painting Pines in a lot of
different ways. I think there is no right way. When it comes to
painting pine trees. That's why they are with their painted by so many artists. Around five years ago, I think I have just started to paint different
subjects in watercolor. I came across this pine trees and I remember them
being very challenging. Today that the easiest
subjects that I could paint, I think the lesson here
is that practices key. Now let's move on to
the second pine tree. I'm gonna make it a bit smaller. I'm going to paint
a bigger one here. You can see the placement of pints here are well-thought-out. I'm not following any
reference picture, but I think I know where to put these darker shaded pine trees. So it comes with experience. But if I have to explain, I can say that the background
pints should be visible, as well as the pine trees
that are on the foreground. So I'm just going with that. So I'm just wetting the bottom
areas of these pine trees. And we can come back
to this later because I still have to paint
a few pine trees with a darker shade so we can come back and then
we can blend it later. You can see I want this pine
tree to be the larger one. I'm going to add one here
besides this large pine tree. And I'm going to add
one or here on my left. Nephew more here. I think I'm going to
make this pine tree even a bit more larger. This one is looking
still a smaller one. So I'm going to add
a few more leaves. Now, comes to blending part. So I'm gonna take my silver
black well-lit number 14, brush, the bigger one. And it is what? I'm going
to first start to blend. Later, I'm going to add blobs
of paint to create depth. Then product should look
something like this. As you can see, the
bottom part is still wet. But I'm thinking I
will add a few birds here because this place
is looking quite empty. This is my rigger brush. You can see how sharp it is. And I'm taking the
dark green color, I'm going to add lots
and lots of birds. Because you guys know how much
I love to paint the words. One thing I love about painting birds is that there
are no rules. You can paint birds on your
painting wherever you like. That's why you can't stop yourself by painting one or two. You have to definitely
paint a flock of them. Splatter some paint. And then once your paper
is completely dried up, remove the masking tape. I hope you guys enjoyed painting this wonderful misty forest
class project with me. If you have painted with me, you can post your class projects in the project section below. I'll be waiting to see
your projects and I'm gonna see you guys with a
brand new landscape tomorrow. Thank you for joining me.
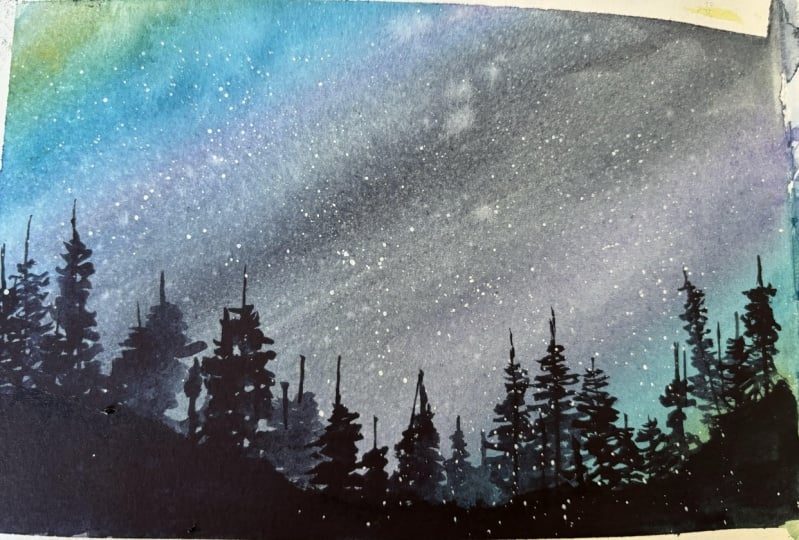
5. Class Project 2 - Practice Session: Dear friends, welcome to day two of painting
therapeutic landscapes. Let's begin with
practice session. And today we are painting this beautiful and
bright night sky. I'm going to be using a
total of five colors. This is PwC, tacos blue color, and that's Naples
yellow from Sennelier. And this is indigo
from White Nights. Again, that was white color
that I just showed you. We're not going to
use that white color today because, I mean, in practice session video, because we're going to use
it only to paint the stars. So I don't think we're going to need to
practice painting stars. So I'm going to take that white color in the
next video directly. And this is purple color
dioxazine purple from Sennelier. Now that I have got all the
colors onto my palette, I'm going to swatch all
of the colors here. And also I'm gonna be
using a mix of two colors. So that gives us bright
effect in the sky. Can you guess what
those colors are? As small hint is that
I use the mix of those two colors most of the time in my Northern
Lights painting. So I will wait till you guess. That was Naples
yellow from Janelia. This is PwC, turquoise, blue. Next, I'm gonna go with purple color tax in
purple from Sennelier. And later I'm going
to swatch the indigo. If you don't have exact colors from these exact brands,
that's perfectly alright. Use what are the
shapes that are quite similar to this outcomes? The shade that I mix to get that bright effect
in the night sky. That is, I mix Naples
yellow with dark eyes blue. You can already see the
color that it is forming. We're going to do a small
practice session of how to blend these colors to form bright night sky
for our class project. The surface with clean water absorbed the class project. You can see that on the corners of each
side of the paper, the bright color will be
there. In the middle. The dark. Indigo and purple mix
of color is visible. So let's get started with this bright mics
off enables a law and turquoise blue at the
corners of the paper. Now I'm going to get started
with the purple color. Later I'm going to
mix it with indigo. And now I'm going to
take the Indigo and sort of like blend all of
the colors together. So you can see that the blending is only possible if
your paper is wet. So if your paper is
getting dried up, you can't blend the
colors together. And also you will need a very damp brush to
blend the colors. So that's what I'm
doing right here. This class project, we
paint only three things. That is the sky, the foreground, which is filled with pine
trees and then the stars. So now I'm gonna
show you how I paint my pine trees I have showed
in yesterday's video as well. First step is to take a
very small brush and you draw a straight line
and move your brush in a zigzag manner that will
give you the pine tree. This is all the
practice that you need to get started with
today's class project. I hope you enjoyed painting
this small session with me. So we're going to now move on to the next video where we'll
paint the main class project.
6. Class Project 2 - Brilliant Night Sky: Hi, welcome to class project. And as you know from
previous videos, we are painting a very
bright night sky today. I'm going to take
my paper and I will start by wetting the
paper with clean water. I'm using my silver black
velvet hockey brush and even coat of water. In watercolor, we always go from light color to dark color. So let me take my light colors. That is the mix of Naples, yellow and tacos blue. Applying the color in opposite
corners of the paper. To blend the colors
properly you might want to apply the taco is blue as well. Blend these two colors
with a damp brush that I would apply the Naples
yellow and tacos blue mix to the other corner
of the paper. But I want to I want the correct
placement of the colors. So I'm getting started
with the purple. But as you can see, I have kept the masking tape under my paper. It helps in flow of the colors and in turn
helps us in blending. So the middle part
of the paper should be dark in color like
I've mentioned before. I'm gonna get
started with indigo. I'm gonna remove all
the extra water from my brush using a tissue. Now the brush became
damp. With it. I'm going to blend
all of these colors together while the
paper is still wet. Now let's move on to paint
the rest of the paper. For now I'm taking indigo. Now, the purple. You can add the dark eyes blue, followed by data is blue
and Naples yellow mix. My paper is still wet. I'm going to blend
these colors together. You can completely skip this
step if you, if you want to. You can also select
which side of the paper you want to
paint the foreground on. I think the top part
has more light. So it's suitable for me to paint the pine
trees over there. So I'm going to turn
my paper around, but it's completely your wish. I'm I'm so confused here. I think I'm going to turn
my paper around again. This is so much fun,
don't you think? Now we're going to
let the paper to completely dry up
before we can proceed. Once your paper is
completely dried up, you can now start
painting the foreground. I'm using my Da
Vinci number six, brush round one to
paint these pine trees. You need to have a very sharp
and quite smaller brush to paint the pine trees. So remember that if
you use a large one, the shapes will not be detail. That's exactly the problem
that I have faced here. I said I was using Da
Vinci round brush, but the shapes
were not detailed. Hence I switched to
my rigger brush. It's from DaVinci as well. You can see the pine
trees are already looking sharp and very detailed. If you don't have
the rigor brush, use the smallest brush that
you have in your collection. We have to fill up
this entire area, the foreground area with pine trees and observe
how I'm painting this. Not one of these pine trees are looking similar
in size and shape. All of these are
looking different. So painting different pine trees cuz a lot of depth
to your landscape. Cover the entire foreground. Like I've said before, the pine trees of
different sizes. Last few pine trees or
left, we're almost done. I'm going to take the indigo
color and I'm going to paint the rest of the
foreground with it. And I have also changed the
brush from regard to round. Next step is to paint the stars, but it's no big effort. We're going to just platter
the white paint around. And I don't want my
table to get messy. So I'm going to place a paper
towel and then my paper. But it's completely your choice if you want to do it or not. I'm all set and
I'm going to take my white watercolor
onto a palette. I'm going to use a new palette because the one that I
have is full of colors. This is not caused by the way. This is white, watercolor,
Chinese white. I have changed my
brush to rigor, and I'm going to take a white
watercolor onto my brush. And then I'm going to
splatter the paint and paint a few stars as well, make them look a bit bigger than the ones in the background. That's it. Remove the tape once your paper is
completely dried. And I'm gonna see you guys tomorrow with a brand
new class project. Thank you for joining me today.
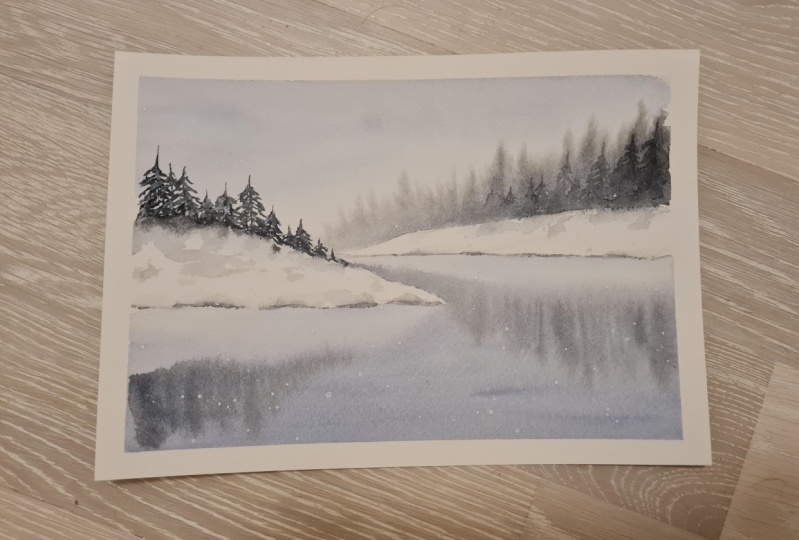
7. Class Project 3 - Practice Session: Hey guys, welcome to day three
of therapeutic landscapes. Today we're going to paint a
wonderful winter landscapes. And let's get started
with the practice. First, I'm going to
take the colors. We will use only
three colors today, indigo and pines, gray. Both of them are from
White Knight and this white watercolor
paint from camel. First, I'm going to swatch
indigo and pines, gray, white. I'm not going to be using since we use white only
for the splattering. I thought I would directly
use it in the class project. My first swatch, indigo, and later I'm going to
swatch the pines gray color. Today's class project. We also have pine trees. So I'm going to show you in a brief way that or
how to paint this. I know we have been painting the pine trees since
the past two days. But like I said, this class
is also for the bigness. The more you practice, the more you learn. If you are an intermediate level artists and you know
how to paint pines, you don't have to practice now, you can directly paint in the class project in next video. Without using any paint, I'm gonna just dragging
what the paint is, whatever the paint
that is left here. And I'm creating a misty effect. So this is one of
the unique things that we're going to
try in the next video, the main class project. We're going to practice
the main class project. Now I'm going to
get started with a very little bit sketching. We have to land areas here. One is in the background, that there is in the foreground. And we don't have to paint with any color for these lines because they are
covered in the snow. So we have to just
leave them alone. Taking indigo color, I'm
going to paint the sky, but this indigo should be
in very, very light color. And we can get started on painting the pines
in the background. Remember how I have created the midst at the
end of the pipe. We're gonna do that here
in the background pines. We wet the area below the line. And using indigo, we're
going to paint the lake. The color indigo should be dark at the
bottom of the paper. As it comes up, the color should get lighter. Then paint the reflections
using pines gray. But in the class project, we are going to paint the
reflection of the land as well. So we are painting
their reflections on the foreground as well. But the pilots on the line, we're going to paint later. My silver black velvet
number six brush. I'm going to paint the ripples and I'm gonna
character reflections as valid. So with the pines gray
and a rigger brush, I'm going to paint the pine
trees on the foreground. Now. That is all we're going to have to learn to paint today's class project. I hope you guys enjoyed joining me in this little
practice session. I'm gonna see you in the next
video where we're going to paint the main class
project. So see you there.
8. Class Project 3 - Winter Morning: Let us begin the
class project now. Rotate my Arches paper. Now I'm gonna get
started with a bit of sketching like we have
done in practice session. I'm going to only sketch the foreground and
the background. This session or a
way of correcting my mistakes in this class. So in the previous
practice session, I wanted to include the
reflection of the land as well. So I'm going to do that
in the class project. Now. This is the sketch of the reflection of foreground. I'm going to do that for
the background as well. And including this, use the landscape a bit
of a realistic look. And I'm getting
started with wetting the sky area with
my hockey brush, with my silver back will work. Number 14 brush,
I'm going to paint the sky with very
light shade of indigo with my silver
black velvet number six brush the smaller one. I'm going to get started
on painting the pines. Remember, this is where the
mist comes in at the edge. Not paint all the pints
in a similar size, make them in different sizes. So it gives more
depth to a landscape. We have learned this in
previous class project. Here. Do not take
any extra paint, drag the paint that is
already on the paper, and paint the misty pine. Even these misty pines
in the background should be indifferent
sizes and shapes. Now with my hockey brush, I'm going to wet the lake
area with clean water. Taking my son went
backward, number 14, brush now to paint
the lake and also adjust the water here. I did not wet this area
using a hockey brush. I'll take indigo and
start painting the leg. Remember the bottom
part should be in dark color as we come up, the color should get lighter. I just inverted my paper here so that it'll be easier for me to paint a gradient wash. Remember, do not paint much at the reflections
of the land area. Make it in a very light shade. Taking a smaller brush, my silver back
callback number six. And I'm going to
paint the ripples with dark indigo color. While we're at it.
We can also adjust the reflection part of the land quite well
with a smaller brush. I paint a few more ripples. Process of painting legs and ripples was quite
smooth, isn't it? It's because I am using
100% cotton paper. Please trust me when I say, most of your problems will
be solved with watercolor when you use the right
supplies, especially the paper. I'm taking pines gray
and I'm going to paint the reflections of
these pines about, as you can see, I'm leaving the space for the reflection
of the land first, later and getting started with the reflection of the pines. If your paper is
still dripping wet, you can wait for a
few minutes until the paper gets damp enough
to paint the reflections. My paper is already
starting to dry, so it's perfect for a time for me to paint the reflections. Now paint the reflections off the pines in the foreground. I know there are no pines
and the foreground, but we're going to just paint the reflections West
and the subject later. Election of these
foreground binds is cut short because I plan to
paint only a few of them. I'm going to paint a
few random dots and lines between the reflection
and the subject of the land, so that you can
clearly differentiate between what is the
subject and reflection. With my silver black one
net number six brush. I'm going to paint the
pine on the foreground. This is, these are enough pines. I'm going to just
do not blend at the edge and leave it at that. Let me take white
watercolor onto my palette. Will add a bit of
paint onto these pines so that it shows that
Dan covered in the snow. And I take my rigger brush
now and I'm going to splatter white paint onto this
landscape to not go overboard. These are not stars. This is just no false. We're done. Remove the tape
once the paper is completely dried out. And that's it. We are done with
today's class project. I'm going to see
you guys tomorrow with a brand new class project. And thank you so much
for joining me today.
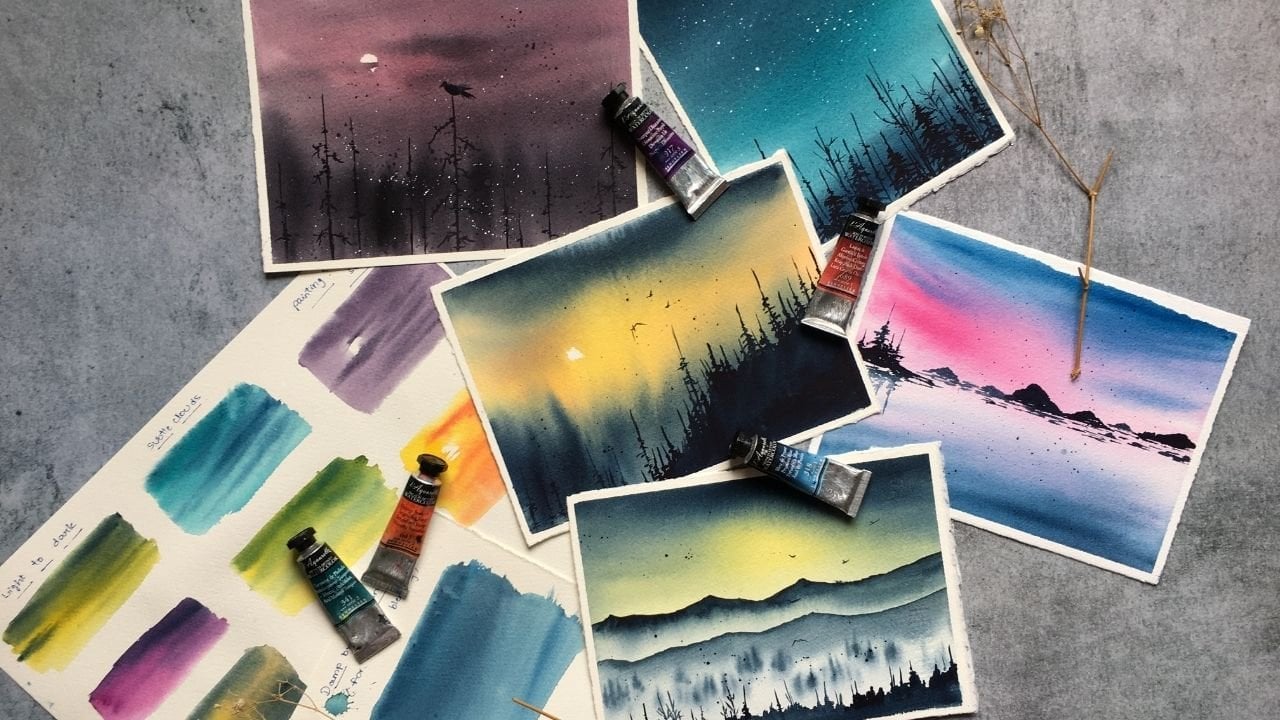
9. Class Project 4 - Practice Session: The class project for, and today we're
going to practice for a beautiful northern
lights landscape. We're going to discuss
the colors first. This is burnt sienna from
White Knight and Naples, yellow from Sennelier,
and tacos, blue from PWC. And of course, indigo from
White Nights as well. I'm going to take these
colors onto my palette now. Think they indigo in this
tube is completely finished. I'm going to have
to buy any one. I'm going to swatch
these colors. First. I'm going to
start with Naples. Yellow, later, burnt sienna, followed by turquoise,
blue, and indigo. Do you guys remember me saying in-class project two
that I use Naples, yellow on taco is blue mix
to paint Northern Light. So we're going to
do just that now. If you don't have Naples yellow, you can use Indian
yellow as well. Just love this bright green mix. Perfect to paint the
light in the sky. We're going to have
to learn two things in this class project. One needs to paint the
northern lights and the other 0s to paint
this little cabin. So I'm going to first
sketch the cabin. For this cabin is very simple. Now I'm gonna show you how I paint the
northern lights sky. Diet by wetting the
paper with clean water. Take the mix of Naples, yellow and tacos blue. We're going to paint
the northern lights in the middle of the paper. And on both corners, we're going to complete
it with indigo. But to use the individual
colors of Naples, yellow, as well as
turquoise blue. To show more depth
in the colors. I'll fill up the corners
with indigo color. Remove all the extra water from your brush using a tissue. Now, your brush becomes
stamped with it. You can blend all of these
colors together very easily. How easily you can paint
the northern lights. Now let's move on to
painting the cabin. You're going to have
to show the light in the cabin because we are
painting the night scene. So I will start
with Naples yellow, followed by burnt sienna. In C, I'm removing a bit
of paint at the windows, so it shows more light
is coming from their dark and the front
part using indigo, but do not overdo it. You have to still be able
to see the burnt sienna. They're going to paint the chimney with indigo. And do not forget to add very subtle shadow
of it as well. It almost done. Make sure to add any final details
that you see fit. It is all for today's
practice session. I hope you guys had fun
painting these small elements. So now let's move on
to the next video where we're going to paint
the main class project.
10. Class Project 4 - Auroras In The Backyard: Let's now begin
our class project. I'm going to get started
on a sketching the cabin, as well as a small mountain
range in the background. We have already practiced
on how to sketch, as well as on how to
paint this cabin, right? So this is a very easy
and simple sketch. We are done with the sketch. Now I'm gonna get started
on painting the first step, that is a wetting the
paper with clean water. I'm going to use my silver black velvet hockey brush button. Thing to remember here is do not let the mountain
and cabin area, just the sky part. We're going to first paint
the northern lights. I have changed my brush here. This is a little
backward with number 14, brush the round one. And now I'm going to take the Naples yellow and
turquoise blue mix. And I'm going to get started
on painting than our, than light, just like we have
done in practice session. From the middle. Make sure
you are adding taco is blue, as well as Naples, yellow individually as well. Let's take indigo and let's
get on with the painting. The sky, the
background sky part, which will be in dark color. Using 100% cotton paper. You will have some time
until your paper gets dried so you can paint
slowly, uncommonly. Using Arches paper and weather outside is also
not very dry and sunny. So I have observed that my paper stays wet for at least 5 min. That's why you're seeing
me paint here very slowly. Now, my brush is damp. That means I have removed all the extra water from the
brush using paper towel. Now, I'm going to blend all
of these colors together. There is a little bit of paint that has deep into
the mountain area. I'm going to remove
it by dabbing the paint away with
a paper towel. Now, we're going to let
the paper to completely dry before we proceed with
the mountain and the cabin. My paper has completely
dried up and you can see that there is
a bleed that happened. It's perfectly normal and
it happens when you do not remodel extra water that
is on the masking tape. You cannot do anything about the bleeds other
than starting over. And these happened
with me so many times. I have started to ignore them. So now I'm going to get started
on painting the mountain. A mountain is actually a
very therapeutic practice, which includes
very simple steps. Indigo paint and you put random dots at random
places on the mountain. That is the first step. The second step includes taking
a bit larger round brush and very lightly painting
over those dots. And you can already
see that this looks like a snow-covered
mountain range. So simple, isn't it? I'm going to add
a few more dots, add few more places. Just because I enjoy painting
this mountain so much. That is all wet
painting the mountain. Now let's move on to
painting the cabin. Already did a practice session on how to paint this cabin. Start with Naples, yellow
and later burnt sienna, and then complete with indigo. Darken this front part
using a bit of indigo, but do not overdo it. Add a bit of Naples
yellow in the front of windows so that it shows that light is
falling over there. Paint the chimney and its
shadow using indigo color. Very light shade of indigo. I'm going to add a few
brushstrokes and the foreground. It not mentioned this
in the colors video, but I have decided just to add a few stars
using white color. Remove the tape once your
paper is completely dry down. And we are done.
I'm gonna see you guys tomorrow with a
brand new class project. Thank you for joining me today.
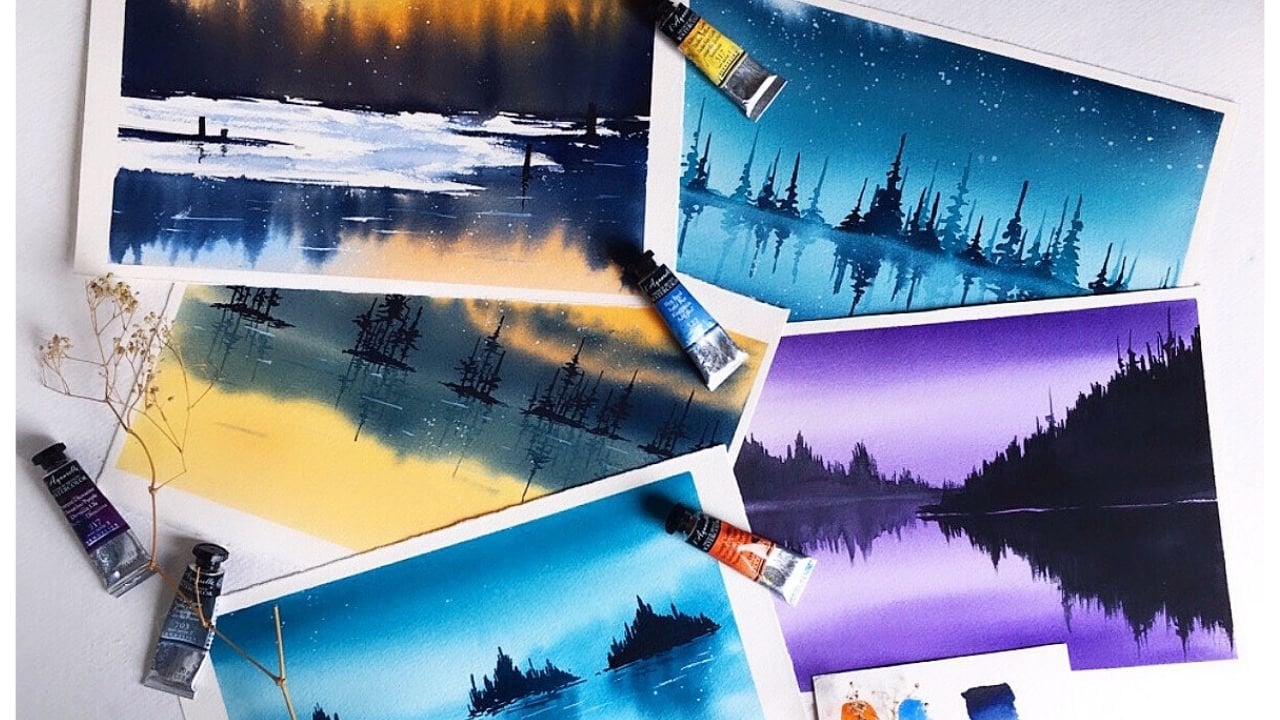
11. Class Project 5 - Practice Session: Hi guys, Welcome Today phi
of therapeutic landscapes. Today we are painting a
very simple lake scene. I will begin by
taking the colors. We are using only
three colors today. Turquoise green from Sennelier, forest green from Sennelier, and indigo from White Nights. I'm going to take these
colors onto my palette. Now. I already have indigo on
my palette. As you can see. I'm going to swatch
these colors, starting with turquoise, green from Sennelier and forest green,
followed by indigo. We'll be using a mix of
indigo and talk ice cream, as well as the mix of indigo and forest green to paint
the lake scene. Now I'm going to swatch
those two color mixes and, um, so that you guys can see
what those colors look like. And this is by far my most favorite color in all of these classes projects
that we have painted. The mix of forest
green and indigo. This is the mix of indigo
and turquoise green. When you mix these
two colors together, make sure the indigo
color is dominating. Perfect. Now let's start practicing for the
class project. You don't have to sketch anything complicated
in today's landscape, we're going to have to draw
only a line in the middle. I'm going to let the area above the line with the indigo color. I'm going to paint the sky. As you can see. The sky area is very light and
shade of indigo. So do not apply a dark
paint of indigo over there. Now how quickly change my brush to silver back,
Wilmot number six, the smaller one, so I can
get started on painting the trees. The trees. I'm using the mix of
forest green and indigo. You're not painting any
detail the trees here, we're gonna get to
that part later. And also at the end of these
trees, there'll be missed. So you don't have to paint
anything over there. You just have to drag water the paint that is
left on the paper. This is where it
gets interesting. I'm not taking any paint. I'm just going to
take clear water onto my brush and I'm going to drag the trees down below. And while I'm doing that, I'm also wetting the
bottom part of the paper. Now I'm going to take the mix of indigo and turquoise, green. And I'm going to paint
the reflection area. I forgot to mention.
You have to leave a bit of space between the
subject and the reflection, as you can see here. Oh, I'm gonna leave a bit of a white triangle
shaped area here. And I'm going to paint
reflections around it. You can see at the edge of the paper There's
supposed to be Miss. I'm not going to
paint anything over there and just drag the paint down. You can also paint a repulse. Here. We're going to leave some paint off to show
these white areas properly. I'm going to paint
the detailed trees on the top using forest
green and indigo mix. We're almost done. I'm making a few last minute
adjustments here. Now I'm going to
turn my sketchbook around and I'm going to paint
the reflections properly. We are done with painting
the practice session. So I'm gonna see you guys in the next video where
we're going to paint the main class project.
12. Class Project 5 - Serene Lake Scene: Let's begin the class project. Take my main paper
and I'm going to get started with that line. In the middle. I'm going to erase some of it because
the pencil was very dark. I just want a light sketch. It's my hockey brush. I'm going to wet the paper and wet only till that line
that you have drawn. Take indigo and I'm going
to paint the sky area. Remember to take indigo
in a very light shade. Going to take the mix of
forest green and indigo. And I'm going to paint the trees window. We are not painting any
detailed binds here. Make sure the shapes that
you are painting should not be in a similar
and same size. As we go towards the
edge of the paper, you just have to drag the paint along without adding
any extra paint. This is the myths that
we are trying to show. Guys know what to do
now with a wet brush. Just drag the paint along and
do not add any extra paint. While doing so, wet the
paper below the line. The border is not straight. You can adjust it with a bit of paint like
I'm doing right here. Take this smaller brush. I have taken my silver
black velvet number six, and I'm mixing turquoise
green with indigo so that we can get started on painting
the reflections and ripples. Paint exactly like we have
done in practice session. Leave a bit of gap between the subject and the
reflections below. Now I'm going for that small triangular
shaped cap as well. I'm going to turn my board and I will continue painting
the reflections. The same paint on
the same brush. I'm gonna get started on
painting the repulse. Drawing straight lines gives
a repulse to the water body. And how many ripples you have to incorporate new painting
is completely up to you. If you want the leg to
look serene and calm, you might want to
add a few repulse, but I'm going in opposite
direction today. I want a lots and
lots of ripples here. I have taken my rigger
brush and I will add a few pine trees here
on the subject area. In practice session, I have added these detailed pines
in the reflections as well. In class project. I'm
not gonna do that. I disliked the class
project now as it is. And I'm gonna get started
on painting the birds now. Splatter some paint and remove the masking tape
once your paper is dried. And that's it. I hope
you guys enjoyed painting this serine
lake landscape with me. I'm gonna see you tomorrow with a brand new class project. Thank you for joining me today.
13. Class Project 6 - Practice Session: Hey guys, Welcome. Today's six of
therapeutic landscapes. Today we're going to paint
coefficients in water. I will first talk
about the colors. I will need to paint the water. I'm gonna be using two
shades, turquoise, blue with Naples yellow
and indigo color. And then this orange
color from Sennelier. Four coefficients. I'm going to take these
colors onto my palette. Now. I'm wearing this thick jacket because there is
a cold wave here across the state and the temperature right
now is seven degrees. The place that I'm staying right now usually have
30 to 40 degrees. And you can imagine from
that how cold it be here. Going to swatch these colors
now, starting with Naples, yellow, orange, and
turquoise, green. And finally indigo color. The water. I will be using. The turquoise green indigo and the mix of Naples,
Elon turquoise. I'm going to sketch
the coy fish. For this practice session. We're going to be painting
only one guy fish, but in our class project we
are going to be painting two. Now we're going to start
painting the fish. I'm going to wet the paper. And I'm using very small brush here that is important to paint. These smaller objects, do
not use the larger brush. I'm taking. Orange color. We're gonna be using
only this color to paint the coy fish. There are no details here. Just dropped the paint in opposite directions of the fish as you see me doing right here. Now I'm going to just spread
the paint here and there. But I'm being very careful here not to lose the whitespace
is that we have created step is to paint the water. For that, the coefficient
has to be dried completely. So I'm going to come
back in a minute. Start with indigo. And I'm using my Da Vinci
number six round brush. I'm not using a larger
sized brush here. And I'm going to paint
with indigo and turquoise, blue and mix of indigo and
Naples yellow for the water. Basically, this is the process. And in the main class project we are going to be wetting
the paper first, the background of the coy fish, and then we're going
to paint the water. You are painting things
individually here. That is, you have painted fish uprightly and the
waters are brightly. For this, you need a
very small brush or you can paint these
things in detail. Painting the
coefficient the water at the same time using
wet-on-wet technique, then you might want to
use a larger brush. This landscape is a bit tricky compared to our
previous class project. So I advise you guys not to
skip this practice session. And this is all for
the practice session. And I can't wait to pay a paint. The main class project, I'm gonna see you guys
in the next video.
14. Class Project 6 - Koi Pond: Let's start. Our class project. Will take my main paper, and then I will
start by sketching. Like I said in the
practice session. In a main class project, there'll be two coefficients. At the end of the sketch. You can pause the video and then you can sketch
at their own pace, or you can sketch with me. Now. I wanted one fish to be a bit larger, the other one smaller. So that's how I sketch now. And this is a very
simple sketch. We are done with
it. Now. Let's get started with
painting the fishes. I'm going to get started with
one fish and I'm going to wet it first using
my small brush. And I'm going to use orange color to paint the fish like we have
done in practice session. Just dropped the orange dots
on opposite directions. That is all for the Fast Fish. Now let's move on to the second and repeat the same process. Advice to you while
painting the COI is never lose those whitespaces
that you have created. I'm going to keep this for
drying and I will come back once this fishes are
completely dried out. Officials have dried up. I'm going to take my silver
black velvet hockey brush and I'm going to start wetting the paper with clean water. As you can see, I did not wet the areas that are too
close to the fishes. I'm gonna be using a
smaller brush later. This is Da Vinci number
six, round brush. And I'm going to add
the areas that are too close to the fish
using this brush. Let's paint the water now. I'm going to first
use the indigo color. The same thing here.
Again. I'm leaving the areas that are very
close to the fishes alone. I'm going to work
on those later. Now I'm using turquoise, blue, and I'm going to also
add a little bit of Naples yellow to it so that I can get a
different shape. Change my brush to silver black and let number 14
the large ones. So good so that I can
walk faster because you need to complete the water
area before the paper is dry. Now I'm going to add indigo on all the corners off the paper. Let us very slowly start working the areas that are
too close to the fish. Make sure you do not paint
over those orange shades. I have changed my brush to DaVinci number six round
brush, the smaller one. Be very slow and gentle while painting the borders
of these coy fish. Do not hesitate to
turn your paper in. What are the directions
that you need. Leaning towards your dominant
hand will always give you the best results
while painting any straight lines or details. I'm going to splatter
some paint as well as some water to give the extra
depth to the landscape. Then extra detail.
I'm gonna be adding a few dots of indigo
paint as well. I'm removing the
extra pain that is on the masking tape to
override the backflow. We have seen this in
Northern Lights painting. If the paper for
drying and remove the masking tape once your
paper is completely dried. And that is it for
today's class project. I hope you enjoyed
painting this with me. I'm gonna see you tomorrow. Thank you so much for
joining me today.
15. Class Project 7 - Practice Session: Hey guys, Welcome to
Class Project seven. Let's begin the
practice session. We're going to be painting a beautiful sunset
lakes in today. We'll begin with the colors. First. I'm gonna be taking
dogs in purple from Sennelier. And the next is Prussian
blue from Sennelier. And Queen Rose and indigo, both are from White Nights. I'm going to take these
colors onto my palette. Now. I will begin the swatches of the colors starting
with Queen Rose. So sorry about this guys. While swatching. I thought Queen Rose
look too bright. I have to add a color, another color to
neutralize the pink. So I'm using a bit
of orange as well. To paint the sky. I'm,
I'm gonna be using a mix of windrows and
Sennelier, orange. This is dioxazine purple. This is Prussian
blue from Sennelier. If you don't have this color, you can use cobalt blue
mixed with indigo. We're swatching indigo. I'm going to be
swatching the mix of orange and green rows colors. Well, I think this
is the perfect color for our landscape today. Let's start with the
practice session for the class project.
Reasonable sketch. There is only one
line in the middle separating the subject
and the reflection. I will start by
wetting this area. Let me take the color mix
of Penrose and orange. So this is how the
color should look like. I will paint the middle of
the paper with this color. Followed by dioxin. Purpose. Can see I have painted acts in purple
on both sides of the line. That is the top part is the subject and below
part is the reflection. So now I'm painting
with Prussian blue. I'm painting both sides using the same color,
the Prussian blue, I mean, remove all
the excess water from your brush using a tissue and then blend all of
these colors together. To darken it a bit. I'm going to add indigo
on both the site. And at the bottom part I'm gonna be adding
repulse as well. I'm going to let the paper dry so that we can
proceed further. Paper has dried up
and I'm painting the trees, the subject part. Later, I'm going to
paint the reflections. I'm using indigo for this. Now. We're going to
take a wet brush, that is the brush
without any paint, just water, and we're going
to drag the paint down. The paper will be wet. So while it is wet, we're going to add
the reflections. Lift some paint
using a dry brush. Between the subject
and the reflection. It is all for the
practice session. I hope you are ready to paint
the main class project. If you, then I'm gonna see
you in the next video.
16. Class Project 7 - Sunset At Lakeside: Let's get started with
our class project seven. I'm already feeling blue because we only have
three days left. I'm going to take my main paper and I'm going to draw
that line in the middle. And I will get started
by wetting the paper. And I'm using my hockey brush. It may mix the orange
and queen rose colors. It should look
something like this. And then we're gonna get
started on painting with it. In the middle of the paper. Can see 50 per cent of the paper is covered
in this color. Because in practice session
have seen that most of this light color in the sky is getting covered up with trees. So I thought I would
add more orange. And now I'm going to paint
with dogs in purple, followed by Prussian blue. Just like purple, we're
going to add Prussian blue on both top and
bottom of the paper. I don't have to remove
extra water from my brush because it is
already done with it. I'm going to just blend all
of these colors together. This is also called
gradient wash. Trust me, having 100% cotton paper really, really helps in blending
the colors together. I don't think I'm going to
paint indigo on top side of the paper because
I think this is just looks perfect
only at the bottom. And I'm going to start
painting the ripples as well while the
paper is still wet. As you can see, I
have also taken a smaller brush to
paint the repulse. Now I'm going to remove
all the extra water from that masking tape using a
tissue to prevent the backflow. And now I'm going to
keep the paper for dying and I will come back once
the paper is completely dry. Using my silver black
velvet number six brush the smaller one,
and indigo color. I'm gonna get started
on painting the trees. Painting pine trees above
that line that we have, we have drawn before and paint all of these trees in
different sizes and shapes. Yeah, done with this object. Now let's paint the reflections. Again, my silver
black velvet number 14 brush, the larger one, and I have a dipped it in
the water with a wet brush. I'm going to drag
the paint down. Since we have to paint the
reflections in a larger scale, I'm going to just wet the entire bottom
part of the paper. This is called
reverting technique. It's not that hard. Just don't push your
brush into the paper. Very gently wet the area. I will do two things here. First is I'm going to keep the masking tape under my paper. You can keep a
small box as well. It helps in paint to
flow down easily. And I have taken a
flat brush as well. With a flat brush, you can paint the
reflections fast. But if you don't
have a flat brush, you can use a normal
round brush as well. That's not an issue. And see all the reflections are being done very fast here. Just with a small brush strokes. I'm just going to make a small brush stroke
between the subject and the reflection without
any paint on the brush. We have done this in
practice session. The same indigo color. I'm gonna get
started on painting the ripples as well while
the paper is still wet. Painting repulsive is
completely your choice. You can paint a few, or you can paint a lot
in this landscape. I have decided to paint
a lot of ripples. That is all. Remove
the masking tape once your paper is
completely dried up. And I hope you guys enjoyed painting today's class
project with me. I'm gonna see you tomorrow and thank you so much
for joining me today.
17. Class Project 8 - Practice Session: Hi guys, Welcome to
Class Project eight. Let me start with colors. I'm going to use only
three colors today. Dogs in purple,
Alizarin, crimson, both are from Sennelier and
pints gray from white knight. I'm going to take these
colors onto my palette. Now. I'm going to start swatching the colors. First, I will swatch the
purple tax in purple color, followed by Alizarin,
crimson, and pines gray. Last project, there are
going to be two colors. One is a mix of dogs in
purple and alizarin crimson. To paint the background and
to paint the foreground. I'm gonna be using
pines gray as it is. So I'm gonna just swatch these two colors to show you what the color
will look like. Now this is too much purple. So I went to it 50 per cent Alizarin crimson and 50
per cent dogs in purple. This is the perfect color. I'm going to take my
syllabi callback number 14 brush and I'm gonna get started painting the practice
piece by wetting the paper. I'm going to take the shape that I've just demonstrated before. 50 per cent mix of tags in purple and 50 per cent
Alizarin crimson. And I'm gonna get started. So the bottom part
of the paper should be darker as we go up, the paper should be lighter. Alternatively, you can paint the dark shades and the
bottom later as it ripples. Have taken a rigger brush
and I'm going to paint the background while
the paper is still wet. Let the paper dry now and I'll come back once
the paper is dry. Usually you can leave it at this stage because for
a background it looks, it looks completely good. But I just wanted to
experiment what I can do with one more layer of the
trees in the background. So I'm going to paint with the same mix of dogs in purple and
alizarin crimson color. Just like we have painted a reflection with a
flat brush is today. We're going to paint
today as well. The same technique. I have taken, my
silver black velvet number six brush
the smaller one, I'm going to paint
the foreground. Remember I've told you the
foreground we're going to be painting with only one
color that is pines gray. Remember the practice
session is all about this, the practice. So you can make any changes you want when you go for
main class project, whatever the places that you
feel uncomfortable if width, you can change the map. So for this foreground, I'm gonna be making
a few changes. I'm going to be
painting only the pints that I'm painting right
now that place only. And this curl that you are
seeing here at the bottom, I'm gonna be, I'm
gonna be skipping it. Attaching the picture
of class project here. So you'll understand
what I'm saying. Going to paint the reflections
of these pine trees and a few ripples. That is all for today's
practice session. Let's move on to the next video. We're going to paint
the main class project.
18. Class Project 8 - Rusty Lake view: So far we've painted
seven class projects, and I have a feeling this class project is
gonna be your favorite. So let me get started by
taking my main paper. Like I mentioned in
the practice session, I'm going to be skipping this curvy thing in the foreground. I'm someone who's
always on the lookout. Something simpler scene. Don t think this
looks wonderful. Let's start by
wetting the paper. And I'm using my silver
black velvet hockey brush, and I'm applying a very
careful even coat of water. The second step is
to change the brush. I'm taking my silver
back when we're at number 16, round brush. And I'm going to mix the alizarin crimson and
dioxazine purple color. Yep, this color is perfect. Okay, Now let's start applying a darker code at the
top of the paper. As we come down, the color gets lighter. I know I have said the
opposite in practice session, but stay with me here. I have some magic
to share with you. Now. Turn the paper around, they go, this is the magic. This technique is difficult to do while you're painting
on a sketchbook. Now, I'm taking my silver
black velvet number six brush, the smaller one, and
I'm going to paint the ripples while the
paper is still wet. Previous class projects,
I have told you that you can decide how many ripples you want
to add in your landscape. So in this one, I'm
gonna be going with the very few because I want to
keep the landscape simpler. While the paper
is still wet with the same brush and
with the same color, I'm gonna be adding
the background pines. Well, these are not
particularly pints because the paper is wet and you don't
see the detailed shapes. And that is exactly what we need because in the background, you don't have to paint detailed structures as opposed to when you're
painting foregrounds. But he's getting dried. So I'm going to walk faster. And now I'm painting the
reflections with the same color. Now I'm going to keep the paper for drying
and I will come back. Once the paper is
completely dried up, we can paint the foreground. Now that my paper has dried, I'm gonna get started on
painting the foreground. Like I mentioned
before, for foreground, we're gonna be using
only one color, that is pines gray. Using my Da Vinci number six, brush the round one. And I'm going to get started
on painting the pines here. Just seeing where the placement of foreground should start. I think this spot is
perfect. Now let's begin. Paint these pints in a very detailed manner because these are
on the foreground, unlike the ones we have
painted in the background. Take your time.
There is no hurry. The joy of art is
in the process, not in the result. We only have two days to finish up our ten days of
therapeutic landscapes. I hope you guys had, I mean, having fun painting these. And I really can't wait to get
started on a new class and have fun painting and sharing
the Jaya fight with you. Now, I'm going to
change my brush to silver black velvet
number 14, the large one. The brush is wet with it. I'm just going to
drag the paint below without adding any extra paint. I'm going to take pines gray, and I'm going to just add, just like we have added
in the background. No shapes are winning
any detailed pines here? Just outline. You can see I have changed my brush to silver black
velvet number six, and I'm just going to
drag the paint down into vertical lines and give them a few loose so they resemble
the pine trees above. And that's it. This is one of the easiest ways to
paint the reflections. Taken my rigger brush
and with pines gray, I'm going to add a
few birds because the sky is looking quite empty. Splatter some paint, and then remove the tape once
the paper is dried. I hope you guys enjoyed
painting this landscape with me and I'm gonna see you guys tomorrow with a brand
new class project. Thank you so much for
joining me today.
19. Class Project 9 - Practice Session: Hey guys, Welcome to day nine. Today's class project is
going to be a bit different. Today we're painting as
semi abstract landscape. And we're going to
use only two colors, sap, green, and indigo. Both of them are
from White Nights. I have indigo already
on my palette. Let me take sap green as well. Now, I'm going to
swatch these colors. First I will go for sap
green, and later indigo. We have taken two colors. We're gonna be using three. I'm going to mix sap green
and indigo together and we get this very nice
dark green color. And I am taking sap
green and indigo 5050 in this shared beautiful. Actually this is my
personal favorite. I don't usually go for greens, and when I go I usually
make sap green with indigo. Let's practice for
the class project. I'm gonna be going for
a very brief sketch. You will see it's just it, I'm going to just
draw a small line. And this is where I'm going to be dividing the sky
and the foreground. I will paint the
sky with indigo. And I'm going to
continue with sap green. But as you can see, I have left a bit of space between the sky and
the foreground. It's because I'm
gonna be painting mountains and some
pine trees there. This is where you have
to use two colors, sap green and sap
green and indigo mix. Using two different
shades of color, gives depth to the landscape. And here we are showing
the depth to the grass. In the main class project. We're going to be going with zigzag pattern of
painting these colors. I'm going to explain it there. Here there are no rules. Just paint the sap green as
well as the dark green color. Now, using indigo color, I'm going to paint the mountains as well as the pine trees. Notice I'm using a
smaller brush here. Let's paint the pine trees now and some random lines
to show the grass. But as I'm painting this, I'm thinking not to
include this step in the main class project because this whole thing is looking
completely out of place. This is all the practice
that you're going to need to paint the class project. So let's move on to the
next video very quickly.
20. Class Project 9 - Country Scene: Okay, Let's start
the class project. Going to take my
main paper and I'm gonna get started on the sketch. It's a simple sketch. I'm going to be fast
drying horizon line later, mountain. And that's it. Now, let's get
started on wetting the paper with clean water. Well, water is not clean. After applying an even coat. Before I get started
with this guy, I'm going to keep a masking
tape under my paper. You can keep anything you want. A small box will do
as well. In this way. With the help of gravity, we can blend the colors
together perfectly. I have taken a tissue
paper as well. It looks like I'm assembling
all the averages here. And with my silver
black velvet number 14, brush and indigo, I'm gonna get started on painting the sky. Let the color be
darker at the top. As you come down,
make it lighter. I'm going to paint
with sap green. Do what we did in
practice session. Leave the mountains area alone. We're going to work
on the foreground with the darker green color. That is the mix of
sap green and indigo. I'm going to paint
in a zigzag manner. As you are seeing right here. This is semi abstract, so you don't have to paint
very detailed grass here. I think this looks good. I'm going to now
take **** brush. That is, I have
removed all the water from the brush and I'm going to adjust the
brush strokes a little. Take a smaller brush and dip in the water and splatter
some water onto the grass. Do not add any paint now, my paper is damp, so I'm gonna get started
on painting the mountains. So I have taken my silver
black velvet number six, the smaller brush and indigo. The paper is damp. You can still be able to blend the mountains and the
green foreground. I've taken my rigger brush and first let me remove
that masking tape. We don't need that anymore. And we're gonna get started
on painting the pines. You're going to paint
only a few pints and all of them will be in
different sizes. I'm going to splatter some indigo paint in the
foreground with my rigger. Brush. The paper for drawing now and remove extra water if it is there on the masking tape
to avoid the backflow. And remove the tape once
your paper is dried up. And I have kept a
sped up process here because you have to see the process of removing the tape is not an
aesthetic process. It's very clumsy.
Well, that is all. I'm going to see
you guys tomorrow for our last class project. Thank you for joining me today.
21. Class Project - 10 - Practice Session: Hey guys, Welcome to
today's practice session. And we're going to paint
a night sky scene today. I will use only two colors, pines gray from White Knight and white watercolor from
the brand called camel. And I'm going to take these
colors onto my palette now. You can use any watercolor that you have, white watercolor. It could be titanium
white or Chinese white. I'm going to swatch pines gray. First letter. I'm going to swatch the mix of pines gray and white color. That is, I would get gray color. So totally three colors
that we're using today. Pines gray and white and gray. That's it for the swatching. And of course I didn't swatch
white for obvious reasons. And let me get started
on the practice session. Now, go with a very
simple sketch. Then let's start by
wetting the paper. As you can see the foreground, that is the part
that I've sketched. It is foreground. So what we are painting now is the
background, the sky area. First we're going to
work on this guy. Later we can work
on the foreground. I have taken pines gray, followed by gray color that we have just two
mixed with pines, gray and white, and immediately followed by
white watercolor as well. Now, let's blend all of
these three colors together. Can you spot that the sky is looking a
little bit like Milky Way. So that's what we're going
for at the end of blending, your, uh, your work should
look something like this. Now I'm going to keep
this for drying and I'll come back so we can
work on the foreground. My silver black
velvet number six, brush the small one. And with the pints gray, I'm going to work
on the foreground by adding the pine trees to give depth to your landscapes while going for pine trees, especially paint those trees in different shapes and sizes. Don't paint them
in a uniform shape that will not look realistic. Now add a bit of gray color
in the foreground as well. Just a few random details. I'm going to splatter some
white paint and I'm going to add some stars as
well with my brush. There you go. That's all
the practice you're going to need to get started
on the class project. So in the next
video, we're going to work on the main landscape. So I'm gonna see you there.
22. Class Project - 10 - Midnight Sky View: Let us begin the
class project now. Let me get started
with my main paper. And we will start with a very simple sketch like
we did in practice session. I will start by wetting the
paper with my hockey brush. And I am only wetting the sky area and not
the foreground area. We eliminate the
height of my board. I'm going to keep my masking
tape under my board. It helps in blending
of colors together. Well, I'm gonna get started
with pines gray first. And by the gray color, the mix of pints gray and white tissue paper. I'm going to remove
this extra water that is at the
edge of the paper. Now, I will take whitewater
color and I'm going to start blending with the rest of the colors that are
already on the paper. Now, we're going to only
have to blend so we don't need the masking tape
under the board. Now, you have only a few
minutes to blend all of these colors together because the paper will get
dry very soon. Walk faster. Painted outline
shapes of Milky Way galaxy. In our practice session. Now, I'm going to do it here on the main grasp
class project as well, with the help of my brush. I think this looks perfect, even better than the one we have just painted before in
the practice session. Now I'm going to keep the
paper for drawing and I will come back once the
paper is completely dry, we can paint the foreground. The paper is dried. Let's start the foreground. I'm taking my silver
black velvet number six, the smaller brush
and with pines gray, I'm gonna get started on painting the pints here
on the foreground. I have mentioned before, paint the pine trees in
different shapes and sizes. Today is our last
class project in our ten days of therapeutic
landscapes journey. Hope you guys really had therapeutic experience while
painting these landscapes. What I personally love
about painting every day is that it creates a
certain routine for you. Like you know what to look
forward to add this time, the next day and
the day after that. The day after that. It also helps to spend some time with
yourself every single day. And that really is important for us to de-stress from
our day-to-day lives. Even for only ten days. I really, really hope my
class was that routine. That you are looking forward to coming back to landscape. As you can see, I'm painting the pints in the
foreground still. And I'm painting them in
all the shapes and sizes. Almost there. There are only
few left here in the middle. And we're done. Now cover up this empty space
with pines gray. Read this foreground. And I'm going to add the gray color just a little
bit to not overdo this. I have changed my brush. I have taken a
rigger brush here. And with white paint, I'm going to
splatter. The stars. Also add a few stars, a bit larger in
size with my brush. Remove the tape once
your paper is dried up. And that is all for our ten
days of watercolor journey. I'm gonna see you very
soon in my next class. Thank you. Thank you so
much for joining me.
 Sukrutha Jagirdhar, Watercolor Artist I Creative Entrepreneur