

Tips And Tools To Make Editing Portraits in Photoshop Easier
Learn how to smooth skin texture, enhance the eyes and tame flyaway hair with subtle retouching techniques.


Every photo needs a little help to look perfect, which is why photographers spend so much time editing portraits in Photoshop. Learning this skill will transform your photography and unlock many opportunities to finesse your images.
Why is Photo Editing Important?
There’s only so much you can do with a camera and a lens; the magic comes when you import your images and start editing or retouching your photos. Mastering this will help you correct technical issues, remove imperfections, and equip you with skills that are essential if you want to become a portrait photographer.
What is Photo Editing?
When you correct technical issues on an image, you’re editing it. Fixing things like brightness and contrast, correcting the colors, cropping or resizing the image, or applying filters and effects would all come under photo editing.
What is Photo Retouching?
If your goal is to refine the finer details in your image, whether that’s blurring out a subject’s wrinkles or smoothing the lines of an object, that’s where retouching comes in.
Photoshop Tools and Effects For Retouching Portraits
Thankfully, there’s a heap of Photoshop features you can use to edit portraits like a pro. Enter the Photography workspace via the Window option in the menu bar so that you’ll have all the top photo retouching tools right at your fingertips.
Selection Tools
Before you do any retouching, you need to be able to find the right tool to select the area you’re working on. If you’re a Photoshop beginner, understanding how the selection tools work is essential:
- The marquee Selector tools (Rectangular and Elliptical) let you select simple shapes and are a great pick when you don’t need to be precise with what you’re selecting.
- The Lasso tools are designed for freehand selection of areas and are best if you need to draw around the point you’d like to retouch.
- The Magic Wand tool will select adjacent pixels with a similar color, which is helpful if you want to edit large areas or uniformly-colored objects.
- The Object Selection tool will use machine learning to find and select objects within a defined area.
Healing and Spot Healing Brush
If you’re discovering how to edit portraits in Photoshop for the first time, one of the easiest things to start learning is how to remove small imperfections. Two tools can blend away wrinkles and blemishes. The Healing brush tool gives you complete control in choosing a source with the color and tone you want to blend over the imperfection, while the Spot Healing brush will automatically sample the pixels near the area.
Clone Stamp Tool
You can remove objects or elements of the portrait by essentially painting over it with a copy of pre-selected pixels. It’s called the Clone Stamp tool, and it will let you add things to the background of your portrait, or smooth out skin texture.
Patch Tool
If you’re retouching a larger area of your portrait, a more efficient way to correct it is with the Patch tool. It’s like the Clone Stamp tool, except you select the area you need to improve and then drag that area to another part of the portrait that matches what you want it to look like. It’ll copy that over while retaining the lighting and shading of the section that you’re retouching.
Smudge, Blur, and Blend Tools
There’s no single Photoshop blend tool, but the Smudge tool can blend or smudge pixels in a single layer. Similarly, the Blur tool can blend pixels surrounding the brush to create a smoother appearance. However, these tools aren’t commonly used for retouching a portrait as they aren’t as sophisticated as the other options. Don’t blur the image directly—take photo editing tips from the experts and blend your layers so they melt into each other instead.
Liquify
One of the most impactful techniques for Photoshop portrait retouching involves using the Liquify workspace. It gives you access to a range of tools that will help you make eyes larger, change the shape of a mouth, enhance a waistline, add volume to hair and more. Some of the most useful tools include:
- Forward Warp, which lets you drag around pixels and reshape anything.
- Freeze Mask, which protects a specific area from being touched by the Liquify tools.
- Reconstruct, which will undo the distortions if you’ve taken the retouching too far.
Dodge and Burn
These two tools will let you lighten or darken selected areas of your portrait. Combined, they can help you change the contrast of certain points, fix areas that are overexposed or underexposed, or create a greater sense of depth and dimension. The Dodge tool is really good for brightening eyes, adding highlights to the skin, or emphasizing facial features, while the Burn tool will darken areas and help smooth out skin texture.
Sharpen
If you want parts of your portrait to look crisper and more defined, you can use the Sharpen tool. It can make eyes seem more detailed and will help facial features to stand out, as well as emphasize more intricate details like patterns on fabric.
How to Edit Portraits in Photoshop
Before you jump into the editing, make sure you’ve got the photography workspace open, and your images have been imported into Photoshop. Duplicate the image in a new layer and lock the original to remove the risk of making any permanent edits.
It’s always recommended that you edit non-destructively, which means making no changes to the bottom layer and adding adjustment layers when you retouch a portrait instead. This approach will stack the edits on top of each other so that you can always revert back to the original layer if you need to.
Another tip for editing portraits in Photoshop is to work slowly and subtly, so the retouching looks as natural as possible. And when you’re done, make sure you blur each of the adjustment layers so the final effect is as subtle and blended as possible.
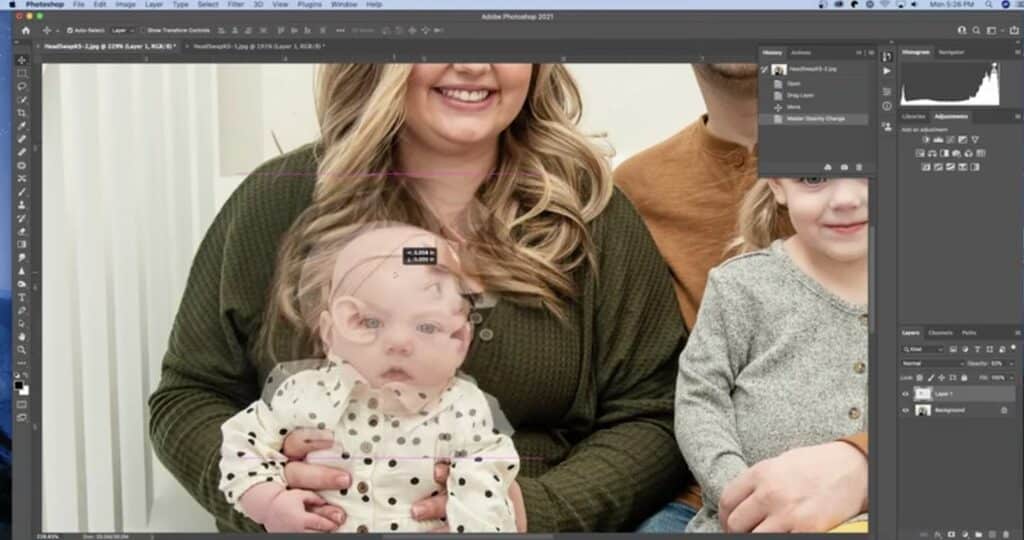
Do You Need to Do a Head Swap?
If you’re working on a group portrait, it’s a real challenge to get a photo with everyone smiling and looking in the right direction. Don’t worry if you can’t get a single shot with each person looking great; you can always create a composite image of the best faces from multiple photos.
A helpful advanced Photoshop tip is to ensure you don’t just copy the head—you’ll need to grab some of the shoulders and a bit of space around the head, too. Paste it across at half-opacity to align everything as closely as possible. When adjusted, turn the layer into a mask and then use a soft brush to erase errant elements.
Edit the Color and Tone of the Portrait First
The next step is to correct the overall exposure, contrast, and tonal range of the image before you get distracted by anything else. You can do color grading in Photoshop by adjusting the color balance, contrast, exposure, saturation, vibrancy and color temperature. Use your Layers and the Gradient Map to fine-tune every element.
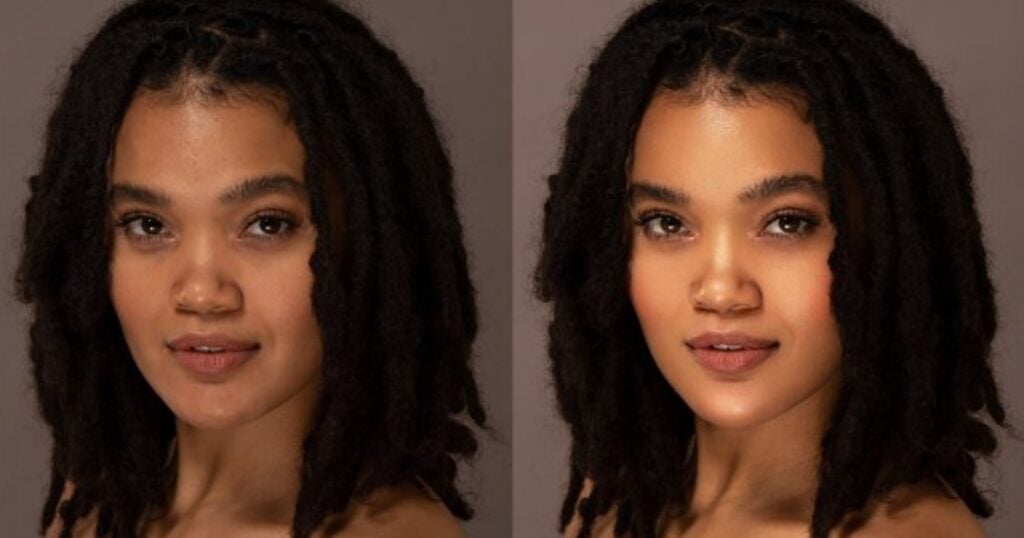
Finesse The Face
When you’re ready to retouch, you should remove blemishes and imperfections first by using the Spot Healing brush. Follow this with the Surface Blur or Gaussian Blur filters to soften the skin, then round out your Photoshop face editing by dodging and burning the skin to make it more radiant.
Enhance The Eyes
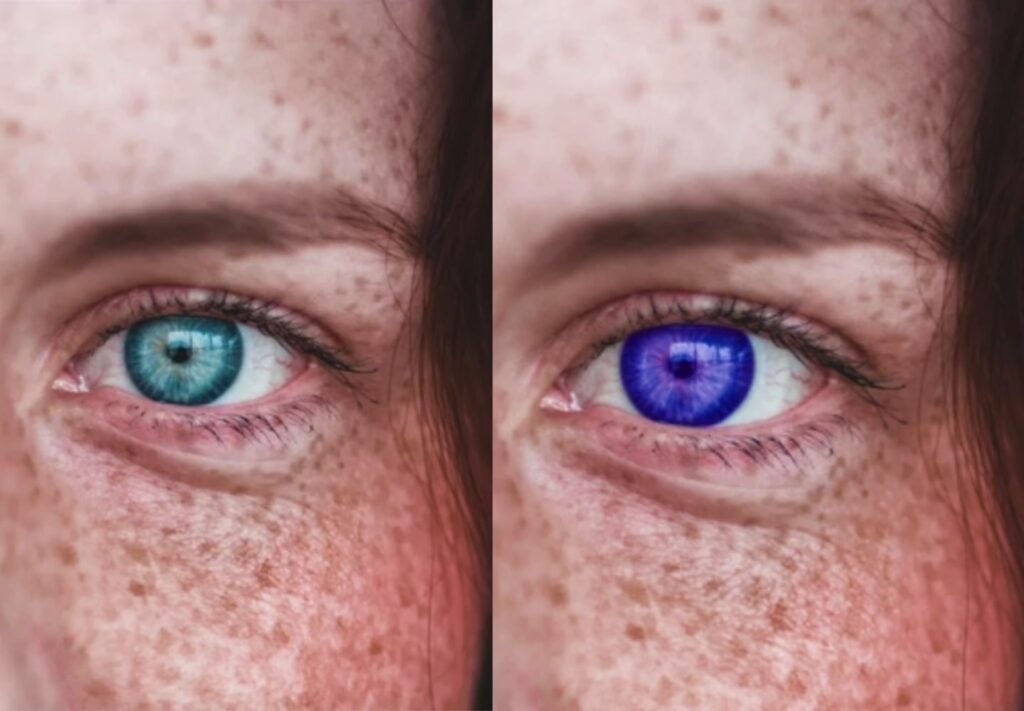
You can brighten the eyes with the Dodge tool, enlarge them with the Forward Warp tool, then use the Sharpen tool to define the eye, eyelashes, and eyebrows. If you want to intensify the eye color, add a new Hue/Saturation layer and paint over the iris. Don’t forget to retouch any imperfections around the eyes or the eyelids at this stage.
Modify the Mouth
Change the shape of the mouth by using the Forward Warp tool. You can also make some areas brighter or darker with the Dodge or Burn tools. Finish with the Hue/Saturation layers to edit the color of the lips and whiten teeth.
Tame the Tresses
Start by editing out any stray hairs by using the Clone Stamp tool or Healing brush to remove or paint over them. When editing hair in Photoshop, you can also add shine by painting over the hair with a white brush at a low opacity of around 10%—just don’t forget to do this on an adjustment layer.
Don’t Overlook the Background
Remove anything distracting with the Clone Stamp. Healing brush or Content-Aware Fill tools. You can blur the background by applying a Gaussian blur, Lens blur or Field blur layer, or adding a gradient if you’d like to include a new color or texture.
Persevere with Portrait Editing
It may be a long journey to using Photoshop like a pro, but the investment is absolutely worth it when you see the impact it has on your photography.
If you’re inspired to explore your creative side further, why not explore Fine Art Photography next? It’s a creative way to combine your photography and editing skills to produce a piece of art that goes beyond capturing the likeness of your subject.
Learn to Edit Your Images
Fundamentals of Photo Editing
Try Skillshare for free! Sign up for a 7 day free trial today!
Get Started- Unlimited access to every class
- Supportive online creative community
- Learn offline with Skillshare's app


