

Mastering 2-Point Perspective: A Guide to Drawing Depth
Learn the basics of 2-point perspective drawing with our beginner’s guide.


Two-point perspective drawing creates realism and depth on a two-dimensional surface. It uses lines and points to give a sense of distance in views of the outdoors, interiors and imaginary spaces.
The concept of 2-point perspective is one of the fundamentals–a technique in drawing and sketching. This post provides a step-by-step tutorial on mastering two-point perspective for beginners.
Basics of Two-Point Perspective
Linear perspective is one way to create the illusion of space and depth on a two-dimensional surface. It uses a horizon line and vanishing points to suggest that far-away things are disappearing, just as they do when you look down a long road or out onto large bodies of water.
Two-point perspective drawing is one type of linear perspective drawing, along with one-point and three-point perspective. The difference is how many vanishing points you use for a realistic sense of depth.
For example, one-point perspective involves looking down one road as it disappears into one vanishing point on the horizon. Two-point perspective involves an intersection, where one road runs into a vanishing point and another disappears behind a building on its way to a second vanishing point. Three-point perspective uses three vanishing points, one not on the horizon line, generally for extreme vantage points (tall buildings or deep canyons, for example).
Horizon Line and Vanishing Points
In two-point perspective, the horizon line and vanishing points are vital to building a sense of realism and believability.
The horizon line suggests the boundary between the sky and the ground. It may or may not be a literal line in the finished drawing. Whether it’s real or implied, the horizon line represents the viewer’s line of sight.
The two vanishing points exist anywhere along the horizon line, even if they’re off the actual page. They must be spaced apart a bit to avoid distortion. Ultimately, they are a guide for the lines of buildings, roads, walls, and other objects to aim toward as they recede or advance in the piece.
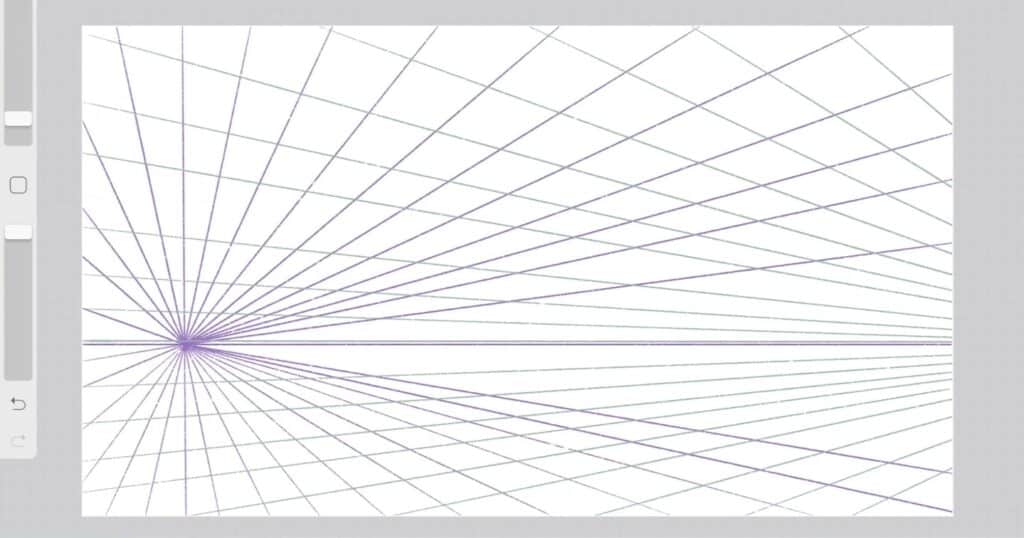
Step 1: Setting Up Your Drawing
If you’re new to perspective drawing, allow yourself time to go step-by-step carefully and with precision.
Start your 2-point perspective drawing by establishing the horizon line and placing the two vanishing points on that line.
Think of the horizon line as being at eye level. This influences the placement of objects in your drawing: Everything above the horizon line will be seen from below, and everything below the horizon line will be seen from above.
Exactly where you put the vanishing points depends on what you’re drawing and where you want the viewer to feel placed in the image. If they’re too close it can cause distortion, but they can’t be too far apart. In fact, they don’t even have to be on the picture plane, as long as they fall somewhere on the continuum of the horizon line.
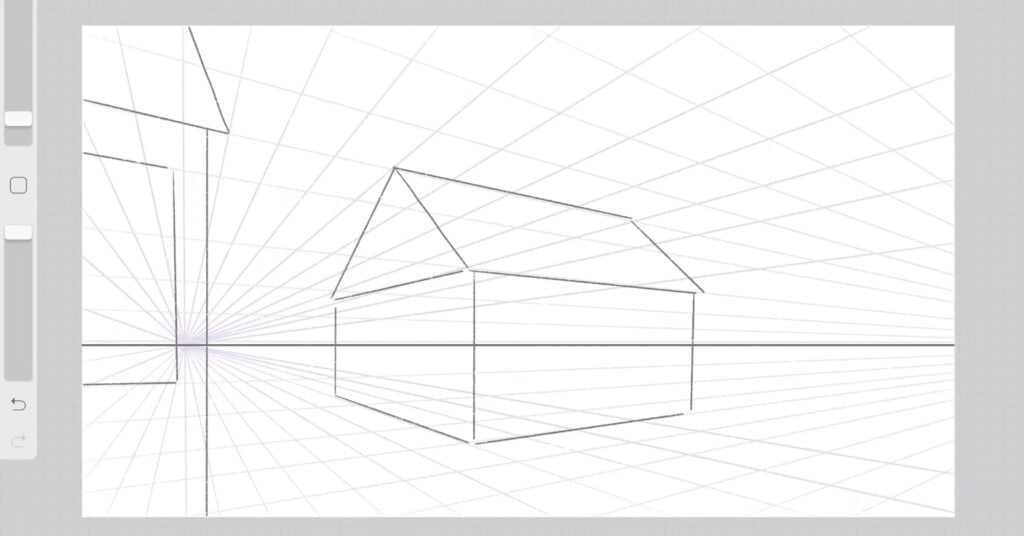
Step 2: Drawing Vertical & Horizontal Lines
Draw one vertical line near the center of the picture plane, intersecting the horizontal line and between the vanishing points. You probably don’t want it to extend the entire height of the page; think of it as the corner of a building in a cityscape or a corner in an interior hallway. This and other vertical lines help maintain the structure and proportion of objects.
Imagine the parallel lines that would make the roof and foundation of the building you’re drawing. While they’d never intersect in the real world, in your drawing, these lines will converge at the vanishing points to create the tops and bottoms of buildings.
From both ends of the vertical line, draw straight to the two vanishing points. These four, diagonal lines are called receding lines, or orthogonal lines.
Once you draw perspective with the major points and lines, you can add other lines to define the building itself. The closer these lines are to the vanishing points, the bigger the building will appear.
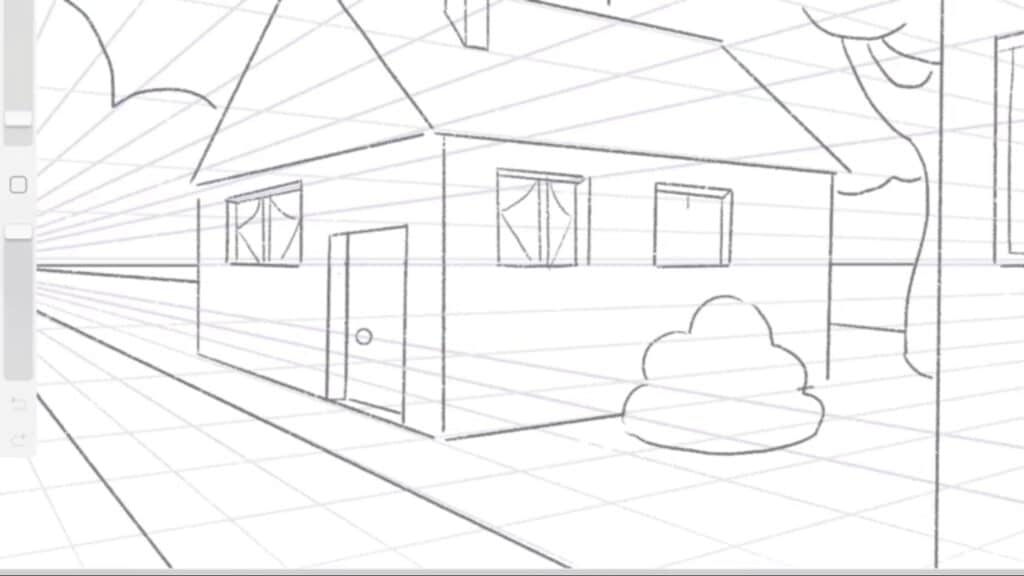
Step 3: Creating Depth & Realism
When drawing perspective step-by-step, stop to consider how to make things look more realistic. Objects that cross the horizon line don’t need their tops, bottoms or backs defined, but anything above or below the horizon line does.
Use the vanishing points to draw objects that appear three-dimensional. For example, say you want to draw the top of a building in the foreground, below the horizon line, after you’ve defined the front edge and two sides, as explained in Step 2.
Determine where the back corner is with another vertical line (which will not be visible in the final drawing). From the vanishing points, draw the two orthogonal lines to its top end. Extend the line from the right vanishing point to define the left top edge and the line from the left vanishing point to define the right top edge.
Use these techniques and keep all vertical lines parallel to each other to add details like windows, doors, and textures that enhance the realism and depth of your drawing.
Applying 2-Point Perspective to Different Subjects
While just about every major project starts with inspiration and rough sketches, you need more to turn ideas into something realistic that might be built in a digital or physical space. Perspective drawing is a vital step in this process.
Linear perspective allows drawings to look like real life. You can apply two-point perspective drawing to various subjects like buildings, interiors and everyday objects.
You’ll see the application of 2-point perspective in interior design and architectural drawings. Professionals depend on it for accuracy and for creating balanced, attractive aesthetics.
Enhance Your Perspective Drawing Skills with Skillshare
The importance of mastering two-point perspective drawing skills can’t be overstated in creating realistic and dynamic drawings.
Along with regular practice, explore further learning opportunities, such as Skillshare classes, which provide projects and tutorials. A drawing tutor might be out of your budget, but you can access multiple teachers in classes like:
Happy drawing!
Related Reading
Katie Mitchell
Katie lives in Michigan with her husband, kids and pets. She enjoys cooking, travel and live music.
Level-Up Your Drawings and Illustrations with Skillshare
Start Your Free Trial Today!- Drawing classes for all levels
- Digital and traditional drawing styles
- Unlimited access to all classes


