

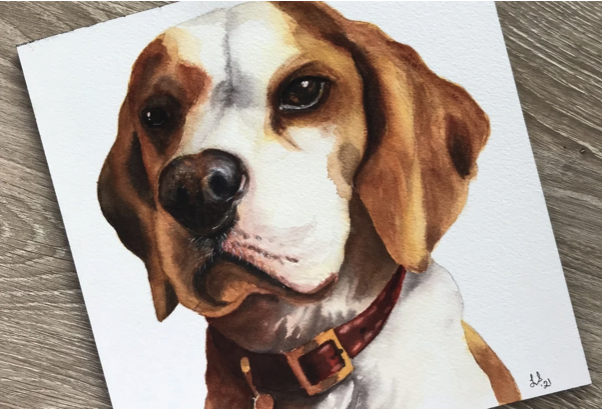
How to Paint a Realistic Watercolor Dog
You can quickly learn how to paint a watercolor dog. The real test will be capturing its sweetness and the soulful expressions in its eyes.
Table of Contents


Can man’s best friend also be a painter’s ideal subject? Absolutely! Painting a watercolor dog is an intriguing challenge because while illustrating a canine’s overall shape and proportions may seem fairly simple, truly capturing a dog’s personality and expressiveness can feel nearly like an expert-level skill to master.
Fortunately, there are a few techniques that can make it easier. If you want to learn how to paint dogs in watercolor—from the texture of their fur to the soulfulness of their eyes—continue reading for a step-by-step guide.
How to Paint a Dog in Watercolor
To learn how to paint dogs in watercolor, you only need a few basic materials: paper, a few round brushes in varying sizes, a pencil, a cup of water, and just a few watercolor paints. (You might be surprised to see how many shades of brown, grey, and tan you can create with just a couple of primary colors!) With those materials in hand, you can begin creating easy watercolor dogs with this tutorial.
Step 1: Choose a Reference Photo

When painting dogs in watercolor, it’s helpful to begin with a clear photo to serve as your reference. If you plan to paint your own dog, you can simply take your own photo; otherwise, look for high-quality images via Google or image websites like Unsplash.
When selecting a photo, look at a few key elements: composition, light exposure, proportion, and face shape. Once you have an image, use photo-editing software, like Photoshop, to remove the background so you can focus solely on the dog.
Step 2: Create an Initial Sketch

Before you begin painting, use your photo to create an initial sketch. There are several ways to approach this step. If you are comfortable sketching freehand, simply use your photo as a reference. If you want to be absolutely sure you get the shapes and proportions of the dog correct, try using transfer paper to trace it. This can speed up the sketching process and ensure you end up with an accurate composition.
Step 3: Paint a Base Layer

When painting watercolor dogs—or cats, other animals, or any other subject in watercolor—it’s generally best to work from light to dark. In other words, start with your lightest hue and work your way toward your darkest color.
In this example, the subject’s lightest color is the white area that runs down the dog’s nose and neck. This isn’t a true white, so you can achieve the right color by mixing just a bit of orange and red and then diluting it with enough water to make it nearly transparent.
When you look closely, you’ll notice that the brown areas of the dog—the ears and around the eyes—actually have an orange undertone, so tackle that color next. Also make sure to hone in on the undertones of the dog’s eye. Rather than being solely black or brown, you might see some yellow or orange highlights, so make sure to paint those in now.
Step 4: Perfect the Eyes
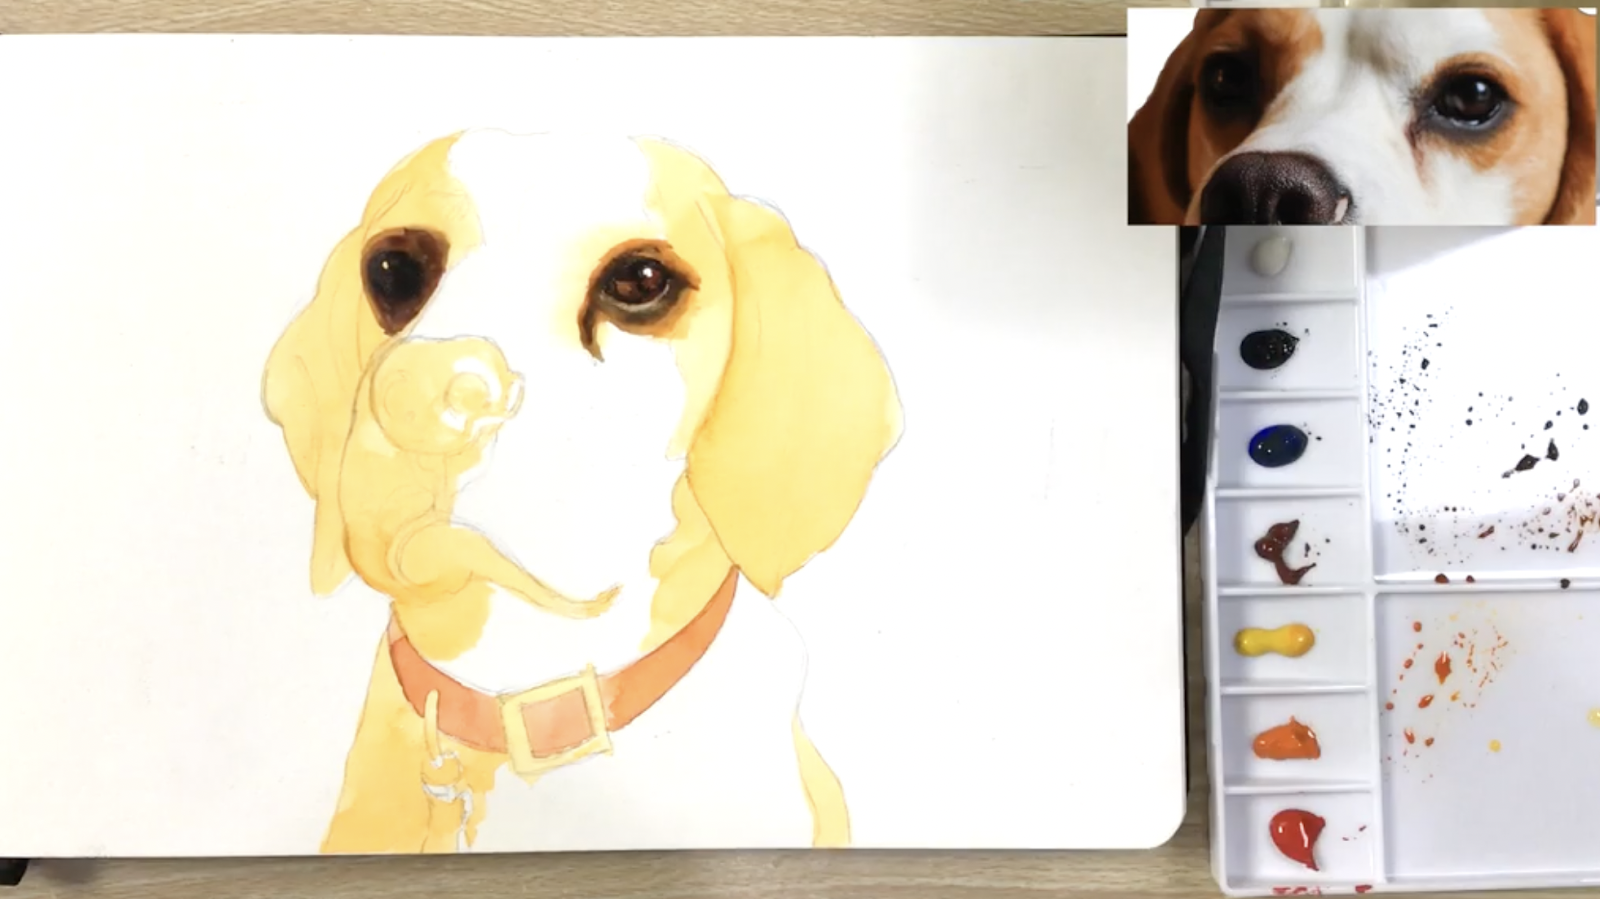
Before you continue painting the fur, take a moment to focus on the dog’s eyes. Capturing a dog’s expressive eyes can be challenging, so it’s worth taking some extra time to get them right.
Start by defining the highlights, or reflections, in the dog’s eyes. Those highlights are key in conveying the emotion in the dog’s face—even if the rest of the eye is quite dark. From that point, work from light to dark, layering in a darker orange, then brown, and finally, black. Don’t wait until each layer is dry to add the next color; using a wet-on-wet technique will create a subtle color gradation that will make the eyes look realistic.

Go More In-Depth
Watercolor—Let's Paint Dog Eyes!
Step 5: Focus on the Nose and Mouth
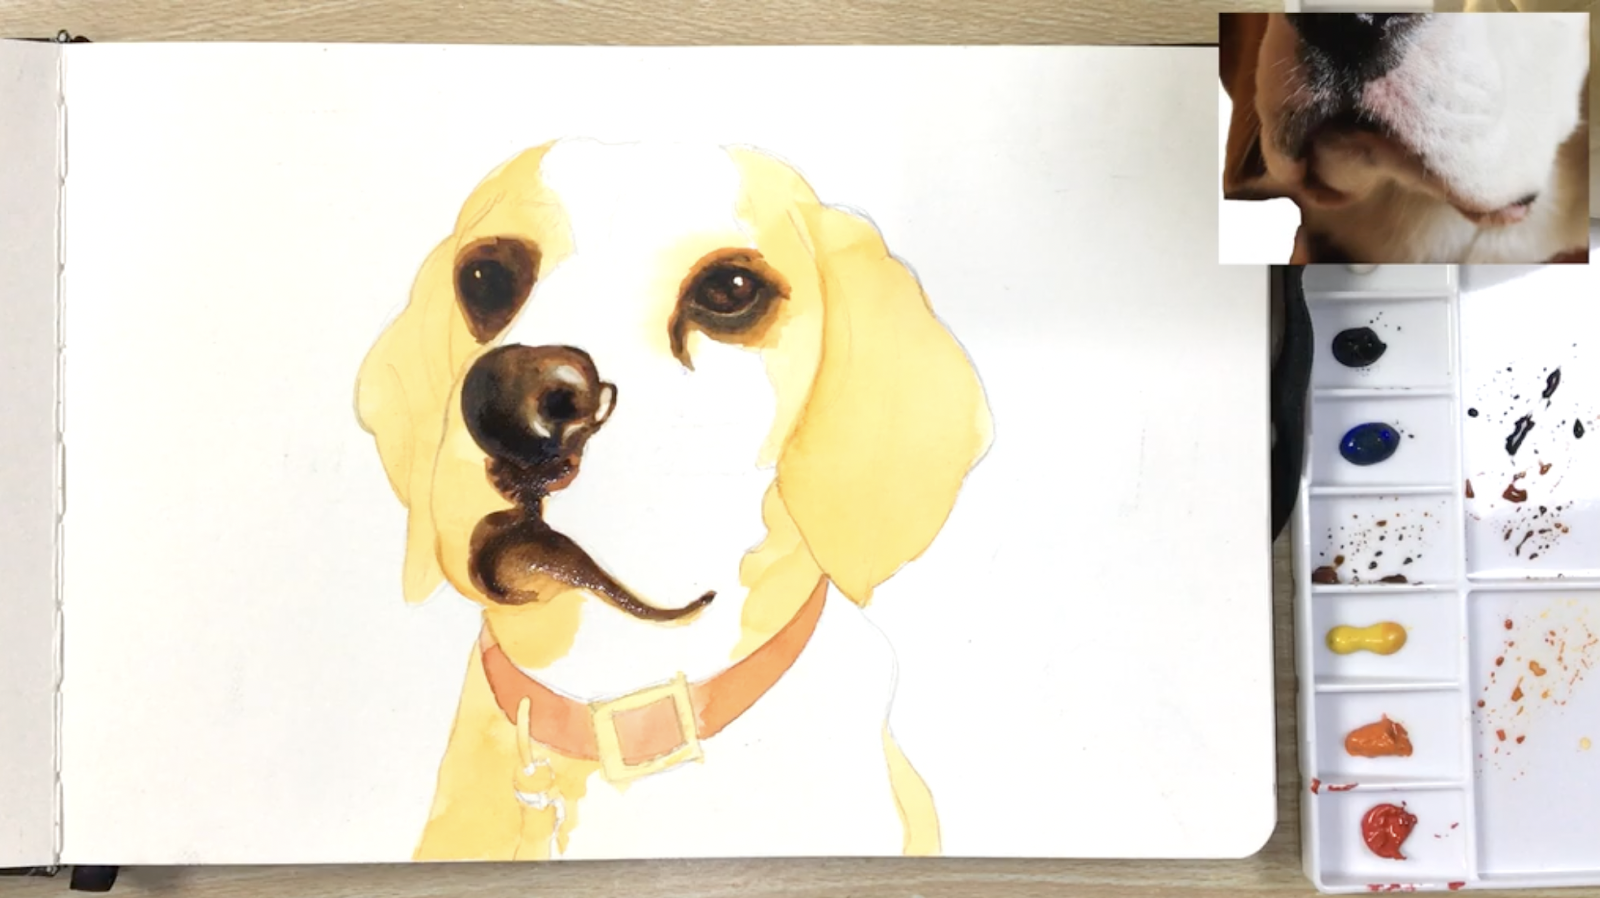
Now, shift your focus to the dog’s snout. For the nose, take a moment to consider the light source in your reference photo. Lighting from the right side, for example, will make the upper right areas of the nose look lighter, with more shadows falling on the lower left side.
To translate this to watercolor, start by using a burnt sienna color to map out the darkest areas of the nose, including the nostrils. Then, highlight the lightest areas of the nose with a nearly transparent grey. Now that you have a map of the dark tones, mid tones, and highlights within the nose, you can add layers of increasingly dark paint to finalize the feature.
Below the nose, outline the mouth with a dark brown. Also pay attention to any dark areas around the mouth or shadows that fall below the nose, and layer those in, as well.
Step 6: Layer In the Fur

With the main facial features finalized, you can resume painting the fur on the dog’s face, ears, and body. To create realistic watercolor animal fur, use a wet-on-wet technique. Start by using a clean, damp brush to wet the lightest area of the dog’s face. Then, dab some light grey paint in the areas where you want lines and shadows. The paint will organically bleed and spread, creating natural and realistic creases and texture.
Then, move on to the ears and body and use the same process. Wet your target area, add small strokes of darker paint, and watch the paint spread and blend. To achieve the right hue and saturation, the darkest areas of the ears and body may require several layers of paint. But that’s the beauty of watercolor—you can continue to re-wet and re-work the paint until you get it just right.
Step 7: Add Final Details

At this point, your painting is nearly complete. However, there are a few finishing touches you can add to make your watercolor dog look even more realistic.
Take a look at key transition points in the painting, and determine if you need to soften some of those edges. For example, you may need to soften the transition between the bottom of the dog’s jaw and the beginning of his neck. Simply wet your brush and swipe it across those lines to create a more blended look. You can also add in some additional texture and detail using white paint mixed with a bit of water. This is perfect for adding whiskers on the dog’s snout, just below his nose.
Trust the Process
When painting dogs in watercolor, it’s essential to trust the process. It may not look realistic at first, but as you add layers and details, you’ll soon see your dog’s personality emerge. With the right reference photo, a few watercolor paints, and some patience, you can create easy watercolor dogs of all kinds.
Expand Your Skills
Modern Watercolor Techniques: Explore Skills to Create On-Trend Paintings
Try Skillshare for free! Sign up for a 7 day free trial today!
Get Started- Unlimited access to every class
- Supportive online creative community
- Learn offline with Skillshare's app


