

How to Illustrate a Children’s Book: 5 Steps to Success
Learn how to illustrate children’s books with our step-by-step guide, from vibrant concepts to publishing your first picture book.
Table of Contents
- The Basics of Children’s Book Design & Illustration
- Step 1: Conceptualizing Your Illustrations
- Step 2: Developing Characters and Settings
- Step 3: Storyboarding and Layout Planning
- Step 4: Creating the Illustrations
- Step 5: Finalizing and Preparing for Publication
- Bring Your Book's Vision to Life With Skillshare


Children’s books are essential for developing literacy, and picture books play an important role from a very early age. Before they know how to read, young children can follow the story by looking at the illustrations and listening to the words.
Whether you choose traditional publishing or self-publishing, knowing how to illustrate a children’s book will set your title apart and hopefully earn you plenty of sales. But before you start drawing, you must understand the secrets of creating captivating and immersive children’s picture book illustrations.
The Basics of Children’s Book Design & Illustration
The market for children’s illustration books is firmly carved up by age range, so you must decide on an audience before starting. For example, if you want to illustrate for kids under two, you’ll need minimal words and bright, simple illustrations, while preschoolers enjoy more words and complex images. If you aim for young readers in elementary school, the illustrations become secondary to the prose.
Since this blog is all about children’s book illustration, we’ve focused on young children who prefer picture books and the role that artwork plays in developing a narrative.
Step 1: Conceptualizing Your Illustrations
The first place to start is conceptualizing your artwork. You’ll need to read and reread the text until you’re comfortable with the story and its characters and can picture what this new world could look like. Watch for critical moments and important characters you want to bring to life through your illustrations.
If you can collaborate with the author, the illustration process will be much smoother, and you will be able to more easily match the tone and message of the book.
Once you’ve got a more precise understanding, you’re ready to focus on how to illustrate a children’s book.
Step 2: Developing Characters and Settings
Creating the characters is an exciting opportunity to bring in your illustration style, but don’t overlook the mood and tone of the children’s book when you do this.
Tips to help you develop your characters:
- Take notes of anything descriptive you’ve been told, including character names, identifying features, and settings.
- Be clear about the main character's identity, and consider how to make them stand out.
- Don’t hold back; be creative when developing each character and work on multiple variations.
- Take inspiration from as many different sources as possible. Look at nature, other children’s books, movies, and anything you can think of. More importantly, make sure your characters are diverse.
It’s also vital that you start thinking about how to illustrate the setting of the children’s book and start working on some concepts. For example, is the children’s story a happy tale set on a sunny beach, a mysterious myth in a magical castle, or an adventurous anecdote taking place deep in the woods? It may not be obvious from the words alone, so discussing this with the author is important.
Step 3: Storyboarding and Layout Planning
With the character and setting sorted, the next step in illustrating a children’s book is to consider how the story flows across all of the pages. To do this, you’ll need to know the book's orientation and then set up a storyboard.
This process of layout planning involves deciding what text will go on each page and which elements need illustration. If you’re unsure where to start, there are plenty of storyboard templates you can use or adapt in Canva.

Tips for planning the layout:
- Create a sense of rhythm and pacing by alternating the illustrations you use. Smaller images, like vignettes and spot illustrations, are perfect for quieter moments, while big, full-bleed options work best for dramatic moments.
- Make sure there’s enough space for the text to breathe.
- Ensure your illustrations flow from left to right to help teach children that the words are read in the same direction. For example, you can get a character to look across the page or show a character moving from left to right, and a child will naturally follow that movement.
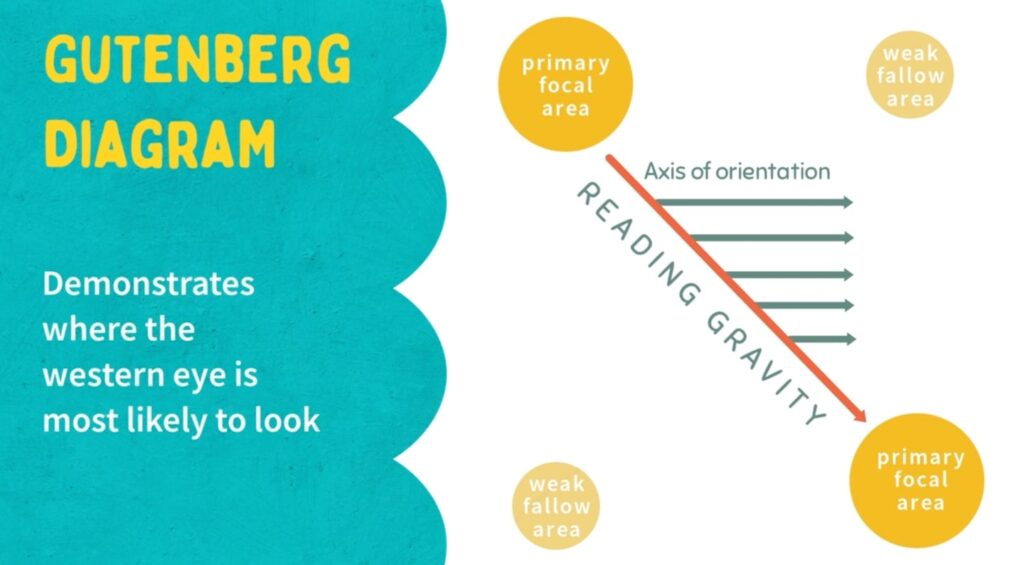
- Follow the rule of thirds and the Gutenberg Rule to place the points of focus in the areas where a child’s eye will naturally fall.
Step 4: Creating the Illustrations
The author should tell you what specifications they need you to work with. It can be helpful to work on a canvas with the same aspect ratio but a fair bit larger than requested so the illustration remains crisp and high-resolution even when it’s shrunk down.
You can use Adobe Photoshop, Procreate, or any other software to illustrate a children’s book. The only important thing is that it empowers you to draw creatively and lets you work on high-resolution images suitable for printing.
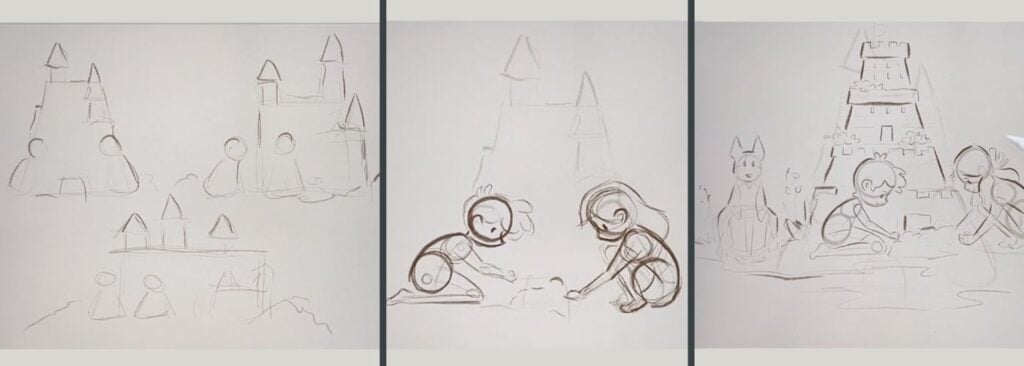
You should expect to create rough concept sketches to map out the illustration first and then refine it step by step once you’ve chosen your favorite composition.
Consistency is another essential element of illustrating a children’s book. You can help your final artwork feel cohesive by sticking to a defined color palette, using the same art style, and aligning the artwork to the mood and message of the story. It may also help to create a character sheet at the start so you can always refer back to how each character should look.
More illustration tips include:
- Play with perspective to help communicate emotion. For example, looking up at a character can help them seem brave or excited.
- Don’t overlook typography or the layout of the text. You can help children understand the meaning of words by being creative with their positioning or the font that you use.
- Use color psychology to help the child intuitively understand the emotion of the page.
Step 5: Finalizing and Preparing for Publication
When you’re ready to share your final artwork, you’ll need to use a file-sharing service like Dropbox to send over the illustrations. Make sure you name your files so they’re easy to follow, either by numbering the page layout or using descriptions like ‘book cover’ and exporting them in the requested file format(s).
You should expect to get some feedback, which means you’ll need to make revisions. It’s normal for professional illustrators and book designers to limit the revisions they’ll work on as part of their quoted fee. This is good for you and the author, as it sets clear expectations on how the revisions process will work.
When the final artwork and cover design have been approved, make sure you have backups of everything and that you share them in the right resolution and format for printing.
Bring Your Book's Vision to Life With Skillshare
Whether you’re illustrating your own book or collaborating with an author to bring their children’s picture book alive, there are many resources to help you on Skillshare.
Our learning path, Create & Publish Your First Children's Picture Book, covers everything you need to know about illustrating and writing children’s books. You’ll be taught by established authors and children’s book illustrators, who will also give you feedback on your work. At the end of the classes, you’ll have created illustrations for your first picture book and a funding plan to publish it.
You can also browse our plentiful courses to find something to help you improve your skills to become a good illustrator or explore other ways to design content for young children.
Try Skillshare for free! Sign up for a 7 day free trial today!
Get Started- Unlimited access to every class
- Supportive online creative community
- Learn offline with Skillshare's app


