

How to Draw Birds: A Step-by-Step Guide
Learn how to sketch, draw and paint your favorite feathered friends in all manner of mediums!


Birds aren't just fun to observe—with their unique shapes and eye-catching markings, they're also ideal subjects for beginner artists. Whether you’re drawn to their vibrant colors, unique plumage or elegant poses, birds provide a versatile starting point for honing your observation and drawing techniques. And since there are birds just about everywhere, they're also easy to find and study, either in real life or through reference photos.
In this guide, you’ll learn to confidently draw birds of all kinds, including cardinals, owls, puffins, parrots and more. We’ll walk you through the basic steps, from sketching simple shapes to adding lifelike details and textures. And if you want to dive deeper, we've included links to corresponding Skillshare classes where you can receive detailed guidance from an expert teacher.
Materials You’ll Need
The materials you'll need will depend on the medium you're using to bring your bird to life.
If you'll be drawing your bird using pencils, you'll need:
- At least one pencil, but preferably a few different ones in a variety of sizes.
- Drawing paper (printer paper will work, but isn't ideal).
- An artist's eraser.
If you'll be using the digital drawing app Procreate, you'll need:
- An iPad.
- The Procreate app.
- An Apple Pencil, or another type of stylus that's compatible with your iPad.
If you'll be using watercolors, you'll need:
- A pencil for sketching.
- Watercolor paper.
- At least two watercolor brushes, one larger and one smaller.
- Watercolor paints.
- Kneaded rubber eraser.
- A cup of water.
- A paper towel for drying and dabbing your brushes.
- A hairdryer for controlling your painting's wetness (this one is optional, but useful).
And if you'll be using charcoal, you'll need:
- A pencil for sketching.
- Charcoal, pastel or drawing paper, or any type of heavyweight paper.
- Charcoal pencils or sticks in a variety of hardnesses.
- A kneaded rubber eraser.
- A pointed eraser, blending stump and fluffy brush (these can be handy but aren't strictly necessary).
- A pencil sharpener, if you're using pencils.
How to Draw a Cardinal
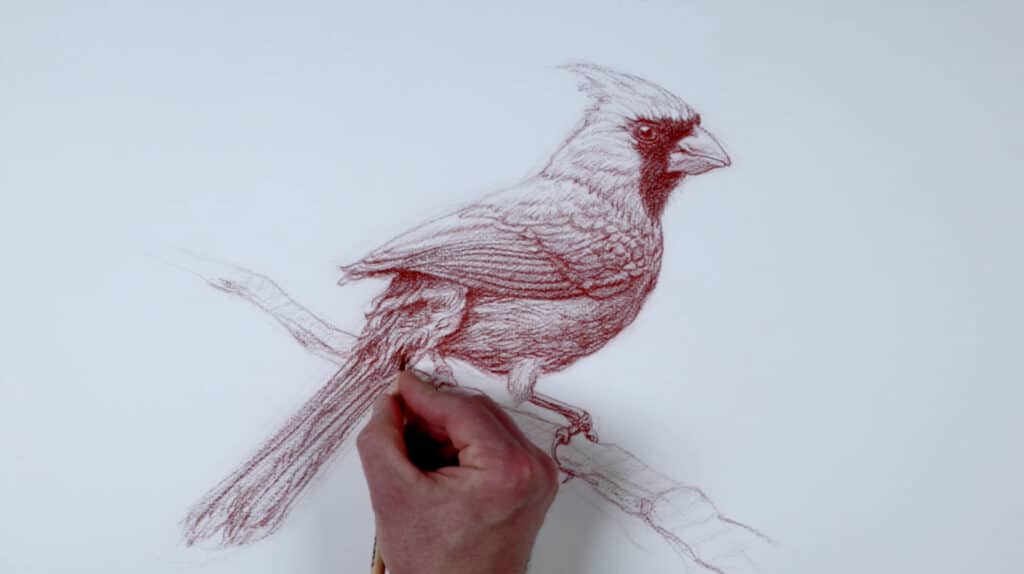
If you have a pencil, a piece of paper, a drawing surface and a pencil sharpener, then you already have everything you need to take Brent Eviston's beginner-friendly drawing class.
In this class, Eviston explains that "drawing is not a talent," but is instead "a skill that anyone can learn." And by the end of this course, you'll "understand how to start any drawing and how to bring it to life with beautiful texture, details, and shading."
Case in point, the beautiful cardinal he shows students how to draw. These are the steps you can take to create a cardinal of your own:
1. Draw an oval for the body and adjust its shape to better replicate your reference photo.
2. Add basic outlines for the head, wing, tail, beak and feet.
3. Adjust each shape's size and position as needed.
4. Add contours and marks to portray more details.
5. Create dimension by adding value.
6. Integrate additional textural details over the value you've just added.
7. Continue adding value and details until you're happy with the result.
How to Draw a Barn Owl
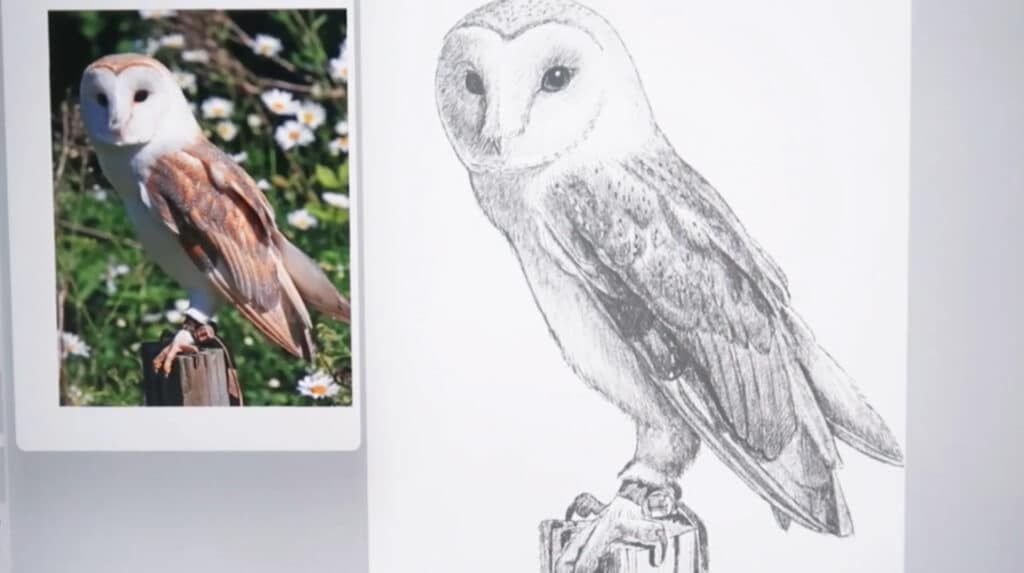
Want to learn how you can turn basic geometric shapes into realistic drawings? Then Mirka Hokkanen's Drawing Realistic Animals with Simple Shapes class will be right up your alley.
In it, you'll learn how to understand the way birds are shaped, use a grid to guide your drawings, observe the relationships between shapes and draw realistic birds from reference photos.
To draw an elegant barn owl, follow these steps:
1. Draw a long, thin teardrop shape.
2. Separate the body from the head.
3. Add a pizza slice-shaped area to mark the point of the wing.
4. Begin to refine the owl's outline.
5. Sketch out smaller details like the legs, claws, face, eyes, beak and individual feathers.
6. Use shading techniques to create shadows and highlights.
7. Incorporate thin strokes and strategic erasing to capture fine details.
How to Draw a Chickadee
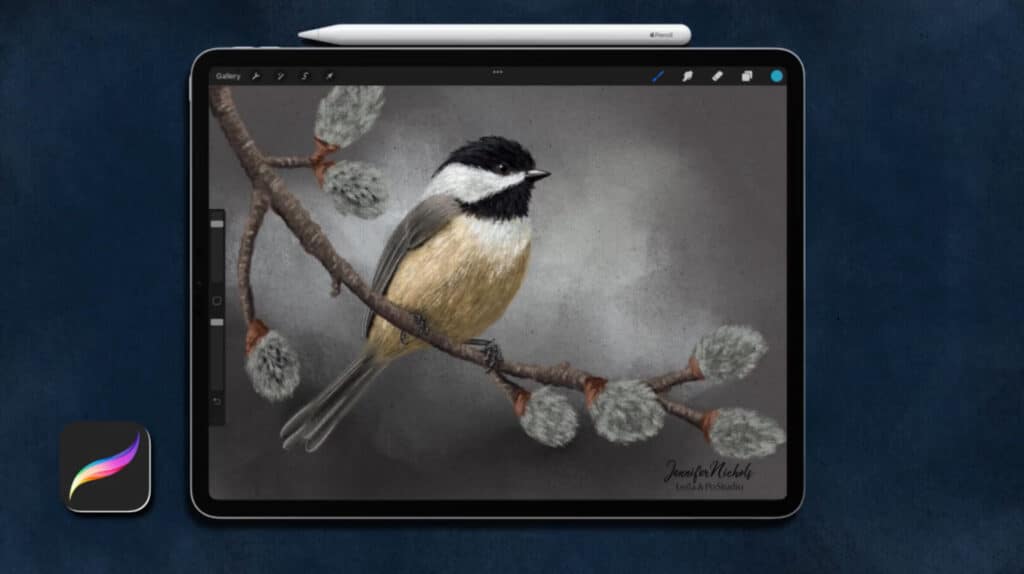
If digital drawing is more your thing, you'll love Jennifer Nichols' Learn To Draw Birds in Procreate class on drawing a beautiful chickadee using Procreate.
With the help of Procreate's brushes, you can make it look like the bird was created with pastels rather than an iPad.
But even if you prefer analog drawing methods, you can still follow these fundamental steps to create an impressive chickadee drawing or painting of your own:
1. Draw a circle for the body.
2. Identify the angle at which the chickadee is sitting and sketch the lower portion of the body.
3. Draw a slightly squashed circle for the head.
4. Refine the outlines of the bird's basic shapes, including the wing, head, neck and breast.
5. Add details like the beak, eyes, tail feather, markings, legs and feet.
6. Add the chickadee's base colors.
7. Use short strokes to create highlights, shadows and more detailed feathers.
How to Draw a Kingfisher
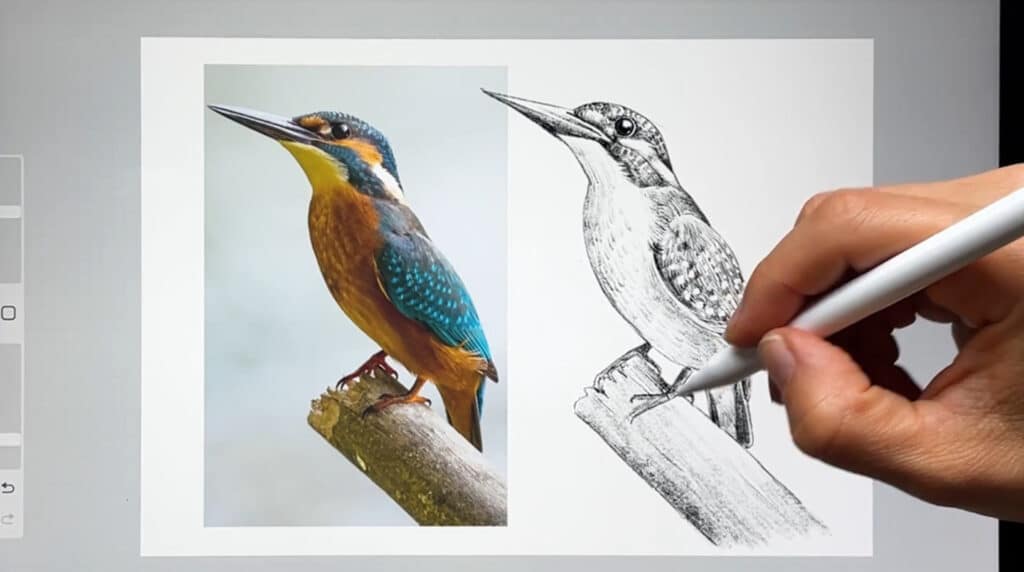
In another class that's tailored to digital artists, Silvia Ospina demonstrates drawing birds in Procreate to create a lifelike kingfisher that's chock-full of realistic details. (Hint: If you’d like to draw a kingfisher that’s more colorful and less detailed, check out the tutorial for creating Chris Hall’s “Grasmere Kingfisher” illustration.)
And since you'll create the kingfisher using the same pencil stroke motions that you'd use with a real pencil and paper, you can easily adapt this tutorial from an iPad to a sketchpad.
Here's how Ospina goes about creating a hand-drawn kingfisher:
1. Mark out the basic angles of the head, beak, body, tail, legs and feet.
2. Refine the sketch by tracing over the lines you want to keep in a new layer. During this step, try to use finer, more delicate lines.
3. Begin adding details by marking out different sections of color and major groups of feathers.
4. Build up the shading and texture gradually over the entire drawing rather than focusing on one area of the bird at a time.
5. Add depth and details with finer lines and shorter strokes, and use the eraser tool to create highlights.
6. Zoom in to add even more details and shading as needed.
How to Draw a Puffin
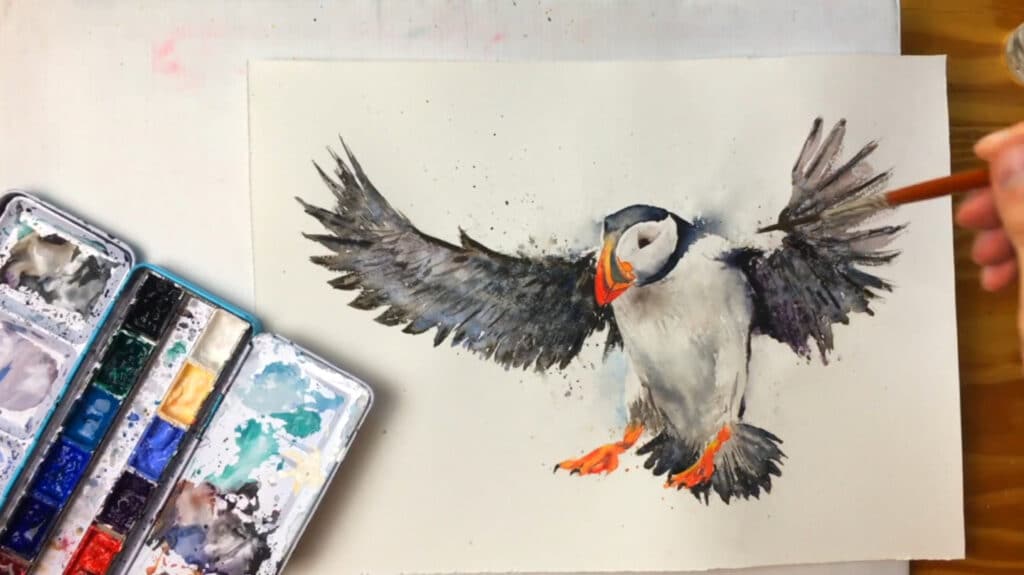
Ready for a completely different medium? Will Elliston's How To Draw & Paint Birds in Watercolor class is here to help. In it, you'll learn how to create a puffin with watercolor paints.
You'll need to gather a few more supplies than you would if you were only using a pencil and paper, including watercolors, paint brushes, watercolor paper and more. But once you see your vibrant puffin come to life, you're sure to agree the results are worth it.
Follow these steps to paint a colorful puffin from scratch:
1. Use a pencil to lightly block out different sections of the puffin. Once you've outlined the bigger shapes, such as the body, head and wings, begin adding smaller ones like the beak and feet.
2. Spray your paper with water, and begin filling in the puffin's body with light colors.
3. Add some background splatters if you wish.
4. Begin adding color to the background, avoiding areas where the bird is white. Using negative space will create the bird's white coloring.
5. Add darker colors to mimic the puffin's body coloring.
6. Paint the wings by first creating the main blocks of color and then adding finer details on top.
7. Repeat for the head and tail: First paint the major colors, then add details on top with smaller strokes.
8. Paint the beak, feet and eye with a small brush.
9. Add shadows to give the puffin more dimension.
10. Use white paint to create the final highlights.
How to Draw a Hummingbird
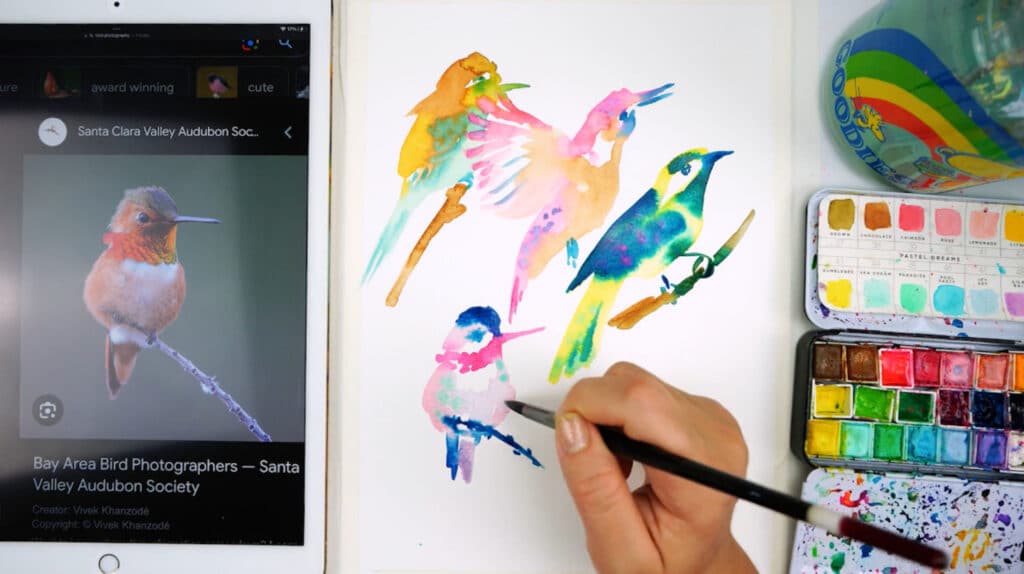
While the previous class taught students how to paint a realistic puffin with lifelike coloring, this painting watercolor or gouache birds class from Yasmina Creates takes the opposite approach.
Under Yasmina's tutelage, you'll explore the art of loose watercolor painting. With this technique, you use your intuition to paint basic forms rather than focusing on details or realism.
The goal of this exercise isn't to paint a perfect hummingbird the first time—rather, it's to get comfortable with trial and error and embrace the skills that you can only gain with practice.
Here's how to get started:
1. Thoroughly wet your paper, brush and watercolor paints.
2. Observe the hummingbird's basic shape and pose, and begin to paint it in whatever colors you choose.
3. Add final details such as the beak, eyes and markings.
4. Repeat as necessary until you get a result you're happy with.
How to Draw a Parrot
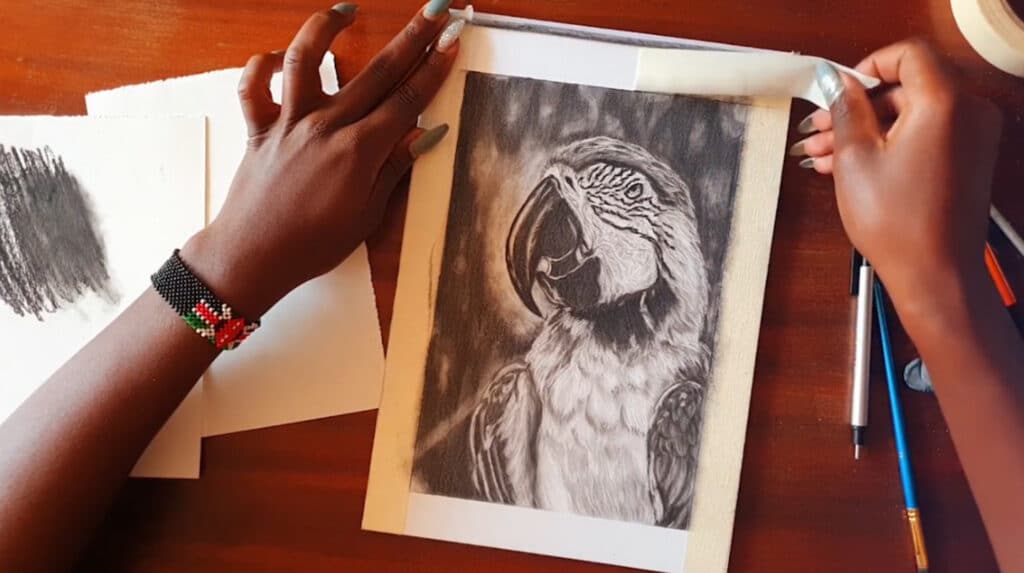
The experience of drawing with charcoal pencils is very similar to that of drawing with standard graphite pencils, with the added benefit of increased pigment and superior blend-ability. In practice, that means the artwork you create with charcoal can have deeper tones, softer gradients and more precise blending.
In Chena's Charcoal Series: Draw Realistic Birds class, she'll teach you how to use charcoal pencils to create a hyperrealistic portrait of a parrot, even if you've never worked with charcoal before.
These are the steps you'll need to take:
1. Use a pencil to lightly mark the photo's center line, and sketch out the basic parts of the parrot as they relate to the center.
2. Sketch out details like the eye, markings and beak. Use your eraser to clean up any unnecessary lines.
3. Use charcoal to lay down the darkest parts of the image, such as the beak, pupil and any black markings in the parrot's feathers.
4. Lay down the midtone parts of the image with the same charcoal, but this time use less pressure. Blend the midtones with the dark tones.
5. Create the background in the same way, by first laying down the darkest areas and then moving on to the midtones. Use your eraser to bring out any light areas.
6. Refine your parrot by adding shadows using the charcoal, and creating highlights using the eraser.
7. Continue darkening the shadowed areas and lightening the highlighted areas until your parrot is complete.
Common Mistakes (& How to Fix Them)
When learning how to draw birds, beginner artists can encounter a few common obstacles. But if you identify and correct these issues early on, you can save yourself a whole lot of frustration down the road.
Here are some typical mistakes you might come across, and what you can do to conquer them:
Overlooking Proportions
Why It's a Problem: If you jump straight into drawing details like feathers and eyes without first establishing the bird’s overall proportions, you may end up with a bird that looks unbalanced or unrealistic.
How to Fix It: Start with basic shapes to outline the head, body, wings and tail. Use reference photos to measure key proportions, such as the relationship between the head and the body or the length of the wings relative to the tail. Lightly sketch these shapes and revise them as many times as you need to in order to nail the proportions.
Overcomplicating Feathers
Why It's a Problem: If you enjoy drawing details, you might be tempted to draw each feather individually. But if you do, there's a good chance your bird will turn out looking stiff, bristly or overly busy.
How to Fix It: Try to focus on large groups of feathers rather than individual ones, and simplify details by blocking in feather clusters. Then, you can add subtle texture with light shading or a few directional lines.
Neglecting Pose and Movement
Why It's a Problem: If you're new to drawing birds, it can be easy to draw them in unnatural or overly rigid positions. This will result in your bird having a stiff, static pose.
How to Fix It: Study how birds perch, fly and rest, either by observing them in nature or by watching videos online. Pay attention to the curves of their necks, the angle of their heads, the movement of their wings and the way their feet curl around branches. Try your hand at creating quick gesture sketches to capture dynamic poses before moving on to more detailed drawings.
Misplacing Facial Features
Why It's a Problem: Without correctly placed eyes, beaks or facial markings, the birds you draw can look unrealistic or even unrecognizable.
How to Fix It: Carefully observe your reference and use light construction lines to map out the placement of facial features. Double-check the alignment of the beak and eyes and their proportion to the head before refining your sketch.
Ignoring Light and Shadow
Why It's a Problem: A bird without shading can appear flat and two-dimensional, while inconsistent light sources can confuse the viewer.
How to Fix It: Identify a clear light source and shade accordingly to create depth. Then, use additional shading to suggest the bird's three-dimensional form. And the next time you see a bird flitting around outside, practice observing how the light falls on its feathers, and the kinds of shadows that are created as a result.
Tips for Drawing Birds
Drawing birds can be intimidating at first, especially for novice artists. But with a few practical drawing tips, you can make the process smoother and more enjoyable.
Here are some techniques you can use to create stunning bird illustrations with as few hiccups as possible:
Start with Simple Shapes
Begin your drawing process by breaking the bird into basic shapes like circles, ovals and triangles. For example, you could use an oval for the body, a smaller circle for the head, and soft triangles for the beak and tail. By starting with simple shapes, you'll help yourself establish the structure of the bird and achieve accurate proportions.
Observe Real Birds
Whenever you can, take the time to study birds, either in their natural habitat or from high-quality photographs and videos. Pay attention to their posture, their unique movements and the way their feathers lay on top of one another. Also, try to take note of their most interesting poses, and try creating sketches of them you can use in more detailed drawings later on.
Focus on the Eyes
The eyes are the focal point of many beautiful bird drawings, and that's for good reason: When an artist captures the bird’s gaze, it can infuse their artwork with energy and personality. So when you're drawing your birds' eyes, use fine details and bright highlights to make the eyes look expressive and realistic.
Embrace Reference Photos
While observing live birds can be incredibly helpful, reference images are invaluable for gaining a more in-depth understanding of birds' anatomy, feather patterns and proportions. When you're working on a bird drawing, use a variety of reference photos to see how the bird looks from different angles and in different lighting conditions. And even when you're not in the middle of a project, be on the lookout for exceptionally eye-catching bird photos, and save them to use as reference in future drawings.
Experiment with Texture
Feathers come in many forms, from long, sleek and smooth to short, fluffy and layered. With the right tools and techniques, you can convincingly mimic those textures on paper. For instance, light and rounded strokes can create soft down feathers, while sharper lines can be used to represent rigid wing feathers.
Practice Gesture Drawing
Quick gesture sketches are a great way to practice capturing a bird’s movement and pose. Spend a few minutes sketching the general shape and posture, and then spend another few minutes adding details. If you find yourself getting lost in the details, try setting a timer to give yourself a time constraint.
Add Context with Background Elements
A bird perched on a branch, gliding beneath the clouds, standing in water or snuggling into a nest tells a story and can effectively draw viewers into your scene. So, if you've been drawing your birds with no contextual or background elements, try adding some to your drawings. By doing so, you can sharpen your composition skills and make your art more engaging.
Learn to Draw Animals with Skillshare
Learning to draw birds is a rewarding journey, but it becomes even more fulfilling when you're able to tap into the expertise of professional artists. After all, experts can teach you how to refine your approach, master difficult details and develop a unique drawing style. And when you watch skilled instructors break down techniques, you can progress faster and get inspired to try new ideas.
When you’re ready to take your skills further, Skillshare's online drawing classes can connect you with expert teachers from around the world. With their guidance, you can master the art of illustrating birds, learn how to draw animals of all kinds and explore new artistic mediums. And since the classes they lead are online, you'll be able to learn at your own pace, interact with other students and even schedule one-on-one sessions with your favorite teachers.
Carrie Buchholz
Carrie Buchholz is a freelance writer who lives in Northern Colorado with her husband and dog.
Try Skillshare for free! Sign up for a 7 day free trial today!
Get Started- Unlimited access to every class
- Supportive online creative community
- Learn offline with Skillshare's app


