

How to Build a Table: A Step-by-Step Guide
Learn how to build a table in this step-by-step guide and tutorial for beginners.
Table of Contents


How do you build a simple table?
The answer—and the process—isn’t as difficult as you might expect, and it’s a great starter project for beginner woodworkers.
To prove it, we’ve put together this handy tutorial on how to build a table based on this fantastic course from Skillshare instructor and all-around impressive woodworker Brittany Joyner. Once you’ve got the basics down, you can start expanding on your skills, taking away fundamental techniques that you can then use to figure out how to build a picnic table or coffee table, or even how to build a dining room table from scratch for your home.
Here’s what to know about how to build a table, plus a step-by-step guide to get you started.
How to Build a Simple Table
Whether you’re interested in how to build a router table, how to build a coffee table, or how to build any other variety of handcrafted table for yourself or someone else, it all begins with nailing down the basics—no pun intended.
Starting with a simple table provides you with a good overview of the essential tools, skills, and techniques you’ll need for this and other woodworking projects. From there, you won’t only have a super stylish table to show for your time, but you’ll also have the confidence that you need to move on to more complicated undertakings. (And when that happens, you know we’ve got plenty of woodworking courses ready for you to try out.)
What You Need and What It Costs

The first step in how to build a coffee table, nightstand, or any other type of simple or not-so-simple table is to set up your woodshop.
You’ll need to gather the following tools to build your table:
- Wood: Wood is obviously essential and can be purchased at your local home improvement store. Pine is a great choice since it’s affordable, easy to work with, and durable for use in furniture. Other good options include cherry, poplar, or cedar. Check each piece of wood thoroughly for cracks or damage before purchasing.
- Saw: A basic table saw is all you need to cut each piece of wood to size. If you don’t have a saw and don’t want to buy one, most home improvement stores will cut your wood for you for a small fee.
Other essentials:
- Drill
- Measuring tape
- Pencil
- Eye/ear/lung protection
- Speed square (also known as a triangular carpenters' marking out tool)
- Screws (pocket hole or regular wood screws will both work)
Optional tools:
- Miter saw, hand saw, circular saw, or jigsaw (if cutting your wood yourself)
- Pocket hole jig
- Wood glue
- Clamps
How Much Does it Cost to Build a Table?
Looking at the above supply list and wondering: is it cheaper to build your own table?
The build vs. buy debate is one that comes up a lot with furniture, and there are a few factors that determine what your total cost will be. That being said, it’s almost always going to be more cost-effective to build your own table than to buy or commission one since a lot of what runs up the cost is labor.
As a quick cost comparison, let’s imagine you want to know how to build a farmhouse table. If you have some of the tools on hand already or can borrow them, you can probably build your table for between $100 and $200—versus $1,000+ to buy one. Likewise, you could build a basic side table for around $50, or spend $100 or more to buy it.
Factors that will affect your total cost include:
- Which tools and materials you already have and which you need to buy
- Whether you’re able to borrow any tools
- If you cut your own wood or pay to have it cut for you
- The size and complexity of your project
Keep in mind that you’ll likely need to pick up a few other things too, such as stain or paint, though neither of those are very expensive on their own.
Step 1: Planning Your Table
Now that we’ve covered the basics, let’s get to the fun part: actually building your table.
Poor plans equal a poor build, says Joyner, so before you strap on those goggles and get to work, you’re going to need to work out the details of your design and dimensions. Some projects—for example, if you’re interested in how to build a picnic table—are going to be more complicated to plan. For our purposes here though, the planning process is pretty straightforward. Here’s how to do it.
- Start by measuring your space. Figure out the optimal length, width, and depth of your piece, taking into account both the size of the general space it’s going to go in and how you want the table to fit in with other pieces of furniture around it.
- Find an example of the table you’d like to build. Gathering inspiration can be hugely helpful for working out the details of your project. Look to social media and woodworking sites to see what’s out there and what you might like to emulate in your own work.
- Figure out what pieces you need. There are a number of different parts to a table, including legs, supports, shelves, drawers, aprons, and the tabletop. For this build, Joyner is sticking with simple parts and not including any shelves or drawers, but for future projects you might want to include them, so keep that in mind. For this project, you also won’t need any supports aside from the aprons under the top. In general though, the bigger your build, the more supports you’ll need.
Step 2: Sketch Your Table
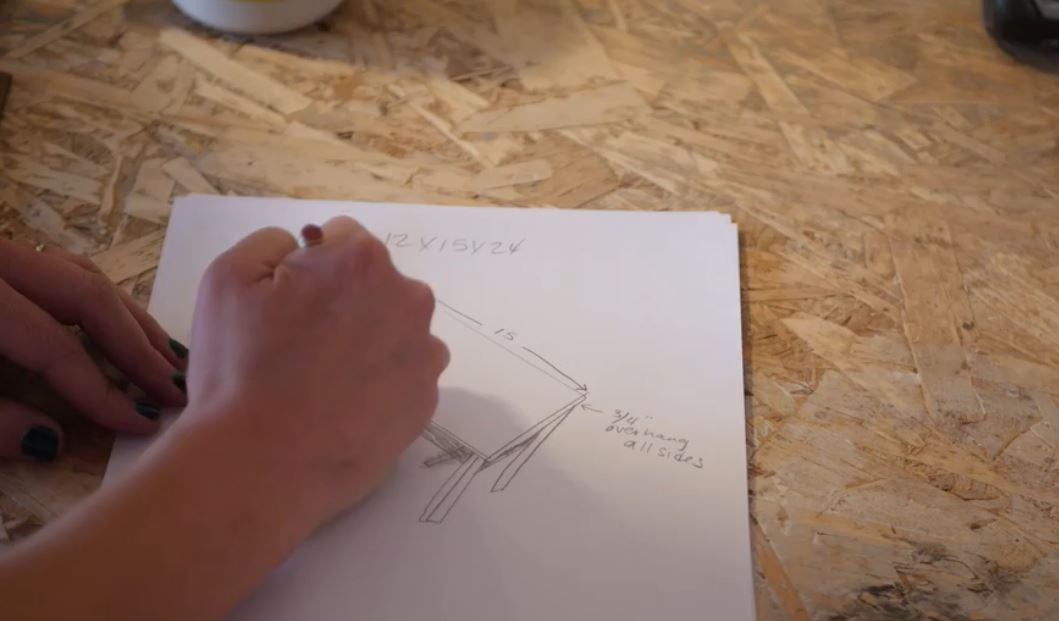
Now you know your dimensions, your pieces, and what you want your table to look like, so it’s time to put it all together—on paper, at least.
Plug in your exact measurements, including any overhangs. There’s a bit of arithmetic involved here, so we recommend watching Lesson 5 of Joyner’s course where she goes over all of the math. It’s crucial to get this sketch—and particularly the dimensions—of your table right, since you’ll be cutting your wood to size before starting your build.
Once your sketch is finalized, you can pick out your wood and buy any tools you need.
Step 3: Cut Your Wood
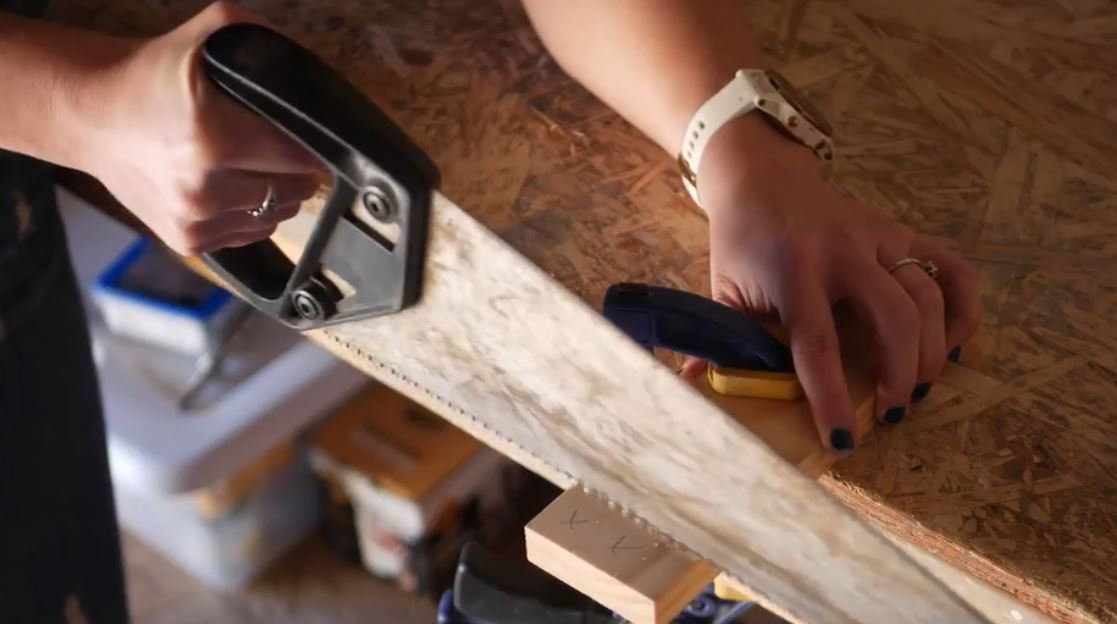
If you’re doing the cuts yourself, now’s the time.
Get your safety gear on, then take your measuring tape and mark out your dimensions on each piece of wood with a pencil. Use your speed square to draw cut lines spanning the length of the wood, since it will provide you with a perfect right angle.
Use your miter saw, circular saw, jigsaw, or hand saw (depending on what you have) to cut your pieces, and label each piece as you go for easier assembly.
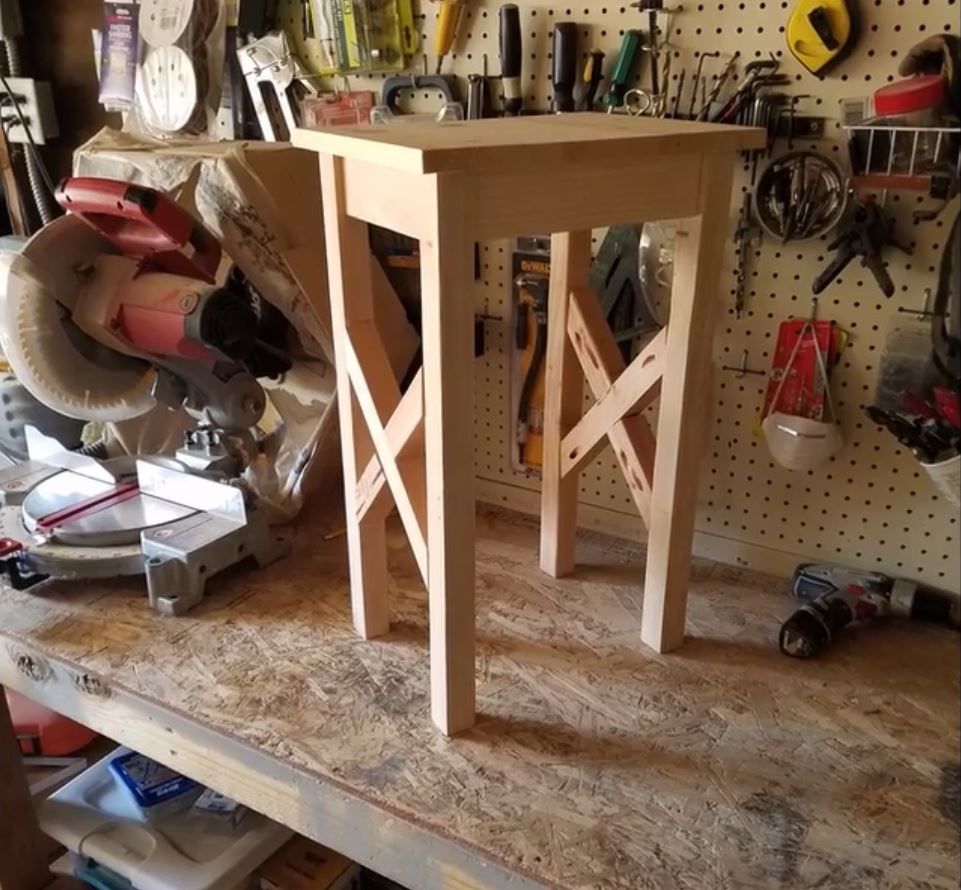
Step 4: Assemble Your Table
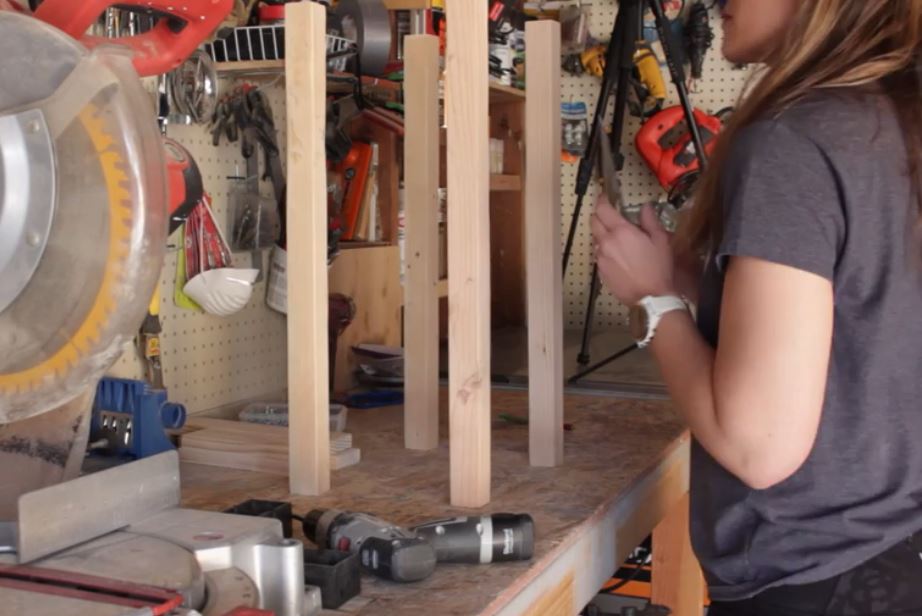
Last up is putting all of your pieces together.
For the basic table in the video, this process is a simple one, and you’ll see your table—and all of your hard work—come together very quickly.
You’ll have some options when it comes to how you join each piece together. What you choose depends on the look you’re going for, how much support you need, and whether or not you want your joints to be hidden. If you’re going for an industrial look, Joyner recommends using brackets in addition to screws, though they’re not necessary for such a lightweight piece.
If you’re not comfortable working with a drill, you can glue your table together. It won’t be quite as sturdy, but it can still look great. Just make sure to use your speed square as you glue to ensure that all of your pieces are held together at the correct angles.
If you’re drilling, adjust your drill to the thickness of your wood, and make sure the pieces you’re joining together are flush before you start to make your holes. Mistakes can (and probably will!) happen, so have some flexibility and fun with it, and be willing to problem solve when the occasion demands.
Once your table is built, you can paint or stain it, and complete the look you’re going for.
For a comprehensive overview of each of these steps, check out Joyner’s course and take a deep dive into everything that you need to do. Like riding a bike, once you figure out the motions of how to build a table, you’ll be able to take those skills and go wherever you want with them.

Store Your Books in DIY Style
How to Build an Affordable Plywood Bookcase
Try Skillshare for free! Sign up for a 7 day free trial today!
Get Started- Unlimited access to every class
- Supportive online creative community
- Learn offline with Skillshare's app


