

How to Add Keyframes in Adobe After Effects
Learn how to add keyframes in Adobe After Effects with this beginner-friendly guide, featuring insights from Gareth David’s Skillshare class.


For decades, Adobe After Effects has been the premier post-production software. Creators use it after video footage is produced and exported from video production programs. After Effects adds visual effects, motion graphics and animated sequences to the raw footage you already have.
Keyframes are an important part of working in Adobe After Effects, and an essential tool for animating objects, properties and effects. They set parameters for all effects over the time of the project, and determine certain factors for what’s happening in the visual composition panel.
If you’re new to digital graphics and motion design, consider reading these articles before getting started with this in-depth tutorial:
- Motion Graphic Design: Your Ultimate Guide
- Making Moving Graphics with Motion Design
- 21 Best Animation Tips for Beginners and Beyond
- 9 Animation Software Platforms for Beginners
- How to Make an Animated Logo: A Step-by-Step Guide
This guide to adding keyframes in Abode After Effects is inspired by Gareth David’s Skillshare class, Complete Beginner's Guide to After Effects. The class contains 50 lessons about After Effects, all geared toward beginners and helping you create your first motion graphics project.
What Are Keyframes in Adobe After Effects?
Keyframes are markers that define motion or changes over time in an After Effects project. You see them as little shapes beneath the individual layers in the timeline panel. They define when animation principles (position, scale, rotation and opacity) and properties are applied to the various layers of the video.
Why Are Keyframes Important?
Ultimately, keyframes create smooth animations. Once set in place, keyframes actually fill in the animation for you (called keyframe interpolation), so you don’t have to animate each individual frame, which makes for a smoother final product.
Common applications of keyframes include specifying a value for object movement, opacity changes and scaling effects. To do this, you’ll add keyframe start points and end points for each animation principle or property.
How to Add Keyframes (Step-by-Step Guide)
Keyframes themselves are simple little things, and easy to add to a composition. However, it can be tricky to keep the various factors controlled by keyframes straight until you’ve had hands-on practice.
Follow the steps for adding and adjusting keyframes, then play and experiment to get a feel for how keyframes work in After Effects.
1. Set Up Your Composition
Open After Effects and click the “New Composition" button. You could also go to the top bar, and click Composition > New Comp. In the left-hand project panel, you should see “Comp 1,” though you can change the name to whatever you want.
2. Add Your First Keyframe
Once you’ve got media elements built into layers in the timeline panel, you’ll have a list of those layers on the left of the timeline panel. On the far left is a little triangle for each layer.
- Click on the triangle for the layer you want to work with.
- Ensure your time indicator is at the very beginning of the composition–keyframes will appear wherever your time indicator is, so this is the simplest way to begin.
- In the drop-down, click “Transform” to get a list of the basic properties you can animate on any layer.
- Click on the stopwatch icon of the property you want to add a keyframe for. The first keyframe will appear in that property’s bar, right at the start with the time indicator.
3. Animate Between Keyframes
To create the actual animation, you’ll need a second keyframe at the end of the timeline. This gives After Effects two points, between which it can fill in the type of animation you want.
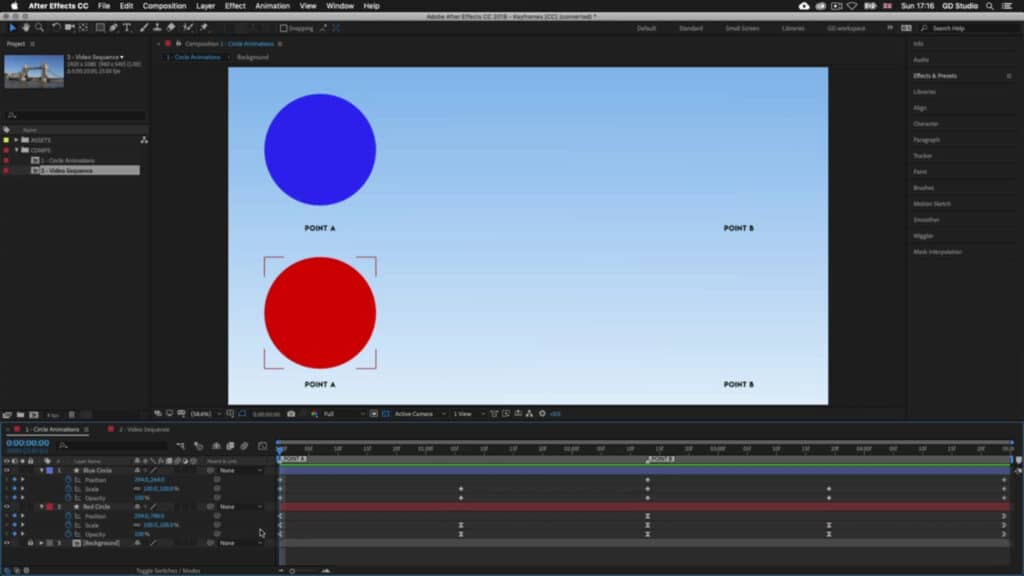
For example, if you want to have a ball move from one side of the screen to the other, it will start from its position (Point A) at the beginning of the composition, where you set the first keyframe.
- Click on the ball itself in the composition panel, and drag it to the spot you want it to move to on the other side of the screen (Point B). The time indicator will move along with the ball.
- Once you release the click, After Effects will add a second keyframe to this later position in the timeline.
- Now, the ball will move with the time indicator.
You can also change the scale, opacity and rotation of objects, telling After Effects what values you want the object to have and when to have them. Each change of each property will have its own little keyframe in the timeline panel.
4. Preview and Adjust Animations
To see your animation thus far, hit your spacebar and watch the animation go. This is where you can start playing around and experimenting.
To alter when After Effects implements the property changes to your animation, simply click on and drag the keyframe itself to a different spot. You can also shorten the work area bar (at the top of the time indicator) to reduce frames and again change the animation.
Again, this will take some getting used to, and the best way to learn is to play and practice.
Tips for Working with Keyframes
Gareth offers a couple of tips for making it easier to work with keyframes:
Duplicating Properties
If you want an object to replicate something it did elsewhere in the animation, such as a certain position or size, click on the keyframe you want to replicate, copy it (Ctrl + C on PC or cmd + C on Mac). Move the time indicator to where you want the duplicate keyframe and paste (Ctrl + V on PC or cmd + V on Mac).
Keyframe Easing
Easing is a smooth animation effect that makes objects look less rigid as they move. Keyframes using easing appear as hourglasses, while keyframes without easing look like diamonds. Gareth includes an entire lesson on the different kinds of easing and how to apply them to your animation.
How To Use the Graph Editor After Effects
Examples of Keyframe Animations
In addition to changing the position of an object through animation, you can also make objects fade in and out with opacity and change size with scale. If you continue with animating a ball, as you did for position, imagine the same scene, with a Point A and a Point B, with the ball traveling from A to B.
Fade-In/Fade-Out Effect
- This will use the opacity property, causing the ball to fade as it moves between the points.
- Bring the time indicator to the beginning of the composition.
- Click the stopwatch for Opacity to create your first keyframe.
- Move the ball to the midway point in the composition panel to create your second keyframe.
- Back at the Opacity Transform option, notice that the ball is currently at 100%--hover over the 100 until your curser shows two sideways arrows.
- Click and drag the value to the left, reducing it to 50%, and release the click to create the second keyframe. The ball will be half the original opacity.
- Move the ball to Point B in the composition panel.
- Copy and paste the first Scale keyframe to make the ball 100% opacity once again.
Scale Animations
- This will use the scale property, causing the ball to get smaller as it moves between the points.
- Bring the time indicator to the beginning of the composition.
- Click the stopwatch for Scale to create your first keyframe.
- Move the ball to the midway point in the composition panel.
- Back at the Scale Transform option, notice that the ball is currently at 100%--hover over the 100 until your curser shows two sideways arrows.
- Click and drag the value to the left, reducing it to 50%. Release the click to create the second keyframe. The ball will be half its original size.
- Move the ball to Point B in the composition panel.
- Copy and paste the first Scale keyframe to make the ball 100% scale once again.
Get More After Effects Tutorials
Congratulations on completing this tutorial! Gareth provides a lot of detail and you’re learning serious and important skills.
This guide to keyframes in only one of 50 lessons in this class. Each lesson has an introduction and a summary, making it easy to follow along even if you haven’t watched all the previous lessons.
Gareth also provides a PDF guide to accompany the class as a quick reference to the summaries and many of the visuals. Because the class is so big and in-depth, the PDF can be extremely useful for finding the exact information you need.
For more on Adobe After Effects, try other Skillshare courses, including:
- Beginner’s Guide to Adobe After Effects
- 11 Expressions for Animation Efficiency in Adobe After Effects
- Animate Your Illustrations with After Effects
- How to Easily Animate Logos in After Effects
- Animating with Ease in Adobe After Effects
If you’re serious about learning After Effects, you’ll reap numerous benefits from watching the whole class. Gareth’s deep knowledge means broad context, additional tips and guidance on pretty much every aspect of Adobe After Effects. Check it out today!
Related Reading
Katie Mitchell
Katie lives in Michigan with her husband, kids and pets. She enjoys cooking, travel and live music.
Learn Animation with Skillshare – Start your 7-Day Trial Today!
Get Started- Hands-on classes with animation pros
- Unlimited access to all classes
- Browse a variety of animation platforms


