

Forest Photography: How to Capture the Majesty of Trees
Forests are magical. It’s why they figure so often in fairy tales and other stories. You can bring some of that magic home through photography.


Forests hold fairytale magic and mystery in the forms of plants, wildlife and mist. Woodland photography lets you capture some of that magic for yourself or to share.
As unique landscapes, woods come with their own challenges and opportunities for photographers. With some basic knowledge, you’ll be ready to take them on.
Forest Photography Equipment and Camera Settings
Before investing in forest photography equipment, think about the pictures you want to take.
Cameras and Lenses
You can take good forest photos with any camera, though certain ones provide more options. Using the correct lenses is more important in capturing the images you want.
Forest Photography Cameras
Start with a DSLR (digital single-lens reflex) or mirrorless camera that can take images in a RAW data format. Opt for at least 16 megapixels to preserve more detail.
Forest Photography Lenses
The common opinion among nature photographers is that wide-angle lenses provide the best landscape photos. However, you may want to bring multiple lens types:
- Wide angle lens: With a shorter focal length than a standard lens, a wide angle lens sees a wide breadth of trees and landscapes without forcing you to move backward from your scene.
- Telephoto lens: With greater magnification and focal lengths over 50mm, a telephoto lens isolates details in a beautiful forest scene. You’ll also see less distortion in the edges of your shot.
- Macro lens: By making objects appear larger, a macro lens is perfect for capturing small details like flowers, moss, insects, mushrooms, leaves and more.
Forest Photography Camera Settings
No combination of settings is the “magic formula” for great forest photography. It all depends on the light, weather conditions, subject and your artistic goals.
That said, a basic understanding of camera settings will make it easier to figure out what works for you:
- Shutter speed: Faster shutter speeds allow less light into the camera and catch minimal blur. For bright, moving scenes, fast speeds work well. Slower shutter speeds allow more light into the camera and might show blur. In darker parts of the woods, a slow shutter is your friend.
- Aperture: This measures the opening of your lens–a larger aperture (represented by smaller numbers, or “f/stops”) means the lens is more open for more light. The smaller the aperture (higher f/stops), the more you can focus on the foreground and blur the background.
- ISO: This measures your camera’s sensitivity to light. The lower the ISO, the less sensitive the camera is to light, which is helpful in bright scenes. A higher ISO, while helpful in lower light, increases “noise” in the image, resulting in grainier photographs.
Get to know your camera in different lights to determine which combination of shutter speed, aperture and ISO gives the best exposure. You can also figure out if you like to use manual or priority settings, which let your camera adjust automatically based on light conditions.
Later, experiment with specific styles, like black and white forest photography, autumn leaves, shallow depth of field, filtered images, or bamboo forest photography.
Mobile Photography
Cell phones might be more limited than DSLR cameras, but you can still get great forest photos when you use them to their potential.
Exposure
Study your phone’s settings for lighting and focus beforehand so you’re not fumbling around in the woods. Depending on your mobile camera, you might have complete or minimal control, but knowing what the device can do will save time when you see a great shot.
Rule of Thirds
Don’t center an interesting tree or other feature right in the middle of your photo. Keep it to the left or right, leaving the other two-thirds more open. This is easy if your phone camera has a built-in grid.
Don’t Overdo Flash
In dimmer situations, check that your flash is off. While the bright light may make something easier to see, it’s also likely to make the picture less aesthetically pleasing.
Burst Mode
Most mobile cameras offer a burst mode, which takes several pictures in just a few seconds. This increases your chances for the perfect clear picture, even when things are moving.
Use Editing Apps
You can apply filters to forest photography on social media platforms. However, you’ll end up with more interesting and unique photos with apps designed to tweak mobile photography in post-processing, such as Adobe Lightroom and Photoshop.
Aerial Forest Photography
If you understand drone photography, aerial forest photography is a viable option. Aerial images can't be beat for showing the vastness of the woods, displaying differences from one area to the next and capturing a range of colors in a sea of green.
Generally, you’ll want a clear day for aerial forest photography, though misty weather can result in some interesting views.
Tripod and Remote Shutter
To reduce the movement of your camera during shutter release, use a lightweight tripod that’s easy to carry and quick to set up.
You can further limit your contact with the camera during shoots by attaching a remote shutter release cable.
Clothing, Snacks and Skin Protection
Plan for outdoor photography with appropriate supplies.
Layers are ideal if you’ll be out from morning to afternoon and in varying degrees of sun and shade. Insulated coats and lined boots are essential if it’s wintertime.
Bring sufficient, but lightweight, food and drink to stay hydrated and balance your blood sugar. Forest photography tends to take quite a bit of energy, so pack enough to keep yourself alert and comfortable.
Depending on the time of year and your location, bring sunscreen, bug spray and first aid supplies for protection from the elements.
Forest Photography Tips and Ideas
Different types of forest photography tell stories with grandeur, drama and wildlife.
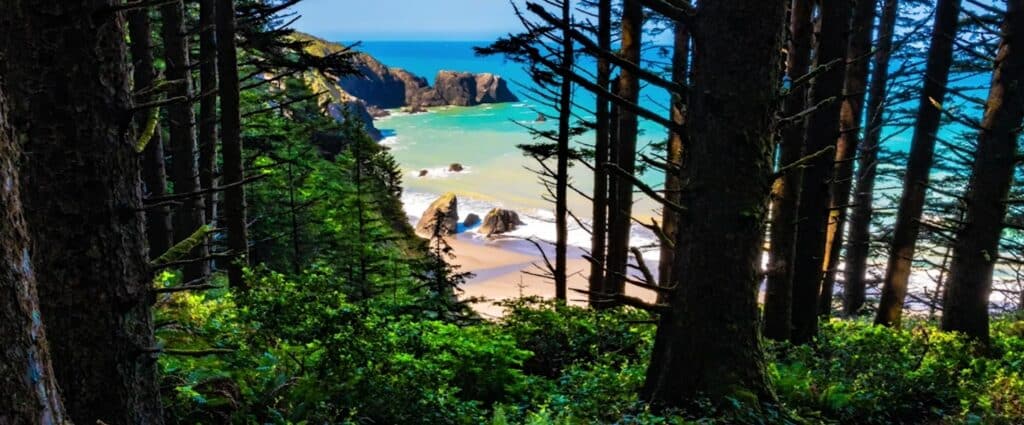
Forest Landscape Photography
Photographs of the forest landscape can quickly become chaotic and without a focal point. Plan out your composition and framing to reduce clutter and draw viewers’ eyes to certain points.
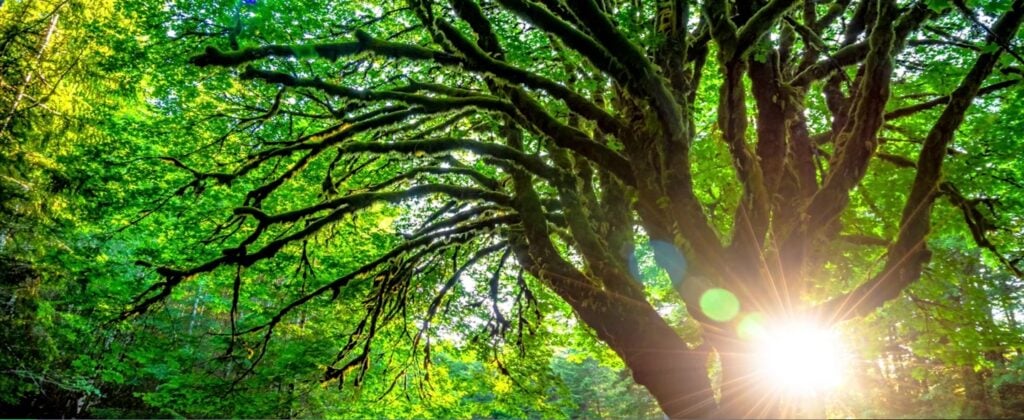
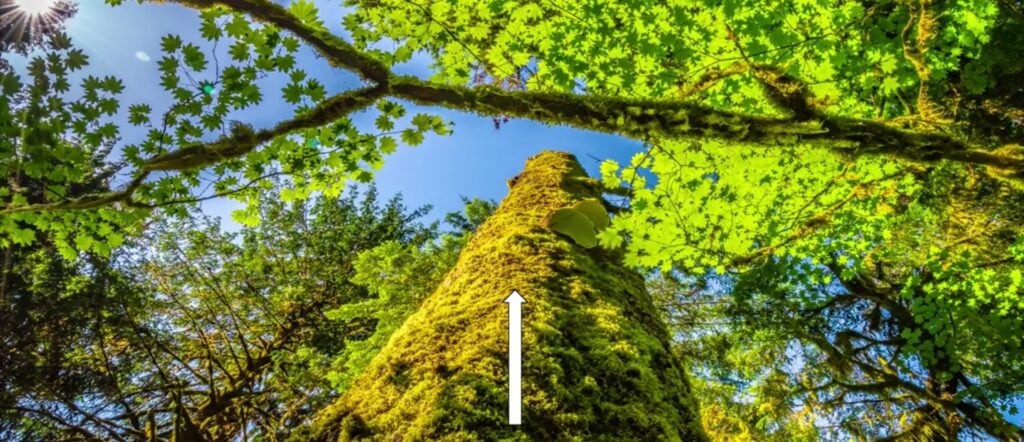
For example, lay on the ground and shoot straight up at the sun rays through the tree tops. Or get down at ground level and focus on small objects with massive, blurred green forest trees in the background to highlight the change in size. Don’t forget about the forest floor! You can even incorporate mountain photography if you see peaks in the background.
Choose your camera settings based on the conditions: If there’s wind, use a fast shutter speed to reduce blur. If you’re in a darker area or it’s later in the day, set a larger aperture and carefully increase the ISO.
To get some truly magical images, aim for the golden hour or the blue hour.
Dark Forest Photography
Shooting in the forest at night means you can practice astrophotography as well as spooky imagery, like silhouettes. Capture stars and the Northern Lights, or let the moon cast a ghostly glow over blackened tree trunks.
Experiment with long exposures and higher ISO to harness the little bit of natural light available. Try to be as far from light pollution as possible, and use a headlamp with night vision for faster setup and packing.
Foggy Forest Photography
Nothing brings drama to nature photography like fog. As long as you’re prepared for moisture, mist in the woods is a fabulous opportunity.
Because the overcast atmosphere will naturally soften the image and reduce forest clutter, you can choose an interesting foreground or focal subject and let other objects loom in the background.
Use manual focus for the most control over exposure. Set your camera on a tripod so that you can keep the ISO as low as possible to reduce noise, which can become an issue with the moisture in the air.
Forest Animal Photography
Wildlife photography typically requires magnification, either through a telephoto or a macro lens. Remember: The first rule is to do no harm and interfere as little as possible.
Be ready for movement with a fast shutter speed. Keep a large aperture to get enough light and a low ISO to reduce noise (wildlife is often active during dimmer hours).
See the Forest and the Trees
Sweeping landscapes, gnarly trees and tiny insects await your eye. With the right knowledge and equipment, you can capture all the magic the forest has to offer.
Related Reading
Katie Mitchell
Katie lives in Michigan with her husband, kids and pets. She enjoys cooking, travel and live music.
Try Skillshare for free! Sign up for a 7 day free trial today!
Get Started- Unlimited access to every class
- Supportive online creative community
- Learn offline with Skillshare's app


