

11 iPhone Photography Tips for Clearer, Sharper Photos
iPhone cameras have come a long way since 2007’s 2-megapixel model. But getting the best iPhone photos still requires helpful iphone photography tips.


Thanks to smartphone technology, it’s never been easier to take professional-level photos without a professional-level camera. Today’s iPhones feature high-quality cameras that fit right in your pocket, plus a wide range of camera settings and photo editing apps that you can use to optimize your images and ensure they look their best. So what’s the secret to how to take good iPhone photos? We’ve compiled 11 of our very best iPhone photography tips, with useful techniques that anyone can use to improve their snapping skills.
From how to change iPhone camera settings for clearer, sharper shots to quick tricks for making your photos look like a pro took them, here are the iPhone camera tips you don’t want to miss.

11 iPhone Photography Tips for Next-Level Photos
How do I take better iPhone pictures?
It’s a question that most iPhone users have probably asked at some point, and one with a variety of different answers—all of which can help you take more impressive photos. Start with these iPhone photo tips and techniques and see just how quickly you can improve your photography game.
1. Use the Grid Feature
Keep your composition on point by toggling on your iPhone’s grid feature. This is a go-to trick among pros, since it takes the guesswork out of achieving balance and harmony in the frame.
When you turn on the grid, your screen view will automatically display nine equal quadrants, which you can then use to position the key features of your photo. For professional-looking results, use the rule of thirds and aim to have the main focus of your image on the grid lines and/or at the point where they intersect.
2. Give Yourself Lots of Options
Many of the most useful iPhone camera tips are similar to the tips that you’d get for any type of camera. This includes the notion that you should take lots of photos and select your best shot from there, rather than trying to get everything right in one take. You never know when you’ll find that perfect balance of light, shadow, angle, and perspective, so take lots of shots at once (you can do this manually or use your phone’s burst feature) and then choose from the bunch.
3. Show Some Depth
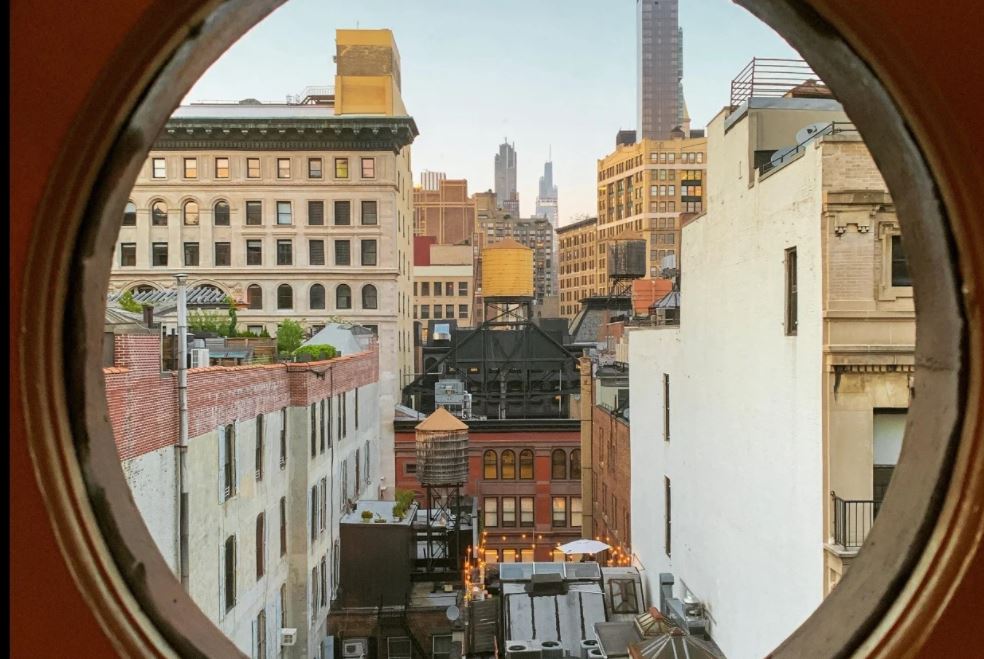
Take good iPhone photos by adding depth to the shot. This creates more engaging images, since there is a distinct foreground, middle ground, and background to look at. In the image above, the photographer used leading lines to draw the eye from the window in the foreground to the buildings beyond it, in turn taking viewers on a journey through the scene.
Other ways to add depth to your iPhone photos include shooting through a foreground object (in the photo example, the window frame serves this purpose) and locking in your focus (see tip number five below).
4. Fill the Frame
In his course on taking pro photos on your iPhone, photographer Dale McManus shares a bunch of tricks for how to take better iPhone photos, including a style choice known as “filling the frame.” This makes your iPhone photos more compelling by positioning the focus of the image alongside other items of interest that add context, texture, and color to the shot. Done well, it helps draw the eye exactly where you want it to go, and it also allows you to tell a more complete story with your photo.
5. Lock in Your Focus

Set your focus manually to make sure that the subject of your photo really comes through. To do it, simply position the frame that you want on the screen and then hold your finger down on the main subject of the photo. This will lock the focus in on that specific area and position it as the primary point of interest. If you want to blur the background, simply move closer to your subject and then lock the focus, which will blur everything behind it.
6. Shoot in Panoramic Mode
Panoramic mode (or pano mode) is an iPhone feature that lets you take a series of photographs that are then stitched together into one long shot. The result is a wide-angle photo without the need for a wide-angle lens, with the option to shoot either horizontally or vertically. For best results when taking panoramic shots, keep your hand as steady and level as possible so that the image comes out crystal clear.
7. Master Your Lighting
Lighting is key when it comes to how to take good iPhone photos. Sean Dalton, a travel and lifestyle photographer, goes over the basics of photo lighting in his iPhone photography essentials course, but the gist is that you need to pay close attention to the source of your light, the direction of your light, and the strength of your light.
Getting it right is the difference between shooting at golden hour versus shooting under a flickering fluorescent bulb, with the former offering a much more memorable—and much more professional—final image.
8. Create a Concept

You can get just as creative with your iPhone photos as you would with photos you take on a standalone camera. Shooting conceptual photos is a great way to test the limits of iPhone photography and produce unexpected images, and it can also help your photos stand out on your social media feed.
Check out photo artist and art director Amelie Satzger’s course on conceptual iPhone photography for a step-by-step guide on shooting and editing these types of images on your phone.
9. Get Familiar With Editing Apps
Between your iPhone’s built-in editing capabilities and the plethora of photo editing tools in the App Store, you definitely have your fair share of options for fine-tuning your pictures. These take some practice to get comfortable with, so play around and see what’s available in terms of filters, airbrushing, and other features. If you want to go one step further, try your hand at Adobe Lightroom.
10. Shoot at Night
Shooting at night time brings a whole new perspective to your photos. To do it correctly, though, you’ll want to utilize your iPhone’s night mode, which lengthens the exposure time and lets in more light so that you get brighter photos. Night mode offers a much better alternative to turning on flash and gives you an opportunity to take more impactful and more memorable iPhone photos—regardless of the time of day.
11. Add on Some Accessories
Our last tip for how to take better iPhone photos: Upgrade your device itself by adding on specialty accessories (photographer Tyson Wheatley has some good advice on how to do this in his course on mobile photography basics for Instagram). Useful accessories include add-on lenses for a broader range of image options as well as tripods to get a steadier shot. You certainly don’t need to invest if you’re just starting out, but it’s worth considering if you’re looking to get a little bit more utility out of your iPhone’s camera.

Photography With Purpose
Telling Stories in Pictures: A Guide to Creating a Photo Story
The Best iPhone Camera Settings
One of the quickest ways to improve your iPhone photography is to simply change iPhone camera settings so that you’re set up for success every time you open your camera app. Here are some of the best settings to use if you’re looking to take good iPhone photos.
Grid
If you change one setting on your iPhone’s camera, it should probably be this. Grid allows you to quickly break your frame down into equal quadrants so that you can choose the optimal placement for your main subject. It’s the rule of thirds made as simple as possible, and a trick that you’ll find most of the pros using for mobile photography.
Smart HDR
Want some help compiling a great photo? The iPhone’s Smart HDR setting tells your camera to take the same photo in multiple exposures when you hit the shutter button, then uses artificial intelligence to produce a photo with optimal lighting. It’s great for shooting in high-contrast locations, though it does take up quite a bit of storage space since it’s capturing multiple photos at once.
Live Photos
Live photos are great for two reasons: they bring your pictures to life by capturing movement along with a still, and they allow you to go into edit mode and change the still photo to another, better frame if you desire. Use this feature for action shots, as well as to preserve more of your everyday memories.
Volume Up for Burst
Remember that tip about taking lots of photos so that you can then go in and choose your ideal shot? You can make it super easy to do this by toggling on “Use Volume Up for Burst” in your settings. Instead of having to hold down the shutter button (and potentially end up with fingers in some of your shots) you can hold down the volume button and ensure they’ll all come out free from obstructions.
Take Better iPhone Photos
Just like traditional photography, improving your iPhone photography comes down to understanding your equipment and getting lots of practice. It may also require that you update to a later phone model if you really want to take advantage of all the camera improvements Apple has baked into the device.
The more comfortable that you get taking photos with your iPhone, the more you’ll discover how easy it is to achieve professional-looking results. So whether you’re taking photos of your dog or you’re shooting commercial images for a paying client, you’ll find that you have all of the tools you need to take pictures that impress.

Edit Your Photo with Ease
Adobe Lightroom: Finding Your Unique Editing Style
Try Skillshare for free! Sign up for a 7 day free trial today!
Get Started- Unlimited access to every class
- Supportive online creative community
- Learn offline with Skillshare's app


