Transcripts
1. Introduction To The Class: Photogrammetry is an
industry standard practice within the 3D space. It is the art of taking hundreds of photos
and stitching them together in software to create
a photorealistic 3D model. And with the constant
evolution of technology, anyone and everyone can now
join in on this practice and create some amazing results with just our fern and
some free software. Hey everyone, My name is Smith
and I'm a 3D artist with over five years of
experience within the creative industry
and as a freelancer. In this class, I'm
going to teach you how to get started with
this awesome art form. Your class project will
be to create a 3D scan of an object either in your household or from
outside in your garden. In this class, we
are going to cover the very basics of
photogrammetry and 3D scanning. Once the basics are done, I'll teach you how to 3D scan your selected object and the best lighting conditions
to scan your objective. After that, we'll
head back inside, input all of our photos into a software called
Reality Capture and begin learning about the software and how
to create our 3D scan. A quick disclaimer,
Reality Capture is a free piece of software
so anyone can use it. However, if you want to
export your 3D scan, it does cost around one to $2. Using reality captures
pay per input system. If you just want to
learn how to create 3D scans using
photogrammetry techniques, this class is for you, all of the steps involved in this class will still
be actionable for free up until you want
to export your 3D model. By the end of this class, you will have a greater
understanding of photogrammetry
practices and a 3D scan to add to your portfolio. I hope you come along
for this short class. And with all of that
said, let's get started.
2. Lighting and Photographing Your Object: Welcome to the class. I'm glad you could join me. Let's jump straight into it and start off with
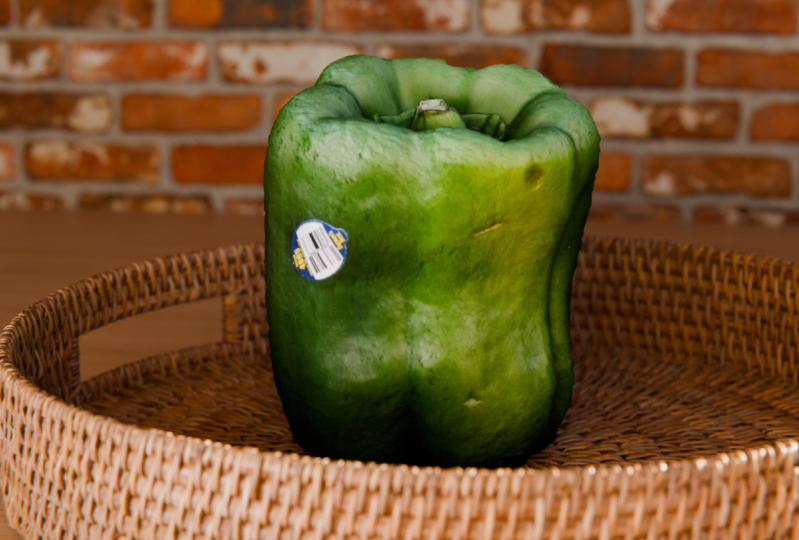
selecting an object. I've selected this apple, but you can select
any object you want. I'd recommend starting
with something small, like a piece of fruit or a rock from outside
in your garden. Once we're more confident with the process of 3D scanning, then we can move on
to bigger objects. Now let's cover how to take
photos of our objects. The best lighting
conditions folder. For lighting. We want to ensure
we're photographing in either a shaded area or in a controlled area
with soft bounce light. The most ideal lighting
conditions would be Ann Arbor cost day under a
shaded area or a tree, giving you an optimal lighting. This is a very important
step and we don't want to take Alfreda graphs
in direct harsh sunlight. If we do skip this step and don't get the
correct lighting, we will be baking in the harsh
sunlight into a 3D scan. And this will make it more
difficult for us to put these 3D objects into
any scene that we want. Okay, so now that we have our objects and our
lighting setup, we want to start taking
efforts to stop. I want you to set your
foreign camera to manual. We don't want to
have our camera use automatic settings as we need each photo to have
the exact same data for the best possible skin. If you don't have manual
settings on your iPhone, you can download an app from the App Store to allow you
to set manual settings. There's quite a
few apps on there, and I found the Yammer app
to work the best for me. If you're using
Android, don't worry, you should be able to
set manual settings directly in your camera app. The early setting that
we'll have as automatic will be the focus or
the focal length. The rest I would recommend
playing around with. The main settings
we want to adjust. Here are the white balance, the ISO, and the shutter.
Let's do that quickly. For the white balance, find something that is
white and well-lit, heavier camera or with a white area and press
the left button. This will lock the white balance for all your images
moving forward. Now in the exposure settings, Let's change to the custom
tab and set up the shutter. Shadow is the speed at
which the camera closes. A fast shutter speed
creates a shorter exposure, meaning the amount of
light the camera takes in. And a slow shutter
speed gives the photo a longer exposure, which produces blurry images. With this in mind, let's
choose our shutter speed. I find that one over 52
works best for my photos. But feel free to
experiment with this. Once your shutter
speed is set up, let's change the ISO
setting. For the ISR. We want to move the slider
until I object is well lit. The ISR is the cameras
sensitivity to light. And it describes
how much light it should let into the
image at any given time. The love of this
ladder, the less likely there will
be, and vice versa. Alright, so once
your camera settings are set and locked in, we can begin taking
photos of our object. I've prompt my object
up on a bar stool under a shaded area so that I can follow the shape of
the object easily. I'd recommend finding something similar to place
your object on and something that is
about waist height so that you don't have
to bend over too much. Once done, we essentially
want to take photos following the shape of our objects at
various levels of elevation. For my apple, I'll
start at level with the object for my close-up
or detailed distance. And I'll snap a few
images on the way back to the wide
distance of the object. This ensures that there's enough overlap of images so that AF photogrammetry software can agree on the position
the image was taken at. Once. I'm at my wide distance, I'm going to take
a small step left, making sure to keep
my distance the same from the object
and snap a shot. I'll move another small
step and take another shot. I'll do this all the way around the object until I've
done a full 360. I find ten to 15
images per quarter of the object is
generally good and gives a great amount of detail for the final result any less than this and you may not be getting enough data to generate
a clean 3D scan. Once I've made it back
to my starting point, I'll elevate my camera
angle slightly, making sure to keep my
distance from the object it, and repeat the process. Once complete, do another pass from a higher elevation and continue this until
you're almost shooting photos straight down
on your object. This process can take
some time and you might think that you're
taking too many photos, but chances are you probably aren't taking
enough of them. The only way to find
out is to finish off your photoshoot and input
them into reality capture, which we will jump into
doing in the next lesson.
3. Reality Capture Setup + Image Alignment: Alright, now that we have all of F furthers ready for input, we need to download
the software, reality capture and install it. Reality Capture is free to use up until you want to
export your 3D scan, which we'll talk about
later in the class. Let's start off bad downloading and installing Reality Capture. First, let's open
our Internet browser and Google Reality Capture. The first option
should appear as Reality Capture or
capturing reality.com. Click on that and it'll
bring you to this page. So let's navigate to the
Download Now button. And this will start a download
of the dot EXE installer. That download is complete, just follow the
installation steps and choose a folder for the
program to install. Two. Once done, click
Finish and locate reality capture in
your Windows programs. So now that we are
in the software, we need to activate
reality capture. This will ask you to
create an account. You can choose to sign up
through Facebook or Google. I've gone ahead with Epic Games. But you can use any
of these options. Once your account
has been created, you'll be met with this screen, which is the paper input system. This allows us to use the program freely
and as much as we want until we want to
export out 3D scan, which is very useful. For reference. Older
scans that I've made in the past are around $1 each. So it is very cheap to export. Once you are satisfied
with your scan, just click the two
checkboxes and hit Activate. Once done, click Next through the on-screen windows and you will be met with the viewport. Up the top right, you can
change your screen layout. I like to work using
this layout here as it gives me more space to
work in the 3D viewport. To actually navigate
the viewport. Left-click will pan or move you in space
through the scene. And right-click we'll
rotate your view. Alright, so now let's
import our images. Simply load them off of your phone into a folder
on your computer. Then select all your photos by left clicking
your first image, and then shift left
clicking your lost image. Then you can drag and drop your images into this
side panel here. This input process, it
shouldn't take too long. And you can view your images
by clicking this plus icon. Wonderful. So now we want
to align our images. Let's go to the Alignment tab and click the Align
images button. This process should take
about five minutes, depending on your computer. Once the software has completed
processing the images, you will have this awesome
point cloud representation of the 3D model. Each of these white
boxes are actually a representation of the
image being referenced. If you click on any of them, it will show you the image on the right-hand side as
well, which is pretty cool. You'll notice a light gray
box around your object. This is the
reconstruction region. And we want to control that. Left-click in the
viewport and head over to the Tools tab and click this set reach
construction region. We want to tighten this
down around our model. Don't need this excess stuff. Just the object that
we're scanning. To do this, you can
use the number pad one through seven to align
your camera to the sides. This will make the
process a bit easier. It actually tighten
the box down, just start by clicking and
dragging the green, blue, and red circles just to match the dimensions
of the object. Here I've pressed for on
my number pad to go to the side view to get this reconstruction region
as precise as possible. Once I'm done, I'll
press it one on my number pad to go back
to the normal view. Now that we've set the
reconstruction region, we're going to create the
mesh in the next lesson.
4. Mesh and Texture: Now to create the mesh, Let's go to the mesh
model tab and click the normal detail button to
create the mesh of our model. This process can take quite
some time depending on how many photos Reality
Capture needs to process. This takes about
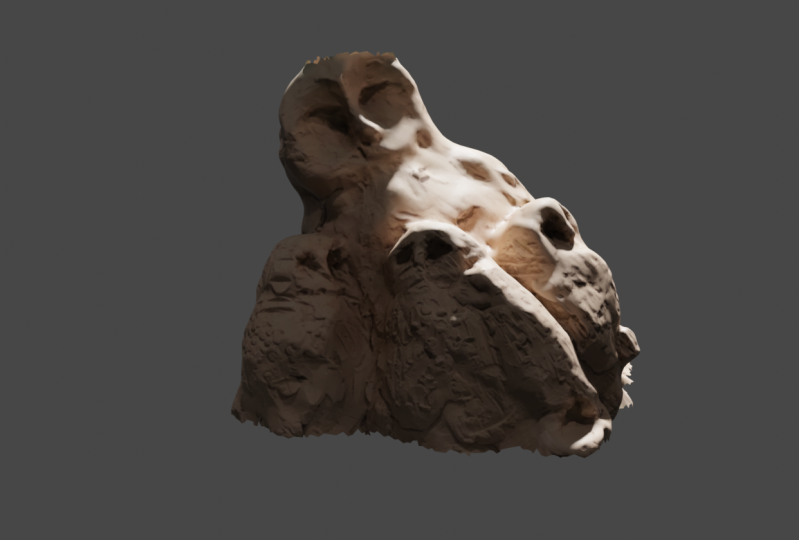
ten to 20 minutes for me on my current setup. Once this process is done, we now have a workable mesh, but it's lacking a texture. While in the mesh model. And if we are happy
with that result, we can click the texture button. And this will apply a
texture to our model based on all the images we
have fed into the program. Now we have a complete 3D
scan that's ready for export. Just quickly. You should see on
the left-hand side, a control point has appeared. If there is more than
one compartment. This means that you may
have rushed the photos. You may not have
taken enough photos. You got impatient and change the camera angle too harshly. Not to worry though, this can be fixed and we will go over the steps on how to fix this
issue later in the class. For now, if we're happy
with that 3D scan, Let's go through how to export LEDs or level of detail
in the next lesson.
5. Exporting Your 3D Scan: Now let's export our
3D scan using L RDs, or level of detail
that we can use this asset and any 3D
program we want to. Leds allow us to export multiple versions of our 3D scan at varying levels of detail. So for example, an
LOD of one would be a highly detailed version of the Apple and have a lot
of geometry and vertices. Whereas an LOD of five would be a low resolution
version of the apple. And it would've have very little geometry and bad disease. This workflow allows
you to optimize your 3D environment and choose which LOD to display in a particular scene
or a camera shot. There's no use in having a 3 million polygon apple that is way in the
background of a scene. As that'll just chew up all of your processing power
on your computer. This is a standard practice
and it will help you when you are populating your 3D
environments in the future. It actually exploit our LEDs. Let's head into the
exploit section of the mesh model tab and
click the levels of detail. This will open a window
and ask you to name your 3D scan where
you want to put it. I would suggest just creating a new folder by you keep your 3D scans for future reference
and click the Save button. Now that we have this saved, another window will pop up and ask you to put in
a few parameters. So we just wanted to focus
on just a few settings. First of all, the model count. This will describe how
many LEDs we want. I usually go with five. So I'll change this to five. Everything else in this section, I will leave as is, and move on to the mesh
settings dropdown. Here I want to change these
safe mesh by parts to know. Just click this
drop-down and click No. And for the format version, dot OBJ is fine. I'll make sure that this
is wavefront dot OBJ. And move on to the texture
Options drop-down. Here, I'll make sure that
export textures is set to yes. The rest of this we can leave
as is and hit the button. Now if you're not yet logged in, you may be asked to
login just to confirm the export and utilize
the pay per input system, which is runoff of credits. To do this, after
looking in reality, capture will ask you
to buy some credits to fund the export
of your 3D scan. The smallest amount you
can get as ten US dollars. And honestly that's
more than enough. This should get you through
at least ten to 20 skins, depending on how many
photos you are processing. Once gone through with their
secure payment system. The credits will be
funded to your account. Once you confirm the
export of the LEDs, Reality Capture will
begin processing them for you to the folder
that you specified. Awesome. So now we have the
dot OBJ files that we can use in any 3D
software that we choose. Now that we've covered all of the main points of
photogrammetry, let's talk about
troubleshooting and fixing bad scans that have multiple
compartments to them. In the next lesson.
6. Trouble Shooting: All right, So as
mentioned previously, if you happen to get
multiple components during your image
alignment stage, this means you may not
have taken enough photos. You may need to
retake blurry photos, or you may need to manually
set control points. This is by far the most tedious process
of photogrammetry. And this is why we need to
put in the work while we are at the location where we're taking the
photos initially. If you can, the first step would be to go back outside and retake a set of photos and start the whole
process from scratch. This time taking the time
to get as many photos as possible and as many
angles as possible. If there are just a few blurry
photos that are failing, you can go and retake those
photos from that angle as well and re-import
them to Reality Capture. If retaking photos
isn't an option, then you'll need to set control points manually to do this, open the control
points drop-down on the left-hand side and
click the Create button. This will create a
control point named 0. What we essentially
need to do is drag and drop this
control point onto a small mark on the object that appears in
other camera angles. So this will help
Reality Capture, bridge the gap and
fix your scan. To do this, let's go
to the top left and change our layout to the
bright layout option. Just so we have a couple
of more boxes to look at images and set
control points on. If you have any blank
views in this layout, I generally find a line
of images that share the same position and
angle in the 3D viewport, and click on the
small white box. This will then highlight the
image in the left-hand side. And I can drag and drop that
image onto one of the boxes. I'll generally
repeat this process until I have three or
four to work with. So now we just need to find a small mark that is
visible across a series of images and set control
points on it by dragging and dropping
them onto the mock. Here I've added just a few of the same control point onto
a small dot on my Apple. You can see Reality
Capture is automatically found that spot across
other images as well. You just want to click these images and check to
see if they are correct. If they are, click the green button to
add the control point. If not, just ignore them
and continue the process. To finish this whole manual
reconstruction process, you will need to
create at least two to four control points across all of your components to get a successful merger of
your control points. Once you've done this
process of adding the control points in
for each component, you can come up to
the Alignment tab and click Match compartments. If it's a success, you'll be left with
one component. If it's a failure, you'll have
multiple components again. And you'll need to delete
them and repeat the process. If you need to
delete a component, you can just hover over it with your mask and click the red X.
7. Outro: All right, So thank you
so much for joining me in this short
photogrammetry class. I'm glad you made it
all the way to the end. Hopefully now you have a
better understanding of photogrammetry
practices and have an awesome 3D scan
for your portfolio. If you want to. I'd love
to see what you create. So please send me your creations on
Instagram at Smith scopes. And please leave a review on this class if you enjoyed it. I'll see you in the next one.
 Smeaf, 3D Generalist and Tutorials