Transcripts
1. Introduction: [MUSIC] Hello and welcome to this intermediate
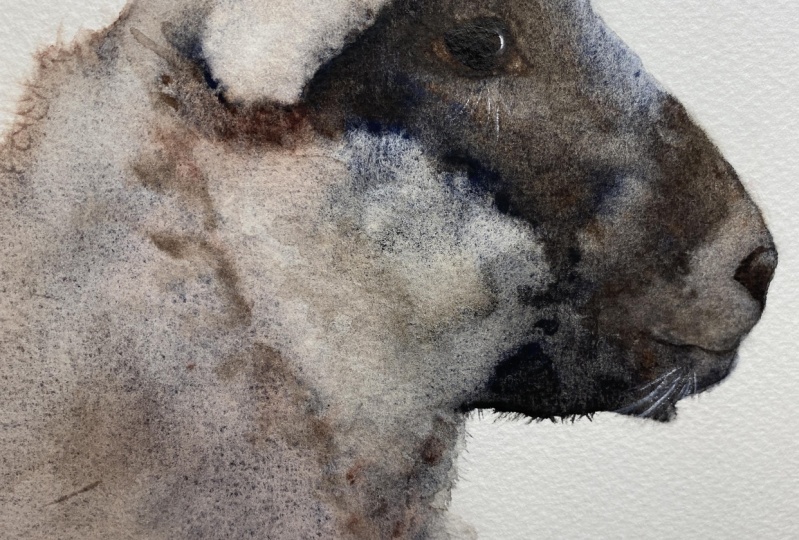
watercolor class. We'll begin to be painting this handsome young
ram called Lambo. If you follow me on
Instagram stories, you may have already met him. He's been our neighbor
for the last year. It's a great class
where I get to show you many techniques I use in
my own portrait work. I get to show you how I
add color to subjects. Know, if you're feeling
a little daunted by the subjects and would like to try something a
little easier first, have a look at my
beginner classes, and these can be found
over my channel. I'm Jane Davies. I live, paint, teach, and walk my
lovely spaniel in the beautiful South Downs
National Park, England. Over the last 10 years, I've taught myself
the watercolor techniques that you see today. Not having been to art school, finding my own way has been
fun and sometimes daunting. But it's allowed me to
develop my own style. This has led me to
teach the others, either on a one-to-one basis
or as part of a group, in a wonderful studio in the
heart of the South Downs. I also run a successful
commission-based business, painting pet portraits and wildlife art in my
own home studio. In all my classes, you will follow
along in real-time, where I can guide you
to keeping your work loose and fresh
without over-fussing. I'll be sharing lots of tips and tricks along the way too. I've provided you with a
beautiful reference photo and template of him in the
projects and resources pages. As I often say, don't feel
the template is cheating. This class is all about
watercolor and not drawing. I'm going to show you how to
create him by simply placing lovely strong color onto the paper using slightly
different techniques. This will give you
that lovely contrast, but all the while keeping
that beautiful softness. I'll also guide you through the process of sectioning areas off that help control where that fabulous paint flows to, and when and how
to join them up. Of course, I share
my tips, tricks, and musings at the
end that will help you with the all-important
finishing details. If you'd like to learn more
about me, all my work, please pop over to my website at janedavieswatercolours.co.uk. This can be found on
my profile along with links to my Instagram
and Facebook pages. I'm very active on my
social media pages, where I love sharing my art, especially on stories
with many ideas, works in progress, and tales of studio life. I really hope you will
share all your paintings on the project's pages as I love
seeing your masterpieces, and don't forget, I'm
here to help if you get stuck or have any questions. I want you to experience that buzz of painting
in this liberating, wet-on-wet, loose style
so come and join me. [MUSIC]
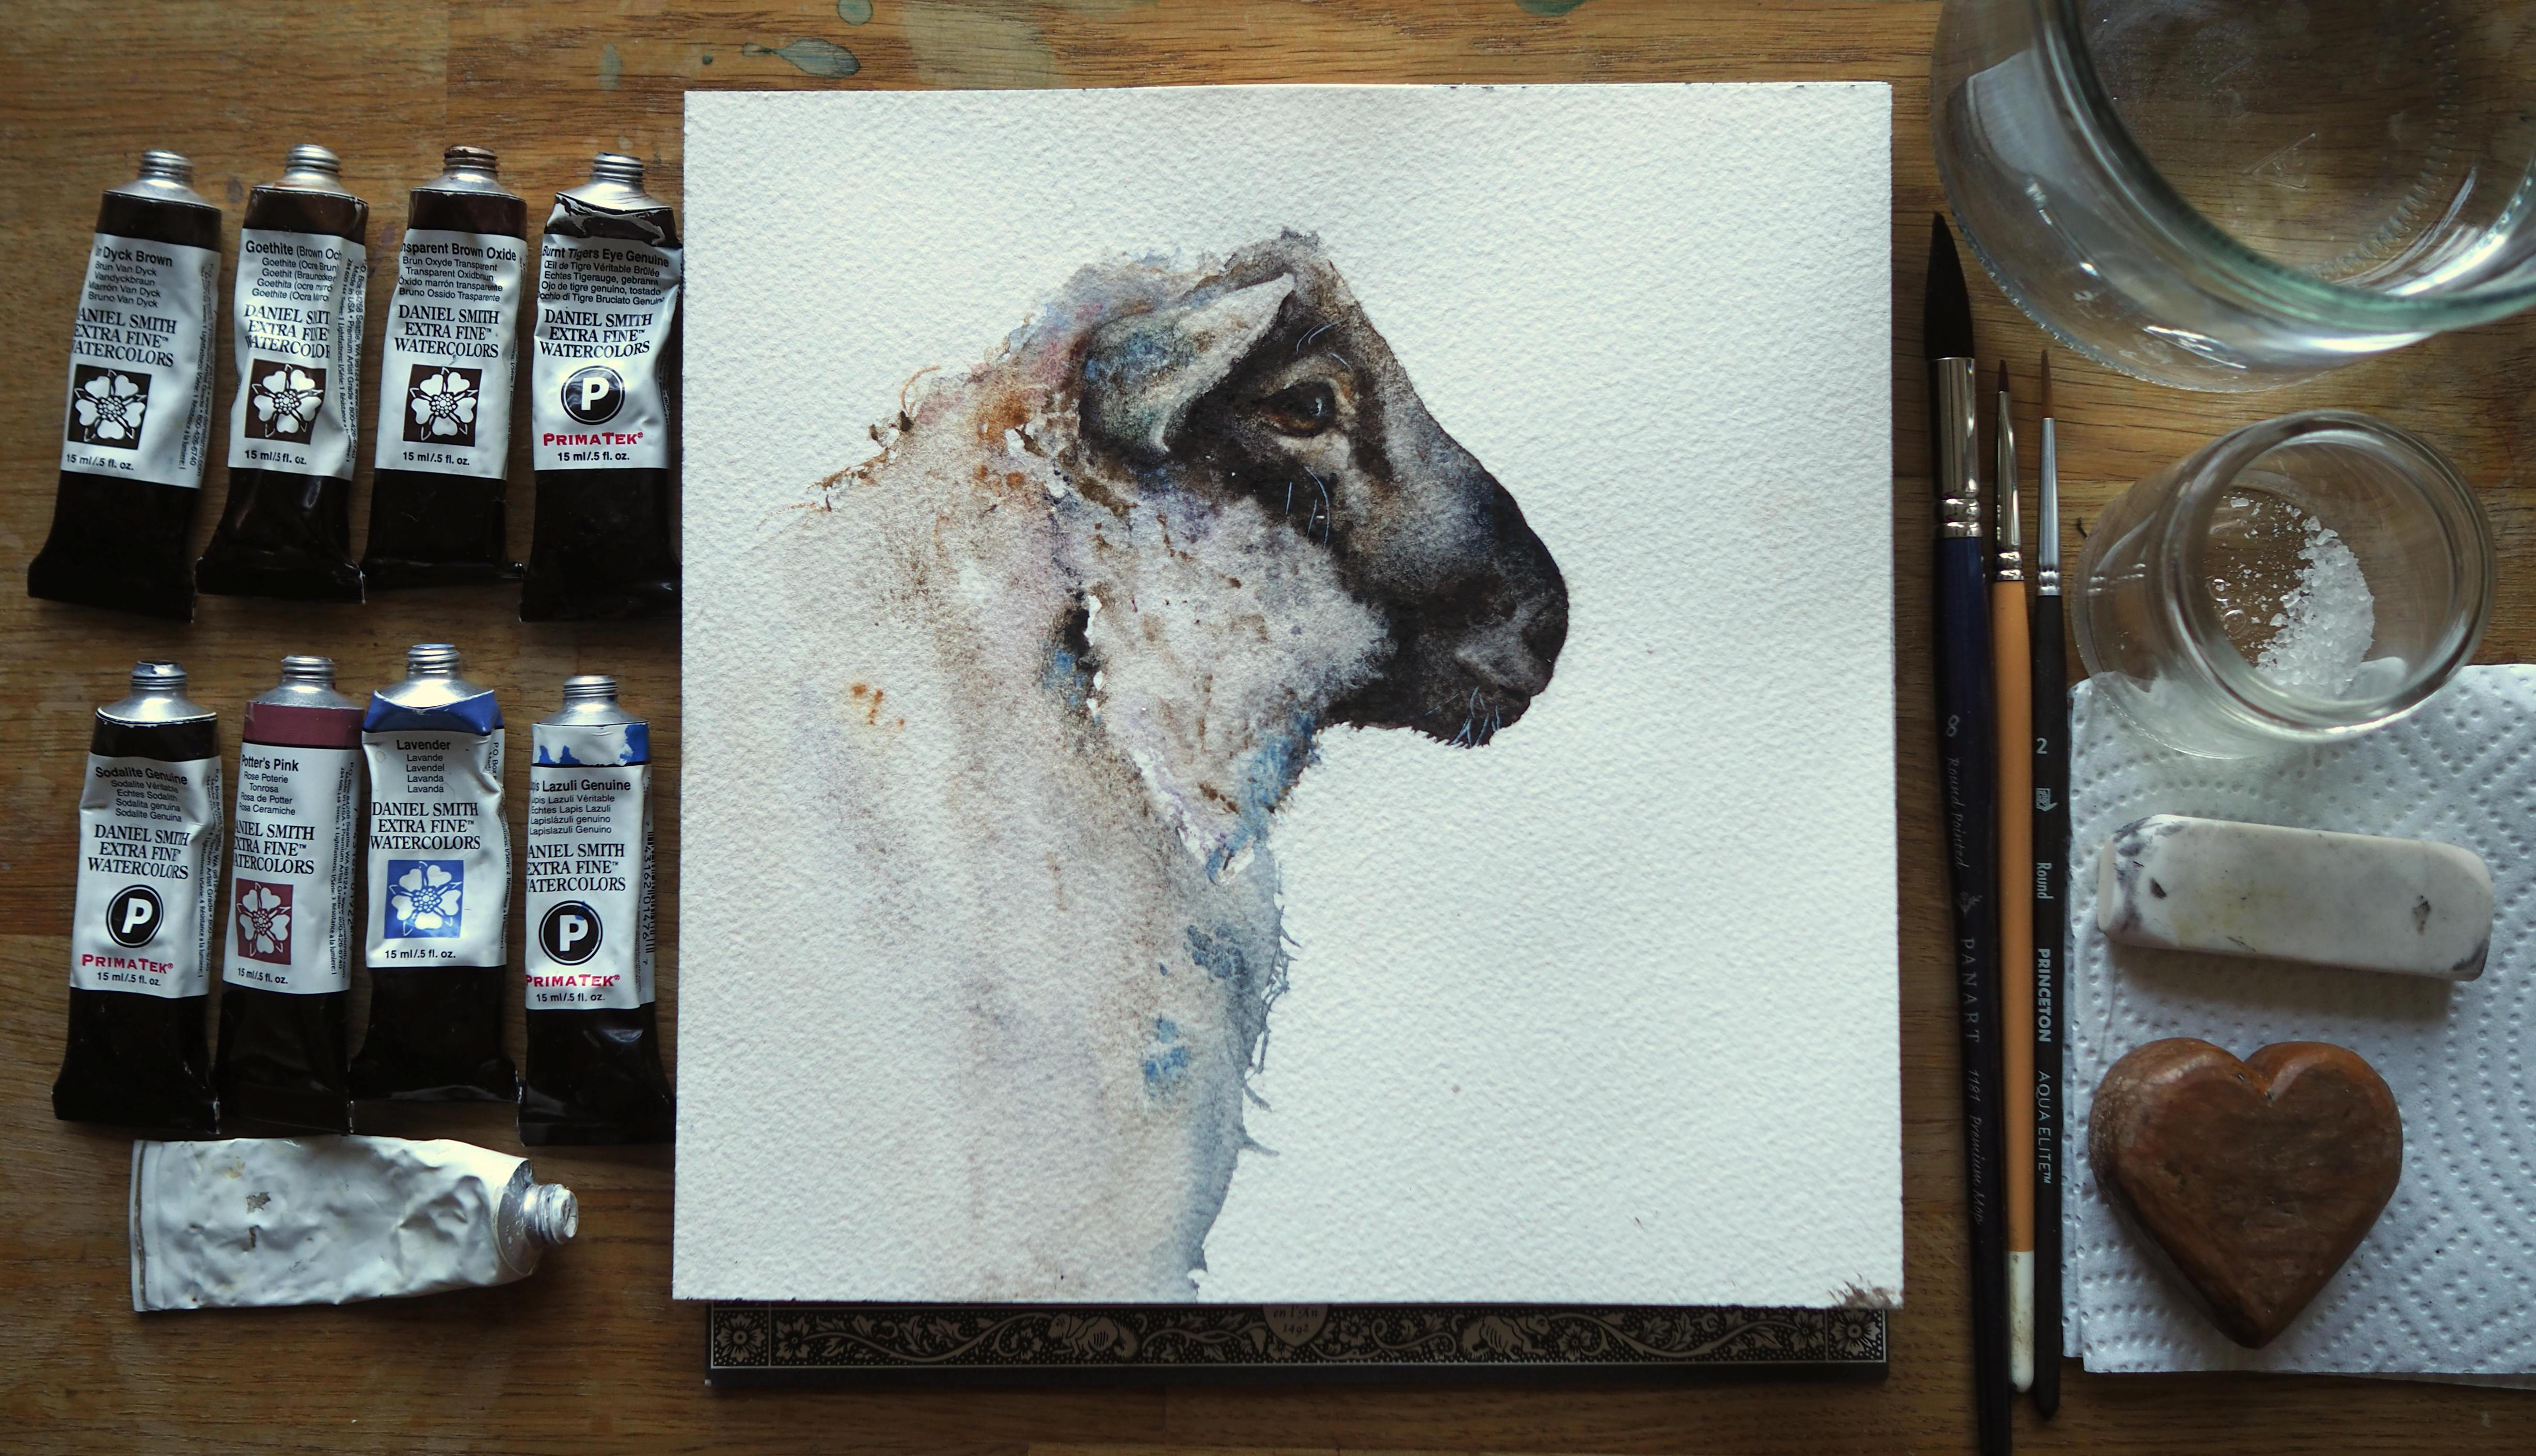
2. Materials: Welcome along to this
little Lambo, the ram lamb. Now that's quite a tongue tie. [LAUGHTER] This lamb is actually
quite dear to my heart. He's been a resident
at the bottom of our garden in the adjacent
fields all summer long, and he's such a
friendly little chap, he'd come rushing over for
a cuddle, and hopefully, I should include some
little videos in the resources pages so you can
have a little look at him. I've been looking
forward to sharing this class and hopefully, we can capture his really
gentle character together. The materials I'm
using today as normal, they're all some light collection
of Daniel Smith paints. Firstly, I'm going to run
through the colors I'm using, and then I will hopefully give you a guide on
some of the colors, if you haven't got
what I've got, that might be a
good substitution. To start with, I have
a Van **** brown, which is the dark
color I used in head. Here's goethite brown ocher. That's just hints of it actually I don't use a lot of that. I've got a transparent
brown oxide, which is a nice rich brown. Again, it only hints
for the eyes really. I could not have a burnt tiger's eye in my
collection, could I? [LAUGHTER] He's
going to think that most of the classes
must need that one along with Sodalite Genuine, again another big favorite
of mine and one I use a lot. Then we've got a potter's
pink. Just a hint. I got lavender, and I've
got Lapis Lazuli Genuine, which is I love it. It's just as such a lovely blue. Then just a little bit of
white gouache just at the end, again that's just for the catchlights and a
few little whiskey bits. The paper I'm using
today is archy arches, which is a rough cold press. If you're struggling
to try and remember, all these our materials are in the projects and resources pages so you don't have to
try and remember them. Pot of water. See
that pot of water. [LAUGHTER]. I got a little bit
of salt which we use on this neck. A rubber. I've got a little, it's just a little paperweight and I just use it to tilt the paper at certain points and we
won't do a lot of it, but you just need something. What about an inch high? Then I've got my paper towel, a pencil, and I
got three brushes. I've got a Number 8, and that's around 0.81. It's a nice brush actually, got a lovely tip to it. The names can be found
in the resources pages. I've got a little eraser brush, which is lovely for
taking color out. Definitely, I must
have that one. We have a number, want to get it out, a Number 2. If you haven't got
exactly eight's or two's, eighth large one
and its small brush will be absolutely fine. I have a hairdryer off camera, which is quite handy just to speed up the drying process
but it's not essential. Just lastly, the words
about the reference photos, that can be found in
the resources pages. I better tell you some of the substitution shade rattling on about all the
other materials. The main two colors
I would have said that are really helpful. They're the Van **** brown
and the sodalite genuine. If you haven't got
either of those, sepia would be quite good. For the Sodalite Genuine
as a substitution, maybe Payne's gray, so any dark rich
blue would be ideal. The others none of them
are essential to this, so have a rummage to see
what colors you're drawn to. There's something that you
particularly like using. Try that. A lamb
hasn't got pink in. He's got blue in only
on the reference photo, but that's a dye he's been sprayed with so obviously
he's not a blue lamb. Yeah, don't feel constrained by having to try and pick
up his exact colors. If you fancy, if you
love a certain move, then add a little bit of moving, say with experiment and be free. [LAUGHTER] I think I've rattled on enough
about the materials. I think we ought to get
and sketch him out.
3. Sketching Out: Now I've sketched them
out as I normally tend to off-camera so you don't have to painfully watch me
sketch them out. But again, I will give
you a few little tips. Getting the eye in
the right place is really important on
this little chat piece. Most of it is really
lovely loose. The looser the work, the more precise you have
to have certain points just to draw the eye and to get
those features dead right. The mouth is quite important, just that little
line across there. Make sure that's right. Again, is placement of
his nose and his ear. The rest, he chops, might move a little bit. These are little choppy bits. The fleece line, don't
worry too much about that. But again, get the outline even on the fleece to the right. These little two lumps
here I found quite important when I was sketching them out or doing lots
of practice pieces. They have just a slight
little bow on the nose. Well, just slight, but these little things will
make the difference and make him the lamb of rather
than another little lamb, so they're little
important parts. Apart from that I think
we will start painting.
4. Head First Layer: On to the fun bit. Pick up your big brush. Let's get that lovely and wet. I've just put my other
two brushes away, just hadn't need
them for this layer. I've got my little support that we're going to
pop the paper up, so we can get a slight
tilt if we need it. I'm going to grab my Van ****
and my Sodalite Genuine. I'm going to pop some lovely, strong color, starting
quarter way down his easier. I'm going to run that down. Get both colors on your
brush at the same time. I'm going to pull that really lovely thick or one at a time. But we want it lovely and thick. All the way down. All down to his little chin. Make sure you stay within
those lovely lines as well because that's
quite important. I'm going to make sure
I got plenty on there. Put those down. Clean
my brush for a minute. We're going to wet
carefully around the eye. I want it up to the top. Lots of nice water, if you don't get it wet enough, your paint won't run, so make sure you get
your brush nice and wet and your paper nice and wet. We're just touching that. You may find it's moving enough. If not, then you can just pop. [NOISE] But it'll support there. I call it support,
it's putting a lot of support. Hopefully,
you know what I mean. We're just going to continue
rustling that paint. We're using is a lucky
little palette, I suppose, be really careful around, because if you're dealing
with lots of water as well. Go careful. Because
you're tilting, you'll find you're going
to have a bit of a puddle, so be mindful of that. We're not trying to rustle, I'm trying to be as
light as I possibly can. What we don't want to do
is disturb or rustle, we just want to encourage
it right down to the front of its face. That looks like it's
done a good job. Now, I know it's traveled. I'm just going to
get rid of this. I don't need that. Then I'm going to pick up [inaudible] light
genuine Van ****. I might have a little bit
of transparent brown oxide just to keep it a
little bit warmer. I don't want to go into
cool and obviously, those two colors are quite cold. I'm just going to pop some of these colors on
my brush at same time, it's a lovely thing about
working straight from tubes is one is lovely and you can
get a nice concentration. Two, it's quite spontaneous because they're right
there in front of you. If you are working from pens, [NOISE] this class is
completely doable, you just have to get those patterns a good
old rustle around here, get some strength. But it's perfectly doable. I don't want you to be put
off if you haven't got tubes. I'm just going to make sure
I come around the eye, I can just say I
haven't gone quite as neat and right up to
the edge of the eye. I'm just going to push it away because there's
a lovely bit of light around his eyes, so we're not trying to
put any paint in there. We will be taking it
out in due course, but just strengthen
at the moment. [NOISE] Down here, just squint your eye, you
can see where that ark is. There's a nice touch
there as well, isn't it? Again, neat around his ear. All the white wet. You can maneuver but if it starts to go to
glue it tacky in one place and drawing, then you just want a whole file for
a little bit this , we will do another layer. If you feel it hasn't
got strong enough, that's absolutely
fine because we can strengthen on the
next layer as well. What we're going to do now, I'm going to wet the top. We're going to encourage some of that paint just to
go around the ear, run it down here, pop it around. We're just going to join up. We're going to encourage
some of that paint and we're going to put something a little
bit stronger down there as well because it's quite
dark underneath these areas. When we do this other
layer, that will soften. Before that completely dries, I'll just stop touching these, [LAUGHTER] put those down, cycle with a lot of
moisture out my brush. I just wanted to try and
just start taking some of that color out from
around the eye. I'm going to close that in
a little bit there as well, so a little bit long. We can do this on
the second layer and then we can also do it
as finishing off a bit. I just don't want the paint to be too heavy
there at the moment. I think that's drawing really
nicely. I always do this. I say, that's just perfect
and then fiddle same as bad as everyone else. I think we need to let
that completely dry and then we can crack on
with the next layer.
5. Head Second Layer and Neck First Layer: This is dried all beautifully, and I've actually left
it to dry on its own. Sometimes it's a nice method, it stops if I put a hairdryer, or sometimes it just
blows the pigment, and they also do combine too
much and you lose some of that nice texture
you can achieve. It's all up and dry, so make sure yours is before you start. I picked up my nice big brush, and we're going to
wet this neck area. I'm calling this the
head, neck, fleece. That helps when I gobble away. Make sure it's lovely and wet. [NOISE] Look how we're going
to join this up in a minute. I'm just going to do
the neck area first. This is a really lovely way
of layering because it's giving me a lovely
lot of strength here. As I touch this, you can just start to
see it will just really gently blend, really gently. If you're ever doing layers, keep everything as loose
as you can and just allow that brush
to fall naturally. Because what you
don't want to do is scrub because you'll very quickly lose any texture you
had on that first layer. If I was to have painted this and left that dry and just
wet that area there, we would have had
quite a hard line. This way, this will just be soft and will just very
gently blend outwards. It's a lovely one and I
paint a lot like this. A lot of these techniques
are what I use in my own pet portrait work. He's actually very
similar to how I would go about
layering and painting. You see my work is a little
bit bigger than his, which takes more time. We're going to wet
this area in a minute. We're just going to go round
it for the time being. My thought is when I wet this I don't want
too much color going in, although this has
behaved quite well. Sometimes you might get more of a wash. That's
quite a hard line, so I'm just going to very
gently give it a little bit of a rustle just with
the tip of my brush. Let me see if we can get
rid of that harder line. I'll put a little
bit more strength for color in there
in a minute as well. What we can do now is we can strengthen or take
out if need be. I'm looking at my
own piece and say, [NOISE] judge your own piece. I'm just going to make sure I've gone
right up to the edge. Make sure you've got
all the paper wet. You can bob your head and
you'll be able to see. You can keep just rewetting this if you need to work on it for
a little bit longer. As long as this area is all wet, you can just add a little bit
more water if you need be, and then it gives you a bit
more time to tinker and play. Let's have a little
bit of tiger's eye. One hasn't been out
to play yet, has it? In my mind, I just want a little bit
stronger this there, so that was just tiger's eye. I know that just
really gently blend. I want a little line down
there a little bit more. We want to try and
get the eyebrows. I've got Van **** as well
in my hand I'm holding now, top that in as well, and that strength.
Just down here. You're going to grab
a little bit of solar light as well and I want that more at the
base of the chin. If you've done the bear this is not the same as bear actually, [NOISE] we just don't
turn him upside down. [LAUGHTER] I'm going to pull
that down for a second. [NOISE] It's going
to pick up if it is lapse eye, lazier eye. [LAUGHTER] I'm going to top some of that
in the base there. I love this color. It's not very strong and a few people who've messaged me and said "How do you find it?" Is a little bit of a weak color. It's going to pull this
down a little bit here. But it's always such a
beautiful color though. It's worth it. Let's pop
that back down a minute. [NOISE] I'm going to try and
keep an eye on this ear. The minute this starts to go
a little bit tacky round it, I'm going to wet this ear. It's quite wet there
still at the moment, so I'm going to hold fire. I'm pleased with
the rest of this. I don't think I want to
add much more color, but if yours is
looking a little bit washed out then add color and make sure this is nice and neat, and we will be doing some
little flicks in a minute. Again, we need to wait for that to dry a little bit
more before we flick out. Always you'll get very
wet, so spongy flicks. Let's have a little bit
of lavender and pink. Let's get some color on top. Roughly bear in
mind I'm going to a little bit warm up at
the top of his head. But if you want you'd like to be painted with some
pink, I don't know. I think he's probably a
very liberal little chap. Just dubbing, I'm not
doing any brushstrokes, it's all just dubbing
and dabbling. Put lavender in there as well. I love adding color like
this, it's so lovely. That's nice. I'm going
to put that down. The minute you like
something stop. Don't carry on [NOISE]
into overrake things. I'm losing a little bit
of strength there I feel. I'm just going to
pop a little bit of solar light genuine in there. Just want that to be nice and strong because it's quite dark. That's looking lovely. I'm going to put that down. That is starting
to look quite nice too. Do some little flicks. I've picked up my small brush, just wet it down and make sure it's clean and I point to it. Start somewhere you're not light on the edge
because you end up with very long whiskers and just very gently.
Just take your time. As long as that's wet you've
got lots of time to fiddle, and try not to make
them to uniform, go back and forth a little bit. You don't have to have
to move along either. We might flick some out here although we're
doing another layer, it won't hurt to have a
couple of flicks there. Now for the top knot, we fleece, I've actually
used my fingernail. It's quite nice because it
just so drags the paint out. All I'm doing, I'm
covering the camera now, I guess I'm obscuring it. I'm just pulling out. I'm just doing some twiddles. Hopefully, I've got enough
paint on there. Swap hands. It's not technical swapping
hands, so you can see. [LAUGHTER] Hopefully, that just gives a very rough
really look hopefully. I think that's
enough. Now I reckon my ear is just about
ready to wet again. I'm going to clean my brush, and I don't want too much
water at this stage. This holds a lot of
water, this brush. I'm going to take
quite a lot out. It's damp, but it's
definitely not holding a lot. Very gently we're just
going to wet the ear. Don't worry, your color is
going to wish into the ear. But that's what we want it to just safest repainting really. Again to keep it loving
yourself you won't end up with a very hard line around
the ear, this thing. We want to put a
little bit of color. There's a lovely crease
going up there, isn't it? I think I'm going to
use the Van **** and let's put that to your life. We haven't used
this yet, have we? I think I might have outdid the dogmatic
colors I've got here. I'm going to distract that. I want to put a bit of color, so I've just added
there, some there. That's my complete randomness. Let's keep to the
game plan, Jane. But that little crease up there. [NOISE] That should
soften quite nicely. [NOISE] I'm going to use my finger and
paint use the offer. Put a little bit of blue there. Sometimes you just have
to go, you got instinct. If something says, that would
be nice there, then do it. I think this is a case of
trying to get your subconscious to come forward and your thinking brain to take
a backseat for a little bit, which isn't always easy, is it? Trust your instincts.
If you think something would work there, go for it, see how it looks. I think that's how ultimately it becomes
a lovely way to paint. You just go with
the flow with it. You're not thinking too much. Now I think that
looks pretty good. I'm going to have to let
this completely dry, but before I do, that's
quite nice and damp there. Now, my salt hasn't worked
particularly well over the practice pieces,
so yours might. I am going to put some in here, but I'm not [LAUGHTER]
feeling hopeful. [NOISE] It may be a case where I leave this
a little bit too long. But we're going to put
a little bit there. Have a go and you may find yours works a
lot better than mine. That just needs
to dry completely before we can [NOISE]
do the next layer. Again, I wouldn't
particularly advise the hairdryer [LAUGHTER] because again you want that
to dry naturally, and again, salt takes
a little bit longer, so have a little break.
6. Fleece: He dried beautifully. But my salt didn't work
very well as I suspected. There's a couple of little
grainy marks there, but it's not very
obvious [LAUGHTER]. I must admit I had to air dry him a little
bit sooner than I would've liked. That
might be a reason too. The light is going
here in the UK, winter's day, we
don't get much light. It's on with a fleece. Before I pick up my brush, I'm just going to pop out
little support underneath just so we can allow some of
that paint to run down. It's not dissimilar to Mr.
Fox if you've done that, just a little more subtle. Pick up your big brush, nice. Lots of water and
we're going to leave a tiny white line in places. You might want to just leave it all the way down
to start with, and as we add color we'll go in, just gives a little
sheen or light really makes it another element. Then we're going to
wet all the area down. If you were to frame it, mount it, you'd lose
a lot of this anyway. Nice and wet again. Bobbly head, make sure you've covered it all. Then we're going to pick up, we're going to have a
little bit of tiger's eye, because that's a
nice soft color. I'm going to give a
little bit of geolife. What else do we have? Let's have a little
bit of pink as well. Let's get those
three in my hand, I'm going to work from the top. Let's have a bit of tiger's eye. Again just touching, if it sticks like that
or it doesn't move, then just add water,
and see how it runs. It will give things a
little bit of a wiggle around, all dry. It won't be so obvious
when it dries, you can add water, just
allow that to run. A little bit of pink up there, keep that pink
element going there, this is where we can
join up a little bit. You don't want strong, obvious white lines, just
a little hint of it. What's really useful,
I've actually got the original practice pieces
in front of me as well. I will include that in the
projects and resources page. You have that open as well. Open all, if you've
got multiple screens, you can actually
see the painting. I'm just going to tilt this
just a little bit more. It's running down to this corner and that'll give us a little bit more sense
of movement as well. See that, it gives us another sense of
direction as well. I'm going to pop some
of these colors down. I'm going to pick up
that lop-sided laser. I get some of that
nice blue in there. I love this, as
you may well know. It up to say either
a bit of very bold, punchy color, but it's lovely. Let's have a little
bit up here as well. Just a hint. It's always just a little hint. It's sometimes not that
obvious when you put it down, but actually from a
distance. That really works. If you're sitting, have a go at standing for a minute while
you are doing the fleece, it just gives you a
little more perspective, a little higher up so you're not staring at it too closely. Just picked up van ****. I'm going to put a little
bit of strength here. Just to give us a bit
of a punch really. Be your own judge if you feel you need a certain
color in a certain place, then go for it. You can put a little
bit of light there, just to give us a
bit more depth. Pick up that way as well. Combining the two, that's nice. I'm going to go
mad with the two. [LAUGHTER] I think I
need a little something, a bit of a pinky lavender. It can get a little
bit dull up here. Breaking in a little
bit of color. I'm liking that minute again. The minute you think you've
got something you like, stop. The puddles at the bottom
if you've been adding lots of water runoff. Again, we're going to do I'd worked at the top because
obviously it's going to be joining quicker, because you've got it
as tilt to the top. I will do draw those
in the bottom. I'm going to use my fingernail again to just pull
up some of that. Please, just go back and forth. Try not to be too
uniformed about any of it. I might do a little bit here. I'm going to be careful
here because it's quite wet and I don't want to
pull that out there, but these is quite dry. Having another look, I'm looking back at it again from
a little bit of a distance, want to get a bit
perspective on it. I might put that GO life. I like this color, do a little bit of
a hint up there. Yes, I like that and let's
make it pop a little bit more. They're just such tiny
little gestures sometimes, infatuated with a
little bit later on. That's enough. I think
that needs to dry. Just conscious of this
little bit down here. I want to do a few flicks. I'm not going to leave it
a slight tilt actually, I like to keep that
some drawing on a tilt. Just be careful, if yours
is a little bit damp, just hold firm, I'm going to flick
out some of these, I might need a little bit
more paint on my brush. If you haven't got
enough paint here, you haven't got a lot
to pull out then. Add a little bit to your brush. But the flicks are
quite important to do when it's still wet. I have noticed a few projects, it looks like people who have just left it just
only a fraction, a little bit too long to
dry and then fix it out. It looks like the flixer
is still stuck on top, just to get a natural flick you need to make sure this
is still nice and damp and don't be afraid to pick up the same color as
you had in there. I'm just as guilty as
fiddling as the next person. A little bit more
strength there. That lightened lateral
eye is lovely together. I'll put them down, clean my brushes and I'm
going to allow that to dry. Then we can do the eye.
7. Neck Second Layer: That's lovely and dry. I might
have lied about the eye, the little [LAUGHTER]
neck area is the next little bit we will do. I'm going to remove that, get that nice and flat again. I'm going to pick
up my big brush, get it nice and wet. Take the excess moisture off and we're going to
pick up that cheer life. What we going to do, if you've got some nice soft texture, you might not want to do this one but if like me you haven't, I haven't managed to get any. We're going to just
put a little bit of texture in so we're going to vary randomly wiggle your brush around to tiny
little bit of this it's only a little bit and that hopefully will give us a little bit of
texture once it's dried. You don't want to
cover it too much, you just want to leaves and dry patches, if
that makes sense. That will give you
a little bit of a sense of texture there. I'm might do a little bit of that ellipsoid
ladder right there, a little bit more of a hint
because I love it so much. [BACKGROUND] That is all we need
to do for that. It says no more than
that and that will give us a little bit of
texture on the neck.
8. Eye: It has given us a little bit
more texture, hasn't it? This has worked. I think would be ideal better
it wasn't to work for me. [NOISE] Let's do the eye now. I'm going to pick up my
eco brush and I'm going to pick up the g of life and a transparent brown,
I'm trying to find it. [NOISE] We're going to wet this entire area
down, just nice and wet. You don't want it puddling, you want it just a nice dampness and you want
to go right up to the edges, just go really
carefully so you want to get right up to the edges. If it's bubbling mine
isn't but you just dry your brush off and just suck it up if it's got a
little puddle on it. If it's got a puddle the
paint would just sit on top and it would
take ages to dry. Put all colors on at the same
time and just deep them in. Make sure you have
right up to the edges. Make sure you add a
little bit of roof, I've added a little
bit too much, add a little bit of
roof for the bottom. We do a second layer over here, but I want to make sure I've got plenty nice rich
color at the bottom, give it a minute we're
going to put the van dyck over the top of this. But that is the first stage
and that just needs to dry. Once he's nice and
dry and we're going to pick up the
little brush again, wet it down and we're going to just wet down that
to the pupil area. A little bit like we did with
the first layer of the eye. Nice bubble but not sitting
so it's just nice and tacky. Then we're going to
pick up the van dyck, we are going to put some
eye makeup on him really and he's got a lovely
dark eye hasn't he there, we can just sculpt
it a little bit, I quite like it when
it's got a little bit of a turn here up the top
here just makes him look a little bit
forward-looking I suppose. He's quite dark here, that thing is actually strictly his pupil
this little bit here. I think that's probably the
inside of the eye socket, but [inaudible] about that, is a dark area and then nice
a little bit down here. Just a blink, there's
no brushstrokes, just going to keep
it all dribbling. Take your time with the eyes
is one of those things, it suddenly comes but you just have to be a
little bit patient. Just going to add a
little line there, just going to put that
little line on the top there bring that around again. It's looking quite nice
actually at the moment, I'm going to pick
up the sodalite or the key powder van dyck. Again, you don't want to add too much water on your brush, you want to quite dry
with the sodalite, just want to tap in put a
dark on the frontal area. Step away here if
you have stood, sitting is quite
nice for an eye. Keep working at your own pace, keep looking that
reference photos, keep your eye flipping
back and forth. If you get panicky,
when it gets messy, just stop let it dry and then
come back to look at it. Sometimes it used to trouble me a lot more
than they probably do now and you get yourself in a panic it will
gets a little bit messy sometimes you
just need to step away, let it dry, and then you
should come back to it with a slightly fresh
pair of eyes again. I'm happy with that
at the moment, so I'm just going
to put that back down, those colors down. There's a lovely
sense of light here, so that's for my little
brush, it's quite dry. I'm just pulling that light out, that's why we needed
a nice strong color on the hair when we did
that very first layer. I'm just working at my own
pace I'm trying to undo it. [LAUGHTER] You have to be guided by your own pace at this stage and how your eye is looking but there is this tear ducts and they are
definitely worth putting. Just a little aligned and
they can be softened, here they look a
little bit hard, damp brush again just to soften
the edge, pull them out. We can fiddle a little bit on the finishing stages with anything that shaping
around the eye. At the moment you can't
shape under here because any wet or paint here will find
that little damp patch there. Don't tinker with the outside of the eye just keep inside. I like that, I think that's
done all right actually. I'm going to try and leave it, I'm going to put my brush down, I'm going to let
that dry completely and then we can put
that little catch light in that always
makes a difference, but let that dry don't
put the catch light on until your eye is
completely dry. That's nice and dry to give it a little blush with a hairdryer because it was just quite tacky, so that's a good time
for a hairdryer. I'm pleased with all that
if you're catch lights, not catch light strictly, that's a little
glint in the eye. If that hasn't
come out very well this is quite a nice time
you can just take that out a little bit more
that will take too much out of mine because
it's looking alike. But this is where just have a little tinker with the outside
of the area if you want. Just take either a rough
little bits but again, that can probably strictly
should be done in the little finishing
off bits better. Now that looks fine.
Only little catch light so you want a little
bit of white paint. We decide to use, I'm going to put that
little catch light in, which makes all the difference. Now as I said, I think the very front bit is
probably an eye socket. You don't want to put
it into the eye socket [inaudible] you want to go
little bit further back. Deep breath, and
just put a little, I love putting those
in the difference. That is your eye. This looks a little bit strong here so I'm just going
to, personally for mine, I just want to take
that a little bit out, soften that a little
bit squishing the finger, looks a bit better. Soften it a little
bit and see if you get too many hard lines, makes the eye look like
it's stuck on a little bit. I think that's job done, so the last little bits and
we are nearly there.
9. Finishing Off: To the very final little bits. This is the nice little time where you can have a
little bit of tinker and address any issues and
take little bits of light out. I'm just going to bring in
my little eradicator brush. I am trying to be methodical, and we'll try and go clockwise around him
and just to say, take little bits of
color out if need be. We need to put this nostril
in and his little mouth. Start with, right
at the very top, I might take a little
bit of color out. This is a great little brush. If you haven't got
an eradicator yet, you need to get one. If you haven't, then a
little chisel brush, that's what I used to use. One of my lovely skill sharers
actually gifted this is as a Christmas present,
last year now. It's been so useful. I'm personally taking a
little bit of color out, if you feel it's light
enough for you up at the top of his head, then don't. Say you're addressing
your own issues a little bit when we
get towards the end. But obviously I'll talk through mine in some of the noses
is obviously relevant. Little bit off the top of
the ear is always lovely and if your paint blend
it a little bit too much when you wet
that area down, this is a nighttime to take
some of that color out again. Just go gently. At this stage, there's no hurry, there's no paint drawing,
there's no paper. You don't happen to race
time before the paper dries, you've got plenty of time. I think it's definitely
worth taking your time because
these little bits really make it come to life. Paint it quite loose, so any sharp detail you can
get in definitely helps. There's a little bit the crease of the ear you
can see that it's all turned around in
there, doesn't it? So let's just chisel that
out without sculpting. That'd be with a kitchen
roll. Kitchen roll is really good for taking
colors straight out. If you don't want to a lot of shrimp taken out, don't dab it with
a kitchen roll. Just move your brush
out in forefinger. See, it's taken a little bit out but it hasn't taken it all out, you will see soaking it up. That's a little bit there and also just a tiny little bit, you can see a little
bit of light just coat the inside of that ear, so I'm just going to tie easy little bit dab little
finger that's enough. Quite happy with
the front of this, I think it looks okay. Let's get rid of the
eradicator for a minute. I just wanted to show you
where the bigger brush is softer this brush, it's not going to
take as much paint out, so very carefully. I don't particularly need
any light taking out here, but I just wanted to
demonstrate you can very gently take color
out with a softer brush. If you take that and
with eradicator, you'll take everything
out and you're left with a very hard line and it'd be very difficult to enter
to do something about, because you've obviously
been gone down two layers. To pop that back down again, I'm going to put my
little brush up. It's minute thing, but the eyes are
really important, it's just a tiny, it looks a
little bit triangle to me. I'm going to take the very top part of just a soften that
and round it off, I hope you can see
the difference here. There's a lovely cheekbone here and I think I'm going to stick with
this little brush, I don't want too hard of a line. I think I'm going to dab. That's just right. You can see a lovely eye socket, isn't it? Probably eye socket bone. Push back and forth,
that's enough. Again, a little bit here, we tried to say keep it clear on the first
layer, didn't we? But I'm not going to use
my finger for that one, I don't want too much color out. I'd say flip your eyes
back and forth to that reference photo and adjust. Just take it little
tiny bit there, that'd be with my
finger to soften that. Now that there is, let's
pick up [NOISE] those Van **** tiny little bit. There's little line here
which I've personally lost, it's the minutest, it's only a little touch. I think that's
worked quite nicely. They've got funny old
shaped eyes, haven't they? This is not quite such a line there and I think it looks
if I can soften that. That looks nice. I'm not sure if I need to fill
anymore with that, I like that eye, so I'm going to go round and there's
the nostril. We just need to pick up
the Van ****, be dark. I'm not sure I'm clutching
this like a gooden. I should keep it in my
hand. Which going to paint? Rarity for Jane
likes your paint. Just paint that nose in. Make sure you get this,
is a slight curve on that nostril and it comes down a little bit, doesn't it? Then you got that line
that goes over the top. The little bit of light
there that we will take out, but this needs to dry first, so I think that's a nose done. Down to the mouth while we
still got hold of this. Don't do choose stronger
line, just a little bit. Break the lineup because it's
not a constant line soften. I'm going to take a little bit of light at the top as well, so I just want a mirrors
to hint of a mouth, I want it to look too comical. I think I'm taking
too much out now. Perfect. Lets put
that back down, pick up my little eradicator. I'm just going to take just a few little bits
out of the coat here. This neck see, I add in a
little bit more texture again. That's actually it. Lost this. I think I've probably drawn
a little bit too quick and I can't quite
remember the saying, but yes, I should have heeded my own advice and
not dry out too quickly, so I've lost a little
bit of strength that I am actually going to see. If I can put that little
bit of strength back in the fleece, I've picked up my big
brush again with Van ****. You've hopefully or may not
have been as impatient as me. That's dried a little
bit better for you. [NOISE] Then that can be a
damp brush just softened. I think you can
get away with all sorts of thing with the fleece, because it's obviously
so bitty and textured. [NOISE] That's better to say really is adjusting your
own piece at this stage. Keep your brush, it's got
lovely point in this brush, so I'm just trying to wiggle a little bit of looking
away that again. Let's do caught up with this
little bit down here on. I find there's always an
area of your painting, your fiddler or being drawn to and this is
obviously mine that a little bit of V. Going round, I like the fleece is not much
I really want to do with those little twists
worked out okay, but if you've lost some
of them, I'll show you. You can pick up Van
**** and let's pick up the geo life together. If your fingernail
didn't work very well, you can always just twiddle
a little bit in now. Not too strong, slightly random. I don't want to do too much because mine worked out okay but I hope you get the gist if you needed to put a few
little bits in there. [NOISE] Just keeping in mind I need to color
out the mouth better. I need it to dry, which I
think the mouth has actually. I'm happy with the rest of that, that's worked out okay.
We've done the ear. I'm just going to
very carefully, from the top, the mouth line, you don't want to do
a very strong line, just want a little
bit just enough and that's definitely worth standing or getting above your work, so you can see it from a
little bit, from a distance. Put a finger, squidge
it down a little bit, it's not such an
obvious line up. Probably take a tiny
bit more too much out of that, I think that's okay. We'll wait till that nose
is just about to dry, so I'm going to again scroll up a little
bit of color out. Just got a nice bit light on
top of his nose, isn't he? Squeaky. It looks nice. I think I'm almost there. The last little thing
I'm going to do is put some few little
whiskers on him. [NOISE] I picked up my little white paint,
very small brush. I'm just going to make sure
this is going to be dry, you won't have this
wet [LAUGHTER], but if you've done any
little tinkerings make sure when you do this,
it's completely dry. [NOISE] That might have been a little bit
heavy-handed there, a little bit too severe, soften that with a
bit of a squidge. If you have a smaller brush, it may even be better with a tiny brush a little bit
smaller than a number 2. He's not a very big
subject, it's quite little. Again, at the top, do a few little bits and I think he is there. I could play like this for a while and I'm sure it'll a bit little bit dull
for you to watch, but it's always nice, when you've done your
finishing off bits, to step away, go make yourself a cup tea, go walk a dog just an
hour or something. Come back and have a look at
your fresh pair of eyes and then you almost go back
through these processes, tinkering and adjusting anything that you feel really stands out when you come back into the room and see it again
what I haven't done, and I can see it's all lovely, I think it's probably
a scent gland. It's nice to put color
out of that, isn't it? Then that will be one of those things I would
probably spot when I walked back in and
I hadn't done that. But sometimes if you stay
with them for too long, we work in for too
long, you almost don't see some of these
little bits and pieces. [NOISE] But I think he is done, so I really hope you enjoy
painting Lambo because he has been a joy to practice
and paint for you. Please do share these on the
Projects and Resources page, especially this little
chat because I will also forward some of the
paintings onto his owner, some of the pictures
of the paintings. I know she's thrilled that
he's become a superstar. [LAUGHTER] I hope you enjoyed it and thank you
for following along.
10. Bonus Extra Tinkering: I thought these might be interesting for you
to just have a look. There's a little
bit of tinkering I've done the following day when I've come back into the
studio and looked at Lambo, thought that ice was a little
bit too big for my liking. If I just go through
the process of how I've just tinkered with that, that might be helpful
for you. I think. I don't know if you can
see on this side this was quite rounded, so all I've done, I've got my little
smaller brush, not actually that
eraser that was a bit [inaudible] bit too harsh, just it'll smooth, soft brush, dip it in some water. Just got my brush damp
and very careful, like we were doing with
the finishing off, just gently took that
very top corner off. Just looked at it, gave the impression that the eyelid was dipping
down a little bit. I'm just taking a little
bit of the eye makeup off. Didn't really think
much with this, left the inside of the
eye which is here, again, I took a tiny
little bit here and I reinstated that little line, a little bit stronger there. That was it. This is
a tiny little bit of color out of here. Just made that a
little bit rounder. It was a little bit
more pronounced eyeball in the reference photos, all quite dark, so a
little bit muddled, you can't exactly see. Sometimes you have to look at the painting and see
what pleases you and what seems to be right, so don't always be such a
slave to the reference photo. Have a thinker and see
what seems to be right. I think I took a
tiny little bit of that top color just soften this top edge and
that has given him a nicer to me more of
an inquisitive look. He looks like he's
really looking over to this corner over here. The only other thing I did, I think at some point I've mentioned probably
took a little bit too much color out there, so I've just, again, within more paint
this small brush, probably use a little
bit of Van **** and just close that little white line in a little bit and that's it. But that to me has
really improved the overall picture
and probably, a warmer version now
this one is probably my favorite was probably
when I finished, I wasn't quite as keen with it as I was with
some of the others. But if just a tiny
little alteration and I couldn't see that at
the time when I was filming. As I say you really
do need to step away sometimes and look back at your work with a fresh
pair of eyes in. Sometimes there's so
glaringly obvious, you're amazed you didn't see
that when you were painting. I hope this little extra
video has helped to explain how I would go about finishing off my pieces and
sometimes the next day, looking at it with a fresh pair of eyes is really helpful.
11. Final Thoughts: [MUSIC] I hope you
enjoyed painting Lambo. He's such a sweet
character and he's been really fun showing
you how to capture that. Did you enjoy placing that heavy paint and allowing
it to work its magic? It's such a wonderful technique. You just need to be
a little bolder if you didn't get enough
strength and depth. How did joining the
layers up code? Remember when you're rewetting an existing layer
to go very gently. Let the glass glide
without any pressure. That way you shouldn't
disturb that layer too much, which will avoid it
going muddy on you. Did all those tweaks at the end pull your
painting together. It's important to
take your time and really observed the
reference photo. I often find taking
a photo of my work helps me to see it in a
slightly different light. We look forward to seeing
you in the next class.
 Jane Davies, Professional Artist and Teacher