Transcripts
1. Introduction: Hi, do you want to
learn how to draw realistic art pieces
with colored pencils? I think is. So this is the
goals for the high, I am furniture and
I am an artist. In this course, you
are going to learn every step from
drawing the outline, which material I use, which material you should
use, how to shade, how to blend, how to
do the first layer, how to finish the drawing. And many more. I focus on every line
that you need to know. This course is for everyone, but I mostly focus on
signal point of view. In this course, I
keep everything very simple and very
easy to understand. So anyone can understand
this very easy. For this course, you don't
need any expensive materials. You just need some colored
pencils and paper. The methods I use
in this course, you can use in any drawings. So make sure to watch the full course and create
some beautiful drawing.
2. Which materials you need : Hi, So in this, but I'm going to talk about which material do
you need to draw, the whole drawing, and normally, which materials you need to complete any color
pencil drawings. So let's start with what
material I use for this drawing. At first, I use this Sakura mechanical
pencil to draw the outline. Well, you can use this pencil or any kind of graphite pencils, just use the light
shade like age BMI. And next I use a small normal. It is. Now come to the color pencil. I use two types of colored
pencil in this drawing. So first is favorite guests. Polychrome was, which is very famous and I loved
that pencils really. And Bismarck as well. I recommend you do
use polychrome moves. If you don't have, you
can eat use prismacolor. Are any kind of normally
budget pencil. Yeah. Prismacolor is also good, but prismacolor is
way too soft someday. Like if you want to
draw a sharp lines, you can't do it with
Prisma gorillas. So I recommend favorite Gaster because you can blend in 3D and you can do very
much detailing. And for this type
of realistic art, favorite guests with
two more and much good. But if we were drawing portrait, then of course, PRISMA color
is really, really good. Let's look at the
difference here. I use polychrome was
on that ID part. And it looks really good. But in the upper part, I use Prisma causes. So I think the polygon mode
part looks amazing, right? So that's why I recommend you to use our favorite guests
and body Chrome moves. Now let's talk about paper. Here. I used 250 GSM boost
to the papers, which actually means
smooth type paper. And, you know, smooth
papers are really, really good for color pencils. When I recommend you to use any paper that is
just if you can't, then use paper which have more than 18 BDSM because you want to
do a lot of leering. I recommend you to use any
vapor which you have to just use some paper which
are like more than 180 GSM. And another thing, if you
don't have smooth paper, just use normal
medium green people. In color pencils. Drawing paper matters more than the colored pencil
because you need a good paper to draw something
very realistic, okay? If you don't have the good
quality are discrete paper, then you can use to
skip sketchbooks. It will work fine and
the quality Earth, okay, not too thick, muddy. Guess they work fine when
I started my drawing, I use them and they are good. And last thing, if you don't
have the color pencils, I use the news any widget, color pencils, like
a dollar or $2. To that, you have great
genius need to work slowly. Like when you are working
with cheap colored pencils. Just use it slowly, softly. Don't use much pressure, and it will work fine. So let's meet you
in the next part.
3. How to blend Colored pencil: Hi guys. In this part of the course, I'm going to talk about the midterm I applied
to blend pencil colors. Well, this is a very
interesting part. This is very simple. I normally use two
different method. First, light to dark
shading and second, dark to light shading. So at first, if you want to
apply light to dark method, then you just need to apply the light colors
first and shapes rolling and then apply that
dark color and shade slowly. Of course. Then you just need to shade the light
color to mark it. And it felt really good. Blended look. The second method I use is Dr. late. For this. You just need to
shade with the dark color at first and then merge it
with done light-colored. This is very simple and it
would look perfect blending. If you are using cheap,
budget expensive. Then also you can
use this to meters. If the area is little, big lake, a round area, then use light to dark method. And if the area is ten, lake, not too big, Sega 1080, lying date, then use dark dark to light. Well, you can use any
method to any place. Sometime it depends on.
4. Which color shades I use for this drawing: So let's learn which
color I'm going to use. In this drawing. I use fibric acid pool
polychrome, most pencils, which are oil-based, and
prismacolor premier, which are wax waste. Let's talk about which shade
I use from Prismacolor. I use PC 924, PC 19, tiny piece in 1985. Pc 937, PC 19 44
BC 19 45 BC 1927, PCs 948 BCE, 1997. And the white colors. And from folic Ramos, I use to 17 to 83,
116, 142, 299. And the black pencil, I mean, the black shade.
5. How to draw outline : Hi guys. In this part, we are going to talk about how to draw outlines of any dry. So let's start with the
difference I use for destroying. To draw the outline, you just need a pencil, a sheet of beaver, and eraser. You can draw outline
in three ways. First and the best
freehand method. Secondly, you can
use grid method. And lastly, you can print your friends and trace it
to your drawing paper. But I don't recommend
this to vagueness. I prefer you to learn 300 outlined class and then
go for other methods. So in this part, I'm going to talk about how you can draw the
outline free camps. So this is a reference I use. Now. It's really hard to draw it without any
guidelines, right? So we're going to see
the reference into shapes like a circle,
triangles skier. For this, I can divide
this into two part. Like the lower part looks like a square and the upper
part looks like a Jenga. So let's do this. It looks nice and now
it easier to draw. It's easy. It's
very easy to start. So image and draw
this on feeble. Sophie Hadley. I know it may be tough when
you just started, but slowly, you will learn and
just take maybe 10, 15 days, you can improve. So now just see how
I draw the outline and observe so it can
fully understand this. Focus on my hand, focus how enjoying
lines and everything. It will make it
really easy for you. So let's meet in the next part. Okay? Okay. Hi. Hi. Okay. Okay. Now.
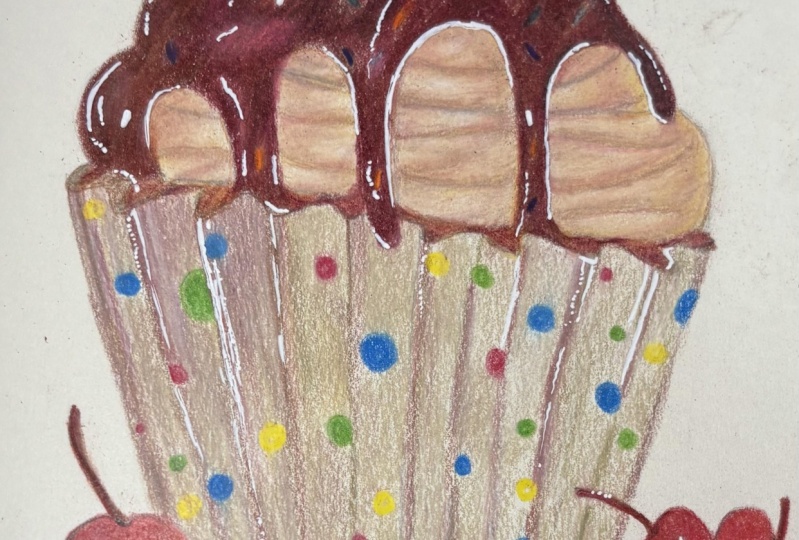
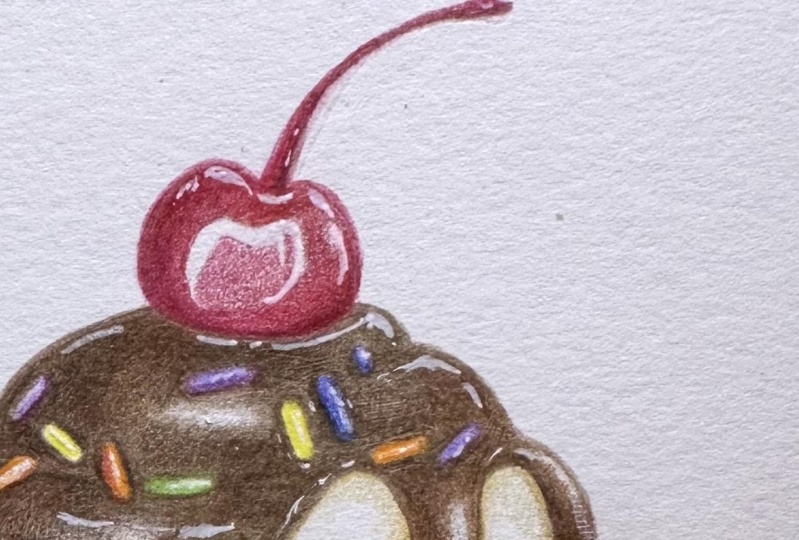
6. How to draw the cherry part: Hey, now you learn how
to draw the outline. Let's start coloring. So let's shade that
Jenny part first. So here you can see that
I am shading this part, this part, this part, I use dark to light method. If you don't remember, what is dark blue light method, you can see the previous part where I teach you how to blend. Okay? So now we're done
with the upper back. Now, droplets shade the body. Now let's shade the
body of the cherry. For this part, I use
light to dark method and I leave the
highlighted area, right? So to draw the highlighted, yes, you just need to apply a
light read and just apply it. How you like little machining and then blended
with white-collar. It will look glossy, finish, not glossy actually. Leg. It will give
a highlight look. And that's it unless you
want it, right? So okay.
7. How to draw the cream part : Okay guys, Now you'll learn
how to shade the Jedi part. So let's learn how to
shade the green part. First, I outline the Kim
part with the PC 940 shade, which is yellow type curve. And then I shade, it, waived the same color slowly
like a solved shading Huike. And then I use peace in
1997 and shade it slowly. And then I use BC 9, 27, and I use it a
little bit, not much. And then I blend it with white color and blend
the whole thing. Envelope. Could this
event really easy part. You don't need to
look much things. Hi. Hi. Thanks.
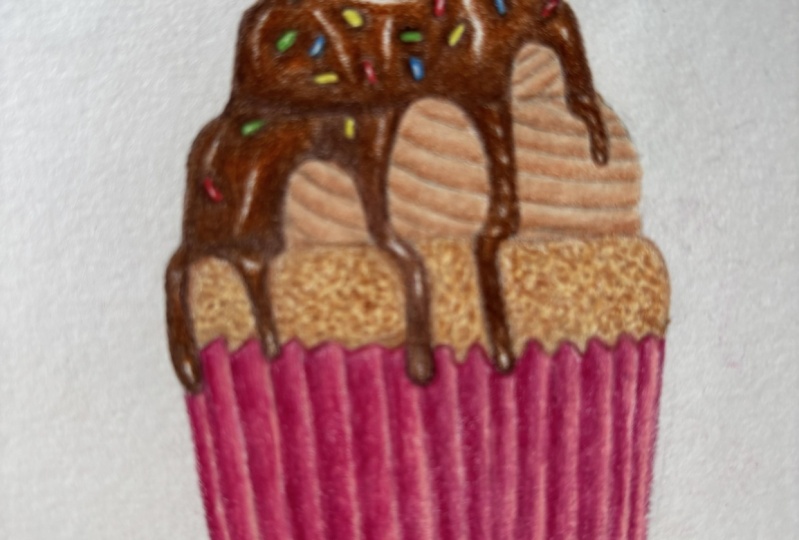
8. How to shade the Chocolate part: How do you draw
the chocolate bar to draw the chocolate part? First, Radha sprinkles, outline the sprinkles of the chocolate
and then take some she'd, which is similar to the
leaf friends and US, adopted light shading method, which I told you earlier. If you don't remember, then watch previous videos. Here. I use PC 937
piece in 1944, PCIe was 945 and from Prismacolor and to a
degree from palindromes. And I use black color. When you then shading the
colon, colored sprinkles. And you would done, if you don't understand
what they see, then just watch it and flew
the deal and sulcus how I dropped and then practice it on yourself and you
will understand. Hi. Okay. Hello. Okay. And get it done. The third is an ideal
and focusing on one or the other one overs. And then we synthesize
one of those bottomed out in
recent photos side. And no way of places dollar sign want to make
two water high on the list. Some say it is. Now. We don't have to think about and I don't want to have as one of the simpler side. Otherwise products such
as a waste product side, one and a lot of high sun. Because if we did like
I don't know nothing. I just wanted to say I
don't know anything. So one of those products
that I'm wasting my time, I don't want to waste
time on the product side. Which people? Hi.
9. How to shade the Chocolate part 2: All right. Hello. Guess what? Yeah. What okay. So that's how models. So this is Lisa. Okay.
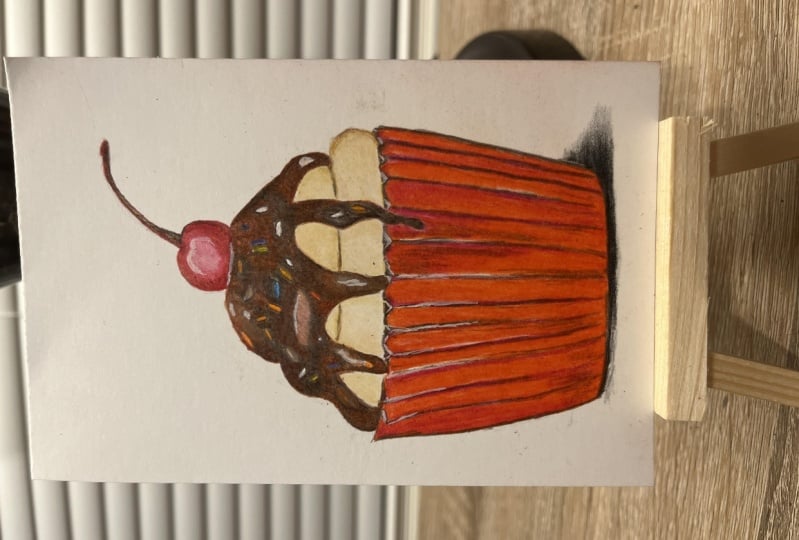
10. How to shade cup: So we are almost done
drawing and shading. So now we are going to say in the last part
of the drawing, to draw the last part, first, thick, dark colored layer, deeper shade of brown. And then shade for
everyone that dark look. You can see the reference
to understand it more. And then shapes
little, slightly. And then use a medium red dawn, OK, and shade the whole Libya. And then use the light rate. All right. In every
but to lend more, watch the video closely
and just follow along. Okay. Hi. You're not following along on the table. So what we're doing here, hello. Much, much, much, much, much, much, much, much
larger distances. Hello.
11. How to shade cup 2: Hello. Hi. Hi. Given that we don't teach. And one of the other side, one of the entire time, I've been wasted so
much time working as well as wanna make
sure fire time. Some research. We don't fix it often isn't. And I don't want to follow along on the bottom line. Otherwise, thought of as a way of almost 71 and a lot
of hunched over sun. I did not I don't know. A key. So you are done. And just add the little shadow under the cupcake
and look perfect. And use a white gel pen, like a white gel royal jelly
roll pen to color the lake, to add little highlight. And if you don't have
white Jelly Roll pen, then you can use white. White, white night
I used to write. You're going to use anything. You can use even youth activity
colors to add highlights. And he did a little walking. I can see that same color. Hi. So now you can see the amount of force in this lesson. Okay? Okay. Okay. So now we're done drying. Let's meet. Let's talk about the whole process.
In fact, next part.
12. Final Thought : How full you are done
with the whole goals. It would just finish the course. So congratulations. I hope you like the full course. Thanks for watching. And Alan, say that if you have any inquiries,
you can comment. If you want to talk
with me personally, you can go my Instagram or
Facebook and talk with me. Ask me a question that you have. Also, I have YouTube channel. So if you get notified
for future goals, who can go there also, I will make more
courses in future. And thanks. Thanks for watching
the full course. See you in the next course. Have a good day, Bye.
 Parna Chaudhuri, Artist