Transcripts
1. Introduction: Hi and welcome. My
name is Nadine. I'm an Australian watercolor
artist based in Melbourne. And today I'm going
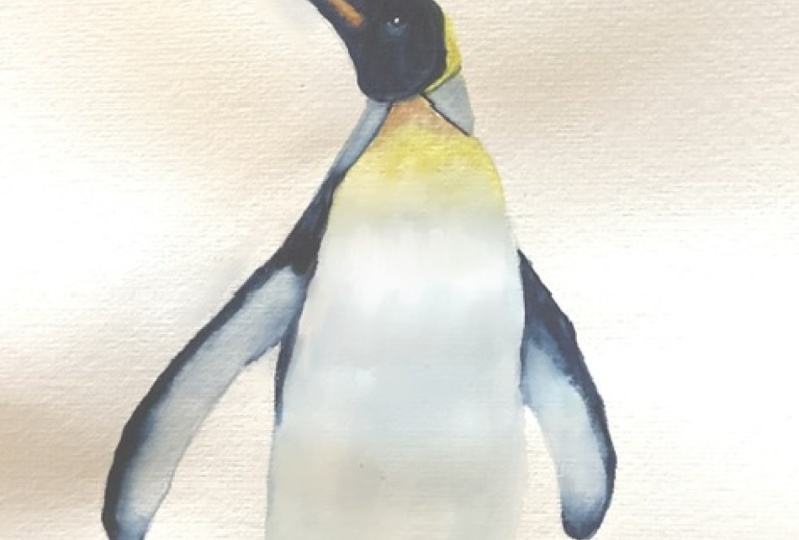
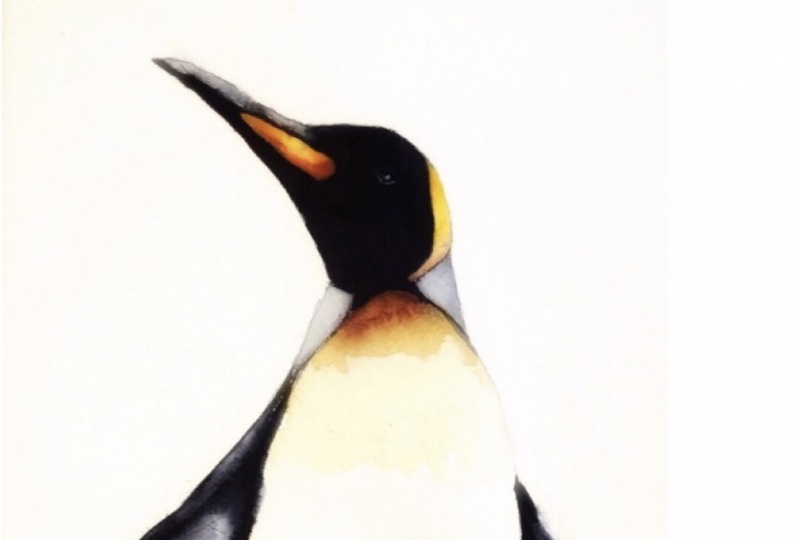
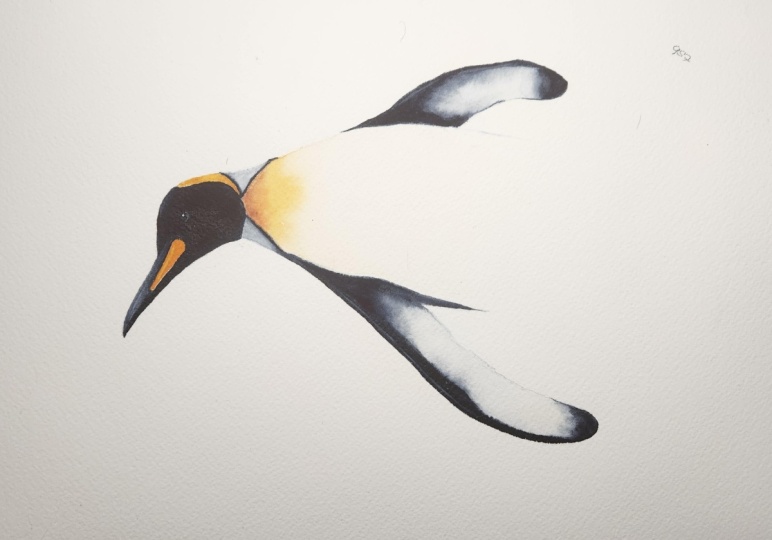
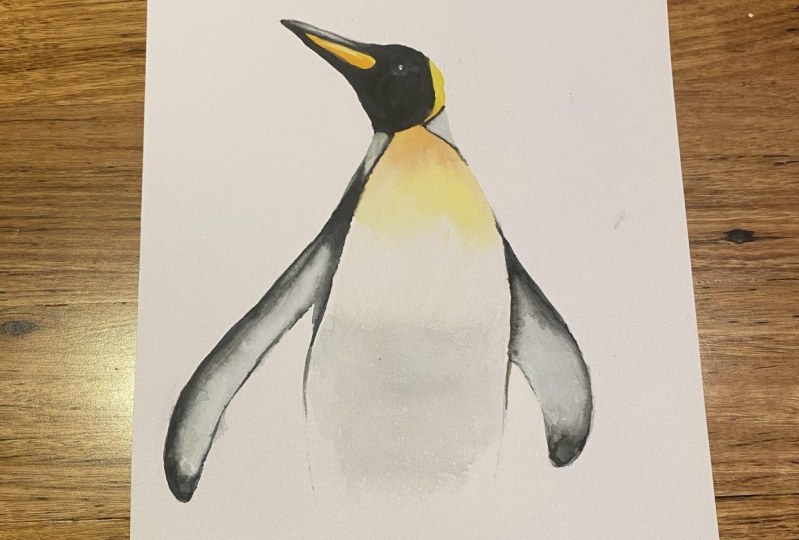
to take you through painting a King Penguin. Now, there are three things that I really want
you to take away from the lesson today. The first is to keep it simple. I'm a believer that less is more with watercolor and you
need to let the paint, do the work for you, and you
need to not overthink it, which can be difficult. The second thing
is about getting your tonal contrast, right So getting your darks dark enough without leaving
streakiness on the page and keeping
the lights light enough so that the
painting really pops when you're finished. And the third thing is about getting soft blends wet in wet. So dropping pigment into a wet page and letting the paint do its own
thing and not fiddling, which is really difficult
to do, to not touch. So the way this will work, I'll go through the materials, I'll go through the sketch, and then we'll do the
painting step-by-step. And I've broken it
up into lots of small parts so you
can paint a bit, take a breath, have a
coffee, paint the next bit. You don't have to go start to
finish all the way through. And really while
you're painting, what I want you to keep in mind is that it's just
a piece of paper. So I really want you to
relax into it and enjoy it.
2. Materials: And we'll go through all the materials
that you're going to need for this lesson
before we get painting. So to start with the paper, I paint pretty much exclusively on Arches, cold pressed paper. This one's 300 grams. If you have a favorite paper, that's completely fine,
use what you like. The only thing I would
say about the paper, make sure you use a
good quality paper. If you use a cheaper brand, chances are you'll get a pretty
unsatisfactory results and you'll just end up
getting frustrated. So buy a good brand of paper, now I actually don't tape my paper to the
board or pre-stretch it because I'm lazy and I hate the preparation
involved in that. If the wobbling, so I've
got some buckling here. If that bothers you, then spray or paint the front and the back
of the paper and tape it down to the board and let
it dry completely so you get a nice flat
surface to paint on. What I tend to do is I wait to see if I actually
like the painting. If I do, then I would spray the
back of the painting and weigh it down under books for a couple of days to
stretch it out once I know that I'm
happy with the work. You'll need a HB pencil
and just a regular eraser. I don't tend to go in for
the kneadable eraser, so I've just stolen this
from my kids pencil case. You'll need some tissue
or toilet paper and palette. So now this is probably
something about my personality, I'm not very tidy in my palette. I tend to squeeze out
paint as I need it, largely because if I want
really strong color, you're better off having
paint straight from the tube rather than
sitting in the palette and letting it dry up
and you've got to add a lot of water,
to get it moving, so I do tend to
squeeze out fresh. I do know people that have
got beautiful palettes that are all set out with
the colors in order. That's completely fine
if you want to do that, I can't maintain that. So I've just accepted that I'm going to have a
messy, messy palette. I've got a couple of pots of
water and then my brushes. So I've got a couple here. I've got two little
synthetics for the detail, doesn't matter what
brand of those. Now I've got two Neef brushes. I quite like that brand, you probably have
a favorite brand. I've got one for doing
most of the work. This is a size 8
series 4750 LP, squirrel taklon mix, and I like it
because it comes to a nice point and it holds a lot of water so you can get get a fair distance
with that brush. And then I've also got for
lifting out some highlights so I've got a Neef bright
stiff synthetic brush. So this is nice and
hard. Now the paint. So most of the dark
here that you see is actually Daniel
Smith indigo now, the brand of indigo
actually does matter, so they're all quite different. I find that the
Daniel Smith is a really nice strong black, basically whereas some of the others have got a
lot more blue in them. So I do tend to buy
Daniel Smith for that. I've got yellow and
red from Daniel Smith. You could use cad red and cad yellow or really whatever you've
got floating around in your palette, I happen to have some
Daniel Smith pyrol red and some hansa
yellow medium. And that's just for the
orange in the beak. The chest I'm using
some Winsor Newton burnt sienna and some Winsor
Newton quinacridone gold. So the burnt sienna is
just a little orange that you see in the top there. And the Quincaridone gold is the
yellow of the chest Yeah. The only other paint
that I'm using is just a touch
of white gouache. I use Art spectrum white gouache. The brand doesn't really matter. It just so happens that
this is a good price and a reasonably sized,
reasonably sized tube . A lot of the tubes are really big and I never get
through enough to use it. So I try and buy
a smaller tube. Now that's it for paint, now the
reference photo. So you'll be able to
download this from the site. This is a King penguin from
my local aquarium. And there is also a
template of the sketch. If you get stuck with that. I think we're ready to
start with a sketch.
3. Sketching Up: So we'll start off
with the sketch. I'm using a regular HB pencil and I've just got a
normal eraser here. Really the main thing
to note about the sketch, and if you want
to paint loosely, you need to keep
the sketch simple. The more detail you
put in at this point, the tighter and
the fussier you'll get with the actual painting. So put as little as
possible in I'm not
painting the feet here, I'm not grounding the bird. I'm just painting from the
bottom of the tummy up. And I'm giving myself
the outline of the bird. I'm not worrying about
these details of the darks under the wings or any of this feathering,
anything like that. Just really keep it simple. I do want to take
note and give myself where this orange part is
in the beak and this yellow at the back of the
head because I need to be careful that I don't paint that in when we're
going to do it. So the other thing to say is to keep the
pencil quite light. I've done this a little bit
darker than I would normally, just so that you can see, but it can be quite hard to get the pencil off
underneath light colors. So obviously it will be fine
underneath the darks, but along the tummy where
it's a little bit lighter. If the pencil is very heavy, it can be hard to get
that to get that out. So keep the pencil
sketch fairly light. Now, I do, I do encourage you to sketch it yourself just because I think
the more you sketch, the more practice,
the better you get. But if you're really struggling, I've also put up a template
for you that you can download and you can use on a
light box or you can trace. So we're really ready
to start painting now.
4. Wings: Now we're going to start off the painting using some indigo. And we're going to
start in the wings. I've got my size 8 neef brush here it comes to a really nice point and it holds quite a lot of paint and water. I'm going to squeeze out
because I want this dark, I'm going to squeeze
out fresh paint from the tube into my palette. So I've got a lump
of paint in here. And I've got a couple of pots, of clean water here
because I'm using indigo. I've got a couple
of pots because the water will get mucky very quickly. And I've also got
some toilet paper, towel, whatever
you've got around. Now, what I'm going do to
start with is I'm going to paint a line of indigo
along this wing. Then I'm going to wash my
brush and I'm going to drag water underneath and
let the paint bleed. A clean brush. I'm going to pick up
a lump of indigo. Now I want this to
be probably creamy, creamy to toothpaste consistency. So I've got a whole lot
of paint on my brush. I'm going to start probably in
the tip of the wing here and I'm going to push down as I
come up and lift off as I come up to the top of the
shoulder there so that I've got a finer line up the top
and wash my brush. I'm going to get clean water. And I'm going to start
underneath the wing here. And I'm just going to
paint the page with water. So I'm coming along
that pencil line, just painting the page. I haven't touched my indigo yet. Bit more water. So I'm not flooding the page,
it's just damp. Then what I'm going
do is I'm going to touch to that indigo. And I'm just going to let
the paint do its own thing. Clean my brush again, I'm going to bring
some water down, do the same thing in
the tip here, of the wing. So I've just touched with
my brush and I'm dragging that pigment around the
page is all wet there. Now I will come back and
add more to this later, but this is just to
get the shape of the wing and to start
to get a few of these bleeds that are more
interesting than if I just painted straight
onto the page. Now here I'm going
to wash my brush, take off the excess, and just tease this
up into that shape. On the shoulder
there into the neck. Now I'm going to
worry about what's happening in there later, not going to worry
about that yet. And I'm going to do a similar
thing on the other side. So here I'm going to take, again, I'm dry at the moment. Take a creamy toothpaste, mix of indigo. I might start this time
on the top of the wing. Come on, push
down with my brush. Then I'm lifting up and
coming around the corner. Wash my brush, clean water now. Check my brush is clean. So again, I don't want I
don't want the brush soaking. I want a bit of water, but
I don't want to absolutely flood it, painting the page. So getting all of this
underneath the wing, wet first, then coming along
and touching to that indigo. Bit more ran out of water there. So I just want a little bit of movement and want the
paint to do its own thing. I came a little bit out of
my pencil lines there, so just tidy that up. And I'm going to put my brush. I just got bit more water. So I missed up there. So I'm just going
to let that run. Now here what I want to do is really avoid the
temptation to fiddle. I just want to get out there and let it do whatever it wants. I'll keep an eye on
this little bleed here, so it's gone a
little bit further. So I'm going to take some water and just push that back a
bit so I'm wicking off, I've got a clean brush, putting it onto that edge
and wicking off the water. I don't tend to dab with a
tissue usually so I'm just keeping an eye on where that was
bleeding and now I'm going to sit back and see
what happens with that. So no touchy here. Let it let it bleed.
5. Head: Then while that's all drying, knowing that I've got more
to add, more to do in there, I'm going to leave it alone and I'm going to
come up onto the head. Now here, I want this color on the
head to be really strong. Now I won't get it
in the first hit, I won't get enough
pigment on it. It will dry a
little bit lighter. So it's going to take a couple
of coats I do want to be careful not to see, be able to see dry brush marks. So I need enough water in my
pigment to be able to move through that shape without
leaving dry strokes. So to do that, I'm
going to make up a milky to creamy mix of my indigo. And I'm going to start on
the tip of the beak here. And I'm not going to
paint into this orange part. I'm going to paint over this little spot I've
got for the eye and I'm going to stay
out of this little yellow bit at the end there. So I'm going to come on. I've got my milky to
creamy mix of paint, tip down, one stroke, and then push down on my
brush as I come around. Get some more
pigment. Push down. Now I'm giving myself a
little bit of space around that orange bit in the beak
that I'll back fill later. Pushing down. I'm dry
here now so it doesn't matter if I touch
that bit of the neck. What you don't want to have happen is that, you want
to move quickly enough that
this doesn't dry on you before you've got
the first wash on. So you need to move
reasonably quickly, grab some more paint over
the top of the head. And I don't I tend to start trying I'm trying
to start in the middle of the shape and push out to avoid me making the shape bigger
than it actually is, rather than starting on the
pencil line and coming in. So I'm pushing out
to that pencil edge. Now I want to keep
a little bit of light on the top of this beak. So what I'm going to do is wash
my brush not completely. I've still got pigment on it
take off the excess water, so I'm touching it to my
tissue and I'm just going to drag my brush along that, wash my brush take off
the excess water. And I'm going to fill in
that shape all the way to where the orange starts. Okay. Now I need to come out of that
and not fiddle in there. It is going to dry lighter. And I will have to touch
up these little spaces around where I've
left the white between the pencil
line and the dark, but I don't want to
fiddle in there now and I certainly don't want to introduce
a whole lot more water. So being careful when I
added this top of the beak, I had less water on my brush. Than in the page because if I added a whole lot
of water there, it would form a
cauliflower and push all this pigment out and I'd get a bloom which I don't want. So less water on the brush than the page when you put
the top of that beak in. Now I need to get out of
that and let that dry.
6. Wings Second Layer: Now I'm fully dry down
here on the wing, so I'm, I'm happy with the shape, so I can come back
in here now and do, do some more work in here. And what I'm going to
do is think about this dark along the edge
of the chest here. Now to help me out.
I'm going to go with some water first. I'm going to take a clean brush
and I'm going to paint. I'm going to paint
with some water. Underneath his armpit
effectively touching up to that. Indigo on the wing, and I'm going to paint
a little bit of water down the side there. Now that because
this indigo indigo will keep bleeding
for a long time. So even though that's dry, I'm still getting a little
bit of bleeding there. So I'm just going
to wash my brush and just drag that water down. So all I've done, I've painted with water in the area where
I think I'm going to go now I'm
bringing the water up a little bit up to the
top of the neck here, I don't want
to get really dark in this part of the neck. So I'm just letting the water
move up a little bit there. And again, I'm not soaking
I'm just damp I'm going to take now some same sort of consistency actually
as for the head. So milky to cream, creamy paint. I've got here and I'm going to paint a line along
the tummy along the chest, push down, come up. I'm going to just tidy
up my shape here. Painting in to that top
of the shoulder. I think I might let that
dark walk in there as well. So now I'm going to wash my brush. I'm going to let this
move a bit more. So wash my brush, clean water, and I'm just going to let
that tease down a bit. So I'm just adding a
little bit more water. And I'll see what
that paint does. Now I can see here
I'm getting a bit of a line where I wet the page to, so I'm going to
soften that back, get some clean water while
it's still a bit damp and just paint over that join and
drag that water down. Okay. Now I reckon I'm
quite damp in here. So I'm going to put in this dark its a little
bit wider he're. So I'm going to grab
while the page is wet, grab bit more indigo. I'm just going to drop that in. And really the reason I'm wetting I'm wetting
the page first is I want these soft bleeds. I don't want really hard lines wash my brush, clean water. And I'm just going to I've taken the
excess off my brush. I'm just going to
drag that down. So I'm just worrying that edge. Now, if I add a whole
lot of water in here, all this pigment, it, I'll
just get a great big mess. So I have to again,
be careful that at this point I've got
less water on my brush. Than in my page. And I can feel now I'm
starting to fiddle. So I need to come
out of there and just let it do its own thing because I'm starting to puddle and I'll
getting into strife. So I'm just going to
stop, stop that bit. I'm going to have
a look down here. And I want a little bit more
dark on the tip of the wing. So I'm going to take some water. I'm going to drop
that in. Again. I'm damp, not saturated
all the way to the tip. Then I'm going to pick up that same
creamy mix of paint. And I'm going to drop that in. And I'm going to let
it do its own thing. Now, if you if you put that on and the paint
doesn't move at all, just drop a bit more water. That's all it means is that you don't have enough
water in there. So I'm going to see how
that how that behaves. Now on this side, I'm going to put on a
little bit more color underneath his armpit there
so I'm going to wash my brush. I'm just going to
paint with water. That whole shape I think. Down and to the tip
of the wing here. Because I want to add some
more dark like we did here. And the tip. Then I
pick up my indigo, I'm going to start in the tip first. because I've got a lot of
pigment on the brush there. And then I'm just going to put
a bit more paint in there. I'm going to wash my
brush and I'm going to soften I've got a
clean, damp brush. And I'm just going to run
my brush along the age. Tidy up where it meets the chest.
7. Beak and Neck: Now, while I'm drying
through there, I'm going to come up and think
about the orange and yellow that I have in the
head now for this you have to have clean water. So I've just changed my pots
of water because it's very easy to get mucky with
oranges and yellows. So clean pot, clean brush. Now I think I might use slightly smaller brush
for the yellow here. So I've gone to a
little synthetic brush. This is a size 0, I think. So any any small
synthetic is fine. And I'm going to
come in and just paint the back of the head here. with I've got
some Hansa yellow here. So I'm making sure my brush is clean and I'm going to pick
up I'm going onto dry paper. I'm not going to touch
that indigo edge because that will still bleed. Pick up some yellow and
just pop that pop that in. And this is one of those areas where the pencil will be hard
to get off under yellow. So you can back
that pencil off first before you paint it,
if you remember. So I've got the
yellow and then just down where that yellow is coming in to meet
the neck line there, I'm just going to drop just a touch of some
burnt sienna here. Tiny bit of burnt sienna. Just to make it a
little bit darker, the bottom, I'm going to take
the excess off my brush and just the gap between the
yellow and the indigo there, I will close up
once it's all dry. I'm just avoiding touching those two now you
could of course, you could paint the
yellow and the orange first before you
paint anything else. I tend to do, I tend to do the head and the
beak first because I want to make sure I've
got the beak shape, right, but depends how
comfortable you are not mixing your
darks and your lights. Now I'm going to come
into this part of the beak. Here I'm going to use
it's much more orange, so I'm going to use
a little bit of my Hansa yellow and
a little bit of, I've got some
pyroll red in here. So I'm going to pick up, bit of
my red bit of my yellow. And I'm just going to come
straight on the page, again, being careful not to touch well trying not to
touch that indigo. Coming as close to it as I can. And I might actually drag a bit more yellow along the top. So I've just washed my brush. I'm going to pick up
some more Hansa yellow. I'm just going to
run that on the top. And then I'm going to
let it bleed now if it if it needs to be darkened
and I can do that later, I've got the shape right, I'm happy that I haven't
touched my indigo, so I'm going to just
come out of that and let that dry and I'll come back and touch that up
if I need to. Okay. I'm going to come
back in here and look at these two areas. So I want a little
bit more strength of my indigo in the
shoulder there. And I want a little bit
of dark along that edge. So I might try and
take my small brush. I'm going to grab some
indigo, thick paint. And I'm going to drag a line of paint along that edge so
that paper's dry there. Then I'm going to wash my brush, and I'm going to take take
off the excess moisture and I'm going to paint with water and just touch that
indigo on the head there, and on that little
line that I drew, clean my brush that I painted
rather and soften that off. Now, the reason I'm
doing this is that I want soft transitions. I want this line to
bleed a little bit. And this is a good
exercise in seeing how much water, how far your pigment goes depending
on how wet your page is. So I've just, it's softened this line a
little bit and I've got a bit more strength of color in my shoulder here, my neck. And I'll just let that
dry and see what it does. I think I'll probably have to put a little bit
more indigo on there to because I'm lifting
paint at the moment. So I need to, this is
telling me get out, let it dry, come back
fix it once it's dry. Similar thing we're going to
do on the other side. I'm going to clean my brush, take up a little bit, I've not
got much water on my brush, fairly thick paint, I'm going to paint that line down and under
my yellow is dry now, so I can paint that line under. Wash my brush. So now I'm painting with water. Well, dirty brush,
dirty brush and water, but I didn't mean to
that to be dirty. Preferably clean. Painting the dry
page and coming up and touching that indigo. And just letting that
pigment move around, come out and let that dry.
8. Lifting Highlights in the Wings: Now I have to stay
out of that, for a bit . while that's drying, what I'm going to do I'm
just going to show you with a stiff brush
to lift a highlight. So I've got this bright
stiff synthetic brush. All I'm going to do is I'm going to put that in some clean water. And I'm going to lift a little bit of paint along
the top of this wing. So I'm pushing pretty hard, coming off, washing
my brush again. So I'm trying to
lift some pigment, but if you don't keep washing your brush, nothing will happen. It won't, it won't move. So you've got to keep push, wash your brush,
take off the excess. So you have to keep doing it but you've got to keep washing that brush. Now this is not all papers
will lift as easily. So I find that arches is
really good for lifting. So test it out on a scrap before you commit to doing this. So I'm just trying to give
myself just a touch of a highlight along that
wing, maybe one more. But if you don't keep
cleaning your brush, all you do is keep
pushing pigment around. All right, so I'll come out
come out of that now and do the same thing on the
other side clean my brush. Just a touch on
top of this wing. clean my brush again. So the brush needs to
be clean and damp. Maybe one more. Okay. So don't need much just
a little bit of a highlight.
9. Chest: Okay, so where we're going go next is we're going to
come into the chest. Now. I'm going to
use a little bit of burnt sienna and quinacridone
gold on the chest. Down the bottom, we're going
to use a little bit of indigo just to round
him up a little bit, give him a bit of shadowing. So I'm going start up the top
with my bigger brush still, but I need to make
sure this is clean. And what I want to
do is paint with clean water in this chest area because I want this
all to be soft bleeds. I don't want to
brushstrokes here. So coming onto the page, I'm going to paint
with water further down than I need,
the color to go. And I'm not going to
touch the indigo wing. Try and keep out of
all that Indigo. I'll hold it up and
show you how damp it is in a second
out to that pencil line. And again, if this pencil line is heavy,
that will be a problem. So back it off with
your eraser first. If it's still, if
it's quite dark, I'm not going to touch that indigo on the head
because that will run. So I'm staying out of that. I have can see there i'm I'm
damp but I'm not absolutely. I don't have puddles, puddles
and puddles of water. Now I'm going to take some quinacridone gold
sorry, I'm going to take
some burnt sienna, I've got my burnt Sienna and
dropping it into the top. And then I'm going to switch
to quinacridone gold. And I'm going to drop that in. Now I need to add my burnt
sienna is too weak at the top. So I'm going to clean my brush, pick up paint with
less water in it now. And just now that
that page is wet, drop that in. And then
down the bottom here. And now I need to wash my
brush because I'm flat, the paint is just sitting on. I'm not running it, it's just sitting and pooling. I'm going to clean my brush and
I'm just going to tease that yellow quinacridone gold down. But I want less
water in my brush than on the page. And I'm
going to drag that out just gently to meet my pencil edge as close to that
indigo edge as I can. And the trick here is you
now have to not touch it. Which is a difficult
thing to do now I can see my brush wasn't
completely clean, so I've got a little
bit of a can see the line my joint down here. So I'm just going to get a bit more water and
just soften that off. So I'm just painting
with clean water, dragging that line down so
the page is wet to dry coming down. I can also see I've got a little
white spot there, so I'll just drag that out. Now we can always
add more to this if we need to, hard to take off. So try and try and resist
the urge to fiddle.
10. Second Layer on Head and Neck: Okay, now while that's all
settling in and drying. I'm going to come back up to
the head now I did say that I thought I would
probably have to go darker, do a second coat to
get this dark enough. But actually it is, I've had
a fair bit of pigment on I probably need to be
a little bit darker underneath the beak. So what I'm going to do is
I'm going to close up this gap and I'm going to strengthen the dark just
underneath the beak here. So I'm going on
to dry fully dry here and take my size 8 neef, I'm going to get a little
bit of water on my brush. I want this paint,
quite thick. Little bit of water on my brush and I've got a nice tip so
I can get underneath here, restate that dark, and
bring close the gap up inbetween the orange
and the indigo. Now I don't have
quite enough water. So my paints
not really moving, so I don't have enough
water in my pigment, so I just need a bit more. I'm going to actually
get somewhere. Okay. Now you can do this with a really
small brush if you prefer. This brush comes to
quite a nice sharp point. So I'm comfortable that I can get the detail without having to
switch to a tiny brush. The advantage being is
that I can get further without having to
reload pigment. And then on the top here
close up that gap. I'm going to wash my brush, take off the excess, and drag my clean. I don't have any
pigment on there, but I'm just dragging my brush
over the area that I just was in underneath here too
because I don't want to see the dry strokes. So I'm just going to
paint pretty much with water just so that you
don't see the patchiness. When you've got such
a strong color. Well, such a large
amount of pigment. And then I'm going to
close up the gap here as well. So again, if your bigger brush doesn't come to a nice tip, you can switch to
a smaller brush. And I think I'm dry here. So I can close up the gap for my burnt
sienna to my indigo here. So I just don't want any whites. Okay, and now I want, while I'm in here
with this indigo, I want a little bit
darker on this side. I'm just going to
paint with water and paint that area down. And because I've just been
in there with that indigo, I should be able to
get that to bleed. So I'm touching where I've
just filled in that gap. And that pigment will run
down to that shoulder. If the pigment doesn't run, you can just pick up some
more indigo and drop that in. And that's just
about dark enough. And that's that nice soft grey.
11. Shadows: So I want to come
and put a shadow. A little bit of
indigo on the chest, I've got little bits of dust everywhere. So what I'm going to
do again with my size 8, clean brush, clean water,
hopefully cleanish. Yep. I'm just going to
So I'm dry here. Now. I'm just going to drag
some water through his tummy. I'm not saturated. Damp. Then I'm going to pick up some
milky consistency indigo. And I'm not going to start up here. I want it lighter up. here than down here,
so I'm going to start in the middle and just drop some pigment
on so that I don't, if I put the pigment
on, it's really dark. It's a pain to have to lift off. So I'm just testing out to see the strength
of my pigment, moving that around, washing my brush and take the excess off my
brush and just tidy up where I want these edges. And I want to be stronger
with the shadow in the tummy here and then have it disappear because I'm not painting
the feet and the land. I just want to disappear
off the bottom there. Now I said I don't normally dab, but down this very bottom bit, I'm just going to back that off. I'm just conscious
that I want it lighter. Dragging
into my pencil edge. Now with this, you are much
better off putting it on, letting it dry and strengthening
it if you need to, than going too strong initially and not being
able to get it off. So I'm just walking that water up onto my dry page and
I've got a nice soft, I've got some granulation.
It's nice and soft. It's not quite dark
enough I don't think , but I don't if I add a whole lot more
pigment there now. I'm going to have to
flood the page and lift it off and I'll get
myself into a mess. So I'm going to let that
dry and then I'll come back and strengthen that if
I need to strengthen it. Now when I look at these, I also need to, while I'm working
with these shadows, I need to put a
little bit more dark underneath this wing too, because it's the
underside of the wing now it's fully dry on each. So all I'm going to
do is go on with the milky wash of indigo. Maybe test out before I do it, just test out the strength. Yeah. Maybe that's a bit too dark. So I want to know how much
water I've got in there. Probably that kind of intensity. It's going to come straight on. With that milky wash
onto the dry page and just paint that whole wing. And I'm going to do the
same on the other side, so milky and just
strengthen that. So although it's white
underneath the wing, there is actually a fair
bit of tone, dark tone, I should say,
underneath the wing. Okay. Maybe a bit more here.
12. Finishing the Head: Okay, I'm going to come
back up to the head. Now I've got a little
bit of patchiness a little bit of streakiness here that
I'm going to tidy up. So I'm going to fully dry here. I'm gonna get some creamy paint. And I'm just going to paint over that head and smooth out. I could see a couple of brush
strokes which I don't want. I want this to be nice and flat. Just going to paint
the whole area. And then I have to
think about how I'm reconciling what I'm doing
with that beak there. So I'll wash my brush, take off the excess water, and just blend from the top of that beak down into
the actual beak. So I don't want a really
solid join in there. Okay. Now, if you don't have a highlight on the top
of the beak there, you can do a similar thing
to what we did on the wing. So I can sort of a bit hard I've got pencil lines there
still see pulls the eye, a little, I've
washed my brush, take off the excess. So I've got the bright flat
white brush again. I can come in here and
lift a highlight. Now the only thing
you have to be careful of when
you're doing that is that this will push
the pigment to the edge. So you can very easily make that shape bigger, which you
don't want to do. So you've got to
watch that you're not going outside the lines. So I can get if you
didn't have a highlight, you can get it in by doing
that and it's. I've got pencil lines
still here that I can't rub out yet because
this is still very wet. So I have to wait
until that dries. Now I also think I want to pull a little bit of
highlight into that yellow. Now I have just been, I've just had this brush in indigo, so I've got to really
make sure it's clean. I'm going to wash the brush, take the excess off. And just in here, just
going to see if I can just drag a bit more light in. So I'm just running it along that top bit of the orange. Wash my brush again. And now I'm just
going to soften that. So I'm just going to
then pull that down into the base just to give myself
a little bit of a highlight. Now when I'm doing that. And this, this is
just to get a little bit more interest in there, but I've got to
be careful not to touch the indigo
or that will drag all that indigo
into the orange and I'll lose that nice color. Now I also think while
I'm in this head on, I actually think I probably want that a little bit darker. So this time, I'm going to take my
little synthetic I'm going onto dry paper with
a little bit of indigo. Wash my brush. And I'm just going
to move that around. Just want that to be
one shade darker. Okay. Now for the eye,
I'm not going to. All I'm going do is give
myself a little line of gouache, a little semicircle
with gouache and add little white spot. Gouache is, a
little bit goes a long way and you can get
into strife pretty quickly. So you only want to
use a tiny bit. And I'm not actually being
true to the reference. I'm not painting in the
iris and all of that. I just want the suggestion of the eye sticking with
the less is more thing. So I paint, obviously I painted over where I thought my eye was going to be. So
now I've got to guess. So I'm looking at my reference. And I am going to take, this is a really little synthetic one is a triple o round that has got terrible
bristles on it now, but I'm going to wet the
brush and drop it into my tube paint a little
bit on my tissue. Then I'm going to guess where
I think the eye might be. So I think probably, it's probably around here. Beauty of this being that
if you get it wrong, you can color it back in with
the indigo right there. I've popped a little line. Then I'm going to wash my brush, take off the excess, and I'm just going to drag my damp brush along it because I don't want
it really, really bright. I just want the
suggestion there, so I'm softening it off by dragging that
brush through it. Then I'm going to
take one more spot. And I'm just going
to pop a little highlight, but not quite enough paint
back three quarters of the eye I guess, just in there. And that's all I'm gonna do for the suggestion of the eye.
13. Finishing the Tummy: Okay, so the last thing
I really want to do is I just need to strengthen
off underneath the tummy. I've got a nice soft shadow. I just want him a little bit darker through the middle here. And now that it's dry, I can do that without
getting into trouble. So I'm going to take my size 8, neef my, slightly
bigger brush. I'm going to do the same
thing of I'm going to wet down with clean water. Was meant to be clean. So damp it down. Coming up a little bit
further than I want to go. Then picking up my
milky Indigo and just dropping that in, taking off the
excess off my brush and just pushing it around. Wash my brush let it soften
down the bottom. And you can do this as many times as you like until you get
the intensity. Until you get the tone right And I would rather add it dry, have a look
add it, let it dry. and have look rather than
going too dark and not being able to lift it
because it's really difficult, particularly with indigo because it's such a staining color. You really can't you can't get it off once
you've got it on. So I'm going for that
really soft feel and just tucking him under. I've got a line here. So I'm going to drag
that up a bit and come up to meet my yellow. I'm just keeping an eye on
that edge down the bottom. And so I don't want
to get because that that water and the pigment
is sitting on the wet edge, it's going to form a line. So I don't I don't want to
hard line down the bottom, so I need to keep
taking the excess off my brush and just
soften that back so just running the damp
clean brush along it to help wick up the water and not form a really hard edge. So then I need to be
patient and let that dry to see if it's
strong enough. The only other thing I'm
just looking and thinking I probably can strengthen
up my color here. So what I'm actually
going to do, I'm going to use my small
synthetic nearly finished. I'm going to dampen. I'm, I'm going to use the
quinacridone gold for this over the top
of the burnt sienna. So I will get some clean water, just check that
my brush is clean. I'm going to paint that
further than I want to go. So I'm painting over
the quinacridone gold. There bringing that up. When I get to the burnt sienna. Now I'm going to switch and get some of my
quinacridone gold. And I'm going to
paint over that burnt sienna. I just want the intensity of that color to be a
little bit stronger. But I also want that to blend
into the quinacridone gold. underneath I don't want to hard line, which is why I painted
the page first. Because if I painted with the quinacridone gold fist and then tried to drag it down. I'd be chasing the line of the quinacridone gold
down where as if, I wet the page first
and let it bleed. I'll get that soft transition. But definitely now
starting to fiddle, I need to let this
dry a 100 percent. Then I need to come back, rub off those pencil lines and make sure I haven't left any
gaps anywhere or when. For example, If I
rub out this pencil line, whether these two join, I might have to
tidy up in there, but it needs to be
a 100 percent dry, particularly when it's indigo
because we don't have a background it's really easy to drag paint through and ruin it. So I'm going to be
good have a coffee and let that dry and we'll
come back and have a look. So I've just gone
ahead and rubbed out all my pencil lines and the only thing that I can see that
I probably need to fix. is I've got a little
bit of a gap here. So I'm just going to
take my small synthetic, everything's completely dry take up a little
bit of indigo. And I'm just going to actually, I'm going to take off the excess. I don't want much
paint on my brush. And I'm just going
to drag a line down and just join
that onto the chest. Just wash my brush. Just going to soften
that in, dragging and clean brush
along there
14. A Final Word: Thanks for joining
me for the lesson. I hope that when you
come to the end, you've got something
that you're happy with. I'd really love it if you
would post your paintings, you're finished
paintings on the site. It's really fun for me to
see how students have gone. And of course, if you have
any questions at all, just send me a message,
always happy to answer. And I did say at the
beginning that, if you haven't taped the painting down and it's got a little
bit of wobble in it. But you really happy
with the painting I would take a water
bottle spray the back, put the painting face down on a clean piece
of watercolor paper. Then pop a board on the top of that and weight it
down with some, with some weights or some
books and leave it for a day or two until
it stretches out. And that's it from me.
Thank you for joining me.
 Nadine Dudek, Professional Watercolour Artist