Transkripte
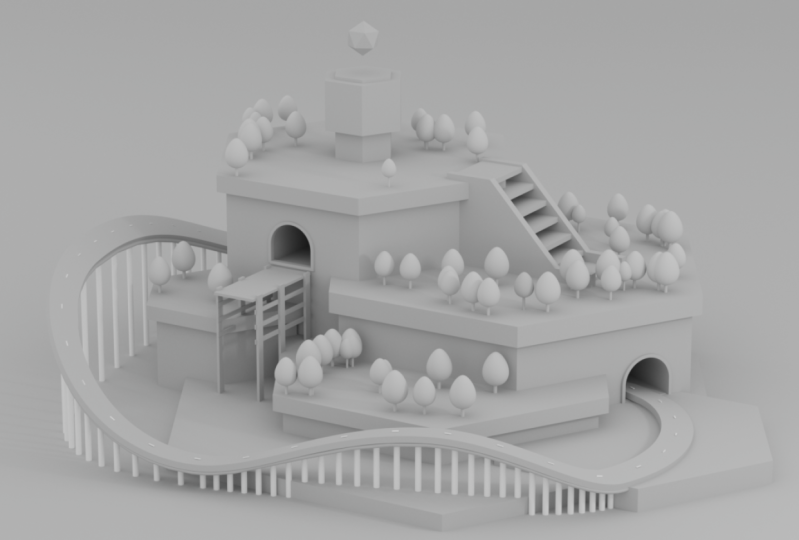
1. 00 Kurs-Promo: Hallo Leute. Willkommen zu diesem Kurs. Erstellen einer
3D-Insel eines Telefons mit Cinema 4D. Was macht diese Kosten aus? Eine ist, dass wir
keine Plug-In-akzeptierten
Tools verwenden werden , die
von Cinema 4D bereitgestellt werden, und
es wird erstaunlich sein. Beginnen Sie nun
mit der Modellierung, dem
Blockieren unserer Illustration und der Verwendung von Box-Modellierungsmethoden. Bei der Einstellung von Details. Wir werden unsere Szene mit dem
Cinema 4D-Standard auf der fiskalischen
Rendering-Engine von Dell beleuchten . Also werden wir unsere Szene
rendern. Diese Anrufe sind
ausländische Kosten, um weiterzugehen. Und ich möchte nicht, dass du den Dietrich-Switch
verpasst. Ich werde diese Gedanken
ohne weiteres
teilen . Lasst uns anfangen.
2. 01 Modellierung (Blockieren der Grundformen: Leute, ohne unsere
Zeit zu verschwenden, lasst uns anfangen. Wir werden anfangen, wir werden dieses Polygon platzieren
und auch ein Setup
entwerfen, das sehr, sehr einfach
ist. Folgt einfach mit.
Fangen Sie zuerst an. Wir fangen
mit einem einfachen Zylinder an. Wir werden den Moment reduzieren,
den wir nicht brauchen. Jedes Segment. Kann unser Erstes sein. Erhöhen Sie die Größe der Röhre.
Es würde nicht durchkommen. Neues. Erhöhen Sie die Größe. Kontrollieren Sie gegen Neuheiten auf
Weihnachtsgröße erstellen , reduzieren Sie die Größe. Was wir tun
, ist, dass wir versuchen, unsere Sicht zu versperren. Axel wird nahe proportional
zur Referenz. Ich rate Ihnen, einen
meiner vorherigen Klassen zu sehen , die mit einer Referenz
beginnen. Und wenn Sie nicht
mit der Referenz beginnen, zumindest sicher, dass
Sie dieses Problem erhalten. Wenn du anfängst,
fängst du mit etwas an. Sie können wissen,
was Sie tun möchten. Denn wenn Sie das nicht tun, können
Cinema 4D oder
3D in der Regel dazu dienen, ein kleines Haus
für das Modell
streng zu verwenden , das
Sie am Ende
nicht
zufrieden sein können , da es
keine gibt spannende Ziele
beim Einstieg. Folgt einfach mit. Dies ist der Satz
des Salinas-Polygons. Schnelle Dinge ein
bisschen einfacher. Stimmt's? Phosphat. Ich denke, wir können fließen
oder diesen Moment, nur kritisch fließen oder nicht. Also denke ich, dass es am besten
gezwungen ist, eine neue Kamera zu erstellen. Die Brennweite auf eins bis fünf. Willkommen, um das
richtige Verhältnis zu erhalten. Ich glaube. Bleib einfach im Block drin. Sie fühlen sich mit diesem
schönen Absendekörper
manchmal wohl , der es Ihnen
erleichtert, Ihr
Objekt im Objektmodus
ohne zerstörungsfreie
Weise zu verkleinern , zu
skalieren , bevor Sie zu wechseln das Internet. Das ist einfach, das ist einfach. Du kannst kreativ werden
mit deinen eigenen,
die genug sind, um
genau wie meine auszusehen. Finden Sie einfach etwas, das
Sie sich wohl fühlen. Wir benutzen es gerne. Lassen Sie uns durch gewöhnlichen Auftrieb
mehrere in der Landschaft hinzufügen. Anstatt die Kosten zu senken, wollen
wir es nur
als einfaches leichtes
Medikament verwenden als einfaches leichtes . Viele Fenster ein bisschen. Sie möchten
das Saatgut ändern können in
Ihrer
Landschaftsfirma kommen , um die verschiedene ein oder zwei,
nur wenige bequem sind. Ich denke, dieser eine große Referenz
für den Außenbereich auf V2. Nur damit du sehen kannst, ob nur auf dunkle
Kontrolle geklickt
hast, kommst du zur Akte. Du hast noch gespart. Sie können Ihre speichern, wofür
Sie es speichern möchten. Wo auch immer wir ihn meinen nennen. Ich hebe es auf. Sie können Ihre speichern
, um die Datei rückgängig zu machen. Du möchtest
deine dumme Affenkomponente speichern deine dumme Affenkomponente zu speichern, weil du es nicht sagen kannst. Alles kann passieren. Boom. Lassen Sie uns unseren Block
fortsetzen um die Form zu erstellen. Spiel einfach weiter
mit deinem Schiff. Ihre Persönlichkeit, die Ihrem
verschiedene Objekte hinzufügen kann muss
nicht unbedingt genau wie die in der Referenz sein. Und das ist das Schöne
daran, dass du irgendeine Referenz bekommst und
wir bekommen eine Referenz. Sie können damit problemlos
ohne Vulkanprobleme
mitspielen . Kein besonderes Ziel, mit dem man arbeiten muss. Noch ein neues. Ich denke, wir können es
aussperren , indem der Referenz
folgen. Jetzt. Ich glaube, ich liebe es. In der nächsten Folge
werden wir
in den Bearbeitungsmodus wechseln
und wir werden mit unserem Modell fortfahren. Wir werden ein
bisschen mehr Details hinzufügen. Wir sehen uns also im nächsten
Video. Danke.
3. 02 Modellierung (Details mit box: Die Leute sollten mehr Grad hinzufügen. Wir fahren nach Süden, um auf
das Objekt auf dem Tisch zu klicken. Durch Drücken von C können Sie auf
das Boot in der Tabelle klicken. Mantel und Mantel. Hokey, mit dem Sie dasselbe mit
vielen Objekten
machen können , anders als zusammen und
einfach bearbeiten. Was war gerade zum
Polygonabschnitt gekommen? Um dem Herausgeber zu viel zu sein. Klicken Sie darauf, um zu sehen, dass es so ist. Du fühlst dich wohl damit. Wenn Sie es als Schleife auswählen. Am einfachsten,
um als Schleife auszuwählen, nur um die
Shot-Uhr zu verwenden, die Sie gehalten haben. Sie würden eine Schleife auswählen. Dann verbindest du dich. Drei. Prüfen Sie. Du. Wählen Sie Schnelle Billionen aus. Wir könnten das Gleiche gebrauchen. Ist es nicht unbedingt, dass
du bei der Kamera stecken bleibst. Kann es einfach verlassen. Zumindest können Sie es leicht machen, schnell zu sein,
damit die Wunde wichtig ist. Sie können also einfach den
Vorgang wiederholen, der nach der Extrusion dann benötigt wird um sicherzustellen, dass wir nicht in Deep Blue Jay
geboren Ich kann einfach editierbares Polygon sehen. Das Jahr der Linie. Klicken Sie hier
und ziehen Sie das nach unten. Nur um es zu versenden. Wir haben es auch vorher
geschafft, es auf den Kredit geschafft. Ich werde nur die Spitze
des Plunk Gladys sein. Das Choral, mit dem Sie
Ihre Kamera nicht bewegen können, fügen Sie
einfach ein Tag hinzu. Kann es in der Takelage finden. Selbst wenn wir den
Handgelenksensor für die fünf alternativen verwenden , werden
Sie
ihn bei Takelage Tags,
Schutz und Inklusivität finden . Danke. Es ist Zeit für
uns, diese Fehler zu beheben. Sie wählen alle
Polygone auf der linken Seite aus. Ich mache diese Symmetrie. Wo auch immer ich mich auf den Weg
zum Wandbild mache, ordnen Sie diese Objekte
an der anderen Seite an. Indem du zu Image anodyne gehst. Kann leicht
symmetrisch erzeugen vergrößert die Größe. Kommt darauf an, wie du sein
wolltest. Es muss nicht dasselbe
sein wie meins. Denke, es ist auch Zeit für uns. Mir werden die ts, ts, ts beigebracht. Und das einzige, was wir nur
brauchen, um einen einfachen Würfel zu machen. Löschen. Ich beobachte diese. Du willst Cinema 4D skalieren. Lassen Sie mich das
Beispiel setzen und fügen Sie ein neues Objekt hinzu. Du kommst zur Skalierung. Wann du skalieren willst. Die Skala auf 0,
du kommst auf 0. Sie können es nicht wieder
im richtigen Verhältnis skalieren. Stellen Sie einfach sicher, dass
Sie, wenn
Sie eine Neue Hoffnung hinzufügen , sie
auf die nächste skalieren möchten sie
dann töten. Schon wieder. Dass du wenigstens das richtige Verhältnis bekommen kannst
, nach dem
du suchst. Ich habe nicht gesagt,
dass etwas davon auch daran gearbeitet hat. Die einzige Fähigkeit, Fähigkeiten für
Studiengebühren zu lesen . Einfach eins. Lassen wir es uns im Moment
so lassen. Es ist wichtig,
mit dem Umbenennen zu beginnen. Um fortzufahren, willkommen. Kopiere diese drei. März unsere Referenz. einfach fallen. Ich glaube, ich bin 1.5. Wenn ich denke
, dass ich mit diesen arbeite, die gezwungen sind,
mehrere Medikamente darin zu schaffen , werden
beide nicht in der Lage sein, die genaue Fähigkeit zu
bekommen. Manchmal führen die besten ein, wollen
nur, dass dies eine lange ist,
diese Blutkapillaren. Der einfachste Weg,
dieses args-Objekt auszuwählen. Stellen Sie sicher, dass Sie die Umschalttaste gedrückt halten, Sie können
die Umschalttaste blau machen. Jetzt gibt jede Seite
des Würfels heraus,
was entlang dieser Achse sein wird. Also ziehen wir
das einfach rein. Sauberer, werde es auf 3131
ändern. Ich werde nur die Größe reduzieren. Es klingt einfach könntest du das Symbol
nach unten ziehen Ich lebe Tatsache, die die Stummschaltung nicht aufheben
wollte. Dies wird unsere Arbeit mit einer Erhöhung
viel einfacher machen. Diese beiden sind kongruent. Die nennen es die Planke. Sie können es den Wert nennen, den
Sie nennen möchten. Ich werde leer sein. Zugehörig, wir können das Gleiche auch machen. Lasst uns diese Details beenden. Kopie, du bist über den Würfel gegangen. Ist okay. Darauf. Wir verwenden dieselbe Methode
, die wir zuvor verwendet haben. Sie können einfach dieses
klonale Polygon kopieren, ich meine, die kubanische
Droge, dieses drin. Wir werden es von diesen
beiden auf 11
umstellen . Benutze einfach die Nummer, die ich verwende. Und kann auch 31 erhöhen. Einfach mit einem einfachen geschlossenen Box-Wochenende hatten
wir Angst. Es wird nicht darum gebeten, genau
so zu sein, wie ich mich mit etwas wiederhole , mit dem ich arbeiten kann. Schön, es jetzt durchzusetzen, indem man Boolean es in den Posten
einpasst. Um dies zu tun, müssen Sie nur
das boolesche True Cinema 4D verwenden . Es ist einfach. Aber wir
müssen das Schiff bauen. Versenden Sie weiter. Erstellen Sie einen Zylinder. Schon wieder. Flip Beat zum Raster des Xerox. Der erste
würde das Segment einfach nicht brauchen. Außerdem können wir
die Segmente vergrößern, die, da wir
unser Irland nicht teilen werden, es portalfalsch ist das höchste Segment
zu verwenden. Sperrig haben wir. Die Verschachtelung tut es. Nur um es editierbar zu machen. Wählen Sie aus, wählen Sie den mittleren aus. Dann klicken Sie auf,
Sie füllen die Auswahl aus. Sie können einfach löschen. Lösche diese. Wenn Sie
auf diese letzte Zeile klicken Ihre nicht ausgewählt ist
, klicken Sie darauf. Und klug mit dem Sauerstoff. Einfach ich, dass wir in der
Lage sind, ein Symbol zu erstellen. Diese Schiffe,
die wir machen werden. Jetzt falsch, um dieses
Schiff aus dem Booleschen zu beschichten. Boolean ist leicht zu finden, wenn
wir auf Yeah klicken, degeneriert, diese werden boolesches Odeon für die aktuell
ausgewählten Objekte
heiß
finden . Als wir
das hineinschleppten. Dreh es um. Wenn Sie jetzt bemerken, bemerken Sie
, dass das Objekt nur das Schiff verlassen
würde. Der Grund dafür ist, dass Sie dafür sorgen, dass diese gut,
es keine Geschwindigkeit gibt, was
ich meinte, ist, dass Sie bemerken, dass es dieses PCM gibt. Wir brauchen ein Polygon, um es uns leisten zu
können, das boolesche Feld nicht ändern
kann, das
vollständig oder so sehen kann, damit
Sie
diese alten Erstarrungen einfach füllen und mit der rechten Maustaste klicken können. Sie werden unseren
geschlossenen Polygonhalt finden. Es gibt noch eine andere. Klicken Sie einfach mit der rechten Maustaste, setzen Sie sich hin, schließen. Shot hat seinen MD bekommen. Wir konnten tatsächlich auf Switch
überprüfen, auf dem Booleschen
behandeln. Sie machen sich sehr einfach auf. Das ist auch einfach,
das ist effektiv. Dies ist die einzige Möglichkeit, Metadaten
sehr unserer Freunde
einzuführen. Wir werden feststellen, dass eine von Mickey bestimmte Änderungen dies leicht
tun können. Wir bezweifeln.
4. 03 Modellierung (Details mit Voronoi fracture) erstellen: Willkommen Leute. Lassen Sie uns
weiter weitere Details hinzufügen. Kleine Insel. Liste fortsetzen. Erschaffe diese Steine fallend. Es ist eine so einfache Mischung. Sie werden Datei machen, es könnte
30 Tibialfraktur sein , um leicht
durch unsere 40er Jahre zu halten, in der
Lage, auf all
diese Kroko-Kompliment zu kommen die Kühlung zu ermöglichen. Und weil es sich um einen Generator handelt, können
wir einfach
nur dem harten Teileeffekt einen Effekt hinzufügen ,
indem wir den Alt Enter Point gedrückt halten. Es würde uns diese
schöne
Python-definierte Denkweise geben , dass wir die formelle Seite
nicht können . Es hängt davon ab, ob Sie bemerken , dass es
sichtbar sein wird, um
diese betriebene Wirtschaftsunion für
Schafzüchter zu schaffen diese betriebene Wirtschaftsunion für
Schafzüchter , die raucht. Also beides ist es nicht das meiste für das Medikament diese TSCA. Lassen Sie uns diese Schritte erstellen. Fügen wir einfach den
Kloner hinzu und machen ihn linear. Betrachten wir es einfach
aus dem falschen Aspekt. Sie können nur
zu Ihrer vorderen Perspektive wechseln, können hierher kommen und
von den Anzeigezeilen aus klicken. Denn die Abfrage hat linear
gelehrt. Jetzt 40 erstellt entsorgen
die Standardeinstellung. Wir brauchen. Wir brauchen diese
Teile etwas näher. Ich glaube, wir brauchen vier. Ich schaffe es wie fünf. Mach es, du wirst diese Zeile sehen. Um das voranzutreiben. Dies ist entlang der Y- und
X-Achse einfach. Das ist einfach. Wir werden
diesen kleinen Switch zurück in
den Boxplot ziehen wollen den Boxplot um das einfach zu erstellen. Jetzt erstellen wir eine Spalte. Dieser Crack-Effekt wieder. Einfacher Zugriff. Einfacher Test für diese einfachen, wir wählen einfach den Würfel aus. Ein Teil von facto. Reduziere schnell die Stärke. Minimum. Ich möchte
, dass wir aufhören, mit der
Lieferung aus der Waffe zu entscheiden. Führen Sie weiter zu dem, was gezwungen ist, das zu schaffen, das so
herrschte. Schrift Nullen. Das ist ein erstaunliches Grab, das wir
selbst verwenden würden, um diese Rohlinge mit
der Farbe Schwarz zu verwenden. Wenn Sie diese
Ebene auswählen, liefern bestenfalls manchmal auch. Dies ist eine Mischung, die Sie zur Draufsicht
wechseln. Kann auch wechseln. Finde etwas, mit dem
du arbeiten kannst. Ich werde die
Meile von diesem Ort aus laden, dann wird es sie kosten. Hier drüben. Du kannst dich ein
bisschen anders machen. Es spielt keine Rolle,
muss das Gleiche sein. Ähnliche Proteste können es je Aktie
belassen. Also klicken wir. Stellen Sie sicher, dass Sie
als Lead to möglich erstellen, da dies möglich ist. Vielleicht siehst du dein Zuhause nicht. Ich glaube, es liegt an dem Tief- und
Hochland. Auf der Höhe. Beides
würden wir
klar sehen , dass wir das Einkaufszentrum benutzen. Unterschiedlicher Ansatz, um Ihre eigene Form zu
erstellen. Kann die Kamera nicht verstecken. Klicken Sie auf das Medikament, spielt keine
Rolle, wirklich scharf. Ich möchte nur den Punkt bekommen, den
das Schiff zu
mehr, glatter und eher so gezwungen hat, wie
wir es wollen. Rosa. Klicken Sie hier auf diese Schafe. Wählen Sie klicken und ziehen Sie es nach oben. Eine der Tibia, oder? Wenn es nicht Ohad ist, machen
Sie weiterhin weiches
Gewebe, um
diese weiche Population zu schaffen , wird wie Photoshop
kommen. Dies ist einfach, diese nach oben zu ziehen. Ich schaue es von der Kamera aus an. Kommen Sie, wählen Sie dieses
Medikament auch. Diese können auch bis zu S1 nach unten liegen. Sie können auf eine
der Anzeigen klicken. Stellen Sie einfach den Schieberegler ein. Denken Sie, dass wir in
der Lage sind, das Sie nicht wünschen, eine
bestimmte Lieferung zu erhalten , Sie können einfach auswählen
und Dropbox löschen. Ich denke, ich werde
mit
dem Schiff arbeiten , bis der
Spline verwendet werden kann auch wenn Sie diese
animieren werden sehr wichtig für
den erstarrenden Kollegen
zeigen, die Straßenversorgung
Pflegemittel schaffen diese Straße. Straße nur in einem anderen Spline. Weil wir konkretes Rechteck
verwenden und es kleiner machen
wie m um zwei. Ich fege es. Wenn wir Shooting für
eine Reise zum Gehen verwenden, brauchst du Profil und ein anderer Teil erstellt
wird
, wird unsere Handlung sein, wird unser Profil sein. Es würde leicht eine
Straße schaffen , die leicht zurückgerufen werden kann. Wahrscheinlich. Bearbeiten Sie immer noch Spline,
damit Sie
die richtige Orientierung erhalten , in die
Sie gehen möchten. Er kriegt zumindest, dass
ich es später machen kann. Ich kann es sogar
ein bisschen breiter machen. Wir können den gleichen Code schnell wiederholen, den gleichen Code schnell wiederholen den gleichen Prozess wiederholen,
in Boolean kommen . Eine Form. Machen Sie es ohne den Booleschen Wert. Droge, kann es einfach umdrehen. Falsch zu
schwer zu haben. Lkw verlegen. Montag mit diesen markiert. Auch einfacher. Da wir
diese Blind bereits als neuen Kiefer hatten, wird
Ihr Profil kurzfristig verwendet
. Bevor wir das tun, denke ich, dass
wir mich nennen können Ich habe geklickt um die Form zu verwenden, um den
Extrakt nur Modellpfad zu verwenden. Aber Kelly, ändere
einfach die Verletzungen
wieder in Richtung Orientierung. Kann es immer noch kleiner machen. Wir müssen
die Proportion schreiben die Proportion und extrudieren. Das. Mach es einfacher. So ohne Konvertieren
ist blind zu Mesh, kann einfach
mit dem gewünschten Chip mitspielen. Ich denke, wir bekommen
Includes, wie man referenziert.
5. 04 Modellierung Modeling(finalizing Modellierung): Willkommen Leute. Lassen Sie uns
weiterhin weitere Details zu Irland hinzufügen. Ich denke, das nächste, was ich tun
werde, ist nur eine weitere Straßenschicht
zu schaffen. Ich werde nur Franklin erschaffen. Ich
kontrolliere einfach das Drag. Um das zu machen. Ich nenne es einfach das Stück. Ich werde mich reduzieren. Es. Es wird immer noch nicht ewig weitergehen. Gerade gerundet. Um mit dem Rauchen aufzuhören. Sie können erklären,
dass der Rechtsanwalt einfach den
Winkel vergrößern oder
auf Sie
reduzieren, den Hunger nach außen reduzieren. Es wird
es glatter machen. Wir werden
das auf Tempo reduzieren. Das gefällt mir. Die nächste Sache ist, diese
einfach zu erstellen. Der einfachste Weg, dies auch zu tun,
nur um die Warteschlangengröße zu erstellen, wollten wir
wie drei mal drei sein . Dies kann ein abgeschrecktes Leck gehört werden. Es muss kein Slice sein. Diese werden wir
machen, wir
werden diesen Bericht klonen. Erstelle wieder unseren Kloner. Was wir vereinbart haben zu kreieren, ein Outfit-Zeug zu
kreieren,
was wird handeln? Was wir also
verwenden möchten, um zu verstopfen, ziehen Sie diese
einfach, um die Wurzel zu erklären, das Objekt
einzuführen. In gewisser Weise nicht markiert, ausgerichtet. Sie können diese ziehen. Ich denke, der beste Weg
, um DCs zu
machen, stellen Sie sicher, dass Sie die Straßenschiene
duplizieren. Der Grund ist, dass wir,
wenn Sie die Straße bekommen, erklären Sie, dass wir jetzt die Achse
dieser Wurzelversorgung verwenden möchten . Mitten in dieser Olive
haben wir versucht, das Essen zu wechseln. Wir werden unsere
Route zusammen mit nur verschieben,
wir erstellen unseren eigenen
Spline, indem wir einfach auf einen
klicken oder steuern , Sie ihn außerhalb
des Pools, indem Sie auf
Luna klonal auf Luna gehen
Die Lieferung aufgrund von Konflikten Luna,
Wurzel, die
nur diesen einen Abwärtsfonds ausspioniert nur diesen einen Abwärtsfonds um ihn morphisch zu
machen, macht es fummelender. Wir können eine Gruppe
insgesamt leiten. Gruppiere einfach, es. Gerollt Und die Lektion besteht nur
darin, den Strom zu erhöhen. Du kannst hier rüberkommen. Ist der Optikkleber nicht oben, und fangen Sie einfach an, ihn zu vergrößern. So schöne These,
das hat wirklich Spaß gemacht. Wasserhähne. Wenn du das jetzt nur animieren
willst, wird es so viel
einfacher, zu schwer. Der Lkw kann es
wieder mit dem Würfel machen, nur 32 Stoppen macht, kann eine Zunahme der Krankheit
feststellen. Ich denke, sie
werden den Kloner wieder benutzen. Verwenden Sie das Objekt und verwenden Sie den Spline dafür. Was wir
das vorhandene für alle Root verwenden werden, weil
der IND am selben Speicherort ist. Droge, ehemaliges. Tut mir leid, ich glaube, ich
ziehe den falschen. Wir können es klar sehen. Sie können also auf
den Kloner klicken und
ihn zusammen
mit dem Geben ziehen ihn zusammen . Nur auf Scheck. Überprüfe diese. Diesmal verwende ich
die Gliederung. Leicht reduzieren. Wir sind in der Lage, den Truck zu bauen. Wir werden nur Christy glätten
, y-koordinate. Machen Sie einfach eins um es umzubenennen, um
mehr Grund dafür zu schaffen. Ich werde
diese Details auch hinzufügen. Kann mit der Insel gemacht werden. Ich gehe zum nächsten booleschen Jahr. Wählen Sie die Zeile aus. Das Gleiche mit
Hitze würde erklären was wir mit
dem Sweep benutzen werden, den wir benutzen müssen. Also benutze ich das
mit diesem Power-Profil
nur für Chris diesen Bogen. Wir werden diese Beiträge
verwenden , um das einfach machen zu können. Wir müssen das Kino 4D
Tom in diesem Alter machen, um es zu erklären. Es ist einfach, dass
Semaphore wir
für Sie tun können , indem Sie mit der rechten Maustaste klicken. Und nur um synarthrotisch zu spalten, erstellen
wir das ganz einfach für Sie. Geh zur Seite. Ich werde dies nur als
unsere Schätzung für uns verwenden , um nur dieses Muster zu nehmen,
hat das Profil erstellt. Das Profil ist das Rechteck. Ich wollte nur näher dran sein, diese einzeln
zu machen. Lass uns reden Sweep,
Droge, wechseln sie. Als leicht betrachtet können wir diese nicht einfach
erstellen. Sie können das Gleiche
für den anderen tun. Um das zu erstellen, führen Sie zu Details. Ja, in diesem Moment sind wir mit dem Modellieren
fertig. Ich denke, wir können unsere
drei auch von hier aus modellieren. Dies kann ein
bisschen einfacher und schneller als Cinema 4D, damit
wir diesen Oxo haben können. Ich denke, wir können all dies
gruppieren und nennen es eine Landschaft
nennen. Es ist wichtig,
Ihr Objekt zu benennen und zu organisieren. Der Grund dafür ist dass
wir wissen, was was ist,
wenn Sie an einem großen Projekt arbeiten . Du würdest die
notwendigen Objekte bekommen, du brauchst es pünktlich. Sie verschwenden also nur Zeit
damit herauszufinden, wo er die Geschichte
schaffen
wird,
ich denke, es war ein einfacher
Zylinder und die Kugel. Wir schaffen einen einfachen Zylinder. Ziehen wir es noch raus. Klar. Ich denke, einer ist okay, weil wir
oben Trinkgeld geben werden. Wir werden eine Kugel schaffen. Dann kann es auch drucken. C max ist nur ein einfacher Baum, den
wir verwenden werden. Aber du kannst deine
etwas komplex machen. Das Modell ist das, was
ich mit diesem einfachen,
einfachen Ergebnis für Sie zum Essen verwenden werde. Sie können einen Deformer verwenden. Einfacher einfacher Deformer
ausgewählt, einfach verformen. Kann Teekanne sehen, eine alte Schicht, beide verschieben, wenn man darauf klickt. Das ist also zumindest, dass es diese
als Kind präsentieren
wird . Wir erhöhen
die Stärke. Sie können sehen, dass es verwendet, um
abhängige Arten von Bäumen zu machen. Ohne Tom-Druck würde die ursprüngliche Form
lehren. Also denke ich, dass wir
unsere Anfrage jetzt kongruent machen , NGOs Cholin
holen. Um die Größe zu erhöhen, um manchmal zwei zu bekommen wird diesen
Baum benutzen, unsere Sünde bevölkern. Dr. Mcdade, Freund. Du kannst an deinem Sohn arbeiten und weitere Details zur Blume
hinzufügen. Du kannst es dir wirklich zu
eigen machen, wer dich im nächsten sieht.
6. 05 Bäume mit dem hair hinzufügen: Leute, ich denke, es ist an der
Zeit, dass wir
unsere Szene mit unseren
Dreien bevölkern unsere Szene mit unseren
Dreien , die das nicht schaffen
sollen. Wir
müssen zuerst ein Gebiet schaffen , in dem diese
Bäume erscheinen sollen. Dies ist sehr wichtig,
denn
wenn Sie es zum Beispiel persönlich
machen möchten, als würden Sie den Baum
nacheinander bewegen und
versuchen, ihn zufällig zu platzieren. Es kann gehen
Teil wird eine Menge Arbeit sein. Und so werden wir
das Jahr nutzen. Wir werden den Baum
machen und x Dots sollen das tun. Das bedeutet, dass unser Objekt
x ein Objekt ist. zum Beispiel so
getrennt sind, müssen
Sie es als
eins kombinieren , indem ich denke, dass ich es
inzwischen entfernen
werde , weil ich sicherstellen
werde , dass
ich diese gelöst habe, meine Sphäre auf 24 oder sogar 36. Tödlich. Ich kann das duplizieren
, damit es ein beliebiger Pfeil ist. Ich kann zur Theorie zurückkehren. Ich kann mich einfach entscheiden
, beide Objekte auszuwählen. Sie können mit der rechten Maustaste klicken und Beiträge für Objekte
löschen. Ich kann es einfach von
diesen keinem Kollegen entfernen, unserem S3. Eine andere Sache, die Sie tun
müssen, ist nur die Region zu schaffen, in unsere Bäume projiziert werden sollen. Basierend auf dieser Referenz. Wir wollen, dass es auf jemanden
projiziert wird ,
der von Jahren spricht, einen Hirschmuskel und doch so weiter. Um dies zu erstellen,
müssen wir die Polygone erstellen. Und der einfachste Weg, dies
zu tun, sind nur zwei. Gehe zum Objekt selbst. Wählen Sie einfach die Region aus, in
der sie projiziert werden soll. Ich will diese Region oder
die Gesamtzahl dieser Region, aber ich möchte nicht, dass es sich um
eine weitere kleine Insel-Iso handelt. Zuallererst muss ich dieses Polygon einfach vom ursprünglichen
trennen. So ist es
auch möglich,
es bei der Zielauswahl auf einmal auszuwählen , sowohl weil wir es an verschiedenen
Orten
projizieren wollen, um es zu bekommen.
Ich denke, es ist ratsam, dass wir
die Quelle trennen, sowohl weil wir es an verschiedenen
Orten
projizieren wollen, um es zu bekommen.
Ich denke, es ist ratsam, dass wir
die Quelle trennen,
wir, um jeden zu trennen. Ich muss nur auf U drücken und du wirst dich sehen. Du hast es gelernt. Schon wieder. Wenn Sie diese Region
auswählen möchten, kann
ich einfach UL verwenden, möchte sie teilen, Sie
ändern meine 40 sind getrennt. Dieses Polygon für Kraft. Das ist einfach, also werden wir das nicht zu
vielen duplizierten tun. Ich will Arm-CD, die Reise abgelehnt wurde ich
will es nicht da drüben. Ich will nicht, dass es nur einer ist. Du würdest schlagen. Ich glaube. Ich werde nur diesen Radian
benutzen. Für mich, um Daten zu machen, ist es am besten,
wenn Sie erschöpft sind. Betone, einfacher Ordner,
in dem Sie es haben möchten,
vielleicht irgendwo dort. Gruppiere es einfach auf Cholin-Lunge. Ich denke, das
wird gut werden. Also nur das nächste , dass wir nur
behalten werden müssen, damit du wenigstens sicherstellst, dass du jetzt
weiß, welches ich bewegt habe. Also Leitungen für diese Bereiche. Stellen Sie also sicher, dass Sie
sich tatsächlich im Polygonmodus befinden. Wählen Sie einfach die drei Regionen aus. Für Sie nicht notwendig für Prominente, da
wir nicht mehrere Speicher
Ihres Computers
sehen werden . Wählen Sie am besten einfach
das spezifische 0.1 aus, damit Sie es in unser Freeland ziehen. Nett, dass wir gehen würden. Außerdem möchte ich nur
eine Region auswählen. Converse. Raus aus unserer Kamera. Willkommen zu sehen. Ich wollte gelöst werden, früher verdient worden. Ist okay. Sie können eine
davon üben , ist unser Land wird ein projiziertes machen
wollen, Sie könnten separates Polygon sehen. Und auf dem Nest und
weiter hin ist es nur so, dass wir es unterteilen müssen. Die Unterteilung ist wichtig. Warum? Weil d hier identifizieren
wird,
wie viele Polygone. Und du siehst, dass es nicht
genug Polygone in jedem gibt. Bevor wir es also unterteilen, will
ich, wie gesagt, kein Gebiet. Ich möchte nicht zulassen, dass
ich die Folie isoliere. Du siehst es besser. Ich will meine Insel nicht. Ja, ich möchte mich nicht
zwischendurch reproduzieren. Also bewaldetes Gebiet kurz bevor wir es einfach umkehren, dann löschen Sie es nach oben,
ziehen Sie es dort an. Stellen Sie sicher, dass Sie Polygone
möchten, die Sie von Ihnen ausgewählt haben. Nicht gezwungen,
dieses konservatorische Polygon zu unterteilen. Du unterdrückst uns. Ich werde sehen, dass
Fourier-Ports, um es
zu sortieren denke ich viermal x. Also, ein weiterer Aufruf, kombiniere diese durch Rechtsklick, dann verbinde dich von
Plus, das
als einzelnes Objekt geliefert wird sehr wichtig, dass
wir drei einzelne Objekte machen. Wir machen. Wir wollten auf einem einzigen Objekt
sein. Code in SF will
jetzt tun, ist einfach herzlich zu tun. Willkommen bei Simulate. Gehe zum Objekt und zum
heißen Haarfollikel. Sie müssen hier
ein Objekt erstellen. Wenn du zu den Haaren kommst. Denken Sie, ich kann diesen
herausziehen, damit Mädchen, wenn Sie beim
Übungsrendern zu
den Orangen kommen , hier
rendern, weil Sie zu stark nach unten
drücken Mädchen rausrendern werden. Ordnung. Das brauchen wir
nicht. Wir wollen, dass es etwas anderes ist, das
als degeneriert bezeichnet wird. Deaktivieren Sie das. Wenn Sie dies hier erneut überprüfen, stellen Sie sicher, dass Sie zur Instanz gehen. Für das ganze Objekt. Sie können Objekte verwenden, das ist der Baum, den Sie diesen Baum hinzufügen
möchten, die Objekte, aber wir
können ihn noch nicht sehen. Warum? Denn das erste, was wir
unbedingt tun müssen, ist sicherzustellen, dass
Cinema 4D, die IKT, nur zur Notwendigkeit muss
ich gleichzeitig
auf 1 Tausend reduzieren. Sehen Sie jetzt, dass es
beide die Größe bildet ,
nicht das ist, was wir wollen. Wir wollen, dass es mehr
Waffen ähnlich ist. Sie werden also feststellen, dass es sich
nicht um ein Objekt handelt, das wir
ein Material auf diesem gelben Bereich
erstellen ein Material auf diesem gelben Bereich das Sie verwenden werden, um Ihre Kopfgröße zu kontrollieren. Mach dir keine Sorgen um die Farbe,
denn das spielt keine Rolle. Weil wir
die Größe von allem
über das Jahr behalten werden , das wir machen. Das Objekt, dass
wir alles behalten werden. Wir werden nur das
Texturohr
behalten , anstatt
uns mit der
Farbe des Jahres zu belohnen . Also werden wir zur Dicke
hierher kommen. Und wenn Sie hier bemerken werden, ist
es noch am Wurzel angegeben, finanziert es stetig, dass das die Wurzel
ist und Sie nur die Größe
vergrößern müssen , um es zu lange
anzuziehen. Weil wir morgen für
den Flughafen eine Menge
von dem schaffen , was wir treffen müssen. Mach es einfach prozedural. sagte, du willst etwas machen, kannst
du ein Buch lesen und
einfach das Ei reduzieren. Vielleicht hat unbereit gesprochen. Sehen Sie, dass jeder, wirft es in jedes Land,
das
wir auswählen, wir können es sogar
zumindest herausbringen. Eine erstaunliche Sache daran
ist, dass wenn wir das Land bewegen, wer die Position verschieben kann? Wenn du merkst, dass
wir dabei sein wollten. Das ist der Grund, warum es
wichtig ist, nur
die wirklich erstaunliche Street
Edit Collection
zu trennen die wirklich erstaunliche Street
Edit Collection
zu , die entartet wird. Die Guides. Dies sind die
Leitfäden, die Zahlen. Das ist nicht deine Szene. Du kannst es ändern. Sie können den Stammraum
aus Polygon-Zwei-Polygonbereich ändern . Die Wurzel des Punktes, Punktes, des Punktes ist das, was Sie nur beachten
müssen . Du kannst einfach wenn du willst oder
es einfach nur schaffen. Das
zählt nicht wirklich nach Ruhe. Mein. Das steuert wirklich. Benutze das Recht, um das Auge zu
kontrollieren. Du siehst es. ist nicht
erstaunlich, dass wir
mit Material die Länge
kontrollieren können. Auch. Komm zum Material, du klickst auf das Material, wir können es wie ein
100% jenes, das auf 25 angegeben ist, zufällig machen. Diese Variation. Dies ist ein Auge für das,
es braucht zufällige Größen. Dixie ist erstaunlich. Anstatt sich Sorgen zu machen, sparen
Sie, machen es rückgängig, Sie
speichern mehrere ist rundum. Ich versuche alles zusammenzubringen Semaphore, um all
diese Kunstwerke für dich zu machen. Und es ist erstaunlich,
weil es jederzeit darauf
zurückgehen kann und einfach die
mechanische Korrektur einschaltet oder sich anfühlt wie Sie
Ihre Bäume mit verändertem CT entarteten . Finden Sie etwas, das wir lieben, wird reduzieren einige der Bäume , die Sie erzeugen plus drei und unser
LAN, um überlastet zu werden. In einigen der Gebühren
, die Sie sehen, die den
Mindestabstand dazwischen
abfangen, werden
sie
den Platz in Tokio vergrößern. Es ist nicht das, was ich möchte, dass
du erhöhst. Der Abstand zwischen den Haaren sieht
etwas mehr Abstand aus. Beachten Sie, dass das Lied Ihre Landung noch konfigurieren muss
. Wichtig, wenn Sie mich die
Erhöhung isolieren
lassen, obwohl wir feststellen, dass Sie von der
einfachen Lösung dies tun, stellen Sie
einfach sicher, dass Sie nach New York
kommen, diese Polygone
löschen
und wir wissen, dass dies ist vielleicht deine Insel. Du kannst es einfach löschen.
Sie können sehen, dass es nicht für mehrere Personen ist, die Sie aktualisieren. Außer dass ich denke, dass die TAs auf
Sendung sind und einfach von dort
weg sind. Sie reduzieren die Sozialreform. Das haben wir gerade aktualisiert. Dies ist nur eine
einfache Lösung zu denken. Wir sind bereit, zum Shorting zu
wechseln, anders als in, weil
wir
das nur mit Standard machen werden . Wir werden für diese keine Gedanken über
die
Rendering-Software
verwenden . Nichts, was es wirklich erfreulicher
macht. Ich denke, wir können weitere Details hinzufügen. Es hängt von dir ab. Ich kann nicht mehr ableiten,
indem ich es vorher hinzufüge,
um diese kleinen,
schönen weichen Kanten zu schaffen , reinkommen, einfach auf den B52 klicken können. Die Pharmaindustrie, um jede Korrektur
vorzunehmen. Da diese editierbar sind, der Grund, warum Sie
Formeln verwenden, darin, dass das unbekannte disruptive Video in der Hedge-Stimmung nach dem
Beenden es nicht mehr bearbeiten kann. Deshalb können Sie, wenn Sie das Format
verwenden, zumindest jederzeit
wiederkommen und
die gewünschte Sammlung erstellen. Und du kannst sogar
das frühere Plus in
diese wirklich tollen
weichen Punkte kopieren . Wir können sicherstellen,
dass wir sie löschen. Das wird es mehr geben. Wir versenden, berechnen wir die Form. Es wird einfach
die Abschrägung kopieren und sie einfach zur Flut dieser
Lose und des Innenohrs
machen. Ich denke, ich mag wirklich die Art und Weise, wie die Dinge
wirklich auf dieses kreative Experiment hinweisen , je mehr du willst, du kannst einfach
mit den Haaren herumspielen, die du auch umbenennen kannst
es Ich werde
dieses Editor-Widget nicht erstellen , weil ich immer noch damit
herumspielen
wollte. Also denke ich, dass wir
mit der Modellierung und
den Daumendetails fertig sind , die wir zeigen müssen. Ich denke, im nächsten Kurs
werden wir mit Material beginnen. Die Beleuchtungsindustrie
wird sehr notwendig sein. Und das nächste, was wir
tun werden. Wir sehen uns also im nächsten.
7. 06 Beleuchtung mit Kino 4D-Nativbeleuchtung: Leute, willkommen zurück. In dieser Episode
werden wir die Szene
mit Cinema 4D native
aufgehellt. Aufhellen. Es ist ein
Off-Board-Rendering-Agent. Die beiden Typen haben wir physisch
und wir haben Standard. Beides. Gut, das haben sie. Sie können
auch ein erstaunliches Ergebnis liefern, ohne
eine von Drittanbietern gerenderte
Angelica Octane Redshift
oder sogar eine Anzeige zu verwenden eine von Drittanbietern gerenderte
Angelica Octane Redshift . Lasst uns unser Licht aufstellen. Wir werden das Himmelsobjekt benutzen
. Dieses Objekt wird dazu führen, dass
Post die Szene aufhellt. Insgesamt. Ich benutze auch ein
Baumbeleuchtungs-Setup. Lassen Sie uns ein Himmelsobjekt erstellen, können Skifahrer Verkleidung bereits unsere Sünde angewendet hat,
wenn Sie sehen, wann
wir jeden Tag überall
unseren Himmel hatten und wir müssen dieses Material schaffen das ich verwenden wollte,
Verlaufsmaterial Ich komme vorbei und
erstelle meine einfache Semaphore, das neue Standardmaterial
für das Material Tabia. Und ich nenne es Sky. Ich wollte es zu einem Farbverlauf machen. Dafür. Ich klicke auf Komm
zur Farbe und Textur. Langweilig. Ich werde es sein, ich
wähle Gradient aus. Also ist es für mich möglich, ja, ich kann einfach meine Farbe von
hier auswählen, meine Farbverläufe erstellen. Verschiedene Blätter online
und erhöhen Sie einfach. Bettlaken sind es. Lassen Sie mich einfach unterscheiden. Benutze diese nicht intuitiv. Auf jeden Fall wollte ich
die Farbverlaufspresets
im Kino 4D
Bibliothekarin verwenden die Farbverlaufspresets
im , um das zu verwenden. Komm zu deinem Content-Browser. Wählen Sie Voreinstellung aus. Am einfachsten ist es ,
einfach zu klären, weil
Städte größer oder N mit Medikament
D kontrollieren. So können Sie sehen, dass
ich nach Farbverlauf
suchen werde. Der Farbverlauf wird in meinen Ordner
schauen. Alles Gute dann
wirst du Zutat sehen. Laden Sie die Bibliothek herunter, die
Content-Browser-Bibliothek. wirst du sehen. Also kann ich mir einen
anderen Farbverlauf ansehen. Es gibt also verschiedene
Arten von Gradienten hier. Wir haben die eine über Flamme, wir haben die über den
vollen Farben, den Regenbogen. Wir haben den einen Punkt einfacher als dieser mit Cinema 4D
einhergeht. Aber ich werde
diesen Himmelsgradienten benutzen und
um diese Mischung zu verwenden, hast du auf der Anrufladung,
deine Zutat, OK gezeichnet. Diese darüber hinaus identifizieren das wahrscheinlich
leicht. Wenn es ein anderer ist wird es
auch sofort
identifizieren. Das ist also ein Lebensretter. Ich meine, das ist einfach. Dann werden wir den Gradiententyp
von Ihren verschiedenen Typen
auf das mehr gewonnene Radium
ändern . Sind Sie am
zirkulärsten auf E2 ist Druck. Eine andere Sache, die wir
tun können, ist, dass wir den Farbverlauf
umdrehen,
wenn es das ist, was Sie wollen. Was ist mucky mit
dem, den ich habe? Danach werden
wir diese auf unser Himmelsmaterial anwenden . Von dort aus können wir
Strom bezeichnen, unser Beleuchtungssystem. Auch hier stellen Sie fest, dass Sie
den Inhalt auf 300 ändern. Es war vorher drin. Ich ändere es einfach auf 300 und ändere Größe meines Kommes so, dass es so passt , dass es so ähnlich ist, wie die Referenz, die wir verwenden. Ich denke, das nächste,
was ich jetzt
tun werde , ist, dass
ich mein Leben
hinzufügen werde, um das zu tun. Komm ans Licht und
Angeles droge das hier raus. Betrachten Sie verschiedene Arten von
Licht I in Cinema 4D wir
bis zum normalen Harnstofflicht, dem Bereich wie dem Omni-Licht, dem IES, Sie zielen auf diesen
Port und anders als eins. Also
benutze ich das Licht. Ich benutze nur
das Helio-Licht. Also brauche ich diese, um diese Szene aus
dem Geld zu
heben , um Daten
im Winter zu ziehen. Ich glaube, ich werde
es ein bisschen größer machen. Folgt weiter. Dieser
wird Gegenstände
von hinten oder von
der Felge mögen. Rim leicht Ich ziehe noch ein anderes, das wir nicht kontrolliert haben, um ein anderes Licht zu
erzeugen. Ich möchte, dass es die Szene vom Kopierer aus beleuchtet
. Ich kann es einfach wiederholen. Ich kann es einfach verlassen
und es ist auch
wichtig, nur ein Ziel zu
erstellen, denn wenn Sie das Ziel-Tab-Tag erstellen, können
Sie jedes Objekt ziehen. Zum Beispiel, wenn ein
Medikament eine Null ist, indem ich
einen Knoten in
der Mitte meiner Szene erstellt und ich in das Ziel-Tag
gezogen habe . Diese Null, ich kann es
einfach Droge nennen. Fügen Sie es in die ein und Sie sehen , dass das Licht dies
automatisch anvisiert. Und ich kann es leicht bewegen,
indem ich den Bezeichner verschiebe. Das ist sehr wichtig. Du gehst zurück zu meiner Sünde. Ich kann diese auswählen, damit es nicht Cinco de
Camera sein wird, sondern nur Routine. Ich denke ich, für die letzte Folie, die ich neu erstellen werde
, wird das Ende aus dem Plus sein,
um es ein bisschen hohl zu
machen. Also wird es diese auch
aufnehmen. Leads, können auch das
NOL für diese Bibliotheken verwenden. Ich ändere die
Farbe der Lichter. Dieses wollte ich wie das Lied
sein. Ich kann hierher kommen und
Temperatur verwenden, wenn Ihre nicht der Fall ist, um nur sicherzustellen, dass Sie
die Temperatur überprüfen, wenn Sie Chronizität
ziehen um es ein
bisschen so zu machen. Bei diesem
wollte ich einfach
so etwas komplett mit so
etwas sein . Was ich
reduziere die Intensität. Wir überprüfen unseren Senior, wir klicken einfach auf Renderdatensatz wird das
automatische Rendern verwenden. Ich meine das Standard-Render. Wenn Sie bemerken, möchten wir bestimmte Materialien
anwenden ,
damit wir unsere Salden in der
Mitte nicht
identifizieren können , sind einige wichtige Tricks. Sie können damit
ein Standardmaterial erstellen , das auf all diese Dinge angewendet werden soll. Eine Möglichkeit, dies zu tun, besteht darin, dass Sie das Material dann anwenden
können. Es ist also, als würden wir
das Standardmaterial erstellen und es einfach die
Vier nennen. Für drei. Wir können es einfach
mehr erhöhen und einfach
das Spiegelbild entfernen. Sie können versuchen, dieses nach
dem anderen Buch anzuwenden. Das wird viel Zeit sein. Versuchen Sie, Ihr Objekt zu gruppieren
und anzuwenden. Das ist auch möglich. Aber ich werde eine andere Methode
verwenden. Ich komme zu
den Render-Einstellungen nur um einfach zur Materialvielfalt zurückzukehren und sie zu überprüfen. Und jemand wird Sie nach
dem Standardmaterial fragen , das Sie auf alles anwenden
möchten Das Kundenmaterial
wird ein wenig gelten. So können wir diese in
das Küstenmaterial ziehen. Ziehen Sie es auf die Materialkosten. Siehst du es nicht, aber
es wendet jede Röhre an, die
ganze Szene. Es klickt auf Rendern,
rendern erneut, Sie können sehen, dass es sich von dem vorherigen
unterscheidet. Wir wollten
einige Materialien wie beschreiben ausschließen , die wir bereits erstellt haben. Sie können dies also einfach auf
das Ausgeschlossene ziehen. Wenn wir dies ausschließen lassen, wird
Singapur unser Himmelsmaterial
identifizieren. Dann werden wir das
einfach noch einmal rendern. Im Moment wird es vielleicht nicht sehr
gut gezeigt. Es gibt noch eine andere Sache, die
wir auch schaffen müssen. Ich wollte auch
ein anderes Material erstellen ein anderes Basismaterial
ist. Ich wollte nur wie diese
Illustration sein wie
der ganze Ozean. Ich erstelle nur ein neues, ein neues Standardmaterial. Objekte sind viele der
Farbwähler hier, ich werde das einfach auswählen. Vielleicht blau. Ich ziehe es einfach an. Ich ziehe
es auf den Boden. Das ist es, was geschaffen wurde. Wenn wir erneut auf Render klicken, hat sich
nichts geändert,
da wir diese noch nicht als zuschreibend
hinzufügen müssen . Also schließen wir
dieses Fenster aus, um diese auszuschließen. Sie können sehen, dass diese
ein bisschen addiert sind. Ich will diesen Schatten nicht hier haben, also lasse ich dieses Backboard fallen
. Da dies Flächenlicht ist, die großen Ideen, wird die Software
jede Scharia sein. Wir werden sehen, dass das jetzt immer
schöner wird. Wir können einfach unseren
Vorsprung zu Reibung machen oder einfach nur so glücklich sein. Es gibt eine Menge, dass
Einstellungen Standardrhetorik bis zu einem gewissen Grad nützlich sein
kann. Wenn Sie jedoch mit Ergebnissen
arbeiten möchten, müssen
Sie zu physisch wechseln. Physisch braucht
viel Zeit und
es braucht viel Last von Ihrer CPU. Laufzeit laden. Kinetische Netze mehr Kredit. Da einige Futures wie
Tod oder Feed-Bewegungsunschärfe sind, können
Sie das nicht
mit Standard tun. Also wählst du physisch. Sie können diese Optionen hier sehen. Also werden wir
Adoptive benutzen und wir werden einfach mit Medium
gehen. Wir klicken auf die
globale Illumination. Globale Innovation ist wichtig weil sie das Licht aufprallen
lässt. Lichtbalken werden
mehr schaffen. Setze es im Moment einfach als
Standard aus. Sie sehen also den Unterschied jetzt, wenn wir auf die
Globale Illumination klicken, ist es gut, das Licht zu berechnen. Sie können sehen, dass T
angefangen hat, mehr zu machen meisten Heiligen werfen ab, bevor das Licht zusammen
reagierte. Das ist das Schöne an der
Verwendung von Luba-Beleuchtung. Beleuchten Sie Ihre Szene. Sie können sehen, dass es länger dauert , weil sie jetzt Fiscal
verwenden. Da dies immer noch
die Testpalette
neuer Kunden ist ,
halten Sie sich an Standard. Betrachten Sie, dass Standards mehr Phospho
auch auf dem vorherigen
arbeiten . Weil diese anfangen schneller
zu laufen, physisch. So heben Sie Ihre Szene in Cinema 4D mit dem Standard auf, den wir werden, wenn wir mit der
Erstellung unserer Materialien begonnen haben, diese Materialvielfalt deaktivieren. Ich gehe zu vielen ähnlichen
Materialien wie Auto und Sin. Ich glaube, dass die Dinge jetzt
abgeschlossen sind. Sieh in der nächsten Episode.
8. 07 Material: Leute, wir werden jetzt unsere Materialien
erstellen. Wir werden viele Materialien und
Daten in der öffentlichen
Inhaltsbibliothek verwenden . Content-Browser. Weil sie nicht nur schneller werden, sondern sich
dagegen aussprechen, von den vorhandenen
Liedern zu gehen , denn
abgesehen davon, dass es einfacher ist, gibt es Sie auch dazu, einige Materialien zu
zerlegen und
etwas vorhandenes Material, nicht Ihre eigenen benutzerdefinierten
Einstellungen zum Essen. Also werden wir uns ansehen, du wirst solche Materialien
aus dem Inhaltsbrowser sein. Gehen Sie zum Durchsuchen hier
auf dem Objekt Looks zeigen Sie
wählen den Inhaltsbrowser aus, dann für Materialien. Und ich werde
dieses Material für das Gras benutzen. Sie können auch so verschiedene Routen. Ready kann einfach suchen. Die meisten. Tao auch. Wir
haben
drei, die den Rest benutzen, um unseren Sinn
zu schaffen unseren Sinn
zu schaffen um Ihren eigenen
materiellen Zustand zu schaffen. Doppelklicken Sie und doppelklicken Sie
auf das Material. Kann einfach den Abschluss
korrigieren damit Sie mehr
über Materialien erfahren können. Ich habe noch einen
Kurs, den ich gemacht habe. Ich denke, die Einführung in die
3D-Komposition verwendet Cinema 4D. Ich glaube, ich habe
über Materialien erklärt. können sie sich auch ansehen. Sie können also einfach
mehr Materialien herstellen. Füge einfach dieses hinzu. Sie müssen beachten, dass
Sie, wenn Sie Materialien haben,
sicherstellen, dass Sie
es an den Booleschen Wert halten. Es tut mir nicht leid, ich bearbeite einfach über du fügst es nur
zu einem einzigen Element hinzu ,
weil diese Bedingung
zum mittleren Element, das wir als Prolog verwenden. Also müssen wir es als
boolescher Wert auf
dem Booleschen Wert addieren . Also weiter denke auch, dass
es wie eine Insel ist. Ids auch im Raster. Unser materieller Standardton setzt
wieder den Farbverlauf fort. Wir können unseren Sohn auswählen, der diese einfach
nicht haben kann. Wenn wir die Referenz haben, können Sie sie einfach für zwei Jahre in
den objektiven Betrachter
ziehen und einfach danach suchen. Zieh es einfach hinein. Du kannst es hineinziehen. Willkommen. Wähle auch deine Farben aus. Ich hab es schon, bitte. Dso. Ich
wähle die Farbe aus. Ich werde nur
sicherstellen, dass ich es
nach meinen Wünschen korrigiere . In diesem Moment kann ich einfach eine Beule einsetzen , um
das Geräusch hinzuzufügen. Um zumindest
diesen viel
kontinuierlichen Lärm Samen zu erzeugen diesen viel , werden diese
beiden für die Bäume hinzugefügt. Ich werde dieses Material für den,
für die Zweige, nach oben gerichteten Stiel hinzufügen , der ein einfaches Braun
sein wird. Sucht nach den Bäumen. Denken Sie daran, dass wir unseren Baum verstecken. Wir haben bereits gesagt, dass Cinema 4D-Materialdiagramm
degeneriert ist,
die die Materialien beibehalten , sodass Sie sicherstellen
müssen , dass
wir
dieses Material auf das von uns verwendete
Rückzugsobjekt anwenden . Die ersten beiden erwachsenen Materialien. Einfach gut im Objektmodus. Wählen Sie Polygone aus. Wir brauchen dies nicht, um ein Polygonjahr
für die Marken-Auswahl erneut auszuwählen. Wählen Sie Verbunden aus, UW, und wählen Sie unsere verbundenen
Polygone aus. Steh auf. Wir werden nur hinzufügen, dass keine Karriere
automatisch berücksichtigt wird. Und wir können den Edit auch einfach wieder
einfügen. Du würdest wählen. Dann werden wir hinzufügen diese Verschiebungen
hinzufügen, den Easterlies-Effekt, damit wir unseren
Hauptbaum wieder verstecken können. Jetzt hattest du dein Material, du kannst flexibel sein. Sie erstellen was, drei
oder vier verschiedene Pfade. Ich kann diese noch hinzufügen. Ich kann einfach einen
dunkleren grauen Rückzug erzeugen. Ich kann einfach
die gelbe Spalte erstellen. Zieh es einfach. Ich kann einfach einige der Materialien
wiederverwenden. Einige der Materialien. Wir werden fortfahren,
indem wir einfach Materialien hinzufügen. Du kannst deine auch
weitermachen. Du kannst dem folgen,
wie ich es mache. Hier drüben. Ich glaube, ich das Holzmaterial
hinzu. Ziehe es einfach zusammen
auf Punkte. Und auch um
dieses Licht zu erzeugen, weil es uns gebraucht hat, wenn verschiedene
Mykorrhiza hierher gehen. Also werden wir es sein, wir werden nur einen bestimmten Bereich
auswählen. Schau dir das Markierte erneut an, gehe in den Bearbeitungsmodus und
wähle das Hochland aus. Und wir
wählen hier einfach die Regionslinie aus. Ich
füge einfach Material hinzu. Bewerben. Um dies anzuzeigen, diese Zeile
anders als Ihre. Der Grund, warum es
dazu führt , dass diese
unterschiedlichen Effekte entstehen, die Kosten nur die vollen Kosten, bevor wir das tun, um vorher
angewandt zu planen. Dann das Material, das
eine Möglichkeit war, es zu tun. Um diesen Effekt zu erzeugen, werden
wir als
Ziel für
diese Bibliothek geschrieben Ziel für . Und suche einfach nach
einem Goldmaterial. Gutes Material und
Spekularitäten sind
Kino-4D-Goldmaterie ,
denn wenn Sie
eine andere Software verwenden ,
wird sich keine andere Software identifizieren. Es ist nicht schwer, es wird
es nicht als sein eigenes identifizieren. Kontrollieren. Klicken Sie auf diese
Materialien, so dass es Beton ist, die guten Materialien. Dann können Sie
dieses Objekt später löschen. Gut geeignet, um
die Rauheit zu erhöhen. Sie erhöhen die Rauheit. Ich werde die Reflexion reduzieren. Ich sagte Ileal, damit wir diesen Effekt erzeugen
können , der nur sicherstellt, dass wir diese zuerst löschen
können. Stellen Sie sicher, dass wir diese Abschrägung auf das Schiff
anwenden. Um dies zu tun, wählen Sie
einfach den Zylinder aus. Goes sagte den aktuellen
Status des Objekts. Was wird erschaffen? Um eine neue Kopie zu erstellen? Was würde der angewandte damit wir diese Frau verstecken können ,
damit
Zach etwas zum Arbeiten hat, falls Sie
zurückgehen und eine Korrektur vornehmen möchten. Wir werden es tun, eine weitere einfachste Möglichkeit,
dies wirklich zum Laufen zu bringen. Nachdem Sie sich angewendet haben
, kommen Sie zum booleschen Werkzeug und
wählen UL for Loop aus. Sie können Ihre
Auswahl sogar vergrößern, indem Sie Sie drücken. Warum stimmst du zu oder wählst? Auswahl, Greer-Auswahl. So ist der Ort, an dem
Sie
das Material anwenden möchten , das Sie dann anwenden
können. Dies ist der einfache Weg zuzustimmen, aber wenn Sie das Gras hinzufügen
möchten, das aggressiv
ist, kehren Sie
zur Auswahl zurück. Wählen Sie diesen Bereich in den
Grasparametern hier aus, wir können ihn einfach erhöhen. Sie können eine einfache grüne Tür verwenden, aber Moche mit diesem Knoten können
diese Materialien
einfach vorbeikommen. Dann. Sie können sich bewerben. unser Körper das Material
auftragen wird. Sie können das UV-Licht
wie
etwas lockeres ändern . Wir können sehen, dass sich
das schnell addiert. Wiederholen Sie den gleichen Vorgang
für die andere Insel, ich gerade mache. Leute, um weiterzumachen. Wenn wir fertig sind,
die Materialien mit dem Gras zu multiplizieren . Wenn ich auf Rendern klicke, indem ich auf
Rendern klicke, um es schneller zu machen , verwende
ich keine
globale Eliminierung, also klicke ich auf Rendern. Sie werden feststellen, dass es
auch geputzt wurde. Es mangelt hier an Schatten. Wir können dies tun, indem wir eine
Umgebungsokklusion hinzufügen , die
beide, die den Schuss
aufnehmen werden , fast überall dort sein werden
, wo sie ist, sich kreuzen und laufen können. , wenn wir die Proben erhöhen Was wird viel länger dauern
, wenn wir die Proben erhöhen? Der einfachste Weg, dies zu tun, ist
also nur unser
Licht, Schatten zu haben. Wenn du herkommst, wirst
du feststellen , dass es wieder einen Schatten gibt. In meinem eigenen Leben kann ich
einfach einen Flächenschatten hinzufügen. Zimmer eins, den ich hinzufügen werde,
ist sanft zu diesem. Ich werde nicht
schwer in
diesem wichtigen Schatten sein , ohne überhaupt eine bessere Lösung zu
verwenden. Sie können sogar sehen, dass das
Gefühl, dass ich mehr mache, die
meisten Dinge darin besteht, immer mehr Telefon
zu machen. Ich glaube, es gibt keine
Möglichkeit, diese Blitze zu machen. Du musst nur hin und her
gehen , wer sich einsetzt, das
wirklich für dich funktioniert. Also Zeit, gehe es durch und finde das Beleuchtungs-Setup
, das wirklich für dich funktioniert. Reduziere diese, mach sie mehr Licht. Um fy, dy nochmal, globale Illumination
in dieser Zeit zu sehen. Bei beiden globalen Illumination sieht
man, dass es die Szene gemischt hat. Jedes Licht, das
unter geht , wird so beleuchtet, wie
wir es wollen. Ich glaube, ich werde
diese ändern, mein Holzmaterial. Ich kann persönlich falsche
Holztextur erzeugen. Ich kann diese einfach kopieren. Schaudern. Ich werde diese
Sheena bei allen Patienten kopieren. Dieser Schatten. Sie können sehen , dass die Front einfach zur obersten Form
weitergeht. Wenn du nicht alles rendern willst
. Auch hier kann Render den
Renderbereich verwenden, der ausgeführt wird. Sie können sehen, dass ich glaube, dass
ich die kleinen Dinge geliebt habe. Dies ist der Prozess, den Sie
hin und her durchlaufen
können , nur um
Dinge zu schaffen , die wirklich für Ihre Szene
funktionieren. der nächsten Folge
werden wir die Dinge abschließen und uns dort sehen.
9. 08 fine: Leute, in dieser
Episode
werden wir ein paar Details hinzufügen. Ich werde in einem anderen Modell draußen sein
, das wir nicht modellieren
werden, weil Sie es nach innen
importieren werden. Welches ist die Farbe, die du siehst. Um dies zu tun, ist nur eine einfache Datei, die an Ihren Download
angehängt ist. Sie werden die kürzeste
Einfachste
finden und Sie können es
einfach importieren. Wenn Sie es
in Cinema 4D importieren. Ttn. False, um sicherzustellen
, dass es ausgerichtet wird. Chris Blind, er hat versucht, es selbst auszurichten. Wir werden nicht finden, dass zwischen der EU die Größe verringern
wird
, so dass der Bezug etwas
näher kommt. Es wird schwierig sein, es auf die Anzeige
auszurichten. Und was wir also nur tun
müssen , ist,
Ihre Sprache leer zu verwenden. Wenn es um Animation geht, können
Sie sich einfach
auf das Liefergespräch ausrichten. Wir werden denselben Spline
verwenden
, den wir verwenden, um die Straße zu erstellen. Das ist also meins unter der Wurzel. Also gehe ich einfach zu
diesen Tags, klicke darauf und ziehe die App in den Anzeigepfad des zweiten
Jahres. Es ist also nicht wirklich so,
wie ich es fallen gelassen
habe, ich bewege die Position, die Sie
sehen können , dass sie automatisch auf DES
ausgerichtet wird, kann einfach auf die Tangente klicken. Denn selbst wenn ich das animieren
wollte, ist
es einfach zu animieren. Ich kann
diesen Koeffizienten einfach animieren. Ich kann ein bisschen sehr gutes
Ergebnis erzielen. Also kann ich die Größe einfach reduzieren. Elite ihn kann die Größe reduzieren. Ich kann auch
nicht so aussehen wie Elliot, du kannst einfach nach
Ich kann nach dem Kopieren suchen. Ja, das liebe ich. Können wir benutzen Ich kann das einfach
hineinziehen. Wenden Sie dieses Material an. Wir erstellen noch einen. Das sieht aus wie ein Reifen. Ich könnte auf Material spielen
, um essen zu wollen. Möchten Sie diesen anwenden, um
ein anderes zu erstellen? Nur um dieses
Rallye-Rohrmaterial zu erstellen damit ich sogar vorbeikommen kann, erhöhen
Sie die
Transparenz, um
die Farbe auf etwas zu reduzieren , das 2 sein
muss. Drittens, kann
dies einfach auf das Glas anwenden. Du kannst einfach
weitermachen und wir nennen es pleite. Ihre Materialien
sollen so wichtig sein. So kannst du einfach die Materialien
sammeln. Sie können kaum schichten, eine neue Ebene
erstellen. Sie erstellen also eine neue Ebene. Nennen Sie es Auto. Mit diesen können
wir unsere editierbar machen. Wir können Variationen erzeugen. Sie können hier sehen, dass wir es duplizieren
können,
damit wir es wirklich nicht
brauchen, noch einmal zurückgehen. Also können wir es einfach editierbar machen. Store kann
einen einzelnen Baum auswählen ist wirklich nur um alle zu lassen, nicht wahr? Wir können es einfach auswählen, alle. Lassen Sie sich einfach verbinden auswählen. Wir verwenden sunlit connected ,
damit jeder, der sich
kreuzt, Sie auswählen. Wählen Sie Verbinden u w, u w aus. Sie müssen das Verhältnis erstellen. werden
unseren Senioren nicht ein bisschen
mehr Telefon machen . Mobilität, die Fähigkeit zu führen. Du kannst etwas Falte bewegen
, dass du diese Falte bemerkst, nicht das, was ich mache. Ich wollte nur
ein bisschen lieferbar
für Ihr Exemplar aussehen . Sie können
die Materialien auch duplizieren. Das meiste Material,
einige aktuelle Einstellungen, und versuchte es
nur auf einige wenige Bäume anzuwenden. Als ob dieser falsch ist. Die Droge es, oder? Es wird also ein
bisschen Variation erzeugen. Ich werde den Senior
ein bisschen interessanter machen. Wir werden uns
unsere Blätter ansehen wollen . Probiere verschiedene Arten von einfachen Zufällen aus. Schon wieder. Tasse
hat mir genau im Moment gefallen , oder? Wir benutzen Red Board. Ich
denke, ich werde diese benutzen, um das Material einfach zu
ersetzen. Was Sie nur tun
müssen, beginnen Sie einfach neues Material auf diesen vier, wird
das abgefüllte Blei ersetzen. Also denke ich, dass wir bereits sagen, dass wir das Rendern einrichten
wollen. Wir wählen einfach
die Renderseiten aus. Wir werden
mit 1920 um 12 auf Kurs gehen . Und bitte interessant. Meine Kamera. Meine Kamera. Ich kann auch auf physisch
wechseln, aber ich bin mit dem Standard einverstanden, aber
ich werde einfach das
Anti-Aliasing am besten ändern , dass sie auf der Marktabsicherung scharf
sein werden. Ich muss nur sicherstellen, dass BY einen Pfad auswähle, in dem
ich diese speichern wollte. Und wenn Sie
das Teil nicht auswählen, um diese zu speichern, können
Sie dies später tun. Wählen Sie das Format aus. Weil ich das später machen will. Also muss ich es nicht erneut
speichern, um einfach auf „Rendern“ zu klicken, um den
Bildbetrachter zu öffnen. Wie Sie sehen können, ist
das Rendern fast fertig. welcher Minute, 21 Sekunden. Nur indem Sie den
gerenderten Standard verwenden, den Sie verwenden können. Sie können das physische verwenden
, um Markowitz-Ergebnis zu erhalten. Was ist Moche mit dem,
damit du es speichern
kannst, du musst nur vorbeikommen
und einfach auf OK drücken
und
überall rücksichtsvoll sein, wo du willst. Und wir verwenden
neuere Kino 4D, x und L für 25 Jahre. Sie können sich leicht von einem Bild machen. Jetzt verwenden wir eine neuere
Version von Cinema 4D. Sie können sogar mit
dem Cinema 4D Magic Bullet in
Photoshop gehen . Dies ist eine erstaunliche
Möglichkeit, sogar kostenlos zu bearbeiten. Ich glaube, du hast
etwas daraus gelernt. Echt, ich werde die Animation
Bonos Kosten für die Verteilung
hinzufügen. Du wirst das animieren wollen. Und jetzt können Sie diese einfach und
so schnell wie möglich machen. Ja. Ja. Danke.
10. 09 Abschluss (Bonus: Leute,
das ist das Bonusvideo das
wir
über Autoanimate sprechen werden. Das. Ich werde nur ein paar Lerntipps zum
Erstellen der Animation teilen. Um dies alles zu animieren, um einen ähnlichen
Animator wie diesen zu erstellen. Wie Sie sehen können, werden die
Residuen entwirrt und vergrößern, um
diese einfache Animation zu erstellen .
Ich zeige Ihnen nur bestimmte Dinge, die Sie
nur automatisieren müssen. Und um einen Schlüsselrahmen einzustellen. Es kommt darauf an. Sie müssen sich zuerst entscheiden, wie lange Ihre Animation sein soll. Die meisten Animationen stehen normalerweise im Vordergrund pro Sekunde und um Ihre Projekteinstellungen zu ändern, primär durch
Drücken von Strg D auf 24 Standardeinstellung verwenden, müssen
Sie immer ändern, reformieren. Und auch hier
müssen Sie sicherstellen , dass Ihre Ausgabe 24 beträgt. Fangen Sie an. Nur
muss man einfach nur verschiedene Keyframes einstellen. Jetzt hat die Fed verschiedene Keyframes. Es ist einfach, es sind keine 40. Ich muss nur wissen
, dass wenn wir eine Fünf-Sekunden-Animation
erstellen wollen , einfach viermal fünf drücken. Das ist 123, und
das ist das Konto 24 Frames zu machen, um es einfacher zu
machen? Das erste ist, dass Sie entscheiden
müssen , welchen Aspekt
Sie animieren möchten. Als ob ich die Inseln unbegrenzt habe. Was ich getan habe, war, dass ich mich bewegt habe um all dies
darin zu bewegen, abgesehen von dem letzten Halten diese all diese
und ich animiere, dass all dies wirklich zunehmen könnte. Insgesamt wird alle diese
Atome Hypotheken
einschließen. Stellen Sie sicher, dass ich eingestellt habe, dass ich sie
einfach
sofort animieren kann , um das Boot zu bekommen. Habe es nicht sofort so gemacht. Ich sorge dafür, dass ich es einzeln
mache. Zum Beispiel stelle ich sicher,
dass ich jeden
dieser Bäume, die ich für eine Gruppe
halte,
diese auch in einer Gruppe aufgewachsen dieser Bäume, die ich für eine Gruppe
halte, bin. Es ist das in einer
Gruppe, in einer Gruppe. Als ich also zugab, wusste ich , dass das Individuum auf sich selbst
animiert ist. Also lasst uns das schnell machen. Die beste hier, weil
wir diese Insel haben. Der erste ist der
höchste. Wählen Sie aus. Sie die Gruppierung mit einer auf. Konkrete Insel, eins. willst du einbeziehen. Wir können auch die Bäume
einbeziehen. Da wir die Bäume bereits editierbar
machen, könnte
es einfach alles auf einmal auswählen. Kann hier einfach
nur diese Bäume auswählen. Holly werden dazu gebracht,
diese Bäume kongruent auszuwählen. Ich glaube, du würdest
diesen Kerl und
dergleichen auswählen , um den rauszuholen. Ich wollte nie den
Routen-Truck einbeziehen , indem ich nur alles auf einmal
auswählte. Kann den Rest einfach rausziehen. Eins. Ich fange an, das zu gruppieren. Ich weiß, dass du
auf der Edit Krankheit einen Block vor der Kamera warst. Ich glaube, ich habe die Kamera bewegt. Deshalb musst du
darauf klicken. Geh zurück zur Kamera. Animiert wie von Frame 0, weil ich nicht möchte, dass es in Print 0 dafür
angezeigt wird. Also wollte ich schon von einem zu Formular
überprüft werden. Ich kann einfach
zurück auf die Insel kommen. Nur Keyframe oder die zu koordinierende
Disposition, Position der Koordinate. Dann gehe ich zurück zu Frame 0. Stellen Sie sicher, dass ich es nach unten ziehe. Wieder Perimeter. Also wenn
ich mit dem Spiel anfing und das besteht darin, langsam, langsam, langsam zu
steigen. Ja, genau. Das ist es. Wir möchten den Keyframe also nicht
bearbeiten. Ich kann einfach zu den F-Cops
gehen. wollte nur
sein, sei abrupt, wenn es anfangen
wollte, sogar ich kann den Keyframe
bearbeiten, um zu mögen, okay, du kannst Drug Dot t2. Ich sehe es einfach ansteigen. Das ist in der Tat die Insel. Die Rotation für diese, ich behalte einfach die Frame-Drehung. Wenn ich zum Beispiel AT rahmen
wollte, wollte
ich weiter rollen. Ich kann danke. Fünf Ansprüche, 1800 Mal. Also
rollen wir einfach weiter, auch danach. Sie können sehen, dass es
eins nach dem Inhaber emittiert wird. Für diese echte, diese Straße. Es ist einfach, weil es ist, Es ist immer noch degenerierte oder
Stahlhörner , die noch darauf angewendet werden müssen. Alles was ich getan habe war, dass ich gekommen
bin, ich animiere das
Start-Gruppenwachstum. Das liegt daran, dass ich möchte
, dass alles
von jedem Frame bei 100 von jedem Frame damit ich es einfach mit heute
beginnen kann. Und so gehe ich meine Haare zurück. Ich schaffe es zu 100. Wenn ich wieder mein Unlimited spiele, siehst du, dass es angefangen hat. Eine andere Sache, die
ich für The Bridge gemacht habe macht
auch nur die einfache
Aufschlüsselung der Animation. Das gleiche
Verfahren ist nützlich. Das ist einer ist eingesteckt. Lassen Sie mich, lassen Sie mich das
noch einmal machen, damit Sie sehen können wie einfach das ist. Stellen Sie sicher, dass dieser Keyframe, die Position, die
Koordinate zu diesem Zeitpunkt. Also habe ich das einfach geschleppt. Ich benutze nur das Web ist nicht notwendig, damit ich den Rest
überhaupt keyframe kann. Okay, lass mich das nochmal machen. Also kann ich das hier aufheben. Also führe ich die y-Position mit einem Keyframe aus. Dann komme ich hier rüber zur 0. Kann jeder einfach nur mit
dem Stream
beginnen wollen ziehe ich diesen nach oben. Wie Keyframe es. Wenn
es genug Körper ist, fing einfach
alles an zu entwirren. Es
kommt nur alles zusammen. Diese drei sind also
Kongs Download. Und ich habe auch für das Linear gemacht, das Auto war
einfach unbegrenzt, indem man
diese Anzeigeposition benutzte . Ich wollte mit diesem Key Frame an der 0
Position sein. Bei einem Startup kann ich mir Gedanken über Emission
lassen. 100. Bluten. Die Animation nochmal. Alles begann
sich an jeden Ort zu bewegen. Und der Rat ist
etwas, das einfach ist. Und du kannst auch eine
Infusion machen, du bist fertig damit. Stellen Sie sicher, dass Sie hier zur
Energieoption kommen, um auszugeben. Ich sorge dafür, dass du alle drei
auswählst. Wann du willst. Stellen Sie sicher, dass
Sie sehen, dass Sie bereits sieben Teile Ihrer
Datei erstellt haben,
damit wir sie speichern können. Sie können es
als Bildsequenz speichern
oder als Video speichern. Das ist sehr einfach. Ich sehe, dass du
schon etwas gelernt hast. Wenn Sie Fragen haben, lassen
Sie es mich bitte wissen. Wir booten mein Bestes, um es ausführlich zu
erklären. Vielen Dank. Bis später. Bevor
ich alles fertig habe. Ich möchte ein bisschen
über das Unterrichtsprojekt sprechen. Ihr Unterrichtsprojekt
macht möglicherweise genau die gleichen
Dinge wie ich hier. Oder Sie können etwas
anderes machen, wie im Hochland, Sie können
einige fantastische Häuser einschließen einige einfache Dinge
sind, die Sie
auf Ihrem Telefon erstellen möchten. Überlassen Sie es einfach
Ihrer Fantasie und achten Sie darauf, dass Sie üben. Denn denk dran, übe,
mach Spofford durch. Wenn du weiter übst, lernt
man
alles kennen, lernt. Vielen Dank, dass Sie sich
diesen Kurs angeschaut haben und bis später.
 Paul Olusola, 3D Motion & Illustrator