Transcripts
1. Intro: Hey guys, In this video series, I'm going to teach you how to create this scene in Blender. This series of videos is aimed at complete beginners. So I'll be running you through navigation, modeling, texturing, lighting, and compositing. I'll be going through this step-by-step and hold your hand all the way through. There's a ton of ground to cover. So let's just get straight into Part 1 with navigation. Sumif skull.
2. Navigation: Okay, so let's cover the navigation of Blender. Once you open up Blender, you'll be met with this green. You've got here the thought QC, point lat and your camera. But we actually want to be able to move around the area here and actually start interacting with the list objects. So I'll start off with just simply had to rotate the screen. And as you can see down here with this screencast keys, that's just simply done by holding in your middle mouse button and dragging. And so that's how you rotate around your scene and get that motion. If you want to drag across your screen. Oh pan, I should say. That's just simply shift middle mouse button. And that's how you get that little function. Another thing that we can do here is I'm zooming in an app. Simple. You just scroll up and down on your mass. Well, another key element to the Viewport navigation is simply if you want to snap to a particular view. Say for instance, I'm gonna go here to the left. You can see on the screen cascades, you just press numpad 1 and now snappy to the left. If you want to go to the top view like this, you can hit seven on your numpad and it'll snap it to the top or K another way. And with that as well, if you're not comfortable using the numpad like this, you can just come up here to the little gimble in the top right. And you can literally just click it and write it like this. Or you can even click the X, Z, and Y, and that'll just snap tool, there's positions. Another thing you can do, for instance, if maybe you've lost sight of your objects. So maybe if you scroll down to oblivion and you don't know where objects are anymore, as long as something is selected. So if you click off of it and nothing is selected, and you press the period key on your numpad, nothing's going to happen. So in that case, what you can do is you can up here to your Outliner and find whatever object you want to. Come back to. Click on it. And then in your viewport, press the period key on your numpad it and I'll just zoom me straight back into it and bring it back down to earth. And this happens quite a lot to be honest, sorry, That's a good little shortcuts. And another thing is if you're finding it really difficult to move around, me, put it like it's kind of sluggish and you're really struggling to move. And again, you just press the numpad and it'll make all of your movements relative to that object. So that is super, super helpful. Okay, so that covers the navigation of the viewport. But what about actually using objects and moving the round and navigating with them? So for example, if you click on your default cube and you want to move it to a particular point in space. So let's say we want to move it here. How exactly do you do have? Pretty simple. So if you just click on your key, press the G button is, let's see, grab it essentially. So G is the shortcut for grab. And now we can move it freely like this, but There's not much precision with this. It's kind of like you're, you're living up to the gods or wherever you are looking at that point in time. But if we can see I'm snapping it to a particular axes. So we've got the, the z axis, which is up and down. We've got the y axis, which is left and right. And then again the x axis, which is kind of the opposite. So with all of that in mind, if you just bring your little guy back to the center or anywhere, you can start practicing that. So you can press G and snap it to any particular axis five, Pressing it. So Z to go up and down, x to go this way, and y to go to this way. If you're not really a fan of pressing that particular axis button on your keyboard. You can actually press G and then snap it to a particular axis with your middle mouse button. So if you press in your middle mouse button and kind of go up and down, it'll snap to the z axis and then you can release your middle mouse button and it's like stuck there. And then you can choose wherever you want to put it. All right, so now we know how to move the cube around with the cheeky. But what if we want to maybe scale it up to make it larger or even rotate it. The same rules kind of apply. It's just a different hotkey. So instead of pressing G to grab it, if we want to scale it up, we'll press S. And then we can actually scale it like this just by dragging it in and out. And again, the same principles apply. So if you want to scale it on only one axis, so maybe the z axis to make it go up and down. You just press C and it'll snap to that axis and do as you please also for rotation, same rules apply. So instead of pressing G to move it around, or S to scale it, we're going to press the button. And now you can see we can rotate it as we please. But again, you can see how it's kind of Genki looking and it's rotating on a weird axis because it's rotating from my point of view right now. So if I was to hit one, go to the left and then press R, it'll rotate much more linear and you won't have to worry about those weird Genki looking rotations. You can also, if it's rotating too quickly for you, you can hold down shift. And this will slow down the rotation and give you a little bit more precise control. Another quick tip as well when you are rotating or grabbing or scaling. And if you press Control whilst doing this, it's going to snap to these little, little cubes in the grid here on the floor. So you will see press S Control and then scale. You can see it's kinda snapping to those cubes, which also gives you a little bit of control. Okay, so I think that about sums up everything that we need to do right now in regards to knowing how to use the software navigation wise. But now I think it's time we head over to modelling.
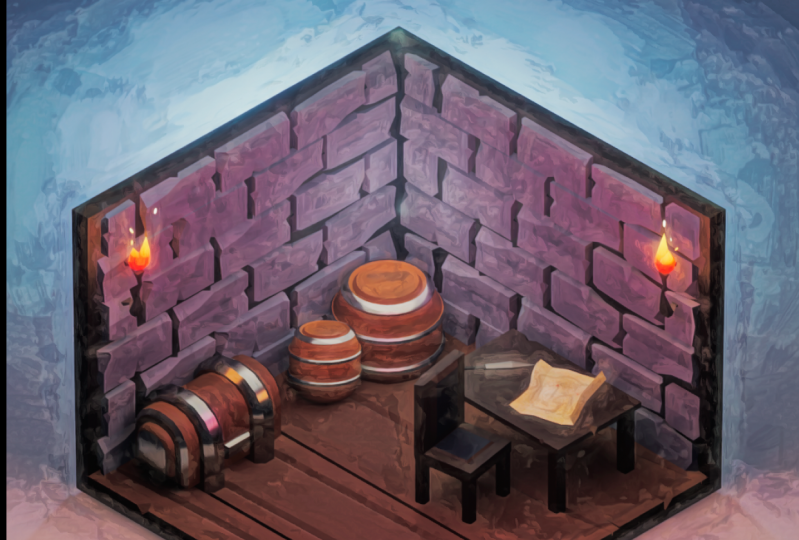
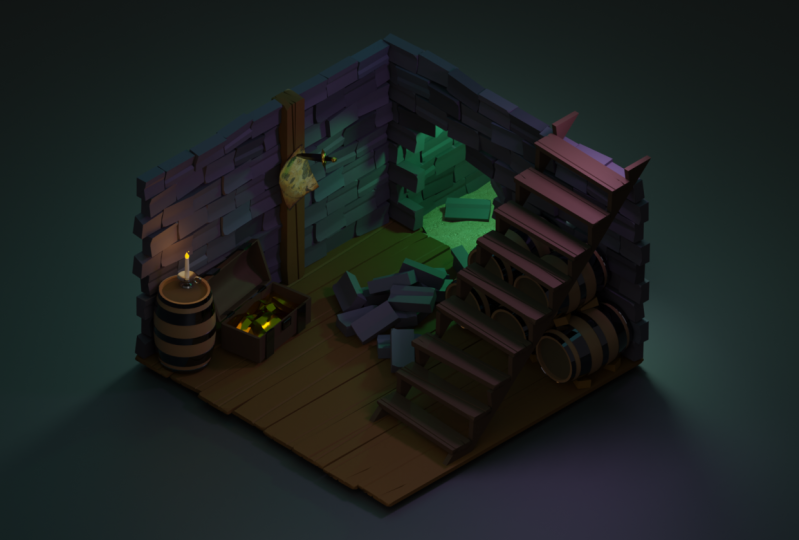
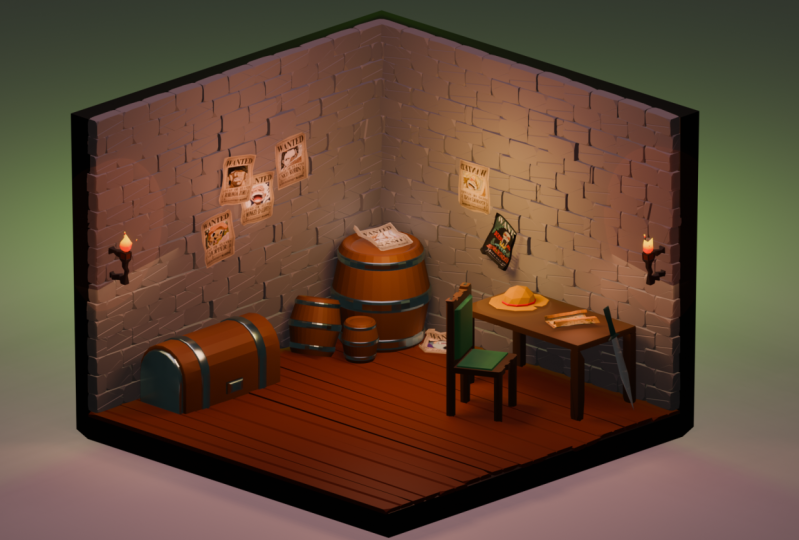
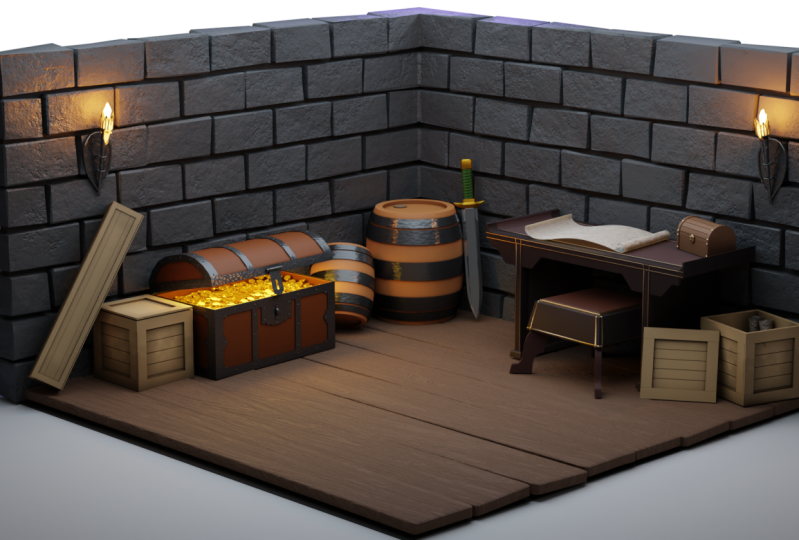
3. Modeling: All right, So now it's time to get into the modeling side of things. So to begin with, let's actually just delete everything here on our screen. So you can either drag your cursor across them all and select the middle, or you can just press a and then I'll select everything in the scene. And then to delete them, you can press X. And the other say you show you one, delete that and you can oppress. Yes. All right. So now we just have a blank scene and now we want to start populating it with all these objects that we start modelling it and curate that cool little asymmetric scene. So to begin with, you can come up here too. Objects, sorry, add. And you can manually select what you want to add here through this drop-down box. But very quick way to get that box as well on your screen here is by pressing Shift a. And that's going to allow us to add something that we want much quicker than going all the way up here. So Shift a, go to Mesh and plane. So now we have this little ground plane that we can again scale up to whatever we want by pressing S. For now I think I'm just going to scale this up by eight. So if you press S and then press eight on your numpad, that'll scale it up eight times. Great. So now we can start filling out this scene. So from what I can remember, we've got a chest, some barrels, a table, a chair, and some bricks and stuff on the wall. So I'm going to start off with just a simple cube. So grab this key, I'll bring it up just above the ground plane, so z and then z to step into the z-axis. So now we've got this cool little cube that we can start doing stuff with. I think I want to begin by making the floorboards actually. So to begin with, we'll press tab, and that'll take us into the Edit mode. This is where we can start moving the vertices around and actually start creating the objects that we're going to put in the scene. So to begin with, there's a couple of things that we need to know. We've got the vertices, we've also got edges, and then we also have faces. So that's pretty important to kinda grasp. We'll start by going through the material so you can change from vertices, edges, and faces up here in the top left. Or on your keyboard, you can just press 1, 2, and 3. It will cycle through those modes way. Okay, so let's make these planks. Essentially what we want to do is select everything. Doesn't really matter what major you're in. And we're just going to start scaling. So I'm going to squish it down on the z axis. And then I'll elongate it by pressing scale and then x. And that's going to push it out. Awesome. So we've got our plank here. What I'm going to do is go back into object mode by pressing Tab and bring it down to the floor, back into object mode and continue editing it. So to get those cool little low poly bevel phosphate edges, what we're gonna do is go to the vertex mode, click on this little vortex and then press Control B. And that's going to put us into BabelNet. But as you can see, nothing's really happening. And that's because we're not battling the vertex yet, so we have to press V and then it will snap to the vertex. So I'm just going to go around the corners here and start babbling a couple of them just to get that cool little look through it. And then you can also grab one of the edges here and maybe move it down a bit, give it, give it some cool, different kind of vibes. But what I really want to do is make a kind of cut in the middle and give a little crack. So what I'm gonna do is head over to the edge select mode. So now i'm, I'm expressed to our camp here on the edges. And now we can actually cut through a little crack in the middle. So what I'm gonna do is press seven has to go to the top view. And then I'm going to press K to bring up the knife tool. So there's still kinda lets you cut through the surface and create edges for yourself. But what I wanna do is come over here to the side, press K, cut through like this. And before I complete the cart like that, I want to press Z. And that was kind of x-ray vision through the whole object and cut through. So what we'll do is we'll come through here, press C to cut all the way through. Once it's connected on the other side will click, and that will complete the cut-through. So all we have to do now is press Enter to confirm that. And we can see now we have this cool little cut all the way through it. So now that gives us the chance to start beveling and doing some cool things. So what I'll do is I'll just select this top one here and press Control B. And now we can see we've got this cool little bevel style battle it out a bit. And I might even just press scroll up on my material. And that'll give me a couple more sections that I can play with. So I'll just do one for now. I'll click to confirm that. And then I can actually click this middle piece, press G to grab it, pull it down. And now I've got a kind of cool little crack. So I think for now that's what I might do is go to the underside and make some, some other edits on that side too. But it's a little bit hard because there's a plane in the way. So what I'm gonna do is click on the plane, press H to hide it, and then click on the object again and go back into edit mode. So now here, I guess I just want to make some other adjustments to it. So I might even just create another Babylon this side. Pull it out a bit. And then again, just pull down this crack here. Okay, so we've got the floorboard and it's looking flicking decent. It'll do too we need to. So what I'll do now is I press Alt H to unhide that floor. And let's actually begin setting up the floor plane and all these plaques. So we'll move this guy across to the end here. And we essentially we would just want to line it up with the scene. So what we can do is I'll scale it out a bit more. So it's lined up perfectly. Like so. Again, you can press Shift while you're scaling to get a bit more precision. And now we essentially just want to make. Bunch of copies of this plank across the floor until it reaches the other side. So what I'm gonna do is over here as little wrench icon that you click. And it's going to allow us to add in some modifiers that give us particular kind of things that we want. So we click Add Modifier, come down to array, press that, and you'll see it's created a duplicate object of it, but not, not on the axis that we want. So what I'm gonna do is switch it to the y-axis because it's currently arraying it on the x. We want to be around on the Y. So I'll move this to 0 if the y to one. And now you can see we've got two planks that we can play with. We want to essentially click this up until it fulfills the whole object. And that seems to have done it. So I'll just scale it in a little bit more. So that's in line with the ground plane. That looks pretty good. Great. So now it's very uniform and there's not a lot of difference in between each plank. You can see it's just a raging across. And we kind of want to give it some variety. So what we can do is except this array modifier. So if you click this little drop-down here and press Play, you'll see that we now have this whole plane in its entirety. But we want to split all of these planks or an individual blank. So to do that for press Tab, press a to select everything. So once everything selected, we'll press P and then we'll go by loose parts. So this is going to separate all of these are planks into their own individual object, as you can see over here. So now what we can do is start giving it some variety. So right now, if we were to rotate this, you'll see it's on a weird axis and that's because the origin point, this little yellow. That's the origin of the plank. And we want to essentially move that back to this object. And it's actually done that for each one. So what we can do is right-click this object, set origin, origin to geometry like that. And now when we rotate it, it's rotating on its own axis, which is awesome. So what I can do, you can press R and we can snap it to a particular axis. And so maybe we just want to flip it over like this. But to kind of eyeball, It's a bit weird. So what we can do is type in 180 degrees on the NumPy and enter. And then you'll see that that's just done exactly that it's rotated it 180 degrees. So I'm just going to move it into position now. And I'm just going to repeat that process for each one of these planks, so I'll see you after I've done that. All right. So now I've got some planks here on the floor that have been rotated and skewed set. They're all kind of individual and they all have their own unique style to them. So it's not all uniform. So once you've done that, we can move on to maybe making the wall. So to make the wall, I'm actually just going to use the ground plane and we'll throw a modifier on it to give it some thickness afterwards. So first off, a little bit hard to see it with the planks on the way. So I'm just going to come over here to the outliner. Shift-click all of these so that they're all selected and I'll press H to hide them. So now we've just got this in the viewport. So let's go into edit mode. And with edge selected, I'll go into, go over here to two edges. And now we're going to extrude them upwards. So to do so, we'll press E. And that lets us extrude the plane. But we want to lock it to the zed axis, extrude up to whatever you want it to be. Let's just say that that looks good. And I mean, that's pretty much the extent her to have gotta wanna say. If we press Tab to get out of an American back to object mode, we can add on a modifier in the little wrench menu. So click Add Modifier come down here to solidify. So now we can actually give it some thickness with this little scrolling wheel. So let's just pull it across. Let's just say that looks pretty good. And now I think if we press Alt H, we've got the beginnings of all seems. So let's just wrap things up now and start modelling or the objects and get into the flow of it. So shift a, Let's start making the maybe the bricks of the wall. So I'll go mesh cube. And I'm just going to start editing this to look like a brick, essentially. So let's go tab into edit mode. And I'm going to, with everything selected, I'm going to scale it in a bit, maybe this way. So on the y-axis, and I'm just going to make it look like a general rubric. So I might pull in some of these edges here and press Control B, V and allow me to bevel it. And you can see I've given it some extra detail by accident, by scrolling. So I'll scroll all the way back out. So it's just like that. And yeah, it's now just pretty much a process of making it stylized to your heart's content. So I'll be doing that now. I'm going to do on both sides as well, because again, we're going to give it some variety by flipping it and playing around with it. So I may even again, give it a cut through the middle and give it some extra detail. So I've just tapped into edit mode, press K for the knife. I'm going to click here. Press. So the way through and confirm it by clicking and then confirming again by pressing Enter. So now I've got another cool little cut that I can play with. So in edge mode, again, I'm just going to fill in a bit. And I mean, that already looks kinda cool. So I think that's a pretty good start for my cube. And if I pick, it's looking okay here. But I think even I might just want to give it a little bit more of stylization. So to do that, I'm going to come over here to the modifier stack, click Add Modifier and give it a decimate. So what this is going to do is essentially that it's going to decimate the geometry and make it look even more low poly. So I think maybe that looks okay. It's really easy. You just got to play with it until you have something that you enjoy. So I think I'm just going to stick with that for now. And now it's just as simple as lining it up with the wall and begin fleshing out the bricks on the wall. So I think instead of arraying the bricks across the wall for this one, what we'll do is we'll just duplicate the objects and have multiple duplicate that way instead. So to do so, you can click on your object D and let out. And now you can place it wherever you want. But to make it easier, if you just right-click, it'll snap it back to its original location. So now we can precisely move it to wherever you want. So I'm just going to move it across next to it. And again, I'm going to rotate it to something that looks cool. So I've just snapped it to the y-axis. And I'll press 180. And I'm just going to do this process again and fill up the entire wall. So I'll see you after that. Okay. So we're up to this part now. Well, we kind of have it forever extending from the wall and we pretty much just need to cut it off and then move it across here so it fills up this side of the wall. It's super easy, so you just click on your object, go to Edit Mode, bring out the knife tool, and then we're just going to cut it directly through. So again, both through. Press Z to go directly through the object, click to confirm, and then Enter to confirm again. And now it's just a process of deleting these unwanted pieces. So I'm going to select it like this. And what you can do because it's not selecting them back. If you press Alt Z, it will go on to setup some x-ray vision and you can select everything like that. So I've selected the whole sky and press X to delete it. And then I'll press on faces and delete these faces. So now we actually have a little bit of an issue because there's an open hole here. What we can do to fix that up there is if we go into edge mode, select any one of these edges and press F, that's going to fill it in. So it hasn't filled then fully. So I'll click on this edge here as well, present F. And there we have it. It's completely filled in. And then we can just continue the process of duplicating things across and filling out the wall. So I'll see you once that's all done. Okay, so now we've got how brick wall setup and it's looking pretty good. And it makes some few adjustments while hours setting it all up. I just edited a couple of them to get them a bit more minutes static field too. But now we want to essentially copy this across to here. And it's going to be kind of painstaking to duplicate it and then move it across it. It's not ideal. So what we can do is select all of these cubes. You can either shift, click them one by one, or you can just find them in your Outliner. I like I was doing and select them all like that. And then we pretty much just want to hit Shift D to duplicate it back like to snap back to where it was. And then OF to do is rotate it to be perpendicular with this. Well, so I'm just doing it on the zed axis. I'll just go 90 degrees. And now what we're gonna do is just move it into line with this wall, snapping it to the correct angles. And voila, we have some bricks on the wall. Okay. So it's looking pretty cool right now, even when it's not textured. So that's always a good sign. I think now we'll just move on to doing the barrels. That was a pretty easy. So again, let's go. Mesh will actually add in a cylinder this time because it's kind of barrel-shaped. And let's just get straight into editing it. So there's a couple of new techniques with this fun. Firstly, being control art at an loop cuts. So this will give us, it's kinda like the natural, but it's more precise and gives us a lot more precision on what we're doing with them. So you can scroll up and down to get more of them. I'm just going to scroll up to have to write now. And then you don't have to place them. You can just right-click and it'll snap it back to where it is. I've got a bit of weird rotation around it, so I just snaps to it with the period key on the numpad. And now it's actually just start making this barrel. So I'm just control click the edges and this selects the entire ring. So control-click, move them up and down. And we just want to give it that kind of barrel field. So if you can control click the edge and you press S, you're going to be able to scale it out and make it look more like a barrel. So I'm just going to do that. I might even just select both of them. So shift Alt and click on an edge to select multiple at any given time. So I've selected both of these. I'm going to scale them both out to about there. And it's now just pretty much a matter of stylizing it to look like a barrel. So I might even just control our check-in to my loop cuts and bring them both up closer to these original Luke upset I meant. And then what we can do is make those little rings, those metal rings around it. So to do so, I'm going to switch over to the Face Selection Control click to select the entire ring, and I'll do that down here too. Alright, and now we want to extrude them out. Sorry again, e to extrude. But you'll see you have got a bit of an issue. It's not working like we want to. So what you can do is hit Alt E. And what we will do is extrude the faces along their normals. You don't really need to know what that means. But essentially it's going to let us extrude like this and it's going to make it much more uniform. So that's looking cool. But we want to make it not such a harsh edge. It looks a bit weird. So if we come into edge mode and just start selecting these edges, I'll select the top and the bottom. Well, it was a bit tricky to account because at the blanks, but I've done it. And then we'll just kind of Babel them. So Control B and Bevel. And it's given us a little bit of a less harsh angle here. So I'm gonna do that again. On top and on bottom. Shall be. And there we go. We've got some some rings for the barrel. But I do want happen in the middle as well. So I'm going to control for a loop cut. I'll make two cuts here and scale them in a bit on the z-axis and go back to face it, edit, bay select, and essentially just do the same process. So scale, sorry, extrude. And again, we don't want it to be extreme in that way. You've got Alt E extrude faces along normals. And I think that'll do. And then again, back to edge selection to select both of these rings here, Control B and a cool little, bring a little barrel here. And it's looking a bit sad though because it's like a flat. There's not much liquid. It's very non buoyant. So let's us like huff it up. So go into edge mode. I'll just back into edit mode. And we're going to select some of these. So Alt Z to go into x-ray vision. And I'll just select this here and the scale. So immediately that's looking more barrel heck, which is awesome. But I can't just want to make it a little bit bigger. So I'll select everything and scale on the z-axis. Bring it up. And yeah, that's already looking pretty cool, pretty barrel-like. What I'll also do is give the top of it a bit of an indent to give it a little ring around the edge. So to do so, we're going to inset this by pressing I. Instead of about there should do. And now we have the option to give a loop cut on this ring. So Control R, click Accept, and I'm just going to bring it down, grab it and press Z. So it's looking a little odd right now because it's got that really harsh edge. So in edge mode, I'm just going to select that. Then we'll let, and there we go. It's looking better. I think for the purposes of this, I may even just bevel the top here as well. So in face mode, select the top truck bees, and there we go. It's all beveled. So that's looking pretty cool. I'm just going to give it to the corner here. And for now that I think that's all we need to do for the barrel or K. I just made some very minor adjustments there and I liked the way it's looking. So I'm actually just going to duplicate this bow. So Shift D, right-click so it snaps back to its original position. And I'm just going to make a small barrel and have it propped up next to it. So simple stuff and just scaling it down. I'll give it a bit of a rotation. And this time I don't really care how I'm looking at it, like the perspective of my camera. I just wanted to look good. So I think that seems or K. And let's get onto making the chest.
4. Modeling Continued: We've got our barrel Assyria floorboards, our walls and our bricks. And now that we have a basic knowledge of how to create stuff here, we're going to ramp it up a bit and speed and get the rest of the scene built up fairly quickly. So keep up with me if you can add, I'm going to walk you through it step-by-step anyway, but we're just going to be going a little bit quicker. So I'm going to add in a cube here. I'm going to move it across, over to the corner here. And we're just going to scale it up. So scale, so S to scale y to pull it across. And we've got a little chest like shape. Let's jump into edit mode by pressing tab. Go to the edge select mode with two. And we're just going to select these two edges on top. And the reason being is now that if we bevel it, we're gonna see we've got this cool little chest like look to it. If we if we scroll up, we can give it more. Luke cuts and it's going to look more like a chest. So let's go back. That sounds pretty good. And now I'm going to go to Face Select, select these two faces. We're going to end set these two. So I'd ends up pull it in a bit, and then we'll extrude along normal. So I'll extrude along normals. And again, you can hold down shift if it's going too quickly for you to get some more precise control. And now we've got this cool little pop-out thing here. So what I'm gonna do again is just controlled BY to give it that beveled look. Awesome. So now we kinda wanna make those straps along the top here. So that's a pretty easy thing to do. You just hit Control R, scroll up to get to loop cuts, right-click to center in position. And now we can scale it along the y-axis. And we're just gonna do that again essentially second trial are two lookups and then scale on the y axis. And now, if we go into face select mode, we've got this kind of a cool thing that we can extrude out and make straps with. So Alt E, external interfaces along normals. And now I've got two straps. I think. I do want to move them a little bit close to the edge here. So I'm going to press Control and then plus on the non patent. And you'll see that's expanded the selection, sorry Back Control Z and do that again. So Control Plus, we do it multiple times. You can select everything. You can also do Control minus. But it's just a really quick way to essentially like select more things. So Control Plus to select these two bands. And what I'm gonna do is just press S and scale them again on the y-axis to be a little bit closer to the edge. So that's looking pretty cool. Now I'm just going to bevel it. So the bevel, the edges here that we have, I'm just selecting these two loops on the edge here as well as these ones. So Control Shift click, and that will select the whole loop feet. And now we just have to build it. So Control B, pull that into something that looks okay and that looks pretty good to me. And now we can move on to making the little lock pad up the frontier. So to do so, and it's just as simple as setting this to something manageable. So that looks pretty good. And then I'm going to scale it on the y-axis. So SY, to make it kind of like lock pad, ie looking. And I think that looks pretty good to me. So from here, we're just going to extrude it and say E. Let out if you can. Whoops. And we go and that looks okay. And now we're just going to bevel it second trial BY pull that in. And I think I might give this one a little more resolution. So just scrolling up on the mouse pad. And then we've got, we've got good luck patent. So that's pretty much the basics of the chest. We'll get onto texturing f so that this is metal and then sides and the padlock and metal. But that's in a future video. So now let's move on to maybe making the table here in the corner. Again. Shipped a cube, will that up to the corner. And let's just get straight into secure writing this thing. So tap into Edit married, numpad, period k. If it's got, we had rotation and we're just going to scale this into a table looking shape. All right, so I mean that looks pretty good for the tabletop. And now he prevents just need to make the legs and we're good to go. So again, to do that, control out, create a loop cut. We want to make probably two on this side, so we can confirm that. And then we'll scale them out to the edge. So S, x, boom. And then we've got some, some loop cuts that are on the edge. We'll do it the same on this axis as well. So why there? And now we have these little squares that we can extrude downwards to create legs essentially. So what I'm gonna do is pull this up in object marriage that I can look under. Go back into edit married with tab. And I'm just going to select each and every one of these four squares. And then z to pull down. And now we've got a little kind of table here. So we want to make this a little more stylized. We can come over here to the face, select married, and we can essentially just bevel the edges. So I'm going to grab the edge like Marion and facts and just select each side of this and battle it out. So control shift click to select all of those, control B. And now it's looking more aesthetically pleasing. So for the legs, I do want to give it that kind of low poly chipped look like these bricks. So to do so I'm going to go to one of my keypad and, and get these data vertex selections. And I essentially just want to do some beveling of the vertex, so Control B and then v. And now we can get these cool-looking little chips in the woods. Do that for a couple of these. So maybe down here, Give a chip up there over on this side, Control B V. Pull it across. And I mean, at this point it's really up to you how much, how far you want to take this. You can see it kind of broke here, so I might just undo that. But it's going to have to garden over this. You can just be kinda subtle. But I think that will back to me for that process. I think that'll look pretty okay. And again, if you want to give it some like super low poly details, you can add a modifier again. So in the wrench. Icon, click on Add Modifier, and then decimate. Then you can play with the ratio here and you can see it's like cutting it up and make it super low poly. So if you want to go that route, feel free. Okay, so now let's move on to making the chair. So again, shipped a mesh tube and let's just start fleshing out the chair loops of tab into edit mode, scaling it down. And I want to create essentially what we did with the table. So we'll make two luke cuts here, scale it out to the edge. And then I'll also make two more loop cuts on this side. And scale it up again to the edge to make those four little corner so we can extra down as legs. So I'm just going to go back into edit mode, bring it up so I can look underneath because of the way the floor is faced. And I'm going to go to Face Select mode. Just select each one of these four faces and extrude them down on the z-axis. Awesome. So we've got essentially like a stool right now, which is okay, but we want to create that back face. So let's grab these three here and extrude them up. So e, z and I mean it's super basic obviously, but it gets the job done. So I'm going to give it again another little street here on top and Bevel that. And we give it a little bit more resolution. Cool. So we've got like a very basic check. But what I wanna do as well as create a kinda like a little cushion here. So using the same geometry, I'm not going to add anything. I'm just going to create a loop cut tool that back. And I'll also do it or the top here as well. So down to the bottom, I might even just a Control Z and due to cuts here. And I'm just going to scale it so that it's kinda like this and an even. And that way when I come here to Face, Select and select these two faces, I can inset them a little bit and then we can extrude them and create those cushions. I, but what I'll do is press a to extrude the faces alone, the normals. That way it's even and there's no weird like glitches happening like you saw before. So that seems pretty good. I'll just be to bubble up, give it a little bit of that cosine feel. And I mean, that looks pretty good. So I'm going to channel awesome. So we can move this across wherever we want. I think in the final render I had at something like this, kind of like sitting up a little story that maybe the dude's ran off and he's left his chair old stuffed up. But let's just go and make the map, the map that he has there on the table. This one's really easy and it actually introduces a new kind of style to modelling. So this'll be fun to do. So I'm just going to place it on the table. Let's close as I can and jump into edit mode. And what I'm gonna do is I'm going to right-click and sub-divide. So subdivisions, essentially, it gives it more faces and geometry to play with. And once you do, press anywhere up to you subdivide this, you're not gonna be able to create any more, and you'll have to go back and do it again multiple times. So if you press control Z and do it again, you'll see this. Menu down here has come up. And you can actually decide how many P1, which is super handy. So I'm just going to say, let's go with four. That's more than enough. I'll click to confirm that. And now we can move on to the cool part of this modelling for the map. So what I'm gonna do is go to one and select attacks. And before I press G to grab it, I'm going to press the button. And what this is going to allow me to do is as you can see, it's the proportional editing hotkey. So it's essentially what happens inside this big circle. You can zoom in and out with the scroll wheel and create a bigger or smaller. And it's going to affect circle. So this is going to help us get that crinkly cut pieces on the paper. So what I'm gonna do, I'm gonna hide this chair, go into the side view. And with my map selected, I'm going to just create that kind of crinkled map feel. So I'm just rotating and making it look like kind of like a scroll scrunched up map. So I'll do this for both sides. And you just gotta, you just want to make it feel like a map essentially. So sometimes if you don't want to do it to all vertexes, you can just press O and change the editing to be on or off. But for now, this is looking okay. I think we've got like a scrunched up rolled-up math, but I think I want to have a little more segments applied to it. So go back to the side view. I'm pressing one. And what we can do is just e to extrude. And we can create our own little extra vertices for us to play with. So now if we go out of edit mode, it kinda looks like a map. It's just like a piece of paper that's curling in on itself. But I want to give it some more asymmetry. So super-easy again, you just go back into edit mode. The Press already gone to proportional editing. And then we can essentially just move the vertices around until something looks too are lacking. Say I think something like this looks pretty okay. So I'm happy with that. And what I'll do is I'm just going to place it on the table in an interesting way. So I think this is like something was looking like in the final render, so I'll keep it as this for now. And in the texturing part of this course, we'll go through how to actually apply an image texture of an actual map to make it look really cool. But for now, let's go on to making the solid. So shift a mesh tube and you guessed it into the tub mode. And we're just going to stop fleshing out this sword look, you probably want to turn off proportional editing now so or, or to sound off, on and off. You can also do it up here with this button. And now let's just make something that resembles a DAG. So going into face, select my and I'm going to grab this face here and extrude it out, scale it in. And I'm going to extrude it. Again. And then one more time and scale this up. So now we've got kind of like little hilt to our solid. It's pretty cool. So I'm going to press this face here and press Control Plus to create, to expand my selection. And I'm just going to scale it in a bit so that it's a little more hilt lack because it's, it was too big for us, like really chunky. And now it's just a matter of creating that saw to that little DACA that we have. So if we press I to insert, we can pull this in a bit and then we can extrude it out and essentially just bring it all the way out until whatever length we want. And then we can start scaling it in to make that sold kind of look. So that looks okay for a dagger, but I kind of want to add another loop cut somewhere down here so that I can scale it out and make it more of a sort. So that looks pretty okay. For now. I think we'll, we'll stick with that. And even here, just at the hilt, I'm going to Control click this so that I can bring it forward a bit so that it's not so jarring and shop. And now we have it, we have a very basic so on. So I think to finish off the soil, Let's just select the edges and Batalden and hopefully make it look a little more, less jarring and a little bit nicer. So Control V to bevel. And there we go. We've got a, a cool look. And so I'm just going to scale it down and place it somewhere on the table legs. And then I'll just rotate it around until something that looks okay maybe this way. And that looks pretty, pretty okay to me. I think the last thing I might do is make this edge here a bit, little bit and law little more taken. So just like that. So what I did there is I just spent all Z to go into wire-frame there, select everything on the top and I just scaled it. And so then we go, we've got a sword, we've got pretty much everything. I think that was in the scene. The last two things that we need to add here now are there as torches on the walls. Sir. Let's stop doing that. So let's go and mesh, shift a mesh cube. Bring this guy up. And we're just going to make that little kind of stand that was holding that flame. So I'm gonna go to Edit married, scale this in a bit. Let's just start making some cool adjustments to this. So I think we want to make the, the thing that attaches to the wool. So I'm going to inset this side. Latin extruded out. And not just extrude it again and then scale it. And that's a very basic kind of hilt attachment to the wall. And we're just gonna do kinda the same thing up top here. So e to scale it up, scale it up again. And then here, and set this E to scale it out. Again, scale it up a bit. And then we've got, we've got a very, very basic. Attachment to the wall for our flame to be attached to you. But I do want to give it a little bit more detail. So back into edit mode. Let's give the the attachments here a bit more length. Sorry, I'm just grabbing it and pulling it out. And then the actual Hilts here to kind of stick that's holding it. I'm going to give it a loop cut. I'll see if I can look at the objective bit better. And now I just want to start scaling it in so that it's got kind of cup on top. So I've scaled that in. I'll also do that for this here. So scale this in. It's looking good. I might add another loop cut here. And right now, it's really just up to your preference on how you want to stylize this thing. So maybe I'm going to give it a little bit of a crooked edge just by putting in a loop cut and dragging it across, giving him some asymmetry. And I mean, that looks, looks pretty cool. But I think for the top here, if we go to Face Select, so I'm just going to click the top face, going to inset this a bit. And I'm gonna pull that down. So G and then z. And now we can bevel this edge so it looks less shop. So into edge, select my width to, on the numpad control, click the edge and then B, control B, sorry to bevel. Looks like it hasn't caught this edge here. So I'm just going to Shift click that control B. And there we go. We've got a cool little cup thinking that can hold a flame, which is pretty cool. But I'm just looking at the handles here that are attached to it and they're looking really pretty average. So I'm just going to add some more loop cuts in. Oops. Chuck in some loop cuts. And I think something like this should do. So I'll do that again on the button. Control our chuck, it needs to scale it in a bit. Sx, just scale on the x-axis. And I might even give these guys some kind of asymmetry. So I'll pull this one to the to the left-hand missed one to the right. And then the one on top here, I'll pull this to the left and this one to the right. And that's looking pretty cool. All right, so now we can essentially London, so with the wall wherever we please. I think some I like this we'll do. And then we just want to hit Shift D to duplicate it. Like so. Right-click to snap back to where it was. And then we can stop moving it across. So I'm just going to rotate it on the z-axis negative 90 degrees. Pull it across. And it doesn't have to be like exactly married to this guy. But that looks pretty good to me. So we'll leave that as is for now. And we're onto the final object, which is the flame. So this one's actually pretty fun to make. It's going to be using this objective of the ecosphere. Shift a mesh ecosphere. And this one's pretty cool because it comes with a lot of little vortex point so you can play with. So if you remember with the map here, we're going to be using the proportional editing kind of workflow or to jump into proportional editing, G to grab. And then we can scale it in and out as we please. So we basically just wanna make a kind of flaming look to this object. So I believe in what my final render, I pull it up here on this side over, find these vertex up as well. And that, I mean, that's pretty much the extent of it. It looks pretty flame lack very locally flame. But feel free to play around with maybe the backside of it, to do whatever you feel is necessary. And what is your kind of stylization choice? This is looking pretty okay for now. It's going to make some final adjustments, maybe squashing the sides. And yeah, I think I think that'll do. So what we can do now scale it down. And just essentially on top of the object here, black sand. And now we've got a little flame. Depending on your camera view. Once we set up our camera, you can rotate it to look more aesthetically pleasing. But for now, let's just duplicate this across to here. So I right-click to step it back to where it was. And I'm just going to move it across the axes by snapping it that we go. And that is pretty much everything we need to do for the modelling process. The final things that we can do for the flame if we really want to. If you go into edit mode again, you can actually add in another object in at America and that'll apply to the same object you're working on. So if we added another atmosphere, bring this across and just make like a little flame that is kind of like sparking off of the initial flame. It's going to give it some really cool aesthetic. So if I scale this down and then make it sort of like a little drop of fire that's sort of an NBA coming off of the flame here. And then rotate that a bit. That's going to look pretty cool in the final render. So i'll, I'll duplicate a couple of these, scale them down on different axes. And that is essentially everything we need to run through for the modelling process. So for now, I'll finish up. The little m is here and you can follow along or you can jump onto the next video. But for now, we're going to move on to the texturing by flare and get this same looking really cool.
5. Texturing: All right, So now it's time to begin the texturing process of how little scene here. And it's going to introduce a bunch of new things that we need to learn, but it's pretty easy and I think you'll get the hang of it very quickly. So to start off, let's move over to the top of our Viewport here and go to the tab called Shading. And immediately this is going to bring you into a new workplace and a carbon new environment. But I'll just explain what's happening, sir. For right now, you're in the material preview selection and everything's wired to essentially because there's no material is applied to them. So up here in the top left, we've got our basic scene that we're used to this as solid mode. Then we have material preview, which gives us a little preview of what I'm materials look like. And then we have the rendered mode up here and everything's kinda like gray and black because we've got no Latin, we've gotten the textures. So if we go back to material preview mode, you can also cycle through them at any given point by pressing Z and choosing whichever one you want. But let's just go over this section down here because this is where all the magic is going to happen. So let's say, for instance, we want to give our planks some texture and some materials. So we're gonna give it kind of like a brown material. To start off with, we need to create one. So hitting this plus new button will essentially create some nodes for us to play with and give the materials in life. So to start off, it's going to give us the principled be SDF in a nerd. And the everything, all the information here reacts to what's going to happen up here on your object. And each one of these little sliders and options. Particular look, sir. If we go to the base color and let's say we want to make it a brown plank because planks he usually brown. There we go. We've got a brown plank and we can play with all of the special saturation and value and everything. So there's a lot of nodes that you can add in. So Shift a to add nodes. And they all do. There are in special little thing. But for this tutorial, I'm going to keep it very basic for you guys and we won't be adding too many notes. We'll add a couple here and there. But for now we're just going to be really using the principle of BSD F and keeping it very simple. So a few other things that we kind of need to mention are the metallic slider. So metallic it makes the object. So we'll use that for the bands on the chest and the barrel. And usually something is metal, non-metal. So it's either one or 0 in most cases. Specular. That is kinda the shininess of an object. So if it's completely speculate, 100% specular, it's going to be like a mirror essentially. And especially if there's no roughness to it. So if there's 0 roughness, it will literally be a mirror and you can see your reflection in it and the reflection of everything in the scene. Whereas if it's got no specularity, it's going to be very rough and hard. So something like probably the planks in themselves won't be very speculative. They'll have something like point to specularity. And then yeah, about about 0.7 roughness, it'll do them. And I mean, that's pretty much all of the fields that we really need to use. I think in this project is not going to be too many one that we'll use. But let's go on to actually linking the materials data to other objects because we don't want to do the same process like 10 times for each one of these planks, that'll take forever. So let's first start by giving this material a name. So let's call this one wooden planks black. So and now we want to actually copy this material and place it on each one of these planks really quickly. So the easiest way to do this would be to select each plank by shift clicking them until we've got each one. And then the very last plank that we've got textured. If we click that one, then we press Control L. We're going to actually be able to link the material data of the plank, all of these other planks, which is really helpful. So Control L will click Materials. And just like that, we've made nine instances of the wood planks, which is really awesome. And you can see down here, it's even stated that we've made nine copies of the same material. So as their instance materials or whatever changes we make down here, it's going to affect each one of them. So that's always something good to keep in mind as well. So I think I'll make the wood plank a little bit more darker, something like that. It doesn't have to be exactly like mine, but you guys can play around with it. And let's move on to making the chest because this is going to increase difficulty slightly. And it'll open up a new kind of thing that we've gotta do. So let's just click on the chest. Press new cars, new material. Let's give it a name, call it just base. And let's just start off by giving it some color. So base color. We can choose some kind of ground here. Or we could even just come down to this little eyedropper tool. Click that, and then click the material color here. But I wanted to sort of stand out a little bit from the from the floor. So something something like that will do. Okay, great. So we've got the chest kind of wood. The whole chest is brown right now and we want some mental attitude it. So how exactly do we do that? Well, we'll start off by coming over here to the slot area. And this essentially opens up a new way of texturing. Sorry, if we want to give specific parts of the model different kind of textures, this is where you care to do it. So in a nutshell, I'll show you what to do. So if you press the plus key here, you're going to be able to assign another material to the same object. So we've got this new slot now open and now we can create a new material, give it a name. So maybe chest metallic. And we go and then we can create some different properties to it. So we want it to be completely metallic obviously, and probably a little bit grayish. But the first thing that comes to mind is, where is the material it's not applying to my object? Well, that's very easy to fix. So what we have to do is we actually have to assign the material to a particular part of the object. So if you go into edit mode by pressing tab, and let's say it's already got the padlock here selected. But let's just say we want to select this area up here, this whole strip Control Plus to select that. And now we want to assign this material, that metallic chest material to here. So to do so you just go to the slot, click on slot T, which is just metallic, and then click Assign. And then we get its assigned to them, the metal to the metal part that we want. So that's really cool. So now it's just a matter of doing that all over again for each part that you want to be metal. So let's say for here, I want these to be metal. Come down to sluts, click on chest metallic and assign that we go their birth metal now. And let's do it also for this band here. I'll just Control plus the selection. Come down to slots and chest metallic Assign. And then lastly the padlock. So Control plus this selection again, all the way out. And then we'll just assign the slot t2 to it. Bam, we go. So now we've got metal bands and mental paddle-like and everything on the chest. And we've got two different materials on one object, which is really cool. So for now, for the metal, I think something like this looks pretty cool. I think I might even take the roughness down a little bit, so it's a bit more shiny. Say maybe something like 0.3. And, and think specular can just stay as is for now. All right. So we've got the floorboard sound, we've got the chest and let's do the barrel. So for the barrel, It's going to be much the same really. So I might even just use the chest materials on the barrel. And this is another way to really utilize materials kinda just like instancing them like we did with the planks. So if you want to add an existing material to something, you can either link it like I showed you just by shift clicking Control L materials. There we go. Or you can do it here in this little drop-down, which shows you all of the materials that you've created. So if I wanted to do it this way, I would just go chess base. And there we go, it's applied to it. So I'll do that for this one too. So I'll just shift click Control L materials. This way Is this a little bit quicker for me? And now we want to create those metal bands, which again, we know how to do now by just creating a new slot, clicking that. And we can just reuse the metal that we made here. So for slot two, I'm going to come down here, use chest metallic. And now it's just a matter of going into tab mode and selecting the bands. So I'm going to select each one of these guys, click on chest metallic and the sluts and assign. And then we go, It's just a matter of doing that for each one of these guys. So I'll see you once this is all done. Okay, so we've got the chest and the arrows all set up. But I think it's going to really come to laugh if we start texturing these bricks. So let's start off with that. I think I'll just choose. It really doesn't matter which one we choose. Let's go with this one, create a new material. Let's call this book. And I really like the style that I had in the final render of kind of like a grayish looking brick. So I'll just bring that down like that. Give it a bit of roughness and even a bit of specular to, so something black lists should do. And now it's just a matter of copying this material to each and every brick. So what I'm gonna do is find it in the outliner. And I think if I just scroll to where the first instance cube I made was. And we care. I'm going to scroll all the way down, Shift-click. Until I get to the final brick that I have placed down. We place quite a few of them that we go. And now to link it all up, we have to ensure that the textured brick is selected. So shift, click the texture brick and control l Materials. And then we go, we've got the beginnings of a wall. So that's looking pretty good. I think we missed a break here, so I'll just do the same process. Control L materials also. So the wolves all set and done now. But the floor is looking a bit weird. It's I think in the final render we had it as black. Sorry, I'm just going to create a very quick let's call this. Let's just go with black. And we'll make the base color black. And that we got it's giving it a little bit more of that aesthetic field now. Okay, great. So now there's only a few other things we didn't extra. So let's start off with maybe the table. This one again, super easy. Let's just go with something a little bit brown. I think, something like that we'll do. I just want to give it a little bit of an ultimate brown to each of the other browns in the scene. So I like that texture. Let's just copy, link it to the chair. So I've just selected the chair. Should clip the table Control L materials. Olson. And again, we've got these cushions and we want to give them different materials. So let us, lets festival and name this material. So let's just call this, maybe it's like wood. And for the chair, Let's give it another slot to play with. We'll make a new material called this one. Maybe like Heller tap into it. And it's basically go everything that we need selected. So I'll just select these two faces plus the selection and assign the pillar and the slots. Bam. So I think I want to give it a little bit of a blue texture. So let's go with something like this. There we go. There we have it. So the chair is done. Now it's just a matter of doing the dagger, the map, and then the flames and the holders. So we'll go over the dagger because the map is going to introduce a new kind of workflow to putting image textures onto it. So let's just start off with this data. So new material, we'll call this data. Give it kind of a silver. Look to it. There we go. And we want to give the hilt a different color. So for the hilt, I think the Docker itself, I might make it a little bit more light. So something like this. And then for the hilt will make a new material. And then in the second slot, we'll call this dagger hilt. And then I'll make this one a little bit more doc. And then again to apply it, we just have to go into here and actually select the Hilts by control blessing that selection. There we go. So now we can assign it by clicking this button. I go, we've got a cool-looking dagger. So now let's cover the image texture for the map because this one is pretty cool and pretty fun. So for the image texture, we essentially, we want to download a map image and place it on this plane that we've created. So I have described this as the image that I'm abusing, super-simple. You won't really see much of the detail and the final render, but it just gives it that extra bit of stylization. So what we can do is create a new material. We'll call this one treasure map. And what we want to do now is we can either drag and drop that image that we've downloaded or we can add in a nerd. So for the purposes of this, i'll, I'll show you how to add an inert because that'll be helpful. So if you come down to texture and just come through to image texture and place that down. You can now connect the color to the base call. And you can see it's gone completely black. But that's because there's currently nothing here in the image texture. So all you need to do now is sharpen the image that you've downloaded. So I'll go ahead and do that now. Okay, so once you've imported that image, you'll see it's immediately updated and maps to AP plane, which is really cool. So that's pretty much the extent of the map. We don't really need to add anything else to it. Paper's pretty rough, so I suppose we can add some more roughness to it. But again, the final render, you won't really see too much detail with this map. So I think I'll do just fine for now. Now, the last two items that we have to texture are the hilt and also the flames. So for the hilt, I think it's something super basic. I just added some black texture to it. So let's go new. We'll just scroll this tool holder. I don't know what that's called. Base color will pull this down and I could kind of black. And I think it wasn't too specular. And we'll just pull the roughness up a little bit. Okay, great. So that'll do for apoptosis here. And we just want to copy that over to this one. So click on this hilt over here, Shift click this one, Control L materials. And that's linked to the two materials together. And finally, we've got the flame. So this one will be pretty fun to make. We're essentially going to create a gradient texture. And we're going to have the darker red at the bottom and the latter flame at the top, essentially. So let's just jump into it. So crediting material, let's call this flame. And straightaway it, we're going to do something new here. So Shift a and we're going to search gradient that we get. So what we wanna do with this is essentially, we can plug this into the base color and see what happens. Essentially. You'll see it's going to be darkest here and the lightest here. And that's not exactly what we want. We want it to be from the bottom to the top. So all we need to do now is go shift a. Such texture coordinate will place that down here. We also want to place in a mapping there as well. So if you just shift a such placing a mapping node, and now we can add in, essentially, we can plug all these into here and then add in some color here. And then it's going to flow through to the end and give us what we want. So for the texture coordinate, let's place the object into the vector here. And then for the vector here, we're going to place this into the vector here. And still it's not doing what we want, but we can fix that with the mapping here. So this is going to allow us to move, move it as we please. And which is awesome. So what we want to do really is just rotate this until it's at the correct location. So from what I can see, I think we need to rotate it on the y-axis. And in fact we do. So it looks like we just need to rotate this 90 degrees. And now the texture is going to go from bottom to top. And that's exactly what we want. So right now, it's looking good, but there's no color to it and we want to add some color. So what I'll do is move this across, press Shift, such for something called the colorRamp. And this is going to allow us to add some color and add variety to the, to the actual texture. So if you pull this across, we can unplug this, plug this into the factor of the colorRamp, and then the color ramp into the base color. And it's going to look the same. But now we can actually play with the colors in the color ramp. So if I was to move this black slider all the way across, you can see it's kind of creeping up to the top and then it goes all the way through. So we wanna make this maybe deep red. So let's do that. Let's pull up this value here. It goes down to read something like this. That's looking good. And then for the top, Let's make this a little bit of like a yellowy, orange type deal. Some like that. So that looks pretty good. If we want to add even more little sliders and the middle, well you have to do is press this little plus button here. And that gives it a tiny bit more variety. But that's looking good. That's looking like how I want it. So we've got the flame and we just want to copy that over to the other flame. So I'll click on this guy, shift, click this guy, Control L materials. And now we've got the flames. We've got pretty much everything textured as we want. The final thing for the flame there, we can actually make it emits light as if it was a real flame, which is really cool to do. So what we're going to do is come down to the emission strength and the emission color. So admission essentially means it's going to emit some light. So what I'll do here is change the emission color by plugging in this color narrowed down to emission. And at first it's not going to do anything. But if we start ramping up the emission strength, you'll see it interacting up there as you maybe it round. And once we go into rendered mode, you'll see it as well. It'll actually be emitting some lat. So let's say we'll put it. So if I point to, I'll press Z, go to rendered. And you can see already it's, it's actually emitting some light onto the same. Okay, so that about sums up everything for the texturing part of this course. Next, we'll move on to lighting and composition. So it will be creating the lights in the scene. We'll be adding in some little flair to the scene, as well as setting up the isometric camera.
6. Lighting/Compositing: All righty. So now we're up to the part where we can start plotting our scene and giving it that bit of life. So let's just start off with adding in some really simple lats are the same. So if we press Control a, come down to light here, and let's just click on the area light. So this lab, if we just bring it up, incur into our rendered view by clicking this here, viewport shading. We can scale this up and we can't really see that it's doing much. But if we come down here to the light bulb and change the panel, you'll see it starts to light up passing. And it's starting to look really cool. So the watts and the power that you put in, it's really up to you and how much what kind of lighting setup that you want. But for me, I think we're going to have to go back and forth and play around with it until we find something that looks good. So for now, that looks okay. Well, we'll keep that as is, but, and we'll probably come back to it. But for right now, what I think we want to do is actually add in a camera and start setting up the scene compositionally with overlapping. So to do so, we're going to use a special plug-in that creates an asymmetric camera for us almost instantaneously. So I've left a link in the description below where you can click on it and I'll run you through how to install that now. So once you have downloaded that zip file, only have to do is go up into your edit menu here. Scroll down to Preferences. Once this loads up for you, come through to Add-ons, and then you'll click on the Install button. So once you click on this, it'll pop up a window. You just have to go to wherever you saved that file, click it and still add on. And then if it doesn't show up here, you can just sketch it. And it should show up. You just type in ISO. This is the one that we want to use, security, Isaac. And once that's done, you can come down here to the little burger menu, press Save Preferences, and close out of it. So now we actually want to create this camera. So how do we do that? Very easily, if you press N on your keyboard in this menu, a little, little menu pop up on the side. And I have quite a few out on SEO, but yours will most likely be one of the very fast ones. And it's called create ISI can. And what this is going to do, if you press true, ISO can click that. It's going to create your camera for you. And we now have a camera that we can look through and start editing and playing around with. I'm going to press N to take this off of my screen. And if you start moving around your scene, you're going to lose the camera and, and you're not going to be able to look through it anymore. So if you want to snap back to it, you can press Zero on your numpad. And that's going to be putting you back into the camera view, which is this bounding box here. But as you can see, it's not really encapsulating the whole scene. So we're going to have to train some parameters in the camera menu down here. So click on the camera menu. And we're going to just change the orthographic scale by either zooming in or out. So for this instance, it's Apps. Like so. And then it's just a matter of pressing G with the cameras selected and moving it into position until it matches your scene. So something like this will do for me that we get. So now we can start making some adjustments to the scene. So if you want to go out of camera of marriage, you just rotate out of it and you're good to go. But what I want to do now is add in a flow plane so that this large to actually reflect off of the floor. So it's not just floating in an abyss. So what we need to do is just press Shift a mesh plane. And I'm going to scale this up to eight initially, but that's actually too small. So for this instance, I'm just going to press S and scale quite a bit out, essentially until it covers the floor and it's encapsulated by the camera. So that's looking good, but it's a little bit too high up. So I'm going to press G, Z and bring it down slightly just so that it's like flush with the wall. And now we've got a cool little ground plane for our a little asymmetric seem to sit in. And from here, it's just as simple as adding in some lights and figuring out what works for me. I'm going to add in another light. Let's go with a point lattice time. Let's go bring this up. I'm going to bring this behind the scene. So essentially so it's lining the floor behind it. And right now you can't really see anything because it's quiet week. So let's just make this one. Let's press 0 to go to the camera view. And let's just move it to somewhere. That looks good. So right now, I think that'll do for the moment. We'll add in some more lights and play around with them. So I'm lucky how it looks, but I also want it to be a different color. So you can actually come through here to the panel, click on Color, and change it to be whatever you want. So let's give this one a bit of a blue tint, say something like this. And I increase this a little more, say let's actually give a 2 thousand. So it's looking okay, but the vehicle, It's a little dull that there's not much light going on in the actual scene. So I'm going to grab this life that we made previously. I'm going to bring it out a bit and then I'm going to rotate it so it's looking at the scene at an angle. So to do so, you can press shift and T while your selected on the light. And you're going to be able to point your Casa to whatever you want it to be lining. So let's just point out down here to barrels and That's looking good, but there's not much lack coming out of it. So let's bump this up to maybe 2000. Okay. So now it's really just a matter of personal preference, moving things around and getting it to your lacking. So for now, I think that's all right, but let's add some more point lattes in, maybe behind the torches. So that way we can emphasize the torch light. It's going to be if it's across to the torch. Right k. And I'm going to give it roughly the same color. So I'm going to click on the color here, click on the eyedropper, and just click on that. Material. So now we've got the same kind of color bouncing off of it, but it's not very strong. So let's increase that brightness. Like so. And maybe we don't want it to be too intense. Something like maybe 50 will do. And now we just want to do that on the other side too. So let's shift D, This Light, bring it across and we go. And that's looking good for the lats on the torches, but the actual room, it's still missing something. So let's make another line, make a point, but let's bring this. I was imbalanced. Strength here. Something like this. And what we can actually do if you try to scale this, nothing's going to happen. But if you come down here to the radius, could actually increase how large the lat will be. So let's do something like that and then increase the power a bit. There we go. So you have maybe like 1150. That'll work. Okay. So it's looking good. Let's make this point right here at the back, down a bit. And let's maybe even bump it up to something crazy like 5000 plus. And that's looking cool. But I actually want it to be maybe even a bit closer to the back. See how that looks. Yeah, not too bad. So I think now let's actually move this guy back to the middle. I kinda just wanted to be a very soft overhead light. So Shift T, aim it down, bring it up a bit. Let's even scale it out to be a bit bigger. And let's give it a warm hue with the color. So let's bring this down to like a bit of a orangey red, something like that. Okay, It's coming together now. So I'm looking at these two lights here and then I think the color is a little too yellow. So let's pull this back, give it maybe a little bit less saturation. So something along those lines. And I think even the radius here, it's a little too small. So if we bring it up just a bit so it's encapsulating the torch as well. And then we can bump the power up to something a bit stronger. Let's have a look. Maybe something like 500 that we get. So let's do the same for this slide here. Click on him, change the color to something a little less saturated. Bring out the radius, and then up the power to 500. I think now's a good time to move on to. Actually making the scene look good. Compositionally lies. Not only that, but we can also change some settings in our render engine to make this whole scene look a bit more contrasty and make it pop a bit. So what we can do is if you come over here to this little camera icon. Click on him. We can see there's a bunch of little options here that we can check. And the ones that we want to do checkoff is ambient occlusion as well as bloom and screen space reflections. So immediately it's giving it a little bit more spice to the image. But we can also come down, scroll all the way down to this drop-down here called color management. And if we change the look, too high contrast, you'll notice immediately there's a big pumping contrast and it's looking a lot nicer. So what I'll do now, if you want to, you can play around with the gamma as well. And that's going to give it a different kind of looks. So you could have like a When liberty doc seeing or you could have a really bright seeing is also exposure here. You can play with totally up to you. I'm going to leave it as is. And I'm just going to play around with the lighting still. So this tuplet, I wanted to be a little bit more powerful and a little bit more soft. So I'm going to scale this up a little bit more. And then in the lab menu I'm going to throw this value up to maybe 5 thousand. And immediately I really like how that's looking. So this point right in the middle too, I think I want to pop up that as well. So maybe something maybe 1500. And this line at the back, It's looking good, but I think I've got 10 different kind of blue because everything else is very warm and this is very cold back. I want it to be something a little more warmer or something like that. We'll do. It's looking pretty good. And I'm just looking at the overall composition. This chair looks a bit small compared to the table. So I'm going to scale this guy up just a bit, just so it looks a little bit more in place. Now for the knife, I'm going to rotate that. Actually I'll leave it as is, but I'm going to rotate them out. Looking at the camera. And then for the chest, we're now just getting into the nitty-gritty of like making it look good. So the chests, I want it to be maybe a little bit bigger as well as this this barrel here, maybe a tiny bit bigger. Okay, cool. So that's looking good. Let's scale up this chest as well, so make it a little bit bigger. And I'm actually going to go into edit mode. I'm going to just scale up these bands and this padlock. I'm going to scale this guy on the y-axis and on the zed axis and bring it up a bit. There we go. Now for the bends, I think what I'm gonna do is select this outer ring on both sides. Control click, Control Shift click. And I'm going to scale them on the y-axis in a bit. So just like that. And then again over here I'll do the same on the outside control shift. Click these to scale y and scale it out a tiny bit. So now we've got some thicker bands and it's just going to give it a little bit more of that aesthetic that I was looking for. So that's looking pretty good. What I wanna do now is make these metal materials pop a bit long because right now it's looking very flat. And I believe in my file and render. Little bit more lighter. So I'm going to change the color, bring it up just a tad. Something a little bit more reflective, so something like this. And immediately That's looking much better. So I'm very happy I did that and I'm just looking at the barrels here. I think I'm gonna do the exact same process to them. So the bands are looking a little too thin. So I'm going to scroll in control plus on the bands here, I'm going to scale them. Elect, sorry, sorry, S, Z. I'll do that for this one in the middle two, control plus the selection S, Z. Bring that up. And then again for this little guy here, we'll just go through the same process. So this one's actually going to be a bit difficult because it's on an angle, it's rotated. So if we were to scale it on the z-axis, it's going to be skewed like that. So really easy to fix that if you just go back into object mode, press Alt R. That'll flip all the race, all the rotations back to 0 essentially. So now we can do all the edits that we want without having to go through all that nonsense of having it skewed. So I'm going to select this band here, scale it up, make it a bit thicker. Do it again here for this band. S, z, scale it up. And I'll do it as well for the one on the bottom. Sorry. It would go Control, click Control plus s, z, scale that guy up. And now it's looking a little better. So now I just need to rotate it back to how it was. So I'll just do that now. The final thing I'm gonna do here is with these lights, I'm going to get them will be different colors and I might add a couple, just a few more little point lattes in more aesthetic appeal. So this flat, I'm going to give it a bit more of a different color here, so something like that. And again, I mean, this point in the process, It's just about finding what works for me. So I'm adding another point light and maybe I'll put something closer to the map so your eye gets drawn there a bit. Wrap up the panel here. Maybe I create the radius a little bit more. Looking at K. And I'm not just duplicate that across to here. And that's going to give the balance a little bit more attention. And you'll also see in this bit my reflections on the metal bands to Sir, I think that's a good place to leave off on the lighting. Final minor adjustments I guess you could do is just with your materials if you're not lacking in the kind of contrast that they have, maybe you, the flow would isn't as bright or dark as you'd like it. And maybe we can make it a bit darker. It's really, it's up to you what you want to do in these very final stages. But right now, it's looking pretty good for me. Might just do that and I'll I'll call that done. We'll keep it at that. But Very, very final thing that we can do. The barrels and the chest here they are. They've got this kind of like Jaggard faceted look. Not to their fault. It's just because it's super low poly, but they stand out more so than everything else in the scene. And it's a bit weird. So what we can do is you can right-click and do Shade Smooth. And it's going to smooth them out, but it's looking really odd that way. So all you gotta do to fix that is come down here to this little triangle. And if you click on the normals tab and press Altos month, that'll smooth it all out and fix that issue. So now it's like and it looks like it's in place in the scene a little bit more than it did before. If you lack it as it was, you can keep it however it was. But for my purposes, I'm going to do it this way. And just have a look and see how it looks over all in the same. And I kinda like it like that. Okay, So final things that we can do now, we can actually go through the rendering process and also get through to the compositing, which we'll do in Topaz labs. So to render this, all you gotta do is press F2. And we're using the AV render, which is kinda like real-time. And it's very quick. You'll see it's rendered in like 15 of a second. There are some things that I can see immediately that I need to fix. So first thing, the wall that kinda comes in and then it's like intersecting with itself. I kinda want to split them apart. And also the barrel at Slack intersecting with the other barrel. Non-ideal. So let's go and fix that up. Right now. Super easy. What we're gonna do is move this across. But we do want it to be kinda cropped up on the other barrel, sir. That looks like it'll do the trick for these bricks. Pretty much. I want to select all of this wall. So let's find, find them in the outliner here is fine. Essentially I'm just scrolling through to see if I can find the fast one. So there it is. I'll scroll down until I can just select each one, so there they are. And the final direct here, I'm just going to scale them in supply. And I might do that again on the other side too. So I'll come back to the outliner. This brick scroll way back. I think that's all of them. I think I'm missing maybe one or two. There we go. So I'll scale that on the x axis. So now that's got a little bit more of an aesthetic to it. And I think for the barrel, the, what I could see in the final render is definitely not pumping as I it would lack it. So I'm going to essentially I'm just going to play with it for a bit. All right, There we go. So I think that's looking good now I might just scale this guy and a tiny bit more. And we're pretty much ready to jump into the final render, setting, the final render settings, and then essentially putting it over to type has labs and giving it that composited painterly look. So what I'll do is I'll come through to the render tab here. We've got the render samples as 64 and that's base samples. So essentially, you have a very dark scene and there's not a lot of light, the more samples would be the better. But for now, we'll just test it out with 64 and see how it looks. So I'll press F2 this out. So that's what the 64 samples, that looks pretty okay. I think it's looking it's looking good enough for me. So if you want to up the samples, you can get, It's really up to you how much you want. Doesn't really matter for this purpose. Let's just try it out with 500 and see how that's looking. Sorry, F2. The most samples you've put in, the longer able to take. But right now, I mean, I I don't really see much of a difference, so let's just keep this as is. Sorry. Now we can save out the image up here. So image Save As choose wherever you want to put it. I'm just going to call this test render, save as image. And now we're going to move into Terrapass labs and stop putting on some filters that create that cool, painterly look. Okay, so I've got Topaz studio to open here. This software is paid, but you can use a free trial, a 30 day free trial, which I'm currently using as well. So if you go through to the link in the description, you can register their download it and meet me back here in a moment. So once you've got everything installed and up and running, what you can do is you can either browse for an image or you can just drag and drop here image in like so. And now we've got our image in here and we can start playing around with it and giving it a cool look. So the way Topaz labs works is it's pretty much you're placing filters onto it. So there's a bunch of filters here that you can choose and play around with. But what I like to do is come over to this tab and immediately there's a bunch of stuff that you can choose. And if you click on this one, for example, immediately you've got this crazy cool new look to your image. You can choose how much of the amounts you want to place onto it. It's maybe we want to be like halfway in between. You could give it this cool, moody, know our design. And there's just so much that you can do with this. So what I like to do is go down to maybe let's look at abstract. And there's a couple of ones that give it sort of like painterly textural feel to it. Okay, so let's try out this one, 1940 landscape painting. So immediately that's like super vibrant, super, There's way too much going on that. So what I'm gonna do is I'm going to just play around with it until I get something that looks kind of r k. Looks all right, Let's apply that. And so now we've got our layers here. So we've got the image on the bottom, and then we've placed this filter on top. So what we can do is we can add in some more looks and sort of mix them all together and create a cool overall final image. Okay, so I have created some looks while I've been using this software. Essentially it's a bunch of different looks mixed into one. And then I've just saved it and named it as high as it is. So I honestly don't know what's involved in some of these like this one, textural color. I don't know what I've put into it to get this outlook. The overall look at us, put app. Once you change the amount of it, it, it does look pretty cool. So I'm going to use this one. But I definitely, definitely recommend that you play around with the look and find something that what do you and gives you an overall cool font. So go and apply that. It's on exactly what you're going to continue adding on some more looks. Let's try this pass to leave on here. We're down to the mat. All right, that's looking pretty okay. So I'm going to apply that. And I want to add else to it's missing something. So let's look at maybe some of these other ones that we've got here. Helpful, right? So ops or playing around settings. I've found something that looks pretty similar to the final outcome of my, my first initial render. And it looks pretty cool. So I definitely recommend if you're not looking for this textural kind of painting style. There's so many other looks at you can play with. Just scroll through the categories and look at maybe like some bold ones or some dream Yuan. There's so many cool things you can do with this program. And it really, it elevates your final render to something else. So it's really fun to play with SAR to have a quick look at the original. You can come up here and press original. That's what it was initially. If you're happy with that, you want to keep it as is Hello means. But for my purposes, I really enjoyed this look, so I'm going to keep it like this. And to save it out, it's just as easy as coming up here to Export and then naming it as whatever you would like it. And older normal settings. And finally, you can just hit Export and you're good to go and process that out for you. Cool image to post up on Tuesday. All right guys, that's the end of my introductory series to a blender. Thank you so much for watching. You should now have a beginning understanding of how to use Blender. I'd love to see what you created, so please tag me on my socials so I can check them out.
 Smeaf, 3D Generalist and Tutorials