Transcripts
1. Introduction: I love the challenge of painting a white subject because
when you actually look, they never really watch. Hi, my name is Nadine Dudek. I'm a watercolour artists
from Melbourne, Australia. And I'm often asked
by my students, how do you tackle
a white subject? For me, painting white
subjects is one of my favorite things to do
because it's a real challenge to lift the Subject off the page and retain all
the light and the glow. For me I find there are two
ways to paint white subjects. Firstly, using lots of
soft colours, so purple, yellows, and then working up
subtle shadows to give form. The other is to make
use of contrasting backgrounds to make the
subject emerged from the page. And we'll be doing a
bit of a combination of both today while we're
painting a white swan. So what we'll do is we'll go
through the reference photo, the sketch, the materials, and we'll work step-by-step, building up the shadows
and the background while retaining lots
of white paper. Now I've set this class
to all levels because I think if you've been doing
Watercolor for a long time, you'll find this really easy. If you're a beginner. I think there are lots of different techniques
in this class that you'll find useful. So we're doing a
lot of wet and wet, wet on dry eyes,
dry brush strokes. You've got soft shadows. You've got wedding
down large areas of the page to adding
water and sky. But because we're
doing it step-by-step, none of these are really overwhelming and
they're all techniques that I would have
found useful when I was starting out
with watercolors. So by all means, give it a go. Once you've gone
through the class and you've got a
painting that you happy with or even if
you've got to work in progress that you want to show, please feel free to upload
those onto Skillshare site. Always happy to
answer questions. Always happy to give feedback. And I'd actually be
really interested to see, to see how you go. I suspect that this
will be one of those classes where I see your paintings and I think
I wish I'd done that, particularly with the
water in the sky, which is not something
that I tend to tend to do. So that's your challenge to
do a better job than I did. So let's get started.
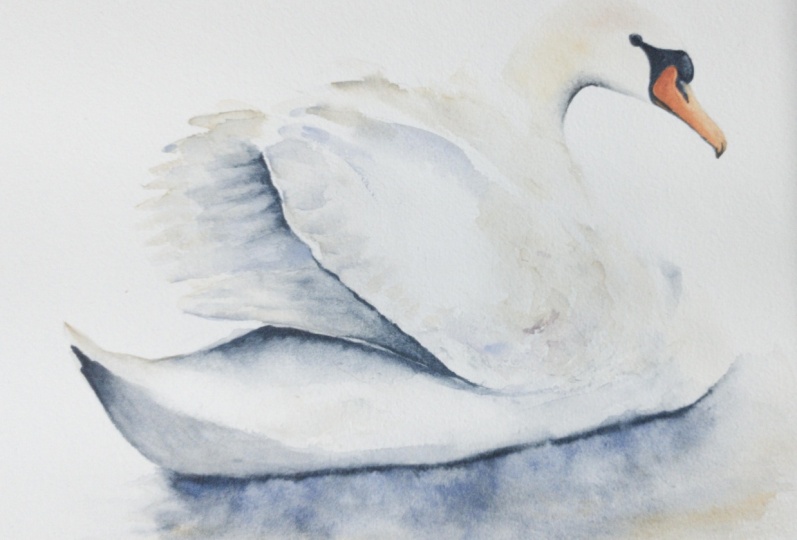
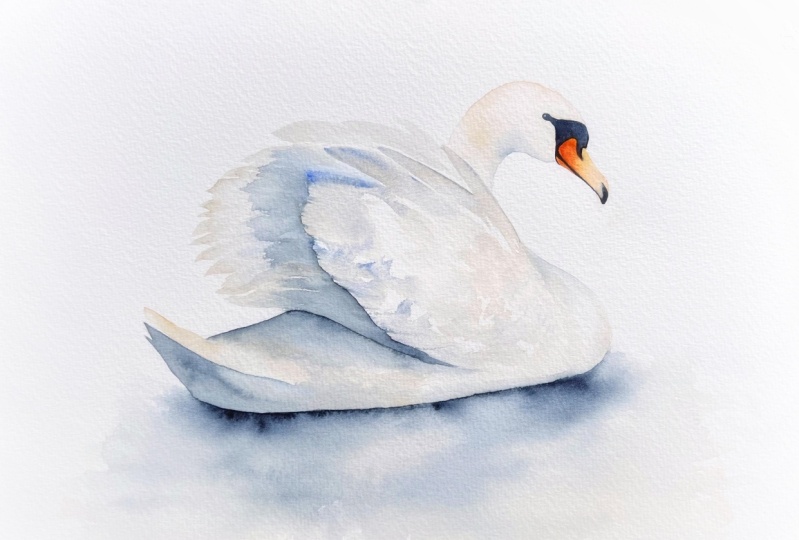
2. Materials: Materials for the class
reference you can download from the
Skillshare side. This one's from Pixabay. Now on painting flat and I'm on arches 300 gram
cold press paper. I'm painting on board but
I'm not typing it down. You need a regular eraser and
HB pencil for the sketch, and a bunch of different paints. Now for the main
part of the Swan, I'm using some Winsor Newton, Yellow Ochre and some
Daniel Smith Lavender. And the dark here is
Daniel Smith Indigo. Won't see, you can stay
on top of the head. There is some Winsor
Newton Burnt sienna. Now in the beak. I've got some Daniel
Smith Pyrol Red and some Daniel Smith
Hansa Yellow Medium. You can use cad red, cad yellow, whatever yellow and red you, Courtney Keith doesn't
really matter. Now what I think initially
I put in water and I didn't put in a sky and then I decided to
put in the sky. Have a think about what
colors you're using. I ended up through the
sky using some French ultra from Winsor Newton and
some Daniel Smith Turquoise. We've been really
grief. I thought about that first because I
probably should have put some of those two colors into the water as
I was doing it, whereas I retrospectively
had to put some and so do put a little
more thought into that. Then I got what Gouache just for tiny
highlight in the eye. Don't go out and buy that
specially US and China white, titanium white or
you could just leave it white paper for
that highlight. In terms of brushes, I'm
just using three of God. This is a size H Neef brush. It comes to reading
is zero point and it holds a reasonable
amount of water, makes a nice finished shape. Here. I've got the details
of that under the materials and to
just it all synthetics, I've got a little
sizes three and a double zero just for the
detail around the face. Other than that,
you just need fuel, pellets, some tissue
tub of water. And I think we're
pretty much right to go
3. Sketching the Swan: Now for the sketch, like
always, keep it simple. We don't want to worry
about too much details. So all of this
patterning in the wings, I don't want you to
worry about that. All I want you to
do is give yourself an indication of
where these edges. So I've just got a few
lines through here. Shape of this ring
that's underneath here. Get that in a little flick of the tail and around the face. Just make sure you
get the position of the eye and the nostril
in the right shape. So keep it simple. If you don't want to
sketch it up yourself. I have included a
template for you, but you can download
from the Skillshare. So I will get straight into,
straight into painting
4. First wash on the Wing : Right? So we're gonna do, we're going to get a whole wash over all the wings
and into the tail. We're not going to touch
the Head to start with. Now, I want a mix of
weighing Wet on Wet on Dry. One. We're gonna do is
we're going to actually Wet down some of the Wing
and some of the body. And then we're going to
come in with pigment. And the two payments
I'm using to start with some lavender and
some yellow ocher. I'm using my medium
brush, my size eight. Brush, this guy, tissue in hand. So I'm just going to start
coming into the middle here. And I'm just going to roughly actually Wet down a little bit. I'll see if I can hold it up. I'm going to pop a
little bit through here. Okay, if I hold my
page, attach the one. You can see I'm patchy all three day that I'm going to pick up a little bit of
my yellow ocher, little bit of lavender. So I want to milky puddle of H. It's going to touch my
brush into both of those. Is starch probably here. Tip the brush to form
a feather shape. Going through. Wash my brush again, pick up a bit more lavender, bit more names as my reference. Okay. And then coming into
this bigger Wing. So I'm coming in and touching into these areas
where I've wet so I'm letting it have a mixture of the sharp edges and then
bleeding into the wet areas. Okay. Picking up again, I'm going to come through
the front here. So I've got some funny patenting through the feathers here. So I'm just perpetually
running my brush there, come down through the front. So just roughing it up, lots of bits of white paper. I come yellow ochre, lavender and come
underneath this fellow. The front. Then I'm going to
bring my brush. I'm just coming out
to my pencil lines. I've got mostly
lavender on there. I'm going to talk to this tip. I'm gonna pick up a bit
of yellow stick MOM, maybe more Yellow
archaea. Touch that. Coming in from 11 to here. Now I'm going to leave
a little flash of white dry paper in-between. Lavender bit of yellow ochre. He touched, it, doesn't matter. We're going come
back and strengthen up in their later anyway. Pulling it underneath the Bird. Now I'm just looking, I'm stuck in a second
just looking in here. And I probably want a
bit more of this sort of mixing of the lavender
and yellow ochre. Just just wet and wet
here on the basis me, I've just picked up a bit
of Queen bottle of there. Now you've got to
remember that we can add lots more to this.
Hard to take off. I'm going to start with that as a first Wash then as
that drives as it's dry or hominin do the back
here with the same colours. But what I don't wanna do is do these feathers and have them
run all the way into these. I want to keep these
crisp edge here. So to come out of that
and let that dry. And then we'll come back in
5. Back Wing and Head: It's been about five-minutes
and on, on fully dry. Now, I'm going to come and stop feathers in
here. Same idea. I'm gonna put a
little bit of water on just to help things move. So clean water. Just a little bit. I'm not
painting that whole wing. I'm just putting a little
bit of water on this side. Same same here. Keeping bits of white paper, dry paper in-between, just
perpetually running down, just to help when
people have moved bit. I'll pick up my yellow ocher and a bit of a bit of Lavender. And I think I might start good under how strong
this is going to be. I don't want to
start on this one that I want pretty
light and they go, Oh gosh, that's really dark. So I'm going to start down
probably here and put a few strokes in that lock, pick up a bit more. Coming on this side. Suggest that mix the 2k
two colors together. I'm just dragging that through. Right now. I want more
strength than colour in towards the edge here. So I'm just dropping
bit more pigment. Good morning. I'm gonna do this Wing in there. Taking up the two now, this one, I'm gonna be a bit more
careful with the shapes. So I'm going to, I think maybe
a bit more yellow ocher. Touch my brush down, come in. Now let's strike, change the direction of my wrists
and just feeling that shake, dry my brush and ties this down because I don't want that
because I'm paying flat. If I let that water pool there, it's going to push all
the white back out. So I'm drying my brush
and just teasing that water just down into
underneath that Wing there. Now my eyes getting caught on this pencil line here,
but that will be gone. So terminal to worry
about that too much. So that's all I want in there at the moment for those
for that back Wing. Now I'm going to think about
the face and the neck here. Now I want this all
really nice and soft. So I'm going to paint
down first with water into the neck. Coming out to my pencil age. Now you do need to be because this is all going
to be very launch. My pencil line here is a lot darker than it
would be normally. You might still
find, hard to say, but It's a press
a lot harder than normal because when
you're painting a white subject domain
using yellow ocher, it's really hard to get the pencil off underneath
the Yellow Ochre. So normally I would
back this off a little bit with eraser so that my pencil lines
were really light. So I'm just coming up to
my pencil edge with water. It's not saturated,
it's just damp. I just want to let that
help the pigment move because I want to soft. Yeah, I could paint straight onto dry paper
with the pigment, but I will get much stronger, stronger lines and
I don't want that. I want really soft
colours up here. Got some water in. Now I'm going to pick
up my Yellow Ochre and just drop that into that web page and push it around a star in the middle of that shape
and push it around. I don't start on the edge
because I don't want to really solid rocket paint on the edge. I start in the middle of
the shape and push out. So I'm just teasing that
around my pencil edge. Up to the eye. Be careful that you're this
brushes got a really nice tip on it so I can get into
these little shapes if yours doesn't switch
to a smaller brush to get in here underneath
where it joins to the bag. Tuple massage, bring the pencil edge and I'm just dragging
that over the top. I'm just making sure that
that whole area is damp. And then I'm going
to pick up just to touch more paint and just drop it in while that's drying. So it's nice and
soft, really milky. While that's drying, I'm
going to do the same thing, keeping it really lights here. I'm just going to
Wet down the chest. Coming to meet the Wash
where we ended here, the base of the
Wing coming out to the pencil edge and just dropping just a touch
of color too much. So I'll wash my brush. I'm just going to
lift that off a bit. I just put a bit too
much pigment there. So I want to keep
this all really liked because I can add more
pigment if I may. Have to take it off and
on what make the decision about how much more I need
until we got all the dioxin. All right. Now, while
this is drying, I still got a lot of
water in the page. I'm going to switch
to my smaller brush. This is my size three. Now I'm going to take a
needle gate of Burnt Sienna. And into that Wet page, I'm just going to
drop little bit of burnt sienna over the top of the Head Dance isn't
taking the excess. I've got quite a lot of water, so I'm just mopping up
a little bit of water, drying my brush, just
pushing it around. How much time you
have to do this will depend on how warm your room
in my room is really cold. So my papers taking a
long time to drive, just picked up a little
bit more burnt sienna with a little less water in it. Dry my brush, pushing it around. And what I want, what
I want to watch when I'm doing this is if
I put a whole lot of sienna there and I let it run to the age that
at run out to the age. If I don't keep an eye on it, it will form a really it, it will dry on
that edge and form a really dark line and
I want to avoid that. So I'm kind of dry my brush and just pulling it away
from that top edge. I just want it to be
a subtle transition. I don't want a really hot line, Burnt Sienna, jumper
fluff on that day. I'm trying to ignore that. Okay. Then I'm going to
come come out and let that all fully dry now, I think I'll probably
need more on there. But I've been in five-minutes.
I've been fiddling. I want to stop, sit back, then we'll come back and probably
stuck in the bag. So let that fully dry
6. Beak and Water: We're going to come
into the fake. Now. I've got my sizes, three synthetic and I've
got in my, well, my very mucky well here
I've got a little bit of Hansa yellow and I've got
some Pyrol Red over here. I'm gonna go straight
onto dry paper. I'm going to mix up and we've got a bit of my Red Butte of my Yellow might just see what sort of color that
I'm going to come on, dry paper and just
paint that shape in. Wash my brush. I'm going to tease that pigment is quite a lot of pigment there. So rather than making it really, really solid, I'm just going to tease that out with some water, so drag that down. Washed my brush. I'll leave the nostril where just as dry pica will come and feel
that in lighter. So I'm teasing this down and I'm keeping mole
lot on the top of the bake, keeping it stronger and
the bottom I've got that little black
tip to go in there. Right now. There's
also a little flesh of orange just along
underneath here as well. Just pop that in. Then I want to resist the
urge to fiddle with that. I just want that Wash to dry. Okay. So while that's settling in, I'm actually going
to pop the water and now I'm not too fast
about the water. I just want to sit up,
sit it onto something. I'm fully dry here. What I'm gonna do, I'm going
to Wet down underneath. I'm going to throw a little
bit of the same colours, the yellow, the yellow
ocher in the Lavender. And I'm going to come
in with a hot edge of Indigo while it's all
wet. Clean water. Underneath. Haven't touched yet to the
actual Swan from just wedding, right down to follow the page. We're just going
to let things run. Now because I do want
to let things run here. I'm actually going
to tilt my page when we do this a little bit. So I'm just throwing
some water around here. I'm gonna kinda come
out diagonal here. That way. Yeah. Let it come close to the chest. Now, I'm going to come
right up to the edge. Now. I'm going to Wet. Along way the Swan will sitting into that water
bottle on that pencil edge. Then I'm gonna take my eraser. I'm just going to tilt my page. Right. Then I'm going to grab a little bit of yellow ocher, and I'm just gonna throw a little bit of
paint onto the page. A little bit of my Lavender
didn't actually get an even check a little bit In. Shouldn't get some paint. Okay. You're really not thinking
I'm just blocking some on, then I'm gonna get my Indigo. So I've squeezed out
some fresh Indigo. I'm going to come up with
my Indigo really solid. That was a really tooth paste
it grab of Indigo there. And I'm going to come all the
way up to that pencil edge. Wash my brush. And I'm just going to drag
but through and adjust. Want to let it do
its own thing and remembering that it will
dry lighter than this. All right. I'm just going to
come up to that. I'm just going to
make sure it actually sit it all the way. Don't really want
a hot edge this. So I'm just going
to soften off that. Some people will spend a
lot of time in the water. I don't tend to do backgrounds
and that kind of thing. I'm not all that interesting. If you wanna do
fancy reflections, by all means go ahead and do it. I just really want to
sit it into the water. I've just picked up suddenly
more pigment there. And I'm just going to
see what that does. So come out of that
and let it dry. Now, we we will let some
of that bleed up there, ducts to go underneath here. I'm not going to
have that really stuck what to dark there. But I don't want to do that
while this is all Wet, I want to let that settle in
and I'll come back to that. So I really need to come out
of that and let that dry. And we'll come and
work on the Wing skin
7. Adding Some Shadows: Alright, it's been
probably 10 min. So I'm not white drawing he
it because it was a lot of water through their
Some hustle be tempting fate because I'm
going to come up into heat, but I've just up
just being patient. I'm going to keep my
slave out of this and coming to the dark
on the top of the head. I'm going to use I might need both little brushes,
I'll just get them out. I'm going to pop just a Wash up Indigo through the area that I know
there's gonna be dark. So I'm using my size three
synthetic to start with. I'll see if I can manage
tips like on that. So again, starting
in the middle of a shape onto dry paper. Milky, creamy Wash up, Indigo. Being really careful. Yeah, everything's dry up here, but bringing really
careful not to go over my pencil edge. The tip on this isn't terrific. So what I'm gonna do is
I'm going to switch to my smaller brush to try
and get to my edges. Just be careful when you do this sometimes depending
on what you brushes, Lakoff got big drops of
water there on the brush. And if they run
down on your page, that can be really
disappointing. And gates open to strive. So make sure you brushes dry. So I'm coming up and she's
laying out the shape of that. I come into my pencil edge. The orange is
completely drive it, so I can come and touch that edge to get this is a little bit of a dark running along
on the Neef there. I'm just going I really want
to dry brush to tease that through because I don't want to get I don't want that black
to bleed everywhere there. So I just want to
make sure I've not got too much pigment. Starting to dry a bit more
pigment into the nostril. Now, this will dry, lighter. And I'll take advantage of that because I want to keep
some highlights in here. So this will need a second Wash. But I just want to get the shape right that I am going to drop just a bit more pigment into that little native steady hand. Chase that down. Just having a look
probably comes. So that the black underneath
the orange as well there. I'm going to come
out of that now. I'll let that dry. Just tidying up that shape, just making sure I'm coming
close to that pencil edge. Now. Something that's gonna be
problematic for me now, these heavy pencil,
pencil lines. So what I might do is
I'm actually going to make sure I'm fully dry. I'm just going to backoff those lines just so I can
see where my Wash is. Don't touch for black. Okay. Haven't gotten rid
of all of them. But I just need a few of them
off to see where I'm going. Okay. So I'm still
I'm kinda dry. They're going to be a little
bit careful down here. I'm going to start
in some of the dots behind behind this Wing. So I'm gonna do, I'm
gonna be using Indigo. I'm going to come and Wet. Think I'll start on this one. It's a clean water. I'm pretty slaving
anything that's Wet. I'm just going to drag some water in this feather
here, coming up a bit. Actually it's dirty water. It's not really clean water. I was going to clean water
but didn't quite get there. And then into that, I'm going to stop on this edge, dropped some Indigo in. Then I'm just going to pull out. So I'm using the side of my brush to just keep myself some interesting
shapes in there. Then I'm going to dry it. Ties that age really
as close as I can get to that front Wing. One a little bit of a gap. I don't want too
much live there. The idea is I want to Dhaka
going out to Life here. I'm just going to tease
that over the top. I've got this one to do as well, but I'm gonna let that settle in before I come into there. What I am gonna do, I'm going to do the shadow underneath this. I'll come and do that once
this is dry and that's dry. Don't want to do them all
at once because I don't want them all to bleed
into each other. So here I'm going to Wet down, not sopping just them, just so that I let my Pigment move. I recommend shadow comes to
probably about there. So I'm just going to
drag my wet brush in. Then I'm going to pick up
some that's too much Indigo. Pick up some creamy Indigo
stuck underneath that shape. That fellow, sorry. Wash my brush, dry it off and ties that run to that
Wet age that I just made. Then I'm going to
drag that underneath. Now, there's all sorts of
nonsense happening in here. So I'm going to use some of that pigment and just put
a little bit of stuff. Just because I'm just a
little bit of dry brushing. Their come out drama brush. Smooth, but I've just got a clean damp brush and I'm just smoothing over that
a little bit so that I've got a little bit
of a mix of hot strokes and in Wet on Wet
on Dry basically. Okay. I'm letting that just bleed out. I might need to
strengthen in there, but I don't want to go
to Hide image just yet, so I'll let that dry. Then I'm going to put the
dark underneath here now. I didn't actually
leave the gap here. I said to you, but I
didn't do it myself. But what we're gonna do
is put a little bit of a dark underneath here. And then I'm going
to touch down onto this wet edge and let some of
that Indigo blade back up. Now, this is fully dry now. So don't do this if
you still wet in here. I'm gonna go onto dry
paper because I want this to stick first-time onto their drag it through
just roughly. And then with a
clean damp brush, I'm going to drag
my clean damp brush along that Indigo edge. And it should move a bit like Indigo will keep bleeding
for a long time. So what you should find is that some of that Indigo from the water will bleed
up into the Swan. If it doesn't, you can
just add some pigment in, but minds moving a bit. Now, one thing to watch, I need to make sure
I come all the way to that first Wash. So I've just got a
little flashlight this I just dry my brush. I'm just making sure that Indigo comes all the
way up to that pencil. And now I might
need to go darker, but I don't want to do that yet, so I'll let that settling. I'm just going to soften, just clean my brush. I'm just going to drag bit of water up to settle
the chest bit. Clean my brush. Now, if this wasn't
dry when I did that, all of this water would
have pushed down into this Wash and form
cauliflower, which I do want. So as I say, make sure that this is dry. Now I think I'm probably
probably dry up there. So I'm just gonna
do a little bit in this feather as well. So same idea. Wet down a beach halfway
two-thirds down the fibo. And then I'm going
to take some Indigo and just draw that in. So that was milky Indigo. Saying how a lot ties that
might do. Just for interest. I've just picked up
a little bit more Indigo and I'm just going to drag a little bit into that dry. So I'm drawing here just to give me a little bit of a
suggestion of feathers there. So at this, the striping, I'm just going to take
a bit more Indigo now. And the same idea I want
to be a little bit darker on this sheet is I want
to talk about age. They're dropping
more pigment into that web page and letting
it run dry off my brush. Now I'm all waiting Wet. So now when I come to push
and pull around here, I need to have less water on
my brush then in my page, or I will get into a
whole world of trouble. I'm just dry, cleaning my brush, drying it off, just melding
those two washes together. So I've got the harder
dark transitioning out. I'm just going to tease that
just underneath therapy. Now I will probably need
to close up that line, but I don't want to do that
until everything is dry. And I'll probably need to strengthen up the
dark underneath here. But again, I've
been in here a bit, so I'm gonna come out of
there and let that fully dry. Then we'll come
work on the face. I don't quite like all
my dry strokes here, so I'll have to deal
with that as well, but come out of that, give that a good 10 min to fully dry and then
we'll come back in
8. Working on the Head: Okay. It's been
another 10 min or so. We're going to come on working
the Head for a bit now. I want to type my
size three synthetic. I've got clean water now because it got pretty
mucky with the Indigo. And I need to tidy up in here. So I'm going to Wet down.
I've got a big gap. You might not have that,
but I've got a gap here between the neck and where that first
wing feathers start. So I'm just going to pop
on some clean water. And I'm just going to
restate my Yellow I could there just so that you can
see where the fittest up. All right, so just
strengthen that up a bit. I might need to put another
striking in the efferent, another feather in here
to close up that gap. But I'll decide once we've
got this done. Alright. Now I want to start to put in some shadows under
the neck here. Now I'm not necessarily going to stay true
to the reference. I'm going to make it a little
bit easier for myself. So I'm just waiting
down Coming up to my first Wash in the cheek,
underneath the neck. They're not going to touch that Indigo the beak because I don't
want that to run. But now that I'm old damp there, I'm going to pick
up a little bit of indigo and a little
bit of burnt sienna. So good of H on my brush. I'm just going to drop
that into the web page. Into that turned up the neck. They're wet. Wash my brush. I'm just
going to tease it Around. Wash my brush, push it back. I'm flat on painting flat again, but I'm just changing
the direction. Will have the key guys at these so you don't
have to get it all in. The first hit. The idea is, I want this to be really soft. So I'm just teasing that edge, so I get a nice transition. Okay, so now that I've kinda
pushed it to where I want, I'm going to re-size it. So a bit more Burnt Sienna, bit of indigo into
that web page, just make it a
little bit stronger. Dragging it on the Neef all
the way up to the fake. They're still knowing your soft similar when
it dark enough. But I've started to get the
idea of where I want to go. So I'm going to come into
here for the time being. I'm going to painting. So
these washes quite light. Now I'm going to
painting a DACA. People unlabeled little flash of light of that first Wash. See if this brush, I've picked up
really solid Indigo. And so now we are putting that. I'm just leaving little flashes. The first Wash over the
top of the eye there. Come back and
coming to the dark. Shuffled the bag to
pick up a bit mogul, not good enough water on my
brush now I'm going to leave a little bit a lot
on the front here. But I want this quite dark. The rest of it quite dark. So really creamy
to tooth paste it. Indigo. Really strengthen up that Wash. Never be very careful not to
touch this into where you were on the underneath the
chin there because if it runs, it'll be hard to get rid of. So here I'm going to drag
into the nostril, the front. Then I'm going to wash my brush. I'm just going to tease that pigment around
with a damp brush. I'm going to leave
a little bit a lot just on the top here. Okay. Then I'm going to drag a
little bit of just Milky. I just need to back off a lot
underneath that beak this, I've just got some milky Indigo. You still get the
flesh of orange, but it's just nice dark and
off a little bit there. Now I still need another
wash of orange on there, but I'm going to let that
Indigo dry before I do that. I'll come back and tidy it up. Okay. Something I can
do while that's drying. I'm going to suggest
through to the shadow, it's not on the reference. But I'm going to
suggest a bit of a shadow from the bag
on the chest yet. So I'm going to take my Medium, one little brush and
I'm just going to paint with some water veto bit
of a Wash there. Then I'm going to well, I had to he I had a duty
brush pens and I can take a B2B Indigo and drop that in, Wash my brush and soften that. So I just want it to
transition down darker up the top and then
just bleeding out, blending out down, getting
a lot down the bottom. I'm just washing my brush and softening off
this bottom edge. Again, remembering this will dry lighter than it
appears at the moment. And now I'm dry up here. So I'm gonna go before I
let you have a breadth, I'm going to just strengthen,
do exactly the same thing. We're just going to
erase, strengthen the shadow underneath here. Waiting down again
because I want it soft. Because I want to hear I went
onto dry paper because I wanted that sharp edge
on either side here. I don't want to shop page. I want it to softly
transition out. I'm going to come maybe put a bit more color database,
the neck there as well. So the same idea that Indigo
and the Burnt Sienna. So the blue and brown together. Touching that in, Wash my brush through all the way to the beak. Washing my brush
and just softening. Keep cleaning the brush
and softening that edge. I'm going to let that one dry. It probably will need
strengthening gun, but I'm just going to let that settle and my Burnt Sienna
disappeared on the top. So I'm going to re-state that. So I'm gonna do exactly the same thing that
we did before. I'm going to paint down
with some clean water. And then I've gotten a little
bit more burnt sienna. I'm just going to drop that
straight into the web page. I do want to finish this orange. So I'm gonna go on to dry bake
Making a bit of an orange. I've got a bit of my
red, bit of my Yellow. Just going to pop. Another Wash on my brush. I'm going to leave
a little bit a lot. Meant to. I didn't quiet just
around the nostrils. I've washed my brush, just lifting it, touch. I'm just looking for a
little bit of variation in the wash. Now this does, the bag actually
has a little bit of probably queen
ball at, I would say. But I'm not going to put eating. So just feel like we've
already gotten enough colours. But you could put a bit
of purple in there too. Just making sure that
that Wash comes all the way to the edge when this dries, we'll put in the little
black of on the tip. Now under here, I'm going
to suggest bit of a shadow. So I'm just dragging
my damp brush just underneath dark and just
letting it run just a fraction. Just so it suggests a
little bit of a shadow. Okay, I'm going to pop
a little hard on me. I which he doesn't have to do. I'm just going to use
a tiny bit of Gouache. So I'm sticking my brush, might go to small brush actually sticking my brush
straight in the tube. I'm just going to pop. Just a little highlighting. Okay. Now we need to re-state
stayed a few things, but I'm going to come
out and let that dry. I'm going to rub
off my pencil marks and then we'll and
then we'll finish off
9. Finishing Off: I wanted you to much
more cute little things. First off, we have to
pop the little black in the fake that my really
loose brush MAN, double zero brush, pick up
a bit of straight Indigo. Painting. My tissue
just said that I've not got too much water on here. And painting onto dry paper, hot body and then I'm
just going to get a wash my brush and just soften it in a clean brush. And then I think I probably
need to a protonated back that light off and have that second round of
shadows under here. So I'm gonna take clean water. That wasn't clean water. Clean water and just
paint in there. Just is just a bit much light. Take my Indigo. Again, do the same sort of trick and now bring that into backoff. Some of that law.
It doesn't have to make a whole lot of sense. I just need to have
a little less lot. So just wash my
brush to soften off. Now, I'm going to close
up the gap in here. So to do that, I'm
going to Wet down first that shadow that we put in just to help me
help the pigment move. Then I'm going to pick
up my solid Indigo. I'm going to turn a
little bit so I can get my resting back that
loan off a bit. Just a little bit too bright, then this needs to be stronger. So when I look at the
reference, this is quite dark. So I'm gonna go into Dr. Haifa. I might take a little
bit of burnt sienna, so there's a little
bit of brown in there, a little bit of indigo. Straight on to that first Wash. You've got to actually
cover up at first Wash, which can be tricky. See much with this, you
know that that's okay. Wash my brush. Drag that through. Careful way. You put
your hands so that you don't lean on anything wet? My brush, you can
just dragging that. Right now. I don't like that is
a bit too patchy. I'm actually gonna put
a little bit more. Maybe I'm gonna put
a little bit more violet and yellow, green there. You also want, need it. But I'm just going
to perpetually Wet down patchy patch Apache, maybe a little bit in
this front as well, because my front feather
there has disappeared a bit. That I have pick up my
yellow ocher and my violet, milky and jazz, touch a bit more paint into the front. Just a need it took I
want it to be rough, but I just want to
get more stuff. Stuff being the
technical term for it. All right. I'm just sort of
sitting back and seeing where I want to balance my colors that I probably need a little bit
more yellow ocher. Just going through
there as well. Okay. I might just pop
just a fraction, just a little bit of warmth
with the yellow ocher. Just a little bit
onto dry paper here. Just put a little
bit underneath here. Just messy. Sit back. Alright, now, if I were going to leave this, just going to soften
that in here. If I was going to leave this fully white with a
white background, I would probably
strengthen up in here. Maybe put a little
bit of a shadow in here just to see
where the Wing and the chest a separate there may be tidy up in there instead, something I don't normally do. And I'm gonna put a little bit
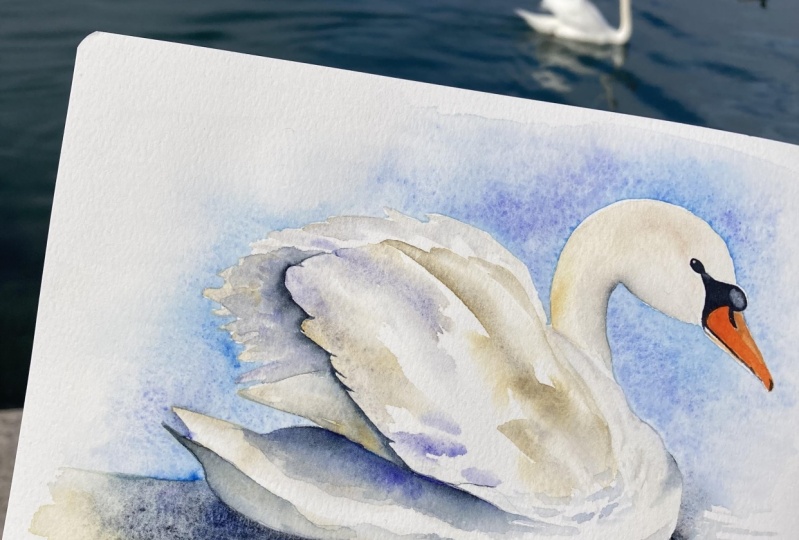
of a blue background just, just around the head here. So we're gonna do is
we're going to Wet down the whole area
like we did the water. And we're going to drop in some, maybe some French ultra. And I've got some Phthalo
Turquoise in my palette here. I just have to make
sure everything is dry before I do that. Alright, and that my water
is clean, clean ish. And we'll put that
on. Getting my water yet it's clean enough. So wedding down, painting flat, really rough around here. I'll pay more attention
when I get closer in. So pretty I do want a fair
bit of water on here. Now. Now I need to pay attention. So now I'm going to come
and try and Wet up to the neck line over
the head there. Same thing she's laying out. So now I've gotta be careful where I went to and figure out
where that chest is. Under the neck. Again trying not to
touch to that Indigo. And then thinking about where
these feathers might be. If I hold it up, you can see I'm just like
a halo around the head. Isn't dry paper. So that
will work out what colours? So I think I'm going to take, I've got some good, some French ultra, they're not some Cytotec or so
I might use those two. Alright, so I'm gonna take
the French ultra jar, check that into the web page
and maybe some of my site, I know that was a bit much. Let's just get some more
water around that played out. I can tilt my page and
It's around where I want. You can use whatever, whatever blues you like
really doesn't really matter. What matters is that
you get your Edge run. So you don't happens is that you don't have
to put this in. I don't tend to put
backgrounds in, just coming up to
touch its closest. I can tend to put backgrounds
in just because I'm usually exhibiting and it's easier if my work stands out
more without a background. That's kinda FUN space for it when you're hanging
with 500 other paintings. By all means, if you want
backgrounds, put them in. Okay, So I'm gonna
go a bit stronger. Underneath you. Think well, that's throwing up. I think I just want a little
bit more dark and then I guess I'm just using
my small brush. I'm just going to Wet down. Just want that dark to be just to touch
stronger under there. And I still think right there on his wrong I'm just
going to document Off again. Still just want a bit
more color. Yeah. So I'm just painting
down with water. Just drop a little bit. Just a little bit more
colour, bit more Indigo. I spent about 10 min because
I needed this to fully dry things off still
this still isn't strong enough
underneath the neck. And really, I probably should
have thought a little bit beforehand that I
probably need some of that blue in the water. I'm not sure whether I'm
gonna be able to do that now. I'll give it a go because
this might be to yellow. I'll just say whether I can get any this could be really bad. So don't do this until oh, just think about it a bit. When you could do yours. I might say that in the intro. I just feel like because
I've got all that sky color, I probably need it in here. Just to save, I can get a
little bit in sub-optimal. I might say any
introduction for you to warn you about thinking
about that before you do it? For me, it was an afterthought. Do better, do better than I did. Alright, so I'm going to
pop the dark in here. And again, I'm gonna
go onto dry paper here because it's
getting ridiculous. How many times or
pet to do this. So my Indigo and my Burnt
Sienna, I'm dropping. Yeah, I think I'm drawing there. Make sure you dry there. And straight onto the dry paper. Dry my brush. Same processes softening. Just bringing it a little
bit over that top Wing. That feather of the Wing too, just so we can see
where that Wing starts. Stronger. Nearly there. I feel like I could keep
doing this for days. So some point got
a call, it quits
10. A Final Word: So I hope you've
enjoyed the class today and you're happy with the
painting that you produce. Make sure you remember
while you're painting. It's fine to have to
keep adding more layers. He don't have to get
it all in one here. And I said a few times during
the class to much better off leaving the lives and under doing it and then
adding more if you need it. Thank going to have
to start with them, then you kind of chase each
towel to lift pigment off. So go slow, steady. Work on those nice
soft edges so that you get a transition
of dark to light. If you're happy with the painting or even
if you're not and you want feedback to upload a photo of the painting to the projects section
on Skillshare. I'm always happy to
give feedback and I really enjoy seeing
what you've done. An I really enjoy
answering your questions, so don't hold back to
please feel free to ask and I'll see
for the next lesson
 Nadine Dudek, Professional Watercolour Artist