Transcripts
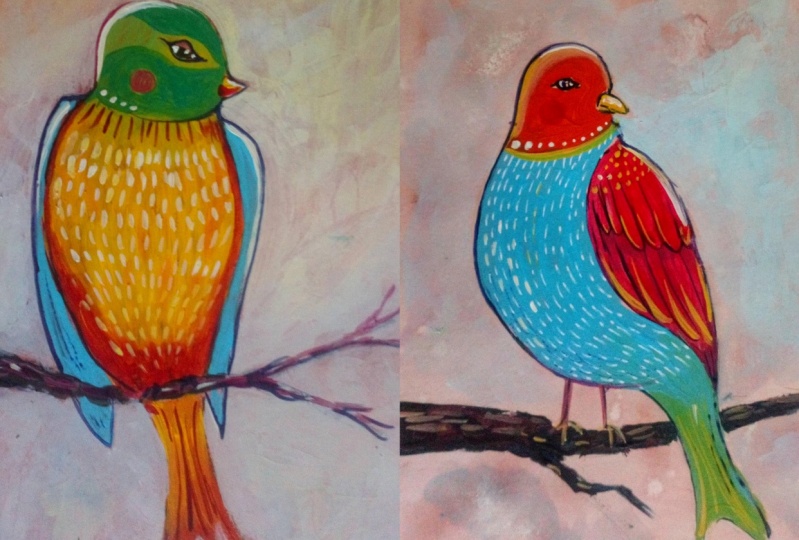
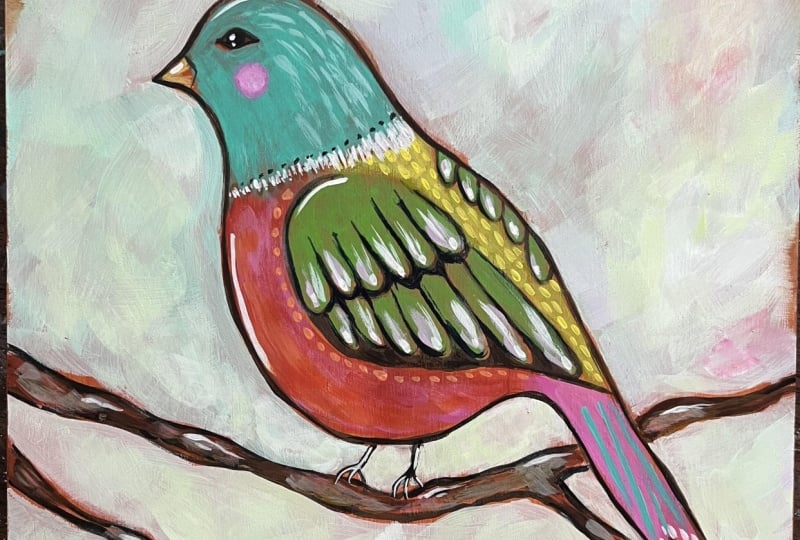
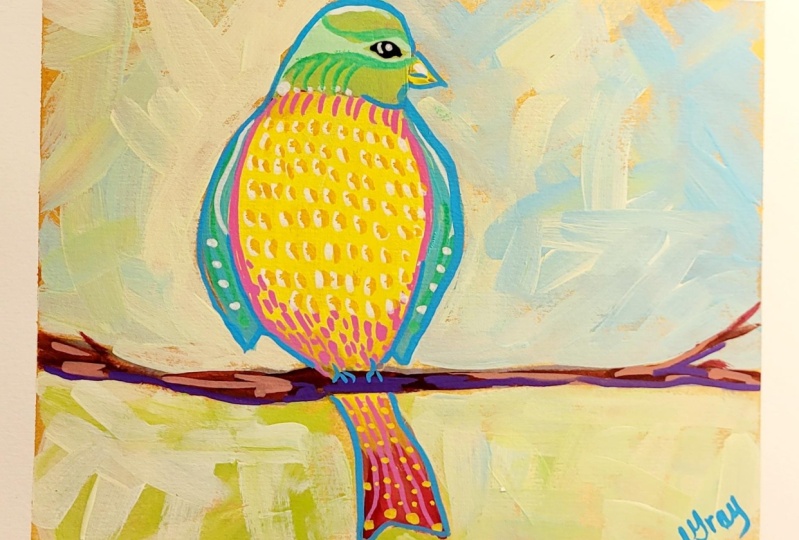
1. Introduction: Hello, Love. My name is Jennifer Laurel Keller, and today I'm doing a whimsical lesson where I share how to paint these sweet little birds using acrylic paint on watercolor paper or canvas. I love painting both realistically and with more playful styles. So today I thought we would brighten the mood with color and mark making to create these lighthearted birds. This is a fun, colorful project where you can relax and learn without the pressure to make things perfect . These are make believe birds, so there's no need to worry about making them lifelike. Or having the exact colors is me. You're going to use your imagination as well as learn some acrylic painting techniques that you can use in your other art projects. In this class, I go over everything. Step by step will begin with a sketch to plot out the piece, then do an under painting. I'll go over how to create a layered background will block in some pretty colors, and finally, I'll show you how to bring the piece toe life with light and some darling little details. You'll find reference images and a materials list down below, so don't miss those, and I'll cover what materials I'm using as I use them in the class. Are you ready? Let's begin
2. Sketching the Birds: hello and welcome in this lesson will be sketching out our bird paintings. So I've started with some watercolor paper and I cut these out from an 11 by 15 pad. So I cut the pages in half and next I'm going to start my sketch. I sketch pretty lightly at first until I break that blank page barrier and then I dark in my pencil. So this is gonna look my kind of like a pair that's leaning to the side. One side is a little bit straighter than the other, and then it dips down for the tail. So I make the tail into this kind of fort tail with two feathers, the end, a little beak there on the head. And then I'll dio the wings and I come down with a curve that kind of straightens out at a diagonal and goes below where the tail should be and then a little hint of another wing off to the side. And then I do the feathers, so I just have these little rounded feathers that repeat across and then below that more, and they just follow the contour of that bottom line. So it's almost like half of a heart shape when they meet at the end. And then over here, just a few little tiny hints of that other wing across the back. The eye is kind of parallel to where the top the beak is, and then I do too little points and then the legs. So just too little sticks going up, down, and then they have three little toes and then we'll give it a branch to sit on. So I'm just making this kind of wobbly line. It forks there, three branches on this one branch or three twigs on this one branch, and that's looking really good. So hold it up so you can see everything. It's really simple. We'll do a lot of the details with the paint. All right, here's the next one. So I started that rounded shape at the top and then kind of marked where we want the tailed and so that I make sure that I don't Sometimes when we sketch things get switch squished to the top or the bottom. So I'm just doing this gentle line that's curved, and this bird is gonna be looking over its back. So I've got the head pointing to the right. And then it's just this chubby little bird round it can't that. And so then we do the legs. I'll have the branch here, and I just make it kind of rough. It's not a perfectly like smooth line, and the big is going to start closer to the right and then overlapped the outer line of the head so that we can see it really well in the outline. And then there's the eye. I'm going to make the head a little bit taller, and I think the was gonna put the wing over more to the left. But I went so you could ski more of the breast of the bird. And then it's just this tapered, lying rounds up a bit, and then we'll do those feathers again. Just rounded little lines at the bottom. That and then I just kind of sketched it in loosely below. Okay, and you can see all of these lines in the finished images, which I've attached down below so that you can have a reference image. Okay, let's do the last one here, marking the top, the side and the bottom and the other side just so that I don't go to big and then push myself off the page. That happens a lot with sketching things in, so that always helps. So it's just kind of this this round little guy and his wings or her wings are off to the side, just kind of dripping down below the vote outline, and it's going to be looking to the side little points by the eyes. That's about it. We'll give it some feet and a branch. So this branch is gonna cross over the body, Nothing behind it. And there we have our three birds sketched out, ready to go Looking pretty cute. I'll see you in the next lesson where we're going. Teoh, use acrylic line work to reinforce those sketch lines and get more of a bold structure for this piece. I'll see you there
3. Acrylic Linework: welcome back to the acrylic line. Work for our bird paintings. So I have my sketch and I have my palate. I've got my water off to the side. I'm gonna take my tiny little round brush and I'm gonna use Payne's gray. But you can also use black or another dark blue or any dark color will do. Actually, it doesn't even have to be blue. Could be purple or something like that. And basically, I'm just gonna trace over the sketch that we did before, And the reason that I'm doing this is so, um, well, it's for a couple reasons. First off, I want to do a color wash over this, and I want the pain to be dark enough so that it shows up under the next layer of paint. So I'll show you what that looks like in the next lesson. So it's important that there's a lot of contrast between the white paper and the dark paint . And then secondly, I'm gonna have this line work kind of peek through the next. We'll all of the rest of the acrylic painting layers that we're gonna dio. So I am, um I I just want to do something dark so that when it shows through, it creates this shadow effect, and it's gonna create contrast from one area of the painting to the next. And you'll notice that with this small little round brush, I have to go back a lot of times. Teoh reapply the paint, and I just roll the brush around in the paint. I don't go straight into the center of the area of paint on the palate. I go, um, off to the side of it and kind of drag it out. So I'm I'm just able to control how much pain is on the brush. It's a rolling it around, and then I'm using a really light touch on the page or the canvas. And because this is the first time I'm using acrylic on this watercolor paper, the paper is absorbing a lot of that paint as well, so it does dry out rather quickly, and but it's great for line work. However, you'll see in the next bird piece that I actually go up a size with my brush, Um, and it's okay to have a little bit thicker line here because we're gonna paint over it and you can control how much you want to see show through by working next to it and over it. So here we have the feet, and now I actually use my larger brush. This is a flat brush. There's the cat. This is a bright brush, and it's rather small, and I'm using it the sideways instead of the Broadway so that it's following one in a thin line and my cat is yelling in the background, so don't mind her, Okay? It's okay if you fill this in with blue because we're gonna paint over it and layer, and I'm just blocking in where that branch is gonna be. Looks good. All right, let's move on to the next one. I'm going to stay with the little tiny, bright, fresh and I'm just, um, angling the brush in the direction that the line is going. So it's kind of curving around with the lying, and I'm using that narrow and for the the thin line. But even if I were to go thick with this and push more if you if use more pressure, the line is gonna be thicker. And if you use more of the broad side of the brush line's gonna be thicker, but we're gonna use paint in and around this line so you don't have to worry about it being totally solid or totally perfect. It's really just about having something darker in place so that we can paint over it with the next layer of color and around it with all of the colors and the bird. Okay, little toes. I was like bird feed their cute, Actually, not all of them are cuter and cute in real life. But in paintings there, okay, and then just kind of this uneven lying. It's good to have the branch have different wits and everything like that. Okay, so you can barely even tell the difference when you hold these up next to each other between the brushes that I used. Okay, My last bird. I'm just going along on that, narrow into the brush and really paying attention to my curves. And, um, you could make little adjustments at this phase as well, about how you want the line work to go. And then just a swift little tale at the end. Once a little bit different, I fill in the hole. I and just a little triangle for the B. The branch. I left a little gap for the feet, and I actually I forget to paint the feet like that's my bad, but it doesn't really hurt the painting. You'll see. You'll see. You can see it in the reference photo. This bird has no feet at the end. See that? Anyway, next up, we're going to do the under painting. I'll see you there.
4. Underpainting: Hello and welcome back where we are going to be doing the under painting. So I've got some artist tape and I'm gonna take this down to the table. But I'm also gonna be switching these out because I have three to work on, and I'm gonna do it and stages. So I'm just making sure this isn't wet anymore. And I'm going Teoh, uh, get it nice even. And then I'm gonna take the tape, measure it to the length of the page and make it a little bit longer, and I'm going to cover up about 1/4 inch of the edge of the paper. But you could do more if you wanted. I wouldn't do much less. Okay, so I put down one end, and then I make sure it straight, and then I attach the other end, and I really push it down onto the paper. I'm not so concerned. I'm not so concerned about the table, making sure that it's really, really stuck to the table cause I'm take it off when I work on the other birds. So just doing that on the other sides and getting it nice and even and the whole under painting is gonna be one color, and I'm gonna do burnt Sienna. If you don't have burnt sienna, that's fine. You could do another warm color, like red or like a dark orange. The lighter it is, the more it's gonna show up in in and around paint that you use for the bird. But this is kind of, um, a medium tone, and I just dampen my brush and wiped off the excess water, and this will be transparent. And so I'm just making sure the the pain is dry and you don't have to be all that careful about which direction your brushes going in when it's a top layer. It does matter because you're going to see your brush strokes. But this is gonna be covered up for the most part, so you could go in any direction. What you're really looking for is thin coverage. You don't want any glue Bieber strokes that are gonna dry, didn that are going to dry and then show through the paint that we use next over it. So I'm just going all the way over the top. I'm speeding the video up here so that I don't bore you with all of this. So, um, the dinner you go, the lighter the pain is gonna be because the white is behind it showing through. And now I'm just gonna peel up the tape from my table and go stick this. I actually stuck it on the wall, but you could just set it down on the other part of the table or wherever. Okay, here's my second bird. Getting that nicely. Even with the tape and continuing on Teoh do this under painting. So really simple guys. So you can see my brush strokes are really uneven. Just getting it on there. Okay? You wanna cover all of the pain's really simply not too thick. Not too thin either. You want even coverage for the most part. Okay, So up next, we're gonna block in the color in the background and the birds, so stay tuned for that. I'll see you there
5. Blocking in the Colors: Hello and welcome back in this lesson. We're gonna block in the color for these birds. Okay, So I'm bringing back my first bird, and the page has worked a little bit because it's, um, got paint on it, and it does straighten out a little bit when it's 100% dry. I've also flipped over my palate so that I can have the clean side towards the painting. And I am putting out my colors and all of these colors. Aaron, the materials list. But you should have, um, looked at. But if you haven't yet, it is attached down below. I'm taking some magenta and yellow, which is creating this kind of orange color, which is strangely close to the color of the background that I use. So it's an odd choice as my first demonstration of color against this background. So bear with me, you can see a little change there, but this is just yellow and magenta. But the thing is, is that you can use any color you want. Here's magenta and white, and I'm gonna fill in a different area of the painting with that color combo. And I'm doing that in the tail, so it's really just pick a color, pick a mix. I went over the top with some texture just to make it stand out a little bit for you. So I washed my brush and I'm starting a new color. So any time you change colors a lot, you wanna watch your brush and I'm filling in the head of the bird with this teal color, and you can see how much that pops next to the burnt sienna of the background. And some of that burnt Sienna is going to show through a little bit. The till is very opaque, so it's not going to do it as much with the teal. But you will notice that with certain colors it does show through a lot. And I'm going for that. I like it that way. It's, um, giving my colors just a more dynamic, layered look, and I put a few lines in here. Actually, that's a little bit early to do that, so don't worry about doing any details like lines and texture over this. We're really just worried about blocking color, and at this point I got a little bit ahead of myself, so I mixed together some yellow and teal and I'm going into the wings now. So I'm using the brush to just get in between those lines that I painted in over my sketch , and they don't have to be perfect. It's OK to show through some of that burnt sienna, and it's going to actually give it a warmth and a different color under the green. And it's gonna add to the shadows and make them a little bit more dynamic for you. So I really like doing that. Okay. And then just wrapping up that green on the wing, I went over that large area again and just touched it up so that some areas are have more paint on them unless of the burnt Sienna is showing through. But it's up to you. You can always come back and do a little touch ups. Okay, so and then I did the wing on the side, the same color. Now I'm adding more yellow to my brush that already had the green in it and then going to do the back of the bird. But honestly, you could do any color you want. This part is up to you. It's kind of like coloring in a coloring book so you can pick any color you want. It's just gonna make it fun and unique to you. Now, I did a little bit of that orange color with the magenta and yellow and did the beak. And now I'm gonna work on the background. So I This is gonna be a color that has a lot of white and a little bit of different colors in it. As we go around and here, it's really important in my mind to use your brush in different directions as you move along. So don't just go at one angle the angle that your arm moves from the elbow. You really want Teoh change the direction of your hand so that you don't get a streaky background, And then as you come in on the line around your bird on the outline, you just want to be pretty careful. And so I take the wet paint on my brush and I work on the line around. The birds are in my hands in the way, and you're gonna have to change the angle of your hand. And then I just bring it out into the background and kind of feather it outwards, or fan it outwards. So here we go. On the narrow side of my brush. I'm cutting into that outline of the bird and then bring it up in and around that branch, and then I feather it out into the background so that it's blended in. Or else you're going to get a lot of streaky lines. And I like the brushwork a lot because it shows the burnt sienna coming through and just gives it that nice painterly look. Um, this brush is a little bit big for those little nooks and crannies around the branch, in the tail, on the legs, and in hindsight, I probably should have gone down a size of brush, but I was determined to make it work. Um, feel free to use a smaller brush. At this point, I'm just using a bright brush. You can use a flat brush. You could use a line or hose com line around brush to make the line, but just make sure that you bring it out a bit when the paint is still kind of wet so that you don't see it. So, um so streaky against the bird. And then there's a different texture in the background. I try and bring the texture in as much as I can to the site of the bird. But there's you still do see the brushstrokes going around the bird as well, and that's just kind of part of it. And I like that. I just really like that. Okay, so I'm just being really careful to always have a lot of white in this mix so that it's light and airy. If you wanted a darker background, you could. But for what I'm doing in this demo, I'm tinting these colors with a whole lot of white. So tinting just means adding white to something to make it lighter. So there's just like a hand of color in these mixes and then, ah, whole lot of white. So going in around that branch and you can see it just really brings the branch and everything together really nicely. And this is why I used the tape because I really wanted to protect my table and go right up to the edge. So, um, it helps do that as well. Keep the page straight for filming and painting so you can go back over in the areas that need more color as well. And it's okay. Toe layer, two different colors that it's just going to make it all the more interesting in a little brush stroke between the legs there. Okay, so any place that looks like it just doesn't have quite enough pain. Just do a little brush stroke over it, but I'm letting a lot of those areas be slightly transparent. Okay, so I'm just speeding this up now for my second bird going around and around and you'll notice that in this one I started with the background first. So there's not one order that you have to use. You can do the background first to show the contrast of the bird and make the birds stand out a little bit more before you paint in the color blocks there inside the bird. And that's just gonna, you know, be a different experience for you. There's no right or wrong way to do it. Okay, so I've got it mostly filled in in the background, and now I'm just doing some layering, okay? And then I switched to that small bright brush to fill in around the legs this time instead of powering through with a big brush. So don't be afraid to go up and down in size for your brushes if you feel like things were getting too tight or you just want more coverage. Okay, So first I started with some teal, and then I added some yellow to the teal to make this green color. Here I have yellow and magenta, a little yellow on the beak, and things are moving pretty quickly with the video. Now, I didn't want to bore you with too much time with just filling and color. But I'm using white and magenta in the wing. And now we've switched over to our next bird, once again failing in the background. I have yellow and white on my brush right now and then I'm just picking new colors as I move around. I think there's some magenta in there at this point, and now I added, like just a tiny bit of teal for the bottom. So there's a change from the top to the bottom. One is warm and one is cool, but then also attended with the white. Okay, now I've got my smaller brush. I'm gonna dio just yellow on the breast of this bird and I'm gonna take it up to the neck. And yellow is a really transparent color out of the two. It's just a little bit weaker, so I, uh you can layers much over it as you want. Now I have some magenta and yellow in the brush and I'm going to dio kind of a blend here. So while the paint is still wet, I'm bringing more yellow back down and it gives it this blend e look, which in the art world is called a Grady int. Now I'm using teal for the wings, and it's important to let the wings go behind the branch to make sure that it looks like the bird is sitting on the branch. This is teal and yellow to make green for the head and a little bit of yellow for the meek . Okay, up next, we're going to do the details and the highlights to really make these birds come alive and pop. So I'll see you in the next lesson.
6. Highlights and Details: hello and welcome in this lesson. We are going to do the details and the highlights on these three birds to make them pop. So I've got my first bird down on the table taping them down, and I'm gonna use a small round brush the tiny round brush. And I already kind of started this process by doing teal or the tail and a little texture on the belly of the bird. So we're going to do more of that. So here I have just yellow in my brush and I'm doing some little tiny baby dashes on the back in a row, and they're just going to make the back more textured and a little bit brighter yellow, And then I'll do a little brush stroke on the beak on the top and then the bottom and you can see I left a little tiny gap and give him a smile. You don't have to do that. If you don't want, you could do the whole thing one color, But that's what I just decided to do in the moment. Here I have some agenda and some yellow to make over orange color, and I, um, gonna do little dots filling my brush up. You don't want it overloaded, just well loaded so that you can get us much pain out of the brush as you can, because the small a round brush doesn't have a lot of room for paint. So you want toe. Um, you know, just keep your brush loaded, go back for more paint as you need to, and it just gives it a little bit of detail there. Here I am, doing some lines over the teal, and you'll see that they don't stand out as much as it did over by the wing with the same color. And that's just because the teal isn't much darker than this orange. It's a different color, but it's still not much darker, so they didn't show up. It's much I must going to use this orange on the edge of the breast of the bird, and it kind of makes it look like there's just a little bit of warmth and sunlight. Hitting him here is some white and magenta, and I'm gonna dio a little circle, kind of like a rosy cheeks right there, and that doesn't show up that much, too. I decided I wanted to stand out more. So I added some white to that mix again. And now there's a It pops more. There's more contrast because it's lighter. I'm also going to use the same color in the wings to give them some light and form. So I added just a tiny brushstroke to the ends of these feathers, and it's going to make them look like they're elevated. They're picking out more, son. They are, um, looking more three dimensional now. And the contrast makes them seem more finished and a little bit over on the right hand side and touch ups. Just making it a little bit more substantial right there. And I'm gonna use just white now for the I. So I do a tiny crescent, just this little crescent shaped and a dot and a little dash on the beak, and that gives it more of a life like Look, I love doing that to the eyes, making them seem like they're reflective. Some little dots on the tail and I'm adding one more tiny dot to the end of each feather on the wing. And this is just gonna elevate how much light appears to be hitting them. And I like that. Look a lot. Do it over on the right hand side so you can see all of these little marks and dots and circles are not that complex. Here's a line against the edge for more light hitting, uh, breast of the bird. Oh, yeah, that's right. We do a cool little line around the beacon, the I. So a lot of birds in nature have this. It's a marking on the head of some songbirds. And so I actually looked at some examples from real life, um, photographs and decided to dio some markings on the head like that. All right, so yeah, these aren't too complex. They're just the more you do it. And the more you stay with it with little lines, little dots, little dashes, little circles, they're just gonna give the bird more details and make it look more finished. So I've just been working with white on my rash. At this point, I'm gonna clean that up a little bit. Clean that up a little bit. The more you go over something you already did, the more opaque it will be because it's layered. Um, and it's not gonna have a much transparency. Yellow and magenta. Oh, yeah, I got to do the branch. So on the branch, um, I feel in the middle, but also in places I go all the way up into the area. That's right next to the background on the top to make it seem like more light is hitting the top of the branch. And there's most shadow under the branch. But I don't do that in every area. The same. Like I mix it up a little bit. Great here, it's on the top. Put that color down on the top, and then I mix more white into it for even more detail sold, just kind of scratch through with some marks to give it more of a texture. Kind of like bark in case there, just like dash, dash, dash. And that looks pretty good. I'm using a little bit of that color, plus white to do the legs, so I'm doing the feet with very light pressure. Very, very light, very small detail, and I don't take it all the way up under the belly because there's a shadow under there and a couple lines there. I want to just a little bit more white on the tail to balance that stripe on the head. And then I'm using white to sign. So don't forget to sign your artwork and there we have it. I'm going to peel the tape and reveal the nice clean lines. Except there's one little inconsistency right there where the branch I I did paint the branch before I take the edge, so I could have done that earlier. But it's not the end of the world. Okay, that looks really cute. I'm really happy with the colors. They're fun and funny. And now we're going to dio our second bird. I've got my small, bright brush, and I'm going to pick up some teal and white getting that nicely incorporated in the brush on the palate. And then I come through with a series of dashes on the teal area of the bird on the breast of the bird, and I'm using my brush on the narrow side, coming through in these dashed lines, and it's kind of just like a repetitive thing. I'm relating my brush at the end of every line, and then I actually wipe off the excess on the brush back onto the palates of that I don't have too much. You don't want your brush overloaded or under loaded for little details like that's or else you'll end up with a group gloopy mess and just carrying that all the way through to the right hand side where the wing begins. And as we get into this more narrow area kind of tapers down. So I'm just taking it as far as I can and then coming back up to the top looks great. Okay, so now I'm doing magenta and yellow, and I'm bringing in just a subtle highlight into the wing, and I'm being kind of loose here, just letting more light into this area. It's a little bit lighter, and I switched over to my tiny round brush and I'm gonna do some dots, brings more yellow into the beak, mix white into mail from were opacity so that the yellow is not as transparent, and I can bring in some line work into the wing, so that has a lot of contrasts, and it's gonna look really cool. All right, more white and yellow, and I'm gonna do some line work with the tail just following the contour of the tail with some curvy lines. And now I'm going to add some warmth to the bottom because there's a lot of warm from the top, the bird. So just bring in a little bit down to the bottom is gonna make it a little bit more balanced. My whites kind of drying up at this point, but, um, there's a couple little marks for the reflectiveness of the I. A little tiny crescent on the dot and the same for the toes. Just adding some really delicate little toes. Some dots around the neck kind of looks like a necklace and highlight up top. I do fix that. I didn't like it at that point, but adding light, Teoh, the top is going to make it seem like that sunlight hitting the bird. Okay, so I think, Ah, just reload. The yellow is starting to dry up, and so I mixed it with that light teal. So there's till yellow and white on my brush right now. And I brought in more dots to the shoulder and I think I kind of straighten up things. Yeah, I do a line around the neck just light light. Here's a small, bright brush. I switched up my brush again because I want a little bit more covered coverage for the branch, making the lighter areas of the branch higher up on that space so that it looks like the light's hitting it. And then I came in with a lighter texture over the top, and I'm gonna use that same color for the head. Okay, let's take tape off. It's always a fun part who, and there we go. Bird number three. I'm gonna take my small break brush, do some lines on the tail. You could do dots. You could do little waves or curly cues. Whatever you want. This is your time to play with Mark making. You don't have to do it exactly like ideo some little dashes around the neck. And then I brought it in by the wings and realized that I really liked it for a shadow to kind of give the belly a little bit more of a shadow underneath of it underneath it. Now I have some yellow and white on my brush, and I'm going to come in with all these little dashes, giving it a lot of texture. So I think that's really cute and fun. And we just got this sped up quite a bit and coming through. Now you can go back over if some of your marks are too transparent and just go right over him. Here's a mark on the beak to give that a little hint of sunlight, some lightness on the bottom of the tail. I have teal and white on my brush for some highlights on the wings and some light green with yellow until on Dwight on the face. It's almost like a, um, like a superhero mask, isn't it? Okay, some lightness in the I just a couple tiny little births, strokes and some dots around the neck just giving it that cute little detail. Highlights on the top of the head and the shoulders and some magenta and white there, my jewel rosy cheek just to give it a cute little finishing touch. And then I signed the bottom, and I'm gonna use that same color on the branch. I forgot to do the branch before I signed it, so let's go back and text arise out with a lighter magenta, and that looks really good. So let's kill the tape and we have our finished pieces. They look so cute. I hope you enjoyed this process. I had so much fun with these colorful, playful birds. I think it's so freeing toe. Learn how to paint with a whimsical style because you can borrow bits and pieces of these techniques and then apply em to your future projects as you grow as an artist. So no matter where you are in your art journey, remember, the most important thing is to show up and get started with an open.
 Jennifer Keller, Express Yourself with Creative Confidence!