Transcripts
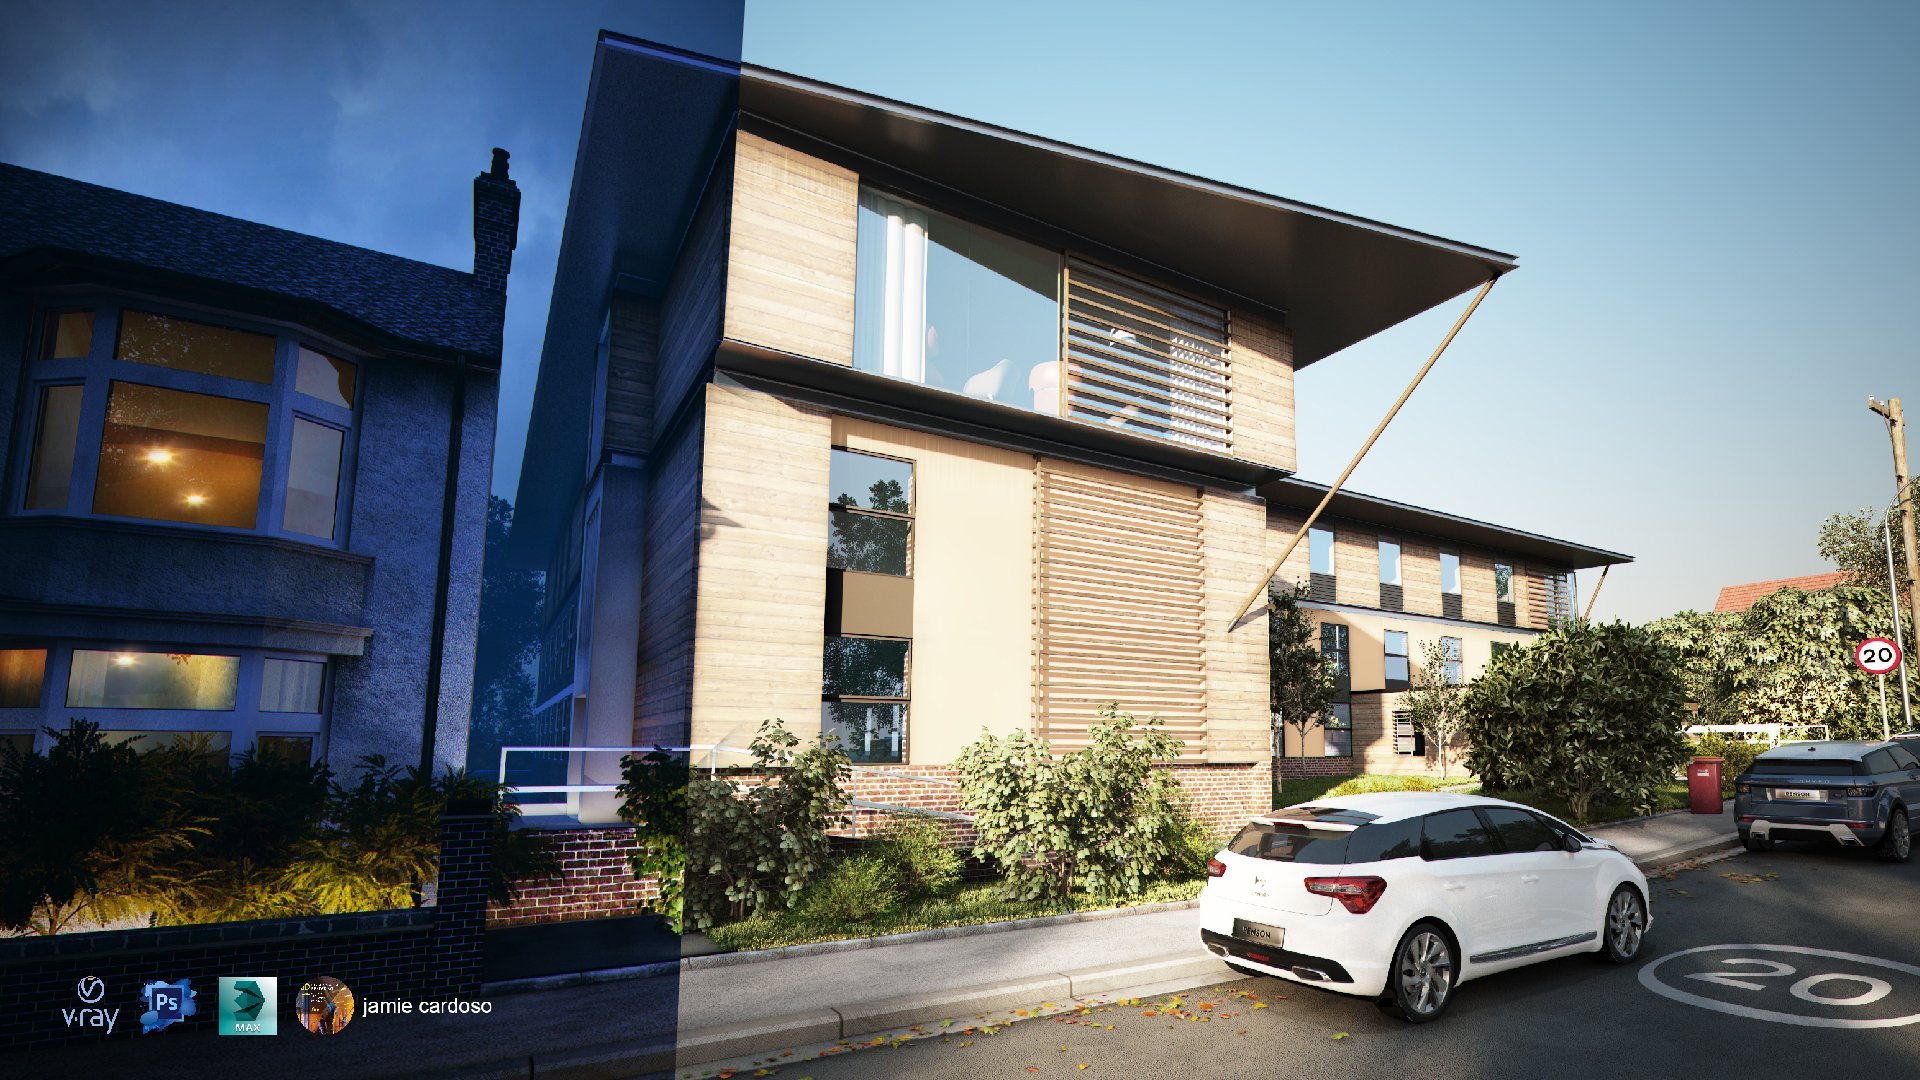
1. Webrotate 360 3ds max vray jamie cardoso 1: Hello there. I'm Jamie. Welcome to Notre section of this Exposed. Does indecision are quickly take you through. The process of created in publishing animated rendered frames of products is in serious makes Vera and Web rotate 3 60 while on religion is an amazing to showcase your work in products that climbs in a physical location, 90% of your customers will have a glance of your products through a Web browser first before they even consider visiting your physical location. For this reason, alone is utterly crucial to dazzle them. First on your websites where protect 3 60 is one of the best tools out to help you achieve using pretended friends photos. These are a few examples of products previously published with about 83 60 a personal farmer indispensable to showcase my clients products in key industries. Such a design, fashion, retail, automotive product is our gym equipment etcetera. In summary, we learn out to set up the freest Maxine. Load up two of your rendering engine and such a treaty scene for drawn from great and set up of your don't light Ontiveros. Violent explosive from school. A client Tentative. Your noticed your eye light Creighton Meditate Camera animation Crowton edited. Very material. Andan Edit ist your eye to the environment I don't Edited three DS Max Lot Far in a Frame Buffer Creating editor Stanley Still material set up the way for high resolution renders creating automatic preview fixing gamma issues. Used a lot. Explore a script to save a rendered with a lot applied. He is Guard Farm. To render the frames great photo shop actions automatically apply. Love falls on December size and up. Northern France using were 43 60 spot listen.
2. Webrotate 360 3ds max vray jamie cardoso 2: to set up a display units scale. Click on a customised tool bar in Jeezy. Inception from the list display on its scale is Colonel millimeters. Some users prefer meters or centimeters For the purpose of this exercise, let's keep the displaying millimeters. These metric systems one affect the scale of the object in the scene. If you wanted to affect the scale of objects in a scene, you would need to get to the system units set up toggle and change it from there. For example, you could scare the scene by setting one unit to be equivalent to. We should have scale entire scene twice over. Go back to the main parameters and click OK to close a dialogue. The falling step is to dial up the V very rendering engine. To do so, simply click on or under set up button to open this dialog. Before we learned up fewer rendering engine. Let's set up the render apple size of square by typing in 16 and 40 pixels by 640 pixels and left the energy aspect ratio by clicking on this padlock to load up the rendering engine, scroll down and expanded assign render parameters click on a production total and choose a vera rendering engine from the cheese rendered dollar, with zero now loaded opened of you later and expend of your friend Buffett, rule our parameters and the global searches by default. Most zero parameters are hidden to expand them to expert mode. Simply click on it full button twice. Scroll down the image sample, roll up parameters. But the progressive image template type is quite farce for local test roundness. However, it doesn't sport strip renders animations and other important, crucial under features. For this reason, we're going to choose the pocket top instead and dissuades parameters in expert mode lacks increase Amendment shading right to 64. Increasing dysfunctions value improves image quality without affecting the rendering time expended image filter. The image is set to Vera, Wang says filter by default. I personally prefer the area type because it doesn't general artifact In broad areas, however, Phil Fate experiment with any other image filters listed here. Under bucket him. Assemble promises change the maxim Division 200 for Universal World Flow, expending global dame cereal. Our promises in clicking a default button to display the advance parameters to quickly explain hard Israelis affected under quality. The Global DMC. No special values should always be lowered in a nice special value of the pocket image template. As you can see, Dishneau threshold is currently set to 0.1 and the Global DMC Nice racially said to 0.0 for the stairs. Separate values. I get enough a draw from this. However, they will be later. Decrease for Final Renders explained the color mapping roller parameters. Groene Hart is a default color mapping type, however, for the purpose of this exercise against use exponential time after next exponential color mapping because it provides a mouthful terroristic look to my renders and tones down there over experience. Bright areas. Having said that, Phil Fate experiment good any other times of color mapping to see what works best Click twice here to display the parameters in expert mode in a dark in that multiplier often lived their values is 1.0, unless an argument real footage for nerve your photomontage kept it for grammar value as 2.2 kept effect Background function in a murder type Anna's Use a column opinion. Gamma discolor mapping type corrects the discrepancy between what you see in a frame buffer and what he saved in your hard drive expend environment, rule our parameters. This is a session where we will be using its your images for reflection next up in the July tub. So the Fort Planner engine is set to brute force, which is good. However, uses after net increase the samples very high to get rid of the crane to speed things up, we're going to use the rodents map instead to display the expert parameters. Click on this button twice. Just the rodents map is a primary engine and keep the like. Cash is a second for engine. The name for the I'm in seclusion function. I meant a collision. Ours connecting shadow details indirectly Areas, which makes your own dismal, realistic and appealing increase the radios suspended millimeters in the subdivisions to 16 . Subdivision values smell vile granny connecting shadows expended of agents. Map ruler parameters in changing current pre set too low as a starting point for more complex scenes, eases often changes. Imagine and sometimes high in extremely complex scenes. Change the display to expert type by clicking the button twice in able to Should I write like function in case we end up using direct lights on the scene. Dysfunction is quite useful to preview the direction of the right shadows deer in the pre calculation process before the running starts. This is usually to determine whether to cancel the pre calculation or not. If the shallow directions are not correct, expended like actual up parameters and keep the current settings of their open. The setting sub and enable the advanced settings by clicking dysfunction. Always loaded dynamic memory limit to zero. So the recon uses much memories possible and click Run did to see the first draft. As you can see, the run this completely black a moment because running lights in the scene next closer vendor Darlow and Expended report in a great panel. Click on a lot spotting n Choose the Vero type from the list. Any object type. Click on a very like button in drag and drop it in the top. Reports created while the lights still selected. Click on a modified panel and renamed The Light Is Your Light Under School Dome. Since History S Maxine set up, it's similar to Real City alighting with diffuse shadows. We're going to convert this light into dumb type in plug honesty. Arroyo of a real city light in his image total in a large general printers roll out changes Stipe too dumb and expand its parameters Since we'll be using on this jury map, let's reduce to Can't multiply value from 30 to 10 as a starting point. Next. That's enabled invisible function to make the don't object invisible in the render but still affected the scene and inject the effect. Reflections function, sometimes a reflection of a don't My pop doesn't look nice, and objects, for this reason will be using development this year. I instead selected Perspective report in. Do another test. Render two other camera exposure. Simply press eight and a keyboard or go to the running toolbar and do the Roman from the drop down list in Environment Darlow Under Exposure Control, choose the viewer exposure control from the list. Minimize the dialogue The falling Step is supplying to issue our cedar image in a light total. Click on the texture Tuggle and expensive you realize shakers. Double click on the viewer is your are shader alerted and choose this issue of city lights . It's your sense for our dynamic range image. In a nutshell, these types of light place emitters are created by capturing multiple photos, a different experience at the same time. Metro, I imagine. To emulate realistic lights and reflections, the one website often go to find amazing a ceramic stuff design dot com to find them simply Google dust design. Here you can find a host of a Sharma's for civilization, reflections for cities and much more. But a click of a button eases can quickly go through their vast and diverse library of assets is definitely a must scale to for most professionals. - To add estates, your eye maps simply click condoms your letter to button to open this dialog first. Next, drag and drop the don't texture toggle into one of the material editor slots. Choose the instance method in clinical Cray. Now you have to use your eye map parameters loaded with issue road map. The map in type is currently set this focal, which is perfect. However, some terms is displayed as three years Max Standard, which is not correct. As mentioned earlier, circle mapping is perfect, loved overrunning parameters as they currently are into another test render
3. Webrotate 360 3ds max vray jamie cardoso 3: much has improved, however, the current Rundle will look a lot more interesting and realistic with a nice A sure, I reflection. Apply to the environment total. Before we do this first, we're going to create an animated camera to correct the phones to LOTR. Upload nowhere. Rotate 3 60 application in a correct panel licking the candle button and select a target type click and drank in a top view Port Security camera. One of the canisters selected. Open a modified panel in change of free camera type. We've just changed a camera to free type. To have the flexibility to move the camera will. We can change it back to targeted afterwards. In a front report, right click induced a new the candle upwards to center. The product likes selected perspective. Report. Input Scenic Able to change of you to camera nothing away from the product. Slaughter in a top deport to firm the product properly. To ensure that the exact feeling we've seen a view poor school hand with a rounded frame buffer, click on the camera tax and change to show safe from option from the list matter can a position a bit further until the problem is center properly. To remove degreed currently displayed in a report, simply click on this plus text and select the show Great option from the list from the camera A bit better, but the purpose of this exercise we're going to create 180 decrease camera animation fooling a circle to start there scared to the correct panel in Click and a Shape Spartan, followed by clicking in a circle button to ensure this circle is created from the center of the product. Click the cursor in the middle of the product and drag upwards and chili rich to the camera . Only some mouse click to exit creation next, while the circle still selected. Open a modified panel to ensure the camera follows a circle Puff Smurf Lee. We're going to increase interpellation steps first. Expending stipulation. Roll up parameters. If you zoom in closer to the circle, you will. Magister. The circle is not totally smooth by default, increasing tribulation steps to smoke out the circle. Now we have a very smith both for the camera to follow because you want the camera to follow 190 degrees of the full circle. We're going to other edible spine modifier by quickness. Edible spine button here otherwise simply quick under sour here and select experts. Five. From modify a list while searching on the less economics person E on a keyboard to quickly get the letter e on the list. All these buttons have been customized by simply clicking on this button and choosing to configure, modify sets any star log you could replace. So our new partners by cooking here, followed by dragging and dropping your modifier from this section to the pot in here and click OK, this song was able to customize all these buttons here using the ethical spine modifier, because it's safer to keep changes in this modifying stack in case you need to go back and rectify any of the previous changes to lead the extra creditable spine modifier to start editing in able to segment button in the top deport. Select half of the circle by clicking and dragging the castle from left to right, followed by pressing delete on the keyboard. If you turn off this light bulb here it hearts to edible spline changes in case you want to reverse them. Go back to correct panel in a front report. MTA Circle up Toe where the camera is. Some clients might want their products to be displayed in 3 60 degrees. If that were the case, you'd simply turn off the vegetable supply in here and animate a full circle for the specific project. The client did none the back of the product to be seen, therefore, the on animating 180 degrees of the full circle. Also, we went to Canada to start from this side of the product to decide to complete 180 degrees circle. Before we start animation, we need to set the number of frames we want. The animation toe have 40. Firm is more than sufficient from 80 degrees animation and 80 frames for a full screen. It and 60 degrees animation, or is entirely the same would have applied for animation, rotated vertically to set up the number of frames, simply clicking the time configuration button. Love the current settings as they currently are in chance to end from 2 40 instead and click OK. As you can see, the number of friends have been reset to 40. Next, select a camera in change, its type back to target camera. Be using a targeted camera because you're in our animation. We want the camera to be looking at a product at all times. Select Amanda camera Target to the center of the product, as mentioned earlier, we went to camera to rotate from this side to decide while looking at the product at all times. Select a circle again. Any neighbors edible, supplying modifier again. Select a camera and open the motion panel under parameters. Expand the sign control roller and select a position. Next, click on your son, control a button and choose a puff concern from the list and OK to close a dialogue clicking Artkraft button. It's like to circle, as you can see on unimagined, was immediately created for the 40 frames previously set. To check the animation. Simply drag the slider from left to right. Lila Cam is rotating. Its song is always constrained it of year. Hence, we had to send to the camera target, as mentioned earlier. It takes 30 friend for the camera to complete 180 degrees movement along the path while constantly looking at the product in a path parameters. We have the constant velocity nailed and check the look function to prevent the camera from jumping back to frame. Zero. Montana nations slide a bit more to check the animation saved. Have seen incremental in case to fall crashes abruptly opened. Run the set up Dalo by clicking on this button. Next, select a kind of import and lock it by clicking on this padlock here. Justice prevent maximum rendering and wanted few balls. Saved a scene again and doing a test. Render fulling step. It's creates another man materials of our product before you applied issue or a map to the environment. Total weapon. The material itis him selecting a material slot in clicking again Material button in the same materials rule are right click to check. The parameters were seeing on around material because of filter slighted objects. Function is enabled. Otherwise all materials in a scene would be visible by in checking function. Right click again on it. Users can also change how the material some nails are displayed here and much more unable to feel to selected objects function again to display the selected objects in the scene. Only double click on the material to load it in a material slot. It's a standard material by default. Click. Understand that tuggle, and choose a very material from the list. It's a fuse color swatch selected, making completely blank to match the close close specification and check the highlight closeness function to fully control this parameters. Also inject a friend al function. Click on different color swatch and inclusive surface reflectivity by making its 24 color brighter, Brighter colors make a surface more reflective, and darker colors have the opposite effect. Double click on Attila slot to have the best. A preview of the material Click on the background. Parton to preview the reflections Denial Parent to check his are in the sphere. The more reflections there are on a selected material justice fully reflective. If you slide a color to completely black, there will be nine. Reflections is you can see for this exercise. We need a surface of some reflectivity to add to be ashamed to the surface. Decrease the highlight closeness value slightly as you can see the higher defenders to snow the sheen and vice versa. The reflection classiness determines the sharpness of the reflections. Lower values defeats reflections in high family's dirty opposite. If we increase the reflectivity here. The reflection glossing This will be more apparent in the material preview notice hardly reflected to behave friendly increase in decreasing refreshing glass in its values here. Now that we're happy with refreshing grossness values, we can now reduce your effectivity by making its color swatch darker. The less reflection demanded few scholar will be seen. Let's turn out a quick render is. You can see the surface of the poets currently not looking very interesting because there's nothing interesting in environment.
4. Webrotate 360 3ds max vray jamie cardoso 4: to correct this open to the Reiter and scroll down to the environment. Roll up parameters inaudible the reflection function. Select a material slot with this year I map in Dragon. Drop it into a reflection. Total change the clumpy method because they've been making changes to the parameters. Drag and drop them into a new material. Slot Johnson's method because you want these changes to affect reflection. Total Landis. No material areas reflection in do another test render. As you can see, the surface is looking more interesting now under processing, increase your role and render multiply violence to 2.0 and do another test render. Do you have real runners? Looking increasingly better now to falling step is to load up the three D Luck falls to make the run ribbit more interesting That fall stand for look up table and thereafter needs to change the colors and all the contrast of an image to load. One click on the show Corrections Control Button first enabled a lot function and click on a low. Tuggle picked a slot fall from City Collector website. Here they have a huge list of amazing not falls to choose from. Check the website in a descriptions link. When he first load a lot fall, eat my look overly bright correct is simply inject the function to convert a locked space before playing lot. Do you ever wonder is now looking a lot more appealing? Turned a lot function on and off to see the huge differences making to Dior or render increase your world and the render multiplied to 3.0 and during a test run there, decrease of funds back to 2.0 and do another test runner. Because this is an animation, let's test render some of the frames to see what they're looking like. Slide animation brought too few frames to test for under the angles the next, which you will be working on. It's the stainless steel knob in the middle, enable the move tool and select the object in the scene in clicking again. Mitchell Button to load its current monsieur. Once loaded change into very material is previously done. You Some of the previous steps to set up this new material enable the track most wall rendering dysfunction allows users to pick here is of the view of frame buffer to for under first with the mouse in a B RDF ruler parameters. Let's change it to award type. This type is no coherent with a metallic finish. DoubleClick the material slot to preview it more closely enable the background button to see the reflection increase of reflectivity a bit more to emulate and nice every list. Extended city reflections we're going to apply a pre prepared grayscale texture in the UN is a strop function. To do so. Click one. Minnesota Free Total Immature Matt Brother Dollar Expand the standard real lot in Choose a bit map shader followed By choosing this real black and white takes, you notice how it's highlight. Pardon Change immediately in the material slot. Click when I go to print button to go to the main basic parameters. Next, copy this material by right clicking on a toggle and choosing to copy extended maps for a lot in a bump total say its final to about 10 followed by right clicking intrusion to pacer Previously copied texture Again, usual surface has changed. Subsequently, let's turn not a test run there to check the changes, slide the firm to 20 endure another test, render increasing effectivity slightly and doing a test. Render the road Will standard sale material is now coming through. Okay. The falling step. It's improved around the settings to increase the quality of the render to start, go to the very tired and decrease the bucket in a simple noise threshold. Robots important 007 and the Global DMC Nice special value to about 0.4 into another test. Render next less inclusive. Render upward size to really improve the quality in a common stab. Increase the word Fahrenheit output size to 3000 pixels. This final change should remove some of the grain seen here. As you can see, most of the crane is now removed. Some companies tend to render as high as 5000 pixels or higher to achieve even higher resolution. Let's turn out of test rendered to see other material details. To check how smooth the current information is, let's create a quick automatic preview Presti on your keyboard to convert this report to a top one and turn is displayed. A wire frame. Select a camera people and maximize it. Next, clicking a tools toolbar followed by going to the previous cry Vieux Port in choosing to create preview animation. The active it time segment is set to from 0 to 40 in a visual style change of rendering level to shaded in clicked create cinematic previous nitrate. It opened a vendor, set up dialogue and go to the viewer. A tab. Click on the show Last frame buffer to display the last round. If you're to save his frame, is it? Is this what you would look like by clicking the duplicate to Max frame Buffer button? As you can see, all the euro settings are okay, including the display colors in SRG. Be here, Orender. Being this dark is an indication that the gum is currently disabled in three DS max. To correct is simply go to customize toolbar in tcisa provinces. Option in its dialogue. Go to the gun and luck. Tap and checked enabled Camelot Correction, which is currently set to 2.2. Let's duplicate to Max frame buffer again. To see this is what the current wondered friend would look like after being saved into your hard drive. This is because your right as an automatically saved a lot fall currently applied to the view, a frame buffer to correct this. Let's surrounded a full frame first because the client will probably ask you to change the background color. It's important to render these frames as a PNG type to make the background automatically transparent to, say the rendered frame. With a current luck file applied, we're going to run a Chaos Group script called Lutz Explorer. To run the script, simply click on Description Toolbar and choose to run script followed by selecting in opening the script. UniStar log. You have this first total to locate and load your lot falls if you intend to say just a cunt lot for loaded in your frame buffer, he showed to have only one not fall in a chosen location. Other riders script will automatically site every single like variation in your chairs and folder. Click on the toggle and found a folder location under the farm lots. He should go to mostly Cedars three D lots in a chosen location to auto apply selection is enabled by default. Otherwise, you'd have ad to click on the button under Variations. Exporter, you can click on a pick me up portfolio variations Toggle to choose your full the location moments if as a PNG fault, I and Click the Savior Rations button. Once of innovation, he saved into a folder that couldn't let applied to the viewer frame Buffer is automatically turned off to view this a variation. Simple. Click on a rendering toolbar in Choose to view image, fall and open your safe fault. As you can see, this is a safe render image with a lot follow plight. Select the viewer frame buffer and enabled a lot function again to compare the two.
5. Webrotate 360 3ds max vray jamie cardoso 5: because you'll be running 40 frames. It's not practical to use this script in this manner. We're going to run to the frames in years. The photo shop reaction To automatically apply a lot fault All frames we use lot fall specific to Dobie Premier after fix falls instead to render the frames, let's open the runner. Set up dialogue in a common step in a really active frame, scroll down and enable to say fall, followed by clicking the false total name. Your fall and set up is a PNG fall type enable. The RGB 48 bit would offer channel option. Check the rendering settings. If you have any product surrender, you probably best for refusing Orender form instead to save time and money off. To use a render farm cool garage form before using that services you need to register, download and in so that software first and open the run Derby model of your computer. Next in three DS max, click on Run the Beam, a toolbar and used to beat me up Google Co. Two The first time render tape Darlow to open the Render Beamer dialogue for this project. We're going to choose a camera animation render mode from the list. Each murders a quick description of what he does. 100 cameras rollout. Choose the selected camera animation. Also under camera animation. Roll up parameters chose to save like cash and click to send to form. You should see the progress of your three DS max for being uploaded into the carriage form . Once the fire has successfully uploaded, click. To copy the link to Click Port and Pacey onto your Broza, look into Carriage Farm to submit The animation is you can see in red. I'm currently using high priority machines. Click to submit the job. Once the message. You can follow the rendering progress here. Specter rendering Bheema Tollo click to close the open dollar. Once the job is completed, you should receive an email notification in a courage form. You can see all the job details here, including the cost. All 31 frames came down to $8 only even while using high 40 machines to see defended frames . Clicking a Donald stab and refresh Next enable and right click here you can choose to download Here List Falls open directory. There you can see all the rendered frames if you wanted to rotate the same camera vertically, your daughter falling. Select us flying. Hold on the control key and press via on your keyboard shoes too clumpy this plein next right clicking juice to rotate this plane to ensure this plan is rotated and snapped into a specific angle. Enabled angle. Snap toggle in right click on it. Here you can see it. Sets automatically snap every five degrees. Began rotating despondent X axis until it reaches 90. Decrease in a left you port rotated again to 90 D'Cruz. Insert axis. Next, select this camera and copy it by holding on control Key. Impressive E on your keyboard. Who named the camera? As underscore Vertical is previously done, open the mission panel and extend its uncontrollable a lot. Select the position controller and click on your son. Control a button. Choose the path constrain and okay, followed by clicking on the art path button and selecting the Nuesslein Nafta slider to see what's happening with the camera. The camera needs a target to look at. Let's change the camera type to target. It is previously done. Click on a select from seen button and select camera target. Move the camera target to the center of the product. No de animation slider to see the changes as a camera reached the top of the product. He turns up properly because of the direction is looking at. Select the camera V port and change it to a new camera. Loved animation slide a few more times to check what's happening. Next. Selecting. Rotate the camera 190 decrease so the camera starts on the opposite side, not the animation. Slaughter again to prevent the camera from turning a properly, be going to create a new camera in animating manually. First, let's change a cull of this camera to avoid selecting the wrong one. Select the main camera in copied as previously done. We name as camera vertical. Animate it. Move the animation slaughter again to begin animated. Click on the Auto key. Pardon Moved the animation slider to frame 10. Yes, Maxwell work out the friends in between. You can review did a new camera and choose to select the camera de Select the snake to a ball, not the camera up and rotate it. So it's all this focus on the product. Also, always he sure the product is always at the center of the camera frame. Moved a slither another 10 frames and repeat the previous step until we reach Framed 40 not animation. Slide a few times to see what's happening on each frame. Once you're happy with everything, simply send it to render its previously done. It's worth noting that there are two types of three D rotation, most in Web rotate 3 60 The first type is a simple one and only requires two rows. One results another one vertical, which helps a lot reduce the number of rendered frames and costs. The second rotation top is a full multi row moat, which will cover in another video. If you happen to give photographer for company ecologies a similar approach to set up your own camera rig before uploading the photos into Web rotate 3 60 Back in photo shop CC 2018 up in one of the 40 frames previously run that about quickening off all toolbar inches into open, followed by opening the framing further show it's grow in action to automatically applied for a photo shoot, blood fall and saving a different location. Simply go to Windows toolbar and select the actions tool from the list or simply hold on the okey and F nine on your keyboard. In the action, stab Kurt any action by simply clicking on this button and selecting any action in a national dialogue. Rename it as luck Jamie and Click Record. The Red Button is an indication that it started recording to apply the photo show plot. Simply quicken adjustment layer, but in cheese, a color look up option from the list in its properties Tab, Click Win a Load three. D. A lot of love Far. We're going to pick a specific photo show and couldn't be used in Italy s Maxine Locating loaded This is a filter shop, but fall similar to the one used in Freedom Axe. Next, click on a fall toolbar in cheese, too Soapy angina, Different folder except the default fighters to save it. Next click to close the original document and choose not to save fall is an adult before shop document. Once closed. Click to stop recording the action. You contest this new fashion, you know tests fall to see if he works as expected, once happy. So let all 40 frames apart from the one just saved in a Protestant action by simply clicking on the play button. As you can see, the knee action applies a lot. Fall saves the fall in a new folder and closes the document automatically. You can see all 40 your friend with the lutz automatically apply to, as mentioned earlier. You just can also apply lot for specific to Dobie Premier or aftereffects, followed by running out the frames in a separate folder.
6. Webrotate 360 3ds max vray jamie cardoso 6: if you're renders are too large to be applauded in where brought its 3 60 simply saved them again at a smaller size. Or use a photo shop action to reduce image sizes without fact in the policy. To do so, open a test image through any action experience. Lee done. Go to file in juice export, followed by choosing to say for Web here, you can see the new image size reduce while previewing the display quality. Try any of the presets here to test the size and the overall quality. Once happy with the false eyes, end equality quick to savor into a separate folder. Click No to Save the fall as an Adobe Photoshopped document. Stop the recording action. This deduction can be used in all 40 frames to upload and published prayer under images or photos you need to download and is still were brought a 36 and spot editor to learn to simply double click on sport at its a pardon in a new project. Dialogue topping the project name. Here, you can select the folder location where you want your new project to be saved. This is a location where your pre run it falls of photos will be pulled from to be launched in import section. He have the number of rows for this Sexist says You're only using one row. If we had rendered another vertical row, we would have had to type in two rows instead in clicked create. This is an example of another project, these blue lines representative Yoon Dimensions on your webpage. He can treat these by sliding the width and height values. Here. You can also set the zoom in dimensions on images by going to the image staff and tweaking with this parameters, it's best not to set it too high because he's a screen size different often or not. In a rooster, we have all the pre uploaded images you just can also our new rose, if desired. We also have the compass promises here. You just cannot tax watermarks, set text size, image watermarks and etcetera well served to filter section here to control time. If he hover over, he actually displays what each setting does here. You just can't use a specific image or road to start with a se London. A work page you skin also are the hot spots. There are quite a few here, but let's try this one. We can customize indicators by loading them from here. Image Contin is a section where Jesus can are limited to the hot spots. Here we have the text content, which stars and phones. The action tab allows users to choose from a list of actions to be executed on hot spot click, but the label section allows users to select from a list of frames or pre animated images. It's great a hot spot. Simple. Click on a specific part of an image. Rotate in place, another hot spot to define its path. It goes without saying that the past will not be visible on a Web page once published. You just can also choose the skin interface. Here. There are all these options available. Once you happy simply click to publish. They can change the project. Oppel Directory. Here he can choose the FTP connection to your website. She was surprised to test. They also have a number of 10 places. Choose from. These options are very important, except of remaining options and click to publish. This is the final project publishing a present. Finally, here we have a list of free plug ins to help you integrate your progess. Quit e commerce website using these platforms. These are quick and easy to integrate and do not require any coding. For more information about this it oil. Please contact me and check the description links. This concludes our tutorial. I really hope you found a useful like in sharing and I hope to see over the next one.
7. 3ds max Vray vray frame buffer settings: Hello, I'm Jeremy. Welcome to another session of this text for services. In this session, I'll be taking through some of the key parameters of eerie frame buffer. So without further ado, let's open the runner. Set up and frame, buffer up in the view Reiter and expand the Vero frame Buffer ruler parameters and click on shoulders view and frame Buffer button. Let's go through some of its key parameters. This first button is a show crushing control. When you click it, it will display all the crushing controls available for editing. Renders Interactive Lee. First, he had exposure control settings, which can click to enable to expand the setting. Simply click on the air a button in exposure settings. You have the explosions slider to me from left to right. You also have the highlight burn, in contrast, then you have the White palace with a temperature slider. If you want to control specific correction controls, simply click on enable back then you have the other correction controls, such as hue and saturation color balance, which is similar to photo shop. It is also the background with background. If you enable it, you need to load up the Vero image fall similar to these ones here to say about your image . Farm types We need to enable the Vero raw Image file function and click on its toll. Once inside a dialogue, begin type in the name and enable the other options, such as X R and so on. If you need to after rendering interview in which fall type would have been saved and you could load it in the background image to control it, you can use as a background or foreground. Same thing, Applies said Hello, T corrections. If you wanted to controlled any T parameters, you'd need to load up the Kelut file type. We also have the all seeing eye. Oh, and I see see image control types his mentioned earlier. We can use all these functions to control the runners in a frame buffer. We can also use pre saved viewer Image Falls is the main render in a frame buffer by clicking on a load image. But vera image phone types content all the necessary data to manipulate the role. Render accurately or call control settings displayed here on the right are linked to some of these buttons here, as you hover over in click this button there will automatically unable to control displayed on the right. So you gotta at yourself color correction there. Same thing. Color balance. Same thing. Levels him. So every time you click there that would be unable to trace away. He's the colors, the levels, a curve, same exposure control. If you got any of it. Explosions, that's things there. Hell you t Didn't we have the street? But here, in order for the viewer frame buffer to save a Serie of your renders, you need to set it up first. To set a click on a settings. Tuggle in Chooses SRI Settings in a Render History Settings dialog under History Directory , he can set the location by clicking on his pro struggle. In choosing the location, you can also set the maximum file size in megabytes. All renders saving the three folder. Alternatively, you can choose the use project path. You can choose to save it manually in a frame buffer by on checking or enabled auto save to save automatically. He can also choose to auto load color corrections. It's often left unchecked because most users prefer to save it regular. If in one less right uses often enable that completed renders on the option dysfunction. Onley Auto Saves Completed renders into his refrain buffer. You can also choose to clear in Click OK, once old is done, unit enabled a viewer frame buffer history button. Otherwise, you're runners will know appear in these re frame buffer, and you have the channels A and B buttons to compare your runners against. This button allows users to copy whatever is being displayed in a frame buffer into the clipboard and later save it anyway. New computer This but allows you just to say whatever channels been displayed in a frame buffer, choosing the location and saving. If you click and hold, you have other options, such as several image channels to separate falls. So, for instance, when you render an image with multiple render elements in a frame, buffer assumption allows you to save them all at once Separately, under given name. An exception is to save all the much channels into a single fall. This button allows eases duplicate whatever has been displayed in a frame buffer by clicking on this button. Two region render allows users to click and draw the region to render in a frame buffer to track miles wild, rendering a large Jesus. Stay strong fever on dearest friend by selecting the Parton and moving the mouse in the frame buffer. This action might take seconds or minutes, depending on how fast your buckets are rendering. This button is for interactive angry. This one is to stop Orender, and this one is to render lost. In Here you have the Red Queen and blue channels. Most of these buttons and parameters will be easy to understand. One surrender is in the frame buffer. So without further ado, let's start with our first friend. Best open the runner Elements Time. Any name, Let's click. Run it. Test the scene to speed up surrenders. One override material was applied to the whole scene, apart from the glass windows, curtains and the picture frame. As you can see, the latest friend was automatically saved into the frame. Buffalo Sri Preview. The falling step is to do another test run there without the are years lights turned on to do so. We again to select one of the instance, are your slice in the same and opened the modifier panel inject enable function all instance, I yes, lighting the scene are now turned off in a V rule image found section. Let's rename it differently to prevent the previously say far from being overridden, and that's doing it a test run. Now that both friends have been saved into the frame for face re, we can load them in the frame buffer by double clicking in their respective thumbnails. This one had the IRS lights turned on, and this one had lost turned off. We can also collect the compare resentful button to compare between both friendlies by sliding the line in the middle. Next, click on a frame by for a to see both friends in a frame buffer, use the middle line to slide from side to side and switch previews if desired. Now we can use some of the correction control discussed earlier to edit offenders in a frame buffer. As mentioned earlier. All these render elements can be saved a separate files. By choosing its option or low the precepts, the image fall. Finally, you can also are the lens of facts settings in a frame buffer. By clicking on this button, I personally prefer to add its final runners in postproduction packages such as Nuke Faith . The shop will, after fax simply because of their vast tool, the nondestructive work flows.
8. Forest pack vraylight select: Hello there. I'm Jamie, welcomed into the session of this explosives distinct recession. I'll quickly show you how I was able to cry all the cross and shrubs and now also be introducing you to the script. Call Auto 100 elements Viewer light. Select descript, automatically creative. You relax, select render element of all the lights in the scene with a click of a button. The final result of that of that particular scene would look something similar to this, where you seal the older shrubs and so on. For very turns and complex scenes such as this are used an amazing new graphics card called a M D Radiant pro. He can handle almost any scene run this fast and perfect Fulvio projects. You should check it out if you can. So to correct the shrubs. The first thing that was able to do her first created a rectangle around the area that I wanted to quit the grass or the leaves like so the next thing left on just isolated the scene there went into geometry, understand it primitives and inform the list of selected E. I to software. First click on a forest Pro button 100 of Forest Gration library, clicking on a selectable that should take you to the library first. So he's your library. Sometimes he gets hidden by accident. Here in this vast library, he can choose different sets of grass loans and so on. For the purpose of this exercise, not choosy. Oak leaves set, and once you've selected very just click enter and simply going to direct angle in, click on it. It should automatically create the self. Oakley's previously changing from the library by default for us pro display objects into people as point clouds. If you wish to change this, simply open the modified panel and then you scrolled on, hoping to display role lot and choose to display the objects in the view port A smash. But it depends. For instance, if this is all grass, I don't think you'd be able to see anything here because he would be to tends to be displayed a smash. Another amazing feature forest Back is that automatically generates an update. How resolution textures with all objects in the scene. Use the material picker to check the forest raw materials in the scene. As you can see this translucency maps bump normal maps and high resolution textures. In the end, you can convert the forest pro objects into heritable Polly's Oh, mash, if you wish. Simply select the object right click and choose to converse. Great the grass. Simply repeat the previous steps and select one of the grass library sets. As you can see, everything has been created with randomness. To decrease intensity, simply open the modified panel, scroll down and hope in the distribution rollout. He didn't stick crew to smooth the values to more tense. That wants will be the higher values the Lester's Across full bay. When objects are not too tense, there are easier to be displayed as mashing of e port. Otherwise, you probably won't be ableto taking going to mash like, for instance, if you had to go back into density here, you know duties. It obviously now is becoming more and more tense. There still be a point with to mash density so high that we will not be able to be displayed. Er's has mashing the view port for a few types of display options. Did full points cloud the mash type in proxy and he takes second stolen? Also, you can argue own objects off, for instance. Imagine if he had your own self geometry. He wanted to art. So your sphere select your forest project first, you just go into odd multiple custom objects. An arty object. This is obviously just a example, you know, gonna use this fair in, in addition to their if you on specific types of Patton's, there can go to image and then select the map. So for a spike will give you some different partners for the grass thistle based on the grayscale material. So So the arrangement will just be slightly different, mostly because it's not too tense. He can't see a lot of that part in there. The moment you start decreasing the density values that Parton will become a bit more parent. Now, you can choose a different button. See, there you can see the part in there like an arrow going just like that, you can choose. We can create your own partners. Obviously, in there, I really like this one here. Uh, quite easy, really. The forest broken also be used on objects as opposed to splint only. So that's suppose there, this is. He wanted to great some cross around this particular circle surface quite easy to do stlede to use the same approach. You can also use the scale function to reduce the size of the overall object. Then we can increase the density. Now that scale is much smaller. Let's also change the display type to mash that the X Y and rotation values can also be used to place the forest project more accordingly. To use forest back, simply go to their website and download it. So it's correct. The curbs have done something quite similar. Have used the royal clone. Well, Clone is quite easy to use. Simply go to the website and download it, thinking of a trial version for this as well. We can create amazing partners in a click of a button. So for the curbs, these skwy easy as well. So you just selected the edge off the pavement. There. Isolated have been the modified panel and click on edible Polly. We're trying to extract this blind from the age of the surface. There simply enabled the edge selection there and start selecting on the ages and then creates spline from that, you look right shape from the selection linear rename it has carved like So you got you. You curb there, just click H from a keyboard to open the dialog box. Select. Curb us the isolate that. So you have explained. So the next thing that you do, you go to I t y two software again their unique click on the royal clone Pro. First. Correct your Elkann icon by clicking and dragging it created. Then what you do while the icon and still selectivity go to modify it and you click from the library there. So you got curves. Rosie. A sidewalk, all presets, the railways, your street lights, traffic. Same thing. Concrete curbs, building types stayed. Ian's contrite bleaches. The choices are immense. We can cheese from any of these in this great amazing content. So for the Cubs that I have just chosen at one concrete curb Click Import selected so under splaying. Then the properties explains. Click on that any click years point if you just created again. He just opened material loaded, so there just, uh, make them visible in the View port with the show shaded misrule interview pool by default. This is all being display as a box again. Do not use soft taking cheese. Are you want surfaces to be displayed? Its moment is it's as adaptive boxes so you can get to mash that he offset LRT to either go to the left or right if you want. Teoh constraint the selection to just shapes because sometimes you don't want to select objects by mistaking just scared to shapes unless you curve there selected, you can move that curb. Have you told me one, too? Move the slab upwards. We'll use the actual splint itself to move it because it's constrained to it. And then there's that access. Yes, moving up. If you change today, the curve itself change the width and the gap. So on. Once you're happy, read older, setting, seeking always convert into edible polio mash, even if you don't want to. Him just art. That's what Polly on top of it. So you just keep stack. We can only go back and forth. This is I was able to create the grass, shrubs, trees, curbs and so on. Creative. You last like 100 element opened runner set up town. Look first in the run the Elements tab. Click on your struggle into the viewer last like 100 element from the list. He should be prompted for the viewer, like slag run for element parameters there. Then you click Art you cannot. A light sort of lies there. So once that's rendered, she looks something similar to this in the name Post was the light selections work best with this screen mode. See that? And you can easily increase intensity off every single light. Just simply add in the levels adjustment layer. To do so. Simply hold on all key as soon as you see there clipping sign clipping against their life, slapped under element. It's going to the middle point there. Increase intensity is required. Can you can do that? We've ever seen your light, so the end result would go from side. This is the rule render. This is a lot selection tools. The elements there, one by one, hunted. So you forward to diesel like this what you would look like, so he makes a huge difference. You can also art colors, something like Cola Pollen's this scene. Because we have quite few lies. You'd be very practical art over 100 lights manually. To expedite this process, we're going to use a script called auto. Render element very light. Select. Just get a script spot, is there? So what you do with this? You don't have to be stole. Anything we just downloaded here, this is attachment. After downloading it, you unzip it and place it under scripts. Go into Autodesk, the version of your max and under scripts. You put the full day called E C. Is heimer just going inside? You put it there so Max should definitely know it straight away. That's there. So you need to reopen Max after every open mike, just drag and drop that particular fall inside Max to correct button for the script opened the customized user interface. Open the tool bar tab under tool bars going under categories there found in Choose the easies. I'm a command from the tab. The next thing that you do to create a bottom there right, says new you could write anything there for the time being. So you but in this that so what you to you just try can drop it. That and you can simply drag it onto the toolbar. Just says I previously done with that one to automatically quite very lights like rendering elements. Simply click when it's toolbar first by default that goes to all lights on the scene. So you want allies and say, Never use this function has one element this function. Arts. All lights in tow one render element without giving you any flexibility to edit each light individually in Post s previously shown. So never use this particular option here. Once it's here, just leave it as it is to correct the render elements of all the lights in the scene. Simply click on create elements, but you can see all lights are being created here. Those who automatically created, as you can see your light selections have been named according to the light names. It's, uh so you know exactly which lights which. So, for instance, if you wanted to add it, have you realize you're 85? Simply go into post. Select a relevant light selection layer and editing post, so it's very easy, very quick. If you have too many luncheon and seen, it just makes your life a lot easier. Also, never render more than 120 life slight. Render elements your renders will probably crash resolved the check out entire exterior night scene was created. Simply check the links below to my belong in my patron page Entire causes foolish. The N word captions. I hope you've enjoyed the city RL If he did, Please don't forget to like this video and healthy on my next one.
9. Floor generator: Hello there, This is Jamie. Welcome to another session of this text for services in this Splichal session. I'll quickly show you how was able to create this floor. Takes you here after feel requested, publish 80 Children. How was able to correct this floor surface? I've finally taken time to do it. If always start, we need to dull or to plug ins. The flow generator and the multi take ship Siegel map and some high resolution would plane textures to find everything, simply clinical cities source dot com. In their website, he confined all the plug ins in the plug ins to section. We have the full generator there. We also have the multi texture map and the wood ports to download. After downloading and unzipping everything go into your programs full. The rave installed your version of three DS max. When the root of your plug INS folder simply copy and paste both the D. L M and a Deal T falls. There's no need to install anything to see the floor generator. Simply restart your three DS max and draw spine, followed by opening the modifier panel to choose the floor generator. The floor generator plug in were expressed with declines. As you can see, just by adding a full generator modifier, it automatically created the floor tiles for you in a board size parameters, Eking quickly set to max 11 which before you start writing the floorboards. Make sure you set the units set up in my case, because the crime and the bevel vital is a usually very small. I would normally set the display units scale two millimeters to make it easy to type in. It's worth noting that the display units Caylee's only for display purposes you can easily tweak with the officer and the board size venues to run demise wood planks. You can also rotate the wood planes by simply typing in the direction value to about 90 degrees. The next step is to applied a multi textured procedural map to the wood floor. Let's start by opening the materiality to tar. Look. First click. Understand that Tuggle and choose the V Ray Shader from the browser list. Next, click on it to feast Tuggle schooled on the material brother and choose the multi textured procedural map from the list. After loading up to multi texture procedural map, click on the managed textures. Tuggle in the dialog, Click on the hard bit map button to bring in the textures. This is one set of wood planks previously downloaded from the sea You source website. They're all there in batons. Let's select in toys set after loading up one self textures. Simply close the dialog box and assigning to the floor object after a son in the material enabled the show shading material in view port. But even though each bit map differ from one another in a set, we conceal randomize them further in the color Chessman group, I simply increase a random gamma value slightly and the distribution. Let's do a quick test render to see what the floor is looking like. Flu is looking OK To make it more realistic, we're going to start by tweaking with the reflection in the glass in the settings. To have the full control of these settings, let's start by disabling the Fresnel reflections and unlock in the highlight close in this values. To increase their effectivity, simply click on a reflect color swatch to bring up the color refraction. Their log also enabled the background Tuggle there. If you double click on the material slot. He allows you to see the amount of reflectivity. Dave grants the reflections at a moment. Very linear. It's almost like glass to defuse. The reflections seem to reduce a fraction glass in its values, slightly to our special highlights on the surface. Simply reduce the highlight glass in this fight is slightly the smaller the values, the mood diffuse. The highlights will be. You can control the amount over effectivity by tweaking with a color swatch. Darker colors reduce the reflections, and brighter colors do the opposite. Just one other quick test wonder. We can clearly see how the reflection of affecting the scene. The highlighted areas seemed to Cleary at the moment this council that this reduces reflectivity value to about five and doing a test run there. That's much better now. A lot better. Most Caesars would probably look at these render results and be happy with it. However, we can make this surface even more realistic by making the surface reflect light more evenly has seen in real life. We can quickly achieve this by simply applying grace, kill big maps to the reflections, highlight glossing, there's and a refreshing glass. Innis toggles. Let's start by copying and pasting the multi texture from the diffuse into the reflect. Toggle two. Great skill. The multi texture. Again apply the color correction. Procedural map, too. Dee saturates it in a replace map dialogue. Choose to keep the old my past sub map. Two. De saturate All these textures simply reduce the saturation value to about minus 400. We can use the brightness and contrast values to control the reflectivity based on a bit map grayscale. Next, begin to the maps full out parameters. It's controlled a grayscale bit map at a moment. V Ray is using 100% of the great skill texture to reflect the surroundings. To mix between the refraction, color values and the new grayscale bit begin to reduce the reflect failures. Restaurant Have a quick test render. We could make few more tweaks here and there for better preview of the effectivity and the speculum for postproduction. Simply other speculum and the war reflection render elements. So with this one, we'll actually see how reflections are behaving. So we're gonna leave. Reflections like that said that's him. That Unity used to copy that into the highlighting listeners sleep you've lost some of its because used to be tweaked slightly, so that's just test one. That's how that's gonna. We can also be saturated few sections slightly by using the same techniques as before. The colors are less such voice should now. Next, we get to our day grayscale bit map to the bump toggle To make the surface more realistic. Let's start by copying the grayscale bit map from the reflect Tuggle in pasting it into the Bump Tunggal. You can also tweet the color correction parameters and reduce the bump five years to make it more realistic. The next stage is to simply use the render elements to polish it in post. The final result can be seen in this visual produce for client. Check out my other two tools in my Freedy visuals to see how the render elements can be used in post production. A sample of this floor exercise and more detailed to Charles available to my Patriot supporters on my block in the U to meet made you
10. Project manager jamie cardoso: Hello, everyone, this is Jamie here. Welcome to another session of its export services into serious or Project manager Plug in will be exploring some of its main features in this session, you will learn, are too quickly, crew and added, are yes, lights efficiently and automatically personal rendering engine dry and edit textures or to Moscow intelligently, basically rendering engine brought in a line proxies intuitively and efficiently basically a rendering engine. Create and reorganize virtual fall systems efficiently and independently from your hard drive through it and edit materials boasting your rendering. Engine searching Really missing falls automatically select move copy, cut paste, multiple folders and much more. So without further ado, let's start by clicking on a product manager button and opening it to begin exploring some of the project managers. Main features. Let's select multiple Fullers and Explorer and drag and drop them into model step. As you can see, this section is divided into four parts. The model stab, material step, texture, step and I Estep. Easy skin drag and drop Fuller's into any of these separately in any specific order is an example. In a material SAfrican simply drag and drop one or multiple Fuller's at once in Detective Sturbin are yesterday. You can do the same, going back to the model step. All these folders structures are virtual and can be organized in any specific order without affecting the way they appear on your heart wife. This feature load is an amazing way to organize your favorite folders, messed up file structures and much more with our ever interfere reader all hard drive. Also, it saves these a lot of time by allowing you to reorganize everything inside max hysterically. Affect your hard drive. Users need to cut, copy and paste bulldozer writings or seem to delete them by confirming in a masses to delete from our drive. To select multiple fullers or items, simply hold on to control key on your keyboard and begin selecting folders one by one. Or select one item in user shift key to select the host of them in a list. Also, while multiple folders are selected, easy skill right click induced a copy cloned by right clicking in June's correcting for our catalogue. In pacing into it here, you can see all the pace it items, as mentioned earlier, pasted up that items are not virtual and become about all of your hard drive. Too hard specific files or folders on the list, simply selected right click and choose to heart from the models. He Diskin also cheese to rename, convert, catalog or fresh cut to leave for my drive removed for models at two batch rendering reeling in auto silent Previous. In this instance, we're going to choose the heart from models. Option in high directory dollar. We can cheese hard on Lee current. Hide away cancelled. That's just too hard on Lee. Current, as you can see, is hidden from the list. Ah, pathum. Cutting and pasting Most of this change is their only affecting what you see in a project manager, not your hard drive. To see the hidden items, simply click on this button here in a hidden Directors doll. Oh, you can see all the hidden items listed. You just can Jesus selecting removed or our new items. For the purpose of this exercise, let's choose to select and removal items. To close this dialogue. Simply click on this button again. All hidden falls are visible again. Another feature will be exploring. Is the ability for project managers social images or J picks to specific three S. Max Falls via auto son Previous option. If you select one of these folders, you can quickly see the Maxwell has a simple wire frame preview. In some cases, there aren't any Maxwell previous at all. In these are the separate Fuller's. By clicking on this button, who will see the images and J pays with the exact same names as a stewardess, Max Falls, which I've already renamed accordingly to different file types. Having similar names will make it easier for project manager to make here to my association when the auto son previous function is applied. To use the order son previous function with multiple folders. Let's start by selecting a world want falters. We want to use the auto some previous function with next right clicking cheesy auto son pre reception from the list. The options downloads. You'll be prompted. He should have all these options and file extensions enabled, followed by Quicken to continue in the or Tucson previous dollar. Under searching Directors group, the same director is enabled by default first. Often it's quick and only searches in one directory because you're using multiple directories that's unable to subdirectories parent directory and nearest directories. This four options will be searching for fall associations in all directories, which will take slightly longer. Also, be sure they include suffix. Option is enable and click start. As you can see, all the fall associations have been made. The same approach can also be applied to the material step. This technique only works could save material libraries in here. We have saved material library, and this folder is where we have images and JFX associate them with select multiple forces previously done followed by right clicking in choosing the auto sign Previous. As you can see all material associations that you made in the texture step, we're going to drag and drop news self textures inside a folder. Let's reduce the size of the product Manager Dollar first, Next opening Material Editor Darlow By clicking on this button, it's great new material. Aegis consumed the drag and drop textures from each stab into the material editor. As you can see, a new V ray material was automatically corrected and named accordingly. With attacks you applied to defuse Tuggle, it's great new material. Select another texture on the texture map options he's asking cheesy option to tell the texture. Using the real world for the constrain proportions function. As an example, begin typing too tall. The texture by 2000 millimeters. The former two options is using the current rendering you just confused from a variety of other rendering engines available from the list, followed by dragging and dropping in the material editor to create new material clicking. It's too few struggle to see its bit Map coordinates. As you can see, it matches with a texture map Options. Previously Set E. I. Esther Aegis Consent Funding settings in color temperatures by tweaking with his parameters here, there's also the option to previous profiling diagram mode. The auto buyer under option uses the loaded rendering engine in your three DS max fall to automatically create an I s light on your scene when you drag and drop it. Scrutinise. Yes, like basically rendering engine. Simply drag and drop in your see the object placing paint. Darlow should automatically appear you can choose any of these options available. The smart online mode automatically aligns objects in the scenes, is decorated with a mask, like to exit the creation simply right click to select the light in the scene. Choose to filter the selection toe lights on the main toolbar and select all the lights followed by moving and placing them accordingly. Eases can also juice. Replace the selected lights to do so. Simply select another I s LA in a project manager, right click in, choose to replace selection. To replace subject. Dalal allows users to replace all instance selection only, or simply cancel the option to keep selection that's near lies in the scene, while retaining the previous one as opposed to completely replace him with a selected one chooses selection on the option. As you can see, the selected allies will replaced. Let's scroll down the list and cheese. Another IRS light will place to set Would B. I. S lights will automatically replaced again. This amazing workflow allows users to build a scene very quickly and efficiently. Back in the material stare. You just get assigned materialistic objects by simply dragging and dropping them against your option in the scene. In a model step, users can also create objects in a similar way. The IEA slice will create it before merging any object in a sane, easy skin. Choose from a variety of these options available here in a place in group eases confused. Full home Great Onley, select objects or seen objects in a clone section. Keep the instance method when placing in creating objects with a mosque, like in a line mod user skin cheese. A smart alignment or normal one. Creating objects. You can choose to display them as boxes into paint on selected objects. In Exclude group, you can choose what exclude from selected seen shapes. Hidden frozen objects and cameras are automatically excluded. You can enchant these two full options, if desired emerge. Actions group. The objects are set to be merged s proxies by default and to use existing proxies in a scene, if any. However easiest can change these default options, if desired. Dragon drop it to paint. Create the object in the scene. The objects that much we created in a scene with the previously set parameters. Every time you click in a scene, a new objects created experience. Lee separate default to exit creation. Simply right click. As you can see here, a viewer match for proxy was automatically created in the same folder is the Maxwell, which is incredibly smart If you open the modify panel. You can see all the proxy parameters here has mentioned earlier. Project managers speeds up productivity and work efficiency dramatically. Dissection allows users to quickly search for falls and labels by simply topping in and searching. Another amazing future is ability to fix any missing father and textures from the scene before emerging it. To do so. Simply select your right click on Maxwell, followed by Choose Injection to manage Asset Falls enable the missing option in a certain relinquishment. You can choose from any of these options available for the purpose of this exercise. We just want to search in real ink in a search directors group that's enabled his list of directories Tree Show. It finds it, if available in the network, also enable the recursive sub folders and click to stop to recur. Since up full deception might take slightly longer to such. But we'll definitely find them on Lee. Use a recursive full is option. If you can't find the missing falls through the searching, reeling calmly as you can see all false acres read OK, which means all missing files will found and automatically linked perfectly. Once happy you conduce, apply changes in close. Also to merge falls an animation simply selecting right click, followed by choosing to merge with default fierce max dollars or is an ex reference. See, Users also have the ability to export to a host of listed options here, correct and visual fall thumbnails, by choosing to its must be, render an associate surrendered image with a Max fall and much more the same can be done with material. Step Dis concludes our tutorial. I really hope you find a useful like in Share it and I hope, see on my next one.
11. TurboSplines with 3ds max: Hello, everyone. Welcome to met a session of this text processes in this session. I'll be taking you through the process of using and creating amazing effects with troubles . Blanks, blanking Thomas Plans can be secret exquisite animation titles and complex re geometry. So without further delay, let's start by bringing up its star log here. These are some of these to fill parameters. It's great, and he's told his toolbar first kind of the word terrorist. Want to visit their website? Fill about downloading the script into this max simply quick on a script into a bar in Chase to run scripts, Picture turtles clan from the lists and open it to install. Once installed, click on a customer's to power inches. The customer user interface option in the customers easily Interface Doll Oh, go to the temper. Pardon in. Click on a catch. Greek months scroll down and changed the spoiling. Their name is going on from the list. Turn. This plane is here deserves a display in cleaner plugging, which was a solar P earlier. It's great the button toolbar. Simply click on a new Tuggle and name it as tests for demonstration purposes only. Next clicking a total transaction and drug inside the new button, followed by snapping it anyway on a tow bar area to place it correctly. Black clicking. Just to delete this, duplicated till this point toolbar just south of the original term, respond to Bell was created tractor button again to bring up his dollars, quickly talking through some of its main parameters. Let's start by going to the Shapes command panel and click on the text button typing to the spine and click on the front. Report. Correct the text. Right click to exactly creation in a question. Parameters on the great Notify. Rule up ranchers, while the Texas selected click on our past button. The turtles aren't journalists. Allows users to clicking. Choose a power for a splint from the dollar. It's the same A selecting attacks in a scene and clicking on the art paths button to struggle is to remove pumps, and this one is to clear pass from the list. In other the mess type Onda Ness type, we have a cylinder as a default type. One plate is a list of other Nash types to choose from, with a capsule Nash box profile and any customize mess. You want art to the list For the purpose of this exercise, we're going to use a profile. Let's start by clicking on the star shaped button and dragon in the View port operator. Next, click on a master and change the profile from the list. Her back clicking on the R check button. What was simply Quickness Tunnel? In choosing a profile in a dialogue, the national sport power function allows users to set the number of geometry for each defined path. You just can also set the variation percentage here under extra features he's asking Changed to tope of the geometry and tickle slice. This last button is to build geometry easy, older parameters set earlier, unhappy with all settings. Simply click to build geometry except the max Great message by clicking. Yes, I had a modified panel. All those modifiers are being added. Emulator parameters Previously set. This one was crazy with promises previously set. As you can see here, 16 objects maybe not too much grated and selected justice to give users to flexibility to edit and manipulate each object individually. Also, a selection set was created in case there they selected in users want to quickly select them again. Here's a list of all the new sponsor grated Everything crochet can be edited by clicking on In addition button here. Since Cyril selected, we can trick the scale value by tinkering with its splendor here. When we look closely, we can clearly say the star shaped perfectly wrapped around the text. Users can also set Second Mr Similarity Ages in a Brother Edge faces to see the segments in a report. As a segment, values are reduced, the surface sledges are less Smith. That's impressive. Now, to smooth the ages, the high percentage can answer. Be tweaked with and be animated. You just can rotate the General Terry to create exquisite animations. The tres function is also available. It has also distressed function. The path for sentences quite useful for animations sweeping across the Russians can also be applied, and the slice options can also be used to animations to create specific types of animations . Center click on animation button under international type. We can choose to move the love of the path by percentage to grow Andre Villas a slice. For the purpose of these exercise, we're going to use the nerve plow 5% dysfunction allows users to set the starting time. It's set to start from zero. By default, however, use can set it to start at a different frame. Here we have the single animation left group on Emissions order offset. This is kind of certain animations with the minimum and maximum values. Here we have the path percent adoption screen to easing types, totally animation. For the purpose of this exercise, we're going to let the current settings, as they are in click to create modify animation the phone imagine was automatically created . As you can see, there's an animation cheon frame. Zero in unframed 100. The key frames can be selected individually or as a group of selections, as they currently are. Jesus can love the cliff rooms to specific timelines if desired. Next, let's nerved animation slighted to see what was created. You just can't relate the current animation by clicking this button in creating the animation, if desired. In a turn selection, you just can't just convert from London. Splints are turtles. Smith. Modifying this tool is quite useful to smooth out surfaces to quickly birth would kill excited parameters. Let's start by quoting this blind, including the Spartan Honest are low. We have the number of turns to set. It's currently set to 10. You have the proportionate to path live to start radios. For the purpose of this exercise, we're going to set it be five millimeters to start with. Divergence is currently locked, eases getting a lock if they wish to disaster. The variation Function and Versaces pair turn to create the INEC space in these parameters simply quick to select source splints. Picked this plan on the dollar and click the correct analysis button. Let's change funeral parameters and create another helix open Notify panel and make displaying venerable invisible In the report. Repeat the same action with a second Neelix in Clicked convert reputable splinters, terrorist blind objects. It's now converted to quickly go through the extra features branches. They're scared to the Christian promises and are this point from the scene. Next. Enable the taper, taper and slice options for long that click to build geometry. When we treat with a slice and position values slash position announced from its original position, the temperament is controlled. The tip of the geometry beans can also invert the tope by enabling its function in a chair . Amazing result of the remaining parameters disparage animation was crazy for quarantines in Tunis. Points you can imagine consists of the chair pairing gradually on the screen by swiping through explains This is the final render a smell to slather to previewed animation. For now, information about toughness, plants and protect the link descriptions are really hoping for this video. Useful liking Chair it and I hope to see in the next one.
12. Mirza Link Manager with 3ds nax: Hello, everyone. I'm thistles. Jamie Here. Welcome to notice session of this extra services. In this session, I'll be taking you through the amazing process of working in update insidious Maxwell's while having live links from external. For such a sketch up motorcade who have it Reiner and lanky kid for the purpose of this exercise movie is external sketch up model to directly linked to our for yes, Maxwell as national earlier. The same can be tender. It falls coming from applications such as Auto Kid Rabbit Rhino, Anarchy Cat. This is a sketch up model of building will be linked controls three DS max for to shape, texture and wonder Longer sketch up falls is life and being updated externally. You know that's a great between the two flowers and execute your above mentioned affection . Al it ease. You need to use an amazing script. Could there's a link manager to found him down or the script simply gurgle nears. The late manager encourages website. I love the Lincoln Descriptions and a website. You can simply click here to download a bite after done had in the script, you can drag and drop it into the vehicle to install it and access it from the tool ball. Or simply click on scripting toolbar and choose to run scripts. Lord and open the script. It's done. Log should appear in return on condition options incorrectly. So the script the script is now is told before I open the scripts, it's worth pointing out there. As you can see, the landscape is already built in three DS max, a personal profess create the landscaping through. This makes because a proxy phones, well, clone and first bag, which were imagine too quickly. Trick landscape. Realistically, however, feel free to use any other approach he find more appropriate. Before we open the script, let's create a toolbar button for it to test so taken a customer string bar in chairs. The customers User interface option on this list shows the moves, the tools Kamande So about Questioning Button and a top piece night. Nothing about the scratches drugs, the ruins of action Internet button, followed by simply placing it on a two bar by snapping against it. Frequent scraped bottom to open this dollar. Most of this functions are quite self explanatory, really. The function to update update island trolls. The ad only function arts falls. The duplicate faction duplicates linked falls on the airport. From you have the option to Berlin, Francois Marquis Cat and Etch Option. There's information on how to explore fast from each application. Next, we have the option to bring flowers from sketch up Rhino Rabbit To know. To get this airport button allows you to clicking cheese. The Felton Brute Life after the full options to auto world imported falls, photo edges and also Smith, and to refer screen and imported father updating as mentioned earlier for the person s exercise, we're going to go with the first sketch up, but your skin is so important for us and all these other application Cindy here. Imported rushes can be organized by materials. Know about layers by default, it set to the organized by materials to explode the building from the sketch up model. Simply go to the fall press control plus a in your cable to select entire scene, followed by clicking on the fire button and chosen to export to any model in a savings type . Chose the object falls on the list. If unsure, simply go back to the city's makes felt checked information detail your heart explode from each application before expiry ity taken actions totals first, any style. Oh, enabled export texture, maps and these other options and checked in a skill gloom. It doesn't check the option to stop. One is that coordinates. Otherwise you're important model will be flipped upside on. Finally chose the nature unit system and quick will create. Export the mash back in through Yes, Max taken input Model button in Jersey Object metal from sketcher. As you can see, the friendship became loading up. Depending on the complexity of your model, it may take seconds or longer to import. Once the file sell imported, this dialog box should be prompted. Click OK, it's accepted here. He can see it imported. Fall into the same. It's just really middle. Happens to be slightly off from way should have been complete Mervan places on its correct location. Next click went up there, selected link button and choose the model is before, as you can see, even do. The file is currently linked. The manual was updated with our resetting its location into DS Max and sketch up model still on its original location, which is amazing. Same also applies to textures and changes. However, if you had to delete parts of the model in sketch up, then you would have been updated in three DS max. The next step is to begin creating in a sunny shoulders re textures to this model. It's like one of the war panels incorrect, apart in tow. Isolated Max opened a material that is her. By clicking on this button. It's like this would material slot and assign it to the world panel by clicking on the sign apartment clicking a diffuse total and enable the show shade insulin vehicle in unratified panel apartment, a few diplomatic for you and the mapping mode to folks minimizing, Maciel added. $2 an exit desolation mode. Click on a mutual editor and select a glass panels. In the report in a material editor, select a glass material slots and assigning to dissipated object. Next, let's select a little panels in the view port. Select this materials law and assign it to it. Following that, less like the roof panel in a report and a scientist metallic material to it. Next, let's select our sketch up link and click the update Link button as you can see the material sections and a full model position have all been updated accordingly, which is amazing. Another example will be to go to the sketch up fall to leave part model press control, plus a only people to select entire model. Click on off all button in, choose to export its really model again just to confirm and replace the bombing back in three years. Max, Select the sketch up modeling and Glick Top Day Selected Link Select Object Falling Question and open it. As you can see, the model was updated as expected after applying all materials and textures. The final see And she looks similar to this one, as mentioned earlier. A personal prophetic right landscaping three ds max. Because of proxy, it falls well. Call in forest back, which were amazing too quickly. Great landscapes. Realistically, however, if you prefer to build a list of external links from applications such as Ravi or two can argue cared Reina or sketch up simply unable to create function and click to import model button. As you can see, Easiest can build a big lists of external falls if desired. Next, let's do a quick test Run it to see what the scene is looking like. Clicking around the set up button to open Mestalla. Let's check some of its default parameters first by going through it stamps and click Brendan. No, this is a three DS max, a lot farther of use and zero frame buffer to make. You'll run their look more appealing. Also ensure the option to convert love space before buying that is disabled in order to apply. It's a first slept on the show crushing control partner and open its settings. All these other crushing controls will close apart from the lots, followed by enabling and loading from the low Tuggle. If you're in, check it. This is what the whole runner will look like when enabled with a lot loaded. It looks like this. The world Lut stands for Look up table By clicking on a little tuggle, he can locate and low the specific platform. This specific but fall came from a website called Treaty Collective. Unfortunately, a lot falls are for display purposes only and are not factored in one saved, he noted. To save the country under with a lot fall applied, we need to use clear script script called Lucked Explorer, took my descript simple click on a script in Button and choose to run script selecting Open Life Spolar script from Can School. This struggle allows users to locate and picked a lot form. The second folder allows users to set the location for name and extension by default. The file extension is set to PNG. Let's change. It's a Jay Peak full time and name it accordingly, followed by clicking the same rations button. After the father site, the script automatically de selected a lot file from the frame buffer to do to, say Underwood, Luck replied, simply. Go to the rendering toolbar and choose to view image as you can see descent image. That's exactly like the render with a lot of plant. Also here you can see how it if I was saved the farm name first, followed by the lot full name added in front. To send this fault, surrender in a common stop that set to run. The output size is 3500 pixels by one father, 850 pixels. As you can see the image aspect function, it's bad loft, so the width and height buyers are linked to one another. Under the writer, Expanded Global Switches Rule Out Parameters and the Frame Buffer on the friend Buffett Rule. Our parameters enabled Vera Raw image file function. Click on his struggle to open it, tapping the phone line and enable the X option. Dp Ex Art and the Doctor Limited Friend Number. The very Image Walter is right. Powerful rule for four months that allows you just reload the engine of frame buffer and survey our again in any file form. Undesired one. Enable. It saved the data off each rendered bucket, so it's per chance the run that crushes a properly. The last bucket will be site. Click the safe total. Next. Enables separate rule image file function and click on its struggle to open it known to file accordingly and choose a tick file for Mart. Click on Save Tuggle in a tiff. Image control dialogue enable 16 bit color, no compression and surrender dots. French followed by clicking OK under the image. Simple rule up parameters Amendment changing right is set to 64. High value, such as this improves the runner quality without affecting the rendering. Time went test rendering. Some users prefer the progressive time. Which is fine, however, for final, high resolution renders, he should years bucket rendering time, especially when it comes to using stripped Mondays and other key functionality under image filter. Choose the area. Type A personal professors from a shelter time, however, feel free to choose from a list of other image filters in here on the pocket. In a simple rule, out parameters often set the minimum subdivision toe one in a maximum 200 to be coherent. Universal workflow settings. In a nice, fresh short Let's set it to 0.7 Expanding Global DMC Roll our parameters and so it is no special value to 0.3 or 0.4 dishneau. Special Violent from Pocket Imo Sample rollout should always be higher to describe a TMC no threshold value here. Otherwise, the runners might take a bit longer than usual. These two nice special values are dependent on one another. Thes funders of always work well for May, however, feel free to use other values. You're more comfortable with expanded column mapping all our parameters. I'm currently using experiential color mapping type because it helps to balance over exposures in a render and makes your under more realistic. However, Phil Free teas, other color mapping types also Doubront multiplier was reduced to 0.3 for the specific sink . Otherwise, I would normally keep it 1.0 on the mount and using the color and gamma type Innogy, I time the primary engine said to radiance. Have and a second engine is set to like cash enable the I meant occlusion. Function normally certainly am into crude in value to 0.7 the radius to stranded millimeters on the subdivisions 20 whole. These values only effect in curricular areas. Also, these values were well, however, feel free to use values that you're more comfortable with under the radiance map. For all our parameters, keep the current preset has love. External daylight shots don't usually require high settings on the like. Casual up parameters leave it before prompted as they currently are in a setting. Staff on only keep the dynamic memory limit to zero. Soviet broken uses much memories required in a render elements tab enabled rental elements . Previously ardent, checked the remaining settings and click to render in a completely notorious Maxine. We can open the run A set of town in a V. Reiter. Click on a show. Vera Friend. Buffer button to open Install Um next looking. A loading much file button to load up the viewer image. Far previously saved. This what Vera Image file to look like. They're often large in size because of the data storing them collected opening. Depending on the phone size, he may take a while to open. As you can see, beautiful friend Buffel resize its frame dimensions. It's mosque Lee to fit incoming form for times about this automatic re sizing doesn't occur . This often happens when the original viewer image far is saved in a different version of theory in such cases, usually should simply type in the great operas size over the incoming fall here. Prize to loading the viewer image file for Mart. Here you can see all the render elements previously stored in a viewer image home. Easy skin. Turn off s RGB button, if desired, followed by clicking and holding this button and choosing to save all in my channels to separate forms. Chews the fat from our to save as often. Josie Explode. Take far former number two fallen click to side in a tiff, Image control dialogue enabled a 16 bit color option. With no compression and green dots per inch, The file was saving all the render elements To view the safe, all simply click on a rendering to ball and just view image form. The search image looks slightly process than the one interviewer friend offer to rectify. This less reserved of falls again in a separate Fulham enable young right option and set it to 1.0, followed by serving again. Open the newly side the image in three Esmark's As you can see the gum off the newly saves in which now matches with the one in the frame buffer next less enabled and load the luck fall previously used Here you can prove you surrender and a lot with S RGB button turned on and off. Falling debt is previously done. Let's run the Lot Explorer script and save multiple versions with SRG. Be on and off to matter in this more realistic let's open them info show I'm currently using for the Shop CC 2018. This render is a version with SRG be applied and a gamma set to 2.2 in a Leicester right click it just too difficult layer, while the duplicated layer still selected right click and choose to convert. Smile. Gentle, smart objects are quite useful to retain the parameters of filter, and the original quality of an image went scaling up in down. Next, they're gonna filters, toolbar and choose a camera or filter from the list. Any star log increased the D. Hayes function to add more detailed in contrast, image. Let's also increased that charity functions to bring up more details in shadows of damage and reduce blacks function to add a bit more contracts. That's also just wants function to make several emerging more realistic. Finally, let's adjust the shadows function to make. You were only much pop and click OK to accept a new parameters to mascot parts of this camera or faulty fangs. Let's create a layer mask by clicking on this button. Here, banks enable the brush tool falling death Search the background color to black by clicking on the sweet spot in here, or by simply pressing X on your keyboard to switch between the two background colors, black or dark colors or met pixel when brushing with a layer mask enabled and white or bright colors do the opposite. Also know that you're possibly set to 36% desisting. Ensure the brush, brush Islam. Wander back. One colors blank and a layer mask is enable. Begin brushing the pixel of the specific years. Prices will meet them. Reduce your past the violence and minimize the brush effect on pixels. When brushing, zoom in and out of the document checked several changes. The run is looking a lot more appealing to the latest changes. Smart Object Layers gives users to unique ability to edit parameters by simply double quick on a camera or filter and tweaking it. One. Nasrin. Let's minimize the document behind. Finally, that's correct. The chromatic operating. In fact, this effect is often seen a real photos and makes most computer generated images look more realistic as result until pride, simply right, click on the edge of the document into used to duplicate right. Click on any later in choose to flatten image on the bottom left part of the document typing 100 to zoom 100% into the document. Next go to the Channel SAB Inspector, right channel unable to move to and magic up once by pressing the R on your keyboard, selected Green Channel and Magic down once by pressing the arrow on, keep selectable channel and magic to the right ones by pressing the our own UK boomed following that select RGB channel to do the final chromatic of Britain effect, go to the last time and select the main document behind Select Tickle Monster Cooperation document. Again, you choose to duplicate the layer s previously done in a duplicate layer down low. Choose a destination document to be the main PST form can rename the incoming layer as a mask Operation select. The main document is you can see this the nuke from ice cooperation there is you zooming The chromatic aberration seems a bit too prominent to reduce its permanent slightly less click on a layer of blending mode and choose a dark in time from the list. Because it's a process, it's about 39% to make it even less prominent in moralistic. I don't only a mosque to the chromatic aberration there and brush your world a vignette ing , in fact, slightly use another techniques described earlier friendly Justice said the final images a tip fall for Mart on change option to save layers in click to safe. Also serve. Another version is a jape bank for printing. It is a Photoshopped fall film are to be able to edit Lay as if required, the No International. But there's a link managers simply channeling descriptions. This concludes our tour. Um, I really hope you find it useful like in challenge on the autopsy in the next one theme.
13. Spline Cleaner with 3ds Max: Hi, everyone. This is Jamie here. Well, from tonight, a session of this text crosses in this session. I'll be taking you through the process of using a plugging calls. Fine, clean it. This amazing play gin helps users to quickly identify editing. Rectify complex. Find problems in seconds to find. Displaying. Simply, Google's find cleaner can enter the Spine Dynamics website. I leave the Lincoln descriptions in a website you can find and download the planking once Donald, you can quickly stole it by dragging and dropping in your view. Bolt while running the script, including two Patton. Let's check my previous turn. Responses. Still on heart is total car into parking. Once everything is done simple, click on this button to open the dollar. Dissed are warning is simply check for updates of the script. Most of these functions are quite self explanatory. Really, First button is the information dialogue. Let's collect to open it for Quick Jack. The shapes lighted displays. The number of shape selected into the airport displays amount of spines in the view port. Then you have the number of virtus. Is the span left? The longer opens wise, close flies the number of materials, single sub materials possible eros make diagnosis exposed erotic sticks thought its numbers and its your lighty on this function will be later useful to examine certain problems with our drawings or simple tanks. Detached selection button. Ours used to select multiple separate supplies in the view Court and attached him by clicking this button. Any action by fell to function. We have all dysfunction options by clicking this question. Mark totals here. He's just concretely say what each group does to start. Let's bring in the custom to exploit, provided by clients. Right click and juice rotated Enable the main Tobar by right clicking on the lane panel in chains in the main to buy auction enabled angle snap total. This allows rotations to snap to specific angle upon a modified panel can. It's worth noting that the spine cleaner only worse could shapes that have the vegetable spine collapsing. Notified, I can explain the information dialogue to open it expressly mentioned. We have all this important information about the spine demand station she'll focus on is the open smile information. There are currently Children, five open spines, which is a big problem if you're to extruded tanks hair. They have zero close points and the rest of their information. Let's click on the night diagnosis button. The one sections concentrate on is overlapping Versaces. There are currently 220 of them to close reverses before assuring the spine. Let's scatter this one clean a dollar his scrawled onto world vortices group escape that full special value to 0.1 in quick 12 verses, clubs, Aspinall, information dollar and opening again is you can see in a span information dialogue. The number of open spine is now zero in another of close bonds is 12 which is amazing. It's so been fixed. Next quickly Vertex number button. Now that the verses are closed, we cannot say an individual number of each vertex in the vehicles, which is extremely useful. Users can also see the verdict sticks in the vehicle without the need to open unmodified panel. However, display needs to have edible spine applied to it. First, American Extreme Dishpan made up any problems. This is another example whereby disappoint segments they clearly opened by a lot is what obviously had difficulties extruding open spawn such as this. To rectify this problem before extraordinary men 18 years, this amazing function to connect vortices again. The modified panel doesn't need to be openly noted today. This which is extremely useful. Practical advances for bikes Stolen display, As you can see extreme, was executed accurately. However, the holes in the tanks didn't cannot quickly to rectify this problem. Simply go to direction, group and collective fix experience Access. As you can see exchanging, is not perfect. Here's another example of the typical text provided by client, and we won't admit versus to it. If only begin. Let's other people swan Ratify first in an Ally Smart Man crew that's click to normalize the max Trip dollars should be prompted asking to collapse in time, modify a stake into vegetable splint. Take yes and enabled Vertex spoken. As you can see, the entire Texas nominal Alvertis is evenly spread across one millimeter. They can honestly changes values, if desired to traditional purchases. You just can simply click to reducing reverses here. As you can see, the nun reverses were really sorta muscular insulin, or they were affecting the original shape of the text, especially around the marker, the areas of this line for digestive verses. Even without affecting original shape around the curve years. That's really, really small value in a section to preserve angles over type and a vial of 15 to start with in collectively decent and reverses, click again that we must reduce more. Vergis is without the flu in the original text. Can I express control Plots said on your keyboard toe interactions? You just gonna sit in question under graduations, you know, don't have less reticent display descended example for users in our KFOR's industry whereby you'd normally imported WG followed strata smacks and trace over disappoints. He's just strikes over despise because they're often overlapping and can't be excluded correctly as an example. If you take through these rules and turn the view port shaded, it quickly realized that the inside rules are not shaded to spine. Ages have been extruded but nine side. This often happens when versus an all welded to quickly double check. What's happening with the spines. Simply open this one clean. A dollar is previously done in Quicken Spawns Information Dollar button, as you can see through 137 opens plants. There's also zero close plants and so on. The number opens plant is what we need to concentrate on, because the problem Senator Beatty overlapping burgesses it's corrected. You simply click to well, verses get through gaps, pretend of segments than you would have had to click on a button to connect verses and said , as mentioned earlier, 12 verses simply click on apartment. Well, versus. As you can see, the current threshold value of 0.1 didn't work well. Let's click to undo in, try new value of 0.1 and clicked well versus next. Let's exclude explain. As you can see, the rules are not excluded properly. Just technique allowed us to save a considerable amount of time by avoiding to trace entire drawing to create new service. Here's another drawing spawned with missing segments. If you are take should as it currently is, it would have had similar problems before. In this instance, we have a clear gap between splints to correct the problem, delete extrusion and clicked, connect Versaces and exclude the spine again. The world is not excluded. Problem to sound normally avoid spending time retracing the drawing to create a new surface . In this final example, we have a massive number of separates plan we want to quickly attacked extrude and apply a texture to it to do so this summer, opening the spawn cleaner and it's information dollar. As you can see, all spines are close to quickly touch them is once one press control, plus a in a keyboard to select him on, formed by clicking on a touch selected button. Click Yes to convert to expose supplying has previously done. As you can see all spines and our touches. One following that simply applied X should notify in a texture to it. Here's the final results that's gonna cause That's true for the unfinished about spring cleaning. Simply check the Lincoln descriptions we know payphone initiative useful like in chairs, and I hope to see the next one.
14. Proxy Textures with 3ds Max: thistles. Jamie here from to notice section of this export services in this session, I'll quickly take you through the amazing process of managing efficiently. Heavy three DS Max falls with high resolution textures using a plugging call proxy textures . This radius seen was created for a client a while back. It was a nightmare to manage and navigate through, mainly because of the number of high resolution textures in this massive seen the current cameras focusing in a teapot area. However, through a number of different cameras coughing other areas of the masses really seen less critical go for some of its main cameras. The scene currently has hundreds of textures and 100 and nature of them extremely big in size. Vector, our main T point camera too quickly show amount of called it. Currently Eastern. I get through to see we're going to enable the too deeply in zoom mode and use them. Our school will to know to get through the scene. As you can see with every scroll, he takes a while for TV port updates the window starts manager. Also two picks how much memory the scene is consuming to quickly download a process textures, plugging their skin to Google and dumping proxy textures and dynamics and click on its main page. This is the website depicting its main features. Under more information, we have the script Manual link became Click to check back on the main page you can to Stella the trial version or the full product. Once downloaded back in three years, Max, click on a scripting main toolbar inducing run scripts followed by choosing and opening the script to create a button toolbar like these ones here simply what some of my producer tools to quickly go through some of its main front er's in this group. By default, you have the option to affect textures and selected objects enabled. This option only proxies the selected objects with textures in the scene. For the person to sexist size, we can't enable all seen options. Instead, deception will proxy all textures in the scene to reduce Texas Group allows users to set the minimum, and maximum size detection will will reduced it. It's set to max size by default. Just can set the maximum size of such as fun and 12 pixels 1000 baseballs to father pixels . Forefathers pixels well, simply type in a specific figure here. Alternatively, pictures can be reduced by percentage. Instead, we have set sizes of 10% 25% 50% and 75% or simply type in a specific percentage value. Here, the moon's size is set to 32 pixels. This is a 1,000,000 size detector will be reduced. It depart to one enable it uses specific sets of pixel. Size is mostly used in video games for best performers in convertibility. The part il pixel sizes are too full. 8 16 32 6400 and 28 256 512 of father and 24 to father and 48. So if a specific texture in the scene is 3000 pixels in wit, the newest above two vital of three fathers should be 2048 pixels in width. The next part two values should be 1000 and 24 pixels, and so on. If the high value of the same Texans scene was one father and 500 pixels, the new squad to value to produced it would have been 1000 and 24 vessels, so the new resize value of 3001 fathered 500 pixels would have ended up being to father and 48 pixels by 15 24 when using a part two option to reduce its original size. In a nutshell. When using the power of to option to reduce textures, spoken will automatically use any of the closest preset values mentioned earlier, independent from one another to recycle specific texture. To convert a J peg PNG Hoffer option, automatically Converse, Texas in the scene into a J big file form. Art indexes without for channel are automatically converted to a PNG file. Type J pic quality sets the quality of the texture divine. Over 100 is the maximum quality did four value set to 70. The process textures button initiates a process of reducing Texas sizes in the scene. Was this spot in this? Quipped the seven reload. Seen Lozzi is just a saving reopen. The city s Maxine. Once a spot in this collect in a Process sections group, it sets a scene bond by default. What he means is that once across the sections, button is clicked. The new research sections will be automatically search in a location where this really seen was open. From the purpose of this exercise, we're going to change the global ocean instead and click on this total, say its location. Here's a new folder created to automatically saved an eerie silence textures into. Alternatively, he just consider click Click on his struggle to create new folder. This button is enabled by default to use originals on random. Essentially every time you click to run, their display in automatically switches back to your original. My resolution textures before resize in them. Next, let's open Monsieur Sadullah and go inside. One of the higher resolution Texans here is the full name of the high resolution texture. Here you can see the texture size being 8000 by 3113 pixels, which is massive. Next, let's click to process textures to begin reducing detectors with all the previous option set. Click. Yes, the closest actions. One. The texture processing Stay in place. You'll see full names and text has been switched. Is he conceding a message Dialogue 100 in 18 to extremely high resolution textures? Will Virgie's to decide to set earlier click OK as mentioned daily to location found name and sizes of 180 in high resolution Texans will automatically changed. He's a new location of to rename the resource sections. The specific direction went from 1000 pixels to one father and 24 pixels. As you can see, that's pretty seniors also extremely lighter, and the window starts spies using less memory to handle the scene. It's also easier to never get through the sane. It's smaller textures. Loaded drive images will be a lot quicker to protest some random. If you de select a button to use originals or render you're no longer needs to load in process high resolution textures before rendering before sending the final files are under . We only need to restore high resolution textures of the objects closer to the camera and leave the low resolution pictures and objects far away from the camera. To do this. Let's start by selecting all objects in the scene there, close out camera, hold under control key on your keyboard and begin selecting them one by one. Open into a letter again to say file names being restored next under the tools parameters enable the selected objects option and click the button to resource protections. Click yes to restore textures. As you can see here, the textures and selected objects have been restored to the original file names without the previous suffix names. PT resize. Finally, before sending the final run simply and click the button to use originals and render this really sure the objects in the distance will not automatically use original high resolution Texas one run drink Instead, Onley detectors, currently loaded in the scene, will be useful, rendering in summary. Now we have a mixture of high and low resolution textures in the same high resolution Texas for the close up objects and low resolution Texas for objects in a distance to find arrundell of something similar to this. Would it be a post production I really hope you find? Is it helpful, like and share it and I hope to see on my next one.
15. Automodeller with 3ds max: everyone this Jamie here. Welcome to another session of its Export services. Invest Session will be getting an amazing modeling playing call Autumn Ottawa To find this playing simply, go to Google and type in order. Ahmadullah Black on its link on the main page. We have some of its powerful three D printing features seeing here, which are amazing into eternal space age. We have some of the basic tutorials is also the feature list page, with further examples of what's possible to achieve. DISIP Age allows users to buy the full version. What you simply download the trial version and this other page here, once downloaded simply around installation and make sure he's in stone in the same directories, is is your three DS max. Nothing's told like one a customize toolbar in choose to custom my user interface in the Stalag, go to the Tools Bars panel and extend a category All commands list just autumn or look man from the list. Next click or New Parton and name. It has auto Mullah for by dragon it from the action section onto the new toolbar button, created, move and snapping onto the toolbar and close the main dollar to open auto model of plugging simple quick on this button to ensure the autumn model of plug in is automatically loaded with three years max simply green light max. Start here by clicking on it to quickly go through some of its main parameters. We have the tools button to redirect users to the details page. Just question Mark Button opens. The helpful is one Select. This button opens a properties dialog for model sources and target statics just button turned selected object in the sand into targets. This one makes selected objects into a source and this one toe on Maitham under quick tools , have all these four results to select delete height and on height under all targets. We have two options to select on make height on hide, regenerate old and so on. To hide this entire dialogue, simply click on this button. Here, despite Preston, Bar is a main feature of this. Playing one clicked. He allows users to paint masses into objects or targets. This button allows users to paint once clicked before painting their sexual needs to have a mash assigned to it first, that's open just a lot. Exterior scene, which is available to my patron supporters and doesn't already have this ready. Seen for the purpose of this exercise of hidden most ready assets such as trees, shrubs, calls, etcetera. As you can see in this render, all I had was a simple material with detection applied to the roof surface. With the auto model, plucky will be able to create amazing off Charles with the click of a button to start that selector off, dull and isolated. Next, click on a Max fall and used to say selected. Open a several fall in a brand new three ds Max E. This is a safe roof object, and this is the model Freddie. A roof tall mash, one modeling objects tabulated, painted onto objects. He sure to start pulling them by the top. U Port DeSisto had any potential problems down the line to set this roof tile match as a source, make sure the top view ports enabled. While the roof tile mash is selected. Click on a sources button here before printing. It can choose the view to paint from here. For the purpose of this exercise, we're going to show what to do first for beating on surfaces in a front report, let's begin tracing over the roof Glicken a shapes command panel and choose the line button . Next enabled, agreed and snap settings, but and right click on it under snaps, the Vertex function is enable and endpoint interruptions. All these other functions were enabled as well as the remaining function seen here began clicking and trying in some of these points to trace over the roof. Sarcastic process Flying is, you can say here the original roof. It is extra Gasser outline, which shouldn't be here to start with it. Even if you spot of the roof, it probably would have been better to model the extra pass separately. But Autumn Allah is blowing into world properly. Less of justice area with vegetable splint unable to stop toe, press the S key on your keyboard or simply click on its toolbar Button has previously done . Next. She's extraordinary fire from the less by processing E on your keyboard. In choosing it, 100 stood parameters. Increase its amount value to master death of the original roof following that applied to edit poorly modify on top the auto model of pain to works best If the edit Polly is applied before the VW map. Otherwise it won't work properly. Finally, let's apply the VW modify on top. U V W Telling is absolutely key for the autumn Allah to work. Each starling value will set the side of the roof tiles. When painting on the match souls choose the box mapping type Next open in Israel. Editor. Select an interventional slot and click on its diffuse total. Choose the Checker Procedural amount from the list if Jones into specific procedural matter because it will allow us to clearly cedar tiling on the surface. Collector. Sign it to the selected roof under UV and doubly toil. Let's start with a value of 10 for all three. Next, let's select in a roof. Dollar mash again in black on a select text seen here. Not how it suddenly changed from the tax. Select two groups. 01 To run the smashers of pencils, simply selecting the View port and click on a perhaps his Tobar, followed by clicking on and make button. The mash is now reminders of pencils. Let's move the roof tile mash close to the roof model on the roof. Time. Masters still selected hoping to prop his dialogue again and click on a Mac into so Spartan . Once again, the rooftop mashed has become the pencils, the heavy brush. I sets the sauce covered with each breast stroke or blake. The bigger the brush size, the quicker necessity will be filled with each struggle. Click. No, but sometimes doesn't affect the size of each mesh top to give VW totally invited to do that, enable the paint button and start clicking on the roof to paint it. As you can see on a small persons of the mash are being painted with each stroke. If you increase the brush sourced of five and paint again, you can clearly see a bigger area has been covered with its stroke. It's also worth pointing out that mess Charles remained the same. Size is before because they're being controlled by the U V W Tiling values, if he zoom in closely, were noticed that pass of the roof tiles are sank into the main roof surfaced. I record below two breakfasts. That's first select. A roof tile mask is more previously created by the autumn model plug in. When it was first, Sata's a Machel's next in a front view port, begin moving it down. As you can see, the towns are beginning to sit on top of the roof nicely. There are times when they matched. Our source isn't oriented in a right direction. If you're to paint such sites of match sources is depicted in this example, the match those would be rotated in a wrong directions is seen here. For this reason, all those he sure the match yours is rotated in a correct direction. Also, Auto Model enables users to select multiple masters is to be painted with for specific and more accurate results. Some users Prophet's create two separate parts of the picture of in painted separately in this final example begin to create a donut shape under splints up in a modified panel and set in tribulations. Sub two armed. Because you'll be painting on a curved surface, the more steps or segments it has, the more water at the Met. Sores will look when painting on it extrude the shape is previously done. Next, we'll create a different surface to be uses that pencils under spines enable the rectangle shape button in creating a top view port in a modified panel out of flow generator modifier and say its board size. For more information by this, modify it. Please check my other tutorials, as mentioned earlier, create your Machel's in a top view pool, if possible. Divider here two picks the amount of memory currently being used less. Increase italics region to 15 millimeters for lane that right quick and chest collapsed all and convert to edible play. Next that's assigned the same checking material onto the don't object. Previewed Italian a vehicle to and other edible pulling. Modify on top Full body. VW map. Let's make the mapping type as cylindrical with a cap function enabled in the U V and W, it'll change its 20. Open the properties. Dialog can make the new tile into a source s seriously done. Open the pain first. Arlo. This was the previous match ALS has deleted by simply selecting it and pressing Delete on your keyboard because you'll be painting in a cylindrical surface. Let's change the override border searching center form in able to paint button and begin painting tiles onto the cylinder s. Previously done. Let's adjust the gizmo off The naturals between shoe Tatars are not sang into the cylinder to overlap This gap that select cylinder object can make it step. Fight is adaptive. His mission earlier to smooth the surface. The more walker the painted Mashal deformed to a surface, this Haider cylinder to see the curve tiles to run. Demise. The titles. We're going to create new yourself towels and changed them slightly. Open the prop $2 inches. Tow unmake on hind and select to surrender. Click to Clear Pain Mosque. Select both tall objects in the scene. Make him into a source. Jeans a brush size 25 Able to deform function again. Close the properties. Darla in able to paint button again and begin painting. The new mash sources is previously done. But suggested gizmo, This scare is what we can't they have. Between these separate surfaces, we can move them closer together to bridge the gap. It's also worth mentioning that can still art other modifiers such a slice FFT and much more on top of the services to achieve a specific results. Also, in a practice Darlow, we have all these additional functions, which is specific results. Does the UV tiling section to copy and instance options for the group mashes curved surface stairs, mode, borders and much more for the brush paint. We have all these other options here, one satisfied with everything. Simply select a group of tiles we have just created Every time we penned mashes under surface, they created as one group, as you can see here. Next, click on a group to bar in just on group while he'll still selected right click Angie's to convert them into edible Polly falling. That's like the one of the objects insane and open. The modified panel enable the elements election moat in Click on your touch toggle. Just a select, all in quick to attach. All tiles are now part of one hunting. Because it's the big mash. We're going to convert it into a view, a proxy to reduce the fall size and speed up the running time of ready creativity. Toiling hard to create process Simply right. Quake in juicy option to fury. Amash Export. This fall the sets the location where your proxy file will be saved. Into here, you can rename the viewer mash fall. However, the file extension dot you're a mass should remain intact, unable to function to automatic right process and click. OK, This subject is now a proxy form, which is extremely light in size and facets run Note that its original far was automatically renamed to start with the word Be very proxy under school, followed by the original name. This will make it easier to identify and peck. If we open the modified panel, we'll see all the standard proxy parameters here. We can say its few put display as bounding box Pretty from foam showed the whole mash and so on. It's worth noting that you just cannot apply modifies under proxy objects. Otherwise, the match will render with arrows and artifacts, just to show one more example. You just can't paint. Multiple match shows is under surfaces. This is the MASH will be using a source less detached element separately and select them opened a hierarchy panel. Glicken affect people on Lee Point and descended to optic alignment. Let's repeat the same action with this mash. What a modeler has now a lot more information to work with. Slept this south tiles and clicking a source objects button to Ademas pain sources. As you can see here, the group of objects have been ordered as one source. Click to paint and begin painting on the surface to correct some randomness and apartment. Let's select some of the tiles and move them separately to add multiple sources. Let's like other tiles here and other missiles, as you can see here now we have multiple groups is the source selector, second source and click to paint, followed by painting on a surface. All you can select the previous group source and replace up again. Users can also add modifiers to distort specific mashed halls. Would your 50 modifier he's compression? Pull it will. Also you just can select and add it. Mask is Mr Stop the mash button. Finally, if you are planning to later convert to group into one single machin proxy it simply select a group in Clicked a touch here and collector of Fresh. As you can see, the group has become one single mash in a second. Even as a mash uses conceal. Continue to paint on top once you happy. Whatever Fay, it can simply convert into a proxy experience. Lee Done quickly go back to the rooftop. Previously creatures necessary or run over the roof s a texture, and just in your underwear the roof just created, using the Autumn Ottawa plug in the roof tile, Machel's and the entire roof is available for my Patriots schoolteachers and does already have the 67 day like ALS. I only hope you found this a Children's for like and share it, you know, steal money.
16. Overnight Batch Render with 3ds max: Hello, everyone, This is game here. Welcome to notice session of this text yourselves. And this session will show you how to submit multiple treaty camera than scenes using an amazing plug in call overnight. They're trending, so we're not for two. Let's start by googling Deloitte's overnight batch run there. Great Dishpan dynamics link here. This is the page where we can find quick video. Part it. He had a description examples. In here you have the trial and the full version of the Link to download. Let's start a trial version for the purpose of this exercise. Once downloaded in three DS makes less open to plug in my first game to scripting Angie's into Run script Selected opened. Download a script. This is, um, not pets. Run the plague unloaded creates toolbar button that these ones here please check the previous stools. As you can see, just seniors. Four different camera set ups overnight. Batch run The plug in uses multiple cameras and stay setting to submit the current ready seen and external finds with a click of a button under settings, we have destroyed. Yes, Max better and it'll state said, since seen states these three options need to be enabled at all times to set up a scene state simply go to tools and changed to manage since the inception from the list. This is a doll off To save. Seen states simply click in a safe button to save seen state dialogue, largely just to safe seen states such as like properties, conference forms, can properties and so on. The scene parts could be safer. This game review only if you wish and several different Selves seen. Pass for another camera by 700 different scene. State name. Once you're seeing parts are selected, simply type in the state name here for the purpose of this exercise, let's stop in this camera nine and quick to safe as you can see the safe set with its parts are now. Hear this, but in the largest to restore any previously search states. Some of the previously said parts of seen, such as Object Properties, can be later changed by right clicking and choosing properties from the slighted object and change some of his default functions off some of the runners settings. Many scenes say pause can be edited for this camera only in sight as mentioned earlier. You just can restore selected, seen state rename and delete or click to save again and select different parts of the scene to save over. Used to override the previous scene state. You just can say a host of new scenes states here, but each of these cameras to serve a new scene, states click to Safe and renamed the scene State. Select the scene parts he want to safe and glib to save. Now we have two separate seen states that can be used for two separate cameras. Once you happy with you, seen states click to close. This is our users would normally set up a scene, state State said, so similar to since sites to set them up. Simply go to the rendering. Little Ball in Jesus State sets from the list as an example. Let's assume he wanted this chair isolated as a state set click on isolation pud in a site . Still, ball simply choose to art state the state zero to was created. The steps you're one was The default scene is against the year is the object section, which recorded a current state of the objects in the scene. It is also the composited toolbar, with all these functionalities to be set up. If we quiet and a sequence toolbar reductions to assign a camera, you change the sequence. Mount Paektu, the state's toolbar. We have a host of auctions to hide state template or under outputs under old states. Delete our scripts and much more as its escalation mount to turn state 02 on enough simple quick on this sorrow here, this is our state created. You just can right click to rename or use any of these Lisa functions often when using state sets. There's no need to work with, since states of matter under state sets a quite robust and more complete to work with to set up that really a smacks batch Wonder tool. Simply go to rendering toolbar in. Choose to batch run from the list restaurant owners of water down virginal state sets he can also use since states in presets to send out a renders, sets up a specific camera to render simply quick got button, but a fault name was created while selected. Go to the name section to rename it a scale to this camera view in choose to select a camera, My click and attacks into used to select, all followed by right clicking again inches in to copy in the name section, right click induced the paste and press enter on the keyboard. We need to press enter in order for the name to change. Here they are put path blouses to set the location of the render falls to set up the location. Simply click on its whole and Jesus location and the cameras. We can sink the chiefs of relevant camera on the scene state. We can load a preset seen state fall for a specific camera on the preset. We can love one or save a new one by open your under set up. All these Vero parameters can be saved. This preset quoted a precept function. And just to save it while saving the select preset categories, dialogues will be prompted. We can choose old parts or some of the listed ones and click to site. Would a preset saved? He's considerably load it from the list, but surrender has known issues within that run the function. So for using dysfunction, if you can your right preset a large silver rider under upward side dimensions variously setting a runner set up doll. If you had to close this max fall as it is now, the current battery Masetto would have become part of this really seen. So next time you open the vaccine and get back surrender, this dollar would appear these presets loaded. We can also have the potent batch. Render presets by clicking to export best render button new camera's presets. Anna polls can be added to the better and the list using the previous steps before sending any files. Why overnight? Better run. We can override the original Render upward size villages here to do some local toughs. Renders an ex cetera. You just can also set new Oppel full name for the test renders. If you don't set up the runner up will file name for any of the render scenes in a kid. Thea put far names of scenes will be automatically saved in a default location. Seen here. Dysfunction forces serious Maxed. Ignore any potential under warning when enabled dysfunctions overrides any exists in file names when enabled. Dysfunction forces serious max to shut down once or undertaxed I completed. This spotting is to simply run the falls in the kill before sending External Tereus Max falsity overnight. Best friend Kill. Let's turn off the override. Run the settings first. Insure. We have these three functions the name at all times. If you happen to have all three options loaded in your three DS Maxine, do you wanna bet? Run. They will pick one of three options to execute the runners, as mentioned earlier. One setting obviously scenes here. They used the state sets because it's more robust, reliable and complete. Or the batch render in congestion with the scene states for or Process has shown earlier to load up your three DS max. Seen surrender simply quick to show. Run Rick, You next clip Art Falls and select the host of three s. Maxwell's previously set up Ready to Render. As previously shown 50 Under 30 s. Maxine's are not set up a seriously shown the overnight bets. Runner will simply pick the active Cameron the scene and render the output full. Name and location will be saved and full setting. Seriously, Sean once added, we should end up with a list of serious Max Wallace in here. Another way toe aren't multiple. Three. DS Max falls into the render queue is to click on a full the button and set a location of weather. Today s Max Falls will be added from it's button. Allows users to clear all this that fast from the render queue. Eases can also set the total number of files and click OK. We can also harder current seem to run a Q by clicking on this button here. Once you happy with everything, simply click to run the phones. These are some of the final render falls I really hope you find is still useful like in Sharat and Hopes Theme.
17. QProxies with 3ds max: everyone just Jerry here. Welcome to this session of this text for services. In this session, I'll be taking it to the post of using an amazing plugging call. Keep profits Que proxies the three DS max plugging compatible with any rendering engine that most boxes it reduces the polygon count in a scene and help speed up renders substantially what sets this proxy play in, apart from others, its ability to bring back the original Masri textures and modify its previously applied from any rendering engine, not to mention other great features. Such is reeling proximity, current folder removing use, falls and much more. So without further ado, let's start by Googling the name Kid Proxies scroll down and click on the spine. Dynamics linked. Seen here. Here's a quick introductory video by its capabilities and some examples. Here you can buy the light first or the full version. Alternatively, simply, Darling withdraw version by quickness. Link Here this link here redirect seizes to the manual space age where there's a full description of all dysfunctions. Once the script is downloaded. Simply go to script in toolbar, in juice to run script, but by selecting opening it from its location. This is the main dialog box. That's correct. Toolbox similar to these ones here. Simply What's the previous stools? Body Full is set to create proxy from static objects is seen here. To general approx it. Simply click on this button to correct process. In this scene, we can't have four identical shares is a mash by turning one of them into a proxy can instance ing them. It will make your rules in much lighter and quickly surrender. As mentioned earlier. Here we have the option to convert the process of static objects. Animated PRS. PRS stands for position, rotation and static. Here we have the option for animated informations. Old geometry. This section allows users to automatic with select multiple objects in the scene by the minimum and maximum number of faces off each selected object by nearly in the years size filters. You can also slap objects in the scene by their minimum and maximum dimensions when creating process. Did four option? It's quite from selected objects in the scene. Only he can change it to all geometry to create proxies from all the geometry in the scene . Dysfunction in close, always and subjects. This pension ignores hidden objects. While the process have been courageous, this option automatically convert similar objects into instances. Instance. Copies are lot quicker to render than simple copies. Dysfunction Converts Group Objects is a single proxy file on the polygon reduction to default messages. Settled multi resolution. The fort one of 500 says the average number of verses displayed in a vehicle to be quite smooth optimizers lived in displaying of people that's changing to 300. Instead, either skin cheese optimizer is lucid, explain of import as multi rails or pro up to either on the match type. He just can choose from source or any of the list of types in here again. These are for display purposes in the people on it. If you had to choose a custom master, then you would have had to pick an existing proxy. Imagine is seen to be displayed as a mass type. The Save Objects function allows users to choose harder. Proxies will be generated. It's set to sail objects altogether by default. However, he's a skint used to save by group by layer or individual. In a message stool spot on a reference falls, he can set the location where the proxy far should be saved into. Otherwise, you will be saved in a default fall. By clicking this button, you will open the current folder. This button removes the news proxy phones, and this button collects reference files to Spartan selects boxes in the scene. This button brings original mashes with materials and modifiers back into the scene. This one automatically rulings boxes to current Fullers. Two Spartan drillings proxies to new fall. This one's Lex boxes with missing rough users and this button open The proxy reference falls back in the great processed er, less clicking the generate proxies button while one of the chairs is selected. Click yes to accept the general proxies. This is a process created with diversity displayed in the importer 300 in a managed to all star. Here we have the Reference Notes name, which is the name of the original chair. On the reference file, you have to direct your weather process. Reference follows save into by clicking this, but you can change the proxy for location. The X reference made function is gonna reference in the original materials from its location saved no longer from this open scene, show an example that's put unusual editor and isolate. A proxy chair can click under next exit desolation in a sign of different materials to the chair, followed by clicking to render again, as you can see even do. A new material was assigned to the chair. The original materials were rendered because the X reference met function is still enabled . That's disable the X reference malfunction on rendering again, As you can see with the ex reference mode function, disable the materials are now being roofers from the scene, which is amazing. Let's enable the extra fit function again in a man. Still stab is Mission Aaliyah. This button brings back the original mashup textures and modifies. Click on it to bring back the mash and except to bring the original object is he can see the chair. MASH has been brought back to the original material on its original location is an example . Let's make the floor surface, which is a floor generator Modify applied to it. Next, go to the great proxy sister neglect general process. The average versus value was said to 300 this water surface displaying of you boys of a dropped to bring the regional mash with the material and modify applied. Simply click on this button s previously town. As you can see, the floor match was brought back to the material and modify approve, its replied, which is an amazing feature and currently the passing the market. Next, select a chair is previously done. Go to the create process time increasing reverses. The father living creates proxy. I select the chair de select the use proxies Runda button collector ever again is again see by de selecting the use proxies in there under button. The polygon reduction has been using the view port like the use proxies. Render button again in Quitman before sending the fund Orender. Let's copy instances, proxy it around the table and delete the original mass chairs as a final example to see how the minimum and maximum number faces his work. Let's start by creating four spheres of several copies so that all four spheres and click to generate proxies. It's Max Cryptology is a warning that no objects in the scene will fund. With this minimum number of faces, the series of less than 1000 faces each click OK to close a dollar decrease the minimum number of faces to one instead, so that all spheres and clicked general process again. As you can see, the proxy was not generated. This has happened because the minimum number of faces was set to one, but the average number of verses is still at 500. Local objects often have less than 500 verses, on average for D C average number of verses to 100. These two pointers are totally dependent on one another. It's let all full spheres in clicked General proxies again. As you can see, the process have now being generated this function to convert copies to process. Also Converse a copied Sears. Two instances of one another. Back in John Main scene, let's check to find Orender. This is a fun run, which was rendered a lot quicker because of the instance Foxes. I hope you find this tool useful like and share it and hopes
18. Verge3d with 3ds max L: thats Jimmy here. Welcome to the session of his technical services. This session I'll be taking you through the process of creating eye catching instructive abs using an amazing plaguing called verse treaty. First Reedys compatible with V. S Max 2018 and above. It's also available for Blender and Maya, so without fried Redux, let's start by opening through this maxi named car start dot max, followed by Googling the name first reedy and clicking on this link. Seen here. This is the websites is you scrolled on in this step? We have diversion of those three D for blender In this step, we have division three years, Max, and this stuff for my two pups is sexist lies. We can't use verse really for three DS max to download it. Simply click on this tab here. Also have numerous step by step rituals here and hard to use it. Once the software is downloaded, simply double click and store it. Once I was told, Restart suggests Max most everyday should appear. When you're told what has seen here, it's mentioned earlier. Bush Reading works best with three s next 2018. Currently, it's only compatible. Three. It's Max physical materials in standard lighting. Just start up in the material editor by clicking on this button here to load up the physical material. Shader Simple Take When this struggle in, choose to shade in the material process hollow. Next that sees a material preset by clicking here in choosing the red sports car Pain from the list to name the material slot selected. Preset name right click induced a copy to text in Paris in the name field by default. The material model. Gissin. Time set to stand. It is the best to advance, as he currently is, almost set it up to advance. In order to have access, the Reflections group can other important functions. Copy the base color Swatch and Pacey under the reflections and make it slightly darker by clicking. Been holding his color Swatch and change is fun, you say Scroll down to check the remaining settings. Here you have the description of each deal loaded in perspective. People rightly here in Giusti Edge faces option disruption. We let you see the selected objects in the view port. Select the car body in a scientist material to it. Next, select the glass area. It's currently grouped, Go to the group Sue Bar in just Opened group Victor Glass Object. Select a new material slot and load. A new physical material s previously done. She's a glass solid geometry pre set as opposed to the glass in geometry. Brass in geometry is mostly applied to glass surfaces such as window glass and tables. Experience. We done copied attacks and place it under them still slot name and assign into the car glass for the car. Highlights that Scarpetta class material by dragon into the next lot in naming it. Let's change the material mode to advanced because you want the headlights to be self eliminated. That's increased the mission and value to about 0.19 is again. See the glass materials slightly brighter them. Assign into the headlight object in the seat. Next, let's select a ream objects in the scene, followed by selecting a new material slot and loading a new physical materials Previously done in material preset due to call material. Let's rename this material as chrome changes space color swatch dark gray in changing until motor advance, the next material be against create is a plastic material in the View port. Select his front part of the car and maximize of U boat selected guard rooms again, and it's signed it. Crawl material to select the front. Bar that car again in a new material. Slop Loved. The physical material is previously done and cheese a rubber mature preset from the list crop in pace a preset name in the materials law Because you want a plastic material to be really dark. Best click on it's refreshing color swatch and changing but darker color to reduce reflectivity double quick and was your editor to maximize next decrease of roughness values until you see the sheen coming through the surface. Also, let's make the base color completely dark. Selected car fenders and assigned a rubber must feel to it a sanity. The ties as well. Next. Clicking a customised tool ball into user preferences. Option from the list on the general tab increased the CNN deal levels of 500. This would allow you to undo up to 500 levels in case you making a steak under false step. Let's increase the backup intervals to 30 minutes, depending on the far side. Sometimes it's best to increase the auto backup interval times if the max politics too long to save clicker pray to close a dollar. Next, let's create a camera. By clicking this command, I can select a camera button flow by clicking and dragging it in the top. The airport. Right, great toe exit creation, right. Clicking cheese to move to love and adjusted camera accordingly opened modified panel and change it to a freak out. This will give you the flexibility to move the camera freely. The large target constraint is unlike the report and knew the camera up to eye level or 1.64 meters in a prospective you poor change of you to the selected camera. Next, we're going to load the next year. I'm a to the environment map. Before we do so, click on the plus tax. It just configured vehicles under the display performer. Stand change of you. Poor background to one father 500 pixels. If he's not set to that size, already high five years will be sharper. However, it may slow down your computer under the background tab, changes can function to use environment background in clicked applied active, you next click on running to bar in choosing environment option from the list. Alternatively, simply for us eight and a keyboard pro by clicking environment map double in your browser. Click and a bit wrapped in Jesus SGR image. Unlock this padlock and said his display scale colors to 10. This finding work will K for this exercise, however, feel free to enter different values if you wish. Next, dragon drop is tuggle into an empty until slot into user instance. Method. It's great lights. Let's click on the lights. Come on, button. Those treating works mainly with standard light, such as target sports, Free sport, target direct, free, direct and on the lights. For the purpose of this exercise, let's selected on the light in creating the scene moving. Adjust the light followed by going into the modified panel to enable the shadows. Simply check the shadows. Function here, scroll down to see for the 1st 3 D like parameters. Most of these parameters were world by default. When it's seen is exported to Verse three D. The shadows may look dark with unusual Rectify this simple, increasing emission values of a specific juror slightly as previously done because you want this scent of interactive, we're going to correct buttons to be later used to change the material of the car body. It's correct. The first button investigated the shapes Command in Jews to circle. In a front report, click and drag to correct the circle. Go to modify panel, as mentioned earlier. Most light materials and objects will come with the adversary. Need parameters as seen here, increase its interpellation to make the circle smoother. Moving positions circle so it's in front of the camera, expanded parameters and reduce its radiance to make it smaller. This for position again. Next up in Michelle Edison, select the red carpet material in Copied a Texan eight. Followed by placing it in a circle object name field and a text subject in front of a summation earlier is crucial to name materials and objects accordingly related. Pick them in verse. Three D heart explode. Modifying an increase in mind to five millimeters to copy it while selected. Hold on the shift key and moved a circle down after named blue. Here, an object changes object color to blue by clicking here in changing its color, change this circle color to red. Next, let's create a new material slot by dragging and dropping this red material. Id the name blue here and changes color. Salute Sandis material to the Blue Circle Object. Copy the last circle and name it Yellow Object Genius Scholar is previously done great in yellow material. Using the same approach is before before exporting is seen to 1st 3 D Click anniversary detail bar into disruption to sneak peek thistles. A quick preview off the final result. Next, go to diverse arena toolbar into inception to run APP manager. It's creating new at Click on this icon here and name it accordingly. Accepted four settings is it can see a new apus created every time and I piss created. It goes into the specific folder is senior. It's often under your local C drive. Users uses first reedy and applications Inside Applications folder he can see only UPS created is again See a temporary guilty F All in three DS Max World was automatically created under the name off the They need to be overridden with our own Julius Max Fall and Guilty fo. It's great puzzles coding for this new happy. We need to click on this button here before we start quoting puzzle codes. We need to first export country desk Maxine as a GLT fr former back in three DS max. Go to diverse really toolbar and just export to jail TF in export dollar. Make sure to override the placeholder far off to my script. Traitor under the name card Jamie back in the APP manager thinking a puzzles button to load up the recently exported for this puzzle. Space Age is unique in truly groundbreaking diseases. Don't need any experience in Cody to grow amazing interactive and immersive applications. The puzzles list is broken down into events. Slouches, objects, materials, animations, cameras, scenes time. HTML. They are the R sound video physics, post processing to our bloom and other it. Thanks. You also have logic loops and all these other features listed here. Let's start by quitting on these events. Puzzles double click on this event here to select it. Dis event is to one plea to do something for the purposes exercise. We want one click to go to the selectors puzzles under selectors, where the number of functions that's double click on select an object function trade and fitted to one click puzzle. Click on none to pick the object from the Maxine Victor Brush Metal Road object from the list. This is why it's so important to name objects and materials. According there he Notts Maxine So one click. Don't brushed Metal Road object. We want to do something. Click on the treeless puzzles in just a sign to disposal. As you can see, there are also other puzzles to place takes you set color and much more for the prostitutes . Exercise reaches in the assignment. You'll puzzle That's dragon fitted here to connect with this puzzle in assigned material. Best use another selective puzzle on the selector material. Choose this puzzle dragon fitted to assign them to a puzzle. Clicking Jews a road sports car. Pain from the list again. This is why it's utterly important to name objects and materials according to this vaccine . In this section, two objects begin to find the white puzzle. To fit into it. Click the select disposal under the select An object Cheers. It's puzzle and fitted to the objects puzzle. If disposal wasn't Christ, he wouldn't feeling click. Sometimes you need to go through the list of puzzles to see what fits flicking this puzzle inches the car body object from the list in summary. When you click in this brush metal red object, the assigned material to red sports car paint links the object car body this from generalities were applied to the red button. Next, we're going to get these puzzles and applied into the blue and yellow buttons to duplicate the entire self puzzle simply right quick under specs. Item to set into use it duplicate the entire self puzzles in our duplicated. Next, you're simply going to replace the name of objects in the tools accordingly. In here, let's change this brush metal red object to the brush metal blue objects in here toe one plate on this brush metal blue objects. We assigned his blue sports car paint material here to the same Carboni object. Let's say that coding created so far by clicking this safe but one saved the bottom will turn grey. Let's duplicate the last self puzzles again and repeat the same for this yellow button. Here. Let's save the changes again and click the play. But now we can click these buttons to see how the coding is working. We can also never get around the scene as mentioned earlier. We can use the same approach for textures, lighting, animation, e commerce and much more. We don't want to be a program. These African go on a website or sent his links to clients. It's contact me for more information about this happened. This concludes our tutorial, but really hope you found the situation useful like in Sharat Theo.
19. Q Proxies with 3ds Max part 2: Hello everyone, welcome to another session of this textbook services. In the previous tool, we'll explore some of the main queue proxies parameters. How cookies quite proxies while retaining its modifiers and much more as mentioned earlier, this plug-in works with any rendering engine. Second part series. It will be showing you how to quickly create proxies of needing one gigabytes file with a click of a button using amazing precise. So without further ado, let's start by checking the current size of this 3S maxval is, you can see this file as 850 megabytes in size. This massive size is mostly because of the trees and cars. And see, before we begin proxying the trees and cars, that's lectin first column by clicking this button to isolate the selection, let's maximize a top view. Some of these trees are instances, as you can see here, to check how many faces and polygons under scene, let's click on this plus sign here. Induced to configure the vehicles, go to the statistics tab, enabled total plus selection to show statistics in. And if you apply an okay is it can see the scene is almost 15 million polygons, which will slow down. You can feature renders drastically. As previously shown, define Q proxies simply Google the name and go to this website. In a website, we have the video tutorial with information about the plug-in audit tools link and a script manual. Here we have a link to get the full version to light version or the trial version. Once downloaded and unzipped, simply go to description toolbar induced a run script followed by openness script. The script dialogue should pop up its CRO toolbar button of this script. Simply watch my other spine dynamic tutorial. As you can see, the minimum number of phases object is set to 100 and the maximum is up to 50 million faces. And wave formation by these parameters simply watched the previous key processes sooner. Let's start by selecting all the trees first, while one of the trees are selected, hold under control key and draw a rectangle selection by clicking and dragging it to select large gloms onto trees at once. Next, go to the presets pulldown menu. Here we have the precessed proxies, rocks and trees, vehicles, static vehicles, animation, vegetation, vegetation animators, sculptors and statues, and animated characters. Let's choose a vegetation presets. As you can see, most of these firms is having great art and a mesh type was automatically change to convex hull type. Default mesh time calls from source to convert selections approximate simply click the January Process button here, click yes, generally proxies and yes continue. May take few minutes. Here has generated tree proxies. Next, let's select cast in a scene. Choose a vehicle static preset in clicked generate proccess to trees and cars have all been turned into proxies now. And the oscillation button automatically exit it has shake, our optimizer EXE file is now, as you can see here, the file went from 850 megabytes to 348 in few minutes, which is amazing Indeed. Here the bruxism when the input is, it can see its quite easy to novae case and much faucets retina result. I really hope you find this tool useful, like comment and share it, and I'll see you in the next one.
20. SubSpline for 3ds Max: Hello everyone. I'm Jamie, welcome to another session of his textbook sepsis and this session of introducing you to an amazing script tools exploit. As the name suggests, the script works mainly with splines and allows you to scroll and array of different types of selection in material ideas with great ease. So without further ado, let's start by downloading it first, topping the spawn dynamics and press enter in a website. Let's get to the products tab and choose a subsequence. This is a quick tutorial on how to use it, is you scroll down, we have mentioned about the scripts. Pays a link to open a script manual page. Let's right-click and choose the open the link in a new tab. Here we have a very detailed description each of the functions do. Back on the main page. Let's click on this button to get the script post download the vacuum max, click on a script into Bob and choose to run script. Let's pick out, download the script here, open it is the subsequent allo. It's toolbar button here. Let's go to the customize toolbar mars interface on a toolbox tab. Choose this point dynamics command from the sketch Coriolis, select a subsequent action and click the New button here, it's crow any button. And I'm the new toolbar and pledges somewhere on a main toolbar. Let's start by creating a rectangle spot in a vehicle. To say, well the snap tool by open the modifier and increase rectangle size in the viewport. Right-click and choose to beef. This button allows us is to see the vertex number in a vehicle. It only works on multiple slides. By clicking on any of these editable spine buttons, it will convert the spot into S plus five. Click Yes to converse it. As you can see, the vertex numbers are now being shown in a vehicle with a spot enabled. If you unclick it to vertex numbers will disappear. This button displays them Zola, the numbers in the vehicles. By default we are wooden material or D number assigned to all spoiled segment. This segment as unseal ID number one on it. Same for this one. This one and this one here, the material ID numbers are being represented in a gradient color. And in segment r, d numbers here, here, here. And here. You can select segments individually by enabling this button and selecting a segment interview poops, or by dragons collections across the board to multiple segments in the viewport. This button allows ease is automatically grow the number of segments liked it in by clicking on it or click this button to shrink or reduce the number of segments selected. This button will set selections in a vehicle, but segment needs to be selected first. You just can't offset selection foods or backwards. This button selects the segments randomly. Increasing this value. The number of random selections. This button sets the number of sections by click by element only. This section is to select material ID numbers. This section is to set from Sheila de numbers, let's say each segment with a different ID number, topic number two, and press enter to set the segment material. Idea number two is again, see the numbers change from number one to number two. A quicker way to sell material ID number is to simply select a segment in click one of these buttons, just a number that connects segments and set it to material are dealing with three. Slept there next segment has said it's Mozilla. As mentioned earlier. For these changes to take place, the segment button needs to be enabled along with them, Sheila de button. Now we have this segment with them. Sheila de Number one is one we'd material ID number t, discounted material or D number three. And this one Mozilla, D number. For. Now we can use a selected range button to Slight 15 material ID numbers. Next, let's select multiple segments. Hold down the Shift key and a keyboard and move to copy them across flight one other segments and click on the Copy ID button to copy. Slit another segment and click the button to pace until ID. You can see in the viewport to Mozilla, D number four was changed to material or d number one, district make every apply to any of the segments. Here's an example of a scene I've created for clients using the subsequent scripts. Subsequent was used in conjunction with a plugin called ROHC law. Older dot work seen here to show how they're created, let's start by selecting an isolating oneself dot well first, this is one example we're going to recreate. Let's hide it in news original spawning a viewport enabled them to IDs and the segments button does y needs to be selected in vehicle at first click OK. Now we can see Oldham Teilhard de numbers previously creativity, quote, adopt. For the purpose of this exercise, Let's let this group of segments first and sets material ID number to three. Let's select this other group of segments here and set them to LA D number 21. Now we have one group of segments, wouldn't steal IT. Number one, tool ID number t and material IT number three. It's quote didn't work. Let's go to the Query Panel and primitives. Cheesy IT software from the list selector world cone button, followed by clicking and dragging in a VIP which create the icon. Open modify panel, and click on this button to open a dollar lets students a cylindrical Doctype, which is in a rock on library under the industrial ductile. Click to impose selected. And okay, the units mismatched allo, underpay Songjiang. Click the splines button and select the spawning report. To that work is created to display set top boxes by default. Let's change it to quick mesh for more accurate previous reports. And click the Edit button to open the dialogue like this item generator and opened the limit tab. Enabled them to an id function to limit the ducks surface to Missoula d number one, only under the padding group, set the end value to about 15 millimeters. As you can see, this duct work is only affecting this material ID number one. Let's change a viewport displayed to shade it to see the material. While the rural Karnataka is still selected in the vehicle, press control v and keyboard to copy it in a clone options dialog, choose to copy. Change it up, work style in the sauna, different material number type. Let's click on this button again and choose a different ducks though. Once criteria, click on that it's a button. Again, select the item generator and certainty and ID limit to three. Enabled them to t function is you can see now the new Duckworth is only affecting the aims with them till id number three is, let's selecting copy another row called object in the vehicle. Choose a cylindrical deck, again, open to style. It is a one small. Set them to Lai De limit to number two and enable them to ID function under patting set to start to 300 millimeters and yen to 200 millimeters. As you can see, now we have 123 on objects affecting different between ID's previously set by the subsequent script. Let's use the select query decal to select all three material IDs in the spline, unlock it first, and set the maximum of the three, followed by clicking in the ID arrange button. And the set button, we can choose how different sets of duct work should line up along the spine. 0s in these materials are D number sets. We use this resource IDs button to reverse back to the original set exits oscillation mode. This is how most of the world was created in the scene. I really hope you find this tool useful, like comment and share it. And I hope to see on an x-ray.
 Jamie Cardoso, Viztechsupport services