Transcripts
1. Welcome!: Weaving is one of those crafts
where even as a beginner, you can make something
exciting and inspiring. Hi. My name is Amy Flint
and I'll be sharing my love of weaving with you
in this beginner course. I've been a fiber artists
for over 15 years, mostly in the fields of garment sewing and fabric dyeing, but I didn't try loom weaving
until recently in 2020. Working on a big loom
that my dad helped me convert from a
wooden drawing table, I became hooked on creating tapestries row by row,
stitch by stitch. While working at this
skill is exciting, it was a bit daunting
for me as a beginner. So I've designed this
class to allow you to easily jump into weaving
without feeling overwhelmed. Working from a small
loom that you can buy or make out of cardboard, you'll leave a mini
tapestry and in the process learn essential skills
like planning your design, how to choose yarn, setting up your loom, how do we have three
important kinds of stitches, and how to finish your
piece for display. As a multi-passionate creative, I double in a lot of
different arts and crafts. But weaving is the
one I go to when I'm looking for something
quiet and meditative. I find a simple repetition
of over, under, over under incredibly relaxing
and I think you will too. Because this project
is small and simple, you can finish it in
an afternoon or work on it a little at a time when you find moments to yourself. Working in the small scale of a mini tapestry is particularly nice because the loom is small enough to sit on your
lap as you weave. So find yourself a cozy spot
and come weave with me.
2. Class Project: Mini Tapestry: Class project. In this course, I'll show you how to
make a mini tapestry from start to finish. You'll learn beginner
weaving skills, as well as three
types of stitches, Riaa, Tabby, and Sue mac. I've created a
digital download to accompany this course
that has a list of recommended materials as well as links for where
to buy them online. This graph doesn't
require a lot of expensive tools and materials. In fact, you may already have everything you need to get
started right in your home. In the digital guide, you'll also find templates
that you can draw or design on top of to
plan your tapestry, including some that I've
designed for you where you can simply choose your own
colors and materials to use. Throughout the
class, there will be opportunities for you to
study the stitch I'm making. I encourage you to
pause the video at these moments so you can take your time to replicate
what I'm doing. Take as much time as you need
and remember that you can always pull out your stitches and start again if you need to. As you work through the class, keep me posted on
what you're doing, from the early design stages
to your finished tapestry, by posting photos to
the project gallery. If you have any questions, don't hesitate to reach out in the discussion section and
I'll help in any way I can. Without further ado,
let's get started by learning about the tools
and materials of weaving.
3. Tools + Materials: Tools and materials. Weaving doesn't require a
lot of special equipment. In fact, you might have
everything you need already. The most important tool
you need is a loom. Looms come in a wide variety
of sizes and styles, but the basic
function is the same. They consist of a frame with
either notches are pegs at the top and bottom
to allow you to attach your warp strings to. Looms can easily be DIY-ied. My dad helped me convert
his drawing table into an easel style loom that
can sit on a tabletop. I added evenly spaced snails to the top and bottom to
turn it into a loom. This smaller lap style loom was purchased and has notches at the top and bottom that
can be adjusted to change the tension of
your warp strings. A loom in the region
of 12-15 inches in length is ideal for our
mini tapestry projects. If you don't want
to purchase a loom, you could make your own using
a wood frame and nails, or even a piece of
sturdy cardboard with notches cut into
the top and bottom. Just make sure your notches or nails are the same width apart, about a quarter of an inch
to three-eighths inch apart, and are well aligned from
the top to the bottom. In the next lesson, I'll show you an easy way to make a loom out of cardboard. Another essential tool you'll
need is a tapestry needle. This is a larger blunter needle that you'll need to weave in loose ends and will make the overall process
a lot easier. I have a variety of
tapestry needles that I switch out
depending on my mood. I prefer longer ones
for weaving and shorter ones for
tucking in loose ends. The final tool you'll
need is a beater. We'll use this to beat
down our rows as we work. If you're thinking that
a beater looks like a comb, you're absolutely right. That's all it is essentially, and you can absolutely use a wide tooth comb or even
a fork as your beater. When I'm leaving
something small, like a mini tapestry, I'll also just use my fingers
to push my yarn down. But it's worth having
a beater on hand for beating whole
rows down at once. There are several other tools
in the weaver's toolkit, but for this mini
weaving project, these three are the only
specialty tools you'll need. Let's move on to our materials. There's really no limit to what kinds of yarn you
can use for weaving, but there are a few
things to bear in mind. For your warp yarn, which is the yarn that goes
up and down in the tapestry, you'll want something
that doesn't stretch and is quite sturdy. I recommend cotton
yarn for this purpose. It's up to you how light
or heavy your yarn is. But just keep in mind that a heavier warp yarn will
give you a tighter weave, while a lighter
yarn will give you a looser weave that is harder
to control the tension of. You'll probably experiment a lot before you find your
ideal warp weight. Also keep in mind
that your warp yarn will probably show in
your final weaving, so consider that when
choosing a color. For your weft yarns or the yarns that you'll leave onto the warp, have fun and choose a variety
of textures and materials. This project is a great
opportunity to use up any small amounts
of yarn you have leftover from a knitting
or craft project. Cotton, wool, and acrylic
yarns are all easy to handle when weaving and come in a variety of textures
and weights. Anything too big or bulky will swallow up this
small design though, so save that for your
next larger tapestry. I'll go into more
detail about planning your design in an
upcoming lesson. Let's recap the tools and materials you'll need
for this project. You'll need a small loom, either one you've made
or you've purchased, anything in the region of 12-15 inches in length
will work great. You'll also need a tapestry
needle for weaving your yarn. The last specialty tool
you'll need is a beater, which can also be
a wide tooth comb or fork if that's what
you have on hand. For yarn, I recommend a sturdy cotton one
for your warp string, as well as a variety
of others in different materials
for your weft strings. Next, I'll show you an easy DIY for making a loom
out of cardboard.
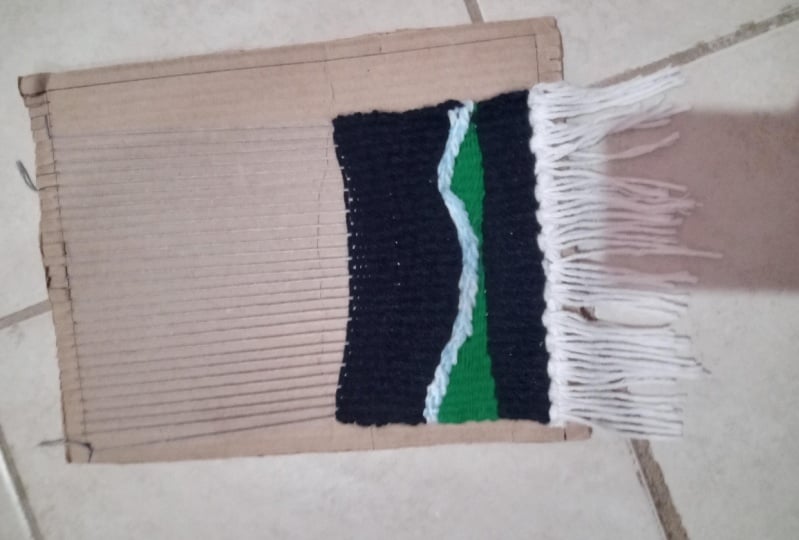
4. DIY: Make a Cardboard Loom: DIY, make a cardboard loom. If you don't want to
purchase a loom here's an easy way to make one out
of a recycled cardboard. Start with a piece of
rectangular cardboard that's around nine by 15 inches. If you can find a piece
where the grain of the corrugation runs up
and down the length, your loom will be even sturdier, and should last you longer. Using a ruler, mark your notches at the top
and bottom of your loom, starting about an inch
in from the sides. Your notches should
be equidistant and aligned from the
top to the bottom. I'm making my notches
a quarter-inch apart, but you could also make
them three-eighths inch apart if you're planning
on using chunkier yarn. Next, draw a line a half inch away from the top
and bottom edges. This is your guide so you
don't cut the notches to deep. Finally, using scissors
or a utility knife cut your notches making sure to
not pass the half-inch guide. When you attach your warp
to a cardboard loom, make sure you're wrapping
it around the notches, and keeping the
yarn in the front. If you need to, you can insert strips of cardboard
at either end of the loom to keep
the yarn away from the back so it's
easier to weave. I'll go over exactly how to add warp yarn to your loom
in an upcoming lesson. Next, I'll give you some tips
for planning your design.
5. Planning Your Design: Planning your design.
For this project, you may want to
plan ahead or just go with the flow and
improvise as you work. Both approaches to
weaving are valid so choose the one that best
matches your creative style. As a beginner myself, I found it much easier to
create a rough plan for my design so as not to become
overwhelmed by possibility. I recommend at least sketching a basic idea of what you want to do so you have something to refer back to if you get lost. Abstract, simple
geometric designs work better for the small
dimensions of this weaving. In the PDF guide that
accompanies this class, you'll find blank weaving
templates that you can design over to help you visualize
the final look of your piece. In weaving, we typically
design in a grid pattern, but the grid will
change depending on the weight of
yarn you're using so you may find relying on a grid becomes a
bit complicated. I recommend just focusing on the shapes you want
to make and then tracing your design right onto your warp strings so you
can use it as a template. A good tip is to
draw in a color that will match or blend in
with your weft yarn. You can also just
attach your template behind your warp
and work over it. This is especially easy to do if you're working
with a cardboard loom. Keep in mind that
if you're working with a variety of yarn sizes, you may have to modify
your design as you go, as your template
may become warped. Try to be open to adapting your pattern as you discover
things along the way. When choosing colors
for your design, it can be overwhelming trying
to narrow down a selection. For this project, two to
four colors is plenty, but feel free to work with
as many colors as you want. I usually get overwhelmed if I have too many colors
to choose from, and find it helpful
to restrict myself to three so I can focus on
other aspects of the design. If you're feeling stuck, here are a few ideas you can
use to build a palette from. Choose two or three shades
of the same color plus one complimentary color
as a bright accent. Create a serene look by using the same color in a
lightened dark shade. Pick two different colors
that you like together and compliment them with a neutral
color like cream or black. Don't overthink it.
Choose colors you're attracted to and have
fun experimenting. You'll also want to think about the weight and textures of the yarns you've chosen and how they'll fit
into your design. Chunky yarn will
have more dimension and will use less
rows to fill a space. Thinner yarn will
produce a flatter look and requires more
rows to fill a space. I recommend being flexible with your designs
so you can adapt as you discover the
different effects you can achieve with your yarn. Before we set up our loom, let's go over our design tips. Keep your design simple, abstract and geometric designs work best in small weaving. If you'd like, draw directly on your warp strings to help guide your stitches as you weave. If you're overwhelmed
by color choice, stick to multiple shades
of the same color or add a contrasting hue to highlight certain
elements of your design. Consider the weight and
texture of the yarns you choose and how they'll
fit into your design. Next, we'll start our weaving
by preparing our loom.
6. Setting Up Your Loom: Setting up your loom. Before you begin weaving, you'll need to set up
the warp on your loom. In a woven fabric there
are warp and weft strings. The warp runs parallel
to the finished edge or salvage and will be the
vertical strings on your loom. The weft runs perpendicular
to the salvage and will be the horizontal
strings you weave with. As I mentioned in
a previous lesson, your warp string
should be cotton. This is so it doesn't stretch
too much on the loom and provides a stable
foundation for our weaving. If your warp strings
are stretched out when you take the
weaving off the loom, it we'll scrunch up
and become misshapen. It's important that you maintain even tension on
your warp strings. To begin, take the
end of your yarn or string and tight
it around a notch. We're going to use
one continuous piece to form all the warp strings. Since my weaving is only
going to be 10 notches wide, I'm going to start closer
to the middle of the loom. Keeping the string taut
but not pull too tight, guide it down to the corresponding
notch at the base of your loom so the string
runs straight up and down. Bring it around
the next notch and backup to the top of the loom, maintaining even tension
as best you can. The width of your weaving
will be affected by your weaving tension and
the weight of your yarn. But overall, the distance
between your first warp string and your last warp string will be the width of
your final weaving. The templates I've
provided for you, are size for 10 warp strings that are about
three-eighths inch apart. For quarter-inch notches,
you'll need 12 warp strings. However, if your loom
differs from mine, you can string as
many warps as you need to to fit the
width of the template. An even number of warp strings is easier to design around. I definitely recommend
sticking to that. When you get to
your last string, cut the end free and do another check to make
sure your warp has even tension pulling individual
strings as necessary. Then tie off your end as
you did in the beginning. Now do one final check
on your warp tension, trying to distribute it
as evenly as possible. This can take practice, so just be patient
with yourself. You now have the foundation for your project and we're
ready to start weaving. But first, let's quickly recap the tips for
setting up your loom. The first step is to add
your warp strings which run vertically through your design and are parallel to each other. Cotton yarn works best for
this as it won't stretch. Tie off the beginning and
end of the warp string while maintaining even
tension as you wrap. Use one continuous piece of yarn to make 10-12 warp strings. With a warp ready
to go it's time to start a design
by adding a header.
7. Weaving a Header: Adding a header. The
first and last element to your tapestry
will be a header. This is something we add
for stability and as a way to keep our warp
strings evenly spaced out. If your loom has notches, this may be less of
an issue for you. However, I find that when
working on a loom with nails, the header is essential
for establishing evenly-spaced strings early on. Now that you've
attached your warp, decide how much room you
need for your design. You don't need to factor in the length of any
friends you may have. I'll be working from
one of the templates I designed for you so
my weaving will only take up a few inches of the warp and I can work
somewhere in the middle. We'll be weaving the
base of our design first and working our way up. If you start at the
top of the loom, you'll be fighting gravity. A neat trick to make
weaving easier is to set a piece of card stock at
the base of your loom. Weave the card in and out, alternating warp strings, and align it with the
bottom of the frame. The top of your card
should sit where you want the base of your
weaving to start. This will allow you to work in the middle of the
warp strings and will prevent your work from sagging when you beat down your rows. To add a header, you'll need
a length of yarn that is eight times the width
of your weaving plus several extra
inches for the tail. Don't use a chunkier
yarn for this. From the middle
of your length of yarn twist each end once around your first warp string with the tail that's
closest to you on top. Feel free to pause the video here to make sure
you have it right. Proceed to twist the yarn in this way around each
of the warp strings, making sure they are
evenly spaced and vertical rather than
cinched towards each other. When you get to the
last warp string, make one more twist then bring
the lower yarn tail behind the last warp
string and in front of the second-to-last
warp string. Bring the other tail over the last warp string and behind the second-to-last
warp string. Continue to make twists as
you did before along the row. At the end of this row, you'll switch directions in
the same way you did before. Again, pause the video if
you need to at this point. I'd like to do four
rows for my header. After your fourth row, tie your ends into a knot
around the warp string, doing your best to cheat and knot towards the
back of the weaving. Now we have a stable
foundation for our weaving and we're
ready for the fun part. But first, let's recap some
tips for adding a header. Headers are added
at the beginning and end of a weaving to add stability and keep
the warp strings even. Use a yarn that isn't too thick or thin and it's
easy to work with. Evenly spaced out the
warp strings as you twist the header yarn around
each one and four rows. Tie off your header yarn
with a knot in the back. Next, I'm going to show
you three different weavings stitches
that are easy for beginners and yet can
be used to create lots of texture and
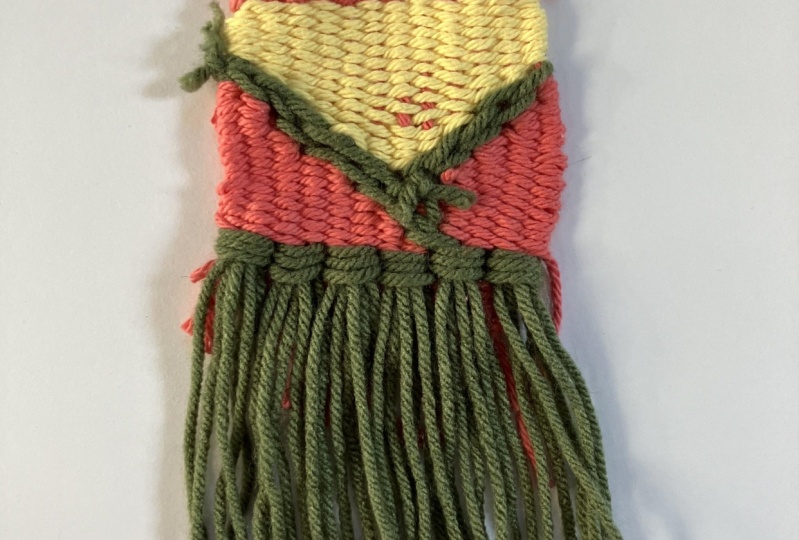
variety in your piece. First up is the rya stitch.
8. Stitch 1: Rya: Stitch 1, rya. The first weaving
stitch I'm going to show you is the rya knot. This is one of my favorites and it's usually
the first stitch I add to my tapestries to
create fringe at the bottom. To make one rya knot, you'll need a length
of yarn that is twice the length you
want your fringe to be. You'll also want to add a
little extra to the length so you have something
to trim when you even your edges later. Chunky yarn works well for this, but if you're working
with thinner yarn, you can use multiple pieces
for one knot to bulk it out. The rya knot goes around
two warp strings. This is one of the reasons
I prefer to work with an even number for warp
strings in my design. To make the knot,
take one end of your yarn and bring it
behind the right warp string pulling until you have centered the middle of the
yarn around the string. Now take the other end
of the yarn and bring it around and under
the left warp string, pulling through
to match the ends together and gently
tighten the knot. Make sure not to pull
the knot too tight and keep the warp vertical
and knot synced together. Continue adding rya knots
to the rest of the row. To secure our first
row of rya knots, we'll add a row of
tabby stitches, which I'll go over
in the next lesson.
9. Stitch 2: Tabby: Stitch 2, tabby. The tabby stitch is
probably the stitch we'll use most often as a weaver and it's usually the stitch
that comes to mind when we think about weaving
at a basic level. It's a versatile and
multipurpose stitch that's also great to use if you need to stabilize
your design and make your warp strings
more evenly spaced. The amount of yarn you'll need
will depend on how much of a particular color you are
using in this section. But it's not a big
deal if you cut your yarn too short
and need to add more. I tried to strike a balance
between how much I need and how much is reasonable for me to pull through
the warp strings. You can pull your yarn
through with your fingers, but you'll find weaving
the tabby stitch easier if you use
a tapestry needle. I like to start working left to right with my first stitch over the first warp string but you could do under
if you prefer. Alternate over and under each warp until
you reach the end, pulling the yarn
through while leaving a tail at your starting point. It's absolutely fine to
weave a row in sections, pulling the needle
through as you go. Beat down your row with
your beader or comb. For the next row, you'll work your way back from
right to left, this time alternating your
stitches from the first row. If your last row ended
on an understitch, your next row will start on
an overstitch and so on. Your first row of tabby will likely bead down with
an even tension. But as you add rows, you'll need to be careful
about not pulling the yarn through too tightly
and syncing your warp. An easy way you avoid
this is to create a bubble with your yarn
before pulling it through. Hold the yarn at the end of
the row to keep it in place. Use your fingers to
push the bubble down, making smaller
bubbles if necessary, and then bead the yarn down. For my design, I'm going
to complete two rows of tabby and then one
more row of rya knots. When you're creating
fringe with rya knots, it's nice to have multiple
rows to create a full effect. Just make sure you're
adding a row or two of tabby stitches in-between each
row of rya for stability. After my second row of fringe, I want to use the tabby stitch to fill in a mountain shape. When working the tabby stitch, you can stop and switch
direction in the middle of a row as often as you'd like
to create different shapes. Just be sure you maintain an even tension and don't pull your yarn
through too tightly. Speaking personally, the more I change direction in
the middle of a row, the more my tension seems
to get tighter and tighter, so I try to be extra
conscious of it as I work. Before we move on
to the next stitch, I want to talk about yarn ends. When you start a new color
or end a length of yarn, you should always leave a tail. These tails will be woven in on the back of your weaving
and hidden from sight. To weave in a tail, thread your needle and
pull the tail through several stitches in the
back of your piece, ideally in the
matching yarn color. You can check from the front of your weaving before pulling the yarn all the way through
to make sure it won't show. If your needle is mostly or
totally hidden in the front, then your tail
will be invisible. Clip the end of the
tail to finish. Ideally, you'll weave in your
tails vertically through your stitches so that they're invisible from both the
front and the back. But depending on your design, this may not be possible. So just focus on keeping the tails invisible
from the front. Since this piece will
likely be hang on a wall, it's not a big deal if the
back of it is a little messy. I tend to wait until the end
of my project to weave in all my tails but that's
overwhelming for some people. So weaving in your tails as
you go is another option. Now, let's learn another one of my favorite stitches,
the soumak.
10. Stitch 3: Soumak: Stitch 3, soumak. The soumak is
another great stitch to have in your arsenal. It creates a twist
or braided effect in your design and looks
great with chunkier yarns. It's also ideal for outlining
irregular blocks of color because it's easy to sneak the soumak into the
shape you want. Start two or three stitches in and wrap your yarn
around the warp string. Repeat this again
for the next stitch. As with the Rya stitch, be careful not to cinch the warp strings when you
pull the yarn through. As you add your stitches, adjust the row to wherever you want it to sit along the warp. It's easier if your row can fall against any rows or
shapes below it. You can wrap your stitches three or even four or
more warp strands apart. But for a small weaving such
as this, two is just right. At the end of the row, you can stabilize
your soumak with more tabby stitches or add another row of Soumak to
create a braided effect. Working in the
opposite direction from your previous row, wrap your stitches
from left to right rather than right to
left as you did before. This makes the diagonal
stitches sit at an opposite angle to create
the look of a braid. When you switch from a chunky
row to a thinner yarn, it can be difficult to
know how many rows of the thinner yarn to use next to one row of the thicker yarn. You can measure and get really precise with counting
if you wish. But when I'm working on
a project this small, I prefer to just
eyeball it and fill in the rows in a way
that looks right to me. Remember that this is just a fun project to get
you practicing with weaving and doesn't need
to be perfect in any way. Next, I'll show you how to join edges to avoid gaps
in your weaving.
11. Joining Edges: Joining edges. When you switch yarns
in the middle of a row, you might find that you have gaps in-between your sections. There are several
ways to avoid this, and I will show you two methods. The first is called
interlocking. When you come to an
edge in your row before bringing the yarn around
to switch directions, thread your needle
through the loop at the edge of the
row you are on. Continue weaving and
repeat as necessary. The second method is called
the dovetail technique. When you meet an edge, weave the next stitch around the last warp string
of that section, stacking over the edge stitch. The edges of your
sections will share a warp string and
prevent gapping. These joins are mostly
used for vertical gaps. If your shapes have
diagonal or stepped edges, you probably won't need to pay too much attention to the join. These techniques are
good to learn however to prepare you for
working larger. We've come to the
end of our design, so next, I'm going to show
you how to finish your piece.
12. Finishing: Finishing your weaving. Once you've decided your
tapestry is complete, you can start the
finishing work. As I mentioned in
the header video, I like to add a header
as a last step to stabilize my work and
create a nice clean edge. I'm going to follow
the exact same steps I did at the start
of this project. Cut a piece of yarn that is
eight times the width of your tapestry plus several
inches extra for a tail. Find the middle of
the piece of yarn you just cut and twist it around the first warp string so that the tail that's closest
to you is on top. Continue to form one twist
around each warp string. When you get to the
last warp string, make one more twist, and then bring the
lower yarn tail behind the last warp
string and in front of the second-to-last
warp string. Bring the other tail over the last warp string and behind the second-to-last
warp string. Notice that the
twists are now in the opposite direction to
create a braided effect. We've four rows of
header and tie a knot to finish just as you
did at the beginning. Now, if you're like me, you'll need to weave
in all the tails you left in the back. Go back to the tabby
stitch video for a refresher on weaving in
tail ends if you need to. I like to use a smaller
tapestry needle for this, as I find it more nimble to use. Once all the ends are
hidden and trimmed, we're ready to cut
our weaving from the loom and tie off
our warp strings. If you have a fringe
on your tapestry, you may find it easier to
do this from the back. Remove the card from the
bottom of the weaving. Remove the warp strings on
the bottom of the loom. All we're going to do is make overhand knots using two
warp strings at a time. Make sure you tighten the knots slowly so you don't
distort your weaving. The knot should sit right next to the header, not push it up. Continue until all warp
strings have been knotted. Now you can weave in the
tails as you did before. I usually weave two warps at a time if they're
attached in a loop. But you could also cut them apart and weave
in one at a time. When you're finished,
you can repeat this process with the
warp strings on the top. Because I tied on and tied off my warp strings on
the top of my loom, I have to cut the
warp strings off and separate the loop so that I
can group them into pairs. Weave in your warp tails
as you did before. Now your weaving is
free from the loom. You can lay it flat and comb
the fringe if you have any. It's at this point
that I like to trim it to a length I like
and even it out. A trick I use to make sure I cut straight is
to lay a piece of card stock or a stiff paper at the base of the weaving
and trim along the edge. One last thing you can do to
make your tapestry easier to display is to attach a dowel
or small stick to the top. Cut a length of yarn about
two feet long and tie one end to a warp string from the back of the weaving
with a double knot. Leave yourself a tail
that you can weave in. The reason we attach this to
a warp rather than a weft string is because these loops we're about to make
will hold weight, and if we tie them
to a weft yarn, the tapestry would
pull and distort. Lay the weaving flat
and arrange the stick or dowel at the top
to your liking. Push the needle through
from the back to the front, catching the top row where
you made the warp knots. Make as many loops as you
like around your stick. As I'm moving along the top, I like to occasionally anchor the thread around a warp
string for stability. Although this isn't
a big concern on lightweight weaving
such as this. When you've added
all your loops, tie off the yarn
around a warp string and weave in the tail. There you have it,
a mini tapestry ready to hang and enjoy. Don't forget to
share your weaving in the project gallery and post a discussion if you've any questions about the process. We've covered a lot
in this lesson. So before we move on, let's quickly recap the
process of finishing. Finish your weaving
with a header for stability and to create
a nice, clean edge. Weave in any tails
you have in the back. Starting at the
bottom, tie knots, two warp strings at a time to prevent your stitches
from falling. Tie off your warp strings at the top of your weaving
in the same way, cutting them free from
the loom if necessary. Weave in your warp tails, tie loops around a stick or dowel at the top
of your weaving, anchoring each end with a
knot around a warp string. Now that you know how to weave a tapestry from start to finish, let's go over a few problems you might encounter and
how to solve them.
13. Problem Solving: Problem-solving.
Before we wrap up, I just want to highlight
a few common problems that you might run into
and how to deal with them. These are things that I myself
run into and knowing what to do makes the weaving
process a lot easier. Problem number 1. My tail is too short to
weave in with the needle. While you should
always aim to leave yourself at least
five inches of tail, this isn't always
possible and you might run into the
situation of threading your needle only to find
that thread pops out because it's too short when
you try and get the needle into the tapestry. Luckily, there's an
easy fix for this. Without threading it,
insert your needle into the stitches you want
to hide your tail in, making sure the eye of the
needle is still sticking out. Now thread your needle and pull it the rest of
the way through. Problem number 2. My weaving is tighter in spots
or cinched in the middle. This happens when your attention is too tight on your weft. Ideally, you'll be
totally relaxed when you weave and use a gentle touch
when you make your rows. This is a little
unrealistic in my opinion. For people like me
that get a little overenthusiastic when pulling
their stitches through, the bubble technique
is essential. If you remember from the
Tabby stitch lesson, this is when you
make a little hill as you pull your yarn through, making sure to hold the edge of the weaving gently in place. Push down the hill
into smaller hills if you like and then beat
down with your comb. It's great to get into the habit of making these
bubbles as you work and eventually you'll get a feel for the right tension
to weave with. Problem number 3. My edges are uneven. This is something that I
hesitate to call a problem, but it is something you
might notice in your work. I'm not a perfect
weaver and I usually have some unevenness
to my edges. Personally, I'd rather
air on the side of some rows being a little
looser on the ends, than pull my weft too tight. It's something I've come
to accept in my work. It's also in the nature
of a hand-woven piece to be imperfect and that's
part of its beauty. As with any craft, you'll
improve the more you practice.
14. Where to Go From Here: [MUSIC] Congratulations on
completing your mini tapestry. I hope you had fun learning
the craft of weaving. Believe it or not, you've now learned everything
you need to know to weave have a wide
range of designs and patterns. Here are a few prompts to
spark your creativity. Make a tapestry using only one stitch in a variety
of yarns and colors. Notice how different
the stitch looks depending on what
material you use. Try several rows of tabby and alternating colors
to create stripes. Get creative with your
materials and incorporate thin strips of fabric or
beads into your weaving. Start a daily weaving practice where you leave for 10 minutes every day as a way to calm your mind and
improve your skills. The more you practice, the more you'll be inspired to create. As you experiment, be
sure to keep me posted by uploading photos of your
work to the project gallery. If you share your
weavings on social media, tag me on Instagram and TikTok @art.witch_ so
I can cheer you on. If you enjoyed this class, please take a moment
to leave me a review. It really means a lot
to me to hear about your experiences with the
courses I create for you. Until next time, keep in
touch and happy weaving.
 Amy Plante, Multi-Passionate Creative