Transcripts
1. About The Class: Are you ready to find your very own personal
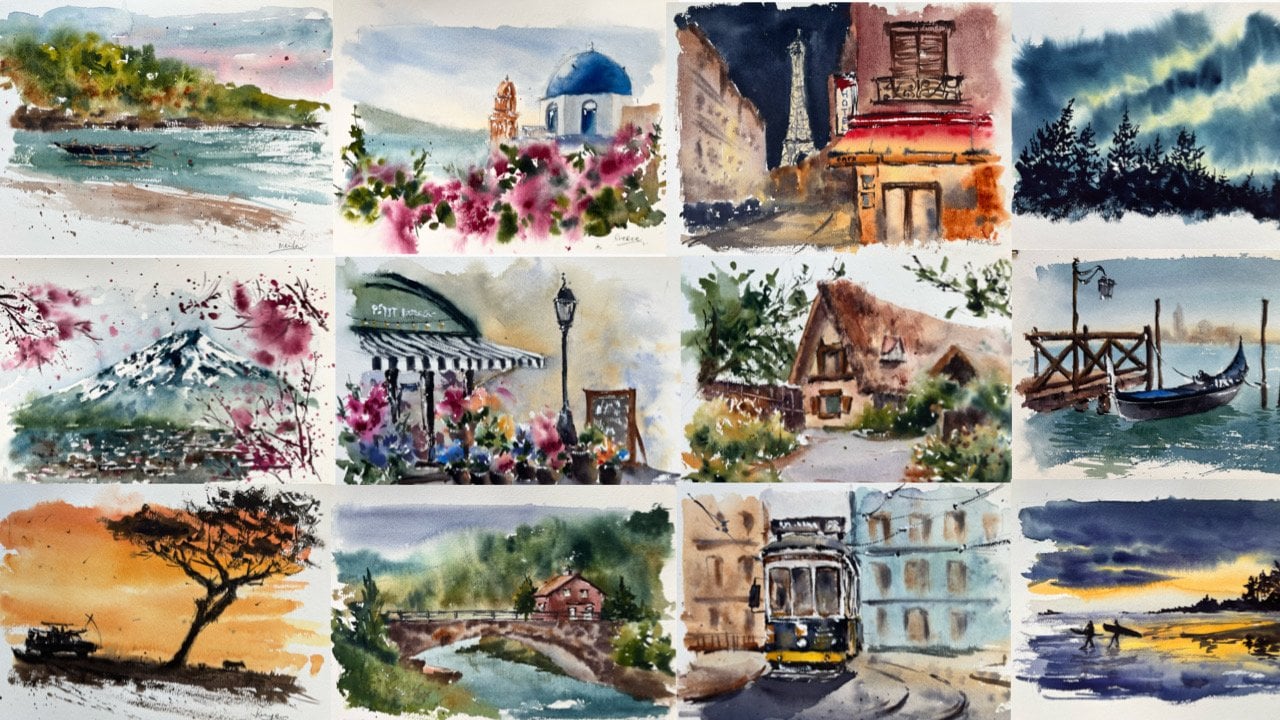
painting style? In this class, I will take you through 14-days of self-discovery practice and watercolor exploration
as we paint diverse landscapes
from 14 amazing destinations around the world. Taking this 14-day
challenge will help you build a
consistent painting habit, which is essential in developing
your painting skills. Secondly, you will
overcome the fear of starting and the pressure
to paint something perfect. When you take the pressure
off your shoulders, you don't just enjoy the
process of painting, but the artwork itself reflects
your joy as an artist. Lastly, you will develop your very own personal
painting style as you fully understand
the mind of watercolor. On each prompt, I will explain in detail how
and when to apply different watercolor strokes and techniques to help you evaluate your unique painting style
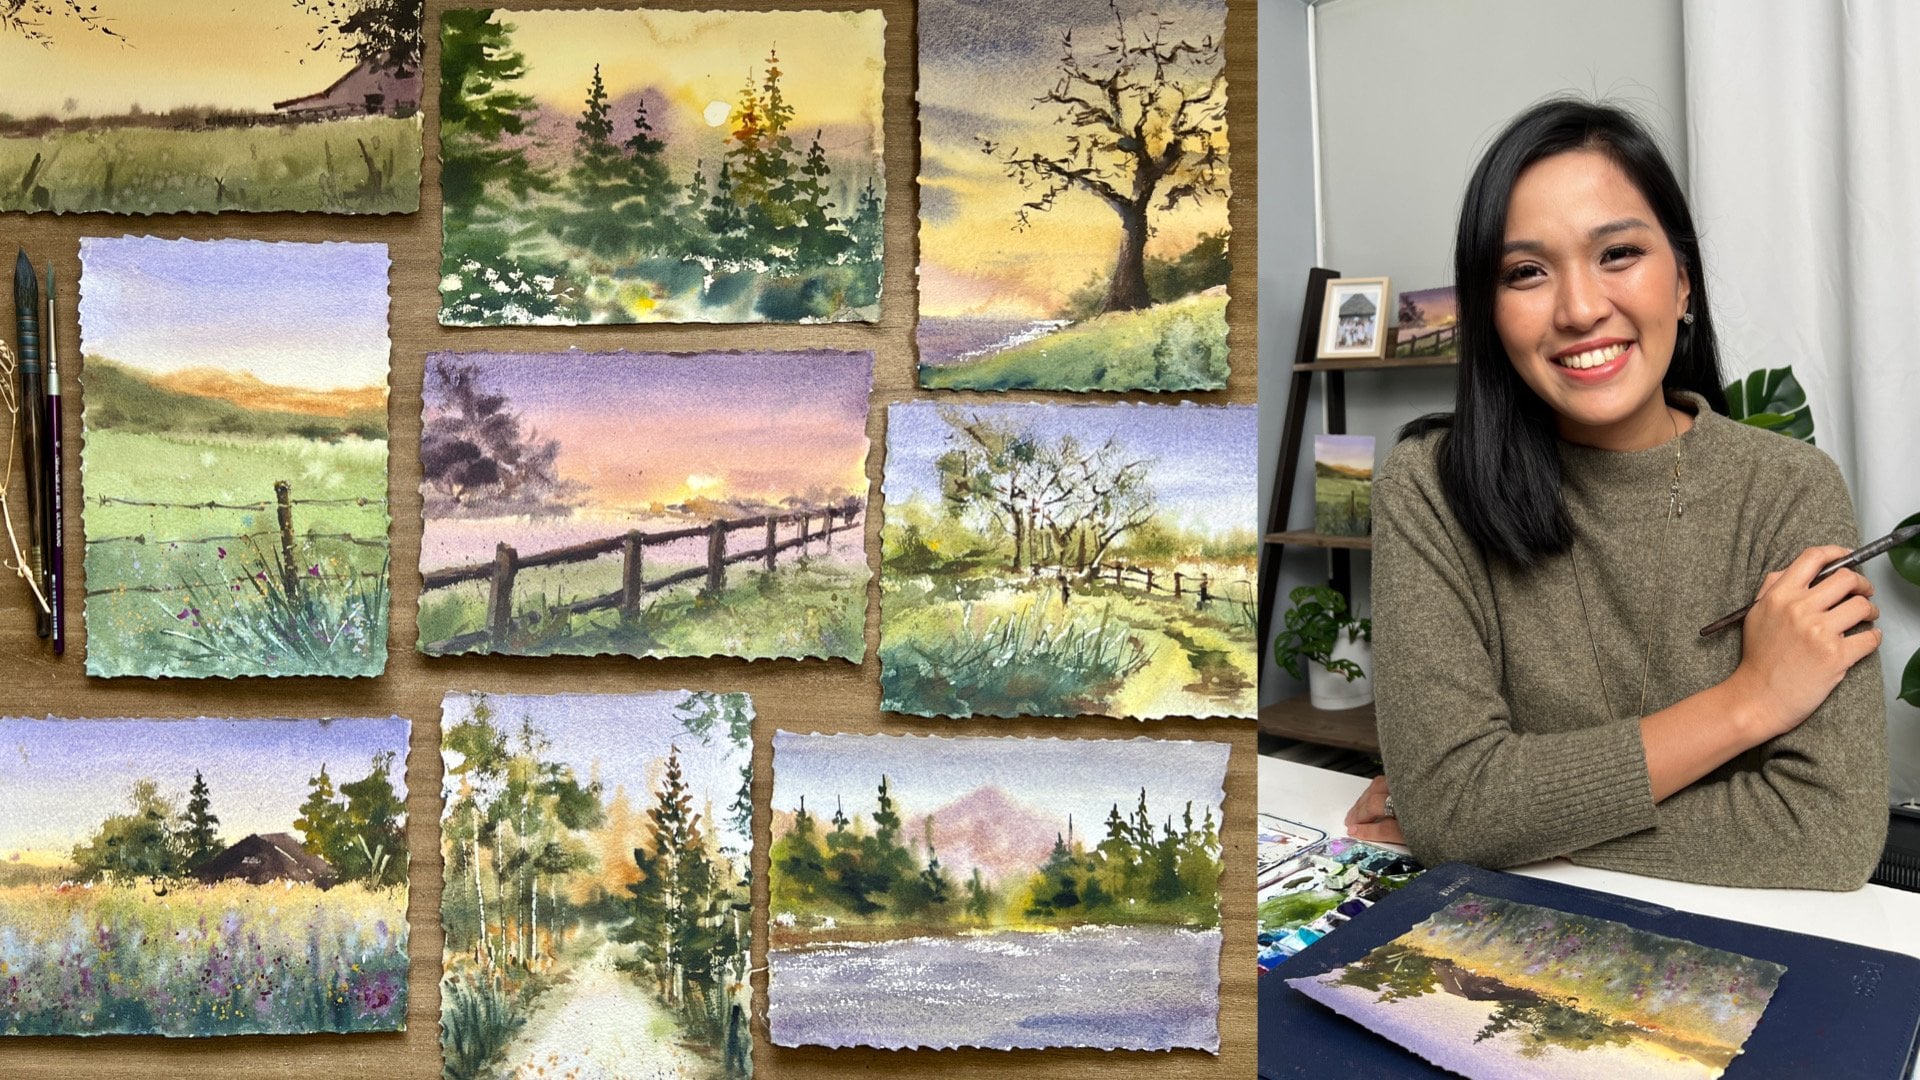
after the 14-day challenge. I'm Bianca Ariola. I'm a watercolor artist and
Skillshare top teacher. Over the years, I've taught thousands of students
across the world, and it is my purpose to inspire people to discover and pursue
their creative version. I teach what I love and
need to learn as a student. It is my greatest passion
to help my students, not just to paint, but also to grow as an artist. I'm sure you're
excited to travel the world in watercolor with me. Let's jump in.
2. Finding Your Style: Our number 1 goal in
this class is for you to find your
own personal style. For you to achieve that, you have to number 1, learn to enjoy the art of
creating and number 2, understand by experience the
fundamentals of watercolor. We will paint 14
landscapes in 14 days. Each lesson will take
around 20 minutes, and on each lesson, I will teach important
principles and key learnings or insights that we can
take from the exercise. I will paint on the
sketch book and will not use masking tape
to create borders. Borderless worksheet for me, takes away the pressure to
create something perfect. It also encourages watercolor
flow and looseness. I'm excited on how your
creative journey will tremendously change
in the next 14 days. Let's gets all the
supplies we'll need, and I'll see you
on the next video. [MUSIC]
3. Materials: Welcome to our
14-day world tour. This is going to be a
very fun adventure of painting landscapes around
the world with watercolor. Let's check out the
materials you'll have to bring in our trip. First is watercolor paper. For this tour, I use this cold press watercolor
sketch book from Etchr. This is made of 100 percent
cotton and 300 gsm. You may also use a
watercolor sheet or block for your projects. Next is watercolor paints. Here are the colors that are
in my watercolor palette. These are yellow
ocher, burnt sienna, Indian red, perylene violet, Quinacridone Rose, neutral tint, Amadeus genuine or the oxazine
violet is an alternative, horizon blue or cobalt turquoise light, lavender, compost violet, Payne's gray, permanent
alizarin crimson, peach, indigo, olive green, blue apathy genuine
or lunar blue, cobalt blue, perylene
red, new gamboge, hematite genuine
for rock textures, and titanium white
for highlights. You may refer to the
color swatches to find a similar shade
if you don't have the exact colors that I have, but I also encourage you to use the watercolor set
or palette that you prefer using to give your paintings a more personal touch. The brushes that you
will see me using all throughout the class are
mainly round brushes. First is Renaissance pure
red sable hair brush in size 8 and 10. I use this for all the washes. Second is silver silk
synthetic brush in size 10, which are used for fine
strokes and details. This is a black velvet
liner brush size 1 for painting thin fluid
lines for branches. Prepare also two cups of
water, pencil, eraser, tissue paper, and
water sprayer for moistening the paper and
creating soft edges. I intentionally didn't use masking tape to
create borders on my paintings as I want each
exercise to be as loose, liberating and
pressure-free as possible. You can download the
reference photos and final paintings in the Resource section in the Project and Resources
tab below this video. That's all you're going to need, so pack your bag and
let's get started.
4. Day 1 Philippines: Welcome aboard. For
our first destination, let's visit this iconic
lighthouse in Batanes, Philippines, my homeland. To start our basic sketch, draw first the horizon line. I place it somewhere below
the middle of the page. Then I draw a rough sketch of the tower in three-dimension. Since our focal point
is this lighthouse, I made it a little big to occupy the major
part of the spread. Connected to the lighthouse is a small stone house beside it. Don't be stressed on
drawing the details. We just need to draw big shapes to portray the
general structure. Then let's draw a downward
slope as the lighthouse is situated in a luscious green mountain
overlooking the ocean. Let's finalize some
lines here in the tower, making sure that it looks proportion and
solid in structure. I will also add
some sketch here to show the details of
the viewing deck. Lastly, let's add some window here on the tower
and on the house. Let's start painting. Using my sable brush, I get a mix of cobalt
blue and a bit of amethyst genuine for
the color of the sky. I added amethyst to tone down the cobalt
blue a little bit. Using a spray bottle, I moisten the paper just to make the washes easier
to bleed and blend. Notice that I sprayed
some water on top to create that
soft edge on the sky. I also tilted my paper so paints will flow
down and create a natural gradient from
dark to light for the sky. I avoided painting the
tower at the moment. I also darken the upper part of the sky to show
linear perspective. Using my sable brush, I sip the excess water puddle on my horizon to prevent
watercolor backflow or blooms. Here I mix the color
of the mountain using yellow ocher and
a bit of olive green. With quick and bold strokes, I colored the mountain area. I also drop in some greens and let the two colors
blend naturally. Now to show the downward
slope of the mountain, I changed the tone
of my mixture to a darker green mix using olive
and blue apatite genuine. I also paint the area
with a stroke that allows the direction or angle of the ground
to be visible. The layer is still moist. I take advantage
of it by dropping some hints of other colors
so they will blend nicely. The secret here is to alter the thickness
of the mixture, so when you lay your colors, you can create a distinction between the middle
ground and foreground. When you lay your paints
with the same tonal value, the tendency is the
area will look flat. I also add some splatters
to show texture on the mountain as I don't want to paint each grass one by one. Now let's paint the
distant mountain with a cold green color. I notice the foreground
to dry a bit, I scratch the paper to create
this grass blades effect. I also drop in some thick
burnt sienna to add warm accents on the
green foreground. Let's paint the ocean
at the background next. Here, the mix should be darker than the sky to separate
the two fragments. Notice that my brush
is almost dry, that's why I created those white unpainted gaps that looks like the
glare on the ocean. I fill in the blank area using the leftover greens that I have. Next, I add some
more strokes and splatters here in the
foreground to serve as accents. I make sure the sky fragment is dry before painting
the lighthouse. I mix a light
bluish-gray color to paint the shadowed side
of the tower facing us. I'm mixed amethyst
genuine and horizon blue. Using the same colors
but now darker in tone, I will paint the other
side of the tower. Now let's paint the base of the lighthouse with burnt sienna mixed with some violet to make
it a bit darker in shade. Notice that I simply
vary the tonal value of the colors per side to create
dimension on the structure. I also left the one
side of the tower unpainted since it is the
lighted side of the tower. I use Indian red to paint the
viewing deck of the tower. My mix is a bit thick and dry, so it will stand out. Let's add some strokes to complete the painting
of the tower. Remember the [inaudible]
on altering the tone. Next, I paint the
roof with Indian red. To make the color darker, I add a bit of neutral tint as I paint the
sides of the house. Let's finish off by
adding some details like the rails and
windows on the tower. I use my synthetic brush
so the brush won't hold too much water and it is
easier to control the stroke. It is almost like
drawing with a pencil. The consistency of the
paint is also thick and almost dry so you can
create defined strokes. Now I rub my brush also on
the base of the tower and on the house to show some
rough texture on the wall. I will add some random strokes with white paint for accents. Lastly, with a dark green color using my leftover
green and indigo, I add some grass strokes
in the foreground and some tiny accents to
complete the painting. This is our final painting. Hope you fell in love
with the Philippines. Let's move on to our
next destination.
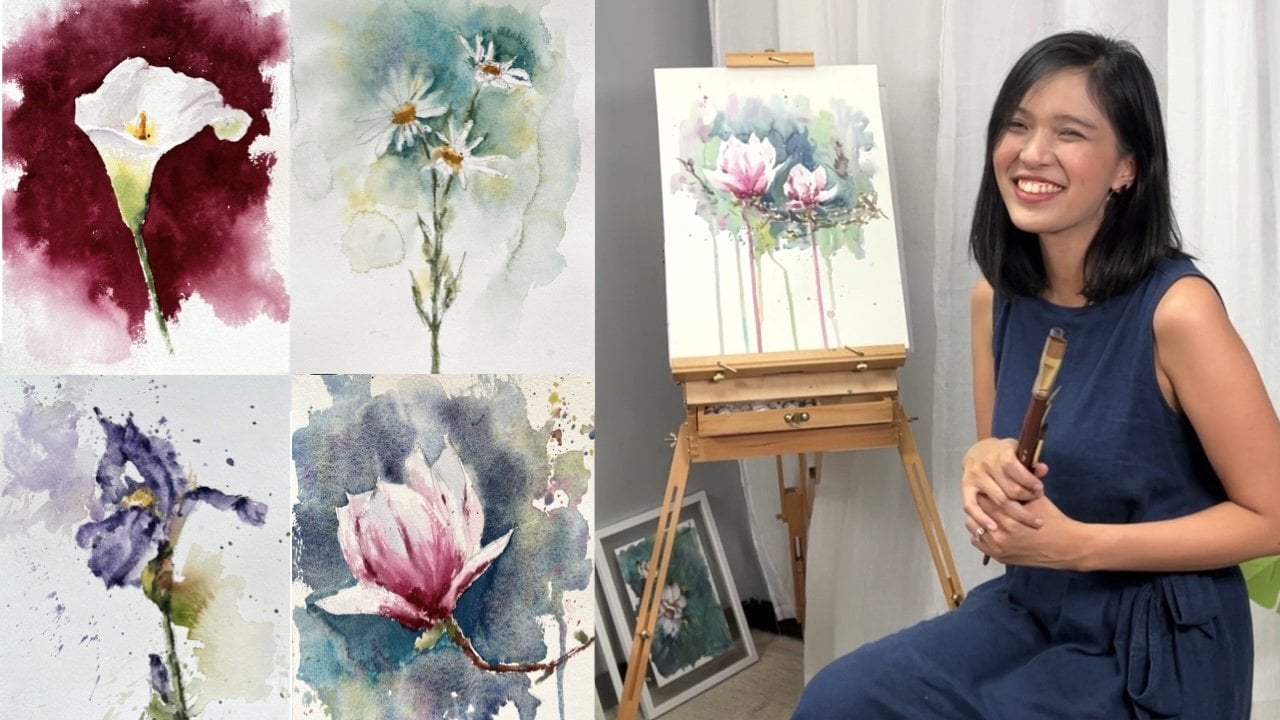
5. Day 2 Japan: Who wouldn't love the delicate
beauty of sakura of Japan. That's why today, we will
paint a cherry blossom tree on a vibrant yellow
flower field landscape. Let's start by positioning
the horizon line. Next, let's draw the tree trunk. I make the stroke a bit shaky for a natural look of a tree. I even hold my pencil in
a different manner to make loose strokes for
the twigs and branches. I just draw some lines
here on the horizon as my guide for distant
mountain or trees. I moistened my paper
with my water sprayer. I mix a color for my sky using amethyst genuine
and horizon blue. The mixture is a bit watery. I use my sprayer to soften
the edges of my strokes. I intentionally leave
white unpainted gaps on random areas to depict
clouds on the sky. I also didn't paint
the middle part as I reserve it for
the cherry blossoms. Again, I keep
spraying the edges to make the area look soft. Notice how soft and light the
tonal value of my sky is. We need to make it light so it won't overpower the
color of the tree. I tilt my paper a
bit as we will be playing with some flowy
paints as we paint the field. I use yellow ocher and the new gamboge for a
bright yellow color. The mix is a bit creamy. Next, I paint some
green strokes and create connection between
yellow and green. Here I changed the
angle of my brush and apply very thick
consistency of yellow. I use my sprayer to let the
colors bleed and flow down. I also tilt my paper more to
help the paint flow down. Next, I add some thick dark
green strokes on the edge. Then I will use the sprayer
again to make them flow. The green paint should be really thick and creamy so
when you spray water, you'll create a
nice gradient and the paint won't look too faded. I add some dots of green at the background just to
put additional elements. I also splatter some
yellows here in the foreground while
the layer is still wet. I splatter some
green too and try to protect the sky from splatters
by covering the brush. Let's paint the distant
building on the horizon. I use amethyst genuine
and horizon blue but the mix is slightly darker
than the color of the sky. I also drop some darker
spots using Payne's gray. Now that the sky
fragment is dry, I use a wet brush and roll it on the tree fragment to
randomly wet the surface. I mixed peach and
quinacridone rose and drop some
colors on the area. Notice that I have
created strokes with hard and soft edges in effect. I left some white
unpainted gaps to prevent it from
looking like a blob. I also hold my brush in
a different manner so I have less control and the strokes would
look more relaxed. You can splatter paints to make various sizes and
shapes of flowers. While this layer is still moist, I make a darker tone by adding
perylene violet to my mix. I dropped some dark spots on some areas just to create
shadow and dimension. Be careful not to overdo this step so you won't lose
the freshness of the colors. Using a small brush, I paint the twigs and branches. I use burnt sienna, amethyst genuine, and the
leftover pink mix for this. Make the strokes as
fine as possible. I suggest that you vary
also the thinness a little bit and make the stroke
shaky and not stiff. I make the color a
little darker to make it pop among the
pink background. Now let's paint the
branch and trunk using a big brush with its
hair flat on the paper. My stroke looks a bit dry to show the rough
texture of the trunk. Let's add a few more strokes
for the branches and emphasize the dimension by darkening some parts even more. The key to making it pop is to make sure that the tree trunk appears darker than the
flower field background. If the tree has the same tonal
value with the background, it will definitely look flat. As our last step, let's blend the
base of the trunk by adding some grass around it. This is our cherry blossom
tree landscape in Japan. Our next destination is an incredibly beautiful
environment so don't miss it out.
6. Day 3 Mongolia: Now that we've gone through
some green landscapes, we're going to have a
taste of Mongolian winter. Here I drew the horizon line and draw the outline
of the mountain. We will be painting the
Darkhad Valley so let's play some outline of dried
trees here in the foreground. I tilt my sketchbook
and moisten my paper. Next, let's start painting
the warm light of the sunset with yellow ocher mixed with
a bit of perylene violet. I paint with a very
light stroke and blend in perylene violet on
some parts of the sky. Notice how softly and
quickly I move my brush. Also, avoid too many
strokes as I don't want my sky to look overdone. I make the upper
part a bit darker, we're using a creamier mix of perylene violent and
amethyst genuine. Using the same purple mix, I add a few thin strokes to make the sky more interesting. Next, let's paint the mountain. I mix indigo, Payne's
gray, horizon blue, and a bit of amethyst
genuine to have this rich deep blue color. Remember to make the mix darker
than the tone of the sky. I also painted the mountain
while the sky is still moist so I get the soft
yet controlled edge. The right timing is very
crucial so the mountain would not bleed
uncontrollably to the sky. I darken some parts of the
mountain to show its sides. I also darken the foot of the mountain with
few broken strokes. Next, I paint the
foreground snowy valley with a color similar to the sky. My stroke is quick, that's why I create
a dry stroke. Here I paint the steep
side of the valley using a dark blue color similar to the color I used
with the mountains. I layer again some
more dark strokes on the mountain since
it is still moist. Now, I changed my brush
to synthetic and make a thick blue mix to somehow
show the horizon line. I also make some quick
thin upward strokes to show some dried
twigs on the snow. The fragment is partially
dry that's why you see some strokes with hard edges
and some with blurry ones. Next, I will dry this layer completely with a
heat gun to fasten the process and I need the layer to be really dry before
painting the trees. Using my synthetic brush, I load my brush with
a thick color mix and remove the excess
water from my brush. I start with the
trunk and try to blend the trunk on the
ground with my finger. Next, I use a liner brush
to paint the twigs. I start from the trunk
going out and make the stroke smaller and
finer as I reach the top. Now, I flattened
my round brush and get a dry paint to create
some impressions of leaves. I simply dab my brush
around the twigs, just make sure your
brush doesn't have much water in it to
achieve this effect. I'll make another tree beside
it using the same steps. I tried to wiggle my liner brush a bit as I paint the twigs. I also thicken the
trunk and blend it on the ground by
adding some strokes. Here's a simple way to
paint a pink winter sunset. Don't forget that the
color of the shadow of the snow reflects
the color of the sky. See you on the next lesson
for another winter trip.
7. Day 4 Germany: Welcome to Day 4. Let's visit an enchanting
winter lake in Germany. This [inaudible]
is different from our usual painting
process as we will purely enjoy the uncontrolled liability and spontaneity of watercolor. The sketch is so simple, draw a horizon line. On top, will be a
range of pine trees, and below will be
their reflection. I will use just two colors, indigo and Payne's gray. I get indigo straight
from the tube and dab some thick horizontal strokes
above the horizon line. I do some random strokes
too below the horizon line. Notice that I vary
the thickness of the strokes and make
them broken lines. This is the fun part. Using a spray bottle, I wet the upper fragment holding the sprayer at the
direction going up, and tilt my paper so the watercolor bleed will
go on that direction. I slightly move my
paper to somehow direct the movement of paint. I do the same thing of wetting
the paper but this time, on opposite direction to paint the base wash off
the reflection. Notice that there is some white unpainted gaps
in the horizon line. It is important to preserve some white spots in
the middle to give a sense of separation between
the land and reflection. Since the paper
has pool of water, I tried to remove the excess
water with my natural brush. I prefer doing it
this way rather than dabbing the pool of water with tissue so I won't lose the natural effect the
paint has created. Now I load my brush again
with pure pigment and add some strokes to show
the tree reflections. As you paint the reflection, the surface should
still be moist so that the painting
will have soft edges. I wiggle my brush to portray
the image of the pine trees. I also varied the height and gap between the
reflection of the trees. Now let's paint the pine trees. This time I use darker color using indigo and Payne's gray. As you paint this, observe the height or
angle of the reflection so the trees and reflection
would have a mirror image. The surface is also
moist as I do this step, but since my brush has
very thick amount of paint and my brush has
almost no water in it, I am able to create
defined strokes. We are almost complete
with the painting. I'm just removing some
more pool of water and adding little
strokes for details. I'll dry it with my heat gun to speed up the drying process. Now that the fragment is dry, I'll add few pine trees with dark tone for added emphasis. This is our final painting. To recap, when
painting reflection, the reflection is a mirror image of the object being reflected. Also when painting wet on wet, we take into consideration
the level of moisture in the brush
and in the paper. Timing is important to
create the desired, defined yet soft
effect on strokes. Preserving some small
white spots is also very important to separate
the two-dimension. On our next destination, we will still use two to
three colors but we will mostly paint wet on
dry in adding layers, so you could also see which approach best suits your style.
8. Day 5 India: Today, let's visit India and paint the gorgeous
silhouette of Taj Mahal. Let's start with the
horizon line then draw the outline of Taj Mahal. Next, let's create
a mirror image for its reflection on water. The idea on this
prompt is to practice painting layers to portray the backlight and
the silhouette. When we paint silhouette, the color is not
really all black. There is a play of tone to
portray it more realistically. Let's paint. I start with
the color of the sky. I mixed burnt sienna
and yellow ocher. I paint the sky starting with
a light tone in the middle and softly gets a bit
darker as I reach the edge. I added Indian red to make
my mix a bit darker in tone. I use my sprayer to
soften the edges. I add water on my wash to make a light gradient
towards the horizon. Now let's paint the
water fragment. The water always
reflects the color of the sky and the
object around it. Since this sky is warm, water should have
the same warm color. Make the wash dark in the
area close to to and softly transition to a lighter tone
as we approach the horizon. I sprayed some water but
the sprayer is facing up so the water
drops will be finer. Let's dry this layer before painting the silhouette
and reflection. Now let's mix burnt sienna and amethyst genuine for
our brown color. The colors should be slightly
darker than the background. As I paint the lower
part of the structure, I vary the tonal
values by either adding few water or few paint. It is crucial that the background color
is thoroughly dry so we can create a hard edge on the outline of
the silhouette. Here I am dropping
some dark colors on random spots to give the silhouette some
texture and mood. As we approach the edge, the color should be
thicker and darker. Doing this gives the image
extra depth and drama. I make them mixed really
dark by using neutral tint. Now I get my synthetic
brush to paint the fine details of
the tower and doom. Once you're done, I
soften the edge on the horizon using a
clean damp brush. Now let's paint the reflection. The reflection should be
darker than the structure since there is almost no light. Just like the silhouette, the reflection is not painted with black or with a
single dark color. I still vary the tonal value creating mid-tones
and dark tones. You can also observe
the movement of my brush as I paint
the reflection. I move it sideways to
show the movement of water that affects the
shape of the reflection. As you paint this, always keep in mind
that the reflection is the mirror image
of the object being reflected so we won't get lost on painting the reflection. I also slightly cut the
straight white gap in the horizon line so it
won't be too distracting. Now you can see the misty
effect that we have achieved by dropping dark spots of colors on the silhouette. It gives the picture
texture and also creates an atmospheric mood. Let's add some final details
using a synthetic brush. I will dry this layer again, and we are done. This is painting in layers
or in wet-on-dry technique. This technique is
not as tricky as the wet-on-wet technique that
we did with Germany. But the crucial thing when doing this approach is applying the appropriate tonal value
on each layer to achieve depth and retain the
transparency of watercolor. Let's learn more
about watercolor on our next travel destination
on the next video.
9. Day 6 Turkey: Welcome back. Today is our Day 6 and we will be
traveling to Turkey. Let's paint chimney rocks
and hot air balloons. Let's start with the basic
sketch of the rock mountain. Again, we just draw
lines and try to portray the essence of the place
with colors later on. Next, let's draw some
hot air balloons, I vary the size and
position to show distance. Let's start painting. I moisten the paper
with some water. Next, I get yellow ocher to paint the light
on the horizon. I add a bit of burnt sienna
to make the color warmer. Next, I mix amethyst
genuine and horizon blue to create a bluish mix to paint
the upper part of the sky. I avoid painting over the hot
air balloons at this time. I gently move my brush and softly blend the blue
and yellow colors. Since I added a purple color in my blue mix and burnt
sienna on my yellow ocher, I prevented having a
green mix in the sky. I also add drops of darker color on the sky
to show perspective. Here I will start
painting the landscape. I use the same mix of
horizon and amethyst genuine but added a bit of burnt sienna to paint
the distant mountain. I painted this mountain while
the paper is still moist, not too wet so the colors
will not bleed to the sky. I get a darker brown mix to paint the other
mountain closer to us. The tonal value has to be darker than the sky
so it will pop. Next, I create an
orangey-brown mix with a very creamy consistency to paint the
impression of rocks. Notice the direction of the
brush as I do the strokes. I do downward strokes to portray the rocks and the consistency is also very thick and creamy. Next, let's paint
the ground with a quick dry brush stroke. Again, the movement of
my brush depends on the angle of the plane
that I want to portray. I sprayed a bit of
water so I can create some hard and soft
edge on the landscape. Notice that loose but
intentional strokes like this are sufficient to portray the
essence of the place. I dry this layer thoroughly before painting the
hot air balloons. I mix a deep blue
color using indigo and cobalt for my main balloon. Create dimension on the
balloon by changing the tone, softening the color, makes it look rounded. Feel free to use colors that
you like for the balloons. Just don't forget about
the tonal of value. For more defined strokes, I change my brush
to a synthetic one. I do the same step to
the other balloons, but for the distant balloons, they must have a lighter tone. Our main balloon
should be the only one with a very saturated
or dominant color. I vary the colors of the balloons to make
it more interesting. Don't put too many details on
the other balloons so they won't overpower our
main focal point. For our final step, I will add some
dark highlights and accents on the rocks
and on the landscape. You don't have to
put a lot of it, a few spots here and there already make a great difference. This is our final painting. I hope you are
slowly getting more relaxed and fearless
when painting. Let's continue the habit and
paint our next destination.
10. Day 7 Egypt: Welcome to Day 7. Are you enjoying
our trips so far? I'm sure you do because
you're still here. Today we will travel the desert and paint
the Egyptian pyramid. Let's start by sketching the
pyramid here on the right. Next, I draw the
horizon and draw an image of a camel with
a tourist riding on it. Since it will only
be a silhouette, we just focus on drawing the general shape or
outline of the figure. Next, I will draw a cast shadow on the
ground as we will be painting a glowing sunset
at the background. Let's start painting. I will pre-wet the background
with clean water first as I will be painting glowing
light in the background. I paint a circle using
yellow ocher and a bit of new gamboge and kept the inner part of the
circle unpainted. Next, I add burnt sienna
around the yellow ocher. The next color will be new gamboge and perylene
red to make the light look warmer as it goes away from the
brightest light. I also strengthen the yellow
to add more contrast. Now I use Payne's
gray and a bit of [inaudible] violet to
paint the rest of the sky. This dark color has to be dark and well blended with
the orange color. I spray a bit of water
to soften the edges. Next, let's paint the horizon with new gamboge
and burnt sienna. I use the same mix plus Indian
red as I paint the desert. As I paint the foreground, I add a bit of amethyst to
create a darker brown color. I splatter a bit of color to show the texture of the sand. Let's add a bit of strokes in the middle ground to enhance
the plain landscape. I dry this layer completely then we can proceed on
painting the pyramid. Using amethyst genuine and neutral tint and burnt sienna, I create a deep
dark brown color to paint the top part
of the pyramid. See how thick the color is. Now I get another brush to mix a lighter shade of brown to paint the portion of the pyramid that is slightly
lighted by the sun. I blend the color
both light and dark, just like what we did on
painting silhouettes. Next, I create an
even darker color, almost brown-black to paint the other side of the pyramid. Since the tone is obviously
darker than the other side, we create a sense of dimension. Now let's paint the cast shadow using lunar blue and
amethyst genuine. I paint the cast shadow on dry paper for a
crisp defined shape. I darken the shadow
closer to the camel and make it slowly fading out. Now let's get an
orangey-brown color for the silhouette of the camel. The same principle
that we did on the pyramid will
be applied here. Don't worry if you feel that your figure doesn't
look like a camel, with just the right dark
strokes and layers, it will look better. I make the image
of the rider even much darker by
using neutral tint. Next, I add some dots of dark
colors at the background, and the painting is complete. Congratulations for completing the first seven days
of this challenge. I'm so excited to start
another week with you.
11. Day 8 Italy: I'm so happy that you completed the first half of
our world tour. I'm sure you're
discovering a lot about watercolor and your favorite
colors, strokes, and style. Let's continue our journey. Today, let's go to the
beautiful landscape in Tuscany, Italy. Don't forget that
you can download the reference photo in the resource section
for your guide. Here, I draw the hill. Next, we draw a
small stone house surrounded with some trees. I'll add a small
house on the side just to complete
the home position. I'll draw a mountain
at the background. Then next, I lighten my sketch
by erasing it slightly. Let's start painting. I moisten my paper
with a sprayer. Let's start painting
the light in the horizon with a light
wash of yellow ocher. Next, I mix amethyst and horizon blue for the
color of the sky. I also blend the colors softly. I darken the upper part so we
create aerial perspective. Since we add a bit of
amethyst in the mix, we avoided a green
color in the sky. Next, let's paint the
cool distant mountains. I use amethyst, horizon blue, and burnt
sienna for this color. I paint the mountains
while the sky is still moist to get
that soft edge. I avoided painting
the house and trees. Make sure that there is continuity as you
paint your mountain. Next, I mix yellow ocher and a bit of burnt sienna
to paint the hill. I drop a bit of green to
add a hint of grass too. Now, I do quick stroke
to paint the landscape. I love the texture that my dry brush creates
as I do this style. I continue painting the hill, but now with a
greenish mix of color. Notice, that I drop colors on the yellow edge to
show connection, and then do the dry brush stroke again to show the
slope of the hill. I continue painting
again with yellow. Next, let's add
splatters of green to paint the details
in the foreground. I love how splatters
create details and texture without
going into details. It is like bringing out the unique characteristics
of watercolor. Here, I am creating a dark brown mix to
paint the stone house. When I paint with
my sable brush, I've flattened the brush to have an even stroke on the paper. Doing it this way
helps the paint to be spread evenly
also on the brush, so the application on
paper looks better. I just softly blend
different shades of brown as I paint the
house to create texture. Now, let's paint the trees. I paint first the lighted
part on the right, then create the darker mix to paint the shadowed
parts on the left. I love the light shade of green, I create using olive
green and yellow ocher, then mid-tone green using
olive green and lunar blue, and dark green
using olive green, lunar blue, and indigo. When you often use the
same color palette, you create a sense of color
theme on your paintings. Even if you mix and match them, the colors don't
really look muddy. This track thing,
unlike using a lot of different premix
watercolor paints. Here, I am just completing the painting of the
trees around the house. I also left small
white gaps like what we did on the
cherry blossom tree. Now, let's paint
with a lighter tone, the house on the side. It is just a supplement on the home position and not
really the focal point. Remember, that when painting, you must keep the focal point
look like the focal point. Other elements should
not overpower it. This will make your artwork pleasing to the
eyes, and second, doing this helps your
viewers see at first glance, the main thing on your painting. This is our final painting. Let's explore painting
mountain textures on our next lesson.
12. Day 9 Switzerland: Today let's paint the fascinating
video of Switzerland. Let's paint lofty mountains with sheets of snow on the peak of the mountains and of
course a cozy Swiss chalet. Let's start by drawing
the mountain ranges. We don't draw mountains with curved lines as how kids do it. We should keep the
outline jagged. Next, let's draw the chalet
on the foot of the mountain. Let's make this sketch
as simple as possible. I add a few lines to show
the door and windows. Now let's paint. Here I get a mix
of olive green and amethyst genuine to paint
the mountain ridges. I want you to pay attention
on how I make the strokes. First, my brush
hair is flattened. My paint consistency
is a bit creamy. Third, my brush doesn't
hold much water, allowing me to create
dry brush strokes. Doing this gives us an instant sheets of snow
impression on the mountain. I start my stroke on the edge of the mountain so I
get a hard border, then quickly drag my
brush to the direction that will show the
form of the mountain. Always keep your mixture
thick and creamy. If your mix is watery, you won't be able
to do this stroke. Next, I'd get a light wash of ocher and blend it
with a little bit of the dark green colors to paint the lower part
of the mountain. Here, the wash should
be really light. While the area is moist, I drop some hints
of dark color to create the general texture and
dimension of the mountain. Here, I darken the area around the roof to define its shape. It is like doing
negative painting. Since we don't want too much white spots
on the mountain, we lessen it by simply layering a softer wash of
light, yellow ocher. On the right side
of the mountain, I change my color to make it similar to the reference photo. Again, we start with
dry strokes on top, then lights off wash as we
move down the mountain. Here on the hill, I draw vertical strokes to
portray distant trees. I vary the size and height. The stroke is also blended to the moist background because we want it to be part
of the middle ground. I do the same technique on
painting the grassland. I do few quick strokes and keep color connection every
time I change colors. I even splatter some paints for more liberating
watercolor effect. Here in the foreground, I make the green color darker
by adding indigo to my mix. Next, I splatter some yellow, orange colors to
show impression of wild flowers on the
foreground too. We are almost done
with the grassland. Let's add a little detail on the mountain since the
layer is already dry. Here on this step, we are adding dimension so it won't look flat. We want to show impression of mountain range with
little strokes. Keeping the peaks of the
mountains really dark is the key to make it
look more alive. Next, let's paint the chalet. I start with the roof using [inaudible]. Then with a darker
and creamier paint, I paint the side of
the house facing us. Remember the principle
in painting the sides of the lighthouse with changing
tones to show dimension, that is the exact thing
we are doing here. Let's add more depth on the chalet by adding
more dark strokes. Here I'm using my synthetic
brush for crisp strokes. Now I'm defining the shape of the house by doing
negative painting. As an accent, I put some white strokes on the
house and on the foreground. We can stop from here as the
painting looks complete, but I think we can enhance
the painting by adding a little color on the sky
to create contrast too. I moisten the sky
area with water, then paint a light wash of
horizon blue and amethysts here on the big blank
space on the left. Since the first wash
looks so pale and gray, I make it look more vibrant by adding a
bit of horizon blue. I keep the edges soft
by spraying some water. We're all done now. Next up will be old
mills and meadows. I'll see you on our next lesson.
13. Day 10 Denmark: Our travel wouldn't
be complete without a trip to an old
mill in Denmark. The sketch is pretty simple, but we need to
follow the rule of perspective to make the
picture look beautiful. First step is to set
the horizon line and assign a vanishing
point within that line. Next, all the lines
that you will draw on the plain should intersect on the vanishing point to ensure correct perspective. Here as we draw the road, all the lines should
be directed to one vanishing point
within the horizon line. This is what we call
one-point perspective. Now, let's draw the wood post
on both sides of the road. I just make a rough sketch
and keep it very loose. Lastly, let's draw the old mill here on top of the horizon line. I start with the roof, then a basic outline
of the structure, and lastly, the turbines. I draw some details in the middle ground to
enhance the composition. These details don't have
to be a particular object. Lines and shapes will
actually do the work. Now let's begin. I moisten the entire page
with spray bottle. Next, I mix the color
of my sky still using Amethyst's genuine
and horizon blue. I make the mix leaning towards the blue shade to
create a bright day. Don't forget to make
the upper parts darker for aerial perspective. Next, I get ocher and some green mix to
paint the horizon. I tilt my paper a bit to
avoid backflows of paint. I vary my strokes ranging from
flat horizontal stroke to dabbing of brush and
splattering of paints to make my landscape
more interesting. Since the subject looks too plain because of very
minimal elements in it, we create added
interest by varying our brushstrokes as we
portray the bushes, and grass, and road. As I paint the
greens on the road, there should be a transition of light to dark from the
vanishing point going out. The direction of my
stroke should also follow the direction
of the fragment. For example, as I paint the
grass in-between the road, I did swift diagonal stroke from the vanishing point going out. Then as I paint the middle, I did horizontal
strokes as base wash, then drop some greens
to portray the grass. Here, I paint the soil using [inaudible]. Let's splatter some
thick yellow ocher paint to portray flowers
in the foreground. I also add splatters of
[inaudible] to create accents and connection in
colors in the foreground. I scratch the bush to create texture on this
solid blob of color. I dry the paper completely then I will paint
the wooden post. Using a synthetic brush, I paint each one
with a dry stroke. The paint should be
thick enough to stand out among the greens
at the background. I create dimension even on this post by darkening
one side of it. Next I connect it to the ground, by adding grass blade strokes
using dark green paint. Let's enhance the road
fragments with few dark stokes. I go back to painting
the wooden posts with dark paint to define the sides. Next, let's paint the windmill
using leftover paints. Remember, the principle
is shared when painting the hot air balloons. We make the same
principle, in this step. We make the shape
look rounded as we create a transition
in the tonal value. Putting dark tones on the shadow part and light
tones on the lighted part. Next, let's paint the
roof and the turbines. Notice that I paint
the turbines with very dark antique
color because I want it to look so sharp. Since it is our focal point, it has to stand out. And the only way to do that
is to make it darker in tone. Let's paint the bees and
create the impression of fence around it
using rice strokes. Now I'm adding some spots of dark burnt sienna and
dark wing color on the foreground to further enhance and define
the road fragment. As you do this step,
make a choice of few systematic spots of strokes. The main purpose of
this step is to control the road using suggestive
strokes or lines. You don't need to outline the
road with a straight line. Broken spots of color is a better and not destructing
way to control the shape. Finalize by adding
tiny grass strokes in the middle ground
and foreground. You can also add final splatters of thick yellow
paint in the foreground. Lastly, darken the
turbines as needed. You can also add very
tiny strokes of birds in the sky to make
it look more pretty. This is our final painting. For next lesson, we will be focusing on creating
a rough textures using the unique properties
of granulating watercolors.
14. Day 11 United Kingdom: Textures, tones,
granulating watercolors. Today's lesson will revolve
around these three elements. Let's paint this stunning
prehistoric monument, the Stonehenge in UK. We begin the sketch by drawing the horizontal and
standing stones. If you look at my hand movement, I draw the stones intentionally shaking my hand a little bit. I keep the shape
very irregular to make it look more realistic. After drawing this, I set
up the ground and also add a small rock here
in the foreground. Now let's start painting. I moisten my paper
with spray bottle and prepare my Hematite
Genuine paint. The special thing
about this color is its granulating property. Granulation is the
effect that you get when the pigment
particles clump together rather than settling evenly on the painted surface. This effect makes
painting rocks or stone textures very
natural and easy. I will mix some
Hematite Genuine on my paints to create granulating
effect on the paper. We bring out the full beauty of granulation by
placing good amount of water on the surface, then dropping generous amount of granulating paint on
that wet surface. Here on our first tone, after placing the base wash, I add another layer
of granulating paint while it is still moist to bring out the granulating effect. The same thing I do with the
horizontal stone on top. Now I create dark tones using branch and Hematite Genuine. Let's continue painting. I paint the base wash of
this tone with a light wash. Then drop a good amount of Hematite Genuine on
the moist surface. I let the paints to blend
or spread naturally so I won't interfere the
movement of colors. I outline the stone with a darker color to
bring dimension. Let's move on to the next stone. I do the same step of painting the base wash
with a light tone. Next I get a darker tone and drop some hints
of it to show the rough texture and uneven
color of the surface. Here I want to emphasize the
lighted side of the rock, so I paint the
side with a mix of horizon blue and
amethyst genuine. I go back to the other rock
and darken some spots that need to be really dark to
make it look more alive. Let's continue painting
the other one. The process is very repetitive. As you practice painting rocks, remember that we need
to show dimension and texture by playing with tones. We create dimension
by making sure that the other side of the
stone that is in shade has a dark tone while the
side on the stone lighted by the sun has a
very distinct light tone. Next, we create texture
on the stone by creating color mixes that is slightly
similar in tonal value, but a little bit
different in hue. At this moment, you
can notice that the stones still
look a bit flat, as there is no strong contrast between the sides of the stones. But later on I will show you
how to make the sides more distinguished by adding
contrasting tonal values. While we wait for the layer to be dry, let's paint the grass. I still use my olive
green with a bit of blue. Since the grass is not
really our focal point, we can paint it with some
light and loose washes. Just create color play
between greens and oranges to make it more
alive and not dull. I paint this small rocks
in the foreground still with light colors as they
are not our focal point, and we don't want it to steal the attention from
the Stonehenge. Let's darken the green
stripe below the Stonehenge. It is a good way to connect
the stones to the ground too. Now I'm using a synthetic
brush and create a dark brown using branch
and a neutral tint. This is the portion
where we enhance the contrast on the stones
to make them dimensional. Using dry strokes, I darken some portions
of the edges to create separate shown between
the two sides. Again, you don't need to outline the entire
side completely, just do suggestive strokes
and it will be sufficient. Here I'm mixing the
color of the sky. The mix shouldn't be too bright. I didn't pre-wet the background
before painting the blue because I don't want the
colors of the stones to bleed. We need hard edge between
the sky and stones to emphasize the rough
solid texture. I continue painting the sky with soft washes and spray
water only on the edges. I'm adding very light spots
of branch in the horizon. They also darken, again
some corners and cracks on the stones and small dot and spots like this to further
enhance the picture. Just be mindful not to overdo
the stroke or not to add dark stones on sides that
should be light in tone. Let's add some final details and accents and our
painting is complete. Let's apply most of the techniques and
strokes we learned from the previous lessons
on our next project.
15. Day 12 U.S.A.: For today's destination, let's visit the Red Rock Canyon, towering red sandstone
peaks and desert road. We'll apply all the
techniques and principles we've learned starting
with perspective. Now, let's draw the
horizon line then identify your vanishing point
within that horizon line. From there, we
draw the guide for the road and boundaries
of the desert. All lines should be directed
towards the vanishing point. Next, let's draw the van. Make the roof slightly on
top of the horizon line. The sides of the van
should also lead towards the vanishing point
to make sure we get the right perspective
in our drawing. Let's draw the car's
shadow on the ground too. Next, we draw the sandstones. I make rough sketch trying to create an impression of
towering stone peaks. I do the same thing
on the right, but make it less detailed
than the one on the left. I finalize my sketch
by making sure all parallel lines are directed
to my vanishing point. Now let's paint. Moisten
the paper with water. Then next, let's
mix the color of the sky still using amethyst
genuine and Horizon Blue. I notice I have very
vibrant blue in the middle, so I try to dilute it by
adding a bit of water. I intentionally leave white gaps to show some impression
of clouds in the sky. Here I'm dropping
some dark tones of blue on the upper part. Next, let's paint
the sandstones. I get thick and creamy
mix of burnt sienna and paint the fragment
with downward strokes. I add in a bit of
amethyst to create a slightly darker
tone for dimension. Use a darker tone to paint the shadowed
sides of the mountain. When painting
subjects like this, in an expressive style, you don't need to
be so particular on copying the reference photo. You just need to identify which side is
lighted by the sun, and which side is in shadow
so you can play with light and shadow and you
put down the colors. It is not mindlessly pleasing
light and dark tones. When you have set up the tones, you can drop hints of color to add interests in the texture. Now I'm mixing Indian
red and neutral tint and a bit of [inaudible]
genuine to paint the base of the
rough mountain and also the very dark dawns
on the mountain top. I use synthetic brush, so the stroke will be so bold and containing
almost purely paint. I use the same color mix for the stones in
the middle part. Here, I vary the washes
from dark to milky wash. I want the left sandstones
to be more detailed, that's why painting
this chap on the right, will not have much
detail since strokes, it will be more of
color blending. Now let's start
painting the desert starting from the area
near the horizon. I paint the sand area with the same color mixes
that we did earlier. Then proceed on painting these bushes on the foreground
with mix of greens. I move my brush copying the
movement of the grass stool. Now I change the stroke to
sideways to paint the ground. Remember to vary the
direction of your stroke depending on the object or
fragment you are portraying. I darken some portions
of the grass in the foreground by adding
indigo in my green mix. Now let's paint the ground with burnt sienna and a
bit of yellow ocher. I kept the rightmost side part of it light by
doing dry strokes. I also splattered
some dark bronze of paint for sand texture. This being the left side of the road with few loose strokes, as it doesn't have
to be too colored, unlike the fragment
on the right. Next, let's mix the color of the road using lavender
and neutral tint, make the foreground
darker in color, then slowly transitions
to light on as we move closer to
the vanishing point. Let's dry this layer completely
before painting the vent. Using ocher and new gamboge, I paint the backside of the van with a synthetic brush for
more controlled strokes. Next, I paint the side with a lighter tone of yellow-orange. Next, let's add strokes off lavender to paint the
top and bottom part of the van and keep some
unpainted spots to show light. Let's add a bit of
dark outline and paint the wheels too with
very dark neutral tint. I mix again lavender and
neutral tint to paint the cast shadow of
the van on the road. I'm going back to the van to add some more
lines and details. Let's paint the lines
on the road next. When doing this, the
line should be very thin near the horizon line, then gradually getting a bit thicker as we approach
the foreground. For our final step, let's add accents of opaque white paint on
the van and on the road. I darkened the wheels
once more and added some small accents like small
posts on the desert side. Then we contour
the road by adding spots of dark gray
color on the side. Here is our final painting. From rough textures, let's now move on to painting
vibrant flower field. I'll see you on the next lesson.
16. Day 13 New Zealand: Welcome to Day 13 where we'll visit the lovely lavender
fields in New Zealand. I'm really excited about this tour because
I love lavenders. Let's begin sketching. I place the horizon on the
upper portion of the paper, then I draw the
distant mountains. I do very light strokes of some row of trees
at the background. Next, I select a vanishing point and use it as my guide for
drawing the rows of lavender. I made five rows of
lavender in the field. Next, I erase the
unnecessary lines and the vanishing point. I defined a bit my main sketch creating those curved
outline on the edge. We won't be painting
the field in detail, but I tried to create the
direction of the lavender, so I know how to do
my strokes later on. We want to portray that
cylindrical shape, so we take note of that
when we apply colors. Let's lighten the sketch, and moisten the paper. Using horizon blue and
amethysts genuine, I paint the sky with
a very soft gradient. Since the foreground
will be heavy on colors, we will keep the sky
simple yet very soft. I also paint a bit of ocher
on the horizon for sunlight. Next, let's mix our green
and horizon blue and amethysts genuine to paint
the whole distant mountains. I paint a mountain with a slightly creamier
mixed in the sky. The sky fragment is also still moist giving
me that soft blend. Next, I mix lunar blue
and green with a bit of ocher to paint the field
and trees near the horizon. I drop some dark green
colors to create layer. Next, let's paint the grassland
with quick strokes of green following the direction
or angle of the land. Let's add a very pretty color of lavender using lavender
and amethysts genuine. Notice the consistency
of my mix. Because it is creamy, the blend between the purple
and green is controlled, soft and very vibrant. Let's drop some dark
violet color for texture. Now let's paint the greens
in-between lavenders. I do this same swift diagonal
stroke using light green. Then I add dark tone
of green on the edge. We are painting on
dry paper here, but we work fast, so when we add another color, the two colors will
still blend nicely. Here here when I
paint a lavender, the green stroke is
still moist leaving a nice colored connection
between green and violet. Notice the direction of my stroke as I
paint the lavender. I do semicircle
strokes following the curve sketch
that I did earlier. Light comes from the right, so we make the left side darker and the right side of
the lavender light. I display with the ratio
and proportion and lavender and Amethyst Genuine
to create different shades. If I want a darker tone, I add more Amethyst and
less water in my mix. If I want a great mid-tone, I add more lavender
and a bit of water. For the light tone, I just put generous
amount of water. I splatter water in the
field using my liner brush. This will create
tiny blooms to show impressions of delicate flowers. The stroke and application of
appropriate tone is crucial to making your field not
to look flat and plain. As I paint the left side, I didn't make it as
detailed as the other ones. It is almost blurry. Now let's create textures
by lifting technique. Using a clean liner
brush with water in it, I create downward
strokes that will in effect lift off the
colors on the fragment. The timing when doing
this is very important. In order to achieve
a nice effect, you have to do this while
the fragment is a bit moist which is not too
wet and not too dry. As the fragment dries, you will slowly notice some
lines of lifted paint. Next, let's add some highlights using Amethyst and lavender. Let's dry this layer before
adding some final details. I get a thick and dark green
color to contour the field. Doing this gives more dimension
to the rows of lavender. I just put dabs of
paint and not really outline the entire field. See the difference
that it brings when we dab paints
on the lavenders. It created dimension giving that rounded shape on
the rows of lavenders. Now, let's enhance the middle ground by
adding some strokes. Since the colors on the
mountain faded a bit, we can paint again the
impression of distant trees. I'll add one tree here to create balance on
the home position. I'll paint the tree starting
with the yellow-green color, then connect a dark green color. Let's finish off by splattering some purple paints
in the foreground, and I will also
splatter lavender and lastly, opaque white color. Let's add a few
more dark strokes, and we are done. Tomorrow is a
bittersweet day for me, so let's take our last
lesson in the next video.
17. Day 14 Australia: Let's end our tour painting
the cliff rock in Australia. I have an initial sketch here, but I will still take you
through the sketching process. I started with identifying the horizon line,
and then from there, I draw the ground
with zigzag strokes, then vertical lines
to draw the cliff. Next, I draw our focal point, which is the big tree
in the foreground. I won't draw the
details of the tree but just the main trunk
and few branches. I will use my Hematite
Genuine and once more to create the granulating
effect of the cliff area. Let's pre-wet the
paper with few water. I use yellow ocher
to paint the ground. I do very light wash just
to create the base color. Next, I blend in
some brownish greens using olive and [inaudible]. Here, I get dark green color to paint the trees
at the background. I paint with different shades
of green so it won't be a long stretch of plain,
monotonous green stroke. Now let's paint the
cliff's texture. I start by slightly
pre-wetting the rock fragment, then I will drop
in a thick mix of brown mixed with
Hematite Genuine. I let the paint flow
down on its own. I strengthen the color on
the edge for more contrast. I help the paint flow
more by spraying water. Here we can now see the gradient of color on the cliff rock. Let's remove the puddle
of water with our brush to prevent it from flowing
to the foreground. I add a bit of warm
orange-brown color on the surface for interest. Now let's apply once
more the principle we learned when
painting sandstones. We identify the shadowed portion so we can make
them dark in tone. This will give the
picture dimension. I continued painting
the left side using the same step,
but this time, the color is leaning
to brown shade and not as dark as the first
ones in the middle. Now that the middle part is dry, I'll paint the cliff
and the background. Notice that I vary the shades of brown depending on
which side is in shadow. Here I painted some
green dry strokes to show trees down the cliff. Let's finish the last
cliff here on the right. Now, let's paint the grassland. I start with downward strokes copying the movement
of the grass. Then I make a wash
to paint the ground. I still do the swift
dry stroke wash towards the edge of the land. At the foot of the trunk, I paint darker green
shade of grass. Of course, this will not be
complete without splashes. Let's proceed on
painting the trees. We do the same technique we did on the cherry blossom tree. We pre wet the paper
by rolling the brush. Next, we put hints of colors and leave small white gaps to
prevent big blob of paint. We also add in dark shade of green to build the
volume of the tree. I add few more dry strokes here on the edge of the branch. Now, let's dry this layer
so we can paint the trunk. I start with the highlighted
portion of the trunk using mix of amethyst
and horizon Blue, I make it very light in tone. Next I get a dark shade of brown to paint the dark
spots of trunk. I also paint the branches
with dry brush stroke. Using a liner brush, I paint some twigs on
the end of the branches. I keep this stroke
shaky and very thin. It is like dancing or wiggling your brush with very
light pressure. Now, I'm adding
some creamy mix of ocher as highlights and
accents on my tree. I do the same thing
with Burnt Sienna. I keep them mix very thick
so it will look a bit too. The last step, I'm
darkening some spots again on the cliff for added contrast. Let's also add some
more grass pleats as final details
and we are done. This is our final painting. Thank you so much for completing the 14 day challenge with me. Let's wrap up and evaluate our experience on
the next video.
18. Assessing Your Style: Congratulations for
finishing the 14 days of landscape painting with me. You are a true winner. Completing all these
14 prompts just prove how dedicated, passionate, and committed you are in
growing your painting skills, so keep the fire burning
and never give up. Let's undertake a
self-evaluation to see what your strengths
and shortcomings are. Then from there,
you could focus on improving your own
personal style. Browse through the 14
paintings that you did and try to observe your
works very carefully. Try to identify the
techniques, strokes, and effects that you
really love doing and enjoy incorporating
in your art works. For example, try
asking yourself, is painting wet on wet an
enjoyable approach for you? Or is it layering of
paints using wet on dry? Secondly, do you find it satisfying to work on
each and every detail, or you are like me
who loves to portray details with loose and expressive
strokes and splatters? I want you to identify
your strengths. Remember, the
approach that allows you to best express yourself, the approach that makes you
feel happy and inspired. Next, identify the challenges
that you encountered, these may be techniques
that you loved but find difficult to execute. If so, keep practicing and
studying that technique. Don't let frustration
get in the way. Through consistent
study and practice, you will eventually get it. On the other hand, if these struggles aren't
actually relevant to you, you can park it first and focus on developing
your strengths and working on the areas
that are useful for you. I encourage you to list them
down and moving forward, think of opportunities
where you can intentionally apply
those observations. Whenever you watch classes, instead of trying exactly
how the instructor paints, challenge yourself
to incorporate your preferred strokes
and techniques while applying the new
learnings you get from observing their style. Most importantly, continue the habit of
painting every single day. The rewards of good habit
may not be immediate, but will definitely
impact your life, your watercolor journey
in the long run. It's my greatest
passion to help you, not just to paint, but also to grow as an artist. Feel free to leave in the
discussion section any help you particularly need or painting subject that you'd
love to further learn. I'd love to hear from you
and see how it can best help and intentionally
guide you as my students. [MUSIC]
19. Final Thoughts: Thank you so much for
joining me in this class. I hope this course
has helped you to discover your
personal painting style, develop a consistent
painting habit and also fully understand how watercolor works that
will surely help you paint any subject that
you would like to paint. I'm excited to see your work, so please upload them in the project section
below this video. You can also share works on Instagram and tag
me biancarayala, so I can see your work
and share feedback. Thank you so much for
joining this class, and I hope to see you
on my other classes.
 Bianca Rayala, Top Teacher | Watercolor Artist