Transcripts
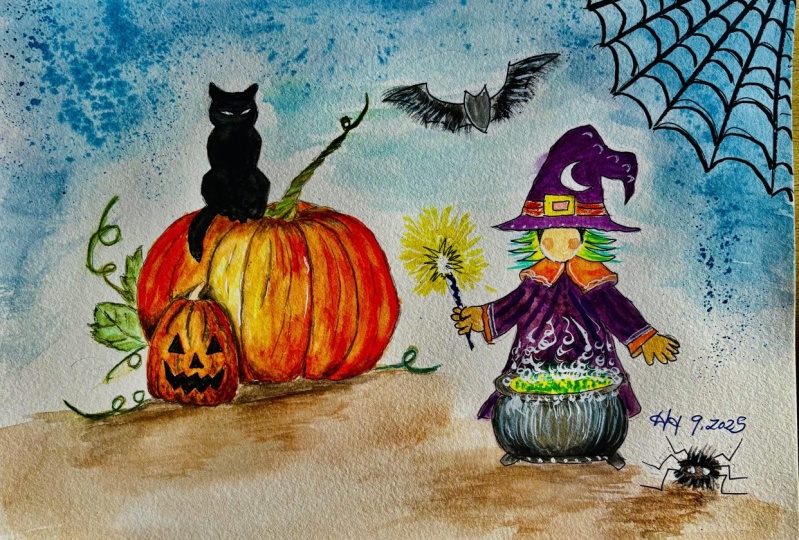
1. Intro: Hey guys, my name is Rosie and I am a freelance artist based in Bucharest, Romania. In this Halloween special, you will learn how to make a water color illustration with some spooky pumpkins. But first, let me get into that Halloween spirit. There you go. Perfect. So in this class, we'll create a whimsical Halloween inspired illustration using watercolors. That technique is simple and the composition is fun and easy to create. We'll go through some of the materials I use. Layout, the sketch will gradually then we'll graduate, then we'll graduate, will gradually, gradually, gradually graduate and graduate Louis. This is five. Then it will gradually bring everything to life with multiple layers of color and finally, apply the finishing touches. During the class, I will show some brush control techniques, how to get just the right shade of color on the paper, and how to easily fix any mistakes that may occur. So without further ado, let's get started.
2. Supplies: So these are the materials we will be using a watercolor brush. This one is from Da Vinci size one, but it can be from other brands as well. The important thing is for the brush to have natural hair. Brush with synthetic hair. This is from Winsor Newton size 0 and a liner brush for more control when painting long and thin lines. Also from Da Vinci size, triple dot and mechanical pencil and eraser. The soft and squishy ones are best because they leave no traces on the paper. These watercolors I bought online and they are okay. I mean, they have many shades and the pigment is bright and that's cool. But they tend to blend at softly, but in this case they work just fine. And I am happy with the end result. I'm mixing palette. Mine is made from plastic, but you can find some very nice ones made from porcelain. A cup of water, some paper tissue, and some white ink that I used only a little, but it has better coverage than the white watercolor. And of course, the paper. This one is from Fabriano. It is cold press watercolor paper, 200 grams, and the size is 24 by 32 centimeters. Okay, now that we have everything, let's begin.
3. The Sketch: You can start by tracing the general shape of the pumpkins. Keep the pencil loose and don't press on it. It's very important not to press hard, especially when painting with watercolors. And if you do and you want to erase something, it won't erase completely. Then trace where the cap will sit on the giant pumpkin. After tracing the general shape, you can start to refine it at some vines on the sides and continue with the other two pumpkins. As you can see, I started to press harder, but that is okay if you are sure of the line you want to trace, but still don't press very hard. After you finished with the refined contours of the pumpkins, you can give them some carved scary faces. I gave the squash some triangular eyes and a mouth full of sharp teeth. On the other pumpkin. You can erase the lines from the big one because this one is in front and give it a scary face too. This bump in will have more rounded eyes and a huge booking grin, also with sharp teeth. After a maybe upper teeth, I realized I made the face a little too big for the whole pumpkin. So I just modifying the bottom to make it a little bigger. Continue with the bottom row and finish the corners of the mass. You can make changes while sketching as many times as you want, as long as your pencil lines are soft and easy to erase. Ok. Next, the cat. Make a circle for the head, then a bit of a neck and shoulders. Then go at an angle for the front legs that will meet at the false. Then the back legs and make sure the front legs are a little lower than the back legs. So it doesn't look like it's sitting on air. After that trace the ears defined the final contour When you are satisfied. Then draw tail and make it a little curled at the end. And some ribs to the Pumpkins. Now you can add some leaves. I tried to make some more complicated shapes, but I didn't like them. So I search for some nice and clear images of funky names because I'm not very familiar with their shape. So I'll just make these nice round ones instead. Make a few leaves on each side of the giant pumpkin. Then add some more squiggly mines. Now. Okay, so here we are in the sketches finishes.
4. Sketch Cleanup: Now, after the sketch is to your liking, racing, I'm joking, of course, you're just semi erasing it. You enter cleanup the contours until your lines are nice and crisp. After leaves, I retrace ever so slightly to get a clear contour of their shape and the pumpkins until we end up with the clean and crisp final version of the drawing. We will be covering the cat with a thick layer of Blackwater color so there's no need to clean her contours. Ok, we're all finished with the drawing part. Next step, painting.
5. Pumpkins First Layer: Take the natural hair paint brush and choosing a pumpkin, a shade of orange, start to fill in the big pumpkin. But before you apply the color on the paper, you will first want to spread it on the mixing palette. Because how intense the shade is, especially for the areas that you want to be more see-through. So the first layer, transparent, using little color and lots of wonder. For each part of the pumpkin. Another shade of orange or yellow is in the middle and more reddish brown on the site. Now a few notes about this brush. The brand is DaVincis and it has squirrel hair. The awesome thing about these brushes is that you basically have more brushes in one. The tip when wet stays very, very sharp and you can make really thin lines. And because the Harris natural, it holds up more water and color and can also make thick lines and feeling bigger areas very quickly. That's our pumpkins. At the top, I decided to make the stuff bigger, so I'll change it, but only after it completely dries so that the eraser won't smash the painting. You can start to fill in the squash, making it a more yellowish orange. The other fun can you can call it a more reddish orange. Scan it in. It doesn't matter if you get the orange in the mouth of i's, we will cover them later with a darker shade. If there are any areas that look scratchy or whatever, you can try to replant them with just water on the brush, then add some more color if it's necessary. That's the edges of the squash. Apply a little more color in a slightly darker shade to obtain some day. And that's the first function layer.
6. Pumpkins Second Layer: Next the darker red with the Brown to get a deep wine shade of red. And flies with the natural hair paint brush on the edges of the company. After that, clean the brush and damage on the tissue in a spinning motion to get the excess water out and blend in the red and the pin joint Brown and water to define the ribs. If your shade is too dark or you went over the lines, you can easily fix it by adding some water and then firmly pressing with a dry and clean tissue. After that, you can retrace it properly this time. And add just a pinch more color when needed. To leave that to dry and continue with the squash. Add some green and make a splashy pattern along the side of the ribs. Getting back to the other one, fixed some yellow mixed with white and apply some highlights on the middle part. Then take some orange and fill it in further. Okay. First thing better, the squash. And some orange decides to obtain a more 3D effect. Then taking some brown color in the bottom and the top and a little bit on the reefs. And then again on the pumpkin, continue to deepen the 3D effect by applying more of the wine shade, ten blended substring. Keep cleaning a brash and taking out the excess water. So that's spinning motion on the tissue. That color, as you can see, is more intense on the top and bottom of the pumpkin and slightly lighter on the middle section to better represent the lightened shape. Now, to make the stamp shine a bit more, will make it here. And the big pumpkin more deaths by applying more layers on the edges and blend them towards the metal. Okay. The falcon sits on the ground. You'll want to make it darker. Continue blending where you see that transition is not soft enough. Then take some brown and dark green stamps. So the squash is a dark greenish brown. Reddish dark brown. Find a big pumpkin, take some green and some black. Worlds. The second layer.
7. The Cat, Vines and Leaves: You can cover the cat in an even layer. All slack. For this, just follow your trace contour and fill in the rest. When you need to add some water, just pinch the surface with the tip of the brush. If you feel like you need a small brush or tracing the contour gives one instead. After you finish the silhouette of the cat while living, you can paint the fines and the leaves. So far, I've only used a natural hair paint brush, but now you'll need to use the liner brush. First. Erase most of the binds. The pencil won't come through. Take some green and slowly but continuously trace this quickly, binds. Had the loop, there are two options. Just before the loop starts, stop and make the two sides and then unite them in the middle in case you are not sure of your hand steadiness. Or make it in one continuous stroke works just fine. On the other side to make some more vines, just try to have a steady hand. After that. Add some more deaths on the stamps. With the darker shape. Further leaves you want to use the thin brush and again, trace the contours and fill in the rest. Okay. Okay. That's it for this step. Well done.
8. Spooky Faces: With the same brush, take the brown and carefully start with trace. The contract has to be dark color with little added water. After tracing the contour, feeling the rest. It's a drive to see if it needs any more touch ups and move on to the squash and repeat the tracing and feeling. Yep, very spooky in just a few more details.
9. Finishing Touches: Make some area iss to the cat first by tracing the placement of the eyes and pencil. Then with the liner brush, use white king. Or you can use white acrylic anyway, something with a better coverage than whitewater column. I love the eyes without pupils to make it look more like familiar than an actual cash. The whitewater color is good for the list things don't start to trace them. You can also add some highlights to the squash. Continue to add more deaths to the bottom and along the rims and then do the same to the other pumpkin. Just keep this process of making the shadows darker gradually to obtain that subgradient of shades as more lives alongside the pumpkin. And if you make one that you don't like, just add water tablets or dry tissue. Continue to add this transparent lines to all the pumpkins. More shade on the bottom part of the big pumpkin. Color. Then with the natural hairpin, fresh, fix some brown and paint the ground around the pumpkins to get the composition some weight. And the darker shade of brown when the fountains meet the ground for more depth. When you are satisfied with the result, you can put your brush down, pin admire your finished work and well done. Thank you so much for watching. I hope you enjoy painting the spooky CAD and pumpkins as much as I did. Happy Halloween.
 Ruxi Vlad, Artist/Illustrator/Semi-crazy cat lady