Transcripts
1. Intro : Hi there. My name is Colby
and I love watercolor. I especially love painting beautiful landscapes and using easy methods and that's what
this class is all about. You are going to learn how
to paint a misty forest and are rarely easy
method like this one. We are going to use different tips and tricks
that I've discovered along my years of being an accidental
watercolor artist to make really beautiful
misty forest scapes. To give you a little look
into the class we're going to talk about different
methods for painting trees. We're going to talk about
different effects that you can use using one special
key ingredient. In the next video, I'll talk about all the
materials you'll need. In the videos that we talk
about, the techniques, it'll all lead up to a series
of videos where we paint this beautiful watercolor misty
forest bookmark together. If this sounds like
the class for you, if you've always wanted
to know how to paint those abstract serine-looking
watercolor forests then let's dive in and explore the beauty
of watercolor together. Thanks for joining
in, and let's go.
2. Materials: Before we get started, I want to talk about all of
the materials that you will need to really be successful and have a
good time in this class. There are really
not a lot of them. First and very important
watercolor paper. You definitely need watercolor
paper to do this class. It doesn't have to be
professional but it should be thick watercolor paper and
at least £140 or 300 grams. My favorite professional
watercolor paper and I've talked about for is
Arches watercolor paper. It is a little bit
more expensive though. Specifically for painting
landscape paintings, the tooth on Strathmore paper mimics professional
watercolor paper a little bit better
but you can use other student-grade
watercolor paper that's cheaper if you want to, and you can get very
similar effects. Those are the brands
that I would suggest. Canson is also another good student-grade
watercolor paper. But I would recommend having two sheets of watercolor
paper specifically. One is so that you can practice the trees
because we're going to practice different
styles for trees and we're also going to
practice different methods for achieving the misty effect and achieving the depth
effects for this forest. Just know that the
first of these videos, we're not going to dive right in to the final project right away. We're going to practice
these things first. Get some practice paper. Especially if you have
both professional and student-grade watercolor
paper for the practice, I would probably go with
student-grade first. Then for the final project, bust out your professional
watercolor paper if that's what you want. Then like I talked
about having a sheet of paper specifically
for your final project. Actually, our final
project looks like this. I did a bookmark and I
know it looks really cool. If you want to do
a bookmark with me then go ahead and cut a piece of paper of watercolor paper into
a bookmark shape. But if you want
your final project not to be a bookmark,
that's okay too. All the techniques
that we're using you can do on any
shape of paper. That's paper. Next, brushes. I would recommend having
round watercolor brushes. I'm using a size
around Number 12 and then a very small
round, 2 over 0. I'm [LAUGHTER] not
a professional. I didn't go to art school. There might be another way
to say this number but this is the size that I have
for my small paintbrush. It is very small. Having a very small paintbrush
to paint your trees, in my opinion, and with
the techniques that I like to use is very important. Now I should note that with big water round
brushes like this, you can also often
use the very tip of your Size 12 or
16 or 10 if you have big round brushes like this but it is harder to
control and it's a lot easier to put way more
pressure than you need. That's why I would suggest, especially if you are just beginning and this
is your first foray, intimacy watercolor forests
to get a small paintbrush. I mentioned this a few
times throughout the class. But the biggest mistake that I often see when people
are painting their trees is when they use too much pressure or they're using the
wrong size paintbrush because then their needles
are very thick and they look clunky and not quite as realistic as
maybe they're hoping. That critique describes you to a T then maybe
think about getting a smaller paintbrush and using so much less pressure
than you're using. We're going to talk more
about this when we go into the techniques for painting different types of pine trees. Next up is paint. I'm using Winsor and Newton
professional watercolor paint and Payne's gray for this. I love doing monochrome
misty forests. I think they're really fun. Yours don't have to be
monochrome but adding different colors can be really fun but it's just
a little different. We're doing monochrome
to keep it basic, I would recommend having professional watercolor
but you definitely don't need to have
professional watercolor to do these types of work. They're just more pigmented
and get more color in the way that makes these
misty forests really pop but I understand
budgets and do not let yours preclude you from practicing this
really cool technique. But if you're wondering
what I'm using, Winsor and Newton
professional watercolor, Payne's gray, which is
probably my favorite color. Then as always, you can't see. I'll move them up
here, make sure that you have two cups of water. One is going to stay clean forever and the other one is going to be your dirty cup of water and then have
a paper towel or a rag or something on the side to wash off
your paintbrushes. I think that about sums it up. Why don't you grab your practice
sheet and let's move on to the different types of pine trees and the
different methods I used to paint them. I'm really excited
[LAUGHTER] for this. Grab all of your supplies
and let's get going.
3. Painting Pines: The “Straight Lines” Method: In this segment, we're going
to practice the first kind of misty forest tree or the first way to form a tree
that I learned how to do. Like I mentioned before, in this class we're focusing on three different ways
to form a tree. A pine tree, specifically. This method, like I mentioned
in the materials video, I have my round 2 over 0
paintbrush by Princeton. I'm using Winsor & Newton
Professional Watercolor and Payne's Gray for this time. The first kind of watercolor pine tree that I use and I used probably most
often up until recently, is straight across lines. I know that sounds
simple and you may have tried it and not been satisfied with the results. Also, like I mentioned before, I really think that was in part because of the size
of your paintbrush, but also probably the amount of pressure that you are
putting on the trees. What we're trying
to achieve here is like really light lines.
There's the trunk. For the straight across
method, all we're going to do, we're going to leave the top of the line to be like
the top of the tree. Then we're just
going to go straight across the trunk like this. But you see how I'm barely touching the paintbrush to
the paper, barely at all. As I'm going down, I am getting wider and wider so that it
flares out like that. It is the typical triangle
shape of a pine tree. Sometimes you can put more
pressure in some places. That's the method. This is probably
the easiest way. The thing to remember with any method of painting
a pine tree though, is pine trees are not even. Sometimes you get a
perfect Christmas tree like pine tree like that. But other times, with
painting forests, specifically, I
think they look more realistic when you paint lots of different
kinds of trees. With using this same method, we can paint a pine tree. I'm going really light. I'm barely even touching my
paintbrush to the paper. But we can do this
straight across method, but only have it be a
little more sparse. Honestly, a lot of pine
trees look like this too. You don't always see a pine
tree that's really full. Or even, even maybe this one goes all
the way to the bottom. I'm not versed on the
different [LAUGHTER] kinds of needle trees like this
that you see in the forest. If you are, and I am calling
all these pine trees, but if they're probably
not all called pine trees. Just [LAUGHTER] for the record. This one is a little
more sparse on the top. You could even not fill
it out to the bottom. But we're still just using
this straight across lines. What I mean by not
filling it out to the bottom is going, maybe like stopping
right there and having the biggest needles
be poking out this way, towards the middle. The top is still really small needles and you're leaving the
top as a point. Then you're just going like you're getting bigger and
then you're getting smaller. I know that there are definitely trees and forests
that looked like this where you can see a big part
of the trunk at the bottom. The way to make your forest look real is if you have
different kinds, so they should be
different sizes. The needle should have different amounts of
needles on the tree. They shouldn't necessarily
be even on either side. In my experience,
at least painting loose like forests like
the ones that I do. Having that variety is what
makes all the difference. All of these trees
look pretty different, but we're using the same method. I'm just going to demonstrate. We're just making
lines like this really lightly with our very
small round brush. I'm not making a tree right
now. I'm just showing you. This is a light line. This is if I pushed my
brush down all the way. Do you see the difference here? These lines, I'm pushing down on my brush a
little bit more. These lines are very
thick and a lot darker. You can do your
trees this way too. I've just found that the way to make trees
look a little more realistic is if you make
them more dainty like this, especially if you're
trying to do like a larger misty forest scene. That is the first method, the straight across lines just we're not doing
one side first. We're doing lines straight across and these are just
a few different kinds. If you weren't practicing
along with me, then go ahead and
practice this right now. The most important thing
for you to practice is not putting so
much pressure on it. In fact, not putting hardly
any pressure at all. Just barely touching
the paintbrush to the paper and see if that
makes a difference for you. Onto the next style.
4. Painting Pines: The “Swoopy” Method : Welcome to the video for the second type of pine tree that I use in
my watercolor lettering. I like to actually call this
style the swoopy pine tree. It maybe looks a little bit more traditional of how
I think we have drawn pine trees
in the past where as opposed to the first
style that we talked about, we did line straight across. But for this style, we're going to do
more swoopy lines and we're going to
do half and half. It's not like all of
the both sides at once. This pine tree is probably
the one I've been using more often in
the last few months. If you look at my
night sky classes, I used this one most often. Which is not to say
that it's the best, it's just the one that
I've been using lately. I could switch it
up anytime I want. Now let's dive into it. Again, if you want to
do this along with me, I would recommend having
all of your supplies ready. The way that I do pine trees, the trunks are almost
always the same. I very lightly paint a line on the paper that
acts like the trunk. Then for this swoopy style, I still leave the
top very small. In fact, that top was
a little thick for me. I still leave the top as a
point and then I just do a little swoopy line like that. See, as opposed to
straight across lines, I do each side individually. Sometimes I'll do one side first all the way down and other times I will do all just alternate sides
and go at the same pace. But the key for
this swoopy style, I'm just making little
light swoops like this. I'll show you like that. They're so small, obviously if you're
painting a bigger tree, this is a pretty small tree. All of these are
pretty small examples, but if you're painting a
bigger tree, they'd be bigger, but they're just very light
little swoops like that. I alternate in pressure for some of them but I never
go like that usually, unless I'm painting the bottom and I want it to look very full. At the bottom, again, this Christmas tree,
perfect pine tree, I'm going to go
back to this tree, you do just little swoops
like that, jutting out. This pine tree to me looks slightly more
realistic than others. That is one version of
the swoopy pine tree, the fuller version
like we did up here. Similarly to what I was
saying in the other video, is pine trees hardly
ever looked like this. If you were to go
out into a forest to go hunting for
a Christmas tree, I say that because
my father-in-law takes my husband and
his brothers out to go. They call it Christmas tree
hunting where they get a license to go chop down
their own Christmas tree. But if you're to go
Christmas tree haunting, not all of the trees
look like this. Mostly in my experience of
being out in the forest, and I grew up in Utah so
I've seen a lot of trees, most of the pine
trees look like this. Like these ones up here. They're a little more sparse, especially if they're newer
and they're not always even. Again, I use the same method
of just little swoops, but it's not quite
so full as that one. But I think they both
look like pine trees. A way to expand on this swoopy method especially for bigger pine trees
that you want to look like really full is to do the swoops on the
side at the top. But then as you get
toward the bottom, if you want it to be like
really full at the bottom, then as opposed to just
doing it on the side, it's like you're filling it out so the needles are also facing
you, if that makes sense. You've point the
swoops down a little bit as opposed to
just to the side. I've found that's a way to
make big full pine trees. Look. Again, just
slightly more realistic. That is the swoopy method. I'm going to do one more
tiny one just so you see, because we've been talking about the way to make forests
really look real is to have them have diverse styles
all in the same piece. That's just a really
tiny pine tree and that could be one that's either just a really
small baby one or it's in the distance. I've talked in another
class about how when you paint smaller things
next to larger things, one of two effects happen. Sometimes they can just
look at a tiny pine tree, but especially if you paint it lighter than the other piece, it can look like it's
just farther away. But I painted this using
that same swoopy method. Now it is your turn. If you haven't been
practicing along with me, grab your tiny round brush and get practicing that method. Next up we're going to look at the very last method that I
have for you, for the trees.
5. Painting Pines: The “Blobby” Method: If you are watching this video, this is the first of the three
videos that you watched. Note that the first
two we talked about, were this method of painting pine trees where
you go straight across and lines all the way
across the trunks at the same time using
very light pressure. The second method, I call the swoopy method, where you make little swoops
like this on either side. The third method, I professionally like to
call the blobby method. Now look, if you've
read anything about me, you know that I didn't
go to art school. I am slowly learning the names of different
art techniques, but I love watercolor painting. I've just picked it up in
the last couple of years. If there is a better
name for this method, I'm all ears, but for now we're calling it
the blobby method. Basically, both the straight across line method
and the swoopy method, it's pretty easy to get to make it look uniform
and to make it look real. The blobby method is going
on a different track where instead of making it look
symmetrical uneven which, again, you don't really
want to do all the time. You want to make them look
diverse and like they're real and in nature
things are chaotic. But for the blobby method, I would draw the
trunks the same way, but essentially instead
of a nice uniform swoop or a nice uniform line, you just take your
brush and blob it out. [LAUGHTER] I did that blob
a little bit too big, which is why I raise
the trunk a little bit so that the top is
still nice and pointy. For this method, you
can use more pressure. You can use pressure
more often and still achieve the
look that you want. I'm just making random blobs. By blobs, I mean, I'm taking my paintbrush as you
can see and I'm pushing down and then just
moving it back and forth to back to the trunk. This method looks
really awesome. If you alternate between putting pressure and not putting pressure and having it
still be some thin lines. I've seen a lot of
artists do it this way. It's definitely a
more abstract way to paint a pine tree, but it looks really cool, especially if you
do misty forests. Like what we're talking
about in this class. I do misty forests using all
different kinds of methods. I've used all of these
methods of trees before. That's maybe more less like a more full blobby pine
tree you could also do. I'll do an example of a sparse, blobby pine tree where it's really doesn't even
really have much on it. Just like that. It doesn't look
necessarily as realistic, but that's why it looks really
cool with misty forests. Because the whole
trick with painting a misty forest painting
is that you can't quite see the pine tree. Using the abstract is a lot more beneficial
for these paintings. In my mind, it's because
they evoke more emotion. I'm going to do one more of these blobby paintings and
just again, to reiterate, I don't really have a specific technique to get my blobs the
way that they are. I just let my hand
and my paintbrush do their thing and
alternating pressure, that's like probably the
biggest tip I can say. It's just put pressure down on some places
and not on others. That's how you can achieve
these blobby pine trees. This blobby pine tree look. I'll do a little
one because I like showing you how to
do little ones. Little ones probably just
barely even have anything. There you go. There are the three different kinds
of pine tree styles. I'm sure there are
many different, a multitude of styles for
you to paint pine trees, but these are the
three that I use most often and that I
have found to be really fun and can result in beautiful emotion
evoking paintings. Now, if you are
practicing these styles, and you were just not happy with the way
they're turning out. I've said it a few
times, but to reiterate, either I think you are using the wrong size brush or you are putting too
much pressure on it. Most of the pine trees that I've seen are people just showing me their work unhappy
with the result. It's because you're putting
too much pressure on it. That goes back to this example over here where with these lines similar to
what I did over here, I barely put any
pressure on them, but these ones are
bigger strokes and when you do bigger strokes, it makes the pine trees
look just a little more chunky and not
quite so realistic. If that's what you like, totally up to you, and this might not
be your problem, but that is the number
one thing that I see. Those are the three styles. Now, let's move on. If you haven't been practicing
along with me again, be sure to practice these and the next classes will be so much better
for you. Thanks a lot.
6. The Misty Effect: Now that we have learned about the three
different styles of pine tree that I use in my
watercolor misty forests, I want to focus on probably one [LAUGHTER] of
the most important aspects of these paintings, which is the misty effect. How do you get things to
look misty and look foggy? It must be so hard? Well, it's not. I'm going to tell you the most important ingredient to get the misty effect with
watercolor is water. [LAUGHTER] You want to
utilize water to make your paint do
really cool things. Then, in the next video, we're going to go more
into the depth effect. But really it's utilizing
water and utilizing layers. For this video, we're just talking about the misty effect, and I'm going to show
you what I mean. When you paint a pine
tree and you just paint it wet-on-dry, which means the paint is dry. There are lots of different
methods for watercolor. The two most common I think are wet-on-dry and wet-on-wet. Wet-on-dry means that
the paper is dry and obviously your paint
is wet because otherwise it wouldn't
do anything. Wet-on-dry, your
trees look like this. I'm doing a little bit
of a blobby pine tree. If you don't know what
I'm talking about, watch the previous video. That's the blobby pine tree. But with wet-on-dry, the way to get that misty effect is to
paint the pine tree, and then get some
water and just put it underneath the pine tree and rub it a little
bit like that. You can even get a
little bit farther up on the trunk and just spread out the paint like this. The thing about when you do
this method is you're going to get some dried paint lines, which I actually think
can look really cool. Right now, if it looks like this one does, it looks foggy. It's almost like this tree
is sitting on a cloud. But there's not so
much color right here. Sometimes I like to put a little bit more
color at the bottom, physically add some and then
swirl it around like this. This is the wet-on-dry method, and then adding in the
misty effect after. That is one way to
make it look misty. This way though, as opposed to the mist going
far into the background, like I said, it's almost like this tree is either sitting on a cloud or
sitting on a lake. Just to show you
an example, again, I can draw another tree
while this is still wet. I can draw another
tree and have it go into the misty part and it could potentially look like this is a forest of
trees sitting on a lake. If you did it farther
out like that, I think it could
easily look like that. That is one way to get the
misty effect using water. Another way to get a
misty effect using water, if you want less defined trees, is to use the
wet-on-wet technique. For that method, you really need to
focus on water control. I'm using my big Princeton
Heritage round number 12, this is much bigger than
my other one obviously, to just paint a wash of water
on this piece of paper. What we're going to do is we're going to paint a pine
tree on this wash of water. But because it's a wash, It's going to be a
little bit blurry. My water has evaporated
a little bit. You don't want so
much water that the paint just blobs onto it, you want enough
so that it bleeds but it still maintains a shape. This has a little bit more
shape than I was anticipating. I'm going to do another example just to show you the
difference and what I mean. I'm doing a little
wash of water, but not so much that it pools [NOISE]
because if it pools, then it doesn't look quite
what I want it to look. This is a little bit better.
I am painting a pine tree, and because I'm
doing wet-on-wet, which means my paint is wet and my paper is wet, it juts out. It bleeds into the water. When you're looking into
a misty forest for real, like there's mist in a forest, the mist obscures the tree. That's what we want
the water to do. We want the water to obscure what's happening
with the tree. This method is perfect
for background trees. If you use this
wet-on-wet technique, I would use it as
my first layer. We're going to talk a
lot more about that, again, in the depth
effect video next. But these kinds of trees
would be the first layer. One more method to
get the misty effect, and it goes along with this, but as opposed to having
the wet-on-wet be a tree, we want the
wet-on-wet method and the washer method
to mimic the mist. To show you what I mean, I did that wash of water. I'm just going to paint, not like a tree necessarily,
but I'm going to paint. The bottom of this
wash that I have is darker and the top is lighter, but there's still color in this little mini painting
that I'm doing right now. I'm going to dry it real quick. Just be aware there
might be some noise, but I'll keep talking. [NOISE] I'm going to
dry it real quick because we're going
to do a little sneak peek into layering and how layering can make it look misty. That looks dry. Professional
watercolor papers, it takes longer to dry. [LAUGHTER] [NOISE]
But I'm going to dry it a little bit longer, in the back too. The reason I dried this is
because the way to achieve this misty effect is to
utilize layers here. Because this is not
quite so light and I don't want to put on
another layer of that mist, I'm going to make sure that
the color that I put on for the tree is lighter. In this method, we're using both wet-on-dry and wet-on-wet. wet-on-wet was to
get the mist first. Now I'm going to use
wet-on-dry to paint the trees. You can do them
along the bottom, but you don't
necessarily have to. Sometimes misty forests
look a lot cooler if you do them more
in the middle. I'm painting using some
really light pain, but it's the same color. That was a little bit too
much, but that's okay. Then, similar to what
we did over here, once I put the wet-on-dry
pine tree down, I take the bottom and
push it out with water. Do you see how because we have this light layering of color in the background and
we're using the same color. You don't necessarily
have to do monochrome, but it looks really cool. We're using the same color, just a little bit
darker on top of it. It obscures the trees so they look like
they're in the mist. Using different values of color, which is like diluting the watercolor with water so that you get different
shades of the same pigment, of the same color, is
the coolest, and best, and easiest, honestly, way to get this misty effect. Next up, we're going to
dive into how to make it look both misty
and get that depth. We've already touched
on that here, but I'm going to go more in
depth in the next video. If you weren't doing
this along with me, why don't you go ahead and
practice the misty effect, these three different kinds. Initially, we did
wet-on-dry and then used water to push out the bottom and make it potentially look
like it's on water, or there's just missed along
the bottom of the trees, or wet-on-wet, where
we got the paper wet first and then we put trees. We made the shape of trees and
because the paper was wet, they bled out onto the paper and made them obscure
like they were in mist. Or utilizing both, where we put a layer
of fog, if you will, on the first layer
and then let it dry, and then did the wet-on-dry technique to put some pine
trees in front of it. Those were the three
different kinds of misty effects that
I use most often. Again, probably multiple
different methods, but these are the three
I utilize the most. Often I use all three in
big paintings that I do. Get practicing and let's move
along to the depth effect.
7. The Depth Effect: In this video, we're going to do a quick [LAUGHTER] deep dive. I don't know if those two
things contradict each other, but we're going to do
a quick deep dive into how to make your forests
look more in depth. So you are looking and it's
not just this one layer, but it looks like
you're looking into a mountain range of forests. I already mentioned one of the key ingredients and that is utilizing layers
in your watercolor, which honestly is the most
important thing to remember. The most important aspect about landscape watercolor painting in general is to think about
paintings in layers. We're looking at layers
to get a depth effect, but we are also looking at
the value of your watercolor, so we're looking at different
shading techniques. I've been using the same watercolor
pigment during this class, and that is Winsor and Newton professional watercolor
in Payne's gray, but you can get lots of different shades depending on
how much water you put on. The one thing that I want
you to remember in terms of achieving the
depth effect is, the lighter the shade of tree, or the lighter the shade
you use to paint a layer, the further away
it's supposed to be. I'm putting water in my Payne's gray so I can
get it really light. I'm going to paint. It's not quite as
light as I was hoping, but I'm going to put a
little more water in here. I'm going to paint just
a lightish pine tree and these pine trees are going to be my background, so they're really light. You can get them even
lighter so that sometimes I use even like four
and five layers in my watercolor forests. I use about two or three, but sometimes I do
even more than that. My background layer, the paint is barely even there. We're using this, if you remember
what it's called, I'll give you a minute
to remember the type of paint method where
the paper is dry. Yep, it is wet on dry where the paint is
wet but the paper is dry. We're using that method. I've just painted a
little forest back here. These are background trees. That is our first layer. In order to make the
painting really like this little strip of
trees really look deep, we have to make sure this
is all the way dry first, as the first layer so I'm going
to dry this really quick. [NOISE] It shouldn't take too
long, probably already dry. Then I'm just going
to go ahead and paint over these trees for my second layer using a
little bit darker paint. I'm going to add just a
little bit more pigment into my paint and let's
see what happens. Now I feel this
should be obvious, but in order to achieve
the depth effects, you don't want to
paint the same trees. They're supposed to
be different trees, so you should definitely
alternate using this slightly darker pigment. For this example, I'm
going to do three layers. This is not as dark
as it's going to be, but it is slightly darker
and you don't have to put the trees so that they fill in every gap
and you don't have to have the same amount
of trees on each layer. Sometimes I think having
it be different and having the trees look different makes the forest look
slightly more real. I've said that before, diversity in nature and not uniformity is really what makes it look the
most real in my opinion, but it's totally up to you if
you want to paint a forest that has uniformity
that's up to you, that one was a
little bit darker. I'm just going to dry this layer really quick [NOISE] that's
one for you might be a little harder than it looks
darker paint that might be the [NOISE] beginning
of our next layer [NOISE]. That looks pretty dry. We
have three layers so far. I mean two layers. We have this faded in
the background and then some slightly darker trees on top and then for
the last layer, I'm going to make my
pigment pretty diluted. I mean not diluted,
pretty concentrated, it doesn't have to be
the most concentrated, but I'm going to make it pretty concentrated because
having this contrast is really what makes the
depth effect happen. You can do the trees all
the way across if you want or you can
just have a few of them be concentrated up here to maybe show that the
forest is coming to a point. It's up to you. Again, do you see how I'm using
a mix of the blob effect and the straight across lines
effect for these trees. I'm going to do a little
bit more out here, but leave a space, so it's not quite so uniform. Then maybe just one right here. I honestly what usually
when I do these paintings, I'm sure some people
plan them out, but I paint my trees where
I feel they should go at the time and they don't always turn
out the way that I want, but that's usually what I do. This wet on dry using
layers effect is one way to achieve the depth
effect to get what you want. Just to hit this home combining the misty effect
with the depth effect if you use these methods with the
depth effect for example, I'm going to go up here to
this misty effect tree. If we did this wet on wet method to get this
misty tree and then you used dry on wet
again to paint over the tree with darker tones. You want your pigment
to be darker. I'm just painting some trees. That was a little
bit more blobby. See, even when you have
the smaller paintbrush, if you put too much water on it, you won't get the fine
points that you want, so you should be aware of that. I'm just painting wet on dry trees in front of this
big misty tree that we had. To me, it looks like the
beginnings of a misty forest. It looks like the
front trees are more defined and the
back trees are obscured. You can leave these lines
or you can do what we did over here and spread them out, so it all looks it's
a little misty. The foreground is not
quite so concrete. The depth effect, the most
important things are? I'm going to give you a second to see if you can remember. [LAUGHTER] I'll tell you the
most important things are to utilize different
values of watercolor. We use a lighter
shade and then we add a little more pigment to
get a slightly darker shade. That one's a lot darker, but I'm going to use water
to show you and then we get a really concentrated shade depending on how many
layers you want, the darker you can get. Then I just said the next most important
thing is to utilize layers. When you look at a misty forest, you visualize what goes in what layer and what
makes the most sense. The lighter is the
first layer and then you get progressively
darker as you go on. That is the depth effect and
then later in the class, probably next I think, we're going to go step
by step through how to paint a misty forest painting. We've learned all
of the methods, I've shown you the tools
and now we're going to get going so you can
create your own masterpiece. Practice the misty effect
and the depth effect. Practice getting these ranges on your pigment and
let's get started. Let's see if we can
create a misty forest.
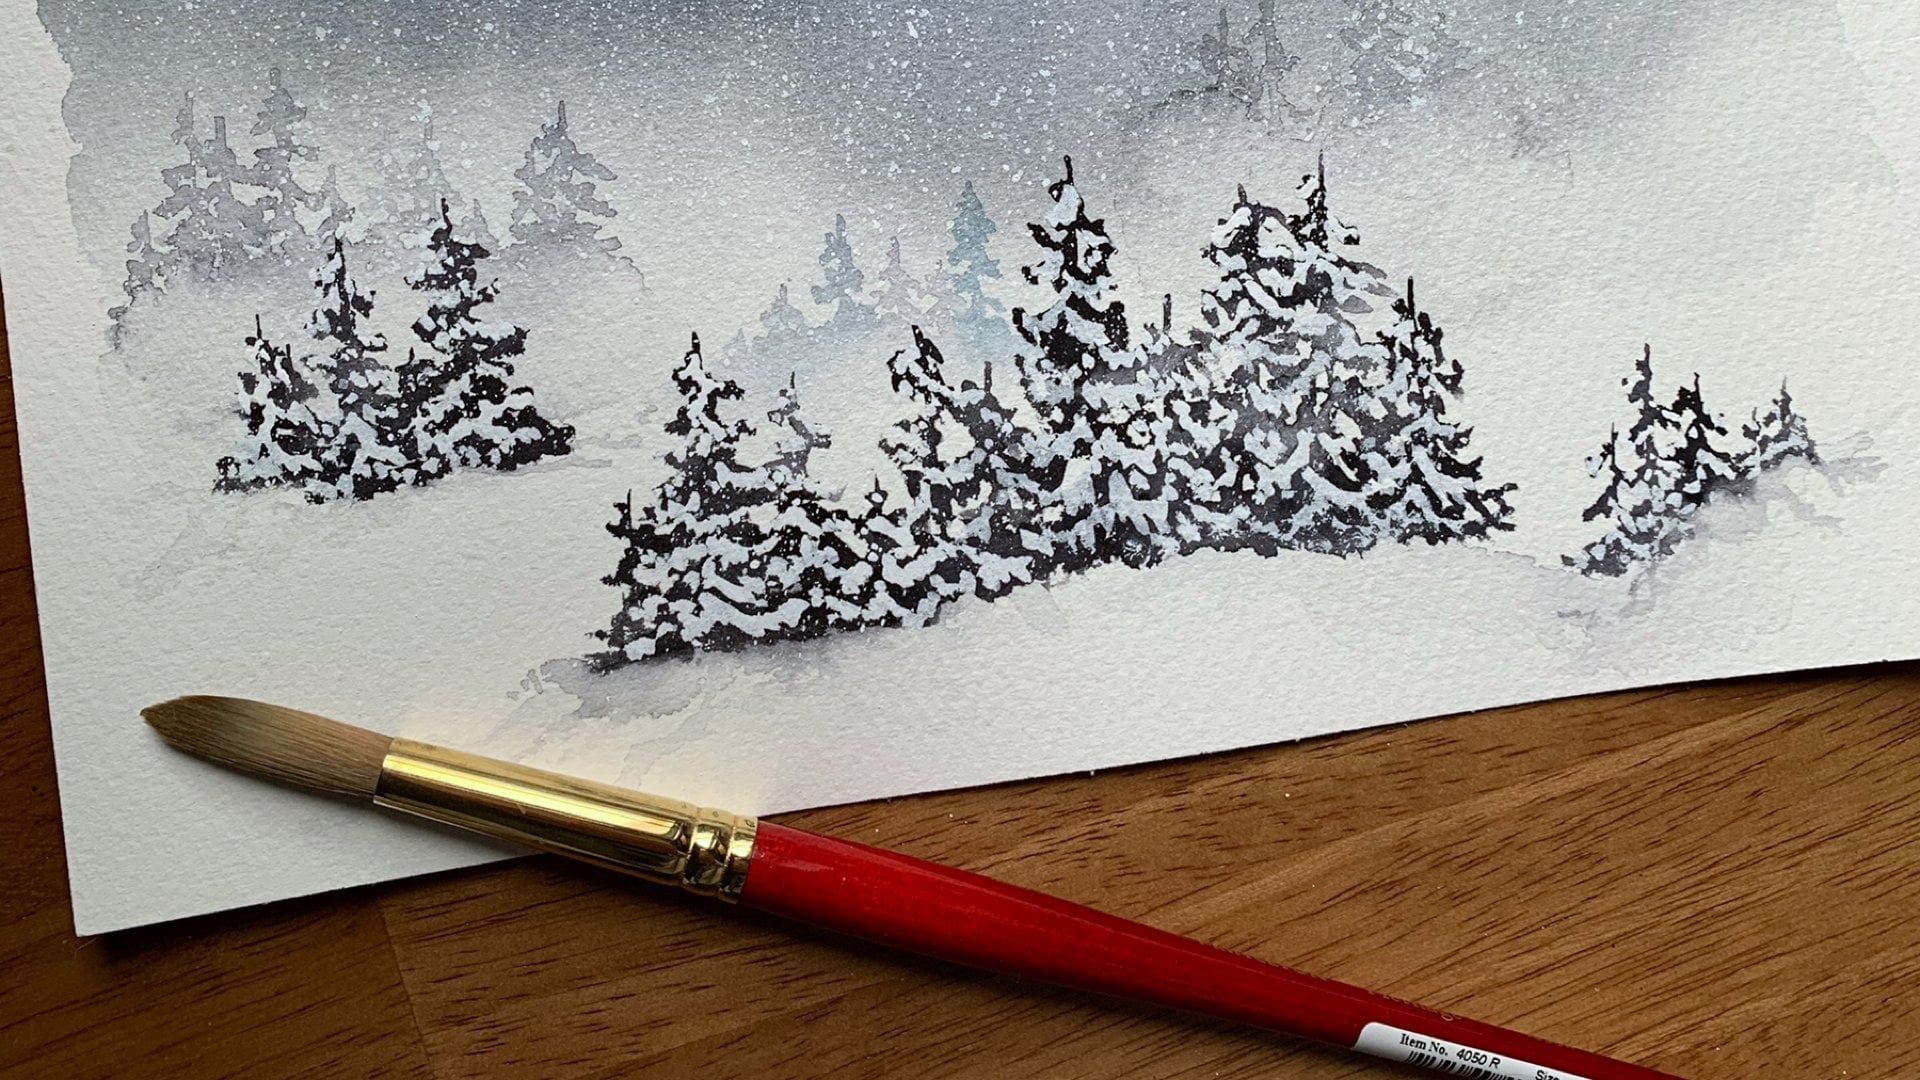
8. Final Project: Layer One: We have learned all of the techniques or the ones
that I use the most to create a misty forest and now
we're going to use those techniques to create our very own misty forest piece. In case you couldn't tell by the size and shape
of my paper here, which is Arches professional
watercolor paper, we're going to create a
misty forest bookmark. [LAUGHTER] We're going to utilize the layering and depth
and misty techniques that we've used and I'm going to use all the different kinds of tree forming methods that we've used in the past as well. This is layer one and if you want to make
a bookmark with me, this is what the
class project is. Go ahead and get
a piece of paper, cut it into look
like a bookmark. The reason I did this is
because I usually buy my Arches paper in
giant sheets and this was coming off of the end
of one and looked like a perfect use for an
otherwise scrap like paper. Grab your supplies and let's
get started with layer one. First, I'm going to use, for my first layer, like we talked about
with the misty effect , for the bottom, I'm going to utilize
creating the mist with some lighter tones and
I'm going to use my big, round number 12 paintbrush and put a wash of water
along the bottom Here. You see I haven't
taped this down. You can tape it down if that makes you feel more comfortable. If you don't tape it down, it requires a lot more
holding onto the paper, but that's how I'm going
to do it this time. I've put down a wash
of water here and I've angled it so it's like there's a hill or
a mountain right here. Then I'm going to get some
of my amusing Payne's gray, Winsor and Newton professional
watercolor Payne's gray. I'm not painting my trees for this layer or this
part of the layer, I probably will up there. But I am just putting down, and oh, maybe actually I won't
put it down right there. For this layer, I am doing my initial mist. I'm just going to make
this the whole sky. The trick with drawing or painting the mist is that it accumulates
more at the bottom. We're going to use this method
more as the layers go on. But for now, I'm
having the bottom, now that I've gotten it light, so while it's still wet, I'm going to make this bottom
look really pigmented, but not necessarily
uniform so it's not like here's a square
that's pigmented. I want it to look still
randomized so you're not really sure what's happening [LAUGHTER] because sometimes I think that's what
happens in nature, that's why it's so beautiful, is you're not really sure
how something came to be. Then at the top, we don't
want it to still be white. We want it to be this
really light shade of whatever pigment
we have at the top. This is our first layer and if you're wondering
where I'm going with this, just keep on keeping with me. We're going to make something
really cool. Layer one. Now, I'm going to
do the drying in between the video so that
you don't have to see it. But just know that when
I do these paintings, I don't usually wait for
this to dry on its own. I use this Darice
embossing tool. It's a heat tool
used for embossing, but it blows out really hot air so that it dries these things,
but it's really loud. That is it for layer one. let's move on to layer two.
9. Final Project: Layer Two: Welcome to Layer 2 of our
misty mountain bookmark, where we are painting
a misty mountain scene to make a nice, beautiful bookmark
for ourselves. With Layer 1, we put down the first layer of mist using the
wet-on-wet technique. Now I'm going to start
building the different layers, like this as a mountainside. I'm going to use
both the wet-on-wet technique and the
wet-on-dry technique. Up here, we have
this sky going on, but I want to create the first side of
our little mountain. In order to do these
kinds of paintings, and especially misty forest
paintings like I talked about, it's utilizing layers. This wash is going to represent this first layer of the mountainside
that I have right here. I'm going to paint some
really light trees. If you're doing exactly
the thing that I'm doing, then I just put a wash
of water at the top of this bookmark at an angle. I'm going to make some really
light trees to go on top of the wash. Just some
really light trees to go on top of the wash and
some really small trees. For these trees, I'm using
the straight across method. These trees are far
away in the distance. You can see the wash of water underneath makes
him look a little misty like we've been doing. I'm going to push out
some of the mistiness, [LAUGHTER] so it's not quite so concentrated
exactly right there. But the trick with these grand misty forest
paintings is again, to not make it look quite so
uniform and to use layers. I like to have these washes
of water jet out from the side and not necessarily go all the way to
the other side. That is our first layer. I'm going to dry
it really quickly. I know I said I probably
wasn't going to, but this is our first layer. [NOISE] I'm just going
to dry it real quickly. By our first layer, I mean, I'm going to do this
all the way down. I'm going to put a wash
of water right here. This might still
be a little wet, which is fine because we're just doing initial
layers right now. When we do wet-on-wet trees and get those
blurry-looking trees, those look pretty good too. We'll just have to see. Yeah, it's a little bit
wet, but that's okay. Because this is
the bottom layer, we're going to
paint more trees on top of all of these layers. If you do that, if you do what I did and have this wash of water
still be a little bit wet while you paint
the next trees down here, while you still want
them to be light, then you get that
really cool background of just like of some blurry
trees in the background. We're going to paint over
these in the next layer, but for right now, some of them just
look blobby and blurry and I think that's
going to look really cool. The end result of
this bookmark is the cover photo for this class. If you haven't looked at the cover photo and
you're just like, what is going to
happen with this? You want to go and take a look at what the end result is going to be, you can go
ahead and do that. But if you are up
for a surprise, then that is cool too. [LAUGHTER] For this layer, we're going to do one last wet-on-dry/wet-on-wet
layer of this mountain. I have said before that I often think art is more pleasing
when it comes in odd numbers, and so for the big
main layering, I'm going to do just
three hills like this. We're doing the same thing
that we did up there, up on these two, where I put a wash down where
there was already paint. Since the bottom layer is
supposed to be closer to us, these trees are a
little bit bigger. I'm still trying to make
them not quite as diluted or not quite as concentrated, so I've diluted them
with water a lot. But I'm just going down the line with this angled
wash of water that I made. Again, having it not be uniform and having them
not be all the same size, so it's just like, oh,
it's all going down, is what makes it look
more real to me, but we're still
going to paint over these in an upcoming layer. This is still just Layer 2, our first layer of trees. That one was a little more
pigmented than I wanted, and the water has gone away, so I am making my own water. Sometimes that happens. The wash dries before
you can get there. That's okay. This is abstractish wonder-like
painting anyway, so you can just add more water. If there are dry lines, that is totally fine. Sometimes I like to
add trees in between. That is Layer 2. Let's move on to Layer 3. I'm going to dry this part with my drier a little bit but I'm not going to
do it on this video. If you're doing
this along with me, I'm excited to move
on to Layer 3. It's starting to shape into
something really cool.
10. Final Project: Layer Three: If you have been
working along with me, we did our first layer already, which was just a wash of water with some
pigment down here. Then we did our second layer, which was the background trees of our misty forest and now, we are working on
the third layer. If you'll notice my paper
is a little warped. I often get questions of like, how do you not warp your paper? There are multiple
methods, but honestly, unless you stretch
your paper out first or you buy really thick watercolor
paper, it's going to warp. That's just the way that
it is and I still like it. If you make pieces
that go in frames, that solves that problem, I'll probably laminate
this and that might help. But, for our third layer, we want to put some darker
trees on top of here. Now just looking at how
this one has turned out. The bottom section is already a lot darker than
this top hilly section. Up here, I might want to put a couple more
layers than down here. Let's see where we're
going to go with that. I'm going to do, no, I'm not going to do that. [LAUGHTER] You have now discovered my secret that
usually when I paint, I don't always have a plan. I just look at what has happened
and then do what I want. I instead of doing another
wash of water down here, because that might mess
up these trees over here, I'm going to do some wet on dry and have it be a
little bit darker. I might may do a little
bit lighter than that. We still want to be able to see the trees behind it
because otherwise, what's the point
of painting them? I'm painting some tiny
trees that are a little bit darker than they were up here. That creates a depth effect up here on this very top
level of our hillside. I'm also going to utilize
that technique that we talked about [NOISE] of using my brush to push out the wet paint and have it
be a little more misty. It's okay if you
get some dry lines. The way to minimize that
is to have the paint. I'm going to put a little bit
more misty effect up here, which is something that I
talked about in the past. Sometimes when you
do this you have to manually add your own paint. But the way to
minimize the dry lines is if you just get
gradually lighter. The way that I do
that is I start at the bottom with
clean water where there's not paint already and then I go up to meet
where the paint is. That is the first hilltop. Now we're going to move on to the next hilltop and
do the same thing. This time I'm going to
use more blobby trees. I've been using straight
across trees, mostly. Like I talked about before, these are blurry trees. I might want to have
it to be a little bit lighter than I have it here. But you don't want
to cover up all of the trees because otherwise,
why did you do that? You can cover up most
of them or some of them but if you cover
up all of them then, I got a little bit too
much water on there, then what's the point of drawing those blurry trees because
you can't see them. I'm doing some blobby trees, and then as I'm going along before the paint
dries completely, I want to just push some
water underneath it so that you can see some of
that mistiness going on. I'm not necessarily doing it all the way
across, and actually, I might do another layer
on this specific hilltop. I think I'm done
layering on that one, but on this one, I
might do another layer. Now that I've pushed
some water out, we already have some
going on there. Don't mind my muttering, watch what I'm doing and
I'll keep explaining. I didn't do a blobby tree there. I did straight across one. But do you see how
this tree right here is really light and they're blurry
in the background? Then with the more
defined trees out front, you have that depth effect
that we were talking about. As I'm looking at this, I think I might add a
few little tree islands, if you will, a couple, so that I have five main
subjects, not only four. I'm going to add a wash of water down here while
I'm still on this layer, I'm not going to do work on this bottom part
for this layer. I'm going to save that
for our next layer, which will probably be the last. But I'm going to do just
a couple of trees using this wet on dry/wet
on wet technique. Because I think having a few just out in the middle and not connected to a side
sometimes looks really cool. Like how all of the
other islands I have here are connected
to a side of the hilltop, having some just floating in the middle I think
looks really cool. This is still on Layer
3, I just added. Actually I might make
that one a little bigger. I'm just adding a few
more little tree islands right in the middle here using this blobby tree technique. You can go ahead
and do that too, if you so desire, if you liked how
it looked before, totally fine, but if you want to copy exactly what I'm doing so that we're working on the same project together,
that's great too. It doesn't have to be like, "Oh, it's all on the line." No, mine is just
not super uniform. That is Layer 3. Now onto Layer 4, stay with me folks,
we're almost done.
11. Final Project: Last Layer: We are almost done with
our misty forest bookmark. We have done layers 1, 2, 3 and now I'm going to call
layer 4 our last layer. You can have as many
layers as you want. Sometimes I do three or
four or five it depends on how you feel and how many times you need to
dry in-between. But we're going to call
layer 4 our last layer. To start, I'm going to put in a last layer of
trees right up here. I'm going make this
layer not quite as dark as they're
going to be down here, but still dark enough
so that they're darker than the trees that
are already up there. I'm not necessarily going to
do it all the way across, I'm doing a blobby method
like I did before. I'm alternated between
doing a blobby method and doing the straight across
method for this piece. I'm not sure if I'm
going to utilize the swoopy method or not, maybe down there, but for
now I'm digging the blobby. I am painting these trees
and in just a second, I'm going to do what we
have done before and put a wash of water
underneath it to ensure its mistiness. I grab some water and I'm going to go
underneath here it looks like these have dried so it doesn't automatically bleed
out so I have to manually do some work here
and I might just have to add my some of my
own paint down here. The things that make
it misty is when a lot of the color is
accumulated in one place. It looks misty at the
bottom of those trees. Here I have a blob of
water that I don't want. I'm going to mop it
up with a Q-tip. Awesome. The great thing about when you use
professional watercolor as you can see my paint
lines have stopped, are starting to dry down here and I don't
really want that. I'm just going to go ahead
and lightly paint with water. Not too much water, but
lightly paint with water so this jets down
over these trees. The good thing about
professional watercolor is it holds a lot easier when it's dry as opposed
to student grade. You see how even though
I put water over here, over top of this layer, this tree held its
shape pretty well. But now I know that
this has water on it, so I know that if I start painting the next layer
of this little island, then it's going to be
a little bit blurry, so I'm going to move
on to this one first. But let's marvel at the
work that we've done here. In the background you can
see some blurry trees and then some defined but
lighter trees and then this darker
pigmented line of trees and that looks like a
pretty deep forest to me. Next, I'm going to just
do one last layer of this little island
doing that same method. Maybe I'll show you
just swoopy trees right here we can do lots of different kinds
[LAUGHTER] because I said that we would all three. I did one swoopy tree right there and I'm going to
do a mix of a blob and swoopy tree right here and put a little tree in right there and put some
water down on here. That looks good to me. Really quick we just make
sure this is dry enough. I'm just going to put my
dryer on it [NOISE] really fast. I think
that's good enough. I don't want to populate this one too much
so I might just do one or two small
trees because if you populate something like
all of these things too much, then it's a lot. I think that when
you have, again, diversity and
difference in numbers, and forests aren't
always completely full. I'm just going to
put two like that on this little island
and use my brush to make it misty out
exactly like that. Now, the last part of our layer. I'm going to, instead of putting a
wash of water down here, so we're going to
focus on this area right here and we're going
to paint some trees, not necessarily on
this tree line, but like in the
middle of this hill. Instead of doing a
big wash of water, I want this to be darker, so I'm taking some
pigment and I'm just painting right on it
with the paint first. Then I'm going to
take my wash of water and move the
pigment out like that. There's a little bit too
much water right there. I don't want to get too
much of the pigment. That is now my wash of
water that I'm going to utilize to make these trees I'm going to paint
right now misty. I'm going to paint a
tree right there but instead of having it go with this layer
in the background, it's planted right there. I think this looks really cool. If you're looking
for a specific like, here's the pattern that
you need to use to make misty forest good every
time, I don't have that. What I have is a basic
knowledge of how forests are laid out because I grew up in Utah where there
are a lot of mountains and a lot of trees and what I know is there's really not a
whole lot of pattern to it. Sometimes there is, but mostly trees just
are where they are, so with this last layer I'm not going to make it
go all the way across. I'm just going to have
a few trees and I'm probably going to have this
one be the biggest one. I just look to see where there are openings
in the painting and where it might be good
to have a subject there, fill in some white-space
and I just go for it. This kind of painting really
is super experimental, not experimental in
the way that nobody has done it because a lot of people do paintings this way. But you need to
experiment to figure out what is the best method for you and what method you
like the very most. There's no secret. I always say that in art, there's really no secret
to making it look perfect. The secret is practicing and trying things out and figuring out what
you like the best. I thought that I might do some more trees on this
layer, but I'm done. I really like the way that
looks and there you go. The next step that I would
do is dry this last thing but if you have done
this along with me, you have completed your
misty forest bookmark and these same techniques
you can use in any painting it doesn't have
to be a bookmark [LAUGHTER]. It can be bigger or smaller. I do many misty
forests paintings a lot I really like those. But we have combined all of our techniques to make
this really cool, abstract, misty forest painting
and I hope you loved it. I hope that you can use these
tools and these methods, and experiment on your own and figure out your own methods
and figure out what works best for you and
put your own tweak on this method of abstract
landscape painting. I had so much fun doing this
with you and happy painting. Make sure to tag me. If you post this on Instagram, my handle is as this writing desk
and make sure to post your final projects
on the discussion board. I would love to see them. I would love to give you all some love on the hard work that you're doing and
I'd love to feature you on my own platform. Thank you for listening. It was a pleasure to paint with you and see you next time.
 Kolbie Blume, Artist