Transcripts
1. Introduction: Hello, everyone, and welcome
to watercolor Markmaking. Create beautiful
patterned swatch sheets. I'm Denise Love, an artist
who loves exploring texture, color, and creative
play in the studio, and I'm excited
that you're here. In this class, we're going to explore mark-making by creating beautiful patterned
swatch sheets for our own reference library. This is one of my favorite
creative exercises because it's simple, relaxing, and a wonderful way to
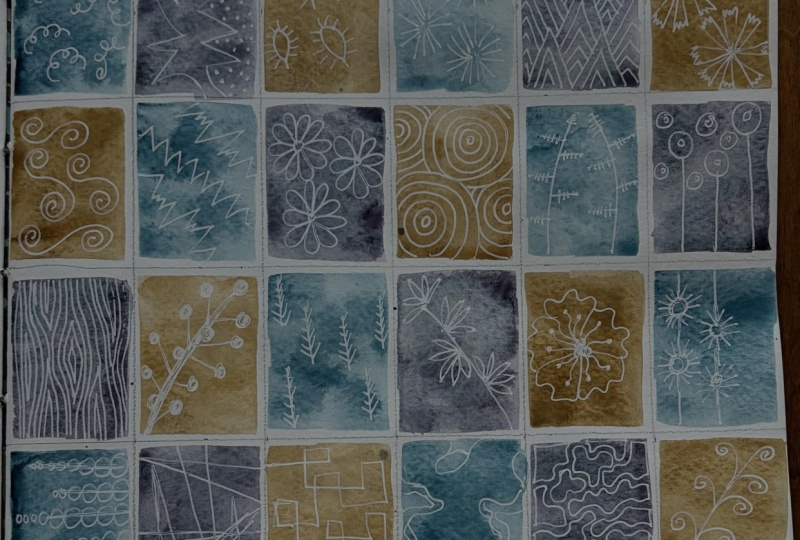
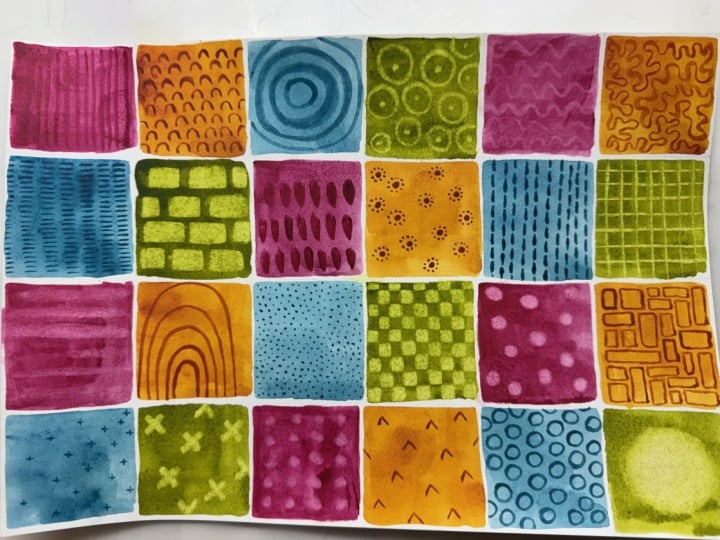
experiment with color, texture and pattern without the pressure of creating
a finished piece of art. By the end of class, you'll
have a colorful sheet filled with unique patterns that you can hang
in your studio, keep as a creative reference, or use as inspiration
for future artwork. This class is perfect
for beginners as well as experienced
artists who are looking for a relaxing way
to have warm up exercises or a playful way
to explore mark-making. So grab your watercolor paints, some paper, a pen, and let's get started.
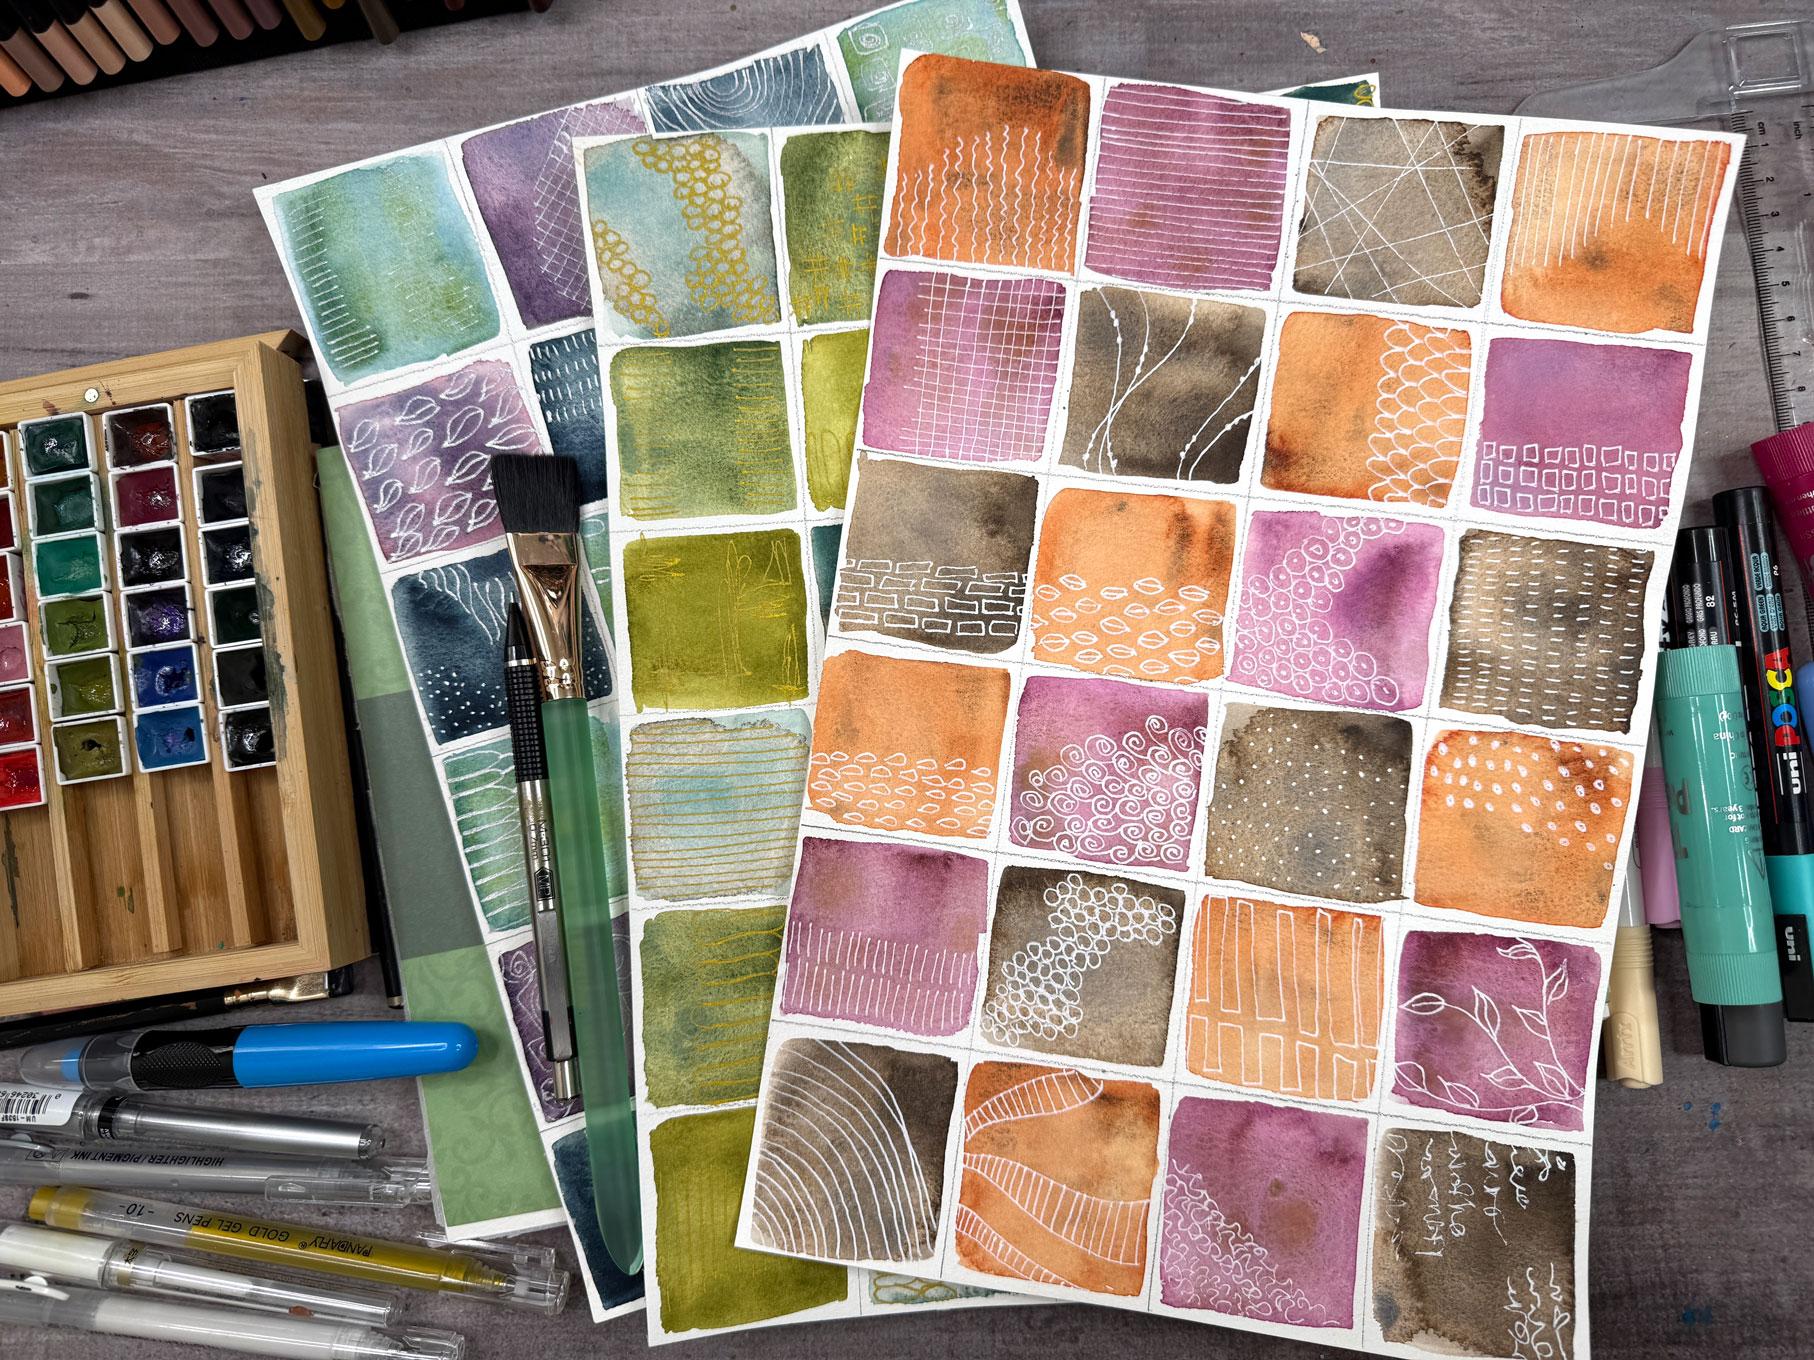
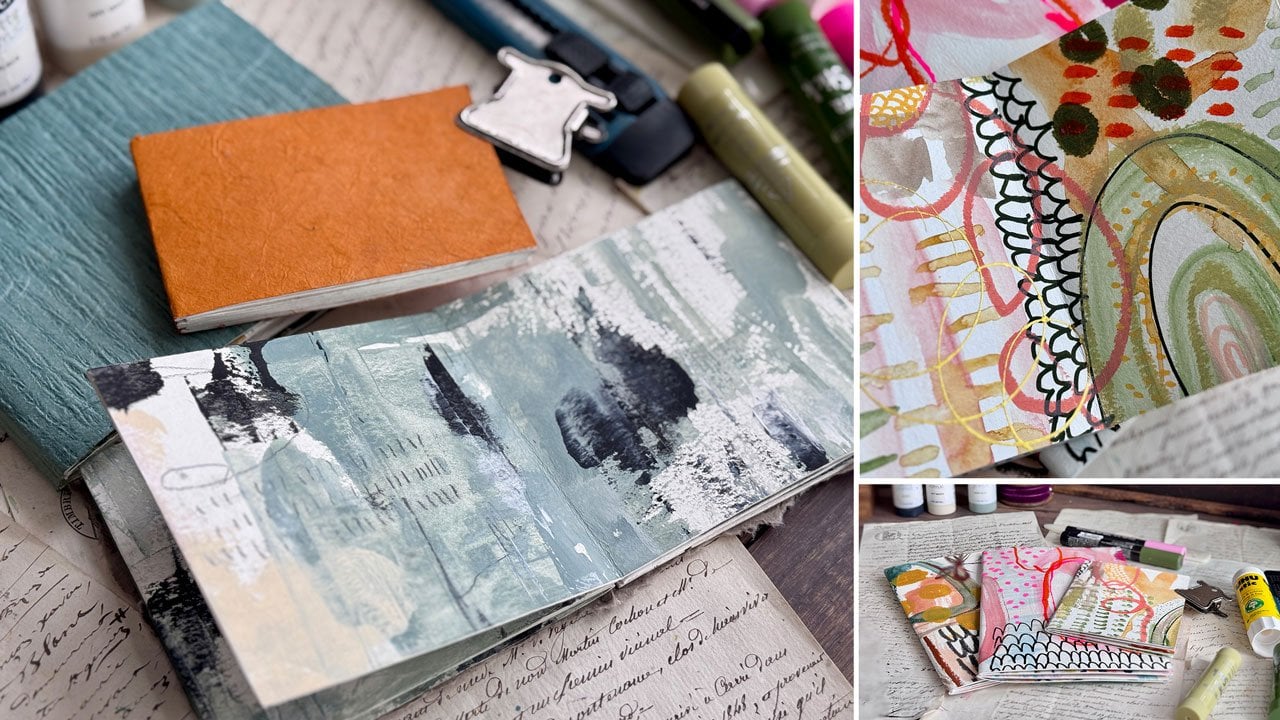
2. Class Project: Your class project,
you'll create your own watercolor
mark-making swatch sheet. Start by drawing a simple
grid on watercolor paper and filling each square with
loose watercolor washes. Once the paint is
completely dry, explore different marks and
patterns using a gel pen, a fine liner, or a metallic pen. Try repeating lines, dots, shapes or organic
marks to see how they interact with the watercolor
textures underneath. Your finished sheet will become a beautiful collection
of many patterns and a creative reference
for you to keep in your studio for
future inspiration. When you're done,
share a photo of your swatch sheet in
the project gallery. I'd love to see the colors
and the marks you explored.
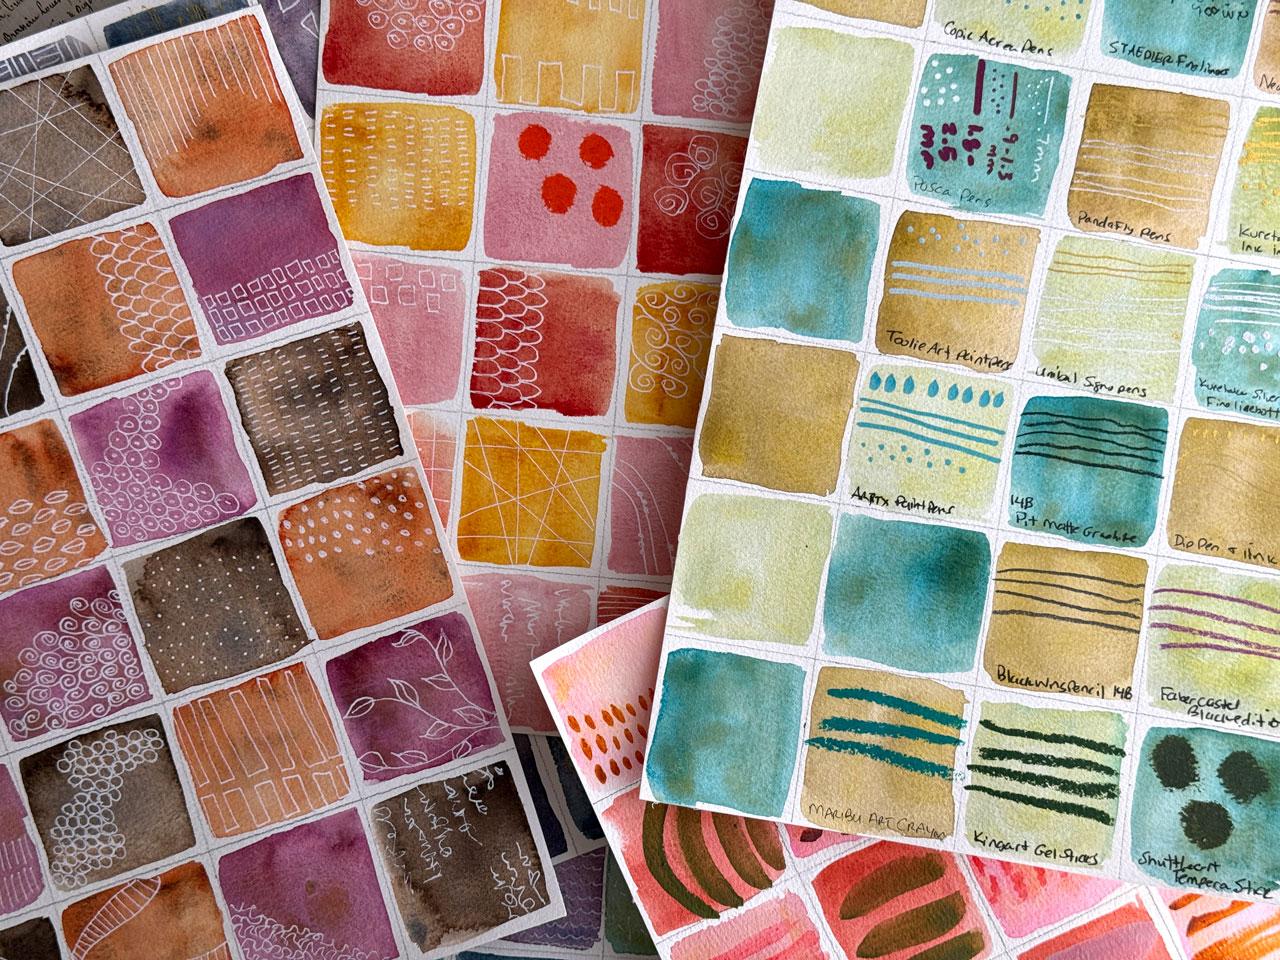
3. Supplies: Let's talk about
the supplies that we'll be using in class today. This project is all about using whatever you have on hand. It's not about getting anything new or playing with things that maybe you
don't already have. I want you to get out everything
that you already have. Pick out some type of base material. I'm
using watercolor. I will be using the
Holbein granulating watercolors because
I like them and I have a little set of all the colors of theirs
that I have put into a little wood case that I had
gotten off Amazon and I've tagged these in my
favorites list, but these sell out, and so I don't think
they're available anymore. You don't have to have
anything like that. I just happened to
have mine put into little pans so that I can
use them a lot easier. I'm using the whole bin
granulating colors. This would work well
with any type of watercolors you have the
Kurataki, the Daniel Smith. Any brand at all doesn't matter. That's not the point
of this class. The point of this class
is more of looking at colors and textures
and mark-making. In addition to a base, whatever it is you
choose to use, I'm going to be using
watercolor paper, and I'll be using sheets of the Lao hong Academy paper in the 12.2 inch
by 8.3 inch size, just because I like working
with cotton papers, it's my backup favorite brand, I'm usually using
the HonamulePaper. Um, so I would recommend you do this project on whatever
paper that you'd like. If you've got a student grade
paper, that's fine too. I generally like
to do things like this on the paper that I prefer using just so I can
see exactly how the materials are going
to work on those papers, but the Bohong my budget
friendly cotton paper and the honomule is my step up
cotton watercolor paper. So I'm using the Bohong
for this project. And I'm going to be doing
several different sheets. Some of these are some examples of ones that I've already done. For myself. I thought this would be a super fun project
for all of us. But what I would like
to do is pick maybe three colors and do the
three colors on the sheet, which is what I've
done with these. But you can do this in any way. You could do, an entire set of swatches of all your colors. One box could be a different color on every
single one of these. You could do mixes where you mix in two or three colors
in every single square. You can just really
get as creative as you want to be
because these end up really pretty when they're done, and you hang them on your wall in front of where
you're working for inspiration and
mark-making inspiration when you get stuck in a piece. I really love having references
to look up and be like, oh, I should use this or
that because otherwise, I tend to get into a rut and use the same two marks
and I want to get past that and have
something pretty hanging in my art
room as we're going. So paint brush wise, I'm going to be using my three quarter inch Princeton
Neptune square wash. You can use whatever
paint brush you want. All you're doing is laying paint down and letting it
dry before we mark make. Um I'm going to be using mostly when I get to the actual mark-making
reference sheets. I think I'm going
to be using white because it shows up the best, and if it's hanging up in front of me and I'm
referencing it, I can really get a look
of what I have going on. But I did do one in silver, and I did do one in gold
because in the end, those are some colors that I actually like using in my work. But as a reference guide where I can actually
see what the marks are, the white shows up the best. My favorite whites
are and gold and silver for this exercise is
the pandaflyGelpins gel pens. These tend to draw on just about everything I've
tried to draw on. I also have the NIB
Cigna, white gold, silver, and they are hit or miss, but
that's another option. Then for black, you could use any fine line pen that you have if you want to do
black. That's some options. I also want to turn this
into maybe one sheet with different options and
then a couple sheets of just mark-making
ideas personally. With the different options, I want you to gather anything
that you happen to have, whether that be Neo
Color two crayons or a favorite pencil
that you like to use. These are my Faber Castle
black edition pencils, which are very, very bold. And that is my favorite
set of pencils now to use with my mark-making. I also like a bold pencil like a black wing or my 14 B Faber Castle pit
graphite mate pencil. I also like, other
things to mark make like the king
art gelsticks. I now have a whole collection
of these colors because I've really enjoyed using
those in my mark-making. I also like temper
sticks by Shuttle art. Those are super fun to
mark make and play. I may be getting out my Arty, acrylic markers as another
option for mark-making. I also have Posca markers, and those could be a fun
mark-making element. I want you to pull together
everything that you happen to have that maybe you don't use as much
or maybe you love it, it's your favorite
thing to use ever. But anything that
you've got that you think would be
good for mark-making, paint marker, gel stick, temper stick,
anything like that. I want you to go ahead and
pull those out and they can be options on your
reference sheets that we'll be making.
That's about it. Paper, some watercolor and
all your mark-making tools, and you'll basically have everything you need
to make these. I also am going to be drawing a grid out to keep
myself focused. You can do that with a
ruler and just a pencil. I'm going to use
my little T square because I was a drafter when
I was in college years ago. And so I like T squares
and they're convenient. And you can just
kind of line them up and then draw, you know, that line down there
without having to mark it and line it
up with the ruler. I just got this at the Art
store at the **** Blick. But you can use any kind
of ruler that you've got, you can mark it off and draw your lines just as easily
with a regular ruler, too, so we'll be using that
in a pencil to make my grid. I'm kind of keeping it as
simple as I can for myself. I want these to be lovely. But utilitarian and useful. I have discovered white
shows up the best for me to be able to look up
and see different fun marks. What I thought we
would do in this class is paint several of these with different colors of paints and then use each sheet a
little differently. We can use one or two
for mark-making ideas. We could maybe use one with all the different other types of mark-making things that we like so that we can see how a temper stick would look
versus a paint marker, and so it'll just be a really lovely set of reference sheets
when we're finished, so let's get started.
4. Where to Find Inspiration: Let's talk about where
you can get inspiration for different marks for
your mark-making catalog. One of the easiest places
to look is on Pintst. I call these doodle inspirations because you can find lots of black and white doodle pages that people have put out there, you can just look up Doodles, Doodle inspiration,
anything like that. Then you could use some of these as your inspiration
for some of your squares. That's one place. It's free. There's tons and tons and
tons of them on Pinterest. And once you find one, a looking up doodle
inspiration, for instance, then you could click on that
and then down below that, you'll have more inspiration come up underneath
it that are similar. That is one place to look that's free and easy to be inspired by. Another place that
I like to look for inspiration is doing
master studies, and I've done two
big master studies in the past several years
that I have classes on, and that's Gustav
Clemt and Kandinsky. I love love Clemt as inspiration for mark-making
because his paintings, I can open this, his paintings, have the most mark-making
that you've ever seen. It's amazing, just looking into the portrait of Adele Backbauer I picked little pieces out of the bigger piece to do
the master study on, but it makes you look in different sections at
all the different marks. And if you only had one
painting, pull from, this would be an amazing example right here because you've got little tiny
squares on squares, you've got the lovely scrolls, you've got circles
within circles. You've got different
colored square on squares and then some dots. You've got the lovely
textured background. You've got this whole
center section that has lines and triangles and eyes, and it's just amazing as you
look around this painting, all the inspiration
um, that we can find. And this little shape
here that's like a coffee bean kind of
shape in a square. I mean, it's amazing. That painting is
one of my favorite. This one, lots of lovely
inspiration going on here in the dress and paint
some inspiration back here. This is the tree of life that's got a lot of texture
and inspiration in it. This one is the kiss. Again, the other one
that is super fantastic for just looking around at
the different mark-making. In here, you've got these
lovely elongated rectangles, little triangles, little
circles on circles, little fun squiggly
lines in here, lots of good interest
and different things to kind of study and look at
and admire in his paintings. Here's a closer up of that. You can really see a lot of these details and
these lovely lines. And so that's one place
that I have gone to get inspiration and
mark-making pages that I have saved from
doing these master studies. Here's a piece that
I did inspired by different marks in the
paintings that I've discovered. And so this lovely little oval chain is
a really fun look. I like the little coffee
bean with the dots. I've got the little circle
on circles in here, so a lot of good inspiration
to be had from there. I've also taken mark-making and just drew out a little
square grid kind of like we did on our colored squares
and just marked with a black pen the different marks that I saw within each painting. And then I kind of marked off what painting
that was that I was looking at and what marks I got out of that
were inspiring. And so that's one way that you can do a mark-making sheet. Another way is I
have just thought up lots of different
mark-making and drew it off on a piece of
paper and then taking a paper cut and then cut each of these
little fun shapes out. This one I did several years ago in the Rolling Stones class, so you can get that PDF out of that class if you want
that mark-making sheet. But it's another thing that
you can just look around. This is more like looking
at the Pintras doodles and being inspired and saying, Okay, let me create each
of these in a square. And so that has been super fun. Then in the Kandinsky,
um, you know, he's got a lot of
different paintings that he is famous for. And I was very inspired
by this one here, which is his black and white
piece of different marks. Studying the different things that painters old
masters have done, and it's not a perfect replica
of his 30 squares piece, but it's very
interesting to then look over here and then
recreate something similar. It doesn't have to be exact. It's just an exercise in
observation and mark-making, and then you could add some
of your favorite aspects of those marks to your
mark-making sheets. So yeah. I like old Masters. You can take from the
mark-making that I do if you see things that you find interesting because I like mark-making
in all my art. Some of my favorite
pieces have been the squares and
concentric circles that I did that I was
inspired to create from Kandinsky's
concentric circles, which were much more plain. So it's kind of fun to take
an old Masters inspiration and make it your own and turn it into something interesting with dots and lines and shapes. And just wanted to give
you some ideas there. Look on Pintrs for
doodle sheets. Out Old Masters paintings or any artists that you admire and then maybe use some of those marks in our
mark-making sheets. Little inspiration
there for your sheets. Alright. I'll see
you back in class.
5. Prepping Our Paper: Before I do anything else, I'm going to go ahead
and draw my grid and make it where I can get
started painting our grids. So this is eight by 12 ish. And so I'm roughly
making my grids, two by two, give or
take a little bit. It's not even eight by 12, so I'm just going to get close. It's not about
being exact for me. It's about getting close and it being lovely when I'm done. You could do this in 1
million different ways. You could grid it
off like I'm doing. You could use a stencil. If you've got a stencil
with shapes that you like, you could do ovals and all over the page and do mark-making
on top of the ovals. It's really about
getting creative. But what I like about
having a set format, you pick whatever it is
that you like to do, and then that's the format going forward for this
particular project. What I like about that is then they're really cool and
they make a collection and then you can frame them and
hang them or you can just tape them up or whatever your preferred method of
something like that is. Yeah, I like having just
some fun with the art and swatch sheets and things really traditional traditionally
haven't been something that I've
enjoyed doing. I think I was always
just in too much of a hurry to slow down
and enjoy the process. And the older I get, the more
things like this bring me some joy and make it much easier for me to then
visually see like, Oh, hey, I got to I forget what I like or
Oh, hey, I love this mark, and I can look up and reference it and oh I love these colors, and now I have them on swatches, whereas before I
would just kind of wing it and I don't know. Now I appreciate
stuff like this. So I've got the holebns I enjoy doing stuff
like this now. Like now I'm like, I want a whole reference
library around, and I want to have, ideas and things that
I'm inspired by. Alright, so I'm going
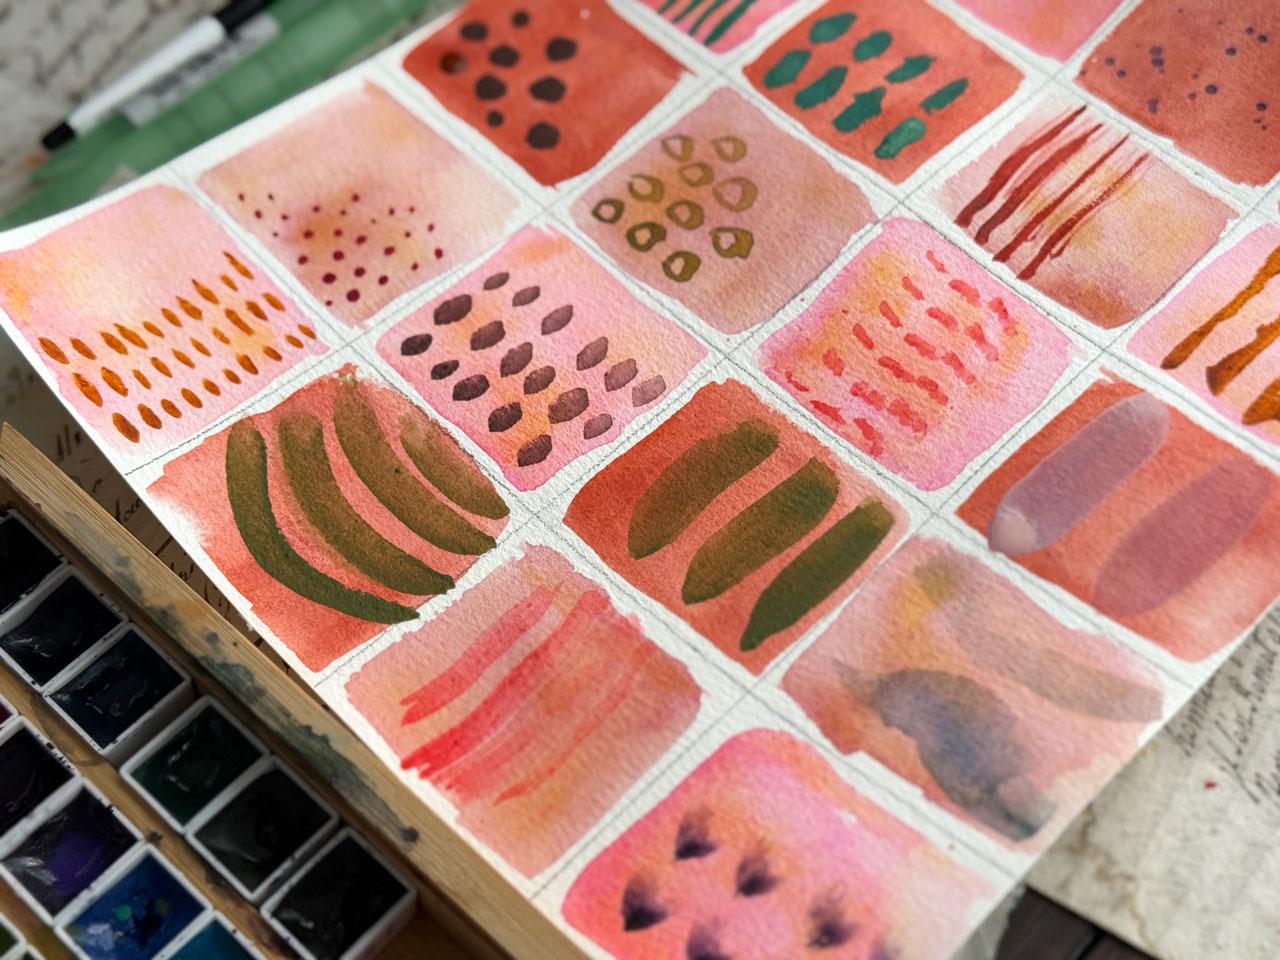
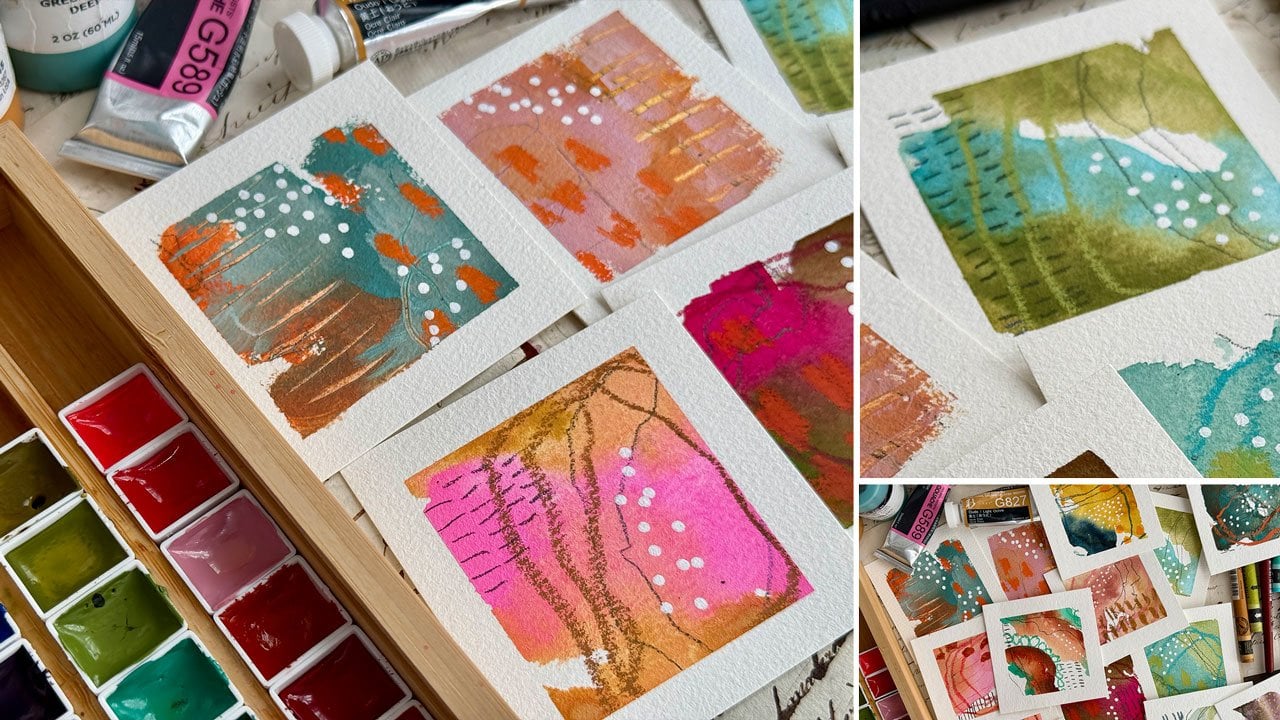
to wet these down. These are just squirted in there and they dried and now
I wet them down to use them. I'm thinking that I want to do three colors and
so I could do one, two, three, one, two, three, and then stagger them. Let's do the first one together. This is our paper
prep and our colors. What I want you to do
I got the big brush, the three quarter inch square
wash that I'll be using, you can use a round brush too, a regular Princeton
Neptune round brush would be a nice choice
for something like this. I think I'm going to do it
in color ways because I really enjoyed the other
ones with three color picks. And so I'm feeling
like maybe I like this 501 and I like this
511 and this 505. I like these greens
and blues in here. I love this kind of deep
blue and this purply tone. So there's tons of options. And what you could
do in something like this is you could pull
out your color wheel. You could use this as an
opportunity to do some of the just standard color ways that make for interesting
color combinations. You have complimentary, split complimentary and triad that would work perfect for
something like this. You could also use this as an opportunity to mix
colors and you could pick, two colors that
are complimentary and you could start
with one color here and the other color here and fill all the blocks in with
mixes of those colors. Actually, now that
I've thought of that, how cool does that sound. Oh my gosh. And so your complimentary colors
could be blue and orange. They could be yellow and purple. They could be green and red, or you could even pick some analogous colors which are colors that
are side by side. This could be a really
great color mixing kind of project in addition
to being mark-making, in addition to being
a reference guide. I mean, you can
just make this into so many things in
the one project. And I like doing color mixing. I have tons and tons of videos and stuff where I've done two colors in
black and white. This could be a two color and
a black and white project. I mean, you could just go wild
with something like this. Thinking, what if we
do this 512, 541? Maybe this 511, we could just go crazy or we could
just pick some pinks. Let's do pinks and oranges
for this first one. Let's just pick
some out and paint. My goal here is, I like the granulating colors
because they granulate, they separate, they turn
into different color ways. You see things in them that a regular watercolor
doesn't really display because a regular
watercolor might just have one pigment or they're mixed in a way that they
don't separate. So I love granulating colors. I like my watercolors
to do tricks. It just makes me happy. My goal here is
not to be perfect. I like the irregular edges, which is why I gritted it off
so they're within a border, but they're not perfect
within that border. I think it adds some interest to have that bit of perfection
and I like that. Don't get perfectionist
with this. This is about having some fun, making something
interesting without getting hung up in
perfectionism. For me. If you need perfect, then I
guess you could go for it. But I think it's so much more interesting if you just play. I'm angling it so that they
are offset from each other. But I've got one, two, three, we're going
to do three colors, let's come over
here, three over. This way, all our colors are offset and
evenly spread out. Look how pretty this pink is. This is that number five oh one in the holbin
granulating watercolors. And it is lovely. I've been really making
it a goal to pull out all the different
art supplies and play with all the
things that I have, but don't necessarily remember or maybe they were precious
and I just have saved them. Let's come back over here
and do this one right here. But yeah, this is the time
to pull everything out. This is how you figure
out how they work, what they do, if you like
it, if you don't like it. I think we got it.
We've got diagonals. Let's pick color number two, which is going to be whatever five oh two is right next to it. I don't know that I love that, but we're going to do it anyway. We're just going for it. This is really the way that you learn. What do you like?
What do you not like? Why do you not like it? Evaluate and see
what is this doing? Then you can make informed
decisions going forward because you've played
and experimented with your supplies. I'm going to continue
making these all the way down. All right. You've got that second
color laid down. I'm going to go with an
orange this time, I think. Now you're ready for
the third color, whatever color that is
that you've picked out. I think blues and
greens are pretty. I like the pinks, reds
and oranges together. I like there to be a variety. In my color ways but
complimentary side by side, so more the analogous. That's what I was
trying to think of. My mind was moving
different than my mouth. But yeah, I like the
differences and I like to play. I just want to see what do
these different colors do? If you pick one set of whatever your favorite watercolor of
the moment happens to be. Pick that one set
and just do all of these with that favorite
watercolor of the moment. Or if you've got a new
watercolor that you've not really done that much with, this is the perfect exercise to play and experiment
and explore it. There we go. And once you've got
your color down, now we're going to
have to let this dry before we can do
anything else with it. So you want to go ahead,
pick your three colors. That's what my choice has been. You decide what you want
to do if you want to do the three colors or
pick your color wheel and maybe do opposites
or three colors that are complementing and play that way, if you want to pick a new
supply and use this as the way swatch out all the
colors in that collection, because we could
have done all the different colors like that just depends on how you
want to work this project. I'm doing the three colors myself. We're going
to let these dry. I want you to do several sheets and all of them be slightly different to play and explore. If you want to do them all
the same, you certainly can. I'm going to do
all mine different because I want them to
be something colorful and fun and bright and all
a little bit different. Then we will come back once you've got several
pages painted, and we will do some exploring.
6. Removing Watercolor Paper From A Block: Once you have several of these done and
I've done several, I've just picked out colors that I thought, let's try those. Sometimes I go for
deliberately funky colors together just to be like, oh, what an interesting color combination. I didn't
know I'd like that. I've done four. I
want you to do four. One's going to be where
we are mark-making with whatever mark-making
tools that we have just as a reference
and a reminder that, Hey, you have this
or you have that. Then one could be mark makes on top of this
with more watercolor, watercolor on watercolor or gouache gouache or
something like that. Then or that could
just be mark-making. Then we've got a couple
for mark-making. I don't usually work on a
block because I don't like the height difference from
the table to the paper. That's my own little quirk. But I did for these because I didn't want to
tape an edge off. I needed the paper to stay
fairly flat as I was working. And so I left it on the block, and I thought I would show
you how easy it is to get these off the block if you've got this little
watercolor tool. So this is a
watercolor block tool. And I've tried using a spoon. I've tried using an old
knife and I've tried using my sharp knife knife, like, you know, the
exacto knife things. And I cut the paper. And so I've never liked working on a block
and then trying to cut the piece off the
block because I'm always going to ruin the paper somehow and get very
discouraged with that. But I do like having this
little green leaf tool, which I have linked
on my favorites page, which I have that page
in your supply PDF so that if you are frustrated with trying to
get watercolor off a block, this tool is amazing. I love it. It does come free
with some Bao hong papers, but I have never gotten one. I got that off of Amazon. Then once you use whatever it is that
you're going to use, then you can flip the page
over and go ahead and mark what those colors were. I say that because you might
come back and be like, oh, I love this.
What color was that? Or if you've done some
other watercolors, these watercolors were
my Mash's watercolors, which are handmade watercolors
off of an Etsy shop, and these watercolors are my
whole buying watercolors. I might later look
at it thinking, what's that? I can't remember. If you write, say, on
the backside of it, you'll remember
what the watercolor was and what the colors were. For this last one, I went
511 because I'm like, Wow, that's a crazy color. Then I went with
505 and I was like, What little oddball could I put in there? How
about five oh three? I actually on all of these
did all different colors. I tried not to repeat the
colors just so that I'd have a fun little record of the different colors
and what they could do. And at this point also, you could erase your
pencil line if you want. I like the high
polymer soft erasers to do stuff like
that because they don't leave a bunch
of pencil dust. They're a cleaner type of eraser and they
work really well. You could erase
those if you want. I'm not going to
do that because I actually like the grid lines in it and I like the
imperfection of every square. Within that imperfection, you have a framework of perfection. I think that's what makes something like this
so interesting. The fact that individual
pieces are very imperfect, but as an entire large piece, it's very interesting because
of those imperfections. And so I want you
to lean into that. Don't try to get perfect
squares in the perfect square. Get wonky squares within those frame lines and just see what you get
when you're done. So now that we have all of
our watercolor pages ready, we're going to do
some mark-making, so I will see you
in the next video.
7. Paint on Paint Marks: Now we've got our grids painted. I want you to take
this moment to now experiment with
the different grids. I'm just going to
flatten this out some. We could go ahead and tape it down a little
bit if we wanted to keep it in place until we're done with
it. We could do that. I've got a hardboard
artist panel, which I like to tape stuff too. I don't really want to tape it so much that I'm in
the way of mark-making. I might just tape it a tiny
bit just to keep it in place. My favorite tape now is
this Holbein artist tape. It's kind of like a like a
washy tape in the thickness, but man it peels really nicely off of the different
papers I like to use. I'm going to use that tape. Then I want you to get
some different brushes. You could have a round brush. You have this is my Princeton
Neptune number ten. You could have square brush like this half inch square
wash. You could even have little tiny brushes
like this number two round. What I want you to do now
is to play and mark bake with the watercolor on
what you've already done. I'm working dry on dry and you certainly could
do wet on wet. But the goal here
is to mark make with the supply that we've
used on these sheets, and so we can do lines and we can do dots and
we can do dashes. We can mix colors, we can mix mark-making things. We can do all kinds of
interesting things, but I want you to
do some of those on here in the spirit of discovery, like, Oh, I should incorporate some of these
fun things in my work. I'm just going to randomly
pick some of these and then do different marks as an idea generator and a reminder that you don't
need anything more than just the paint you're
using if you don't want to have any other mark-making
tools that you're using. Another thing too that
we could do is we could just take clean water. I've got some clean water
and some dirty water. This is my number ten brush, but what we can do
here is just test out will these reactivate
if I get water on them, and some of them
won't and some of them will depending
on the brand. Of whatever you're using. That's another little fun
thing that you can do. This is a perfect time
too to experiment with different colors on here, what will the
different colors do? They don't have to
match. They can be something weird and crazy, which really leads
me a lot of times to interesting discoveries
and things that I'm like, didn't expect that
kind of thing. I want you to do as many
of these as you can think of as you reference,
as different ideas. I don't know that that's really even reactivating hardly any. Once I decide it's not
going to reactivate, I could go back and do
something different there. Use all your different brushes
to get different marks. I can get a different
mark with this brush, this big round brush
that I'm going to get with the square brush. I might even get some of
the square brush it's about how interesting can we
get with our mark-making. And do you have any brushes that might make
interesting marks? Now is a good time
to experiment with other mark-making tools
that aren't a brush. Maybe you go outside and grab some twigs and maybe you
mark make with some twigs. I mean, there's all kinds
of stuff that you could do to mark make. This is just painting
a color on the color. Just for fun. I want you to do as many of these
as you can think of, so I'm gonna continue filling this sheet with just random other colors
that I've got here. I do have some
funky paint brushes too that I never used,
but I've got them. It's a whole little set of these royal and ang
nickel shaped stuff. I don't even remember
where these came from, but there's a whole
little collection of different shaped brush. This is FX elements,
creative mark brushes. This one's a black
and gold by somebody. Yeah, so look for some
of the brushes too that you know, aren't
normal brushes. That's an FX, ex and see what do you got that
maybe you've never used. I got all of these
lovely funky things. I don't even remember
where they came from. So you can maybe Google
FX. F as in Frank. X X, FX brush. We could even try out funky
brushes, a fan brush. Oh my gosh, everybody
needs a fan brush. Let me get a fan
brush down here. I love fan brushes because of just the fun things
that you can do with it. Maybe you can dip those in. Maybe we can do a drag. Maybe we could even do fun
little marks like that. Let's see what this
funky brush does. Fun line brush, that's fun. You don't have to have these funky brushes
because you could certainly get lines out
of just that round brush. It's just interesting to see what's out there and
what does it do? That's different. If you want to remember
what those were, you could take a pencil and notate at the bottom of
each square what you did. I'm not going to do that
because I'm filming it, and that would give me a pretty good indication what I did if I came back
and watch that. But this more for me
is just a reminder of all the different things
that you could be doing on your pieces
for interest. If you see any color combos you like, that's
interesting also. You got to be careful with this, but you could do some splatter. So to do some splatter,
a nice wet brush. You could shield
these a little bit, but a nice wet brush, plenty of pigment on it,
and then I just like to tap and that would give
me some fun splatter. Then you could use
different brushes to see different widths and
lengths and shapes. Another shape is my half inch oval wash that
I really like, grab whatever you've got on hand and see what can
you do with those. You just see how
many can you make. So I want you to fill up
your first sheet with different watercolor things and different colors and
shapes and just see, like, what can I create? So let me finish this sheet out with whatever else I can
think of as I'm going. And then we'll move
on to the next sheet. All right. I think I've got all in there. Now we've got dots. We've got some lines. We've
got some shapes. We've got some brush
marks where we splatted the brush down with like this
one and these brush shapes. We've got some interesting
brush things that we tried. I don't know if those
are my favorite. Another little fun like bird
shape or like arrow shape. A little rainbow shape
that I like a lot. Now we have a full sheet of just random mark on mark with your same product
that you painted with. I used to gouache, you
can do on top of gouache, watercolor on top of watercolor. You could do gouache
on top of watercolor, you can do acrylic paint
on top of watercolor. I just want you to thinking
outside the box and not every mark-making tool has to be a pen or a paint marker. It can be the actual paint that you're painting
with, let everything dry, come back on top
and mark make and just see what you can
think of and create. That's the first
mark-making sheet that I'd like you
to experiment with and just see what can you create with just your paint
and some paint brushes. All right, so I'll see
you back in class.
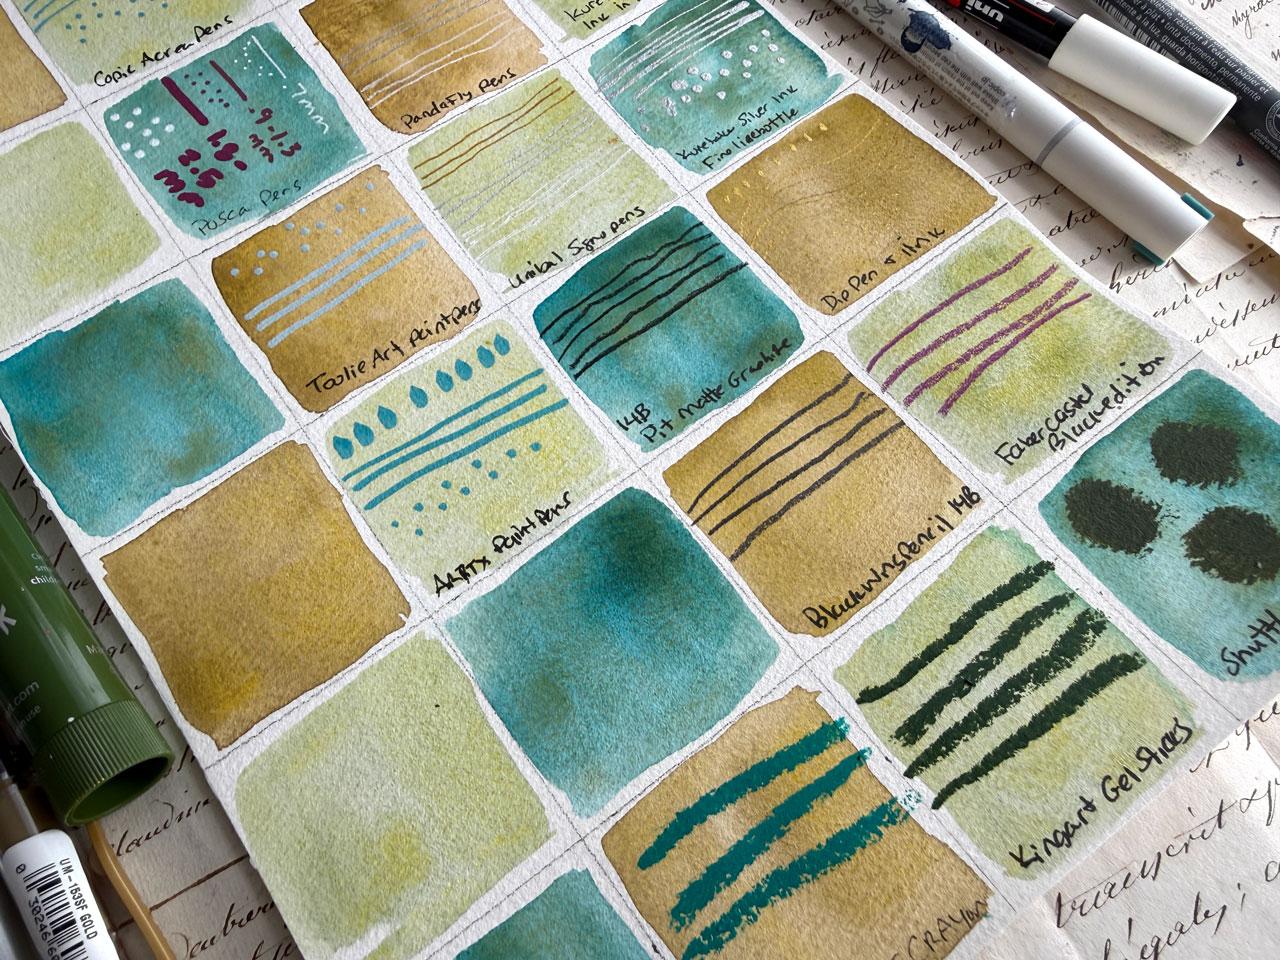
8. Sampling Your Mark Making Tools: This video, I want this project, I want you to take
all the different mark-making items that you have and make a mark-making
reference sheet of the different
items that you have. For instance, I've
got the Neo color two crayons that I really like to use
in different pieces. This is a good mark-making item that I use in a lot of my work, so I can go ahead and just add some marks onto one of the squares
as a reminder of, hey, the neocolorT crayons is one of your favorites
elements to add. Then what you can do once you've used that element is
notate what that is. For instance, this is
the No Color two crayon. I could take a black pen like a fine line pen
and write on here. Let's see if this is
even going to work. And I could write what that is. So I want you to look at all your elements
that you've got. Another favorite
mark-making tool for me is my KuratakiGld Mica
Inc that I use a pipe it and put the ink
into the fine line bottle, and then I use the bottle
as my mark-making tool. I have this in gold and silver. Kurataki makes that
in gold and silver. And then I like
to get it started and that'll get any air
bubbles out and such. When you're using this
for the maximum control, you want to be basically
almost parallel to the paper so that
when you're like this, it's not squeezing out
a whole bunch of ink. You're like this and it's
giving you a lot more control. What I like to do with this
is I like to do lines. You can get creative and think about what kind of
lines that you like, but I'm just giving myself
the reminder that, yeah, I like using this with
dots and lines so that is my kerataki gold black
ink in a fine line box. I can do the silver
one same way. You do have to shake
them up to get that ink really back in there to get the color mixed up. I'm not thinking at the
same time I'm talking. But I do like the gold and
I really like the silver. The silver does come
off a little bit more like a brighter silvery white. Um And then I like that
the fine line bottles have a little needle cap in the cap to keep the ink from
freezing in the top of that. You can also use those
inks with dip pens. I've got some favorite
dip pens that I like, you can have a regular dip pen. You can have the
Kakamori brass nib pen, any of those pens, if you
like to do pen and ink stuff, do some of that on your page. I'm not going to do these
on my page currently because it's been a while since I've done anything
with the pen and ink. I could go ahead. Well,
let's just do it. I'm going to use the gold
Mica Ink in a while. Then I'll just go ahead and hopefully I'll get some
good marks out of this. Let's just test it out
on a little sheet there. What makes this pen work is using it on an
angle rather than straight up and
down and not having so much ink on it that it's
dipping down the sides there, which I just shook that up, so I do have a lot
of ink hanging out. But on the angle, you can't
do it straight up and down. You got to let it grab the
ink on the sides of this my ink is a little bit thick but still going to go for it. I can do lines and
I can do marks. Um a lot of pen, people get really frustrated
with pen and ink. So, you know, not something I do so much
anymore just because so many people find it challenging and
everybody complains. Oh, I can't get that
like you're getting it, so I've kind of quit using them from all of people that just
can't get the hang of it. But this was my solution to that for most applications
was the fine line bottle. Now we can put a dip pen. Okay, I got extra line in there. Tip pen and ink. There's
an extra line on there. Well, but it is a
finer line and you can see the shine in
the light there. It's a finer line than I usually get with the fine line bottle. On some applications, it's
a more preferred look. It just depends on what
you're looking for. Now, I also want to do I
got these fine line pens, and it would be a
really good exercise if you put them in order. Or just something similar. Then did a line of each of those so that you know what
size each of the lines is. These are my Stedler fine
liner pens. There's a 0.8. These you might want to do on the tip so that you really
get the right size. This is 0.05 very fine. Because if you just do
all of them on the side, you're not going to see that you are having different
sizes there. 0.1, and this one's 0.5. Now you have a
really nice visual of how fine or how heavy
each of those sizes is, and then we could write
down what this was. StudlerFne fine liners. And you could also do that
with your different pins. I've got the pantafly pens. And then I've also got the UIL Cigno now I
could go ahead and make myself a reference
of the gold and the silver and the white
for each of those. Got to get them started. Then I've got this Unibal Cignos Kind of wish they did each of
these in a black also also. Usually with the
white, I find that the pandafly are the most reliable in the mark-making. The gold and the silver
do pretty good in both. I do like the gold
better in the pantafly. Silver is about the same and I usually like the white
better in the pantafly because it's more stable or more dependable,
I'd like to say. Also, I've got a favorite
mark-making tool is my Pit Mac graphite, 14 B. I also love my black wing. Which I'm going to call a 14 B because no matter what it says out there, it's
almost identical, slight different shade of color, but it's almost identical to this 14 B that I love to use. So I like that the 14 B Pitt graphite one by favorite
Castle is more black. I like that the Blackwing pencil just as bold, but
it's more gray. This black really is a really matte black color versus the more graphite
tone of the black wings. I like both of those for
two different reasons and that's where
those fall for me. I also love love. My favorite Castle
black edition pencils. Because they are like
a 14 B in color. They come, and this is
the little box for those. I took them out of the
box and put them in these pencil things
because I couldn't see the colors from the tips
and this was in the bottom. So I ordered these
pencil holders, which I've linked these on my favorite page too
in my Amazon shop, the ones that I ordered, but
it doesn't really matter. These are just some
pencil cases that you can put into a three
ring binder if you want, but I like them because
they're sturdy. I can have them
sitting on my desk them over and I can
see different colors. And what I love about
them is they are bold. Let's just doesn't
even matter the color. Let's just pick a color and
see how lovely these are. You can see it's a
bold yummy pencil, and it has become my number one favorite
mark-making colored pencil out of all of the
different choices. This one is now my favorite set. And that's after
doing a ton of videos that have kind of
gotten ahead on my different channels and
playing with just that set and doing different fun abstracts. I also love the temper stick. This is shut shuttle
art temper stick. I like these because they
dry pretty much immediately. They're very fast drying. They're very pigmented. They're not archival. This is considered a children's paint, but I don't care. I love them. As long as you know what these
different paints are for, are they archival or not?
What are you using them for? You can make that
choice on purpose. Now a nicer quality, more of an adult temper stick, I guess we could say, would be these King art
gelsticks I love these. These are nice colors. They come in a set of 48 and they come in a set
that's just the pastel colors. I got the pastel colors first, and then here's a metallic. This is the 48 set that
I just showed you. This is the pastel set. I got the pastel set
first and I loved them so much that I went ahead
and got the other 48 set, and they are fantastic
for mark-making. The difference though,
it does look very similar to the temper stick, but this is a nicer quality. These are artists color
rather than child grade. They have a little
bit finer point and they don't dry immediately. These take 24 hours to cure. But on most pieces of
art, I don't care. That's fine. If they've
got a cure time. The fact is they do dry, which is a good thing. Another favorite
mark-making thing for me are these aca, CFC Acrea pens. And they come in a
variety of colors, and you shake them up. You my little test sheet there. And then you get them started, and they're a paint pen with
a nice kind of fine point. Now what's nice about
something like this, we're not trying to color
swatch everything that we own. We're just trying to give
ourselves a visual record of, look what that pen can do. What effect am I needing? A few lines, a few dots, size indicators, if you've got a set of
fine liners, is good. That's more what I'm
interested in with this mark-making guide
that we're creating. As let me tell you, I do have the
marabou art crayons, which is very similar to
the king art crayons, and I have hardly used them. They're very bright
primary colors compared to the other colors, they're just a tiny bit
more primary in the shades. I've just decided
that for my art, I like the king art ones better. But this is another brand
that you could check out if you like the brighter,
more primary colors. I'm not going to really I could put this on
my thing though, because I have it.
I could use it. And then we'll know that yes, that is another option
that you've got. These are considered
arc crayons. There we go. So we've
marked that now. And I've started doing
little swatch sheets for all my stuff like that,
I never did before. I just didn't like doing
that. But now I love stuff like this and showing up and
creating them with you guys. Totally makes me put even a little more attention
into what I'm creating. Like, I do a better job. Okay, so I've got
these tulle art markers that are kind of fun. These are earth
toned paint markers, kind of like your posca pen. Oh, I got Poska pins. Let's pull the paskas
pens out first. Yeah. Because I use
the poscas more. Okay, I don't like that super
fine for what I'm doing. Here we go. All right. Then we got Tuuli art. I also have the arctic. I got to be real careful.
Those are still kind of wet. Well spell that ARR rdixPaint. Paint pens, and my handwriting is like, it's like I'm a doctor. It's messy. It is what it is. With the posca pens, this is the perfect
opportunity to see what sizes do you have and notate that. Looks like I've got
three different sizes. And so this one is only
got this and the white. This is 0.7 millimeter. Then this is the 0.9
to 1.3 millimeter. That's this one is
the medium point. I think this comes in
a bigger one also, but I don't think I
have the bigger ones. This is the 1.8 to 2.5. Usually what I like to do
mostly with this size, especially is dots. And with this size, you can get lovely tiny dots. Then with this size
like a medium dot. You can see having
a size reference of the different sizes that you have make it
easier to be like, oh, I like that big dot
or like that tiny dot. I like all of those. Then
I've got the Artix markers. If I want this
color, maybe I want. I want a color that's going to make him show up
a little better. And you don't have to
fill every square today. If you don't have enough
different materials to fill up all of your squares,
don't worry about it. The point is that for the
most point, look at that. I didn't put the ti. Oh,
I got them right there. I was about to say I
missed the Toli art one, but I didn't ones are brush shaped and
what I like about these I bought all these. Nobody gave me any of these, just so you know, I
buy my art supplies. What I like about this
one is the brush tip. It makes a lovely
little pattern, but it also can make
dots and lines. It's very versatile. I do like the Arctic acrylics markers. Again, all these are tagged in my online Amazon things so
that you can find them. I link that in the supply PDF. This one is the tulle art and these are all the same size, they're called medium point. They're bullet point,
but they're good for lines and dots
and stuff too. Like, look how fun that is. The reason why you
might pick one or the other is because
of the colors. Tulle art are really
lovely earth tones. What's most of what I
have that I've got out on my counter that I
use all the time. There's different fine liners. You could get the
Pigma fine liners, whatever those fine
liners that you have. If you've got anything
else that I have not used, definitely pull those
out and add them to your sheet as a reference
guide of everything that you've got that could be
a mark-making element that you'd want to remember or be able to look
back and think, oh, I like that, and then
you'd know which one to grab. This is an excellent
reference of what mark-making tools and
materials that you have, you don't have to fill
them all up today. The next time you get a
new mark-making something, if you've only got one or two, you come and add
it to the sheets, so this is going to be a living library of the
things that you've got, and then the ones that
you can add to it. It's ready. Hope
you enjoy making a little reference library of the different mark-making
materials that you have. I'm sure I've got plenty
more than I have forgotten, but this is a really nice start. Yeah, I can't wait to see
what yours looks like and what different tools and mark-making elements
that you've got. The next one we do some pattern and
shapes on our squares. Have fun with that
and I'll see you guys in the next video.
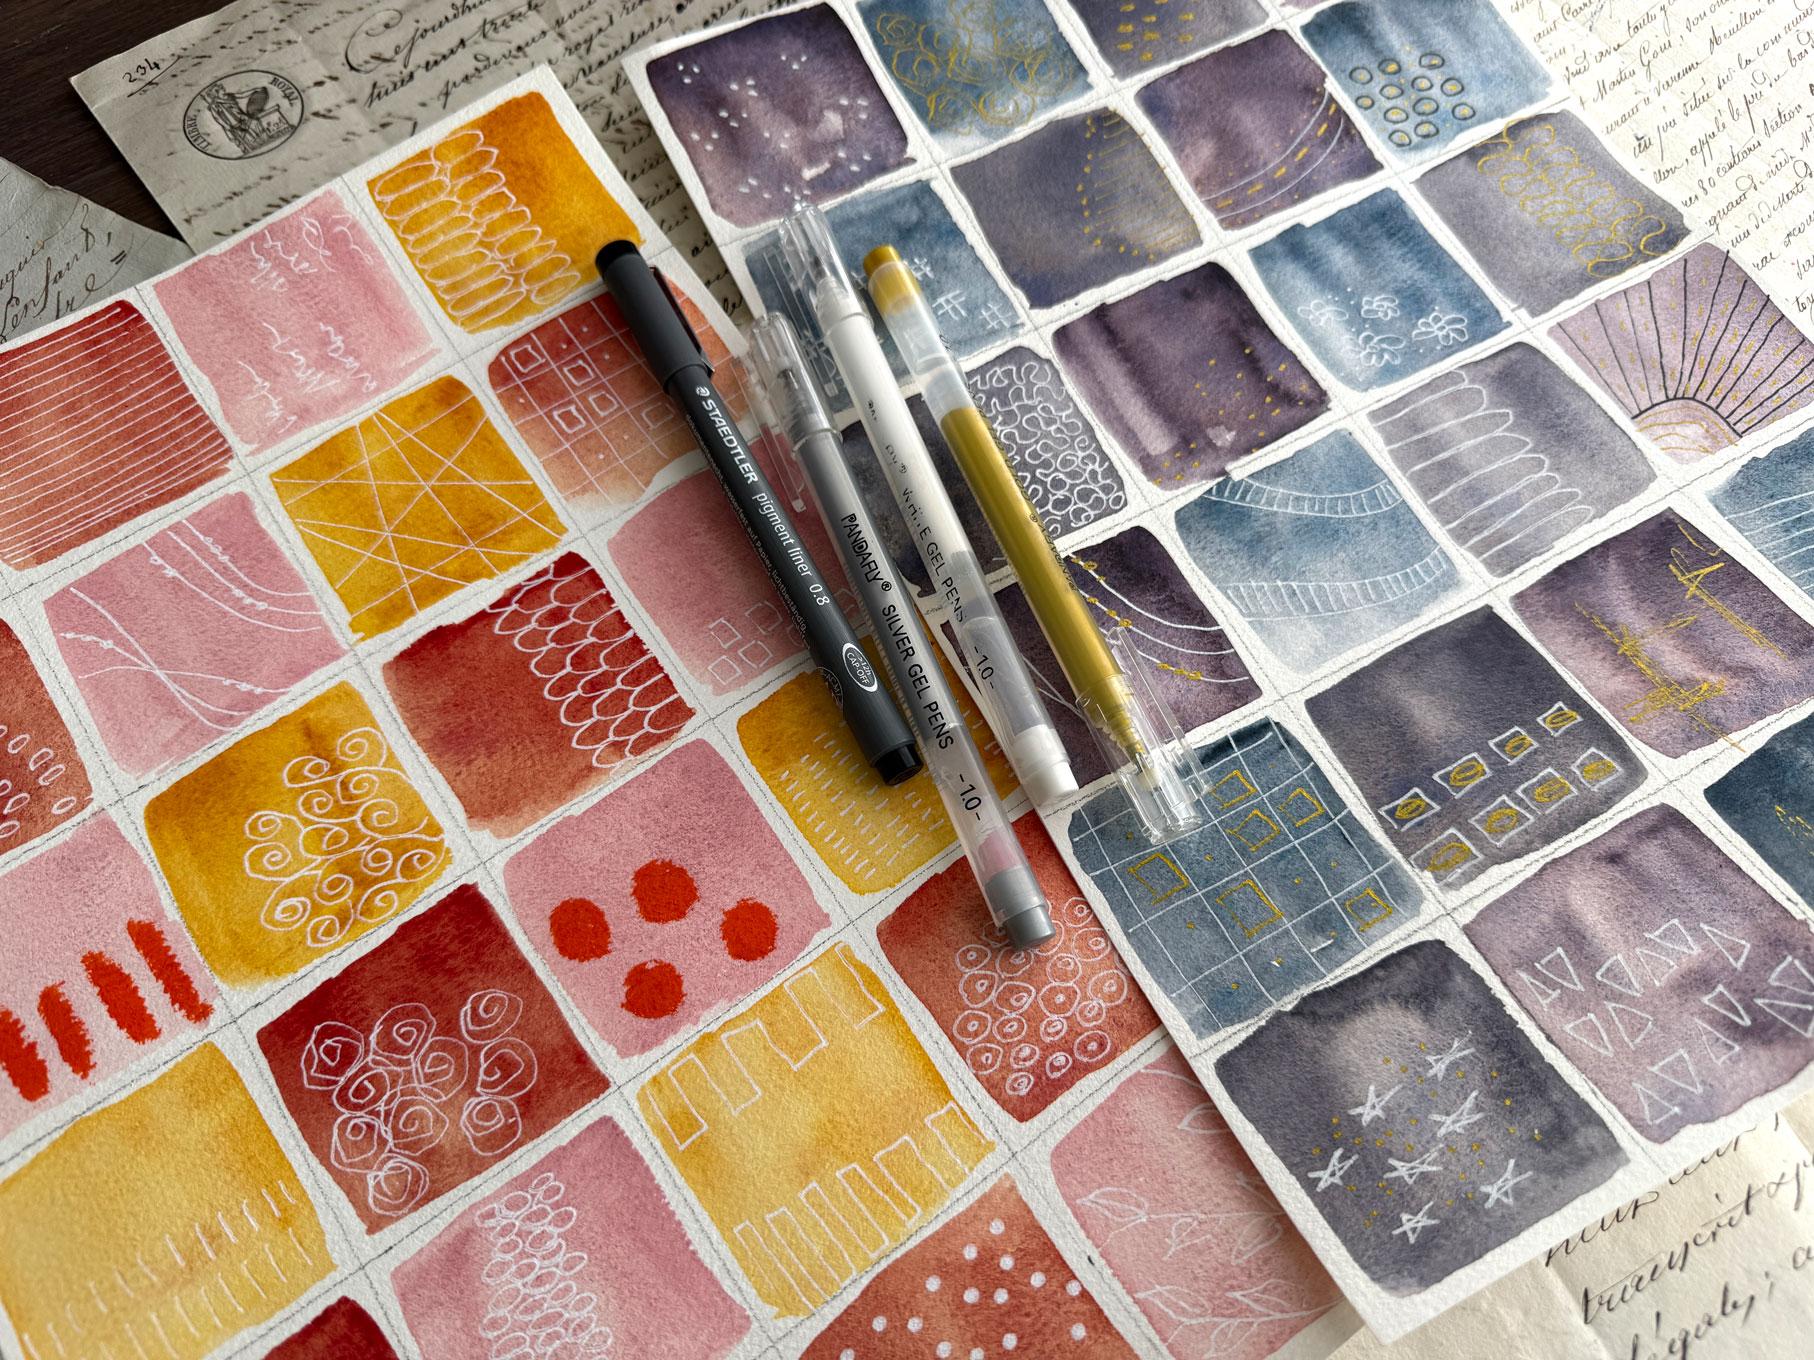
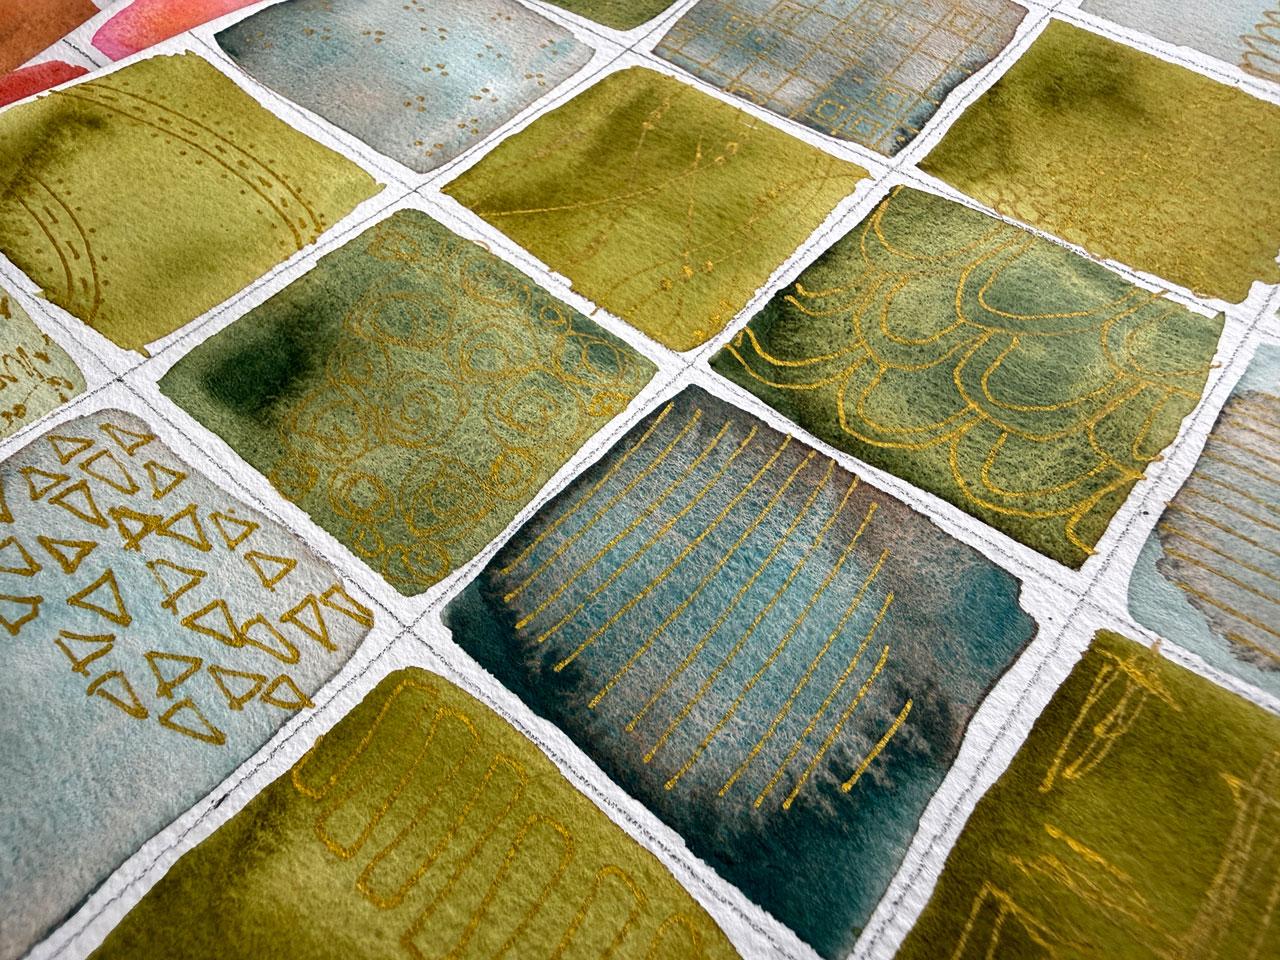
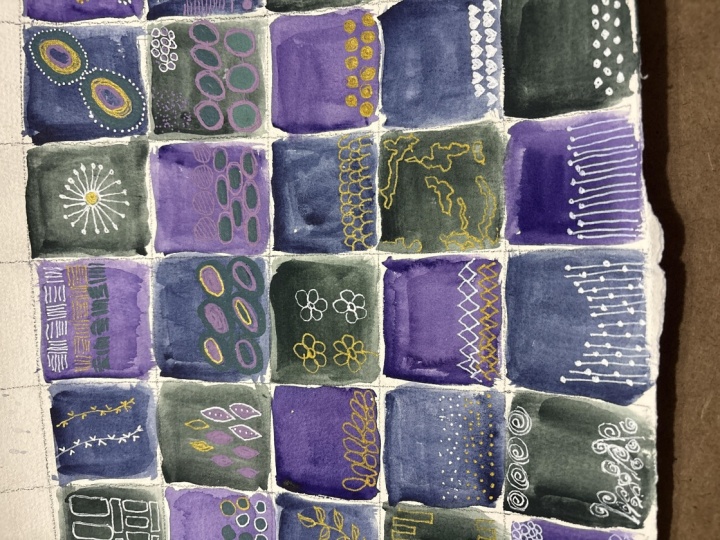
9. Creating Mark Making Reference Sheets: Now that we have got all
of our squares ready, and we've already tested out different mark-making
tools that we have and mark-making
paint on paint. I want to do some mark-making reference
sheets that you might consider doing on
on your pieces. I've done several of these for myself and I did
it with white pen. I use the panda fly
pens on all these. I did it with gold pen and
I did it with silver pen, and I was taking inspiration
from everything that I love. I've taken inspiration
from lemped here with the different wonky
circles and I've taken some inspiration from Kandinsky
with concentric circles, and I've mark-making
with lines and dots and scribbles and
this is a lemped design. But what I've noticed on
these mark-making sheets is the gold and the silver are
not as vivid as the white. So I would recommend for a
reference sheet to maybe use the white and then just
consider that you can use other colors after you see
whatever Mark was inspired. I thought we would just fill
up some mark-making sheets together just to give you some ideas of what you
might do for yours. I'll take photos of all
the sheets that I've done, and then you can use
those as inspiration. You could also just do black and white inspiration
mark-making sheets like I've done in the past, but these are so much more fun when they've got
some color on them. I just love them. And the pantafly I'm just
going to get it started so that we've got some nice fresh ink coming down. And then we will get started. So a few favorite things of mine are dots, lines, circles. So botanical stuff. I'm not really a
botanical lover as far as the things that I might draw
on my different things, but sometimes I will usually that'll be a simple
flower or a leaf. This is a favorite mark of mine, which is an oval with
a line through it, which is very leaf
like, but it's an inspiration that I got
out of the clempt paintings. I like to be reminded of that mark a lot of times
because I forget it. I forget it exists. And then a lot of times too, I like a simple line. Usually when I'm doing a line
on a piece of abstract art, I like the color to guide where that line
starts and stops. If I've got a darker color
with it's a nice obvious stop, then I will use that as
my stop start point to make the lines even more interesting rather than fill
the whole box with a line. I'm filling one color
section with a line and that adds to the interest
for me, something like that. That's a fun, easy
mark-making thing. I also like just rows of lines. And those are very easy just to do a few of those
all the way down. I'm also very partial to
very heavy grid of lines, a real heavy mark of line
with the temper stick, which I could just go ahead
and grab one of those. Because it's a favorite of mine, I could just go ahead and say, Look at this great big fat line. You can go ahead
too, if you want and make some mark-making on your mark-making sheet with one of your favorite
tools if you want. That's a very
favorite one of mine. Another favorite with
the temper stick, I might as well just go
ahead and add it on here. Great Big dots. That's my two favorite things
to do with a temper stick. I like to work
with stencils too, but this isn't about having any stencils or
anything like that. I just want you to have maybe some art tools
available pens and pencils and then maybe
some good shape ideas that you could use with some of these art materials that
you already have without having to buy a whole lot of paint and stencils and
things like that, which I have. I've got plenty of videos and classes where
I'm using those too. Fun little oval shape
forest that's interesting. I like the elongated rectangles like we saw in the
clemed painting. That has become a
favorite element for me. It's just like long rectangles. You can mix and match
some of your marks too. You could do rectangles
and put some dots in there and you can
embellish them even further. More than anything,
I want you to have a reference library of at
least getting started and then you can have a whole mark-making
sheet of taking them up the next level
with multiple colors. Maybe I do white lines and gold dots in
something like this. But that would be
a fun reference to have single color ideas, and then how do you take
those to the next level? Maybe dual colors would
be the way to go. Here I'm just making a grid, all the lines one way, all the lines the other way. Again, that could be
a multi color thing. I could have black
dots and gold dots in the middle of where those
squares are created. That could be
something to consider. If you upgrade your
mark-making on another sheet. It's one color mark and
then on the next sheet, maybe do two colors. How we can upgrade some
of the same elements, but maybe with two. Which let me tell you,
these are already dry and they are not getting on my
hand and I did not smear them. That's why I like
those temper sticks. The King art sticks would
smear for another day or so. Even though they're
not archival, I do love a little temper stick. I'm not making art to sell. I'm making art for my own
enjoyment and play and I make it to show up and just
experiment and stuff. So good circles, those are fun. I also like a wonky kind
of almost flower like, but it's just a swirl circle. It's also a favorite kind
of Gustav clempk swirl. That's where I got
inspired by those. Yeah, I like it. I
like it. At that. Then we also have the
swirls that are really good Again, inspired by Clemt. I really took so much out
of doing that master study. I mean, it's crazy how
much pattern and gold he uses in his work that I
just went gog off for still, a couple of years later,
having some fun with it, enjoying the marks
and the inspiration that I got from
studying his work. Okay, so how about some
pretty lines that overlap? That's another fun element
that I like to do. And then I like to
come back and put some little dots on those lines, kind of like little
pearls, almost. And I do that a lot with gold. It's kind of like
putting a necklace there on the piece of art. It's just a fun little element. And we might do some
vertical lines. Another fun mark-making. Then I always love a dot. I'm going to remind myself that dots are always
a good choice. I might go ahead on
these dots and pull out my Posca pen because you see me making pasca dots
a ton in my work. I just want to remind
myself that that dot is available in my
reference library. I like this back and forth. Still connected on one
side as we're going, that's a fun mark too. Just again, just looking to see how can
I make it more interesting? It's like a long zigzaggy
kind of mark there. Those are super fun. Get some
close ups of some of that. I do find it works better, and I should have done this
on the even darker one if the colors are vivid enough for you to see everything
that we're doing. I like this arch shape. Kind of like an M that
keeps on going shape. I like that a lot. I
use that in some stuff. I just make sure that
the point coming down lands on the curve
of the one below it. That just keeps that
shape going for me. So that's a fun
mark that I like. It's also fun to just draw some lines out here and
let them crisscross in different interesting
ways and just see how many directions
can we go with our lines and how many ways
can we criss cross them. That's super fun. Another thing that
I like is scribble, like a semic writing. It looks like writing, but you can't really
tell what it says. But maybe with the piece that you're looking at and the
writing that's on it, you can infer what
that might say. I do like a little bit
of scribble writing. If you're good with
writing and you like writing itself, go for it. That's not my thing. My writing looks a little
bit like a doctor's writing. You can't really
read it anymore. I think it's because now we've spent so many
years, you know, typing and using a computer
that I'm just out of practice and I'm lazy
with my hands in writing. And so I don't love
to draw either. So you don't see a lot
of drawing. I can draw. I can teach you all the
drawing principles, but I don't enjoy
it, so you don't see it out of me because
I just don't like it. You got circle in a circle. I like texture and pattern and color and
the older you get, the more you figure out, oh this is what I like and that's what you should lean into,
lean into those things, you're like, I like this, but I don't like
that because I had some drawing classes in college and man it was like
a slog to get through them, even though the things that
I created were lovely. When I was done, I had to
make myself sit and create, whereas with abstracts and textures and pattern and color, I show up and I enjoy it. So you got figure out with art, what's the aspects that you really enjoy show up for that. That's what's going to get
you to keep coming back to your table and enjoying
it. I like that a lot. I also like little
little hash mark, little lines like this. We did them similar up here, but they were larger and longer. Here we've got little tiny
tick marks that just make up a lovely pattern all
across a little area. Oh, look at that. Oh,
good one, good one. Look at all these marks
that we have just created. Super fun. Alright,
so maybe squares. I did rectangles, but these
are a little more square, and along the same line, we could do we could do. I've done something similar on a different one where we did, let's do that while we're
squaring it up here. While we're in the square mode. We're going to make these a big enough grid both directions. This is another one out of the clempt paintings that I
liked or an idea that I had. I don't even remember now. Did I see this exact pattern?
I probably did. But if I didn't, then it was
inspired by those paintings. Randomly fill in some
of these squares. A few of these could
hold some dots. Then I did that pattern
here in the gold, and it's just so lovely. Lovely. Loveliness. Another thing that I
really like to do is some big elongated ovals. Again, I'm not going for
perfection on any of these. I like the wonkiness. I like lines that
are kind of crooked, I don't care to have it perfect. I'm not looking for perfect. That's not the style of art that I end up creating. Look at that. We filled that whole sheet
up. Oh, my goodness. What I want you
to do is fill one up like that in one color. Then I want you to consider maybe filling one
up in two colors. Maybe pull out the
gold and the silver, possibly, and then work on a second sheet of
different marks. And then this might
be the chance to somehow make it a
two color something. Whether that's a little
dot around something or maybe an element in the
middle of what you did, but maybe combine two or
three different colors as part of that
mark-making element and that is to remind yourself
that it doesn't just have to be one color or one
pattern or one design. It could be more complicated, but not hard, but more complex. Complex is a better word, not complicated, more complex, how can you take an idea and expand it
into something that will have more interest and more elements in a way that maybe you never
thought of before. When we do the grid and
put the squares in, maybe the grid is in one color and it can be any
color that you want. I just happen to have the
gold and the white and the silver out for
this exercise, but it could be something
like that where you're combining two
different elements in different colors. You could do those in the posca
pens. That would be nice. Do it in the things
that I'm doing it in. We could do those lovely lines that I like with the
little pearls on it, but we can make the little
pearls be a different color. So I could come back with
maybe a gold to tone that as an element of interest
doesn't have to be for any reason other than
we're experimenting. That's fun. Another thing that
will be fun is just some lovely
little scribbles. Your whole page doesn't
have to be two toned, but I do want you
to have a couple of two toned elements in there, whether that be something
with white gold and silver or something with a fine liner, so maybe black
elements in there. These are just little
squiggly scribble lines. That's a fun element as
a background filler. Could be something
behind other stuff, but add some interest in the the background field
of that super fun. Oh, hash marks are fun. Kind of thinking
different shapes and elements that maybe you
could then be like, Oh, I love this or I did not
like that kind of field. So just as many ones as you
can think up is the goal or reference off of mine
or off Pinterest or off old paintings
or so many choices. Oh, you know what else is fun? Like three little dots together. And what I like most about this exercise is it's reminding
me of things that I like, and I get into a little rut, and then I forget
the different things that I've studied
and I'm like, Oh, I wish I had some
different marks in my little catalog that
I just forget about, and this is the way to do it. This is the way to do
it, lovely people. Let's see what else. Let's see. Are there any or Black and
white ones that we like. I like these triangles. Now, I get a little
confused drawing triangles because I try to go
different directions, and then my mind doesn't connect all the angles
correctly as I'm going. I think with triangles, do all the ones
in one way first. If you want them, go in
a different direction, come back and draw those
next because trying to do them both at the same time
totally mentally confusing. Just some fun there. Let's
see what else do we got? I really love, this would be another good one
to be two toned, great big boxes with
the half circles in it. We could do great big boxes in white and half circles in gold. That could be one
thing or half circles in silver and gold, something like
that, and then come back with our little
half circle in our line. Super fun. You could
also do a ladder. Oh, I like a ladder look
sometimes. Those are fun. Two lines and then
lines connecting them. That's a fun mark
on a lot of stuff. Like, that could be a
leading line going through a piece all up through
it. I do that a lot. I let color come in and where they gap, and
there's another color, I do lines up that like a leading line kind of
ladder there, super fun. Maybe we want some gold
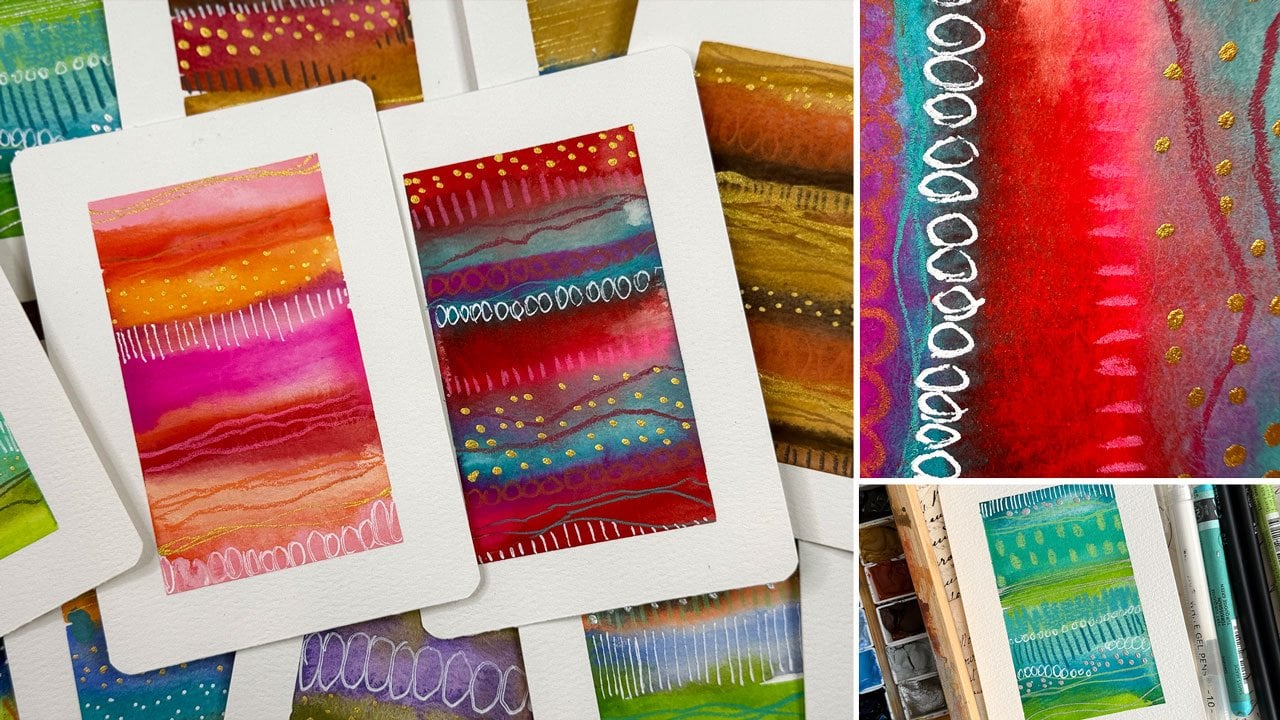
dots as a reminder. I do like a lot of gold. Oh, super bond. We have this as our
gold and white sheet. And lovely gold lines, maybe. And then maybe at the
top of those lines, we have maybe a little ball. That could be a fun alternative. Oh, super fun. It's like
little candles, actually. So those kind of shine
really pretty in the light, which I think is
what I like about gold so much as the shiny bits. I also like that wonky little spiral in gold quite
a bit. That's a good one. It's almost like a flower kind could be the top of a rose, and it's just interesting. I like it. Some people don't. It just depends on what grabs
you as you're creating, but man, I sure do like those. So I want you to
continue thinking and figuring and just what
can you come up with? Maybe we've got some
scribble lines. Oh, I do like scribble. Oh, some scribble. Maybe we got some
scribble lines going different directions.
Ooh, I love that. Um, Maybe we got some great big kind of
petals kind of coming down. That's super fun. Could be
like the side of a daisy. Kind think of it like
that. Great big petals. I like that. Maybe we can
do some little flowers. Just a circle with
little petals around it, just as something fun and
maybe some dots around those. I want you to fill two
whole sheets of these. I want a sheet of just the
white, something like that. I want a sheet of maybe
some alternate colors together to give yourself a reminder of you don't have
to stick with one thing. We can have two things going. And here we can have a road. We did the two lines, but
instead of making a ladder, we made it a road
and maybe some, you know, dots outside the road. That's kind of fun.
Yeah, I like that. And then let's see what
else can we do here? Could do some
lovely larger dots. I like large dots. I like big dots
and I cannot lie. With your paint colors, if I'm doing, how about these lines? If I'm doing something like blues and greens,
you might do silver. If you're doing
something like pinks and oranges and yellows,
you might do golds. So thinking of warm versus cool as far as what's going to determine if I'm using
silver, gold or copper. Copper is a good one. I
don't use copper as much, but sometimes it
comes out in my work. You know what I need
is a good copper ink, and then we need to
put the copper ink in a fine line bottle. Then it will come
out all the time. How about this alternating
lovely lines like this. Super fun. That's a
nice little mark there. What else do I have that I
haven't put on here yet? Ooh, how about some leafy? I did do some leafies
out there. Let's see. Oh, how about some
concentric circles. And then you could fill in those areas right there
if you wanted to. I'm not going to, but you could. And we could do starburst. Let's pull out a black pen for a moment because this is
our multi colored sheet. Then look at here, we could
do a starburst coming out of our edge there. And we could tone that up. We could come back in with some little gold lines if
we wanted, make it roads. It looks like roads. But just as a reminder of multi coolors
not the same color, that might be an option. That might have been the perfect element
that you're like, oh, I need that in my
piece of whatever. You were like that.
We could come back up here with some
gold. How about that? Oh. Then it has a lovely little shine there.
I like it. I like it. Good job. We could do something a little
swirly back and forth. That's a fun element
that we could add into something like
a stripe abstract, that might be a good
element in our stripes. Thinking like we could do black circles with gold centers. That might be fun. As a two tone something again, and then maybe even a few
dots on the outside of that. How creative can you get with these different elements that
we've got going on there? That's super fun. Let's see. Let's do one last something. How about some black something? You know what? We could do. I do like the
different crisscrosses and we could do
that in the black. Oh, you know what we could do we could fill that in too with some gold elements.
Oh, look at that. Totally different than the crisscross lines that we
did on the other one. So if you use something that's similar that you've used in
another square somewhere, how can you make it just
a little different? What can you do? What can you do to just make that
slightly different? Here totally. Wow, how cool that is. Oh, my gosh. Okay. Good job. We filled up another one. Alright, so there we go. Now
we have filled up two of these today with different
marks and different elements. So I hope you have fun
drawing out some of these. I want you to do
two of them, one, white and one with,
white and some other color or just
something similar to that. Solid one color thing, and then throw in some
two color elements to really kind of make your creativity and your
mind start thinking of other directions you can go and I'll see
you back in class. H
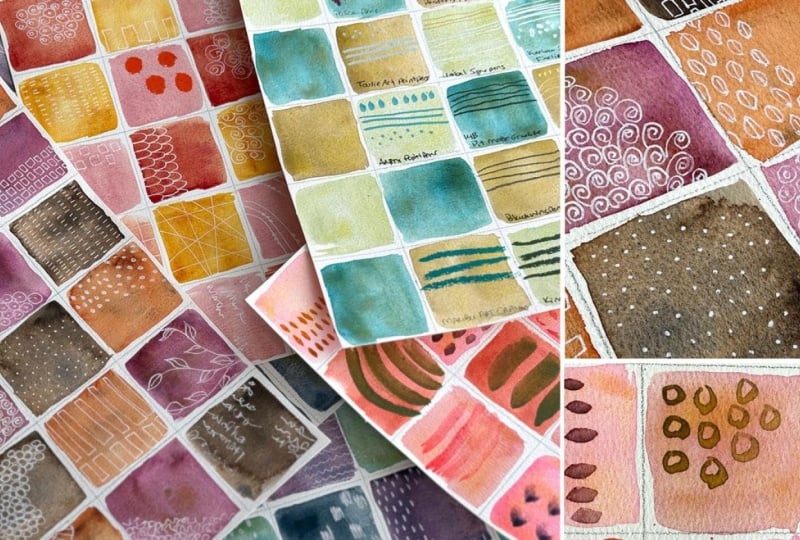
10. Recap Of Our Swatch Sheets: I wanted to just do
a quick little recap of the different elements
and why we're doing these. This is going to be our
reference library for different marks and
elements that we can use in our abstract art, and it's really nice to have them out in a way
that you can then reference and look at and be inspired by when you're painting
because let me tell you, you'll get into a rut doing the same dots or something because you're like,
Oh, I can't think. I don't know what I
want to use. I don't have any ideas in my mind, so the different elements that we explored today
was paint on paint. Lovely. Look at all that. My favorite being these
little circles that we drew. I really like these
lines that we created. I like splatter. I like
the dots that we did. Those are some of the favorites that I got off of this sheet. Then we tested all the different mark-making
tools that we had, and you're going to have
different ones than I have. So go ahead and
draw all those out, notate sizes, notate what it is that you've used so that you can look up and
be like, Oh, what is that? Let me go grab that or
something like that. As add to your
mark-making things. I want you to then fill
in each of your circles, but it's an excellent
reference library to remind you of what tools and pencils and pens that
you have because trust me, once you put stuff away, you will forget
that you have it. Then we went and did some mark-making with
the different elements, and I wanted you to
do some in one color and then come and add
to that with two colors so that you now have a gigantic mark-making
reference sheet that you could be like, Oh, I love these and I
love this and I love, whatever else it is,
and you can then incorporate those
into your pieces. And then you could
also do them as a black and white if you wanted to on Black and white squares. But I do find this
way more inspiring, which is why I have
gone this direction. These were inspired by
the ones that I created for myself that I
did with a gold pen, a white pen, and a silver pen. These are so pretty
now that you could just tape these up on the
wall in front of you. You could frame them
and hang them as a series up on one of
your art walls and then have a beautiful
reference library of marks and ideas that you've created and
tools that you have. You can even go one
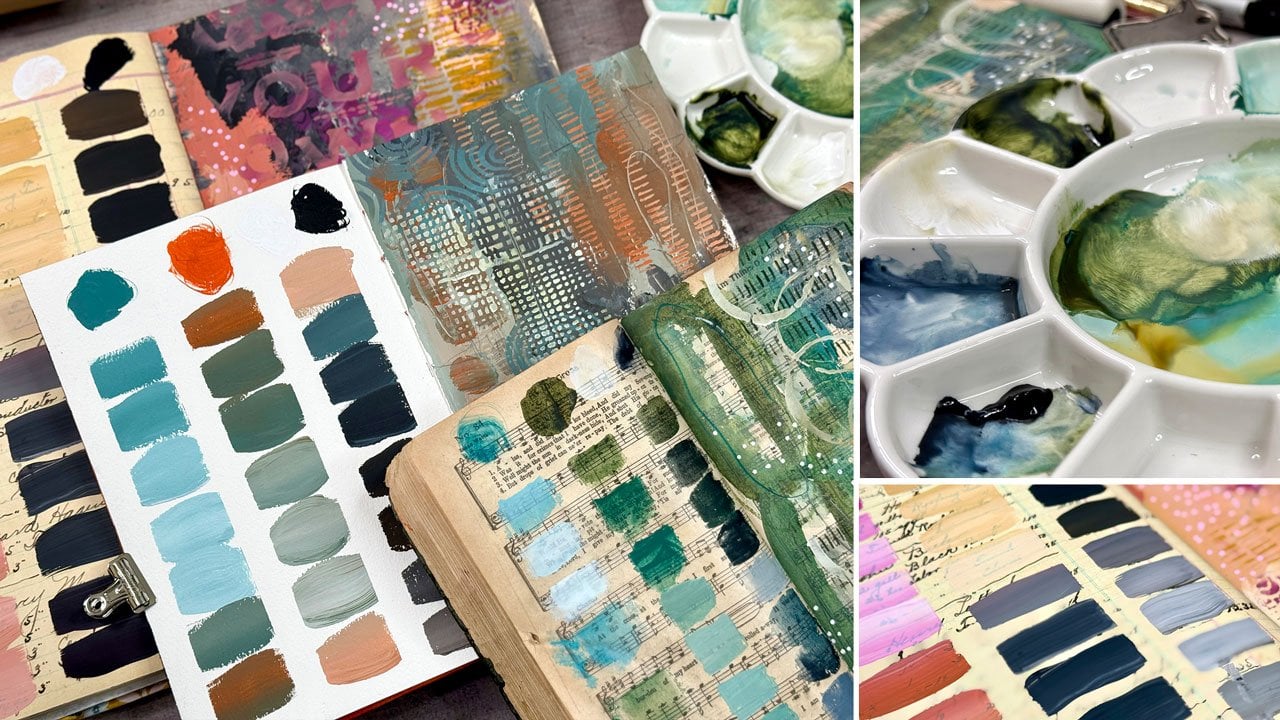
step further and do one sheet in one type of paint. This is my Mashs watercolors. This is my Holbein
granulating watercolors. And if you've got
other watercolors, you could do another watercolor
on a different sheet, and if you've got some gouache, maybe one with that
different kind of gouache. So each one of these could be a different type of paint
with marks on top of it. So that would be
a nice reference also of your different
paints that you have. How pretty and colorful
and lovely are these? Hope you have fun creating a reference library of your own. Please come back and share
those in the project gallery, and I'll see you back in class.
11. Final Thoughts: You so much for taking
this class with me. I hope the exercise
helped you relax, experiment with watercolor,
and discover how fun and expressive simple
mark-making can be. These pattern swatch sheets are a wonderful way to
warm up creatively, explore new color combinations, and build a personal
library of marks that you can return
to in future artwork. I'd love to see what you create, so please share
your swatch sheet in the project gallery and feel free to include close up photos of your
favorite patterns. Thank you again for
painting with me, and I hope this inspires
you to keep playing and experimenting in
your creative practice.
 DENISE LOVE, Artist & Creative Educator