Transcripts
1. Presentation: Hello. I am Cristina and I am so happy that you want to learn watercolor lettering. I am an artist. I live in Spain and I love both learning and teaching. Watercolor and lettering are some of my favorite things, and when you put them together, the possibilities are endless. I hope you join me in this new class where we are going to learn how to form the uppercase print letters. Then with those simple letters, we will create colorful and very beautiful cards that you can use in any occasion. This class is perfect for beginners. It's full of templates and instructions that you can follow step-by-step. This class will help you to learn a new skill and feel more confident with your brush. The uppercase print letters are the easiest ones to start with, and you will be amazed at all the beautiful things you can do with just that alphabet. You can also watch first my previous class called, Painting Simple and Meditative Basic Strokes. In that class, we go in depth into the basic strokes, which are the main pieces that then we're going to put together in this class to form our first alphabet. I can't wait to show you how the magic works, and how just out of simple strokes, when we put them together, we can form the whole alphabet. I'm trying to make things easy for you, and also I will provide different exercises so that we can practice different watercolor styles, and how to use different colors, and create lighter shades, everything so that your practice is really enjoyable. There is also one class where I'll show you different ways that you can practice and also then re-purpose those practice. Get your watercolors ready and prepare yourself to discover a whole new world of letters and colors.
2. Class and Projects Overview: In this class, we're going to learn how to form all the uppercase letters of the print alphabet. It is advisable that you watch first my class, painting simple and meditative basic strokes if you want to start from the very beginning. In that class, I provide in-depth explanations and exercises of all the basic strokes of lettering. My main objective in this class is that you enjoy your practice. Watercolor lettering is all about consistency and brush control. If you find a quiet moment where you are going to be enjoying your practice, you will improve very quickly. That's why it is so important for me to create simple exercises where we are going to be learning the letters, not in the alphabetical order, but in the way of the different shapes the letters has. For example, you will have a template like this, where you will see that we are practicing letters in groups of letters that have similar shapes. This way, I'm trying to make things easy for you, and also I will provide different exercises so that we can practice different watercolors styles and how to mix colors and create lighter shades, et cetera, everything so that your practice is really enjoyable. The materials you're going to need for this class are any kind of watercolor, either if you have water coloring tubes placed on a palate or if you have them in pads, it doesn't matter. Also you will need one or several round brushes. It's good that you have several sizes because that means you will be able to make letters in different sizes too, they are called round grasses, but D&D are fine point. It's handy that you'll have two jars with water. I usually keep one for clean water and in the other one, I clean my brush to change colors. A piece of paper towel, it's always handy so that you can remove the excess of water from your brush. Regarding the watercolor paper, it is important that it is watercolor paper because otherwise you won't be able to absorb the water, but you don't need to invest in very expensive paper as we are just practicing and we're learning. You can use any watercolor paper of student grade or if you want to use 100 percent cotton watercolor paper, your pieces of work will be much better. But this is something that maybe you can leave for later when you know how to make them a little bit more. Also, remember to print all the templates included in the class, and now you have everything you need to start. There is also one from class where I show you different ways that you can practice and also then repurpose those pages. Because everything we do with watercolor is beautiful, and there are many other projects where you can use your practice so we don't throw away anything we're going to be practicing because we know that even with that practice we can use it later. At the end of the class, we're going to do two projects. One will be more simple, it will be to create a cut with an alphabet, and the other one will be a little bit more advanced where I will show you how to present one code into one of your cuts. But both of them are very simple to follow with my instructions so don't worry, you are going to deal them great. In this class, there are several templates included. Some of them are just with the theory that you need to know the way that you need to be mixing all the different basic strokes to form all the letters, and also there are other templates that will help you with your practice with grids and lines that you can just transfer to your watercolor paper and start to work immediately. It is important that you prepare your paper beforehand so that when you have 20 minutes, for example, a day to paint, you have everything ready and you just don't have to worry about anything else. Just get your brush and start practicing. Exercises go from very easy to a little bit more complicated, but they are all very easy to follow, and you will be making beautiful watercolor cards in no time. Even with a simple uppercase print letters, you will be amazed at all the beautiful things that we can create. Get your watercolors, and let's get started.
3. Let's prepare our paper and templates: We are almost ready to start but first please go on to your projects and resources tab and download all the PDFs included in this class. The templates will be very useful for you to have handy and just follow the strokes I'm making in order to create all the words. Also there are other templates that will help you prepare your paper and have everything ready to start practicing right away. I would like you now to pay attention to this template called Main lines because there is one thing that I want to explain really quick. If you take a look at these lines, you will see that when we write, all our letters rest on the baseline. It is shown here with a darker shade and also here, the baseline. That is where all our letters rest no matter if they are uppercase or lowercase. In the case of the lowercase letters, there are some letters that have the ascender strokes that go up to the descender line and other letters that have ascender strokes and go up to the ascender line. All of this is explained and we practice the basic strokes in my previous class called painting simple and meditative basic strokes. But I wanted to tell you this now because since we are going to be practicing now only the uppercase alphabet because it's very easy to start with, then the fact is that all our letters are going to be inserted in these two lines. This is going to make things very easy for us because we only need to prepare like two lines and then place all the letters inside. I'm going to give you some examples. What I did here is I prepared different lines. What I did was I cut different pieces of watercolor paper or it can be any cardboard paper of different sizes and then you just place it on your piece of paper and with a pencil, just make some marks like that. It's really easy. You use this as a ruler but you don't need to measure anything or you don't need any ruler because you're going to be getting the same distance every time. Then what I did in this case is that after doing the wider ones, I started with the smaller ones and then I used the medium ones. Another thing I want to point out is that for making these letters, the size of the brush is different when you want to make bigger letters. For example, if I want my letters to have this height then I should use a thicker brush. That way my strokes can make thicker letters and they will have the proper size. Then if I want to make smaller letters, I use this little one and for the medium one I used this Number 6 brush. That is why this template is also included so that you can use it as a reference and copy these lines into your piece of paper or just trace over them so that you can practice with different brush sizes and see different results. To show you an example, in this case I used the same brush to make small letters and big letters. If you pay attention to this you will see that these letters are nicer and they have a better proportion but in this case, the brush was too small for these big letters. It's all a matter of taste. Sometimes you may want to achieve this style and that's fine. There's nothing right or wrong. I just wanted to show you that you can get different results just by changing the size of your brush or also by changing the size of your letters. That is something you have to take into account and that's why it's good that you practice with different sizes of your brush and also that you use these little pieces of paper to divide your watercolor paper and keep practicing. One way of practicing is just divide your paper with lines or for example in this case, just work right on your part and make these lines with a very slight line with pencil. Remember that when we paint with watercolor over pencil, the pencil mark will be fixed by the watercolor. It's really important that you make it very light if you want to erase it afterwards. Now that we're talking about erasing pencil marks, I would like to tell you about this erasers, it's called a kneaded eraser. It's very useful because it doesn't remove the watercolor. Sometimes when you erase your paper, what you have painted will go together with the pencil. This one is very, very nice. It leaves no waste. I keep doing this because I'm used to a regular eraser. But this is really a good investment, it's not expensive at all. It's really useful if you want to use your pencil to make very light marks and then paint with watercolor on top. There is another way you can practice and that is by using another template that I have included into the class. This template, all you have to do is cut these pieces out. What I have done is I have cut them and then I put them with some washi tape so I can have them handy. You can cut out the template and use it like this and put it on your watercolor pad. Or alternatively, what I have done is I have cut it like in four pieces and then I have also cut the center. This way I'm going to show you. If you have your pieces of paper pre-cut, they can be pre-cut in a way of card like double or just one side. It's very easy for you to place this template. You remove the central piece. This way you can place it either way like this or like that. What we will do is just use these lines as reference and I would first go and do the inside of the square. You can use the template as a guide. It doesn't matter, it doesn't have to be exactly, it's just a little help for your practice. We do this quite lightly. Because you have the lines already in the template it's very easy. You just have to follow along with the ruler and you are ready to go. Now you would have your piece of paper already prepared to keep practicing. You may start first, like practicing like this and then you can start practicing and create your cards. I really encourage you to have your paper already pre-cut and your lines already made before we start practicing. But in any case, just make things easy for yourself and do what is more comfortable for you. Now that you have all your materials ready, you have downloaded all the templates and you have your paper prepared, now we're going to start with the basic strokes. There is another template that I'm going to show you in a minute.
4. Some Basic Strokes to start with: When we are doing brush lettering, the main rule you need to remember is that when we go down, we make thick downstrokes and we make more pressure with our brush. When we go up, we make thin upstrokes and we make very little pressure with our brush. That is the most important thing you need to remember now. In my previous class, we go over all of the basic strokes and you will see that by repeating them is how you gain consistency and confidence with your brush and with your strokes. But in this case, as we are going to be learning just the print alphabet uppercase letters, then we don't need to use all of these strokes. We're just going to use a few of them and I'm going to show how they work. You have them all on this template and I have divided them into straight strokes, under strokes, and ovals. Again, if you have questions about this, it's great that you take a look at my class about basic strokes because that will give you a much wider approach and it will be a great base to start with your watercolor lettering. Anyway, we're going to start practicing this because I want to explain to you, what do you have to take into account when making these strokes? You will see that this works like a puzzle. When you learn how to make all these pieces, all we need to do is put them together and we will have our letters. I'm going to make some quick lines now to show you. That's why I love using this system because I know that all my lines will be the same in a very quick and easy way. Now we're going to start using our watercolors. I am using watercolor in tubes, but you can use any kind of watercolors. I usually place them in a palette and let them dry, and that's the way I use them. But in this case, I had just place a little bit of color in each of these sections so it's easier for me to work now with them and you can see the colors much better. Before we start, I'm going to spray a little bit of water on top of my watercolors. If you have them dry on your palette, you could do the same just spray a little bit, and they will be ready in one minute or less. I'm going to dip my brush into water. I will show these ones. I dip my brush and on the edge of the base, I try to remove the excess of water and I always use a piece of paper towel to also remove the excess of water. Let's start with this pink and we're going to be doing the straight strokes. If you take a look at a template, you will see that there is always a turquoise dot that shows the starting point. Then there's an arrow that shows the direction that we'll have to follow. In this case, we're going to start with this downstroke and what we do is that we place our brush at 45 angle degree against the paper. We wait for a little second and then we pull down trying to make the same pressure throughout all the stroke and then we stop there. Then we need to do the upper stroke and this one goes up because the main rule with brush lettering is that when we go down we make thick downstrokes and when we go up, we make thin upstrokes. In this case, I move my brush. It's not at 45 degrees, it's almost in an upright position and I touch slightly the paper so that I don't make that much pressure and I can make a thinner stroke always with the same brush. Then when we want to make the diagonal lines that we will use for other letters, we do the same. When it's thick we go down, so we wait there at 45 angle degree and we move down making the same pressure throughout all the stroke. This takes practice, don't worry, it's okay. Then we have the upstroke that goes from here. Again, I'm changing the way I hold my brush when I want to pull up and I go up like that. We have another stroke here. This one is the one that crosses the letters and it's always thin and it goes from left to right thin, so we have to place it quite perpendicular. Then for other letters, we will need these diagonal lines to go the other way round. They will have to be like for example, for Z, it goes this way. We wait there for a second and we help the watercolor follow the line. Then you can go over it and make any amendment you need. There are also these little strokes that we will use for letters like R or K. Although they are thin, that should be done upwards because you will see them with the letters that is more natural than we just do them this way and I wanted to place them here. We will see all these with the letters. Now the under strokes we're only going to be using two of them. There are four, but for the uppercase letters, we only need these two. We will change the color because that's the beauty of watercolor, is using different colors. Okay, in this case, we're going to start with the course and they take a little bit more practice. But still, if you do them several times, you will master them. What we do is, in this case again, we have to transition from a downstroke and then end up in an upstroke. We start holding our brush like this and here there is a transition and we go up making less pressure. I'm going to show it with a pencil. This is where you have to stop making pressure and for other letters like J for example, we do this other stroke. You go down and here we start lifting the pressure. That's why we have this one is thick and this one is thin. Now for the ovals, we're going to be using both the circles, but in their different ways. I'm going to show them to you here. This is the circle that is just like an O. We start making pressure and here we start lifting. What we'll have to take into account is that we have both these parts in the outside and in the inside are curved. Now that this is the thick part, this is the thin stroke and this line in between the two different strokes is also thin. That is what you have to take into account, the same as here. If you make these imaginary lines. This is the thick stroke, this is the thin upstroke, and this line in the middle, the one that is going with the transition is also thin. That is what is going to make your letters look so beautiful. Now there is another one that starts here. Take always a look at the starting point. We go down and here we go up. We start here because this letter is going to be with another one of these strokes and this meeting point will be covered so it doesn't matter where you start. Actually, with circles, you can start wherever it's more comfortable for you. But I just want to give you some hints as what is more comfortable for me so I think it's going to be a good idea. Also, we have another variation of this oval, and you will see that we use it for letters like R or D. That's why there's one that is smaller and another one that is bigger. We go up, we start making pressure, and then we just stop the pressure like that. These are the basic strokes you need to master in order to make the whole alphabet. We're going to be practicing now with letters so don't worry, but I just wanted to let you know that all you need to learn is this. Now we're going to be mixing all these pieces and create our first letters. Now that we have seen the main basic strokes you need to use for the uppercase letters, we're going to practice the whole alphabet. But instead of doing it in an alphabetical order, what we are doing is use this template and start with different shapes of letters. This way, we are practicing with letters that have several things in common so this will help you remember the strokes, and also it will be easier for your learning process.
5. Straight Strokes Words: LIFE: Before we start with the letters, I want to talk to you about the templates you have, where you have all the basic strokes we saw in the previous video, but you have them put together and then to show you which letter they form. This way, you can easily, for example, know that if you want to make letter F, you need to practice this stroke and these two little strokes, or for instance, if you want to practice letter R, these are the strokes that you need to put together. We're going to be seeing these with the examples, but I wanted you to know that you have everything handy here so that you can follow along with these templates. We're going to start with a group of letters that have straight lines. We will use the word life as a reference and we will start practicing. As you can see in the templates, I indicate if this is for seven-letter words or for six-letter words, five or four-letter words, this is because I'm going to show you different ways that you can practice and make things easier for yourself. Instead of starting with sentences like this, we're going to start just by repeating letters; since we're learning the letters, what we need is to repeat them in order to be more accurate with them and get more confidence with our letters. In this exercise, what I'm going to do is use a four-letter word, that is why I have used this template, I have prepared my piece of paper. The way we're going to practice is as follows. As an example, I have selected a word that only have straight strokes, but you can do this with any other word after we practice this. What we are doing is, we will start on the left and we will be repeating the same word, we will start with the first one, and we will fill the first line. What you can do is add a little bit more of water each time so that your colors end up more diluted and we can get this effect. What I am going to do is I will do the first letter in each of these rows to explain what you have to take into account, and then I will put the video into speed mode while I fill the lines. Let's choose different colors now. As we saw in the template for making letter L, we just need to make these two strokes: we make one downstroke, and where it ends, we make the thin crossing stroke, and then here you can decide if you want to leave a space, or as we're using watercolors, maybe you want to put it just next to it so that colors can mix and move between one letter and the other. We will see this also when we start with the other letters. I'm going to start now with the next one. In purple, for example. Letter I is just one downstroke, but you can also add these two little strokes, so we make one downstroke and then two crossing strokes like this. The beauty of the watercolors is that while they are wet, they will mix and all the colors will go together. Now, let's see if we make this violet and we make letter F, downstroke and two thin crossing strokes. Then we would have letter E, which is also one downstroke; you can make that they don't connect exactly, you can move it a little bit, E. Now, we'll continue from here, making it a little bit lighter every time. In one word, all crossing strokes, for example, imagine the E would be next to the F have to be at the same height, so we do them all at the same height more or less. This is a great exercise just for practicing your letters. It doesn't matter that colors mix or that some of the letters get too mixed up, it doesn't matter, we're just making something that is beautiful, we are mixing our watercolors. The important thing here is that you have been practicing your letters and trying to control your brush. Again, this is something that takes practice and that you will eventually master, but don't worry if you don't get it the first day; it doesn't matter because this is going to be beautiful no matter if you can read it or not. The end result has to be something that can be read, of course, that's the most important thing when we're using letters. But now we are into the process, we're learning, and you don't have to worry about that, just enjoy the process, follow the templates, and keep doing your words. In the next lesson, we're going to continue with letters that have straight lines, but in this case, they're going to have also diagonal lines. This is the group of letters that we are going to be learning now.
6. Straight Diagonal Strokes Words: AWAY: Now we're going to start practicing with the letters that have diagonal strokes. Here the important thing is that you pay attention at the point where both diagonal strokes meet. I will show you in a minute. Also, the technique we're going to use in order to practice this is that we will place one letter in the middle, in the center of the template, which will be much darker, and then we will go to the sides, making the colors much lighter, like this. These are other examples with different words that you can practice with. The diagonal strokes are also straight strokes, only that they have an inclination. For example, in this case, I'm going to start with this bright pink. When we go up, we have to make a thin upstroke, so we hold the brush a little bit more upright. If your paper is quite rough, then you will have to pass with your brush several times so that it covers the full surface of the paper. It doesn't matter, don't worry. Then when we have to do the thick downstroke, what we have to do is place our brush at 45 angle degree and then move this way. But you have to put your brush right where the other stroke ended, here. Then we cross it with a thin crossing stroke. With diagonal letters, you want to avoid this, that you make one stroke and then the next one crosses over, unless you want that specific style that would have to be like cohesive with the rest of the words, you don't want to do that. You want to have one thin stroke, and then when that finishes, starts the next one like that. The same would happen for a V, which would be the other way around. We would have this stroke, and then when it finishes, we would go upwards. So we will continue now, as we have to do away. We will keep this as a creative end result. It doesn't matter. We're just practicing. Things happen. It's okay. Now for W, what we do is we place our brush a little bit diagonal, making the same pressure throughout all the stroke. We go up vertically, and then we go down, and again, we have an upstroke, only that they are diagonal. I'm trying to fix this later. We will repeat letter A with a different color now, like this, that way with these exercises, what you are going to be doing is that, if you take a look at your templates all the time, you will remember that when we go up, this is the thin stroke, and this is the thick one, and not the other way round, so you will memorize the way that letters are made. That's why it's important to have this template. Now we're going to go with Y. Y, we do first this stroke. That is why in the template, I have placed this one first and then little one. We make this stroke, downstroke, and then the little one. Now, what I'm going to be doing is I'm going to be repeating this letter so it would be like more practice. This piece of paper, maybe is too small then you can do it in your watercolor pad anyway. Then I would do it on the sides with a lighter shade. See what beautiful things are happening here, where colors are mixing. So then we can just erase the pencil marks or even just go over our letters with a marker. It doesn't matter. The important thing here is that you have been mixing your colors, practicing your letters, and learning these uppercase letters that have diagonal lines. Now, we're going to start with the ones that have curve. We're going to start with letters that are in this group. We will take some of this group too. It's going to be getting a little bit more complicated, but not too much. Let's go with it.
7. Round Strokes Words: GOOD: Now we're going to be practicing with the word good. We'd have lots of ovals that we're going to be learning now. There are other examples like door, or cold, or any other word that you want. But I just wanted to put all these letters together so that we can continue working in groups of letters. In this exercise, we're going to start writing our whole word altogether. The main advantage of the print alphabet is that letters go together, they don't link with each other. We are actually linking them by placing them too close when we want watercolor to move from one letter to the other, but we can also just place them one by one and leave a little space. It is good that you make this exercise. It is good because this will be a very good practice in order to work on your letter spacing. That is why I proposed this exercise, now that we are going to be learning the letters with oval shapes, that we also learn our spacing. I will do the first one, I will explain it to you, and then I will speed the video following the rest of the lines. Again, you can mix the colors as much as you want. Every time the watercolor is wet, it will mix with whatever you put next to it. If it's dry, it will be like a transparency. Let's start. Let's make it green. We will start with good. Letter D is in fact one oval only that we start at a different point. Remember that you have these templates where you can see exactly which strokes you have to do. G would be like a letter C, but we add a little stroke here. We would make this letter C, only that we add this little stroke and we have our G. This is why it's important that you keep practicing with your basic strokes before you start to put in letters together. That will make things much easier for you, but it doesn't matter. For example, letter O is one basic stroke. This is the same exercise you're going to be learning when you start with the basic strokes. Letter O has the thick part of the letter is on the left. Good is a very good word to practice because it has so many O's, thus we can do it again and again. It is something that needs to be practiced a lot. For letter D, we will make one downstroke. We know this one already. From here we will add this basic stroke. Remember this was a variation of the oval. This one starts right here and goes down. When we go down, we go thick. Then we start lifting the pressure and it turns into a thin stroke. We can always amend our strokes. This letter D, you could also do it like this. I'm going to change the color now and I will go backwards. You can too also if you want. This D with just half an O. That's another D you can do. What I'm going to do is imagine I have started a little bit more to the right. That way what you do is that lines are like this, changing a little bit so you create this dynamic movement. Now, with this line, I will start again to the left. Now this line, we will move it a little bit to the right as well. Remember that when we want to make a thick stroke, we have to place our brush at 45 angle degree. This is our exercise for letters that have oval shapes. Also, we have practiced putting them together to create our first word. Remember that when we use the print alphabet, letters will one next to the other, that we have to keep more or less the same spacing. But when you're using watercolors, you can also put them together touching, so that the color can mix from one letter to the other. Next, we're going to see these letters that, except for the T that has straight lines, all have something different that we're going to learn very soon.
8. Other Strokes Words: JUST: Now, we're going to practice these three letters that are the last that we need to see. In this case, what I have prepared for you to practice is like a Sudoku. We're still using a four-letter word, and what we're doing is we're changing the color and trying colors not to repeat in the same column or in the same line. The easy way to do this is that if you have four letters, you use five or six colors to make things easier on you. But don't worry, if you end up with a color that you have to repeat, all you can do is just make a lighter shade and that's okay. It will work fine as well. I'm just trying to give you ideas so that your practice is a little bit more interesting and that we can just play with colors and enjoy ourselves. In this case, I'm going to practice without any guide because I also want to encourage you, for example, to get this composition that it's not something we prepared. The only thing that I wanted was that color to mix every letter in one line. I wanted to give you the templates and the lines and everything, but they just have to be a guide and a help, not something that keeps you in a box. Templates are fine and it's great if they're useful for you. But I just want to do things a little bit different now, to show you that we can just be more playful. Also, we are making letters like these because we're starting and we are just placing them into these two lines to try to make them all the same height and everything. But also, you can keep changing sizes and changing colors and just having fun. We're going to be practicing with the word 'just' because I want to talk to you about letter J. You have it in the template. It actually is one understroke, only that we finished a little bit earlier. That is why it's important that you practice these basic strokes first. This would be the one for the J and this would be an U. Let's go with the J. We press down. I'm going to add a little bit more of water. We press down and here we start lifting up, so that we have a thin upstroke, and then we cross it with a thin crossing stroke. Now, we're making the letter U, which is another understroke, but it's the other way round. We start with a thick downstroke and then it has to transform into a thin upstroke. We place our brush at 45 angle degree. We wait for a second and we pull down. Here, we start making less pressure. Now, for letter S, what we need to do is make half or a little bit of one oval, and then we make one diagonal line, and here we make another part of the oval. Let me show it to you here. We would have an oval. We're going to be taking this part. We start like this, thin going up, a little bit thicker here, and then we make one diagonal stroke that goes down. It's thick. Here, we start making pressure because we want to achieve this stroke only that it ends thin like this. Then we will end up with letter T, which is an easy one because we just have to make one downstroke and one crossing stroke. Now for the following rows, what I'm going to be doing is changing the colors. One thing that helps me doing these exercises like sudoku style, is that the same color I enter this line is the same color that I start the next one. I will put the video now at high speed, but you can see the colors that I'm using. As you can see, I ended up here with a color that I already had, but what I did is just change the value. I made this one much lighter and that's it. It doesn't matter. This is an example that we have done with the word 'just' because we want you to practice these three letters. But imagine that we had use, for example, the word love, it would be a great card. Or this one, rest. Or for example, with other colors. I hope you liked this idea that you find different ways to practice and to mix colors and just use the letters as a reference. Don't worry if they are not the way that maybe you have in your mind. Just remember that by putting them together, by choosing beautiful colors, we can create lovely things. Now, we have practiced all our basic strokes, all the letters in the alphabet, and we're ready to start making our projects. Please remember that it's very important that you have these templates handy, so that you can take a look at which strokes you need to put together in order to form each letter. This will help you memorize your letters and make your practice much easier.
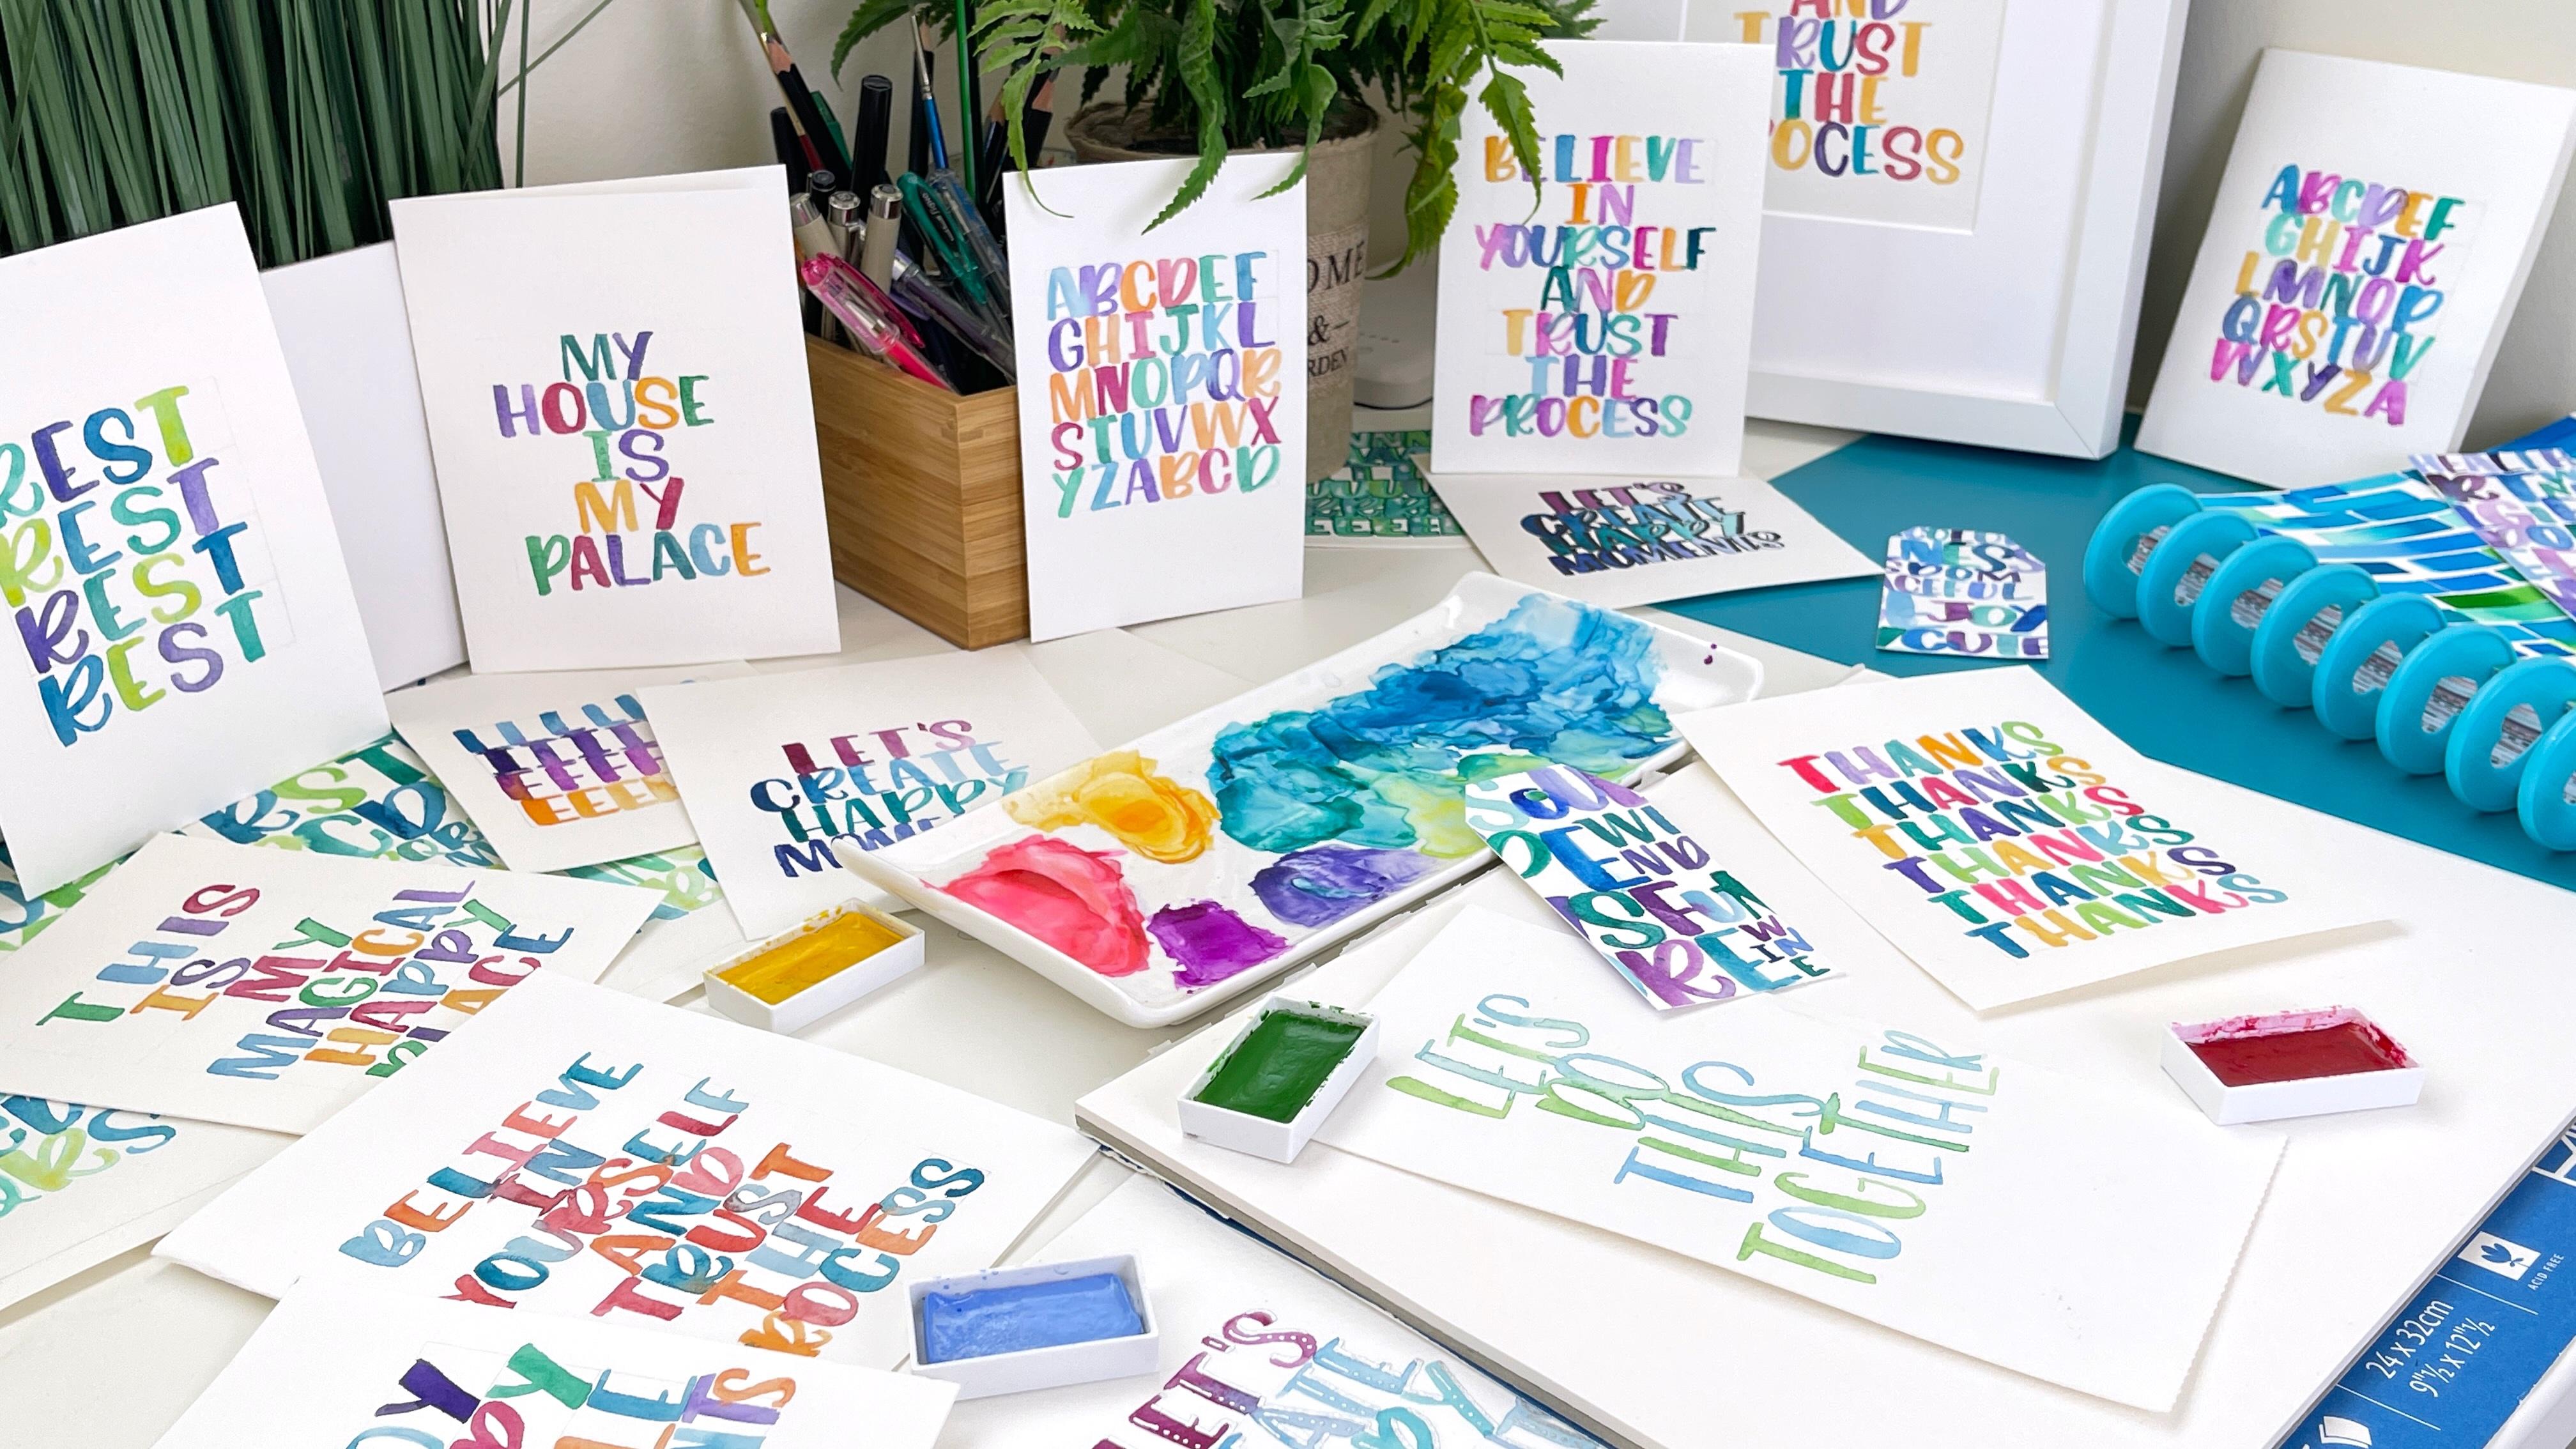
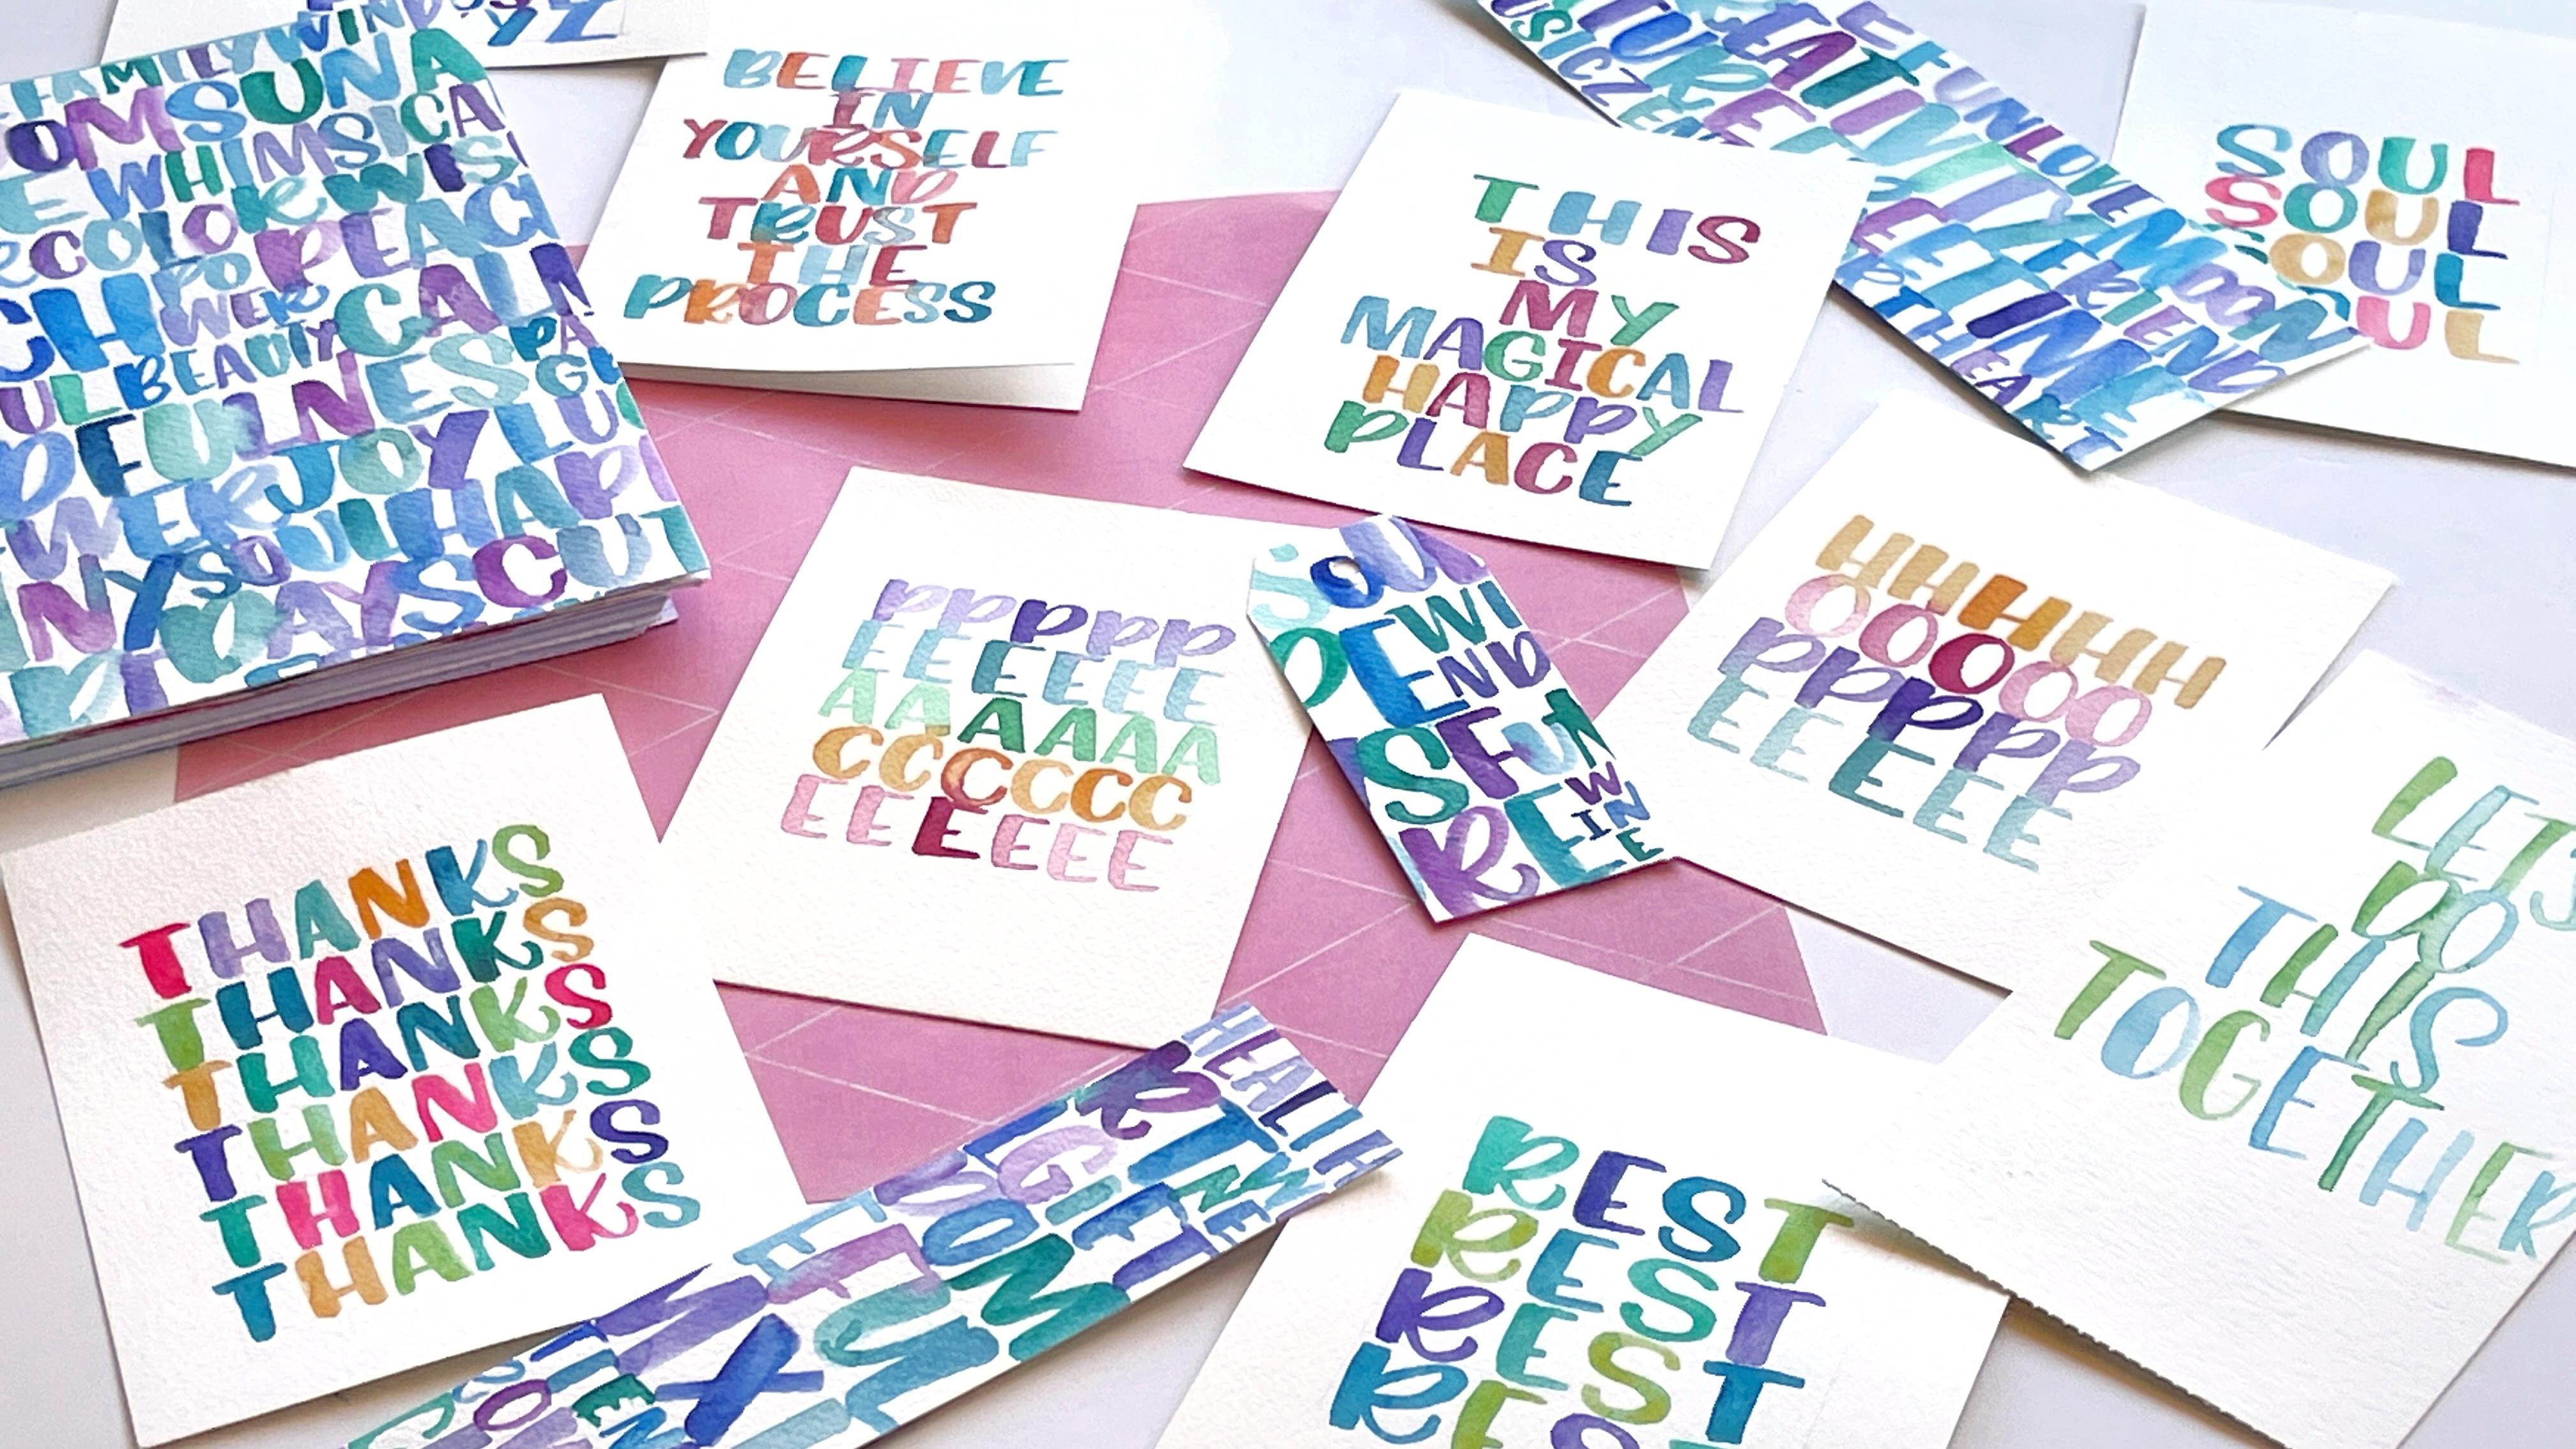
9. Ideas to repurpose our practice: Depending on the way you're practicing, you will have different options to repurpose those pages later for future projects. For example, if you want to practice just with simple letters, just by themselves, without lines or grades or anything, you can just paint them on a piece of paper and then you can cut them out and create little stamps. You can use these stamps to just place them on top of your cart, move them around and see where do you like them better. Then you can glue them, and that way you will have a beautiful card, even if you don't feel confident enough to paint with watercolor directly on the card. This is a great idea that you can create a whole alphabet of letters and then just play with them and rearrange them and create another card. If you like practicing filling the whole page, you will have many possibilities to reuse that paper because you will have created a decorative piece of paper. You can always cut it and create bookmarks, labels, tags, anything you want. One of my favorite projects is to turn this decorative paper into the covers of my notebooks or agenda. I like to practice without lines, choosing words that have a special meaning for me, keeping to four or five colors, and just fill the whole page with those words. Then on the other side of the paper, I will paint some some shapes like circles, blobs of color, anything you like. If you have one of these agendas that have the disk system, you can punch this decorative paper and make the right holes and change your covers of your agenda as often as you like. Another way of practicing is that you use your lines and prepare your piece of paper in order to be framed afterwards. You have to leave a margin around so that you know you only paint inside of your grid. This way when you finish practicing, you will only have to frame your work, and you will have your piece of art. There is one idea that I encourage you doing. Find a nice box and keep there all your cards that you have been creating during this class. That way, you can keep a collection of all the cards that we've been creating in the class, and you can use them in any occasion. Also, you can use that box as a box of idea. For when you have no inspiration, you can just close your eyes, pick one card, and that way see what you can create that day. For example, you can repeat the same sentence or just take those colors, or repeat that exercise. This is a great way to keep you practicing, and also to make things a little bit more exciting. As you can see, practicing uppercase print letters will not only improve your lettering skills, but will also open a whole new world of creativity with letters that you can then apply for many projects.
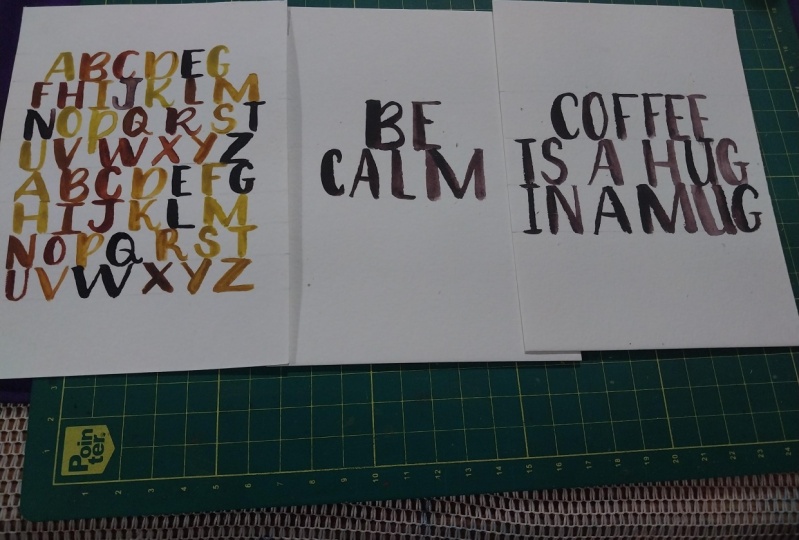
10. Simple Project: Alphabet Card: Now, we have already practiced all the different groups of letters. The projects that I have prepared for you are two different projects. One is much more easier and the other one is a little bit more advanced, but I'm sure you can do it purposely well as well. First, I would like you, well actually we're going to make it together one alphabet. I want you to see how I make it, even if I do it a little bit high speed. Because what I want to encourage you is that maybe by creating these little cards that you can make bigger or smaller. It's always nice to have another tiled room, one alphabet. This is a great way to practice. My idea is that you choose your four or five colors that you like that you just keep mixing them and just feel the lines. If you've finished, for example, like in this case that I reach letter Z here, it doesn't matter. You continue with ABC until you complete your grid. This is a great card that you can use for any occasion actually to just do this in one of these folded pieces of paper and then write inside whatever you want. It's a great exercise and you can decide if you want to use a four-letter grid, so you have just four lines, or maybe if you want to make it into five lines, it doesn't matter. You can choose whichever you want. Let's get started. I have prepared this card with a grid of five lines and I'm going to start now with letter A and keep going until Z. If I don't feel the whole grid, I will keep on going ABC again. Remember to adapt the size of your brush to the size of your paper. Incase you get two colors that are the same and they are touching, you can take one color, a different one, and just place a little bit here. That way, you know that the letters will differentiate. This is why it is important that have your template handy, because with letter X, Y and Z you have to pay attention at the down-stroke that they are different. The X is the same as the V and the W but then the Y and the S have them in the other direction. That is why it's a good exercise to practice whole alphabets. Take a look at the template, and now that you have the basic strokes, you can just repeat them, even making slight changes to have different styles. I am going to place one A at the end. That's it. We'll start with A and end in A, which is beautiful as well. Is like closing the circle. I hope you like this exercise. Then if you have already practiced on a piece of paper that has the shape of a card, then all you have to do is wait until it's dry and then with an eraser or one of this kneaded erasers just remove the lines. Next, the other project we will do is to write one whole sentence into a card. I will give you the tip that I use so that all my letters get in line.
11. Advanced Project: Quote Card: Now for our final and more advanced project, what we are doing is we are going to create a card with a sentence that has several words and we're going to place them in a way that they are all going to be aligned and they are going to end up in a beautiful result as this. You can make them in different sizes, all you have to do is measure your paper and see how you want to divide it. If your sentence has seven letters then you will have to make seven lines. I'm going to be using this template that I have already prepared. In this case, I'm going to do it this way in a vertical mode like this and the sentence I'm going to practice with is believe in yourself and trust the process. Because I think this is a very important message that we should tell to ourselves every single day. You can also have different examples. But the beautiful thing here is that we are mixing what we have been learning in the previous lessons. We're going to be combining different colors, trying to work them all like in a Sudoku away. You can do them like this center in the middle or if you'd rather do them just by moving one word to the left and one to the right or just make them randomly. That's completely up to you or fill in the whole grid as in here. What I do in order to have them all centered, is that first I write the letter in a piece of paper and find out which is the letter that is in the middle. What I do is, this is my template and it measures eight centimeters. I mark here four and here also four and therefore, I just make a very thin line which I know will be the center of my card. Now, once that I have my line created, what I do is that I take this kneaded eraser and I remove the pencil a little bit, so that I have a small guide to follow but the pencil is not seen that much. I'm not going to do it now because I want you to actually watch the video and be able to see it. But I would just go ahead and remove the lines before creating my final card. This is an idea I'm giving you. Again, as I was telling you, if the first work is believe I count 1, 2, 3, 4, 5, 6, 7, so I know that I have to place three on one side, three on the other and one in the middle, being that one, I. What I do is I have to work from the center to the right and then from the center to the left. It's easier now because I already have the example but you can do that in a piece of paper, for example, what I did, I'm going to do it here real quick. You just have to 1, 2, 3, 4, 5, 6, and 7 and I know that believe it's the i that goes in the middle then and this is l e b in because it's just two letters, yourself. Then I count them 1, 2, 3, 4, 5, 6, 7, 8, then it's four and four. I know that here s will go this way and r will go that way. All I have to do is continue to the right and then looking at the paper because that's the way you don't make a mistake. You keep writing to the left. Then four and I would place the letter n in the middle. Then I would to this. For trust again, I count them 1, 2, 3, 4, 5, so u would be in the middle. This way, with this easy trick you can create beautiful cards with any sentence you want. Place the h in the middle and now process its letter c. I know that not all letters occupy the same space but it doesn't matter because it doesn't have to be something absolutely perfect and absolutely measured, is just something that we are doing for ourselves and we want it to be beautiful and because we are doing with care and love, it will be beautiful, of course. Now this is my guide, although I have this one, as well. What I'm going to do is I will take a brush that it's not so big. Maybe this one. I'll try with this one. I'm also going to be mixing different colors. Let's see. I start with letter i here. That's why I rather, instead of making these i, I like to place this little crossing strokes because that makes the i a little bit wider and a little bit more similar to the other letters. Also, if you like this style that letters are going to be touching, so that watercolor can travel from one to the other. Make sure that you place colors together that go well together. If you are not very sure, just try to put blues and purples and then yellows and reds and pinks for example. This is what I was telling you that when we have different letters, they crossing stroke has to be at the same height. Now, we have an l. We can make blue. Because we are making them one by one, we can write backwards. It's not that difficult. Now, we have an a and it doesn't matter, it doesn't have to be perfect. But this is just an idea that you can use with this sentence or with any other that you want. I know that r and s are going to be in the middle, so I decide to put them here. Maybe this one is going to be too similar. We'll go with blue and r and s when they go together they're very nice because they have the same stroke, like in a symmetric way and it's very nice. I would go with purple there but I already have purple. I just want to make a darker green for example. Since we have placed this dark green, I'm going to do it here. For the a that I have to do first the n, I would go with this one here. N goes thin upstroke and then thick diagonal down stroke and again one thin upstroke. I would go for these dark green for the letter a which I will do a little bit darker just by placing more blue and this side. Since we are placing so many colors at the end it doesn't matter because it's going to end up being something cohesive. As you can see, colors are mixing and melting, so it's fine. From trust, if I think that this turquoise is going to match well with the pink, I try them to mix together. If I think the colors won't mix together well, I try them not to touch, so it's something you have to take into account. If you see that colors are mixing in a very rough way, like this two, you can put some water and just while they are wet you can play with the color, so that you make these gradients a little bit smoother. Even though we are just using the same colors here, they are differentiates. Now, we would wait it to dry and we would remove the pencil marks and we would have our card with a beautiful message.
12. Add variations to your letters!: Once you know how to create this print alphabet, uppercase letters, you can make many other variations. For example, you can add an outline in pencil or with a marker, or you can drop some shades, or you can fill them in with a white marker, the possibilities are endless. The important thing is that you learn well all the structure of the letters, so that you can start from those simple letters, and transform them into something more elaborated.
13. Thanks for watching!: Thank you very much for watching this class. I hope you have enjoyed it as much as I have when I have been preparing it. All the exercises have been prepared with love and having you in mind so that you can practice and enjoy and have no pressure at all. The beauty is in the process. I would love to see your exercises even if you create cards or even if it's just your practice sheets, it will be great to see them. You just have to upload them to the project section. I encourage you to keep practicing, watercolor lettering takes time and takes practice, but it's a beautiful world that I am sure you're going to enjoy. I hope to see you in my next classes that I am preparing to take you to the next level of watercolor lettering.
 Cristina Castro Cabedo, CRISTEL DESIGN - Lettering & Mixed Media Artist