Transcripts
1. Trailer: Hi guys, my name is Ana Victoria, and we're here in Mexico City where I paint with watercolors for a living. This is actually my second skill share class. This is modern watercolor techniques. It's a technique I've created throughout the years, and it's just really fun new ways to use watercolors. It's not really like the basic landscape design or wet over wet washes. It's just more like fun illustration style watercolor that you can apply to every day art. You can also scan your images and then upload them to your Etsy shop or just create amazing new paintings. What I'm going to show you today is how to combine mixed media with your watercolors. This means that we're going to be using some masking fluid, we're going be using some white ink or acrylics over your watercolors, and we're also going to be using negative space, which is a technique that I really like and I use a lot in my illustrations. We're going to end up with an amazing super elaborate illustration using all these different techniques that we learned throughout the class and you want to upload that and I really want to see all your projects, and please go back to the beginner's class. If you have not taken this, we will be referring to the beginner's class so much during this whole intermediate level. It's good to know the basics and I just want you to learn this new fun techniques with me. I'm happy to show you guys all these awesome techniques, it's really fun. Looking forward to seeing all of your projects in the project gallery and giving you guys some feedback. Let the class that begin.
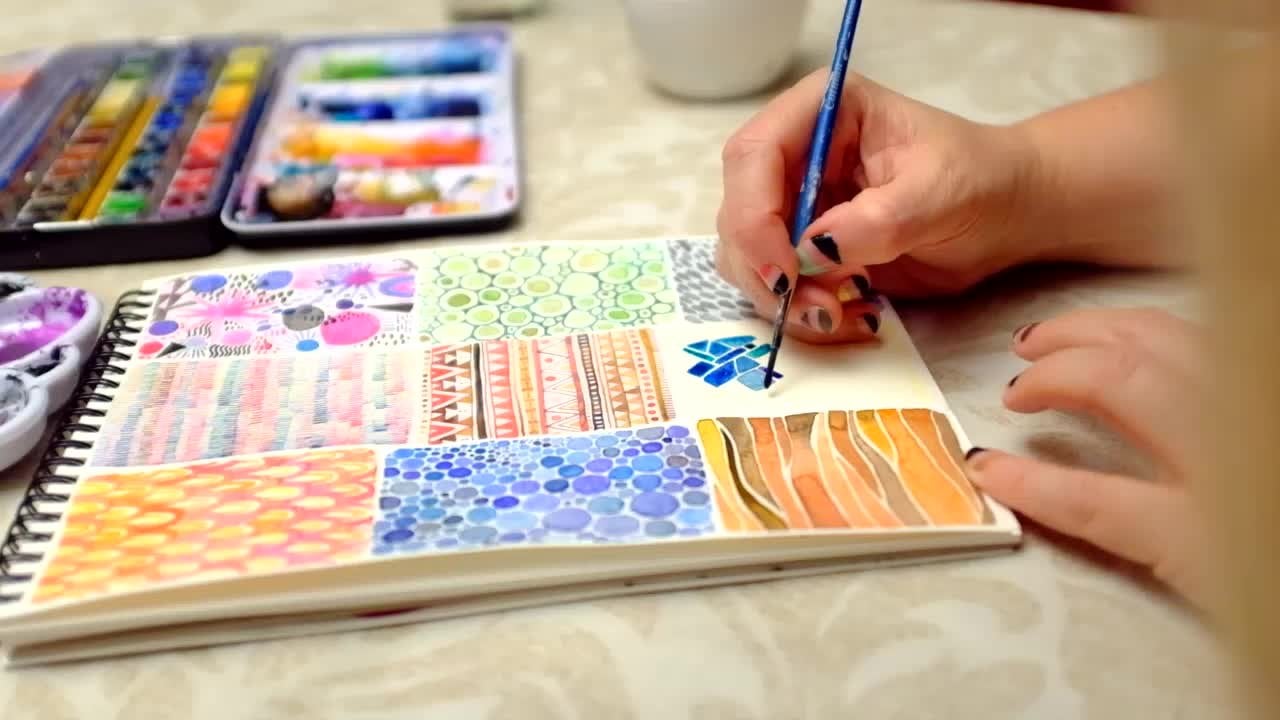
2. Supplies: These are the supplies you're going to need for this class. First, we're going to start with some watercolor paper. This is my personal favorite brand. It's Winsor and Newton Cotman. I like this spiral here because we can work on different projects at the same time. This is 12 by nine inches. This is a really comfortable size for me, but this is a personal decision. Also, if you want to know more about paper, please go back to my beginner class where we talk extensively about this. But for now, this is the type of paper I'm going to use. You're also going to need a set of watercolors. This is my paint set. This is actually Schmincke, it's nice German brand, but there are many paint sets out there. Again, go back to my beginning of class if you want to know more about different types of paints, but for now, this is what I'm going to use. Most paint sets come with an area like this which will work as our palette. You can use this here, and have a separate bowl if you like. I like this little ceramic bowl. There's many different types, this one's a seashell, but it works great for this. Then we're going to need some water of course. We're going to need paint brushes. This is a variety of paint brushes that I have for this class. You're going to want to have a couple of different sizes, for example, we need a small brush like this, which is a size zero, or, this is actually a triple zero. So this is really thin. This is great for fine lines, then we need a couple of maybe larger brushes. These right here are like ones, twos and threes. These are also Winsor and Newtons, and these blue ones are actually for watercolors and these are called university series. Again, please go back to the beginner's class if you want to know more about brushes. I also have a nice large brush here, this is a size 10. Then this brush right here is going to be important for our very last activity in this class. This is a flat, round brush. It's actually called lengua de gatito in Spanish, which I think is really funny, because it means kitty tongue, and it's just because it's flat, and round like that. I have a couple of worn-out brushes here. This one is a flat brush, and it's really good for splatter like that, like what you would do with a toothbrush. Then these two brushes, are old brushes that aren't my favorite. This one's like super cheap. This is going to be really important when we use our masking fluid, which will ruin your good brushes. So try to have a couple of brushes that you're not too fond of anymore for that. Speaking of masking fluid, in this class, we're going to learn how you use masking fluid, and when to use masking fluid. Again, Winsor and Newton is a great brand for this. If you're in Mexico, this is a good brand too, this is super cheap, and it's really nice as well. Just make sure you do not get this, which is permanent masking medium. This will be no good. I bought this by mistake, and some people have been telling me on Instagram, that they made the same mistake, and got this. This permanent masking medium basically means that you won't be able to lift it off the paper once it dries, and we're not going to need this. So this is a no. Of course you're going to need a pencil, an eraser. We don't really need to get fancy with pencils here. This is actually just cool, this a Frank pencil I have here. What else? This is called the masters brush cleaner. This is just optional, but it's really nice if you want to clean your brushes, especially when you use other mediums like acrylic, or the masking fluid. This will leave your brushes like brand new. Actually you just open it up like that, and it's this paste here, and you just need to lather up your brush, and wash it here. We can do a demonstration later on. What else do we need? We need some, white paint. You can use either white ink or white acrylics. This is my personal favorite brand. It's a Japanese brand that's used a lot for Manga. It's opaque white and this is my favorite. You can also see this is a PH. Martin's one. That's pretty good too. Or you can just use some white acrylic paint. Here's a couple of examples. Lastly, we have some experiments we do for some textures similar to the experimental class we did in the beginner's class. So here we're going to talk about some stuff we learned. This is salt that you used the first time, but now we're going to add some more household items. In this case, some rubbing alcohol, maybe some nail polish remover. Basically, anything you have lying around the house, we'll talk about that stuff later on. Before I forget, you need just a piece of paper towel. This is great for cleaning your brush while we paint, and I think that's it for now. So let's start.
3. Blocking Space/White over watercolor: A really important part about watercolors is how do you leave white space or negative space? Which basically means that in watercolor there's no real white paint except for your paper. I'm going to show you just a simple demonstration of three different ways to get white over your watercolors. One of them will be negative space. The next will be masking fluid, and the third one will be white paint, either acrylic or ink over your watercolor. To get started here, this is just a simple demonstration. You don't have to do this necessarily unless you want to. But I'm going to show you how the masking fluid does it's thing. Then we'll move on to a complete masking fluid activity. Here I just poured some of the masking fluid into my bowl, more on that in a bit. But for now, I'm just going to, I drew a little star here, which I'm just going to fill out with the fluid. All right, so I've applied some masking fluid here. We're going to wait for this to dry. In the meantime, I'm going to explain how we do negative space, which is my favorite technique, it's the most precise. If you did your pose in precision activities in the beginner's class, this will be really easy. I'm going to flip around my paper just because I don't want my hand to mess up this part. Basically negative space means painting everything except for the object that you want to be white. In this case, I did the same star right here, but I can show you some examples of stuff that I've done with negative space. Usually it's what lettering. When I want, for example, a starry background to have some white lettering. I'll do this technique. I'm just going to grab a number 1 brush here like pretty, not necessarily my thinnest brush but a pretty fine brush. I'm just going to grab some paint, and just paint around my star. That way I'll have some white. The white area will be left alone. This is when all the pose and precision activities you've done will really, really start to kick in. As you can see, I'm just painting everywhere except for the star that I already drew with the pencil. I'm going to grab my thicker brush to sort of fill in these areas faster. The trick here is just basically I'm not letting the edges dry, so that I can keep painting around my star. If you notice, I'm not doing the outline of the star and then painting around it. But I'm just moving with wet paint around the star. We will do a complete exercise on this later on. But I'm just showing you right now, what the three basic ways to have white space on watercolor art. I felt like putting some turquoise in there. You might say, "Oh my god, your pose is better than mine is or." It's not. It's just that I've practiced so much. If you practice enough, the pose and precision activities in the beginner's class, this will be super easy for you to. Also notice how I flipped my paper around a lot. This is pretty normal in watercolors. It just means that I don't want to mess up an area that I have that still wet with my hand, so I can flip it around to do that. See this part was starting to dry. I'm just going to moisten it up a bit. I just finished painting negative space, which is basically painting around an object. Now I'm going to go towards masking fluid. I let the masking fluid dry for a bit before painting over it. It has to be completely dry before we can do anything. Masking fluid is pretty cool because, you can now be free to just paint over wherever you place the fluid. You don't have to be careful at all, you know, just do this. Once it dries, we can lift this fluid which turns into like a glue, like plasticky glue. But you can see it's fun to just know that you can paint over an object. Once you let it dry, you can lift this up and have something like this. I'm going to talk about, when I recommend using masking fluid. I don't recommend it too much or going overboard. Just because you can get really precise results using negative space technique. Masking fluid is a bit harder to control, I would say. Sometimes your lines won't be as straight or you won't get the thin lines, you want. We're going to practice this in the next video, but I just wanted to show you what the three techniques are for getting white space or blocking working space in watercolor. We have to wait for this to dry completely before we can even lift it up. In the meantime, I'm going to start showing you the last technique, which is just white paint, which can be acrylic or ink over watercolor. I already did this little block here, a little wash. Now basically, I'm just going to use my white ink. In this case, I'm using this, but you could also use acrylic. Just finds the white paint that you really like. I'm just going to open up this, grab a little bit of ink and just place it right here in my ceramic bowl. I'm just going to paint some white object over my dry watercolor. Again, this has to be completely dry before we can paint over it. Otherwise it might plead. I'm just pretty much free styling it right now. As you can see, you do get a nice white object over the paint. But you might get a little bit, since you're using water over watercolor, you're going to get a little bit of the back color that you had already. It won't be as crisper as white as using negative space or masking fluid will be. Although I really recommend using white paint if we're going to do some really tiny details that might be harder to achieve with, like leaving the space or, or even with masking fluid. For example, if you wanted to do super tiny thin stars like this, this is what I would use white ink for. Like tiny T details like this, maybe tiny dots or stuff like that. We're just going to wait for this to dry, so we can remove the masking fluid, and I can show you the difference between the three in a bit. By now our masking fluid and watercolor has dried. I'm just going to remove the masking fluid. As you can see, all I'm doing is rubbing the paper and it'll just come right off like that. You can also lift it up like this, and it'll reveal the white paper that he had underneath. That looks pretty cool. You can tell that this will be very useful for many things. But I do want to point out a few differences between these three techniques which are for leaving white space. My personal favorite technique for blocking space is actually negative space, which I said again is a painting everywhere except for where your drawing is. As you can see, the lines are super precise. It's very, very clean technique. Of course, there are some circumstances where we would prefer using masking fluid, which I will show you in a bit. But it's pretty good to you get a super white background, except if you really look into it, the edges will never be as clean or as straight as if you do negative space. If we were to draw something, a very simple object like this, I would always go towards negative space because there's no real reason why I want to use masking fluid now. That's just something I wanted to point out right now, but this was just to show you how it how it works. If you look close, it's pretty clean, but the edges are a rough. It's harder. It's just a material that's harder to control. Then over here we have white paint over acrylic. It's pretty cool to, it's probably the easiest out of the three. But if you can notice here how it's not super cleaning, you can tell that there's actually paint over the watercolor and it's not like these other two, which are completely white. These three techniques are what we're going to base the rest of the class on. By the end of this class, you're going to have a really cool activity integrating all these different techniques on. You'll see how to get real nice white spaces or techniques with your watercolors. We'll continue with showing you how to use each one of these and examples of where I've used them and how, and how you can use them in the future.
4. Negative Space: The first activity in this class is called negative space. It's one of my favorite techniques with watercolor, which as I explained in the past demonstration is just basically leaving white space on your paper. I'm going to show a few examples of illustrations I have made using negative space. You can see here how, for example, the white part is the lettering and the tops of the mountains. The real difference here is that, I'm going to get really nice, crisp, very precise edges around my white when I use negative space, because my personal brush control and yours after practicing is going to be way better than anything else. Right now I can show you that it was easy to paint around this because all I did was have a mix of different blues, and just keep painting around. Another example is right here. I did these flowers, and then what I did, was I drew these spiders and painted around the spiders, around my drawing to leave white space. You can see it's a super crisp white and the little spider legs are really thin and that was easy to do with negative space. I'm going to show you just a couple more examples. Negative space sometimes can mean leaving space between the edges, like around an object. If you took the beginner's class, all of our pulse and precision activities really lead up to this. This looks cool too when you have an object and paint around it and just barely touch the other object. It has this nice cool border around it. I also really like lettering with negative space. If you're asking about lettering, we'll have a whole class of lettering after this one, but for now we're just going to use negative space as a technique to drawing any object. Here you can see, I did the galaxy activity we did in beginner's class, I have little bit of salt here that I used for texture and I just basically drew my lettering and painted all around the lettering and I have like really thin, nice, crisp, clean edges to this word, wanderlust. The reason I use negative space in all of these is because I could. Anytime you can use negative space as opposed to masking fluid or ink over watercolors, do it because it'll be a bit harder maybe, maybe more tedious, but the results will be way nicer. Just to go back on, for example, this first one, I did use ink on little stars just because these are little details and it would just be easier in this case to do these tiny little stars with ink. Basically, you just mix and match whenever you feel that it's right. These were just a few examples of how and when I've used negative space in my paintings. Obviously, this is my personal style or technique, you can just use it for whatever drawings you do, like with characters or stuff like that, it can help a lot. Now, we're going to actually start our first activity, that you are going to upload to the project gallery. Negative space takes a lot of pulse and precision practice. This is a really good exercise to really feel comfortable with controlling your brush, controlling where you paint, controlling fine defined lines. As you can see, I just drew a really simple leaf branch drawing here. You can do whatever drawing you want, but I do want you to practices this technique. It'll really help you feel more secure with just your basic pulse and precision. What we're going to do here is, you can use either one color or mix as many colors you want. I'm just going to use maybe a few greens. Again, just to remind you how to use your watercolors, you're going to use your pen set or your tube sets if you have and just lather up whatever paints you want to use. You can start mixing them here in your little palette. This is actually the top of a tin that comes with my paint set. Usually with watercolors, we want to avoid using just the paint directly from your paint set or the tubes, we want to mix them up here and also create our own combinations to make it look more organic and just have your own personal color combinations. I'm going to add a little bit of ocher into this to make it more earthy. Now I have a couple of paints ready here. What I'm going to do is just start painting basically. Please do this along with me. Notice how I'm getting very close to my pencil. Just barely touching my pencil joint, and going all around the edges. Please do your pulse and precision exercises in the beginner class. It will really help you out with this activity. It'll make it so much easier. See how I'm almost touching my pencil, but I don't really want to get into my pencil because if I paint over my pencil, it'll be harder to erase later. I'm going to work with two brushes here. I have my thinner brush which is a size, I think this is a one or a zero, to paint around the edges. Then if I want to expand my paint a bit more like have a larger brush, it can help me with that. I don't want my edges to really dry. I just want to keep on pulling that paint outwards. In this activity, you can do maybe a looser paint stain or something like that, Sort what I showed you with the wanderlust painting. Now, something super important that I've noticed that students do in this activity is, they feel the need to start to paint an outline around the whole thing first, but that's a no, we really don't want to do that. What we want to do is, start painting this by sections. Right now, I'm just going to continue with this area here. Here we go. It's important to move around your paper, so that you're always comfortable, and then you can use your hand here as just some support. Here we go around the leaf. This activity is also to show you how it's good to have two different brushes. Sometimes, one is going to work more than the other. Like right now, I'm just tilting my brush like this and that was pretty easy to get around. But if I have a really tiny section that I need to fill in, this big brush probably won't do the trick. We're going to have to alternate between these two during this whole exercise. Here I have just my greens. If you want a nice paint wash like that, you can just grab some water, just plain water and go around the edges like that. Look kind of cool, magical. We're just going to keep doing this. Remember, it's nice to move your paper around. I'm not going to keep painting this area while this is wet, because I'm going to want to put my hand down. I'm going to switch this over, flip it over like that, and start working here, so my hand can be here, no problem, I'm not afraid to like get my hand wet or ruin my painting. Here we go. For example, the smaller brush is way better for these smaller spaces that I need to fill out. You can see that what I'm really trying to do is keep my little puddle of water or watery paint going. I want to try and not let the edges dry so I can keep on going from there. Again, my large brush is going to come to the rescue here and help me out. Remember, we can just get some plain water and go around the edges, just like that. These little windows that we're leaving here, make watercolor really interesting to just being like very loose. I'm going to continue in here. My brush is getting a little too big for this area, I'm going to switch around and go in here. You can see it's all about getting a rhythm going. Automatically, you'll start to know when one brush is going to be better than the other. Now it's starting to get trickier because I'm filling in this really tiny areas. If you guys remember in our basic watercolor technique class or beginner class, there was an exercise, an activity that was little bars and we had to paint the one that was next to it, super close. Well, this is basically putting it into practice. As you can see here, I left a really thin branch, which looks super cool and this would be really hard to obtain any other way. I'm just painting a little branch right now, but if I were to do lettering or something like that, this would be super important, just like getting these really small areas in. Remember, you don't want your edges to dry before you fill in the rest of your painted area. Now here comes my larger brush to the rescue. Remember, just grabbing a little bit more water around the edges to make it look washed out like that. It's basically just starting to get into the rhythm of switching around your brushes and just being really precise and careful when you paint. I'm using two colors right now. I'm just using a couple of greens with some ogre. But remember, you can really go crazy and go wild with this. I really like to see how everyone experiments with their own color combinations, or maybe you really like using just black ink or whatever you like. Maybe you want to do a whole rainbow theme, like the wanderlust painting I showed you. I just decided to do a little bit more washing around here. Then we're going to keep going around. Now, something that I've also noticed in class is that, sometimes we get confused with what your thinnest brush is and what the point of your brush looks like. This is a big brush, it's a size 10, but it has a really nice, fine edge. If I do this little inclination here, I'll get some really nice crisp, fine edges too. I would almost use this big brush for the whole thing except that I have these little tiny spaces that I need to get into in here. I really need to be careful where I use my paint here. Again, we're putting the pulse and precision activities into play here. Hopefully you guys practice some. Unless you feel that you already have a really good pulse and precision going on or you're used to the fine details. But it's just really nice to have some practice too. Now, this side is going to be a little bit harder because I already painted the edge here. Now, we're going to have to really be careful to not bleed into the other area. Here I'm painting super fine. I may want to use a little bit of the green that I used on this side here, so it looks a little bit of continuity here. I'm just going around like that, curving a little bit more of this green. Time to use this other brush. This is also a good practice activity where you can start to see what's your most comfortable position to hold your brush. Each brush has different angles and the way they've settled in through time changes too. Fill out your brushes. We're just going to continue, we're almost done going all around our little branch here. I'm just going to use a little bit of water to spread this out a little here. Got a little bit turquoise in here too, why not? I'll have a little heart here too, just for some extra. You can tell I've this little shape here and try to paint around it before the edges dry. I am just going to let this dry for a bit and then we can go back and just erase whatever pencil markings we have left in here. I finished painting around my drawing. Now I just waited for my watercolor to dry a bit and now I can erase whatever pencil marks I still have here. This is a cool part about negative space too, you can just erase over, since it's just your paper basically. You can just erase all these pencil markings, and you'll have a super clean, crisp white object with a nice watercolor wash. I really want you to do an exercise like this right now. Whatever drawing you like, try to have some fine lines in there so that you can practice some nice pulse and precision just to get your hand warmed up to this. This is something that I use so much. I use it with lettering, I use it with objects with small edges. I love doing negative space and I think it looks really cool. Please upload one of this to your project gallery so I can see how you did. You might have to play around with a few brushes before you really get the hang of it. But this is our first activity and now we're going to move on to masking fluid.
5. Masking Fluid: Now, we're going to start experimenting with masking fluid. I've got a lot of questions from you guys on online and in my [inaudible] Skillshare your class about masking fluid, so we're going to get into it right now. First, I'm going to show you a few illustrations that I've made using masking fluid and I'm going to explain why I decided to use masking fluid in this case instead of actual negative space or white ink or acrylic over painting. Here is a first example, a lot of these you're going to see I use lettering, but not always. In this case, it was really easy for me to do these harvest leaves and I wanted them to say different phrases in each leaf. If I would've just done negative space around my lettering, it would have been hard to follow the vines and the little details that go in the actual leaves. This way I just placed masking fluid and then I painted freely over each lettering, so this made it a lot easier for me. Here's another example of when I used masking fluid. This was also in the lettering and those little heart here. The reason I use masking fluid here was because I had this crazy pattern in the background and as you'll see here, it's just really easy to place your masking fluid and then paint over it just freely not worrying about where to avoid painting and also I use a little bit of texture here, so that made it easy. Here's another example, this is actually a print of a painting I did, but this is a really good example of why I had to use masking fluid for the planets. I actually did use just negative space where all the lettering is, but do you see how I have these planets and they are different colors? So my background, which is this black ink background with white splatter over it. If I wouldn't have masked these planets, everything in my whole paper would have this white splatter because it's really hard to control splatter around your paper. So in the activity we'll do now, I'll elaborate more on this, but this just to give you an idea of when we really need to use the masking fluid. Another example might be, for example, 2016 color of the year, were a rose, quartz and serenity, so I had decided to do this little illustration and for example, here I painted these clouds. We're actually going to paint clouds in this class, but what I want to show you here is how we have it sometimes like a texture like this, which will come out of my edges if it's hard for me to be careful and keep this texture in one place. What I did here was I masked around this square so then I could do this cloud texture freely. You'll start understanding a bit more as we go along. But I'm just trying to show you in what cases or what scenarios I have used masking fluid. What we're going to do now is actually our first masking fluid activity. You're going to do this at home too. So let's get started. I actually drew a little feather here. This is just whatever object I decided to paint. You can do whatever you want if you're into certain characters or whatever you like to do or nature stuff, I just did a feather because that's what I felt like painting and also keeping in mind that I want to try to practice doing fine lines. So I drew this feather to do the outline. I have my little ceramic bowl here, I'm actually going to place some portion of this masking fluid into this bowl. So you can see how it starts to even dry around the edges and it gets this pasty. I'm just going to pour a little bit in here. Remember how when we talked about supplies, I said you're going to want to use just a brush that isn't your absolute favorite brush. So you might want to experiment a bit with whatever brush you're going to use. I have these two thin brushes. Painting a huge space of masking fluid is easy. What I'm going to do is try to do really precise and thinner lines because that's what's actually harder using masking fluid. You'll notice that the consistency isn't exactly like paint, it's a lot thicker and it might be messier, but we can just practice enough where you can get really good at. All we have here is our blank piece of paper with just a pencil drawing. Basically, we're just going to start applying our masking fluid. I have my little paper here. So you're going to see how I do this. I'm going to dip my brush into some of this masking fluid. You're going to see that at first it'll be harder to control, but then I'll start getting the hang of it. I'm going to try and just really lightly touch my paper here, your edges won't be super perfect, it will never be as perfect as if you were doing negative space, for example, but we can try to get some fine lines going here as well. What I'm doing here is just not putting too much pressure onto the paper. See. Don't worry if it looks yellow now that will just totally disappear later. Remember, whatever we are placing our masking fluid on will block the paint and we'll have just a white paper. I'm just applying masking fluid around my edges and every, I'd say, minute or maybe 30 seconds rinse out your brush. If the masking fluid dries on your brush, it will ruin it completely. A lot of people have told me they don't know how to use it because their brush just opens up and basically the trick here is just to rinse out your brush as often as you can. So here I rinse it out before it dried on my brush, I'm just going to grab a little bit more and just continue painting around my edges where my drawing is. So here we go. Also, you need to get it a little bit consistent here because if it's way too thin you might lose it later. I'm just placing the masking fluid over my drawing. Let me get this pencil out of the way. What I'm going to do now is actually start painting this. Here we go. Also remember that if you have pencil markings underneath your masking fluid, that's okay, because once we lift the fluid it will be just clean paper and we can erase over that very easily. I'm just do keep on going here, try and find the best angle for you to get finer lines. Here we go. So it's time to clean my brush again, I have to be really mindful of getting my brush clean and not ruining my brush. So please remember do not use your favorite brush, it will most likely get ruined in the end, but it will work for now. There we go. The trick here to not get super thick lines is to just not apply too much pressure onto the paper. Just let the fluid basically just barely get on your paper here. I'm nearly done placing my masking fluid on this feather. You can see how it's shiny right now. It'll always be shiny even when it's dry. It usually takes around 20 minutes to dry completely and you can also tell just by looking at it, you'll see as we move along. I want to do a couple of things. Waterless draws. I'm just going to leave this brush right here in the water for a bit, and I wanted to show you something else that masking fluid can do. These were very precise defined lines. But we can also do some fun stuff. I'm grabbing this messy brush here and just placing it a little bit in the fluid like so, and we can also do some nice messier, let's see. For example, we can do some circles like this, and this might be. This will look very different, but it's a cool brush effect as well. Experiment with different brushes as well. For example, in the stuff I like to paint which is like spacey planet stuff. This might be cool for like a moon or some spacey texture, maybe shooting star. Just feel free to experiment with your masking fluid as well and please upload your experiments with masking fluid. We're going to just leave this to dry for a bit. In the meantime, I'm going to show you how to clean your brush after using masking fluid. If you do not have this product, I would highly recommend getting it. I've had this for years now and it's still. Look how full it is. I use it very often. It's great if you paint with acrylics too. It's just called master's brush cleaner. I got this at Blake, I think, but it's available in most art supplies stores. Basically, all you need to do is just get some water on your brush and just lather your brush. Like so. Just doing like circles. Don't squish it down so it'll open your brush more, but side circles like that. This is amazing, this product. I love it so much and it's like conditioner for your brushes, and I have not used anything else that removes masking fluid from my brush like this does, and you know how when you take a shower and you leave conditioner in for a while, we're actually going to do the same here. I've got it, worked into my brush and I'm just going to let it sit for a bit, and meanwhile, I'm going to just clean this brush too. This has rubber bristles so I can be a little more harsh with it, but it even no lathers, I feel nice like that. Even if you have dry acrylics in your brushes, this product has really saved a bunch of brushes for me. It stayed here for a while. I'm just going to rinse it out, some water. I can see how here, can tell. It's rinsing it out. Masking fluid can be rough on your brushes. Basically, as I said before, just don't use your favorite brush. Don't use like an expensive brush. Try to use cheaper brushes, synthetic brushes and if you have this product which is the master's brush cleaner, just use it after every time. There we go. Here we have a nice clean brush again. Now we're just going to wait for our masking fluid to dry for a bit and I'll be back with you in a sec. I finished painting or placing my masking fluid on my drawing, and we waited for about 20-25 minutes for it to dry completely. The way now it's dry is because it gets yellow pigment and you can just tell by the texture, it'll still be super shiny. Maybe I'm not sure if you can see it here, but there's a glare. But it's translucent yellow. I know that it's dry now, I can put my finger over it and it'll feel sticky but not wet. That's how I know when I'm ready to paint over this. See. I want to explain to you how masking fluid, we really want to take advantage of what we did, so we blocked certain areas. This means that we can do basically anything in our background and it will be okay, it'll just be white lines no matter what. I might take advantage of this and do some color blocking. I might do a rainbow effect. You can see I'm just painting straight over my object. It's actually really fun because it's just cool to see how, no matter what you do, your area will be protected. I'm just going to start painting over this. You'll start to see how it's starting to reject. Wherever we had the masking fluid, it's going to reject the water when we do water and oil. Since I want to do a color blocking thing, I'm going to start. I'm just doing some blocks up here. I can't stress enough how important it is to know why we're using the masking fluid. In this case we're using it because, let's say we're doing these different colors. We can also use some cool textures and take advantage of our masking fluid. For example. Let me see what still is here. I'm going to use some more pink up here. This painting might look weird right now, but you'll see what I'm going to do in the end. Now you don't necessarily have to do the same design that I'm doing. Just experiment with your masking fluid. Imagine how hard it would be, how difficult it would be to just do a negative space painting with this design and painting all around this and keeping in mind that we're doing color blocking. That's why we're using masking fluid right now. Also, remember that we can do textures in our watercolors. I'm just going to have a little bit of salt and place it on here. See, so this is just something cool to do. Play around with your watercolors. There we go. I'm just going to continue. I'm just going to continue painting over my watercolors. I'm just going to keep painting my watercolors over my masking fluid design. I did this background, which is a little more complicated than this. That just like a regular one tone background and I really want to get creative here. What I want you to practice is just taking advantage of our masking fluid, so we can do different stuff here, like paints and some splatter around certain areas just like experimenting with masking fluid can help us with. I might do a little bit of splatter here, I mean, this is just really like abstract painting, but it's more just for you to experiment. So please upload your experiments, I really want to see what you've created with your basic masking fluid creation here, just some splatter it's going to look cool. I also, place a little bit of salt around some area, as you can see how it's starting to react here already. It looks weird right now. It's a weird painting, I used different tones because I want to show you how darker colors contrast a little bit better. I just painted all over my paper now, and I'm going to wait for this to dry 100 percent. It has to dry completely. Otherwise, when I tried to lift my masking fluid the paper will come with it if it's not super dry. So we're going to wait for another, maybe 10-15 minutes for a watercolor to dry completely and I'll be back with you in a second, so we can start lifting our masking fluid off the paper. All right, so we've waited about 20 more minutes for our watercolor layer to dry completely. We're almost there, but I see that there are some sections that are completely dry, so we can start actually lifting up our masking fluid. To lift up your masking fluid, you can use either your hands, your fingertips, or an eraser. If you're going to use an eraser you just, basically, do this and just pass the eraser or if you want to do with your hands, you can just lift up the masking fluid like I'm doing right now. I wanted to show you these were the sections that we did with our paint brush that was old and didn't do it like too perfectly and I think it's cool. It's a cool effect, you can see how the bristles here, I don't know, it doesn't nice effect. This is different that one were going to see here in our big feather. So we're just going to start lifting us up, see with an eraser you can get those little, I did some little dots when I finished and it's completely white. It's really cool to see, how this protected our paper completely and we have a nice white effect here and see how why I wanted to do this color blocking just because this would be really difficult to do if it wasn't for our masking fluid. So we can start, so you're lifting up these areas here, I'm just using my eraser now and also just do this, it's really fun to do so. So feel free to experiment with your masking fluid. Basically, this is just an exercise to get you familiar with the technique. Maybe you might sort a bit if you're using enough fluid or trying to get some control of the masking fluid, just, basically, all you need to do is practice and you'll get the hang of it. Hear we have this guy too and I'm just going to do eraser here. We can start lifting and even before I start lifting it, you can see how the masking fluid is sort of repelling the water. So you can already tell what your design is going to look like. I'm just [inaudible] see your eraser super handy here, because sometimes there's some little spots that you won't notice with your hands and if you just like, there we go. It's cool to experiment with this kind of stuff because now that I'm looking at it like this and seen this form right here, I can start imagining like wow, it would be really cool to paints or like a desert background and have this be the moonlight or just like different, I don't know just experimenting is when you can just discover new ideas. So just go crazy with this activity, all I want you to do is try to learn how to use this material. So here we go, I'm just using my fingers right here and we can start to see how I'm uncovering the work we did, there we go. This is super fun part and you'll notice, no matter how delicate you are or how good your pulses, if you look really close you can see that the edges will never be super precise, it's nice effect to, I mean it's not bad, it's not wrong, you will never have like super straight lines, like rough edges. So here we go, I'm just using my fingertip right now. Here is also, these nice big spots in my feather, I'm just going to keep lifting these erasers. Whatever, kind of design you do, you'll end up looking with something really cool because just the concept, the contrast is so amazing and I wanted to do this color blocking thing too, because I wanted to show you how we have some like black here, and dark turquoise and obviously the contrast is really big. But also, if we have lighter colors like this it'll still work, it'll still look really cool because there's nothing like super extreme white, you can even use like pastel tones and experiment with that and it'll still look really cool. So I would like for you to upload your first masking fluid activity. Just do any design and try to get some thinner lines in there, so I can see that you start to get some control of the masking fluid. Basically, this is how masking fluid works, we can also do some layers and stuff which we'll get into a bit later, but for now I want you to really start to get familiar with this material and just try to imagine like in what scenario you would like to use masking fluid? I think it's a really cool medium, it's awesome for watercolors. Now, we're going to experiment with our last blocking space or white over watercolor activity, which is going to be using some white paint over a watercolor wash. So excited to see your results on this, and we'll move on to our next activity now.
6. White Ink: We've been going through the different ways that you can get either color-blocking or white over watercolor. One of my favorite techniques is actually using white ink or acrylics over my watercolors. I'm going to show you a few examples of when I've used this and why. For example, in this illustration here I painted some glass jars. You can leave some white space for reflections when you do glass textures. But in this case I just did a bunch of layers and I had the stems in here and so on, and I just think it's cool to be able to, if you can see here, use some white ink when you're done for final touches details. Here too. For textures like this I love using white ink. I also did these little butterflies for a project. You can see that I actually did a little bit of splatter here in the butterfly wings. Then I did some details with white ink and my zero brush. It's really cool for detailing too once you're done. Another example here are feathers. For example, these tiny little dots or these lines that go in the feathers, this is perfect for whiting. It's those final details that really make them pop or these super tiny dots, stuff like that. I have these Christmas ornaments I painted, which is something like we're going to do right now. You can see within the white paint I have different levels of transparencies which give it some cool depth too. For example this star design is a washed-out white and you can still see my watercolor texture underneath, or here you can see how it's thicker. It's just playing around with the opacity of your ink as well or acrylics. Lastly I have this painting which is actually, I did a combination of, this is negative space here in the lettering. You can see how I mixed both techniques here. What I did with the lettering is negative space, which I knew I could get really nice, precise, and bright whites if I did negative space in the lettering. Then when I did the constellations I just used my white ink, and also with some splatter. You can see here. It's just like using your head to figure out which technique you need for the specific idea you have. In this case these examples I showed you, white ink was what was called for. We're going to do a little exercise using white ink or white acrylics. Now we're going to do our white paint over watercolor activity. To do this I just painted this nice circle with a couple of different watercolor paints. I'm just going to wait for it to dry. You can see it's a little bit moist still. While this is drawing I'm going to show you how I'm going to prepare my white ink or acrylic. If you took my beginner's class, we did a really cool galaxy project which was our last project. This is going to be something similar, but we're just going to concentrate more on using our white ink or paint. Here I have some really concentrated paint. I'm just going to put a little bit here on my ceramic bowl. This is super concentrated. It's going to be really opaque. I'm just going to grab some of this. I have some really opaque paint on this side. Then whatever is left on my brush I'm going to dip in some water and create a little translucent or water-down section here, because we're going to use both. We can also have some transparencies within our white paint, and not only with our watercolors. A quick note here. I got a lot of questions on keeping your water clean in my last class. Your water doesn't have to be completely clear for it to be clean. You can see here how it looks murky and it's, I don't know, it had some of the purple that I used here, but that doesn't mean it's dirty water, it just has a little bit of pigment in it. But you can see once I get this water here and place it here, it's not going to ruin my white. Don't worry too much about your water being clean all the time. I usually change it every one or two days. It's a waste to be changing it all the time. It's just like a mind trick to see it dirty like that, but it's not really that dirty. That was just a quick note on water. But we're going to keep doing our white paint here. I really like starry stuff. I love the universe and galaxy, and all this kind of stuff, so I'm going to do like a sphere with some stars. I'm going to use my different levels of opacity here. What I'm going to do is actually have one of my thin brushes. This is a zero brush. I'm just going to start painting some little stars. You can see here how I have my diluted paint here. This is watery and this is really thick, so I need a little bit more water to get this going here. I'm basically just going to start painting over this here. I might start with some cool little stars. Again, if you took my first class you'll remember the pulse and precision exercise. This is a great time to practice that. I'm just going to free-hand some cool stars here. Before we continue I might actually do a little bit of splatter too. Just like we did in the galaxy activity. Another thing you can do with whiting is just do some splatter like that. I'm just going to keep painting some stars in this circle here. Just going to think of different forms. Acrylics or ink is a little bit thicker than watercolors, so you might need to practice a bit more. Just like controlling your straight lines or getting a nice consistency so that your paint can run like fluid without it getting too watery. I'm just going to keep painting a few stars here for a bit. I just finished painting a few details with my concentrated white ink. I think this looks pretty cool, but I wanted to show you guys how to use a little bit of diluted white paint as well. We're going to give this circle a new meaning. We're going to turn it into a sphere. To do this we're just going to get some diluted white paint like this. I'm just adding some more water. We're just going to do a few little details that'll make this shine like what we did with the glass texture. I'm just going to do this here. Just by adding simple details like this, we turn this circle into a sphere, so it has these areas here, make it shiny. This is just an example of how we can use our white paint in different ways. Try do experiment. Please upload a project. It doesn't have to be this same subject matter, but the idea is that you use a watercolor backdrop and use some white ink over it, and do as many experiments as you want. Here I did some splatter, I did some concentrated white ink, and I did a little bit of diluted ink here for some shiny reflections. As a side note, you can see how sometimes your watercolor pigment can absorb into the diluted white paint, which I think is cool-looking. It looks pretty cool to me. If you want it wider you can just wait for it to dry and add another layer. But please upload your white paint over watercolor activity. This is going to prepare us for our cloud activity, which is going to be towards the end. That's it for this activity.
7. Clouds Activity: This activity is our clouds activity. I'm going to show you how to paint clouds using watercolors and acrylics. I'm going to take you through it. This is practice for our final project, which is going to be sort everything we've learned. How to paint clouds. I'm going to start out by using my pencil and doing a really light drawing of forms that are cloud-like. I'm just going to start down here. You can see I'm not doing it too perfectly. You don't want cartoon-like looking clouds. Go up and down a lot and try to get more irregular forms rather than just the classic puffy clouds that you did when you were a kid. Just go up and down like that a little bit, and here I'm going to do one more up here. This is just basically going to be like a guide for you. Here I'm going to take this guy down a little bit. I have three big shapes here and a sky background. A really important lesson in watercolors is thinking about which object I'm going to paint while the other one dries. We have to think in this way that we don't want to waste time and say I'm going to paint this cloud, and then wait for 10 minutes and then paint this cloud. What we're going to do is paint this cloud, then we might paint the sky, then we might paint this cloud and then well this is drying, paint this. Think in a way that we don't waste too much time just sitting around waiting for our sections to dry. What I'm going to do now is just start painting my background. For this sort of illustration, we're going to think of maybe what time of day we want it to be. I'm going to do a colorful yellowish-pinkish cloud design. That means it's going to be either a sunset or sunrise. I can upload a few pictures for you guys to see different references of colors. You can also do a cool nighttime one, but right now I'm just going to do happy bluish clouds. I'm just going to start painting my background here. Just using my nice blues I have here. You guys that practiced painting gradients in my beginner's class are going to benefit from that here. Right now I'm just painting the sky. As you can see, my task here is going to be just not letting sections dry, sort of like having my puddle always be moist so that I can keep dragging my paint along. Just being mindful that I just don't want the edges to dry so that I can keep painting and it'll look like a nice wash. Here I'm just doing a wet over dry technique, which is what I do mostly. But if you wet this whole backdrop first and then paint over it, you might get good results too. It's not that I'm against that, I just like the results better when we're painting wet over dry. As you can see, I'm trying to get a little bit darker colors on the top and then it's going to go a little bit lighter as we go down towards the clouds. Remember, my work is happening right here. I'm just going to continue painting my sky. I'm just being mindful of my edges not drying so that I can continue with just a nice uniform wash here. I may feel like adding a little bit of salt just to get some texture into my sky. There we go. A little bit of salt here. We're just going to keep painting. I'm painting around the edges of the clouds that I drew. I'm not being too perfect about it. You'll see in a bit why this doesn't matter that much. But basically, it's just because we're going to paint a little bit of white acrylics over this. It's just going to be like a reference for our background, so doesn't really matter too much. You can see I'm not really even using my thin brush to outline this. It's just like a rough idea of where my clouds are going to be. Remember, I'm just never letting this dry, keeping my water puddle moist at the edges so that I can keep painting. Here's my basic sky. I'm just going to add a little bit more salt just to give it fun effect. Here we go. I just finished painting the sky and you can see it's still really wet, especially around the edges, which was the last area I painted. Instead of just waiting around for this to dry, I have this cloud down here that is far away from this, so I can start painting this just to wait for this to dry and I won't just waste so much time. I said I was going to do a sunset kind of cloud. I'm going to use a little bit warmer tones, maybe some pinks. I'm just going to have a few colors here. This is my Dr. Ph Martin's. I know a lot of you have purchased these already. There are awesome, especially if you want really vibrant pinks and that usually doesn't come with pan sets. I'm going to start by using a little bit of that. That's actually most rows that I just use right now. This Juniper Green is one of my favorite tones too. I want to grab a little bit of the colors that I used in my sky just to start maybe at the top of my clouds here. We're going to do basically a gradient just like you did in the beginning of class. But we're going to give it an intention, so it's intention is going to be that it's a cloud. If I'm going to start to turn this turquoise into pinkish. I'm just going to add a little bit of pink to my turquoise puddle here and just start painting. See that was a bit much so I'm going to grab a little more turquoise and start. Basically what I'm doing here is just working on my gradient. I'm just going to take this cloud from a turquoise, take it down to a pink. I'm just adding a little bit more color every time. As you can tell, I've been referring a lot to the beginner's class. If you have not taken it, I highly recommend you take it even if you are experienced because we're just going to use so many of the tools that we learned there in this class. Here we go. I'm just going to start grabbing more of this paint directly. Just going to mix a little bit of my pen set here. Because remember these Ph Martin's are super intense, so I want to bring him down a bit with my pen sets. I'm just going to paint till the edge here. We have our first super colorful cloud here. Try to make this pretty intense because we're going to place some white paint over it. Whatever you do, this will actually turn out looking a little bit more pastel than it did originally. So don't be afraid to bring it up a lot like kind of get it pretty bright because this is just going to be undertones of what we do on top of that. Now, you're going to start to think like where can I start painting that it's dry enough around the edges. You can tilt your paper a little bit and see where it's dried more. I can see that what I started to paint here is already starting to dry and also this edge here is pretty dry. I'm going to decide to start with this cloud rather than this cloud, because I still see some wet edges here. That's just basically the way you have to start to think when you paint with watercolors, especially when you're doing a sectioned illustration like this. Now, this is a pinkish cloud and I want to do this similar tones here, but I would maybe have a little bit more yellow in it. I'm going to start off the same way, just a little bit of turquoise on top. See how I'm not too worried about it being perfect. You'll see why in a bit, but just take it easy with that. Doesn't have to be super precise yet. Starting to paint here. A little bit of purple. We need some purple before we go straight into pink. Notice how I'm mixing my color. Everything happens here, you don't want to mix here, you have to mix here first to get a more seamless change from turquoise to pink, there has to be some purple of course, there we go. Even around these edges, I'm being pretty careful but not too worried about that. Now I'm really starting to add some pink to here. Remember, I don't want my edges to dry because I'm doing what we did with the gradients, but I'm doing it in a larger scale and with intention. So try to not let your edges dry. I have my pink here. It's a little bit too pink. I can always fix that with a little bit of water. I have mostly pink now. What I want to do is start adding a little bit of yellow to take it into a little more orange hues. I have some of this paint here, which is Higgins, but I can easily use my pen set too. I'm just going to grab some of my yellow here, maybe use a little bit of that. I don't want to use yellow directly here, it'll be too intense. What I'm going to do is grab some of my pink and just start adding a little here and still, even too much. I'm just going to add more pink, and we start to get some really cool sort tones here. Try and look at some pictures of the sky and clouds just for inspiration on colors. Maybe you like pastel colors a lot, so you can do mint clouds or baby pink. I think this sunset scheme is good for beginning because you can use some bright colors and just learn to mix some larger scale gradients. See how this cloud looks really colorful and cheerful. We're just going to keep that like this. Then this larger cloud, I may start out with some pinks here and then finish with a couple of yellows here just to know that we're in the same scenery. You can also tell how the salt is starting to dry, and we have these cool little star figures already. So that's just a cool part of having watercolor dry with salt. Now I'm just going to paint my final cloud. I just finished painting my first layer. It looks super colorful, super intense right now. But you'll see how with the white acrylic over it, it'll really tone down and look way more realistic. Of course, this looks like cartoony right now, but we're just going to wait for this to dry. Basically, this one's dry, this one's dry. We just have to wait for this last cloud to dry in this little section here in the sky. We're going to start using our acrylics to start painting the actual texture, which is going to make it look like clouds. I'll be back with you in a sec, we just need to wait for this to dry. We did for this to completely dry. You can see everything is dry now, and I still have some salt here, I can just brush this off with my hand or dry brush like this. We just added a little bit of salt to get this cool texture. It's just a little detail. You can see it looks like little stars. This is going to be like sunset vibe. By this point, we're done with all the watercolor in this illustration, now we're just going to focus on our acrylics or white ink. Just going to grab a little bit of acrylic paint here. It's pretty thick. Actually, it dried up. I'm just going to grab this one. I'm just going to wet my brush a little bit and grab some concentrated paint like that. Remember this can be either ink or acrylic, either one will do. I'm just going to put my concentrated paint here. Just close this up, and we won't need to grab any more for now. I have a little bit of paint on my brush. Remember this is the brush I told you about in the beginning, that it's a flat and round brush. This is going to be great for creating texture. Especially this puffy clouds texture. I'm going to start with this more diluted area here. Remember I told you how you can have some concentrated paint and then a little more water down over here. What we're going to start to do is create our little cloud texture. We're going to want to work from back to front. If you look at my design here, the cloud that's in the back will be this one here, and then this one will be in front of that one, and then this one will be in front of all of them. I'm going to start with this one for that reason. I'm just going to start painting and you can just observe what I'm doing. I'm laying my brush flat like this, pretty flat so I can start getting this nice texture here. You can see that I'm not really staying exactly within the lines I created. I'm going to try and go a little bit more organic here, just make it look more natural. This is just the first layer. Don't try to get it completely white or anything at this point. I'm just going to try and start to create some texture here. What's cool about watercolor is that when you wet watercolor, you put water on watercolor, It'll activate itself again. We're going to have some of the pigment from our watercolor go back into our white acrylic because it's so wet. It's not going to be completely white, but we're going to get some nice pigment from underneath. I'm just going to keep on going here. I keep on going here. That was maybe a little too much water, if I have too much water, I'll just dab my brush here. We're just going to keep on doing this. You can see I'm just creating some texture here. The reason why I wanted my clouds to be so bright in the first place is because I'm just placing so much white paint over it. Now I'm just grabbing a little bit of water. I don't want to cover my color completely because if you look at clouds, you can see that sometimes there's a sunburst that comes from behind and you can see some color through there. Remember, I'm just using my super water down white paint here. What I'm going to do is actually, I might create a new cloud figure within this big cloud I made here. I'm just going to start doing this a little bit more concentrated. Remember this is just your first layer. Don't feel it needs to look perfect by now. It's just your first layer, we're just starting to give it some form. I'm just going to wait for this to dry for a bit so I can start doing my second layer. But you can see how it's already starting to look like a cloud and not just like a kid drawing it, it looks more realistic already. Just grabbing a little bit more of my concentrated paint here, and making my diluted mix here. The way you're using your brush here is like dabs of paint. You're not going to do this or that. You're just going to let the paint just lightly fall on the paper. Notice how I leave some areas, for example, here I left this without any acrylic paint because I just want to get those little windows of color. Within these big three clouds that I painted, I'm already starting to create more volume and more texture in each individual cloud because that's just the way nature works. It's never just three big clouds. It's got volume, depth. I'm just going to start with my first layer on this last cloud. The reason why I go from back to front is because now this last one see I already worked on the bottom part here, and it's okay if I cover that up like that. The form of your brush is super important here. This effect really won't work if you have just a plain round brush like this or a flat brush like that. In this case, the brush is actually giving us the texture. I'm just going to keep on going here. I'm going down. I have a super bright link rainbow cloud at this point, but it'll get a little more realistic as we go on. This is just my first layer of acrylics. You can see how it already has a lot more just volume into it. I'm going to keep painting. This is really sort of feeling out what you want it to look like in the end, but I just say, each time make your paint maybe a little bit more concentrated, so you can start giving accents to certain parts. A little bit more. Here it's nice that I already have just a layer in the background that's going to help me. It will just make it look more realistic. I really like how the turquoise paint is starting to push through here. Again, try to avoid straight lines like that. You want your clouds to look organic. Here I felt like it needed a little more volume there. Just like random forms going up and down, sideways. You can really start to feel out your painting at this point. Now, you can see why it didn't really matter that much though. We have perfect edges because we're going to cover them up anyways. Now, you can look at a picture of clouds and get some inspiration from there or just feel. I'm really just feeling it right now. I'm just going to continue painting more layers of white over my watercolor. We'll talk about finishing touches in a bit. We've been layering our cloud painting with some white paint, either acrylic or ink. I'm just going to do some finishing touches. You can see that it really looks like clouds now. Notice how I left little windows of just the watercolor that we had underneath so I can have this pop of color. Now, what I'm going to do is just do some really opaque white details. We're going to get some concentrated paint here. Just that's a little bit rough right now, so I'm just going to wet my brush a little bit, and just wipe it off and just with some water, clean up the edges wherever I just painted. You can see now that I really have some more depth to the painting. I also want to do maybe a few little details with white paint. I'll show you in a bit. We can do maybe some little white dots or just little white details. This is my zero brush. I'm just going to grab some of those white paint here. I'm just going to do just small details like cloud burst. This will just give it some extra magic. It's just another example of how we're using our white ink over our watercolors. See, we can also do this here. I always feel like there's these little details that you can do when you finish your painting that will make it look just way more magical and special. I'm a big fan of doing little details at the end. To me, these little dots are just sort and the mist in the clouds. Just a couple of details here. This cloud painting is in preparation for our final illustration which is going to be a combination of everything that we've learned here. In this particular illustration, you just learned how to paint clouds using watercolor with acrylics or ink, but keep in mind that this technique can be transferred into different things. I find a lot of students that weren't into maybe the cloud idea so much and they decided to paint the ocean and this technique can be the foam in the waves when they crash against the rock or just use your imagination to do different things. There's so much we can do. This can be snow or just basically any texture that this reminds you of. Feel free to explore this in your next painting. In the next video, we're going to talk about what we're going to do for our final design, but please practice this at least once, so that when we do our final project, you really have a hang of it. If you can upload this simple cloud exercise as well.
8. Experimental Watercolor Extra: In the beginner's class, we did an activity called Experimental Watercolor, I believe. Basically, it's a fun little activity where we mix together different types of paints to get cool new textures, and we're just going to elaborate a bit more on that activity. We also call it the baby planet. Activity looks like tiny planets, which is cool. But here I just want to integrate a few more supplies that we have. In our last class, I asked people to experiment with different stuff they had at home, and some students said they tried alcohol and some nail polish remover. I also have some thicker grain salt here, and we're also going to do some experiments with our masking fluid. This is some gold dust that I found in my studio. You guys may have this stuff laying around, feel free to experiment with all of this at this point. Just a little bit of prep, I prepared our page here with three circles that I just surrounded with masking fluid. So I have these three areas that are free for me to experiment with. I'll show you what kind of stuff we can do here, we just need for this to dry a little bit. In the meantime, last time we did a lot of bleach. We mixed a lot of bleach with our watercolors. This time I'm just going to show you a few different materials that we can mix with our watercolors and get really cool textures. Right now, we're going to start doing little circles again. I think I'm using a little bit of Dr. Ph. Martin in gray here. Well, it's actually liquid watercolor. I'm just going to mix it with a little bit of my pen set here, circle going here. Remember, this is all about experimenting. I know you guys who took the first class probably did a ton of experimenting, but it's always cool to come back to this and just try out some even more new things. In this case, we're going to add a few more supplies, including the masking fluid. This is wet right now and I'm just going to grab a Q-Tip and see how this alcohol reacts. You can see I'm just dipping it in here, and I'm going to do some little dots. Remember how bleached did something similar to this. It looks cool, right? So we're just going to wait for this to dry. Sometimes when this stuff dries, it changes a bit. I just tried that with some regular watercolor. I'm going to try it with different color now just to see if it changes. There's some super bright pink that I really like. Now we're going to mix it with my pen set, and maybe I'll do some stripes this time. Remember you can document your results as well. This is going to be alcohol, ph newtons, and this is pen set. Just a few different experiments here while we wait for our masking fluid to dry. I'm just going to experiment a bit more. This time I'm going to use some nail polish remover, which someone uploaded to the project gallery in our beginner's class, and I thought it was a good idea and I had never even tried it before. I'm going to try it now. You can see this is pretty similar to our bleach test, but it doesn't expand like bleach did. This is an interesting technique too. Keep in mind all these different household supplies may do some awesome reactions too. Last time I showed you some experiments with really fine grain salt, and now I'm just going to show you a different grain of salt which is really cool too. Here we go. These are super chunky grains of salt. You don't want to go overboard with this, just a few. This will take a lot longer to dry than the thin grain, but it'll look super cool too. I also wanted to try out some of that gold powder that I found. If by any chance you have something like this in your studio or in your art supplies, feel free to experiment. See that looks super cool? This is actually powdered gold leaf. We're just going to wait for that to try and see what happens. I might also want to try it out with just plain water and see what happens there. Here we go. That looks cool too. Remember, I don't know exactly what this is going to look like. I'm just waiting for it to do its own thing. We're going to wait for these to dry so we can analyze what we just did. In the meantime, I see that my masking fluid has dried. What I have here is three circles with a thick layer of masking fluid around it. What I'm going to do here is show you why I would use masking fluid to do these textures. The first one is going to be some splatter. Splatter is a technique that's hard to control, we have no real control of where the paint's going to land except for a certain area, but we can't really confine it into a space. Masking fluid is going to really help us out with that. I'll show you here how. For example, I'm going to use this one right here. If we do some splatter around here, you can see it's all around here, but once we lift up the masking fluid, it will be in this specific space, which will look really cool. Also, if you're trying to do, let's say, an ombre effect. This is going back to what we did in our gradient class. Let's say we want to do a gradient like this and turn paint into water. You can just do like this and then wait for this to dry, and lift up our masking fluid, and we'll have a really perfect circle with a great gradient ombre effect. Now we're going to mix watercolor, ink, and masking fluid to create something new, which will be, I'll use some blues again. Let's say we're going to do a starry effect. Remember, we need to do our galaxies. I'd say maybe something like that. Just a micro version of that. I'm going to wait for this to dry for a bit and I'll be back with you in a second so we can start applying our white paint over this. We've waited for our masking fluid and watercolor to dry for a bit, so we can continue experimenting here. You can see how these have been drying as well. What I'm going to do now is just do a little bit more splatter on these masking fluid ones. I have a little bit of leftover paint from the white ink activity or white acrylic, so I'm just going to use this, and I'm going to do some splatter here on this guy. We're just going to leave that for a sec. Then I'm going to use my same flat brush to do some other splatter here on this pink one just because. I'm just going to grab some of this. Here just a little bit more. There we go. While these dries, I'm just going to talk a little bit about the results we have here. We did a couple of more experiments with a few different materials. In our first class, in the beginner's class, we did a lot of experiments with bleach. This time I did a little bit of alcohol and this is nail polish remover. You can see how the alcohol reacted a little bit different with the different pigments. For example, here with the alcohol and pan set, it really did a good job right here removing and just giving us some cool spots and just a nice texture. Whereas with my Dr. Ph. Martin's, it really didn't do that much, on this pink side you can see. Again, it's just about experimenting and really seeing what reacts with what. But just for really cool textures, this is really fun to experiment. Then we can see, use some of the nail polish remover on this one, and it removed some of the pigment, but it didn't turn it completely white. That's interesting too, if you want to try that out. Here, see I told you how this larger grains of salt would take a while to dry. It's actually still not dried, but you see how it's starting to do its effect here. Then I had some gold powder laying around. I just dropped a little bit on this green circle here and then just with some water. I thought this was cool. I think it looks cool. You can see how in the green part I think I just blew little bit on here and it spread out. It looks like a gold leaf effect, and then here it's more spread out, looks like gold splatter. I think this looks pretty cool too, you can experiment with different mediums and stuff like that to get the results you want. Now our masking fluid has dried and our watercolor has dried. What I'm going to do is start lifting this up here. Remember, you can use your finger like this, or you can use an eraser like this, and it'll lift it up just the same. I'm just starting to erase around the edges here. This is actually a super fun part. Just lifting up your masking fluid like that. Look at that perfect circle that we're uncovering here once we lift up our masking fluid. The reason I decided to use masking fluid to do this circle is because I had all this splatter going around, and now I have splatter confined into a certain area just like that. This might be cool if you're doing a large painting and you have a bunch of textures within your circle or whatever figure you want to do. It'll just be super comfortable to just paint freely and then lift up your masking fluid and you have a perfect shape. Here are the same with my amber, or my gradient, as you guys learn how to do in the beginner's class. Here we go. Just lifting up some of this here. I think this is probably the best one of the demonstrations because there's no way to get perfect control of splatter within a specific shape. This really works well with this. Here we go. See this is a mistake I just made. My eraser had a little bit of paint on it and it ruined my page there, but this is just an experiment, so thankfully it didn't ruin anything too precious. You have some paint splatter here in a specific area. I'm actually glad I just made this mistake here because this can happen pretty often when you're painting with watercolors where you can maybe smudge. What I'd like to show you is what I do when this happens. I'm trying to find a good brush here. Basically, I just grab a little bit of some of the white paint and use it as a corrector. Maybe just paint a little bit over this. Just a little bit of concentrated paint over this mistake will help a little, especially if you're scanning later, you can just clean that out, but for now I leave. Remember when we used to use a liquid paper, it's like that. Here are just a few more experimental textures I wanted to show you. We can also integrate this into our last activity, which is going to be the clouds. But so here are a few examples of stuff I did using masking fluid. It's great for controlling splatter. For example, I really like to paint outer space stuff and planets, so I use this quite a lot. If we're painting the solar system, and then I might paint the planet's first and then mask them and then paint black over that and do the splatter and have the sky, start thinking in levels like that. That's basically how to be a good watercolor artists. Just start thinking of levels like what goes first, what goes last. I wanted to show you how to use the alcohol or the nail polish, maybe whatever. If you have some gold leaf around. Then this is the thicker grains of salt, it's still a little bit wet, but we can start lifting this up and you can see how we got a really cool texture there. A little bit more open then with the finer grain. Feel free to experiment too, I love seeing everyone's experiments. I learn from you too. If you found some new supplies at home that you want to try, please upload your results and I'd be happy to see them and we can also share with the rest of the class. This was some experimental textures with mixed medium. Now we're going to go on to our next activity, which is going to be starting to paint clouds with white ink. I'll see you in a bit.
9. Final Project!: It's time to do our final project. You guys now know how to do negative space, you know how to use your masking fluid, you know how to use white paint over watercolors. So you know how to do clouds, which was our last activity. What I really want you to do now is think of an illustration, you have to really think about it, where you can use all of these techniques mixed together. So what I did right now is I sketched out this, it's simple drawing right now, but with all of our textures and layers, it's going to look really cool in the end. So what I did here was I painted some clouds, some stars, a moon, and a little bit of lettering. Side we're going to have a lettering class soon. So if you want to do lettering now, do the best you can and I'll talk more about that in the next class. So when painting these types of illustrations, you really have to think from back to front. So in this case, we're going to think of, what do we want to mask? What do we need to place masking fluid on? For example, my sky is going to be a black starry sky and then the clouds are going to be this texture that we just did with my brush like that. So if I have stars here, I'm going to maybe paint these stars, I'm going to do with light yellow and the moon and then let that dry and then apply some masking fluid over that. So that's going to be my very first step. I'm just going to start by grabbing some water and then I have just a little yellow, I will put my paints work here so you can see what I'm doing. So just some yellow paint here. Now, remember that I chose to do a sky, but feel free, you can paint the ocean. I can also upload up a couple of images of stuff that my past students have done in this class. You can get super creative with this, you can get really creative with the masking fluid and just, there's a ton of different things you can create with this mixed media technique. But what I'm going to demonstrate today is this is just something I really like. So I'm going to do a starry night with clouds. You can see I'm just very lightly painting these little stars in a yellow, this is because I'm going to paint these and then wait for the watercolor to dry and then apply masking fluid all over these little stars. So you can also do that. You'll see how the masking fluid maybe removes a little bit of your paint, but it'll okay. I'm not really paying much attention right now staying in the lines because the masking fluid's going do the real job there. So I'm just going to wait for these yellow guys to dry. In the meantime, I'm going paint my planet or moon here. I'm just going to start by adding some water, just simply water to the whole moon here. Here we go. So I have some water here. I'm just going to add a little bit of black paint in certain areas, the craters of the moon. There we go. So this is a real-time painting of what I would do normally. That looks pretty cool and I might even want to use a little bit of this alcohol here just to see what fun textures come out of using this here. Just going to let that dry for a bit. We're just trying to get some nice texture into our painting now. So this is drying and let me just add a little bit more black here, you get a little more defined. So what I'm going to do now is just let this dry for a bit. I have to wait for this initial layer to dry so that my next step can be adding masking fluid onto the little stars and the moon. So I'll wait for this to dry and I'll be back with you in just a bit. So I waited for my little stars to dry for a bit and what I did right now was just pour some of my masking fluid into this little plate here and I'm just going to be super careful and try to just mask the stars up, being really precise. So here, hopefully you guys did the practice session, so this won't be too hard for you now. You should have some nice control over your masking fluid by now. I'm just covering up these little stars. So if you're using masking fluid, it usually means that it's going to be one of your first steps while painting. So remember I'm using my beat up brush. It's a really thin brush, but I really wouldn't use it for painting anymore, I just use it for this crafty stuff. Or it's the same brush I would use for maybe gold leafing or something like that. I chose a pretty complicated form here because they're thin stars and this is a bit tougher but you can do something simple too. So remember you want to rinse off your brush pretty often when using masking fluid, otherwise, it'll just dry on your brush. I already did these now I just have to do these three here. Remember to rinse your brush pretty often. So I just finished masking the little stars that I want to cover up. Always if you have this master's brush cleaner after using masking fluid, I will always just at least cover it up in some of this, it's a conditioner for your brushes. So if you don't have this, just rinse it with water and soap, but this is really helpful. I'm just going leave that there, as a conditioner. So we're done with our masking fluid for now. Now, we're going to start to think of what we want to start painting next, there's a couple of things I could do. Since I want these to dry, I might start painting the sky, which is going to be a dark colors because I want this to be night time. So this might take me a bit because I'm going to do negative space, which was one of the first activities we did. So again, I'm trying to integrate everything that we learned into this one illustration. So I'm just going to start doing that right now. Let me get this thin brush. I think this is a size, I think it's a one and I have my paints here. I'm going to try to go maybe black or indigo for my background. So here we go. I'm going to do a mix of black and indigo. It's actually Payne's gray, but it's like a dark indigo. Again, if you took my beginner's class, you see that I always like to mix around my different types of paint. Sometimes just my [inaudible] might be way too bright and then I mix it in with some pen set so you always want to create your own mix of colors. Right here I have my background mix, which is going to be black and some blue here, but I just want it to be ultimately pretty dark. What I'm going to do now is I drew my lettering right here. It's a really simple phrase that says "Dream big," and I'm going to paint around it. Basically it's going to be everywhere except for where my drawing is. You don't have to do lettering necessarily, remember this is a free drawing, I just want you to integrate everything that we've learned in this class. I'm going to start painting around my letters. This is a technique I use so much and I've gotten a few questions online. How did you get your lettering to be white? Or what do you do? What I did is this, it's just basically negative space painting around my lettering. Remember this doesn't have to be lettering necessarily, it can be any object that you want to leave in white. I'm going to be pretty careful here. This may look like hard work, but I feel like, how I was saying that you don't really need masking fluid all the time. What I mean by this is that it would probably be is much work to place masking fluid on this lettering that it would just be to surround it, and I'm going to get way better effects by just doing negative space. The reason that I masked these yellow stars is because they're yellow and I want to have them be uncovered once I do all the splatter, which is going to be white. If I have white lettering and I do white splatter, it won't matter because it's white anyways. I hope I explain myself, but you'll see how it develops along the way. Now, this may look like it's hard, but if you practice your pose and position exercises, this should be pretty easy for you. Again, notice how I'm not doing just an outline of my negative space, but I'm working in sections. Remember that's super important, it'll look weird, if you trace your outline first and then try to paint around that. Also, notice how I move my paper around, that's perfectly fine too. You need to just feel where your hand feels it can get the best support without ruining the rest of your painting. Here I'm basically painting the spaces in between the letters and around. All I'm doing here for this background is just I have a blue and black paint, I'm just grabbing a bit of each each time. Then here what I'm going to do is paint around my planet. Remember how I said it's good to work with two brushes. Now, I have a larger space to fill here, so I'm going to start using my number 10 brush just to fill in these larger spaces. Here we go. I'm taking this to the edge here. I was going to say, I had a student once that used masking fluid all around the paper and he created a really nice white border, that's a cool idea too. I really like to see what you come up with and what you see you fine for the masking fluid. Now I'm just keeping up with this. I'm painting by sections here. I don't want to paint over the stars here because I want to make sure it's completely dry. It's almost dry but not quite there yet. I'm just going to keep doing my negative space here, which I knew would take a bit longer and that would give me enough time for for the masking fluid to dry. Again, when you paint with watercolors, it's about really being strategic about where you're going to paint next, because if you don't, you're just going to be waiting for everything to dry all the time. You have to move around your paper and decide what's your next move. I'll do something a little bit more difficult here. I'm just going to grab a thinner brush to go around my cursive lettering. This is also really nice practice to start using different-sized brushes when you're doing a complete illustration like this. You guys, that took my beginner's class you did this activity many times. You did it with little straight bar than you did it with circles, and now you can do it with an actual object, in this case it's lettering. But this is exactly what negative space is about. Just being so precise and just trying your best to get really close to the nearest object. I finished painting around my lettering. I going to wait for a bit to paint the inside of my letters because I wouldn't have enough control, so that I can just place my hand down and be able to paint in here. I just want this to dry for a bit before I do that part. But now what I'm going to do is just paint the rest of my sky. This is going to be super easy now because I can just paint over everything without having to be careful about the negative space aspect. I'm just going to grab some more paint here and just start painting. See now this is totally dry and now I can just paint over these stars. Notice how I'm moving my paper around, this is super important. I actually want to do a little bit of stars while this's still wet. I want to start just a little bit of texture in here. A little bit of salt. Then I will do a little bit more salt here, flip this around again. I just finished painting my sky. I've already used a bunch of techniques here. The first one was masking fluid, which were the little stars that are around here. The second one was I painted this moon and in the moon I added a little bit of, I think it was alcohol just to create a little bit more texture. I've also used negative space, which is in my lettering here. I added a little bit of salt to my sky to give it a cool texture once it dries. We're just going to wait for my sky to dry a bit. You can see it's super wet. I used a lot of pain because I wanted it to be intense. But while this dries, I can start painting this bottom cloud right here, which won't ever touch this part here. Remember we're trying to think of how to not waste too much time just sitting around and waiting for stuff to dry. I'm going to start painting this first cloud here. Since it's a nighttime concept, I want to do more of like violet and maybe just a little bit of pink and blues. So just not too warm tones, more cool tones. So could do a little bit of purple, maybe a little bit of pink. Remember we just did the cloud activity, so it can be like pretty bright and it won't look like that in the end. We can go with super bright colors to begin with and then it'll be tone down by the time we're finished. But remember this is just a gradient just like we did in the beginner's class. There's really not that much to it except to be, it's got to change from one color to the next. I just painted this first cloud here. My paper is like pretty wet and saturated right now. I'm just going to take a little break for about 10 minutes and wait for the edges and this cloud to dry and then I can continue painting these two guys. I'm going to wait for a bit and I'll be back with you in a few moments. This area here has almost dried and this area is completely dried. I'm just going to start painting this second cloud and then I'll finish up with the background for this cloud. Again, just a nice little gradient here. Remember I'm using cooler tones. This magenta is going to be the warmest tone that I use here and the rest is just going to be really light, purples and blues. I'm just going to keep painting this. Once I'm done with this one, I'll go to this one. This is basically dry by now. What I'm going to start to do is paint my clouds. This is exactly same as the last activity we did. By now, you should have some practice doing this. Remember I have my concentrated paint here and a little more diluted paint here in the center of my palette. Let me just close this up. I'm just going to start doing my first layer of clouds. I'm just going to do my first layer. Remember your first layer is a little bit more diluted. We're just going to keep doing this for a bit. I'm going to continue to paint these clouds. You guys can watch. You already know how to do it. I explained how to do this in the last video. Whether you're doing clouds or you've decided to choose some other subject, remember you can do something like either under the sea or there's just different stuff you can do and use your imagination. I really like to see everyone's different projects. I'm going to keep doing this for a bit. Once I'm done, we can start doing some of the sky stuff. I'm finishing up with my clouds. You can see that I did a bunch of layers. Same as the last exercise, it was just basically layering a bunch of white paint here. It's hard to tell when you're satisfied, but I think I'm pretty done here. What I'm going to do now is just wait for my white paint to dry. Once my white paint dries, I can lift up these stars that were underneath my cloud texture. Again, the reason why I had to mask these stars here is because it was going to be impossible to paint around little stars with this texture. This is where masking fluid is really awesome. Now what we're going to do is flip this paper around because I just want this to dry. In the meantime, I have a little bit of salt here that I use for the texture. I'm going to start removing that so we can start getting a nice, clean, smooth paper. I'm just using my hands here for that. You can see the salt. Sometimes it doesn't give you as much effect as you like. This time I just did a little bit of stars, but in my past class there's a bunch of examples of salt that I've used for textures. But this is good enough. All we wanted was just a little bit of texture here. What I'm going to do now is while I still have my star is masked, I'm going to start to do some splatter. So this can be like a Starry Night. What I'm going to do right now though is, I have a little bit of pencil markings here where my lettering was. I'm just erasing that now and I'm going to get a super crisp white lettering here. So you can see how white and crisp and just really fine lines I get with using negative space here. I could not have achieved this with masking fluid because you just can't get super thin fine lines with masking fluid. It would always be a little bit of a rough edge. What I'm going to do now is I didn't mask this moon because I have this bottle here or which one was it? I think it's this one that's like the exact size so that I can just cover this up here. There we go. Think it's this one here. What I'm going to do now is with my flat brush here, I'm just going to do a little bit of splatter. Some splatter. Doing basically what we did in the final beginners class. This is just a little bit of starry night. Remember, this is also sort medium, different techniques. There we go. This looks really cool now. We immediately have a really nice starry night. There we go. What I'm going to do now with my really thin brush, I'm going to find my super tiny zero brush and just do some separate stars here just to do some extra details. I might do some realistic stars. I'll do little transparent circles here. Remember, it's all in the details, all these. Final details are really going to have your illustration come together. A little bit more of my concentrated paint here. I might want to do may be some tiny stars like that. This is just my specific interests. But you can do anything you want to do as long as you try to mix together all of these techniques. Use at least a little bit of each. Right now I'm just doing some separate stars one-by-one. I want to do like what we did in the last clouds. I like to do this little cloudburst effect here where we have. Let's have some like shiny little details. I'll lift the painting. I just finished all the little white details with my white ink, and it's finally time to start lifting up my masking fluid. I'm just going to start doing it right here. You can see I have some cool, yellow stars underneath my paint. This looks super cool right now. I want to use a little bit of this here. Remember if you use paint underneath masking fluid, it will most likely lift up some of the paint. If you want to have like a pastel tone, do little bit more intense like what I did. These are little pastel yellow stars now. That looks pretty cool. I'm going to see if we're ready to lift these guys up. I'm trying to see if I'm missing any masking fluid stars here, and I think not. Hopefully this is dry and it's ready. See how cool that looks. There's like a star inside the cloud and it has texture all around it. We couldn't have achieved this any other way. This is when we really love masking fluid. Let's see if this guy is ready. This is like a really girly design, but what I really want you to do is just know how to use all these techniques. I'm just trying to see if I'm missing, I know I have some dots here which are probably covered by my acrylic. But let me just look through here. I might be missing something. I'm doing it here and here again. I think we've got it. I might discover another masking fluid, a little dot somewhere. But these are ones we have now, so our illustration is finished. We used a bunch of different techniques to achieve this. This is basically the way that I illustrate these paintings that when you look at it you're like, "How did that happen? How did you get this to be yellow and there to be texture behind?" These are basically all the techniques I use together to make illustrations like this happen. Going through it again, what we did first was, I did the moon, I used a little bit of I think it was alcohol, I'm not sure if it was alcohol, [inaudible] I remember now. But anyways, we did that here and then "dream big" we wrote some lettering and then I just did negative space around it. I also painted these little stars in pastel yellow and blocked them, then we started painting all of our backdrops. We did the clouds, we did our sky here. The very last thing we did was the white paint. That's usually going to be your last step. It's going to be white paint over your watercolor. We did that, waited for it to dry, and then we could finally lift up what we masked here. This painting is finished. I think what I'm going to do is maybe scan this and have this as a print in my shop. Please share whatever you guys are going to do with your illustrations. Obviously this is your masterpiece. This is going to be your final project in the project gallery. Please upload your results, so I can give you some feedback and the rest of the class can see. This is it for now.
 Ana Victoria Calderón, Artist