Transcripts
1. Introduction To The Jump: Okay guys, Welcome
back to open Mason for another course in
this video game series. And in this lesson we're
gonna be talking about, should I say this class, we will be talking about how to do an in-game animation jump. Now we're gonna be
doing a lot of light. Quick anticipation
is jumping up, holding certain dynamic poses. We have a great RIG we're
working with go COO, up, support these
independent artists. You know, you can go,
I'll put a link in the description of the project and you can download the rig or you can use
anything you like. Like I said, the
principles are the same. We can use any rate we want wherever you're
comfortable with. I just thought we'd do
something different and keep it very dynamic. In this particular case that we're going have a lot
of fun with this class. So without further
ado, let's dive in and let's start
animating this jump.
2. Blocking Part 1: The first pass is
going to be blocking, but not in the other way
that we did blocking. This is just gonna be, we're going to try
something differently. So we're gonna pose
every one frame. First pose second post vessel,
then we'll stretch it out. Then we'll start playing with the timing and the next stages. Okay, So let's dive in and let's start blocking
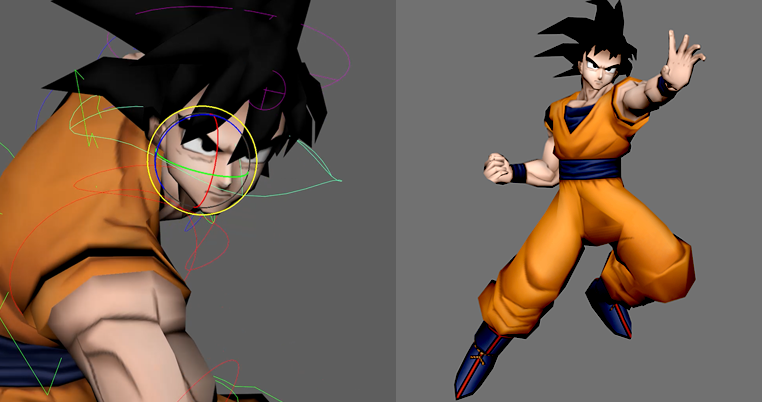
these posters up. All right guys, so this is the model we're
gonna be using. Go COO, classic. And I just looked
at some reference. So I was thinking, I've picked up some reference. And this is the two poses
that I think what I've done, I've just done the
first pose, idle pose. And then the apex, when it goes up in the air, will do it as this one. Because I think it'd
be a good contrast because we've got this going. We've got these hips that way
and this the opposing way. So it'd be a nice
little contrast. And then when he
lands in land in this way and they hop land
the opposite way to this, but they'll hop back
into this pose. Okay, so what we'll do first, we'll get the poses in. So there's different modes or
do I even do pose to pose. But what I'll do is I'm going to do it on every frame and then stretch it out and
play with the timing. But this is just, this
is just a posing. So as you can see the
posing and make sure all the fingers oppose
nicely, they're coming up. And I want it to follow
this nice line here. And also we want to get a nice line coming
through like this. And then this way, just like a little
dynamic pose, right? So here is kind of coming down. And that's what I was
trying to get with this. Officer conduct could go to
doubt on a break the back. I couldn't lean
forward a bit more, but that's the kind of
poems I was going for. All right, So always good
to have a reference. Reference is important. Okay, so we've got that all the pose down so you could
just play around. The rig is very simple. You can play around
with the rig. Might just push it
back there actually. That's all fine. Just make sure the
characters imbalance. You're trying to do. Good silhouette as well. They didn't want dynamic
there, isn't it? Nice the knee controls, you can just bring that
in a bit if you want to. Be just slightly forward. Okay? Okay. So first thing we'll do, just take your eye normally take my time with
deposing, get it right. Seems fine. Okay. So that's like a very dynamic key that
in the next frame, because the legs
are quite apart. So the next frame, actually, what we'll do, we need to anticipation, right? So it needs to come down. So we need to come down. Some slight rotation. It's slightly rotation. Upper area to paint around
with the controls there. Sorry about that.
Moved this kinda in. The energy is building up. So we're moving the
arms slightly in, even the shoulders, moving to bring the head down slightly. So there's a bit of that
anticipation right? Now what we wanna do is
select a revered tier, move this frame,
this out here a bit. I just want to see which frame own favorite discipline,
number four. So I just put a key
there, put that back. Oops, put that back to that
one and bring that back. So we've got that
kind of anticipation that all the textures
are messed up. So I'll just go to. I proceed in how precisely you can just come
in as his textured three. Let's check out texture three. Should be alright. Yes, combat. Okay, so we've got direct. Okay, so we've got
that pose there. Then the next period, because
the legs are far apart. We're going to bring this up. Is zero this out, all these out. Okay, So what we'll do, this one, make you do it so disliked comes up, leg is up. Zero these translations to
so we're working cleanly. You can kind of
do a little arch. The back. Bring this zero, the head is zero, the shoulders out. Even the arms. The shoulders back because
we want that we wanted to force it jumped right back. Yeah. Can lead dust finger
pose like that. It's cool. Going up. To select everything there. Rotate down. Next pose will be the apex. I'll just find that pose. We're gonna be doing this one. Let's check that out. So what we'll do, we'll take
the product is foot control. Then there's gonna be
a rotation, right? So we're going to do
like force rotational that this down out. This is like proper, proper bent waste coming out this rotation because it's really
trying to fire out from the neck to neck, straighten that up in the face. We want to bring it
down to the side. Like concentrating, shooting. And then the shoulder, we can bring in a
bit around here. Flexing this, bring it in and I'll bring this up a bit.
3. Blocking Part 2: And then up K. Make a bit more strongly. Bring that out a bit. And kind of like a powerful, powerful pose, but move
their hand in a bit. Now that seems a bit
straighter they got that day. But we want to do we want to bring it in? Happy with that? I'm going
to bring it in a bit closer. Yeah, that's better. Okay. Now first thing
I'll do is save key that. Then what I wanna do,
I want to hold that, so I'll just bring
this out a bit. So I'll be like, alright, what free, what should we do? Hold it from here.
And it comes up here. Number eight, key number eight. Move that, move that back. Terrible at 0. And then up. Then what we're gonna do is then it's going to come down, but this foot is
going to come down. Come down first. As you're coming down. Land this one first, forward. Zero dot out. This can be in the air a bit. Just about coming down. Delay. Then we can raise these. And the owns you can just raise him as he's coming. He could have been a heavy load that
to the heel lands. That sports are really bad. Get there. Then this
is on the floor. 00 that out. Let's pose right out. This house who's crouching this? You can copy it to number
seven, so we know, alright. Does with the foods can aligned, then maybe you could
just have it come up. Notice it gone, is
there a stretch here? There is a stress
that's put that to one. Let's go to stretch. And let's delete the key is before because we
key on everything. So we can do like a stretch, but we can break
the rules a bit. Why not? Because it's gonna be quick way. Let's see how this is. Lands. Landed. Band comes down. These in a bit. Two very key that band down takes it. We can show the disc in the
center of gravity working first is spine
compresses. Bit more. Phase comes down the arm slightly just taking the impact. Right, and then up, then it jumps up. Turns, turns, and these both feet in the air. We want them the
opposite way, right? So we've got both
feet in the air and then the torso
starting to move. And what we do, we
just copy last pose. Then we move that
out and have a look. Let's say around 13
or 14 h 13 year. Just through just got a blocking we can work with
comes down and then up. Even this up. Could even
be a little holiday. Number 13 moved out
the middle clip. And then we could even delay that middle
click Copy to ten. So it is a bit of a delay. But that's the
main the main kind of pose that we have.
Poses we have, yeah. So that's the blocking. So this is what we'll be working with. We want it, we want it to go up. Anticipation holds
and then down. And then that stretch
will be flush it all out. So it looks nice. We'll
add the breakdowns and this is a key
poses are putting in. The next video we will
start spreading it out and then adding keyframes, working with timing,
adding breakdown, starting working with the
timing to get it looking good. I know that secondary
stuff and obviously polishing the hair will do
that personally way later on. I guess this is the
posing out the way. And then we'll start breaking it down. I'll see you
in the next video.
4. Splining Part 1: Got the blocking and
now it's time to hone in on spline and start playing around with
the timing and try and get a nice feel of the jump. Also, the mechanics
of the character. Let's get that working
right without further ado, let's dive straight into that. Okay guys, let's start. We'll do, now that we
call the poses in. Now we'll do is we'll
stretch everything out. Let's move this to 60 frames. Alright, now, we're going to start
working with the timing. So it was stretched this
all out to save 40, right-clicking the snap
so that all the keys snap to the nearest. Okay. Now we want, we want to hold this
anticipation a bit more. So let's move this
forward a bit. Maybe that's a bit too long. Then go back. And we're just playing
around with the timing. Delete that key. We
don't really need that. Actually we will do. We do need that overdoing. Come in. Frame six key
there. Move that back. Yes, deliberate slowness. We're going to
have to cheat that because the feet are wide apart. Just going to have to
click in this propel up. And then as it comes up, this whole, I'm going to
hold it a bit longer. This one as well. Comes down a bit quicker there. Make the land in a
bit more impactful. Yeah, that's better. Compression there.
Compression. And then up won't be up for too long
because it's quite agile. Got little timing there. Just a little Instant Pot
jumping up. That looks cool. Okay. Trying to get
the feel of it. So what we'll do at the end here is if we just move
this forward of it, then I don't know, maybe 43
key there, bring that back. And what we'll do is
we'll get the feet. Just copy that to that frame. So it's planted. Then we can just put a little
cushion in here just to see up a bit. Yeah, it comes up
and then he learns. We look in the graph
editor groups. You can ignore. This basically is
the whole India. We could kind of bring this up a bit to have it
holding a bit more. There is a bit more movement. Yeah. So we've got the timing right. Contingent bit more. And what we'll do is to identify some breakdowns in-between. So we've got the timing
right. That's cool. I want to save that. Okay guys. So just go and carry on and polishing
this. What we'll do. Let's check out the head. Excuse me. Let's
go straight ahead. Straight ahead,
check out the head. Alright, so what I'll do, I'll keep this cool head pose. And what we'll do, we'll
just copy that 18 to 30. Just delete this. As is winding down, hidden looking down as
we're winding down, kind of still looking
up, winding down. Let me get here.
Straighten it a bit. I think this has to do with
the neck. Check out the neck. Alright, so delete
the net mutations. You see that sudden jerk. Try and copy that frame 12
to just copy that to ten. Because we want to
not be a sudden. Delete that frame is here. So here's a few things
happening here. This is rotating. Bottom one. Check that out. We can go to
11 and move that to nine. Copy I know and see how that, if that feels better, way better. Now we can go, whoops, just moved ahead bit more. So it's not as delete this. Let's delete this. Uranus have his head turned. Bear is coming into that pose. Just want to check the neck
because something's going on. Actually, I deleted that
chest key. Is holding. Yeah, it's better. If you just by
deleting some keys. You can make a difference. Sometimes you have to
delete some poses, some keys to make it work. Now it's just a matter of, okay, Let's just
bring it in a bit ludus and see if we
can hold that head. As it's coming down. We can start dragging it
and even if you want, you could stretch the neck. I know it's a bit stretchy and then you can come
down not that cushion. And still is coming
down cushion. Then we can delete all
these and we can be like, alright, it's coming down. Then it comes up town. Maybe we could have him looking
up here slightly louder. Copy that to the start. N for a magazine. To recall a little
bit of a cushion. Because land, and then there's a little
cushion in the head. Even here, we could just
slightly push it down. Just to cheer bit. Maybe offset it one more. See how that feels.
You know what? I think the rotation
down here is a bit too much. Now.
5. Splining Part 2: Come here, check the list, check the chest. Belt. Alright, it comes up, chest comes up, move down a bit and
then have that too. If we look here, we
could overshoot. Overshoot in these curves. We'll have them soften in. Shooting these curves slightly. Or if you don't like that, you could just middle click
here so it's softens. The dentist too abrupt. You see, if you come
in, bring that back. Good day. We come in and then it
goes down a little bit. So let's take the
translator here. The control's got
to translate on it. Don't be afraid to use
it. The only thing I'm thinking about
as the end cushion. So maybe for productive 50. Just to soften. Yeah. Even the head now, now that we've
softened it a bit, bring that down, maybe leave it, delay a bit more. So we're just
breaking things up. Okay? Now what we'll do,
we'll get the wrist. Same thing will come in
a chip the curves up. So let's go into side. Alright. Okay. Check out the curls
like this. All right. The curves for the hair. Find it. Then. If we look here, we can do is translate
this forward slightly. Trying to get this curve
so it's a bit more. Sometimes you get a cheap, you get a curve coming up this. So we've got a curve
coming from there. We could rotate this
inward slightly. Next pose. How we're getting
that nice curve here, feeling a bit better. So let's go back and
check at the end. So this arc is working
on the top and the side. Nice. Yeah, we could raise the shoulder a bit,
see if that would help. Raise the arms lightly.
That will help a lot. So if we raise the arm a bag, since that will help. Yeah. You got a nice
solid desk. Check it out. Now, what you can
do with this arc, we check out this animation. That arm flows back quite nice, and then it floats in my
local bit floaty there. But I think it
holds pretty nice. I think the wrist could, instead of going, what we could do is delete
this. And we can gum. Say here for E7, middle click that to 40 and just have it
gradually hold. You see? Now what you can do is like e.g. as it comes down here, you can do like a quick stretch
in the fingers like this, just to add that little bit
that wouldn't be there. You might not see it, but you will feel it doesn't
have to be older fingers. Just like even this tongue. To stretch it. We then break
it if you want. More, back. Okay. Now, let's see how that looks. Yeah, you don't really see it, but you can kind
of, you know what, You could even get it in here. Let's try to say if we
come here and say if we move this up and this
one and this one, pushing, pushing, pushing,
pushing opposes me, push them more than you want. Because you can always
push them back. Right. So you've got that stretch, they're kinda loosens up or we could even do it there. So even here, e.g. here, we could make this one even longer. Stretch. These funds
are certainly see, don't necessarily see it, but you can kinda
feel it, right? So we go here. Come here. You could even be more extreme
and just push this back. Break this finger, like proper. Break this. Notice how I'm just keeping that are going on here. That's what
you want to do. You just want to keep the
outgoing. The other ones. You don't have to do
as much as you could. You kind of feel it. You can kind of feel
it right there. Let's check this out.
If we come here. Cheers, pull this
one out a bit more. Let's see how that feels. Good. That doesn't feel as good. You see, sort of undo that. What we can do here is now
if we've got these fingers, the other thing we can do is.
6. Splining Part 3: You can grab all
these fingers here. And we can be like, alright, I'm going to rotate
all of them like this. So there's a bit of a wave is still kind of catching up. We'll just rotate them all. A little bit of a movement. So you feeling that we come here? We could be like, Okay, let's bring this out a bit out of it. Bring that out of it. We can do with his fingers,
start rotating them. The way the shape
of this armies. So it's following a nice line. So all of this is
for a nice line. We can just continue. This is tough. You'll just
feel not necessarily see it, but you would just feel if
we did something like that. And you see you can
just feel the hand. Then what you can do, you can start cleaning
up the poses a bit. It can come in here
and start rotating. The last one here, rotating. It's quite elegant. Then if you want to go further, you can start offsetting. So e.g. I. Could get
free of these controls. And then from here
I could be one, then kept these free
and be like 12, and then the last
three would be 123. Then what we can do is you
get it all into cycle, it ends will match. Then you will get this kind
of cushion there, right? So it looks a bit natural. Just looks slightly naturally. Then you've got the arc
which follows the hand, which is what you're
trying to get. Yeah, you're just trying
to. And then the same thing you can start doing. I'll just save this just
to kinda wanna lose this. But same thing again
with the other arm. The other arm is fine like
everything's working right? So we'll just quickly you, we could quickly just
basically do the same thing. Come here, get all
of these rotations. We can just follow
the flow like this. You can see we're just
following the flow. Again. The fingers, I just
like anemone communist stops, then the flow still continues. And it is continue. That same thing you can do. Let's see. We couldn't bring
this finger down a bit. Just nitpicking. The same thing we can
do with the thumb. So let's do that as well. So we'll get the thumb already. What we should've done.
Let's select all of these. Let's select the second one
because we've done the first. Select these, all
these second controls. Then let's just pick one of these and see where
the keys are. Their key there, cubic. So then we just de-select
this because we know those those ones are the key.
So let's check this out. Solicits also rotate.
Rotate these. You get there. Middle or kinescope today and middle
click that to one so the parameters are the same. That poses and the same. So we'll just middle click
the end one to start. Okay, so we've got those going. May as well do the thumb is all going to widen, do with it. So let's select the finger. One of the finger joints can
see the key, the key there. Let's kill these keys. Then we can go back here and be like just
enough movement. Now, all you're doing
now is offsetting. So you just basically one
selecting that 12123. Then if you want to go further, you can get the second
controllers here. Will come in the graph editor. She wrote a second controllers. And you can be right, and then move those 11 frame. Select all of these. And from, say, from here
you want to move them to. So if we look now, should be a bit more organic. Now that turned
might be too much. Or you can just undo that rotation. So if you think that's
too much, that's fine. Or you can just rotate
the hand a bit. That's if you want to make it really exaggerate
and move it. Most fingers. Jessica,
stylizing is different. But you don't have
to do it like that. But if you don't want
to just come in here, we know, we know
it's the y's, right? So we're just going to
Y or Control Y, Y, Y. And then we can
just come in here, press are going the middle of the gravity and
just tone it down. And it'll start toning it down. When you turn it down, you got to turn the
other fingers down. So we can see here. So we'll get the middle ones. And then we'll go to the wise. Why, why? And then we'll just
turn this down again. Tone it down a lot if you want
if you don't want to make it too obvious that
like you said, we pushed the it's good to
push because you don't know. You can you can tell him down. Yeah. You can tone it down. That's better. You see?
That's a bit more. It's not as way to the end one the hands at
the end is cool. So they both feel
like they haven't got as much bounce bounce up, right. So you've got that
happening. We save that. And then we'll move
on to the hair. In the next one, we'll just add that little bit of more secondary action just
to make it more believable. Then we call it a day. Then that's a jump
done in game jams.
7. Polishing Part 1: Well done guys, you've
made it this far. Now it's time to bring
the animation up a notch. We're going to start polishing and really have fun
with this animation. You've got it all solid, you've got the
mechanics working. So let's start diving in
and working on the fingers and let's start honing
in on the arcs. And then eventually the hair will start working on that and then polish it right at the end and have
a finished piece. Right guys, let's dive in. Alright guys, so now
what we're gonna do, let's just stop polishing
the best to here. And the feet. Just thinking about
the feet, they look a bit the Okay button, they could snap down a bit more. So if we look at an
animation, they feel alright. I just feel like we can add
a little bit more detail. One land, one line
before the other. Just, if we go back up
here to the edible curve, Let's check it out. My middle click copy that
key to the previous. This will make it
stretch a bit though. And just lifted. Maybe move this last
frame back a bit, a bit more of a snap trajectory. Here. We look at this
trajectory, lands up. I could move this a bit. So there's a curve like, so we can create that
nice curve there. This is where you'll
notice, Look, you're going frame-by-frame. You've got you've got
keys on each frame, but it's still moving
organically, right? So Kiki got a nice curve there. Maybe here, you might
want to locking out, bring it back and up. Creating that nice arc. Nother thing I'll do
is if I select this, go to stretch, put that to one. And then what you do when
you go to the graph editor, go to stretch and that
values will update. You want to delete
all the other value because we want it to
always be in stretch. Because then even this one, let's check out this stretch. This is always in stretch. Is that one stretches one
year? Yeah, that's cool. So that's what really stretch. So we're just polishing. Here. As you can see here, it looks a bit twinned. So what we'll do, we'll just
delete this quite edible. Select the other foot. Editable motion trail. And I might just go
back, back, back, back. We might just keep
this a bit low, low, just a bit low. And so just so that it's
a bit different there. Then the knee area, we can always bring
that in a bit. The pose is looking a
bit rude, nice in line. Just cleaning up the poses here. That's fine. The
knees are fine there. Slightly out. And then when you land,
you can add a little. Let's just delete this
because there are delays. So when it lands up. And then what we'll do actually know what do
you see that moving there. So we've got to the n
Fifi copy that today. And it will just us what
we want, what we want. This we want the Coase theorem. Toe, toe up. Yeah, see we can do
all this stuff later. Ball up, mad. Okay. Other thing we can
do is if we undo all this, select ball up. He'll boom, yeah, heel
ball would be better. Instead of moving to control. Come here. Just move the heel
up and then have that zero. It's better to use that
controller and the moon. Because when you use the
main one and you rotate, the foot goes
underneath, you see? So if we keep the main one for
translations and sideways, guess, you could use this for all these controls for the
other bits of the foot. I have a habit of
not doing that, but I guess it's good to
start doing it now, isn't it? So as that comes down, we know that the toe will
be delayed as well. So that comes down. Then if we keep this toe at, the toe comes down, we're just creating that extra detail. The details, what separates the animate is good
animate is to really, really good or great animated. Concentrate on the
details that feels good. When the foot land routes here, we could even turn this, reckon we could turn it just
a bit aligned at the moment. So we can go frame-by-frame
to see the arc assist, check out the arc of the foot. We want it to gradually
turns out isn't broken. When it lands there. We can have a quick knee. But Kosovo, I just
moved it down. Then I go back to the frame
before copy that to 40. Then it goes back up and
then comes back down. So there's a little
bit of impact there. And you know what X, we can even turn that down. So if we come up here. So yeah, we can just count down a bit
and then back up. See what that will look. There. We can just bring that backup
so it's not too abrupt. Then we can just kind
of stretch this. Let's see how much this
is on two friends. Yeah, it's a bit better. We can do the same
for the other one. So when this foot lands, Let's check out the let's
check out the foot first. So as the foot comes back, Let's check the
Orca in the front. Okay, that's fine. Then it lands lands like the show we can do. Again. Lands the heel up with too much and now
we put it down, delayed. And then here we have TO up. And that goes down
next to as delayed. So let's check out the two. That's fine. Ball
and toe. Control. Ball, toe. Alright, so let's see that
we want this to come here. Actually we have
that little food and move the toe back a bit. Move this back one. Okay, Let's check data. Something don't
feel right there. That's not good. Let's
delete everything in, but no, we don't want to
delete everything in there. We want to choose bowl
and toe. Delete that. All right, so the key there. And then maybe we'll, what we'll do, we could rotate that key, that same pose on day nine. Let's go back and
rotate that up. But we want it all the way.
8. Polishing Part 2: Choose that. We will go up. I see. So if we
delete that, yeah, there was a there was
a frame before that was making it better. We can do is first foot lands, then that foot land. Now we can add the toe. So land co-op. And in that land. Okay. Now, that
should be a bit more. Yeah. What I'll do
here with the timing, I think we can move this back
a bit mostly it's quicker. Yeah. Yeah. I think we can copy this delay a bit. This foot copied. Yeah. That one is delayed and then from here we
can rotate heel up. I reckon. Didn't have this Tony. See this? I can move
this a bit quicker. We're just making it
a bit quicker here. And then obviously to make this closer
as well, make this have this come out a bit. Display. I don't like delete this. Right now. This is extending, so I don't like this bit. So we can lift this
up a bit. Yeah. And then it lands straightening. Undo that. Don't like that. Overdoing it the
seed, that's fine. The knee wasn't
messing around there. Yeah, that'll do. We're going like now what
we'll do, let's start adding. So let's check out the
controls on the hair. So what do we have? We have this control, and we have this control. And we have this control, right? So we can do is, if we select all of these, one way we can do it Is that, alright, let's delete
everything in-between. We just got the
start and end pose, and let's just go straight
ahead. Follow it. So we'll go down. Which means the
head will go down. To be honest way, we'll have
to do it one at a time. We will go if we go down, the head goes down it and then
we'll just make it go up. Even here. We don't want
to break it though, right? So in any land, naturally the hair is
going to come down rotate. We can have it come up, rotate sideways as well. Find the silhouette
in the forehead, and then back down. Even move it down slowly. And then backup. You've gotten
a little bit of movement. They're just starting to make the character feel a
little bit more believable. And we'll do the next
one. Same thing. So let's check it out. Comes down, rotate. Rotate the back down.
As you comes up. Rotate out. Don't forget to, you can translate to still the force is
pushing the hair up. As you learned. Naturally,
it's coming down, down, and then back up, rotate, back up, rotate
and then settle down. Backup. Right? You're getting that
bit of cushion and then we'll go to the last one. This is all I'm doing is a
layered approach, right? Hips first, then
working up the torso than older fingers and
stuff around at the end. Because you want to get the basic mechanics
working first. In the animation. Again, down, what's
going to happen? It's going to go down, right? Rotate down, down. Look through spiked up
there, doesn't it? Up. And I'll just rotate. Let's see, with the controllers, I was at the top of our curve. C is dependent on, has pretty cool. We can, Let's see that. We'll leave it like this. I
like that. They will do that. And then it lands. Naturally. It comes
down and then back up and then down. And then set. Okay, that's cool. So we've got a little
bit of a movement there. Now what we can do
now because we've selected everything and we
cycle the cycle, cycle, cycle. And then you want to,
like we said before, I just want to break this down. Just grab all of
these and go 12. And the top one,
do that by 41234. And that will break
up the animation. It just feels slightly
organic feeder. So it's just a bit. And then you can animate
it sideways if you want. Which adds a bit more realism. That's how you animate a walk and just polishing
it at the end. Then we can do a
little play blast. So let's check it out. Let's see a play blast. Yeah, that's fine. Works well, so that's how you
do an in-game jump. I'll just check out the eyes. I don't think these textures, I don't think BI is how big's? No, I don't think so. No, we can't add no face
bird. That's more or less. Yeah. That's how you animate
and jump, right guys. I'll see you in the next video.
9. Conclusion: Okay guys, so you have done in-game jump with dynamic
poses and timing. Now, the things to
take from this, again, with all the other animations
that we do, the hips, the center of gravity, makes sure that it's like the bouncing ball working right? You're getting
cushions making sure. All mechanically working
right with the legs, the weight shift, and
it just feels right. That's the main
thing when a guide, when the character steps, weight shift on that
leg, then settle. These are the things
we're looking for. So once you get all
the mechanics right, like an older, older lessons we were taught
in this series. When you get the mechanics
right and everything else, you can look forward
to animate in Africa. So, you know, the character
is jumping right in those feeling right,
landing really nicely. It feels good. Then you can go into
town and have fun with your fingers and start
adding the details. And it's very important too. Add that detail in the end because that will
bring your animation. If you pay attention
to the detail, excellence will follow
the hands or fingers, the hair, everything
upsetting them, even creating little twitches. All these things
will add in a knee locks in the land that we
do a little knee rock. All these things will help TO flaps coming down, would
you do right at the end? So it's nice to have
a solid foundation when you're animating blocking
like we did in this jump. Can all of that right? Then at the end, honing in, polishing, bringing
it up a notch, the animation which we did, obviously there wasn't
no, I control it, but we could add
some blinks here. And I hope you
enjoyed that lesson. And there will be
another series. Be a combat ladle, will do a take care. We'll do a reaction. So there's all these other
animation classes coming up, and I look forward to
sharing them with you. I'm really enjoying this
series is really fun, so I'll catch you in the
next class. Until then. Happy animating, have fun
animating and keep practicing, practice, practice,
keep going over the classes. Keep doing it. You will become better writers, just, there'll become
excellent at it. So I'm here in the
discussions below. So I'm always around. So leave your projects there. Let's see, Let's give
each other feedback. And that's full uplift
and improve together. Okay guys, I'll see
you next class.
10. Maya Animation Mastery: Hi, everyone. Congratulations. This
is just something after the conclusion
that I just wanted to put into all my courses. If you're really serious about leveling up
your animations, I have a brand new course
that you can enroll in. It's called Maya
Animation Master. This course, I've redone
it with four K Good Audio, came out in January 2024. And this course is
designed in a way how I would have liked to be taught animation when I started. So It basically gets rid of all the pain pain
pressure points that I had when I
started animation. So I want to get rid of those
frustrations and give you a direct line to what that aha moment was for me when my mentor Steve Gagnon Kati taught
me about animation. Something just clicked, and
I teach that in the course. So if you're interested
in enrolling, you can go to the about
me page where I'll have a link there called
My Animation Mastery, and you can go
through the webinar. Then the course breakdown.
You can check that out. And then if you decide, you can enroll, if
not, that's fine. There's a private
Facebook group. There's a link in there
about me for that as well. You can join that
where we get feedback, and there's a nice
community there. And also, when you enroll, there's a private
Myers Mya animation Mastery inner circle
group where it's just exclusive for students
where we give feedback. So, have a look at that webinar and let me know your
thoughts as well. If not, you can join the Facebook group to
the private group. Obviously, the inner Coco group is for people who have enrolled, students who have enrolled,
but check it out, and it's just for
leveling up, and really, it's got all the
theory and practical, heavy on the practical
stuff, video game stuff. If you want to learn
about how to get a shot from reference to
blocking to splinding, to polished, show real level. It goes
through all of that. And also, I talk a lot about networking and
how to get jobs and context that I have within the industry that I can
ph your work out there so at least it's in the right
hands and people can see and at least consider
you for applications. F of my students who
have already got jobs in the industry going
through the course, so have a look at it. And yeah, let me
know your thoughts. So enjoy your animation journey, stay healthy, and
I'll see you around. I'll be around on the
Internet on YouTube and a giving tutorials as
usual. I'll see you later.
 Opi Chaggar, Senior Animator + YouTuber