Transcripts
1. Introduction: Project management dealing with hard drives, dealing
with footage, you're going to do
it at every level no matter what type
of editor you are. Having a sense of
knowing where everything is can often boost
your creativity and spark an
inspiration that you will organically find when
working through footage. My name is Ryan Kao. I'm a freelance video editor and cinematographer based
here in Los Angeles. You may have seen some
of my work on YouTube, but I have a channel talking
a lot about filmmaking and my journey in being a
freelancer in this industry. I do a lot of branded
commercial work for companies like Nike,
Jordan, Adidas, and have more recently been stepping into the
narrative space, doing some full length
documentaries and short films. In today's class, I want
to cover topics like folder organization
and the importance of having a cohesive structure. Project templates
and presets that can help speed up your
editing workflow and give you guys a better
understanding of hard drives and
the importance of data management for a long
term and reliable workflow. To take you through this class, I want to dive into some
of my folder structure. We'll also be diving into my video editing program to show a little bit of
how we set up and organize footage in
a real scenario. What I hope that you're able to walk away with after completing this class is more confidence in your digital workflow
with video editing. So no matter what's
thrown at you, even a project from a client with 10
terabytes of footage, you can take it on without
having to be stressed. If you're somebody who just got started and you're
trying to figure out the ropes or if you're somebody who's been doing
this for 15 years, but maybe you're a
little disorganized when it comes to sorting
and managing of your data. This class is for you. Couldn't be more excited to share this information
with you guys. I sure wish I had it when I
first started video editing. Let's jump in.
2. Getting Started: Okay, here we are. Welcome
to what is definitely a much cleaner and more visually appealing version of what my editing bay would
kind of look like. We've got all of our
hard drives here. We're going to go
through some of our project organization
techniques. Here we go. When I first began my
video-editing journey, my workflow looked kind
of something like this. I would get a project or go
out and shoot some footage, and then dump all of that media into a random folder
somewhere on my hard drive. From there, I would take
all of that content, bring it in to my editor,
drop it in the bins, and more often than not, I probably wouldn't
have much of a plan or an understanding for what was going to happen
with that footage. I'd basically just begin opening it up in
the source viewer, setting those in and out
points of what looked good, and dragging those
onto the timeline. After a while, kind
of just end up with this big disorganized
mess of random clips, and sometimes from there, maybe I'd have an
idea of what to do, sometimes maybe I wouldn't. It just became a game of LEGOs. Either you have to go back
and find another clip, you go into your bins, you set another
in and out point, drag more clips in,
rinse and repeat. Not only is this a
painfully slow way to edit, but it can also hold you back from being a
more creative editor with essentially just a lack of visibility at all of the
media within your project. Keeping all of your
video-editing projects, not only organized
but accessible and in a non-destructive workflow
is something that can help you to not only reduce the amount of stress
you get from editing, but make you more creative. Back in 2019, there was an editing project that
came across my plate, that was with probably one of the most substantial
names that I would have worked
with at that time. I was co-editing a
documentary piece for IKEA in partnership
with the World Surf League. Super ambitious project, super exciting to be involved
in something like this. I received a hard drive with over eight terabytes of media. I had to pick up the pieces from a past editor that
had worked on the project. I didn't really understand a
thorough editing workflow, I didn't really understand project organization
and media management, so trying to jump into that project and
catch my bearings, even get started
editing, my timeline, which should have been
maybe a day or two to get my feet moving and really start working on what
the clients needed, I took almost a
week to figure out how to even begin
tackling those edits. I almost lost this project. I had to work my way through some pretty unfortunate
excuses with a client, which is absolutely something you never want to
have to deal with. In this class, what I hope
to leave you guys with is a better understanding
of project organization, how to go about organizing your projects in a
way that can speed up your workflow and ultimately make you a more
versatile editor. In order for you guys
to follow along here, no need to worry about digging up all of your hard drives. What I want to do is walk
you guys through some of my folder organization
structures that I use to set up every
project from scratch. I even want to take you guys through setting up some
project templates, some presets for your editor. Now that we understand
some of the importance behind project organization
and project management, let's jump in to
talking over some of my folder organization
and structure, and even setting up some editing templates
within your editor.
3. Working With Project Templates: Project templates are like the backbone to a good
workflow as a video editor. They're so important for
the reason that it allows you to create a routine with how you approach
each project. The more you can
automate these kind of boring and somewhat
repetitive steps and have a system that you can
rely on and be able to understand at a glance
for every project, the more you're
going to be able to focus on the important part, which is being a
creative editor. Setting up these
project templates happens at a couple
of different levels. I think the most
important one to start with is at the root, the footage and how it
lives on your hard drive, and how you organize
and label all of the media that you're
going to bring in to start a new project. Look, I'm fully aware that
everybody's going to have slightly different terms or visual things that will help
keep their brain organized. But I want to share
with you guys my project folder structure that I use for every project and how I organize all of
my hard drives. On the root of my hard drive, whenever I start a new project, I've created a folder
structure template and I use this to basically, as soon as I get a new
project on my plate, I can then duplicate
this folder, rename it with the date of the project as well as
the title of the project. Once we dive into the folder, I think you'll
understand a little bit more how this all works. You'll notice that
at the prefix of all of these folders that we have set up, I've put numbers. I do this because, by default, a lot of the times
the finder window or the File Explorer that you're using on
your computer will sort folders, usually
alphabetically. Adding in numbers to
the prefix can help you to place them in an order that
makes sense to your brain, so you can immediately look at them at a glance
without having to read through in the random
alphabetical sorting order. I start with timelines
here at the top, and within this folder is where we would place our
project files, our timeline files,
maybe even XMLs. If you have a specific
project template that you want to use for
specific projects, for instance, the parent folder that
I'm within here is for my YouTube projects
that I work on regularly, I might place my YouTube editing
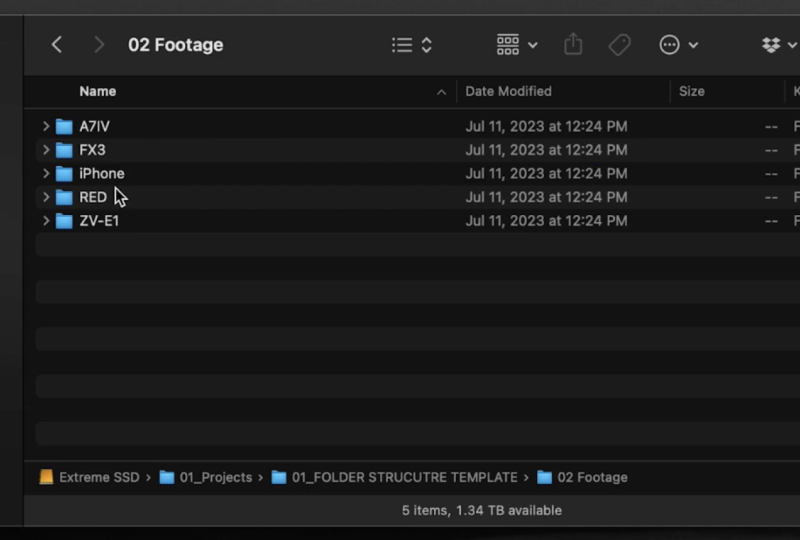
timeline preset in here. From there, we have footage. I regularly work
with footage from different cameras and so I've created some preset folders, one for Sony A7IV, FX3, iPhone. If you are working
on projects that you regularly have footage from a variety of different cameras, you can get as in-depth
as you want here to keep those folders
contained and organized. So at a glance, you
can know if I need to go back into that
project from 2022, I can go into that
footage folder, go into the iPhone clips and find the media
that you need. From there, we have
a folder for music, one for sound effects,
one for assets, things like graphics or logos that might
come from a client, and finally, one for the exports or the renders that you'll have
out of a project. Using a system like this creates not only a better sense of organization in the moment when you're working
on a project. But like I mentioned, if you ever have to go back
and dig through the archives of
finding a clip that you used in a project
three years ago, it all would stay in a
similar order and fashion, making it just that much
easier for you to find clips, but also for you
to explain it to another editor
that might work on a project where to
find that media. I fully recognize that
everybody's going to have different terminology or orders in which things might make
sense to their brain. But if you guys want, I'll actually have my folder
structure available for you guys to download and use for setting up
your own projects. I get it, to some of you, it may seem a little bit
overkill to be this organized and
individual with how you just store the footage
on your hard drive. But the real major benefit
here is that we can translate this basically exact folder
structure into our editor, and it's going to make
it so much simpler for us to organize and
find that media within a project rather than having to dig through all of
those bins and try and figure out where
that random clip was that you
downloaded a year ago. We're here inside
of DaVinci Resolve. This is what I
primarily used to edit. But I want to talk about here today in setting up
these project templates, it's universal with
whatever you're using if you're a premiere
user or your final cut. I've opened a blank project, and the first thing
I want to do to get started in setting
up this template for us for future projects, is beginning to
organize our bins. I talked a bit about how our folder structure
is important and how it can mirror
inside of our editor. What we can do is literally
just go and duplicate all of the naming in the order that we had
within that folder. Our first folder we
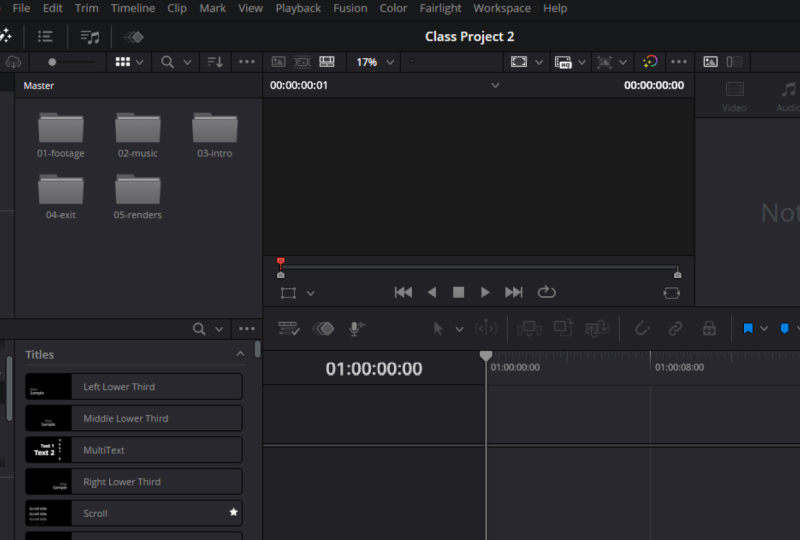
would do 01_ Timelines. Second folder we
could do 02_Footage. Third, music, sound effects, assets, and finally our exports. Great, now it just seems like
we have an exact copy of the bins inside of our editor versus what
we have in our folders. But the benefit to this is
so powerful because it's going to make it so easy
for you to, at a glance, immediately go, be able
to track down a piece of content you need
for your project without having to overthink it. The next thing to consider
here when you're setting up these project templates is
to set up some timelines. If you're regularly
working on projects where you're dealing with
vertical resolutions, maybe you're delivering for social media content,
some mobile videos. Then set up some timelines specifically in that
vertical aspect ratio. We can go here and
let's do 1080*1920, or 9*16 if we're doing
Instagram reels, TikToks, that sort of a thing. Set up your frame rate, make sure that your color
settings are all correct. Just make sure that
you set this up in a way that is
consistent that you want to be utilizing for all of your projects for this
particular type of edit. From here, you
could also bring in any assets that you're going to be using on a regular basis. Maybe you have a client
that uses a similar set of songs for their product
videos that you're editing. You can bring those songs
in now to save yourself the step of having
to do it later when you set up this project again, logos, assets, sound effects. If you're using things
on a regular basis, you can bring them in here. Again, we're just saving
this as a template, a starting place that you'll duplicate at the start
of each new edit. You can get as in-depth and creative as you want
with these templates. If you're somebody
who's working on a ton of different
types of video formats, you're delivering widescreen
stuff for YouTube, You're working on commercials. You're also working on that
vertical short form content. Save yourself some time and set up templates for
each of those and bring in all of those
assets that you're going to be using
on a regular basis. This is going to help you
to automate so many of those just small routine
procedural steps, that again, will allow us to focus more
on the creativity behind the editing and
less of those just like mundane routine steps. Now that we understand how to set up these project templates, let's dive into how to
start using them and how to begin organizing your
footage from a high level.
4. Sorting Your Footage: Now that we've gone
through a little bit about our project organization in the folders themselves and
also inside of your editor, let's jump in to, in my mind, one of the most important
procedures as an editor, and it's sorting and organizing your footage
within that project. Sorting and organizing
your footage is something that's probably going
to be a little bit different for every
editor out there. But I want to quickly
go back and talk a bit about that first
workflow that I had, and I personally know a lot
of entry level editors doing, and it's going into your bins, just clicking into
the source viewer, setting those in and out points, dragging those clips
onto a timeline. What's a huge drawback to
this approach is that, in a way, each time you set an in and out
point on a clip, let's say you drop in one
version and then you have to go back and pull another
selection of that clip, you're overriding
that selection. You don't have a tracked
reference of this was the in and out point I
used at this portion versus this was the
in and out point that I used for
this next portion. This is what we would refer
to as a destructive workflow. You can't go back and track your original edits that you might have made earlier
in your project. In a past class, we talked about a few technical definitions
that editors should know, one of which being selects and
another being string outs. These are an incredibly
commonly used practice in a professional
editing workflow, and so I want to take you guys through a bit about my process and how I set up those
selects timelines and build string outs. Let's go ahead and
start by diving in here and bringing some footage
into our project. I'm going to go ahead and
pull up a past project that I shot for a client
earlier this year. Within my footage folder, you can see I've
labeled camera A, camera B, and drone. We'll highlight all of
these and drag them in to our footage bin inside
of DaVinci Resolve, and we have them nicely
organized still in A, B, and C. Great. Now we're here.
Our footage is in our editor and we can
begin footage sorting. This is a process that
is referred to as calling or pulling
selects of footage. We talked a little bit about
just how inefficient it can be to double
click onto the clip, set some in and out points
of the usable portion, and then dragging that
into your timeline. What we should instead
do is highlight all of our footage and bring it all into a single timeline. We'll get everything from
camera A onto this timeline. From here, instead of doing
those in and out points, we can still set those
in and out points, but we'll do that by cutting the clip at the section
that we want to utilize. Let's maybe go here. This is a nice whip
transition into the frame. Stop it just before the
motion starts again. From here, all we do is just drag that clip up to
our second video track. Once we do this for
a complete project, what you'll end up with is
a timeline where all of the master original
footage is living on video layer 1
and your selects, your cut portions of each
clip that are usable shots, are all going to be
on video layer 2. Then it's easy enough to
just simply go in copy everything on video layer 2 to a new timeline
and there you go. You have a selects timeline
of all of your footage. To save you some time
of watching me go through and cut up selects for an entire days
worth of footage, we're jumping into an active
project that I have here. What we're looking
at is a timeline for a trailer of a documentary
I've been working on, an athlete taking on a world
first attempt at completing seven triathlons in
seven continents in seven consecutive days. Yeah, sounds a little
crazy on the surface, and you could probably
imagine the footage to go along with that project,
pretty substantial. We're talking
multiple terabytes, multiple cameras rolling, pretty much the entire
seven days, well, maybe nine or 10 days if we're counting on the
front and back end. But arriving to this place, this trailer that has so many different clips
and video layers going on, how do we start that process? How do we sort and organize
all of that footage? If we go up into
our timelines bin, we can see we have
master timelines and selects timelines, and let's pop into master day 1. What we're going to be looking
at here is essentially all of the footage laid
in to this big timeline. As you can see, we
have everything living on video layer 1 and 2. These are the selects that I pulled from the
original raw footage. I've also color coded the clips based on what
camera they came from. I think we had four camera
sources these days. At the end of going through
all of this footage, watching through, playing back and selecting the best clips, dragging them up
onto video layer 2, what we're left with
is a broad view that's very easy for us to go back
and track down certain clips. Maybe let's say we're
beginning to build out a timeline from
these selects. Let's look at the selects
timeline that we've created, which is basically just again
a duplicated timeline with only the selected video clips that we had on video layer 2. Now, as you can see, this is a much friendlier
looking timeline. Definitely a lot less intimidating and a
little easier for us to wrap our brain around
when beginning to build an edit with
all of this footage. The benefit to a workflow
like this is as we begin pulling these clips
into our active timeline, call it our V1 of the project or the edit that we're going to make
with this footage. If we found that one
clip didn't quite work, maybe it was a word that got cut off at the end
or there was maybe a certain camera movement
that didn't quite work in the flow and
style of your edit, it's super easy to go back to that original master timeline, find where you had made the cut in that
original video clip, and just really
quickly adjust and pull up a new select to
bring into your edit. This is, again, a
non-destructive workflow. It allows for a seamless way for you to go from even
the final stages of your edit and go back and
reference the things that you did in the very beginning
of the project preparation. This is a workflow that
is pretty standard in most professional
editing workflows and is something that if
you adopt now will make you a better editor
with more freedom to be able to
explore your footage without the stress
of not knowing where things are and how to
go and sort through and organize your footage if client calls for maybe a
different clip, but it also will help translate to working better
with other editors, because this is a process that, while some editors might have their minor differences and tweaks how they approach these, have universal principles that work across any
editing workflow.
5. Understanding Hard Drives, Backups, and Storage: So in this lesson, I think
we need to talk a little bit about an important
critical component of any digital workflow, especially if you're
a video editor, then you're probably
familiar with these things. Hard drives, you can't
really live without them. There are so many
different types nowadays, you have these traditional
spinning hard drives. I think a lot of us will
also be familiar with SSDs, as these are a very commonly
used tool nowadays, especially in a video
editing workflow. But overall, as editors, we should be fluent in understanding why hard
drives are important, what types you should be using, how to go about backing up and
managing all of that data, where to keep it, how
to use Cloud storage. These are all components of video editing that you
absolutely need to have a firm understanding
of in order to develop a successful relationship with freelancing in video editing. Hard drives, while
a universal term, definitely shouldn't be confused
with solid-state drives, which fundamentally they
are the same thing, a device that can store data. But there's some pretty critical differences
that as editors we should understand and that
will impact our workflow. A hard drive actually has a mechanical spinning
disc on the inside of it. That's the reason they're
a little bit bigger and bulkier than something
like a solid-state drive, which are usually small,
they're pocketable. This particular brand we'll see, it's got this orange
bumper around it. They're great and you could kind of say they're robust but because there are mechanical spinning parts inside
of this drive, the chance that this could
be damaged if it was dropped is pretty
high unfortunately. Also just simply due to the
fact that there are spinning, moving things on the
inside of this drive, the chance of this
device just failing over time is high as well. SSDs, they have no moving
parts inside of them. It's much more akin to something
like the memory that's inside of your phone or an
SD card for that matter. It's usually a lot
more reliable. It's pretty unlikely to
receive any damage if it was dropped and the huge
benefit to these devices, they're a lot faster. Hard drive speeds are an
incredibly important thing in a video editing workflow. As we work with different
types of footage, you're going to find
that some footage needs a much higher read and write speed on your device in
order to edit smoothly. Some people deal with
choppy editing workflows when they're working on a new project and sometimes
that can be related to your computer and its performance and
hardware inside of it. But more often than not, it's because you're
trying to work with footage off of too
slow of a hard drive. It essentially has
a bottleneck with the read speed that
it's able to feed into your editor and therefore that footage might
not be able to play back 100% smoothly as
you're working with it. Working off SSDs not only is
safer and more reliable in the long-term but will speed up your workflow without creating
any of those bottlenecks. Now that's not to
say though that these hard drives don't
still have their place. In particular, with a
lot of my projects, what I like to do when I'm
working with the client is ask that they deliver me
the footage on an SSD. This is usually
what I'll work with off of for the project itself. But I will also ask if possible, that they send a hard
drive like this that I can duplicate that footage
and have a backup of. Backups are the next
really important thing that we need to understand
a bit about as editors. Backups, I'm sure we're all pretty familiar
with the concept. I got to be honest here I can't be the only
one in saying that, like you kind of
have the mindset of, I don't need to back things up. It's never happened
to me before. I've never lost footage
off a hard drive. That was me until maybe
about five years ago. I had a huge hard drive, eight terabytes of some
of my personal data in a desktop editing
computer I was using for a good portion of the
early years in my career. Lo and behold, one day I
was moving around some of those hard drives inside
of the computer and fried that entire eight
terabyte hard drive. That ended up being
an $800 mistake and from that point on, the importance of backups have become paramount in my workflow. Even if you're working on a project of your own footage or you're working on a project
for clients at the minimum, having at least just one
copy of that footage as a backup to make sure that
if you by chance user error, accidentally delete some of the footage or something
happens out of your control, someplace burns down and
your hard drive was there, maybe it gets stolen you got to protect yourself in those cases. Sometimes a client will have backups of footage
already done and if they ship you a hard drive
or you download it off of a Cloud storage or
something along those lines, you won't really have
to worry about this. But it's always an
important thing to ask a client if they're
sending you a drive, hey, do you have a backup of this footage or do I need
to back it up for you? If so, can you send
me a hard drive? We have to face it though
hard drives can be expensive. If you're working on your
own personal projects you might not necessarily have the extra money
to be able to go buy a backup hard drive for
all of your content. Cloud storage is a
really great option. There's a variety of different
platforms out there. Of course, you know, we have
Google Drive and Dropbox. But there's also some even more affordable programs
that can simply back up your drives without the need for direct
Cloud access. One that I regularly use
for my work is Backblaze. They offer a really simple
subscription price with a pretty much unlimited
data storage. The caveat though, is that
you can't easily access that footage on your
device or wherever you go, in the same way that a platform
like Google Drive works. But if we're talking about a freelance video
editing workflow, having a routine of
backing up footage is just one way we can
establish a solid, bulletproof workflow
that will keep us organized and keep our clients
happy in the long run. Hopefully, that gives us a little bit more of an
understanding about the importance and kind
of the differences between hard drives in a
video editing workflow.
6. Final Thoughts: We've made it through our
project organization class and I hope that everyone
was able to learn a little bit more on
how to approach organization and the
importance of creating a strong workflow
and understanding of how to deal with
all of that media on your hard drives and maybe just understand
a little bit more why certain hard drives work better for certain
types of things. I'm excited to see some
of your project templates and folder structures in the project gallery if
you're up for sharing them. Again, if you would like to use my folder structure that
we talked through today, that will of course be
available for you to download. But thanks for joining
me on this class. I hope to see you
in the next one.
 Ryan Kao, Cinematographer, Video Editor