Urban Sketching for Beginners: Watercolour Sketch in 3 Steps | Julia Henze | Skillshare
Search

Playback Speed


1.0x


  • 0.5x
  • 0.75x
  • 1x (Normal)
  • 1.25x
  • 1.5x
  • 1.75x
  • 2x

Urban Sketching for Beginners: Watercolour Sketch in 3 Steps

teacher avatar Julia Henze, Artist | Teacher | Urban Sketching Lover

Watch this class and thousands more

Get unlimited access to every class
Taught by industry leaders & working professionals
Topics include illustration, design, photography, and more

Watch this class and thousands more

Get unlimited access to every class
Taught by industry leaders & working professionals
Topics include illustration, design, photography, and more

Lessons in This Class

    • 1.

      Introduction

      1:56

    • 2.

      Supplies

      1:36

    • 3.

      Urban sketching tips

      2:32

    • 4.

      STEP 1: Sketching with a pencil

      6:25

    • 5.

      STEP 2: Fineliner and brush pen inking

      4:16

    • 6.

      STEP 3: Watercolour and splattering

      10:02

    • 7.

      Final thoughts

      1:00

  • --
  • Beginner level
  • Intermediate level
  • Advanced level
  • All levels

Community Generated

The level is determined by a majority opinion of students who have reviewed this class. The teacher's recommendation is shown until at least 5 student responses are collected.

20,717

Students

511

Projects

About This Class

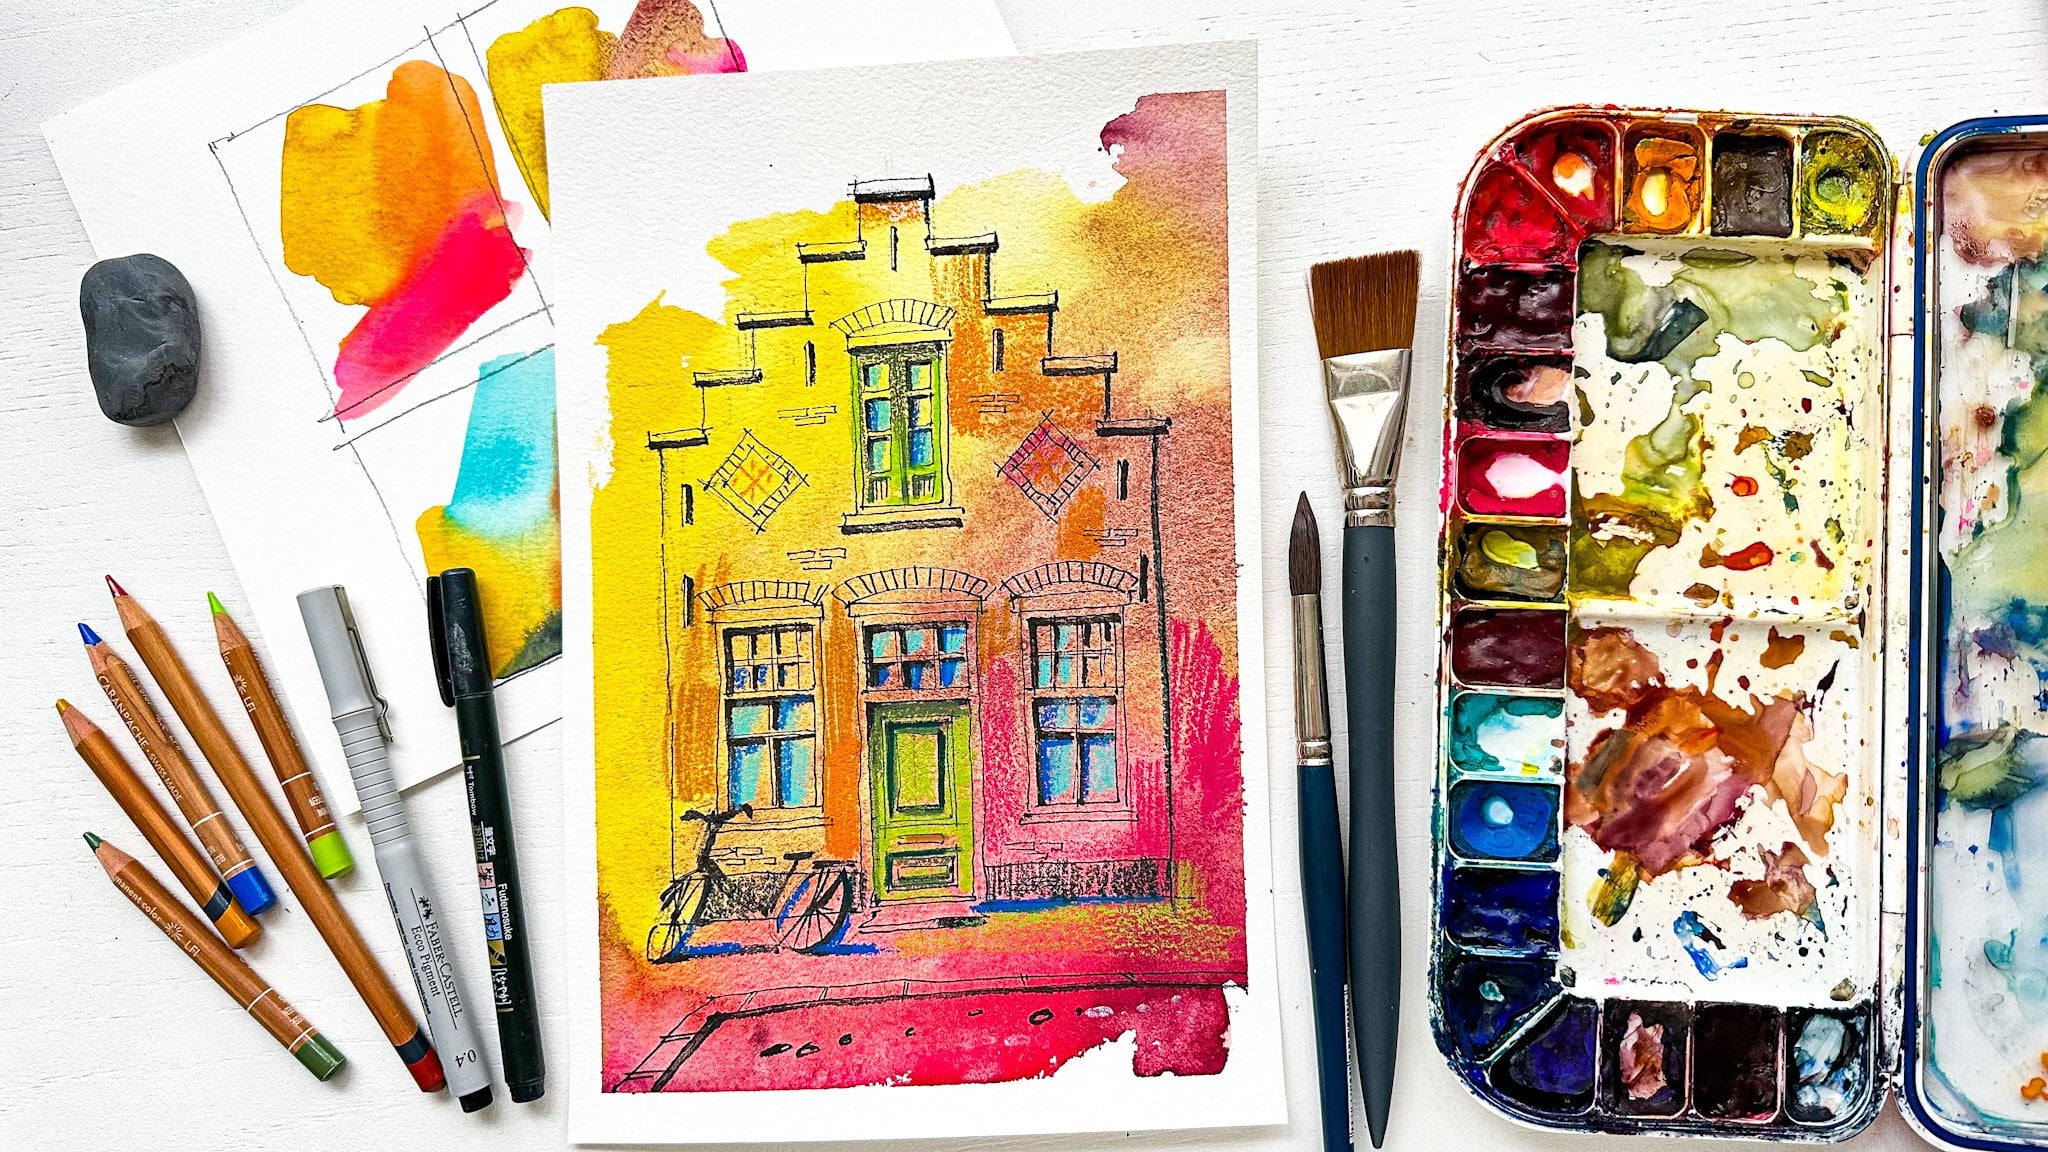
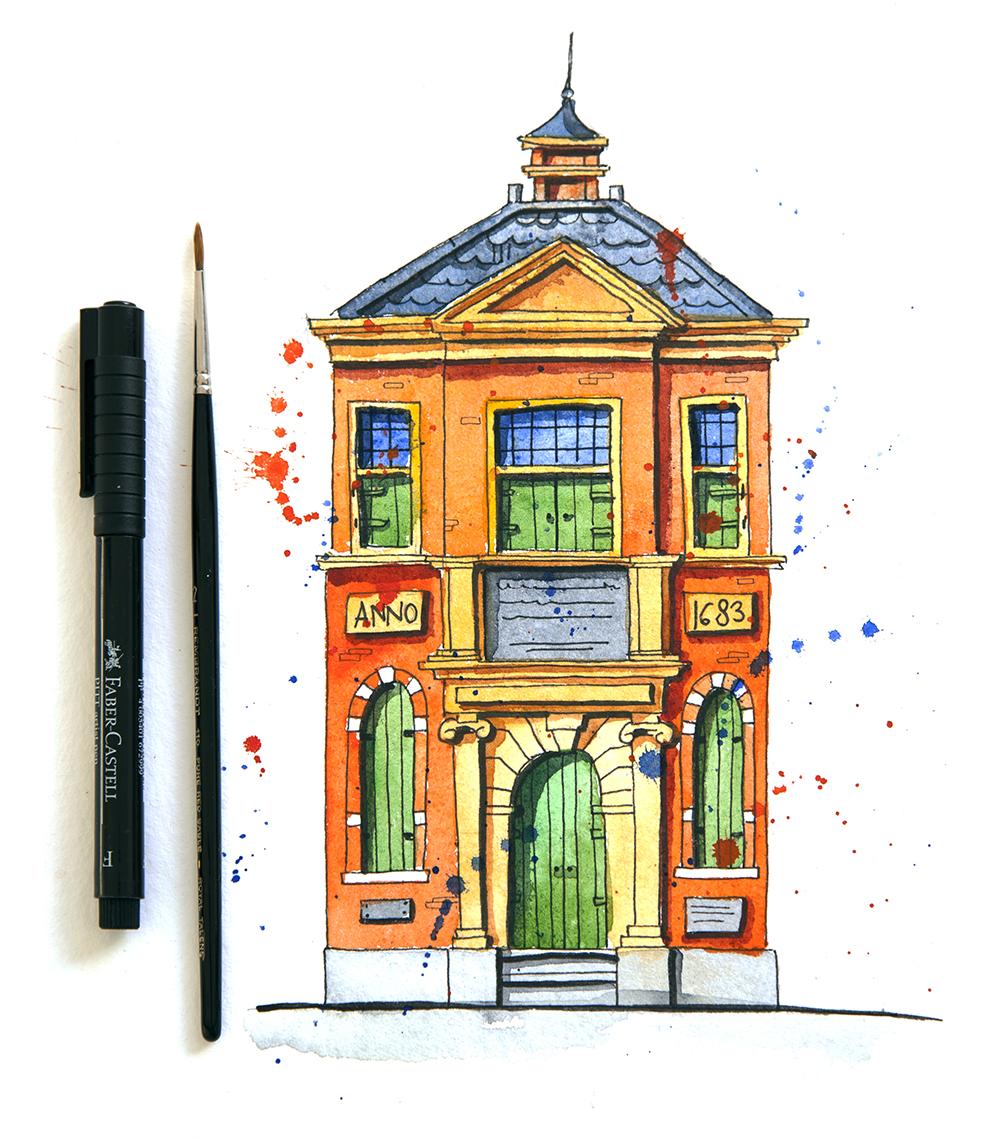
This class is for people who don’t know where to start with urban sketching, for people who are struggling with their first architecture sketches but also for all those who just would like to draw a nice Dutch house with me. I'll show you, step by step, how to make a beautiful watercolor sketch and I'll give you a lot of tips that will make your urban sketching process much easier and more fun.

For practice, we will make a sketch in three steps. You may use my references or your own photographs. This class is easy to follow for beginners. Even if you have little drawing experience or you are not confident about your skills, don't worry about the outcomes. Just allow yourself to play and experiment! 

♥ I hope to see your beautiful sketches in the Project Gallery! ♥

If you have any questions or need help with your sketches, please, don't hesitate to contact me on the Discussions Page, and, of course, I will also appreciate all your suggestions and feedback.

Enjoy the class!

----------------------------------------------

Additional Resources:

  • Check out my BLOG
  • Subscribe to my NEWSLETTER
  • Follow me on INSTAGRAM
  • Follow me on SKILLSHARE (by clicking the “follow” button above the video you will get notified of when my next class)

----------------------------------------------

For INSTAGRAM: tag me @julia_henze and use the hashtag #juliahenze_skillshare I'll be happy to share your artwork in my Stories!

A short video preview of the class: Speed Drawing

Meet Your Teacher

Teacher Profile Image

Julia Henze

Artist | Teacher | Urban Sketching Lover

Top Teacher

Hello, creatives! My name is Julia Henze. I'm a freelance illustrator and urban sketcher living and working in a village with a name that nobody can pronounce, Bergschenhoek, in The Netherlands.

I love to share my passion for drawing and urban sketching with you, and show you how to make the drawing process easier and more fun. All my Skillshare classes are very easy to follow and perfect for beginning artists. But also advanced students can find interesting tips and tricks.

Visit my Instagram for inspiration and drawing tutorials. Tag me (@julia_henze) when you post a sketch made with one of my classes and use a hashtag #JuliaHenze_Skillshare. I'll be very happy to see your artworks!

And find speed-drawing demonstration videos on my YouTube channe... See full profile

Level: Beginner

Class Ratings

Expectations Met?
    Exceeded!
  • 0%
  • Yes
  • 0%
  • Somewhat
  • 0%
  • Not really
  • 0%

Why Join Skillshare?

Take award-winning Skillshare Original Classes

Each class has short lessons, hands-on projects

Your membership supports Skillshare teachers

Learn From Anywhere

Take classes on the go with the Skillshare app. Stream or download to watch on the plane, the subway, or wherever you learn best.

Transcripts

1. Introduction: Hi, everyone. Welcome to my class. My name is Julia Henze. I'm your instructor in urban sketching based in the Netherlands. In this class, I'm going to show you how to make an urban sketch in three steps. I will give you a lot of tips that you can use to improve your sketching skills. What am I going to do today? First of all, I will give you a short overview of sketching supplies I'm going to use in this class. Then I will give you some tips that may help you to get some more confidence with urban sketching. Finally, we will draw together. I'll show you how to make a beautiful sketch of a house in three easy steps. If you don't have any reference, don't worry. I've put some of my photographs in the class project below. At the end of the class, I hope to see the sketches in the project gallery. Let's get started. 2. Supplies: To begin, we will take a look at the supplies you need. Of course, you need a watercolor paper. You can use watercolor sketchbook or watercolor block, a pencil, a fine-liner. I will use a fine-liner Faber Castel with a size F. It's about 0.4, I think. But actually, any fine-liner with waterproof ink is good. You can also use a fountain pen if you like to draw with it but ensure that it has waterproof ink as well. You also need watercolor brushes, one big and one small sized. If you have a black brush pen, it would be wonderful. It's not really necessary to have this tool, but I like to use it for my sketches. I'm going to show you how you can make your sketch a little bit stronger with the brush pen. Watercolor? I have a pen for appropriate watercolor from Rembrandt, water and paper towels. 3. Urban sketching tips: I'd like to give you a couple of urban sketching tips. First of all, try to draw as much as possible. It's all about practicing and not about the perfection. So the more you draw, the better you get. Draw outside if you have a chance. When the weather is nice, drawing outside is just much for fun. You can sketch alone sitting in your garden or when you're traveling. But you can also sketch in a location with other people. With friends or with a group of urban sketchers, you could paint anywhere around the world. These people are really spread, they're encouraging and we'll learn a lot from each other. Although frequently with urban sketchers group here in the Netherlands and it's really a great time. If you're a beginner, don't rush to start drawing in perspective unless you know how it works. If you don't, you can better start with [inaudible] surfaces and trying to understand how to work with them first. A great advantage of being a sketcher is that you can choose what you want to have in your picture and what not. One of the mistakes that almost every beginner makes is that they try to put [inaudible] everything that he sees wrong in this drawing. But if you draw only the important interesting objects, your sketch will be more stronger and you will be more satisfied with it. Show your sketches on social networks like Instagram and Facebook, and follow your favorite artists. I know, not everyone was comfortable with showing his work. Me neither. But I think it's really important to do it from time to time. Choose some of the best sketches you've made. For example, this week and show them. Don't hesitate to ask people for some feedback if needed. Lastly, learn from your mistakes and enjoy the process of drawing and getting better. 4. STEP 1: Sketching with a pencil: As the first step, we're going to sketch with a pencil. This is my reference for today. It's not the best photo, I admit, but I like this house. Before you start with sketching, just try to observe your object a little bit. Do you notice something special? Do you think some details are more interesting than others? What is necessary to sketch and what not? I always try to make some decisions before I grab my pencil. Sometimes, I may change my mind while I'm [inaudible] my image with the [inaudible] , but it's always good to choose which way to go before you start. Let's take a look at my picture I've made a list with a couple of notes that could help you to make your decisions. Try to understand the proportions of your objects. For example, you can see here that the height is about two times the width of the whole house. You also can see that the bottom, on this horizontal decoration element, forms a square. If we look further, we can discover tat the facade exists from four equal vertical parts. You don't need draw every detail of this one, but it would be really helpful if you would use this method by drawing the main parts of your sketch. Notice special and unusual details which are important to draw. I really like the entrance here, and the stairs, and these two small stamps on the wall. Also, I think that their roof is very nice to draw. So this are things I'm going to sketch in more detail than the others. Simplify, notice that you don't have to draw everything exactly as it is. For example, it's not necessary to draw every brick to make clear it's a brick wall, so drawing couple of bricks would be more than enough. Finally, if you can't see a detail very clear, which is always possible when you draw from a [inaudible] , don't worry, just make something up. Nobody will check if it's actually so. [inaudible] now it's really time to draw. 5. STEP 2: Fineliner and brush pen inking: The second step of the sketching is actually tracing of the pencil sketch and adding some more details with the brush pen. I'm going to ink my sketch with the fineliner. Then I will make some accents with the brush pen in the shadow side. You can also do it with the fineliner if you don't have a brush pen. It actually doesn't matter. I just prefer a brush pen because I can create some variety in the thickness of the line. Now, I want to tell you the trick I always use when the sun isn't shining like on this photograph or if the shadows are ugly or just very difficult to draw. But also when I want to have my sketch in a more decorative way. The trick is very simple. I just draw all the shadows on the same side. But ending, the sunlight comes downwards from the top left corner to the bottom right corner, or the other way round from the top right corner to the bottom left corner. 6. STEP 3: Watercolour and splattering: There are different techniques, for watercolor painting. But for urban sketching, I prefer to paint with layers. I start with coloring of the biggest parts. I let them dry. Then I color the smaller details, let them dry as well. Just then, I apply the second layer, which is shadowing. Now, they had a guide for shadowing. I will apply the shadows on the same side as the brush pen shadows, and what we must understand here is that the color of shadows is not black. But it has, actually, the same color as the main surface. We only need to make it darker, and a little bit colder color. This sketch is actually finished. But I'd like to make it more vivid by adding some splattering with the colors I used before. Now, I will show you how to make watercolor splattering. I grab some water and some paints. It's very important to have enough of both of them on your brush, and then I lay the brush on my finger and hit lightly, but quite strong. You can also hit your brush against your finger. But the splattering will be next control plan. I highly recommend you to try both of these methods first, on another sheet of paper, before you apply splattering on the sketch. 7. Final thoughts: In this class, we have learned how make an urban sketch in three steps. We've made a nice sketch with a pencil, we traced it with the fine liner, added some shadows with a brush pen, then we've colored it in the watercolor and added some splattering to make it more vivid. The sketch is done, I hope you enjoyed the class. I'm really looking forward to see your sketches in the project gallery. If you have any questions, I would be happy to answer them. Feel free to ask me questions and comments throughout. Bye, bye. See you in my next class.