Transcripts
1. Trailer: Do you love to
draw architecture? Do you enjoy urban sketching? But maybe sometimes you're
not quite sure how to start your sketch or drawing and
how to set it up for success. What if you could follow fun, simple step-by-step process? So we never get stuck
or feel overwhelmed again. I invite you to a
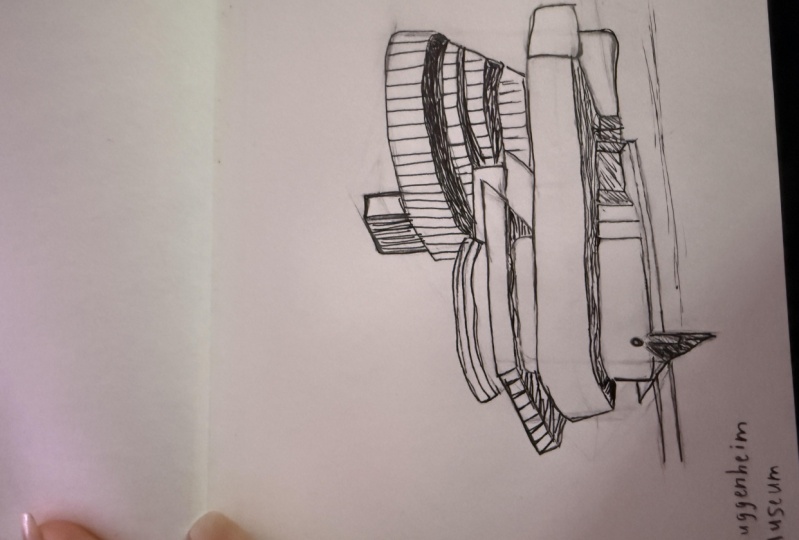
drawing journey where we will draw together at the Guggenheim Museum in New York City by
Frank Lloyd Wright. During the drawing
process will cover things like how to start from
scratch with a blank page. We'll cover setting
up a perspective with two primary
vanishing points. We'll talk about how to use the bounding box technique
to draw the curved forms. Will discuss working with scale and how to get the
proportions right. How to add people so they
fit in the perspective. And how to add shade
and shadow through hatching techniques with
both ink and pencil. We'll take it from scratch. We'll take it slow, step-by-step and I'll walk you through every part
of the process. You'll be drawing along
with me and you'll overcome any fears from
drawing from scratch, not knowing where to start
or feeling overwhelmed. Hi, my name is David Drazil and I'm an architect
who loves to sketch. In 2017, I founded Sketch Like an Architect -- a project dedicated to reviving the values
of drawing by hand. Over the years, I've published three books on
architecture or sketching. And in this class
will draw together the Guggenheim Museum in New York City based
on my third book, 100 buildings and
architectural forms. And while the book is
great at showing you the key steps of the
drawing process, discourse fills in
all the gaps by showing you the full drawing
process in real time. Where I also comment on nuances and small decisions
that I make on the way. Join me and let's draw these famous and iconic pieces
of architecture together. I'll see you in the course.
2. Class project + Resources: Perfection is not the goal here. Hi again. In this short video, I
want to share with you a few quick tips on how to make the most out of this class. These videos are recorded and edited as much in
real-time as possible. So they're made for you
to easily follow along. Basically, you can
just hit Play, listen to the instructions, and watch the process as you
work on your own drawing. However, as everyone likes
to draw at their own pace, please feel free to stop or
pause the video at any point. Come back to it as many
times as you like, or just the speed of the
replay if necessary. The drawing process you'll
see in the videos is based on the step-by-step
tutorials for my third book, draw like an artist, hundred buildings and
architectural forums, which I'll be referring
to throughout the videos. As a part of this course, you are getting some of the
pages from the book with the step-by-step tutorials
as a downloadable PDFs. In the videos, I don't use any rulers or precise
ways of measuring. Everything is drawn
three hands only using reference photos and bit
of visual measuring. If you're not familiar
with Visual measuring, it's a useful technique
for artists to visually measure angles and
proportions of a reference, which can be still-life and
urban scene, photograph, etc. If you'd like to
learn more about it, I'm including a link
to a useful video. The videos are
capturing the row and almost unedited drawing process with all the mistakes and all the imperfections
that I make on the way, which are simply part
of free-hand drawing. I try my best to own and embrace my mistakes
and live with them. And if I humbly me, I would recommend
the same to you. Perfection is not the goal here, rather to enjoy the
drawing process and try to improve it over time. And lastly, I'd like to
encourage you to use these videos more as a guidance which you can
take your own spin on. Feel free to use your own tools, your own techniques, your
own style if you'd like to. And of course, don't hesitate to ask for any kind of help. Share your thoughts,
share your questions, and also the process and
the final creations. I'm very excited to
see what she came up with heavy sketching
and let's get started.
3. Starting with a Pencil Sketch: Traditionally, we start with a pencil to set up
a perspective view. And the basic
composition structure. Start with the horizon line in the lower third of your
canvas and position your main vertical line roughly in the left third of your page. That is the edge of the imaginary smaller box
on the left-hand side. As you can see, our
right vanishing point is outside of our picture plane. So we'll estimate
the orthogonals converging in one direction. Follow the first step from
the book tutorial to draw two bounding boxes for the
main volumes of the museum. You should be able to locate the left vanishing point
still on the page. Now is the time to
pay attention to proportions of the two boxes, both in terms of
their height, width, and depth, as well as
their mutual relationship. You can see that I'm still
adjusting the proportions is I go and I'm using my pencil to do my best when
replicating what I see in the reference
image and the tutorial. It's very much a
back-and-forth process. To help anchor the
scale of the sketch. I'm drawing a human
figure with its head on the horizon line and its feet touching the ground in
front of the building. I imagined they are standing
on the pedestrian crossing.
4. Drawing Outlines: As we have roughly sketched
out our imaginary boxes, now's the time to start
sculpting inside them and draw the main outlines of the separate volumes
of the building. It's absolutely okay to be still adjusting to proportions. We're still in the pencil phase. Here. I want to start with the lower third of the
volume with a common plan, so to speak, that the other
two rounded volumes sit on. I can move on to the
main rounded volume of the museum and tried
to divide it with the three horizontal
gaps which subdivided volume and create a Stripes
cut into the volume. I'm paying attention to the
angle of the conical shape, as well as the thickness
of the four disks. The top one has the
biggest thickness and also a straight
vertical edge around. While the three layers
beneath it are creating the conical shape
with an angled edge. You can also see me jump around from one part of the
drawing to another. And even though in this case it might be a
little unconscious, I was actually
taught to be working on all parts of my
drawing at the same time. This tip helps me to not
get bogged down into just one small part
of the drawing while completely
ignoring the rest. The sketch gets developed
more coherently in this way. And back to the rotunda. Let's try to finish the
main outlines of it. Again, I'm using a
light pencil strokes to find the right curves. Still going back and forth
between the tutorial image, the reference image,
and my own drawing. Since I've already established
some guiding lines, including the imaginary boxes, I can now use these
guidelines to draw new elements based on their alignment with
these established lines. So basically comparing position, I'm double-checking
different touch points of the building sports. I'm using Visual
measuring to check the proportions and
to make sure that I'm still on the right
track with everything. Hopefully, this
whole process gets easier and easier for
you the more we have drawn because there is more
of what we can relate to what the new lines and objects we are adding to
our composition. This middle part that
I'm drawing right now is a great example of debt. I'm using my established
perspective grid, as well as the bounding
boxes and the position of the very top box on the roof to align this new
rectangular elements. And again, jumping back to the plinth to adjust its
shape and curvature. At this point of the refinement, it's all about
trusting your eyes to really see what
looks the best, what is the best line, what is the best curvature? And go with that. As we have most of the
key outlines in place. Now it's about filling
in the smaller shapes, including this horizontal
stripe of windows, details in the insurance area, and connecting all the
volumes in the right way they should meet and overlap
with each other. Now we can also finish the rotunda and its
division into four disks, which is something we already started quiet at the beginning. So now it's just time
to connect this through the middle part to
the lower volume. On the left-hand side. Our drawing starts to look quite decent and definitely
recognizable. So before we move into
the inking process, Let's just add a
few more details to the entrance area and also double-check whether
we're not missing something crucial in
our drawings so far. And as the very last step
in this pencil phase, let's add a little
bit more contexts and surroundings
to the building. We have established
our perspective grid, so it should be
rather easy to follow are two main vanishing points. And draw a sidewalk
around the building, S3 in front of it, with a pedestrian crossing. And the adjacent
buildings in the bag.
5. Tracing with Ink: Congratulations. Now
I think it's safe to say that the hardest
part is behind us. As the next step, we'll trace our pencil
sketch with ink. In this case, I'm using
my touch fine liners, but feel free to use
your own favorite tools. The goal here is to
trace our drawing with a single confident lines to
create the final line work. We're not looking for
the right proportions or curvatures anymore. We simply trace them with
continuous confident lines as long as necessary without overdrawing them multiple times. In that way, we'll get a
nice clean ink sketch. And because this process
is pretty straightforward, I'll speed it up a bit
to save your time.
6. Erasing the Pencil: When we are done with
tracing our pencil sketch with ink and the
ink has dried out. It's safe to take
your eraser and gently erase the layer
of pencil drawing. The only thing you might
want to be careful about is not tearing the paper. If you're drawing in
traditional way like me.
7. Adding Shading & Textures: To clean ink line
work like this, we want to add more visual
interest and information. So we'll be adding textures and shading to add more
contrast and plasticity, and to support the illusion
of three-dimensional space, you can use simple techniques like hatching,
crosshatching, pointillism, and similar
techniques which I'll cover in more detail
in my beginner scores, to add suggestive
textures to the Windows, facade and the surroundings. When you observe how most
windows look during a day, they very often seem pretty dark with bits of
reflections here and air. So that's what I'm trying to suggest and simplify here with simple hedging while leaving white stripes to mimic
light reflections. In the reference photo as
well as in the book tutorial, we have the light coming
from the top right corner. So we add simple
line hatching to the surfaces not directly
facing the light source. With boxy objects defining
the surfaces which receive light or not can become
quite symbol and binary. For the rotunda though, we want to create more
of a gradient shading through changing the density
of our line hedging. My personal preference is to use vertical hatching on
vertical surfaces to help define the objects
and make it easier for the viewer to
understand the geometry, but feel free to use
different directions. You can also see me change the type of lines I'm
using from solid, dashed and dotted lines, which become more
and more subtle. And this helps to create a shading gradient as the
shade is slowly fading away. I'm also adding one more
layer of hedging to the most shaded parts to strengthen the
effect of shading. Following the same principle, you can end a base layer of shading to all other surfaces, not directly facing the light.
8. Adding Details: In this next part, I
want to focus on adding more people to decomposition farther away from the viewer. I guess around the entrance area where it would make
sense for them to be like if they
are gathering and waiting to go visit
the museum inside, you can see did
they appear smaller as they are farther
away from the viewer. But their heads are still
on the horizon line. This because this
drawing is set up as a standing eye
level perspective. And these people
just receive less detailed and the
figure in the front. So I just render them as
silhouettes basically, that's all I need in this
small physical size. And also I want to render black, the racist parts or the
divisions of the rotunda. For that, I'll be using a black brush pen
because it's brushed tip makes it faster and more enjoyable to cover bigger
areas of the paper.
9. Final Touches: As the very last step,
which is optional, I want to add more
contrast to the drawing, as well as to soften the shading by adding one
more layer of pencil. I'm adding the shadow cast on the building
behind the museum. And also I'm strengthening
the form shadow or the shaded part of
the museum itself. At this stage, you
could also just take the finished ink line
work and post-process it digitally if that's your
jam or you could use traditional watercolor if you've been drawing on the
watercolor paper. As you can see, I'm still using the same hatching and
crosshatching technique to add the shading simply
by layering at pencil hedge in
different directions on top of each other, it creates darker
and darker tones. I continue this process until I feel happy
with the result. This is one of the cases where
we can easily overdo it. So be mindful about it. And because drawing is never really finished,
just abandoned. Decide for yourself. One you'll call
your drawing done. Alright, this is it
for this drawing of the Guggenheim Museum
in New York City. I hope you've
enjoyed the process. And as always, if you have
any questions or comments, please drop them down below
in the comments section under this video and also
share your own creations, whether you sketched with me traditionally on
paper or digitally, I would really love to see your creations. Thanks so much.
10. Conclusion & Next Steps: Congratulations on
finishing this class. I hope you've had fun. I hope you created a drawing that you're
proud of and that you've learned something new that
you can use burner for your next sketches,
drawings or illustrations. I would really love to
see your creations. So please share your project here on Skillshare in
the project library. And if you're on Instagram, you can send me a
DM or tag me in your posts as David
underscore drizzle. Lastly, if you'd be
interested in following more step-by-step tutorials on drawing famous
buildings like this. Check out the full book. Draw like an artist, hundred buildings and
architectural forums. Thanks again for
taking this class, and I hope to see you
in my other classes. Workshops are YouTube videos, take care and happy sketching.
 David Drazil, Architect Who Loves to Sketch