Transcripts
1. Introduction: Welcome everybody
to my new course. In this course, I'm going
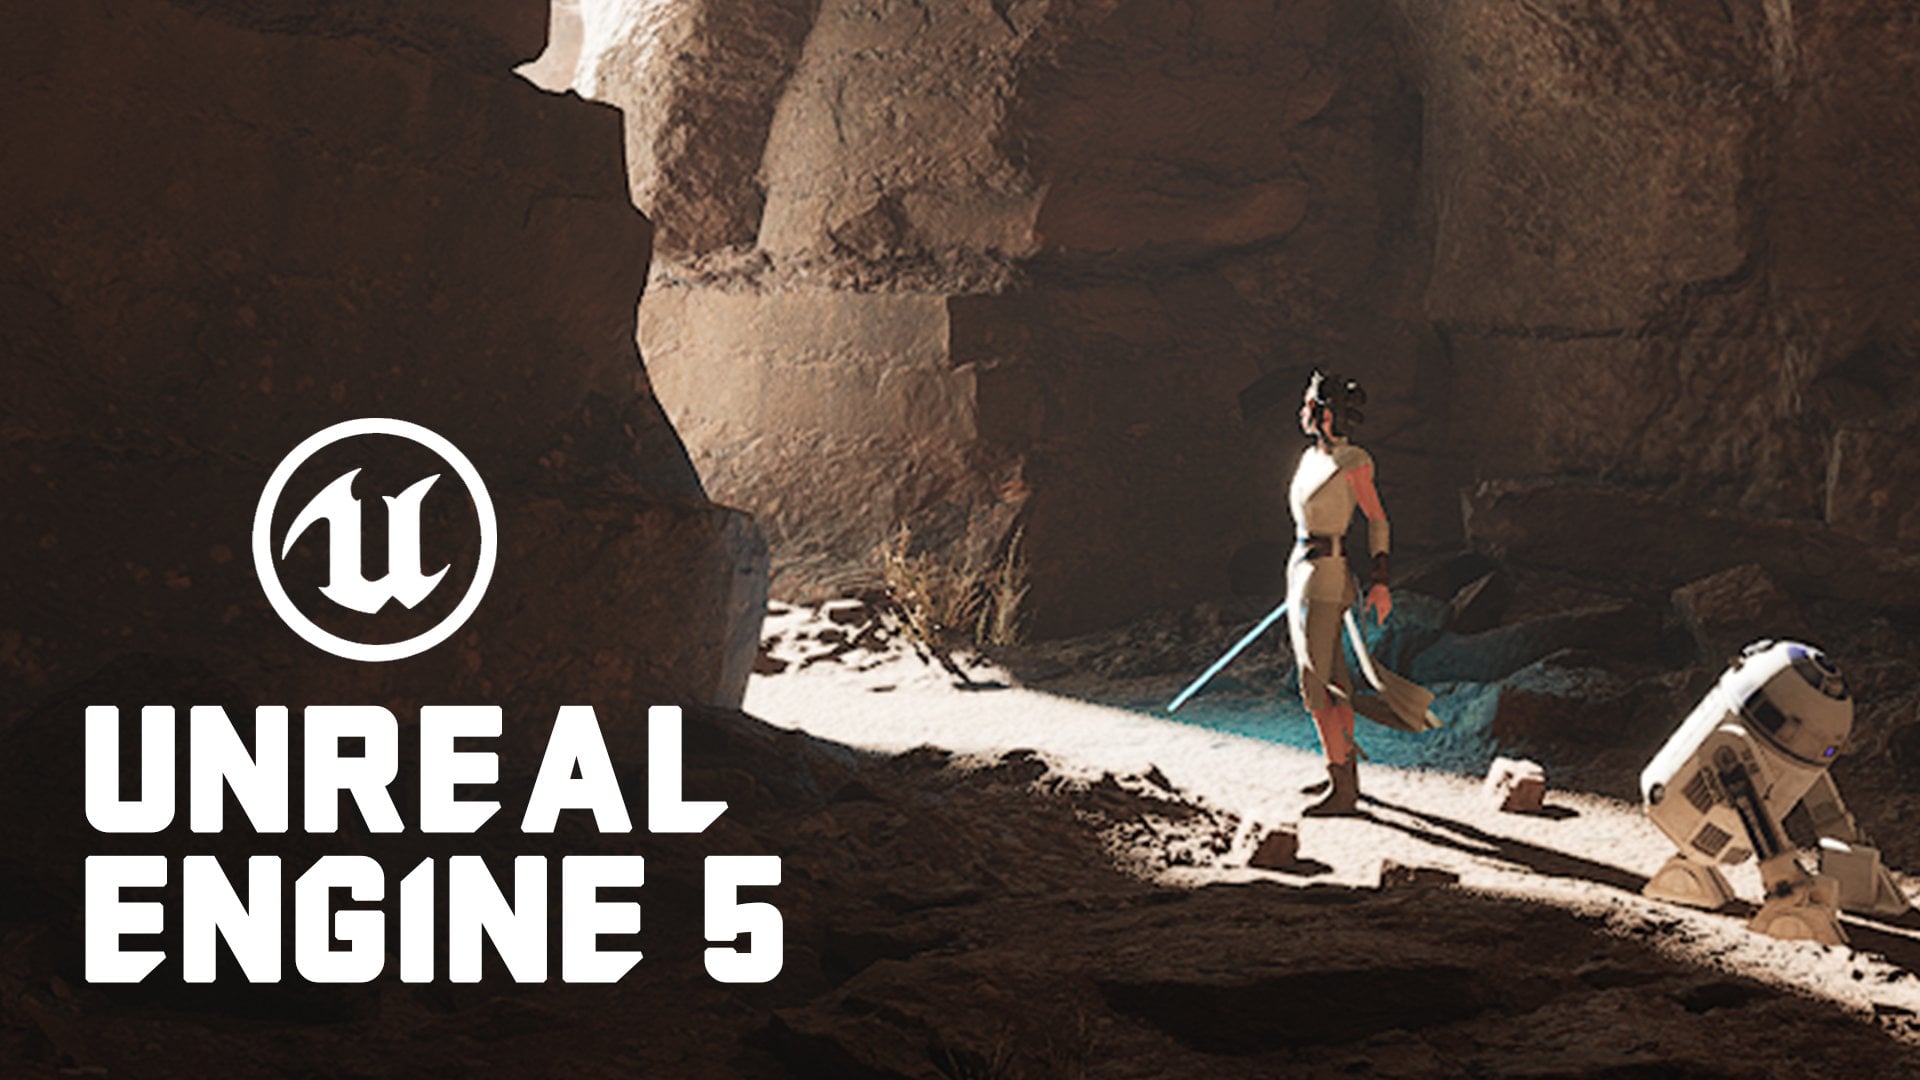
to teach you how to create this sci-fi scene from
scratch in real life. The first thing that I'm going to teach us
how to think and how to get inspired in
order to create this scene, how to create a composition
for the scene, etc. The second thing that I'm going to teach you is how to block out the scene by using only
cubes in Unreal Engine five, this is one of the
most important steps. After that, we're going
to start scattering some quicksand mega
scans assets in order to create the
mood of the scene. And finally, we're going to add more mood to the
scene, some color. We're going to fix the
lightening of the scene, scattered some more objects. In the final stage of our scene, we're going to set
up the final cover. We're going to put a
post-process effect. Then we're going to take our
steel image into Photoshop, apply few filters in order to correct the colors and shadows. And by the end of this course, you're gonna be able to create this scene from
scratch, enroll now.
2. Generate ideas and plan the scene: Okay everybody and
welcome to my new course. In this course, we're
going to be creating this scene in
Unreal Engine five. But in this first lecture, I want to talk more about how I got inspired
to create this. And what are the basic rules that I follow in
order to create this. So the first thing
and the process is to Google and search for
references and get some ideas. I mainly use Pinterest
as a website that I get more ideas from them. The first thing that
came up to my mind was I want to create a winter
scene and I want to be some kind of sci-fi with an asterisk after maybe
a sci-fi vehicle. Then when I think about it, I liked to be in a cave. For example, I put
this as a checklist, so I want to have
an sci-fi elements. Alright, this is the first step. I want to be in a cave. I wanted to have something
interesting as a story. Story. I wanted to
have a vehicle. And I want to play
with lightening. Lightening, at least for me, is maybe 50 per cent of
the scene. Maybe more. To think about how to create
the lightning is very important and you have to
approach this from the start. When I create this scene, I approach it with first
in mind, the lightning. What I want to achieve
with the lightning. So let me just delete this one. So this is the
first one to create a checklist for yourself guys, create a checklist, pinpoint. Some things like
the sci-fi element. I want to cave. I want this
extra enough to be there. I want to have a story. I
want to have a vehicle. Maybe this vehicle is
abandoned, maybe it's broken. Maybe our astronauts
get hit by a, by some enemy forces
or stuff like that. And in the final lightning, which is one of the
most important thing, at least for me. So let me tell you how I
approached this scene. The first thing that you
need to keep in mind is you need to think about
the composition of your sin. So here are some basic
rules about composition. In the first picture
here. Alright? The steel yard, you have the balance between
big and small, as you can see here in our
first composition example, you have big tree
and a small one, which makes the balance
and which makes the eye of our viewer to go first to the big one and then
interact with the small one. So this is a good composition
that you can use. Here is the same, the same element, a
big tree on the left. You always place it on the
left side of your image. Somewhere between here. Of course, you can
leave some air over here and you need to play some little objects in order to give the picture meaning
of scale. Alright? The second is the balance. Alright? Here in
the second picture, our left side is perfectly
balanced to our right side. Here is the same. So in those images we
have the balance in mind. We have what we
hear from the left. We should balance it out with the right side of our picture. Let's move on to the circle. The circle is pretty simple. You have in your image, maybe here in the
center, a circle, or here, like in the clouds, you have circled clouds. Alright? So this is something
that you can do with the circle shape. One of my favorite is
the S-curve composition, which leads the eye. Just like that, the S curve, perfect composition, very
interesting to create. So you create different shapes. You can create this, or
you can create this. Or let's find one more with
the S. This one is S curve. As you can see, it's not only the Roto here that
you can create with SS, but you can also create your
composition of the tree. For example, here we
have our crown and it's going over here and
creating this perfect S-curve. Here is another
example for the OH, over here we have
O in the center, which is the space, the airspace between
those two elements. This one and this one. Alright, another
perfect composition. Here we have the
big and the small, big on our right side and
small on our left side. Another thing that you can do
is triangular composition, just like this one. Or you can use this one to create in the middle
space, again a triangle. This is leading di, over here. Triangles, alright, so you
have the pyramids of triangle. The other composition that
you can use is cross, which is also pretty simple. You have a horizon line
and you have something to stick on 90 degrees
onto the horizon line. So we have here a few
mountains and we have tall trees creating
this cross composition. Alright, another
pretty interesting, and keep in mind that here we placed our boats
on the left side. So if you are going
with the rules of three, let me show you. If we go with the
rules of three. We place our boats here in
this section on this line. Alright? Just to create this composition, I'm going to talk
about rules of three. Just, uh, later on. Here we have a little
square over here, which is the free space
between those two trees, which is perfect for the eye
and comparing those trees. The next is the radiating lines
in this is so old school. All these compositions are so old school and they
go through the ears. Alright? Radiating line. You have your object
in the center. And you have
radiating lines here, just like those clouds. And some reverse over here and creating this
kind of perspective. And of course you need a
horizon line. Over here. Here is our horizon line. And here we have
our radiating line in a little bit S
position. Alright. Just like this. Pretty cool. Another thing is you can make the l rectangle perspective, which is a tall building on the left side or on the
right side, Just like this. And you use horizon to create the L-shape,
just like here. This is the L composition. You play something on the left, on the right and just
creating the L shape of it. Again, a little
example of a triangle. And this, what is this guys? This is L composition. We have the trees, we
have the horizon line. And this is radiating lines because we have lines over here. And going there, going there. Alright? So those are huge
compositions that I want to show you here
a little bit more. The one that is very
important, at least for me, is the rule of thirds, where you can place objects, for example, you can place
objects in that part, in that part, in that part. If you want to give your
viewer and extent of it, you can place your
object over here or you can place it on the
crossing lines over here. And I'm going to
show you what I did with the composition
in my scene over here. But this is the rule of thirds which I used for my composition. Of course, you have golden
triangles, golden spiral, which is one of the most famous and the
traditional drawers. You have a lot more diagonals. You have the cross that
we've already talked about. You have a facial mass. V arrangements. The L style circle, the pyramid, the S-curve, S-curve
is, is pretty good. I think at least I use it a lot. And you have harmonious
triangles, golden triangles, etc. Let me show you what I
did with my composition. First, I place my object
over here in the center, because I want the viewer's
eye to go over there. The next thing is, I've created point of interests, which is this tree. So my story is how this tree in this Arctic environment
was alive one day. And maybe these are
biomass on another planet, nuts on planet Earth. And our cosmonaut,
this amazed by this. The next thing that
you need to take in mind is that this tree, in order to grow it needs light. I place these three in my light. And my light is going
from above, from here. So our tree can grow up when it was alive thanks to this
lightening gap in our cave. And the next thing that I want to emphasize
in this scene, the background is just a
fulfillment in order to create this nice, icy,
rocky environment. And the thing that
you should keep in mind is that when you create such rock
and maybe a cave, you need to leave
some parts not with ice because it looks more
natural just like this, I left some stones
without ice patches. And all those elements are
quakes omega scans library, but you need to arrange
them perfectly. And of course I'm just
creating those. I expect. So here, clean, I spec, clean. And I have a little
pattern over here of creating eyes
and creating rocks. And of course I'm breaking
the pattern over here with another eyes because I want a little bit of
difference. Here. Let me just create
one more layer. Here. I just create a little thick ice and
the angle of it is, let me just show you the angle. The angle is just like that. I didn't want to have it's a straight 90 degrees
because it's too boring. So I've created a little
bit of an edge here. At the far end. I put a little light
there in order to create this this Shine
effect on my rock, like this is the
end of our cave. Alright guys. So
you got to think a little bit of the composition
before you start. But of course, through the process you can get
more and more ideas. The next thing, let me
just get back here. So we've talked about our
main character over here. We've talked about
our story points, the tree over here
on another planet. And we talk about the different things that
I did with the background. I intentionally leave
here at the bottom, everything in dark, dark, black. Because I want to emphasize
over here on this area. But you can see we have some grounds elements and I used vignette effect for this. Here, a place earlier bit of rocks in order
to create height in our scene to be super flat
ground it just like that. The final thing that adds a little bit touch to
our scene is our ship. So we have three elements that are pinpoints in our scene. The first is the cosmos, the second is the story line
of why this tree is there. And the third is the
vehicle of our cosmos left. So what is the purpose
of the vehicle? Adding a little bit
more to the story, how he get there,
what is his vehicle? Why is he here? Is key from a sci-fi dimension, which is obviously,
we don't have this modern vehicle in
our world right now. And the other thing that it's pretty cool is
I think about how to lighten up the vehicle and the vehicle by creating a little gap whole
let me just draw it a little gap WHO
and the roof and just put the lightning over our vehicle and
just on the front of it because it's looked like
a little bit of Dragon. This shape is like a little
dragon with Joe over here. And it's pretty nice shape. And I want to emphasize on it in order to get the
feel of sci-fi. Recall that the other
thing that I did is I've placed here light, which lighten up all the things inside the interior,
the steering wheel, etc.. Because I want to show the audience that this
is a functional vehicle, that it has some elements,
some interior elements. So this was my thought process. So use the rules of thirds and I placed my main character over
here in the center. I have a storyline
with the tree. I have his vehicle over here, and I place the vehicle on the line on the
third over here. I want to center it to that line in order to
create this good effect. And that's it, guys. This is my thought process. Of course, it gets deeper and deeper when I think about it. Why I should have, for example, here a little bit
state stagey eyes. Just like that. I create a little bit
of shapes like this. And this is just break the
silhouette of our scene. In order to create
different shapes. We have here different shape. We have here different shape. And thinking always
about shapes. We have here a different shape. Alright? We have here
a little bit of ice. We have here a little
bit of different shape. Alright, we have a
little small rocks over there beneath our ship. We have a little bit
of a level over here, so everything should
add to the details. And another important
thing is you need to keep the center clean because if I place
too much details, for example, here, it's going
to distract the viewer. And right now, I have a
little bit of detail, a little bit of frog
showing under the snow. But in general, I want
to keep fresh snow over here without much of details in order to emphasize
on those two objects. This is about
lecture number one, and this is how I got the
point of creating this one. And it turned out pretty good
for the time that I've put. Thank you guys for
watching the first lecture and I see you in the
next lecture when I'm going to explain
my process of creating this. See
you in the next one.
3. Final scene overview: All right everybody, so we jumped straight
to Unreal Engine. And what I want to show you is how I've created the level
and how it looks over here. And this is just to show you what we're going to
achieve as a final result. So this is my final
result over here with the camera movements and everything
that I've created. Of course, I've run it
through Photoshop filters. But in general,
this is my scene. Let me just walk you through it. Just put two for
camera movement. So this is my thing. This is my sci-fi astronomy. This is my three. Let me just put the speed
for so this is my vehicle. And let me show you the real
level, how it looks like. It's pretty ugly over here. Because we are creating a
still shot and we don't want anything serious and
anything to look good. We want only the short form, this angle from this
particular angle to look good. What I did is I've put
some 3D objects over here with some spiky ice in order to create
this slide over here, as you can see,
pretty good light and pretty interesting
one for my vehicle. I've done the same over
here, some spiky things. And I just lit up this one. The face of our vehicle
from this angle, which is this one, it looks it looks like a dragon. It is not obviously. But from this angle, it looks like a dragon
with a jar over here, which I get to look pretty nice. The next thing that I did
is I put some lightening inside the seat of
our ship over here. And I've put just on the right side over here because the right side is
mostly visible. The left side is not
so much visible. I put two green lights just to add a little
bit of elements. And I've put some light
pink over here to my cave back in order to give those ice and
rocks some lighting up. Alright, so let me just show you what I've
used over here. So this is my project and
I've put my assets over here. I have a cinematic camera. I have some directional light, exponential height, fog, I have a post-process
volume quality, etc. What I use for this level is a used quicksort
bridge over here. Quick so bridge. And let me show you which bag data I use. You go to collections, environment's natural
and let me see. Use the Arctic, ice
and snow. Yeah. I download it. All those
photos can see over here. And I use this noise dump as
the element of interaction. And I use those
cliffs pretty much. And some of the
textures over here. Those are pretty much
the things that I used. And I used this astronaut
left and this vehicle. The astronaut and
the vehicles will be included in this course
so you can freely download them and just put them in to your
scene. Alright? So this is how my scene looks
like inside Unreal Engine. Alright, let me just give you
one more peak. All right. Pretty **** good. Let me just show you how it will look without
post-processing and without exponential fog if I turn off the height ****, you see how the gut it got ugly because you don't have to create
that kind of mood. So you always need to use, at least for still images, a little bit of fog to
create that kind of mood. And the fork interacts with
the lightning pretty good. And this is my post-process. How different the mood of the
scene is with post-process. Without post-process,
everything is burning. You have pretty
intense lightning. This is not some ice level. It's not telling us
that this is ice. And it looks pretty
ugly, at least for me. And when I turn on the
post-process, bam, you have this
nice-looking scene with that nice look called ISPOR. And this nice look. Bright lightning over here to
emphasize on our character. So in the next videos, I'm going to start explaining on my pre-recorded videos
how I achieve it. And you can see it step-by-step, how I did manage to create this. And before that, I
want to show you how to manage your
asset folders. The first thing
that you need to do is you can create a folder, characters and assets, and you can place the astronaut
and vehicle over here. I've tried to create some interaction with
an alien over here, maybe placed over here. But I didn't like it
because it's bright. It's breaking up my story. But I'm going to include this
alien to the project also, which you can use and
create something with it. Maybe play some,
some small aliens. Over here. You can make some small enemies
and place them over here. Just like that. In order
to create some kind of intense It's up to you guys
if you want to use it or not. I'm just going to
include it here. Of course, everything
here is for personal use. You cannot sell those models
because those models are purchased and they're not
for reselling. But any way. Create your character
and assets folder. Put your astronauts
over here and your vehicle of
here, the 3D models. And let me just quickly show you how you need to
set up the materials. The first thing that
you need to do for the astronauts material is you need to connect this texture to the base color and
the normal over here. Pretty simple. I'm going to show
it in the process. And for the vehicle is the
same you have for textures. This one is in the emissive channel
and the first one with the orange stuff is
in the base color. This one is for the specular and this
one is for the norm. I've linked those
textures over here. I'm going to show you
how to link them. And you're going to create a
folder with the name levels. And you're going to place
your level over here and you need to download
all the mega scans, assets that I've
already showed you. This is pretty much
how the project looks inside Unreal Engine. And let's just start creating
it in the next lecture, guys, thank you for watching.
4. Scene block out: Alright, so let's just
get started the business. In this lecture,
I'm going to show how I block out the scene. And as you can see,
I've already laid out some foundation blocks, and I'm just using Unreal
cubes and just killing them in order to create the space where I
need the cave to be. And I'm just putting
the cubes on top of each other in
order to create the roof. And here, as you can see, I've created some pretty
nice space and I've already integrated and
put my astronaut inside. I'm going to show how
you can integrate your 3D model later
on. In this video. The blocking phase is pretty
important for each project. You need to start
with blocking in order to get your scene right because if you straight jump to place your assets,
you're going to be lost. And you don't have this guide visually where you
need to place the assets. So that's why you need always
to block out your scenes. Never skip this step. This is one of the
most important steps. You are creating a scene. Now I'm just putting
everything into folders. Let me just create a new folder. And I like everything
to be arranged, so I place my three objects
here in the assets folder. And what you need to do right now is I need to play
a little bit with the lightening because I need the lightning to
penetrate from the top. So what I will do is I'm going to select this
directional light and I'm just going to play with
the rotation of it. Of course, you can use Control L on your
keyboard and rotate it, but I prefer to use the
rotation x, y, and z. This is just my
methods of using it. So I'm just tweaking up
the lightning in order to get this lighting
penetrating from the top. Something like this,
maybe because I want my astronauts to give a
real good lighting on it. And of course, later on I'm going to play
a little bit more. But this is only
the blocking face where I need to just
block everything out. And as you can see, I'm just simply moving cubes, moving the blocks
here and there, and trying to figure
out what will be the best position
of everything. And this is important
because when I go into the later phases where I need to put all the objects, I'm going to use those
blocks as a guide. And I'm just going to place my objects over there
based on my guides. And of course, always try to tweak some stuff
on your lightning. Tried to figure out
everything in early stage is not possible because a lot will change
with the process. I'm going to create a new
folder and call it vehicles. And now I'm going to
import my vehicles. I'm going to select my textures
and my vehicle FBX file. Just drag and drop,
click Import, close this, and double-click
on your material. So let me show you how you can connect your material over here. Just select your textures and drag and drop
them over here. And you need to plug them
into the responding nodes. So the first one
is the normal map. I'm going to put it
in my normal channel. This is my Diffuse, which
gonna go into the base color. This is an emissive channel, so I'm going to need to put it into a massive and
this is my specular. Alright, I'm going
to click Save. My vehicle is ready. Then I'm going to drag
and drop it in the same. Of course, it is pretty small. And I'm going to need
to place it near my character in
order to scale it up to get the right size of it. My astronauts scale,
it's a little bit like that because I want
the cave to be massive. This was my thinking
process when I start. Once the space is to feel big. And in order to fill
the space is big, your character needs to
be smaller than that. And I'm going to create
the scale of the vehicle. And I'm just matching
the seat of the vehicle. If my character will fit in it. He can be seen pretty well. Now, I'm going to place
my vehicle over here. In this first stage,
as you can see, I'm just blocking out with cubes and I'm just placing my objects. And intentionally I'm not
recording the complete process because I want you
guys to sit and start your blocking
after this lecture. And this is the thought process, and this is my layout, how I wants to be. And I've already told you
in my lecture number one that I've already have the
picture inside my head, how I want the
composition to be. Of course, you can change
the composition and you can start creating your
own layout of course. So thank you guys for
tuning into this lecture. And in the next lecture,
we're going to continue.
5. Filling up the blocking with assets - Pass #1: All right, everybody,
welcome to this lecture. In the previous one, we
block out everything. And in this one, I've had my quick so omega scans back inside my Unreal Engine and
I will just start to place all the assets inside. The blackout is you can
see the blackout is guiding me on where
to place my objects. And I'm just choosing
different objects and testing how it will look. My main thing when
I start a scene is I'm going to place
the snow on the ground, as you can see right
now I'm doing this. I'm just tasting
different shaders. Of course later on
we can change this. And my second step
is to start blocking out the wall in front
of my Cosmos laughed, because this will be my first checkpoint to see
how the scene will feel. And look. I'm doing this by
simply drag and drop different assets and try to place them and
mix them together. And of course, I'm just
testing out a few things with this spaceship to the video
is sped up on a 150 per cent, just to save you a
little bit of time. Here, I start to block out
with using the ice cliffs. And of course you can scale
them up how you want. And I usually turn off the snapping option
on the scale rotation and transformation
because I want to move them freely and have this
fidelity in the movement. And as you can see, I'm starting to get
some shapes over here. Tasting scaling, of course,
testing how it looks. And as in the previous
video I've mentioned, it's all about the
blackout phase. The first phase.
The blackout phase from the previous video is driving me on how to arrange everything
here, how to do it. And here I'm just placing a little ice over here in order just to
blend the elements. And the most
important thing is to test and not give up in test
everything, just scale, move, and think logically how this environment
will be created, where the ice is placed, etc. Of course, it is a good practice to use a lot of references. Maybe if you have
a second monitor, you can load up a
lot of ice levels and just use the references in order to create your scene. I'm using some references on my second monitor, of course. And I'm just speaking at
them from time to time. Alright. So here I'm placing a
little bit of snow, and as you can see here, it starts to blend pretty good. Let me try one more over here. But the problem with
the second one is it will start to get pretty
repetitive over there. But for start,
this is very good. The first thing is
populate the scene, try different aspects
of the scene. And then you can start and change some of the
measures over here, delete them and replace
them with another one. And right now, what
you see here is I'm just blocking out the wall
as I told you before, the first thing that I want to do is I want to
block out the wall in fraud in front of my cosmonauts in order just
to get the feel of this cave. And here I get pretty decent
results very quickly. Let's try and create a
little erase over here. This is pretty important
because I'm trying to break up the repetitiveness. And as you can see, I'm just
duplicating those objects. And I'm just scaling up and down and try to create
this kind of effect. I want to have different floors, like build up into the cave. And I want them to be connected
with the ice over here. That's why I'm going to
place here another eyes. Let me just scale it up. And everything is just
testing, scaling, rotating. Keep in mind to turn
off the snapping of your tools in order to
get this great fidelity. And now as you can see, we have pretty nice blends when I build up these two rays. Alright, pretty good,
pretty nice blend. Of course later on, I'm going to change
that because I want a little bit
different look. But this is the kind of process that you
need to go through. You need to test,
you need to proceed, you need to delete,
you need to scale. And that's how much it is. Of course, like I told
you in my first lecture, this is all built up. Before I start building
up the level in my mind, I already have a plan and I
visualize how I want to look. And this is just
the exploring phase where I'm just exploring, contesting different stuff,
how they will look over here. And here I want to
create a little bit of snowy effects here
with those spikes, but it's not going to work. And this is the moment when
you realize that you can use this to create the
shadow from the roof. Alright, let me. Duplicate one more
and fill up here. Maybe place it a
little bit of here. Just to break up. And here for a
little bit of depth, I'm just going to
remove this box. And I'm just going to continue on by placing another
objects over here. And as you can see, the process is pretty straightforward. The only thing that
can stop you guys is just your initial preparation. If you're not prepared for it and if you don't have a plan, how you want to look, you're going to struggle
because you will not know where to
place some things. At another important thing, if we want to break
up the same elements, you can rotate them downwards, just like I've done
with this ice element. And as you can see, we're building up to different
ice elements from one. And of course I'm going to add a little bit more
details here in order to break it up and
remove this repetitiveness. Just like this
rotated over here. And if you don't feel like it's looking good, don't force it. Just lead this object, try another one,
try another one. Now the thing is that you
need to try a lot of things. Firstly, and as you can see pretty fast at
blocking out the scene. And later on we're
going to polish it. So we are just, we just have in our first lecture the
bulking out with boxes. This is the second
phase of walking out where we use actual models. And after this phase is done, we're going to read blocket. We're going to
delete some objects. We're going to play
some new objects. So don't worry, if it's not going to happen from
the first block out. You can at least have the
big pitch picture inside. And that's the most
important thing. And as you can see, I'm tweaking some
small stuff here. Still, not very good, but it's getting there. I get the feeling of it. And let me try some other
things for the floor. Of course you can do the grout width,
Unreal Engine terrain. You can just build up our terrain and apply
a shader on it, or maybe apply shader that
has multiple variants. And you can sculpt the ground. But I prefer here to use
the plane because I can place some of the
quirks omega scans in order to break up the floor. But it's a good practice to use Unreal Engine default landscape
and just with the brush, tweak it and you can create
a multi texture material and then Bates different
textures onto this material in order
to get a good effect. This is also good, but
I'm not using it here. As you can see here, I'm using objects and I'm just
rotating them crazy. It doesn't matter
on which degree. I'm just testing out how it
will look, rotates like that. It is supposed to be downwards, but as you can see, I'm just rotating and
trying different stuff. And if it's not going to work, you just delete it and proceed. But you need to iterate fast. As you can see, I'm
iterating pretty fast and checking constantly
how it will look. Alright, identity like this one. And now I'm going to create my point of interest, the tree. But first, I'm going to
need to create this ends. This is, this is guy's pretty
straightforward process. The most important thing is to have a good preparation
and to iterate fast. Keep in mind that this is my first pass and we're going to iterate a
little bit more. Of course, you can multi-select objects and just move them. And after you finish with
blocking out your boxes. So I've put here a few things, a few objects, and then
I delete my, my box. And this is simply
because I've already defined my items or where
my objects should be. And I don't need
the box anymore. So I'm just deleting
them in order to start getting the real
scene over there. Because boxes
sometimes can cover a host which you will need to fill with
objects, of course. And I start to create
the roof over here. And as you can see, I'm
just rotating the cliffs. And another thing in order to keep the shadow good is you need to go to the
material of this cliff. I'm just going to double-click
here and you're going to search for to cite. You need to turn this on. And what this will do is because our rock is how when
people scan it, they did not scan the back faces and to site will
enable the back face. So that's the lightning
want penetrates the model. Alright, this is
pretty important in order to get this
shadow working. And that's what I did. I turn on the, the double side faces on this particular
piece of geometry. And you can do for each geometry that you download from
quakes omega scans. And also they provide
a few other options. And this is my first pass of creating the the top the roof and trying to build
up disliking that I told you before that
50% of the scene, at least for me, is how you
will build up the lightning. Here. You can see I have few gaps over here that
I need to fill up. And that's why I deleted
my boxes in order to start creating some final pieces and not having those
gaps over there. And of course I'm just
blending and copy pasting the previous objects. Let's see how it goes. And I'm going to place this spiky ice and I'm going to turn on the
site faces for them to, in order to start and create some pretty cool shadow effects. So let's try and rotate this. And you're going to
see it in the shadow. We are creating that some nice spikes over
here, just like that. Place them over there. And of course you can
rotate and you can blend. I'm here blending the shadows. I'm not watching the
actual geometry here. I'm just watching what is
happening on the ground. How is the shadow blending? And as you can see here, I start to get the
feel of it that this might work and it will
look pretty, pretty good. And let me just block
out a little bit more. Let me just rotate this and
let me blend the shadows. I'm just blending the sheriffs
and I'm just building up the roof of the cave and
it's still pretty rough. See that? How roof is not looking good. But think like that. We won't see it at all
because I'm going to place my camera at the floor level and I'm just going
to ignore the roof. Alright. So it looks
pretty nice right now. But I need to build up
more of these shadows. And I'm just going to
place this one too. In order to create those spikes. You can of course use scale rotate everything that
you want over here. And if you watch
the four closely, you can see that I'm burning up these shadows and
blending between them. And I don't care that I have this geometry which is not
looking good at the top. And right now I build up a little interesting
shadow over here. Let me place this
pile of snow there. And I'm just trying to blend in with the rest of the snow. And if it's not blending in, you can of course delete it
and place and other objects. Just get rid of it. Don't, don't push it. Let's see how it looks now. It looks pretty good. And let me try another object over here. And I'm going to try
and place this to my aircrafts, the vehicle. But I think it's not looking that good because
this is more of a human human Snow created like from a machine
or something like this. Maybe this cat fit but
something like this. Just a little bit like that. It looks like our ship
just dig into the snow. That's at least my idea
when I build up this. And of course you can
tweak everything. This is the first
phase of blocking out, and it turns out pretty good, I think for the first pass. And in the next
video we're going to continue on and create
the next pairs. So here I'm just creating
some final touches. In order to blend. The ground. Here will be my
camera around here. I'm still deciding where
my camera will go. You can set up a bookmark for your camera with control
0 on your keyboard. And after you click Control 0, when you place your camera, you can click 0 and your camera will be
focused at that point. So this is pretty handy
called key that you can use. And finally, let's place this PRO here and just
close this video. And this scene will turn
out to look pretty good. Thank you for watching. Bye.
6. Adding details and further block out with assets - Pass #2: All right, everybody,
welcome to the next video. In this video, I'm
going to continue on with the scattering
of the objects. And I'm going to start tweaking up a little bit of the fog. Of course, everything about
the folk, the settings. You can get access
to them through the resources file that I've
included in this course. You can just get the final
setting for the exponential. Hi folks. Here. I'm just experimenting with different values and
different setup of the fork. And it's a good practice
to tweak and try to fine-tune old settings in order
to get your final result. And I'm just playing
with them in order to try different setup of the mood, different colors of it. And I highly
encourage you guys to try very different
style of the fog. This is how you can end up with some cool results without
even thinking about them. So always try different stuff, different colors like
bright yellow, for example, or just right now, I'm just testing
the bluish color because I want to
feel cold this scene. And of course I just set up this exponential height for pretty quickly in order just to get the mood and I'm
going to continue scatter the objects and fine
tune everything. So here I'm just placing
some more scans, meshes over here
in order to create a little fall off between the grounds and
the rocks over there. I want to blend them
in order to look good. Alright, so from this distance, this blending is pretty fine. And of course guys continue
on breaking up everything, but don't put too much details everywhere because you're going to have a little too
populated scene, which will drive the eye crazy. I'm just placing few
more stuff over here. I intentionally recorded
all the process because I want you guys to see the complete process without cutting all the parts
that I'm exploring. As you can see, I've test
with different stuff, I taste with different angles. And this is just part
of the process creating environments for steel image. As you can see, I'm just
moving and tweaking with more fine tuning right now as I've already
had my first pass. And I'm just exploring how my second pass is
going to look like. Alright? So I'm just using the scale rotate and move
to most of the time. And let me try different
shaders for the ground. I'm just selecting my plane. And here I'm just trying different textures
in order to see how they blend with
the rest of the snow. Of course, this is
a good practice. Test everything. And you can also tell the texture from the
material settings. Here I put 44 and the
texture is start tiling. As you can see here
on the ground. I'm just saying this is an icy ground and
I'm just testing, I'm just changing
now the tiling 234, but it's not looking
pretty good. So I'm just gonna go and
try some other stuff. This is a granite. This is the eyes that I've put. This maybe like a lake, river. I see Lake which is not working
great with my projects. So this is just the experimental
phase where you try different stuff in order to see if it's going
to work or not. So just try everything
that came up through your mind in order to get
the result that you want. Of course, that's why I download it's pretty much all the
assets in order to have this huge rich library with from which I can
just check the materials, explore, and test
in order to get my final results. Alright. So I'm just going to stick
maybe with this one, and I'm just going to try and
change it to five or six. You can change the tiling, two different stuff
in order to get the fine tiling of the ground, how you like it. Here. I'm just experimenting with the material tiling and
I don't like this now, so I'm just going to
delete it and just put the spaceship
a little bit down. Alright, so this is the final ground that I'm
going to have, the texture. And I'm just playing with
the color of the material. I'm trying to blend
this column with it. Here. I'm just grabbing the cone color and I'm
just fine tuning a little bit in order to get and blend them together
to look more natural. The other metal
that you can use is just place this now over there and just try
to blend it with it. This is pretty
straightforward process guys, but you need to take each
step on different paths. The first path to block
out the second pass, to scatter some elements, some Madison based
on your block out. This is my third phase of scattering objects and just fine tuning some of the details. So this is pretty
much for this lesson. What is the most
important thing is you can tell your texture
through the material. And the second important thing is try to blend your meshes together and try not to put a lot of dense detail
across your scene. So thank you guys for
watching this one. I'm waiting you
and the next one.
7. Setting up fog and continue with assets block out polishing - Pass #3: Welcome everybody to part six. In this part, we're
going to continue scatter some object
across our scene. And we're going to get some
more final look of our scene. I've sped up the video
a little bit like 50 per cent more in order
just to save you some time. But here, I'm just trying to blend the snow into the
ground a little bit more. Of course, this will all fade out when we tweak up the fog. But I need to create some
good edges over here. From this angle. I'm constantly checking
my angle of view. Right? Now I'm placing some
more big objects. That's it guys. Pretty much straightforward
process the parties to tweak everything and to have the good composition of it
does the most important thing. Right now I'm just
trying to create some rock around my camera, around the focus of my camera. And let me just check it
out how it looks here. It looks pretty, pretty
saturated over here. And later on, I'm
just going to remove some objects and
we'll fix them up. Here. I'm trying to scale up and
just blends a little bit more. This rocks. Just like that. This is still exploring phase. I mean, I'm just still
exploring how things should look like here and what the composition of
different elements should be. And later on, when we progress, you're going to see
that everything will look a little
bit more cool. And I've worked a little
bit more on the folk. And of course you can find
all the settings of my fork, of my lightening of my post-process effect
inside the Resources folder. And this will save a lot
of time for you guys. Just to set up those things with my final settings right here, I'm just trying to place some
interesting snow over here. And I'm just going to
tweak a little bit the angle of the
spaceship in order to make good contact with the ground and in order to
have a little bit of shadow. And I'm just trying to create some interesting
color variation with that black rock over
here and the snow of it, but it's not working, so I'm just deleting
it and continue on with the iterations
of my ideas guys. So I hope you are enjoying
the process of creating this, and I hope you
learned something. Now, what I'm doing is I'm just setting up everything to
look good from this angle. Alright? I'm just rotating a scaling. Pretty straightforward. So right now, as you can see, we
have few problems. The astronaut is not a
perfect place, alright? And the spaceship looks good. But I need to add details on the left side
in order to create this cool variations because I duplicate it to same elements. And when you put,
you're over here. And I scale it up in order to give it a little
bit of depth, you can see that it
blends perfectly and it breaks up the
repetitiveness inside. Here I'm working a little bit of the background over here. As you can see, I did delete my my background boxes
and I'm just tweaking up. I've also set up a short key with control 0 in order to
have my camera over here. And when I put 0 on my keyboard, I'm just
going to go there. Let me finish up a little bit. The roof over here now
because I want to create a little bit more
shadow over there. I'm just testing how
this shadow is looking. And of course, when I'm
placing objects like this, I'm always looking
at the ground. I don't care where the object actually is because we are
creating a still image. We're not creating a game level. Because in a game level where you can walk through the scene, he began to be noticing every strange thing that
we did for the same. Alright. I'm just creating here
a little bit more spikes because this will be a little bit seen
from our angle, how the shadows are
falling off the wall. Alright, I'm just going to
jump to my bookmark over here, and I'm just going
to tweak it up. And I'm just going to create
my bookmark width control 0. So I'm placing my camera over here with a little
speed of the camera. As you can see, I'm using the camera speeds of two
in order to create it. And just press Control 0 in order to set up my camera angle. Let me just tweak up
those elements over here. But right now it's not
looking pretty good. And I'm just exploring
how I can create this scene at this
angle to look good. And how the elements can blend. Of course. And pretty straightforward guys placing some stuff over
here and here I'm going to break up the ground
with this duplication. And I'm just going
to scale in order to create not repetitiveness
in my grounds. And all those black spots, we will add additional
detail to the background. And of course, like
I said before, you can always use a landscape and just paint over
everything with brushes. But I use this method
over here because at least for me it's
quicker to setup. And let me just tweak
a little bit more here and just play some
interesting rocks. Let me try and break
up a little bit. The CEO at over here, if this is going to work. As you can see, I'm just using the rotation and moving
but without the snapping because I have full control of each rotation angle, of course. And I'm not just snapping to 15 degrees or two
centimeters, etc. Let me just set up my speed for and let me
just work a little bit more on the lighting because I want to
reveal the spaceship. As I told you in
my first lecture, the lighting is
pretty important. And I want to create this shadow effect over
here on my spaceship. And I'm going to
be tweaking this until the end of the level, until we are ready with it, until we're satisfied with it. You will need to constantly
check the lighting from below once
you've created it. And as you can see over here, I'm just tweaking up
in order to create this nice spiky effects
on my ship, I click 0. And now you can see how
I lit up the scene. But it's not my 100%
satisfaction with the lightning. So I'm gonna be tweaking
it a little bit more. The next thing is those boxes and just create the back of it. Because when you
use the gray box, the lightning
balances and you only have white balance from the GI, from the Global Illumination. And when, when we put
those rocks behind it, we get this rocky scour onto
our snow and ice because our global illumination is bouncing off the scour and just giving our other assets
variation of the cars. So that's why you need to get rid of all your gray boxes and just place elements of it in all for the global
illumination too. In a perfect way. Here I'm finishing up a little bit my light
pink over here. And I'm getting there
of my original idea, as you can see, but it's still, the scene is pretty noisy without all those
assets in here. Important thing that I've mentioned in the previous video, always try different colors with your with your
lightning and with the fog and different
settings because you never know when
you're going to hit a great combination. Of course. You can also test
purple, purple, maybe green in all these plant maybe have some green
gas, purple gas. You can just find, tune and change the lightning. You can simply not use my cars. Of course you can do
whatever you like. I'm just playing with
the source angle with the with the color of the fog, with the directional
light, of course. And I'm just going to
move a little bit more of the roof in order to create a little more interesting
enlightening. And I'm going to move it a little bit out just
like that because they want lightning to penetrate
a little bit to my Cosmos. Laughed a little bit more. Alright, We're getting there. It's still not finished because has to do few more passes on it. But we are getting it and we're getting some good
results over here. And the picture in my head is getting executed
step-by-step. Here it's pretty noisy. And as you can see, we have
pretty much the same detail. And I want to lower it down and move it like
that in order to help the focus of the eye of
the viewer in the center. As I mentioned before, I'm gonna be using the rule
of thirds in my composition. So that's what I'm aiming for, and that's why I need to move
my cosmos after astronauts in the center of the scene
and place it above the snow. Let me just check
it out over here. Now, it looks pretty decent. Of course we have
some more work to do, maybe another few
passes in order to get the lighting and
everything perfectly. And most of the time, when I scattered
all the objects, I start playing
with the lighting. And that's one of the important steps because the lighting is like
50% of your scene. As I've mentioned before. This is pretty much
about these paths. And we're going to continue on iterating in the next video. Thank you guys for watching. I'll see you in the next one.
8. Testing ideas on the fly, adding a beast - Pass #4: In this part guys, I just hate the idea of external
planet where there might be some violent
form like in this beast, which is watching our
astronauts over here. And I'm just experimenting, placing this beast
across my scene where I can create an
intense moment of it. Of course, the beast is in the resource folder
and you can use it in your scene in order to
create this type of action. And I was trying to find out
if this will work or not. And I end up deleting it
and placing the tree, which is my other
and first idea. But I was just interested if this is going to work or not. So this is the idea to test different stuff and to
explore and experiment. And of course I'm just trying
to place him over here and just play with the scale.
This is pretty good. Of course, you can use
this and create some kind of your interpretation
of the astronaut, the beast, and the vehicle. Of course, I highly
encourage you not to copy, base my scene and to
create your own idea. Of course, you can use
those three models. And this will be a
good practice for you guys to create
something different, something that you
have inside your mind. And of course, here
I'm just trying different camera
setup with the beast. I want to look over his shoulder in order to
create intense moment, but it's not working
good for me. And that's why I'm
trying different angles. Maybe I can put it to the side of the shape
inside of the ship. Maybe I can scale it
up or scaling down. Maybe I can make,
make a swarm of it. For example, you can
scale down this beast to be little tiny beasts. And you can place, for example, ten or 13 or across the sea, which will create
an intense modes like there is some swarm. Maybe they're getting out from some eggs and
maybe there is a queen bees which are
making those creatures. So there's a lot of
possibilities, of course, to create this kind of intense moment and
this kind of creature. Here, I'm just testing
out everything in order to see if this
will fit or not. And of course, I'm
just playing with it. I'm just placing it over
here. It looks good. It's not looking bad, but this is not compliant
with my initial idea of the, of the cosmos laughed
and some objects that this planet has to
offer something interesting. But I was, Let's try this,
but I was like that. Let's try this. Let's
try something different. It might work or
it might not work. And I'm just
continuing on creating and putting objects inside my scene in order to refine
everything. In here. I'm just trying
to put snow under the beast hint over here in
order to look realistic. Just like that. And as you can see
here, it looks good. Maybe place a layer of
snow back at a tail. Scale it up a little bit, move it just like
that for the backlog. For the right leg. In order to look good. I need to support it. Let me just draw it like that. Or maybe scale it
a little bit more. I'm just testing here if this
is going to work or not. And this is looking nice. At the moment, you have
this intense moment, you have this idea of an enemy bees watching
our main character. The side of his spaceship
where he cannot run back and gets his spaceship to flee or to run away
from that beast, or maybe get his equipment, his shotgun, or his space rifle. The other thing that I need to refine is to finish up the level and to tweak up
some of the things that I don't like in the scene, which is maybe the lightning, the space ship position. And every object here. I'm just observing it
and trying to figure out what I like and
what I don't like. So when you create the scene and you think You
like it, take a moment, take maybe a minute or
two and think each inch of this this picture is, this item fits there
is this profit, there is this element feet. They're just take a moment just to watch your, your scene. And think about if
something is out of it. And think about the
player, where it will go. Here, I'm going to tweak up
a little bit the angle of my lights in order just again
to test different things. And this is pretty good
practices to test alongside because there are some good
things that might come up. And it is called
happy accidents where You have a brilliant idea just by tweaking and
testing some things. Alright. So here I'm just tweaking up a little
bit more lightning. Alright, looking pretty good. I think this is the right angle. And one more thing is, I need to tweak a polar with
the wolves in order to get that bouncing of GI global
illumination and get that car. And I will start and tweak
up a little bit more the roof lights in order to
blend my my spiky mountains. Let me just move this
a little bit back. Or it is the other one. Alright, I'm going to move it
a little bit back in order to let up our beast. Okay. I'm just tweaking
some more stuff. I'm just deleting
some stuff that I think are not looking
good on my screen. This is the moment where
I think about how can I clean up my scene and how can I make the elements to pop out and to stick there in the
scene to look more natural. Here. I have a problem with the lightning as it's
not looking too good. I have here this spiky ice and it's not covering
the shadows good. So we need to fix this. Let me just put them
a little bit back. That's it guys. Pretty much straightforward. And I'm just showing you how I managed to try
different ideas, how I test, testing on each step and I do the iterations
pretty fast. You don't settle on one item, just try different stuff and you're going to find
out that in the end, you're going to give
a great result, guys, I'm sure about it. Another reminder, try to
create your own scene. Don't copy mine. I would love to see your sees inspired by
this one, by this course. Alright, let me just
finish up a little bit. The lightning over here. I think it has a little
light on my wall, which I once not
to have over here. So I'm just going to duplicate one spike over here and just
finish it up like that. This is looking pretty
good and I need to fill this gap over here in order to
have my GI working good. And let's fine-tune little
bit the foreground here. Of course I'm going to dim this. I'm going to use vignette
effect in order to create this. And I'm just continuing tweaking
those things over here. Alright? The most important
thing is not to give up and always try and fix things that you
don't like on the scene. The more time you
spent on scene, the more the scene
we will look good. Here is my initial
idea of creating a three over here in order
to create this effect. And I'm going to try and
create a red light across my beast because it has
some emissive channel. So those emissive
spots from my beast will emit a little red light. I'm just going to place a few
lights over here and tweak the radius and tweak the intensity of the
light over here. Of course, I'm going to
make it look very subtle. And just to add a little bit of the environment
effect over here. And I'm going to turn
off the shadows. Maybe just leave one
shadow over here. And I'm just tweaking up to
give it a little bit of red, reddish to the
environment around it. In this way, I'm just faking
his emissive channel, his emissive intensity
spreading from his body. Something like this. And let me just tweak. This is pretty much
about this one. I'm going to wrap it
up and we're going to see each other in
the next video. Thank you guys for watching.
9. Removing the beast and further polishing - Pass #5: Alright everybody,
welcome to part eight. Again, I've just speed
up the video with 50% in order to be a
little bit more quicker. And now in this part
we're going to find tune more of the objects inside our scene in
order to create this, this kind of feel,
to look more final. And right now I'm just
testing the scale of our main character to see how the scale will
fit in the scene. Let me just try and scale it
up accordingly to the beast. In this chapter, I'm going
to realize that the beast, it is not appropriate
for my scene because the storytelling we
will not be good. So at the end of this chapter, I'm just going to remove it. But again, I highly
encourage you guys to try it out and try to find
a sweet spot for it. Maybe create a swarm. Like I told you before. Right now what I'm
doing is I'm just fixing some of the stuffs
that I don't like. I'm just testing
some things with the lightning
changing temperatures in order to create
different moods. As you can see here, I'm
just trying to figure out what color should I use
somewhere in the blue gamma. As you can see over here, because I want to have
this coat effect, this cold feeling
inside my scene. I'm just testing, tweaking. And one thing that
I've mentioned before is I always
test with extremes. What this means is I just don't slides in the blue gamma and
testing blue, purple, yellow, everything
just to find out if I can create some
happy accidents. And maybe like some
other cover two. And again, just a
reminder, always. Create everything in folders, group everything in folders in order you're
seeing to be clean. As you can see everything. There is geometry or
inside my assets folder. Here I'm just playing
with the clouds and I'm going to finish up and fix some issues
on lightning. Here. I'm just testing some stuff. I'm just checking out if
everything is looking good. And this is again, another path of just
scattering objects, fine-tuning the objects in
order to be more clean. And just a reminder, always try to create
a clean scene. Don't overextend with
placing too much objects in your scene and just test
and observe everything. Now, I'm just testing and creating another different
angle for my camera. Of course, it's a
good method to place your camera from the bottom and not from eyesight
of a player. Because when you place
camera near the ground, it is more immersive
and the angle is more good and
more interesting. Here again, I'm
just moving some of my roof parts and just checking out on the ground
how my light will look. Alright. I'm going to speed up
the camera in order to get to that point that
I can move faster. And I'm just watching my ground below and just
fine-tuning the light. In order to create this
interesting lights, you need to pay a
lot of attention to the lightning in order to
create that kind of good mood. As I've mentioned it
all over this course. And I'm just going to
keep repeating it that the lightning is very, very important in order to
create the mood of your scene. Here, I'm just filling up the
gaps at the background over here and fixing some
issues where it alright. Let me just add a
little light over here because I want to fill up
a little bit light pink over here in order not to lose the details of the
rocks through the fog. Alright. And I'm just pushing a
little bit intensity. Dislike that. Maybe
make it a little here, which I'm just experimenting guys with different colors,
with different things. And I'm just turning off the
shadows in order to fake a bounce light and get that
details from the rock. Just like that.
Let me just put a little bit yellowish like that. Tune down the intensity. I just want a soft,
subtle shadow. Nothing too powerful. Let me just move it a
little bit like that. And I can play with the radius, with the intensity and
the color in here. I'm going to tweak a
little bit more the fog. Let me just see. And always when
you try a change, some stuff on your scene
like the lightning fog, maybe scatter the objects. Always go back to your original view where
you're going to render your piece of art
and just see it from that angle in order
to get the picture of it. Alright, The most
important thing that you need to tweak is
the exponential height, fog, and the directional light. Those two things are the base foundation of what you're seeing We
will look like, alright? And the final touch, of course, is the post-process. Because we are the post-process, you can achieve
the great cowering that we're going to have
at the end of the video. And of course everything will be described in one
of the final videos, I'm going to show
you my settings for the exponential height fork of the directional light
of the post-process. And you're going to have this as the screenshots in
the resource folder. Alright, so here I'm keep, I'm pushing my height folk and I'm keep experimenting
with the scale, with the view distance, with how dense the foregut is. And I'm just playing
with the settings. Alright, here I have
Q-point lights. Those are the green and
those are the red over here. And I just need to turn
down the intensity because it is too much and we have a lot of reddish over
here on the snow. I'm just going to find
some areas that I don't like in order
to blend more. In here as you can see, we have a clean scene. We have a clean view
of our astronauts, clean view of our object. And it's getting
more and more good. In order with the composition. Just going to need to move this column over
here and try if I can create some
shadows on the left, but this will block my vehicle and I'm just
going to get rid of it, of course, because they want
to see my vehicle there. Alright. So here is how my scene
loop without the fog. And when you turn on the fog, you get completely different. And Locke, and I'm just going to through AI and fine-tune
my fog density. And it is around the
values of 0.2 zeros, three or two in order
to create that mood. Alright, pretty straight,
straightforward process guys. I'm just playing with it. And lets me put 00 for, I think this is pretty
good for my folk. And right now I'm going to start experimenting with
the post-process. I'm going to put
on auto exposure. And I'm going to fine-tune
my auto exposure to 0.6. Maybe, something like this. Alright, right now the
thing that is of is that beast which is not
looking good inside machine. And I'm going to get
rid of it at the end of our video over here. And I'm just going to create and test different stuff on my
lenses, on my exposures. The most important thing in the post-process volume
or the color corrections, which is, which are the
highlights, the contrast. And let's continue on by fixing some of the
objects over here. Let's duplicate this pillar. Let's Play Store here and
create a good angle of it in order to add more
detail at the edge here. Because at least for me
it's too repetitive. And I'm just scaling up in
order to blend them together. And you don't want to have any artifacts between
the blending. So I just want to blend
it something like this. You see that my foundation, the bottom is a little bit off, so I'm going to tweak
it up like that. And I have a little artifact when they connect with
the rock up here. So I'm just going to fix
it by moving it over here. And as you can see, we've added another interesting layer of
detail at the left column. And I'm going to
fix the roof here. I'm going to make a little
bit of leveling, going down. By scaling it up. Let's try to rotate it. Let's try a sharp
edge over here. If it's going to work. Let me just rotate it, scale it a little bit. But that's too alien. Alright. Maybe, maybe we can play
store here at the bottom. Now. I'm just testing
different stuff. And let's place another
column over here. Just like that. And the roof in order to create
this a little bit of IC, I seen as over here at the Rock, because it is too repetitive. And I need to blend it with the rest of the roof. Alright? So we keep scattering and
fixing some of the objects. Let me just focus a little
bit more on the ground and on the right side of my scene. Let's add a little bit
of details over here. Because it is too repetitive. And I'm just going to add a little slope
over here in order to break up the ground. Carefully. Rocks. Maybe just like this. Creating a leveling. Let's test it and
rotate it over here. I'm just creating an
interesting point. And this will add a little bit more
details to the ground, at least at the foreground. I think that looks good. At this moment. Let me just check with another objects and try to play something
on the right side. But as I noticed at
the final version, adding some elements on the left side is going
to block my spaceship. And I'm going to lose this interesting points
of the spaceship, which I'm not going to do. Alright? So I'm just placing
this and this should be deleted because it's blocking the view
on my left side. And right now what is offset
is the beast that is, it is not suiting up pretty
good with my spaceship, but I'm gonna get
rid of it later on. I'm just going to try
and test another angle. Let me just I'm just testing
different angles right now to see if I can place my
camera at different angle, creating a different experience. Maybe at the bottom
of the beast, maybe at his side. Let's try his site. Or maybe top. As you can see, at least for me, those
angles are not working. And my initial first tango
was the best at this point. But this is the way in
order to experiment and find different angles where
you can render your scene. Of course, you can
create different angles. You can create a couple of renders and just put
them in your portfolio. Now the problem,
let's try a little close-up of our astronauts. That's not going to
work. So I'm just going to go back to my original. And maybe I'm just going
to tweak it a little bit. Now. I'm just taking a little
bit of time to observe the scene and think
about what can be changed and what points of interests are not good and
not suitable for my scene. And that is something that I've mentioned in the
previous videos. At some point stop or scattering objects and just
observe everything to see where some places are not looking good and other places are good, looking good. And I have this idea to create a little rock and
place my camera on it. I'm just testing
it out right here. If this look good. But in the end, I think
this is not looking good. And my first initial setup
with the grounds was the best. Right now, I'm just
going to try to find another angle to some, going to fix some of the things that I
don't like over here. Alright, I'm just going
to move this a little bit over here in order
to get that rock. And I'm just going
to place this up. Alright, the next
step for me is again, to start and play with the fog up and back process
where you go your test, you scatter some object, we fixed some, some
objects on your scene. Then you go back to
your lightning and start creating different,
lightening, different moods. Tweaking up the angles
of the lightning, tweaking up the
shadows, et cetera. I'm just testing out a little more stuff and
light pink over here. Those are the three
important things. The exponential chi form the directional light
and the post-process. Here I'm just playing
with the bulk density and height fell off in order to try and get the
best result of my talk. I don't want it to be too dense
in order to lose details, but I want to be enough in
order to feel my scene. And I found out that 0.0034
are the best numbers for me. And right now we're getting somewhere like the
mood, how it looks. And I don't like the beasts, so I'm just going
to delete it or just try to place it on my scene somewhere else in order to create some other
ideas and experiences. But in yet, I'm just going
to remove it because I think it is off for my
scene and for my idea. But of course guys, and highly encourage you to
create your own idea and maybe use the beast and
show me your great idea. With that in mind. As you can see, I'm here, I'm scaling it and creating
it to be like a little. And as I mentioned before, you can duplicate maybe ten of those and just create an
immersive swarm of them. This is pretty much
for this path. And we're going to continue fine-tuning
everything in the next video. And I think everything is
getting to look good right now. We are losing a lot of
detail at the background, but we're going to fix that with adding some point lights. And those points
slides will give us details in our backgrounds, in the rocks in the background. The reason that we are using, that we are losing details is because of the
density of the fork. So thank you guys for
watching this one. I'm pointing you
in my next video.
10. Final composition and Fog, Light and Post Process setup: All right everybody. So this is our final video
where we're going to finally tweak everything out and creates everything
to look final. Here, I've sped up the
video on 50 per cent. And those are,
those will be some of the final touches that
we're going to make. This video will be a
little bit longer, but it has a lot of elements in order to
finalize your scene. So as you see here, I'm just trying to
finalize everything. And I'm just trying to
finalize the lightening first. Let me just go up there
and fix some spaces, Some places that we
don't like the lighting. I'm just going to move
this a little bit back. And of course again, I'm just watching
how the shadow is interacting with my
surface at the bottom. I'm just tweaking. What I want to do is I want
to place this shadow and I want to lit only a little
bit of the right side of my ship and don't get too far away from the
ship because I want this lightning to just hover on the right side of
the ship and don't get too far away from the ship. And I want not to have so much exaggerated spikes
here, enlightening. And that's why I'm just
staring this up here. As you can see, I have
achieved almost what I want. Just a little lightning over the right place of the ship and not too far
away from the ship. This lightning, we'll
emphasize on the ship in here and fine tuning everything by moving
them a little bit. Let me just check out
again the lightening. The next thing is I
want to check out the lightning from
different angles.
11. Final words and touches in Photoshop: Finally, when you are
ready with your shot, you created the camera angle and you finished
everything here. You set up the lightning,
you set up everything. You go over here
to the three dots, to three lines over here, and you go to the high
resolution screenshot here. And here you can multiply
the size of the resolution. So you can create very high
resolution screenshot. But right now I'm using one. And you can create a screenshot from
here, I click capture. It, it shows the directory where my screenshot it is taken. So you can click over here
and go to your folder. And after that, I've touched a little bit in Photoshop,
but very little. So I've put a
brightness over here. We had five of brightness. I have pulled a photo filter, cooling filter, MBB with
eight per cent density. And I played a little bit
with the hue and saturation, which is plus 20, to give a little bit
more powerful scene. So if I turn them off, you can see that I
lose some color. And I just adjust those things in order
to get the final image. So thank you guys for
enrolling in this course. I will be glad to see
your final results, so share them with me. And I'll be happy to
give my feedback again. Thank you so much
for supporting. And I hope this course was pretty helpful for
you in order to establish your mindset and give you
an idea of how you can create a perfect
looking still images. Thank you guys again, I
see you in my next course.
 Ivan Yosifov, 3D Game Artist & Animator