Transcripts
1. Introduction: Getting started to undril
engine is super exciting. You can shape a landscape, drag various models
on the level, put some more stuff in there, even more, even
more treaty models until you end up with
something that you created. But it's static. It
doesn't do anything. The only thing it
does is look pretty. And so pretty soon you
realize that blueprints, the foundation of
dynamic functionality is the key to make your
games playable and introduce game mechanics to make movie renders have
dynamic events that bring them to life, or in my case, even make a fully dynamic
shooter simulation that will be used
for a theater play. Hi. I'm Jordi. I'm a
digital creative and I use UnrLEngine for
all sorts of projects, ranging from video games to movie renders
and so much more. UnLEngine has hundreds of
different applications, but regardless of what
you use the engine for, eventually, you want to learn
how to create blueprints. Well, that is exactly what I'm going to help you
with in this class. My goal is to teach you the logic behind
blueprint so that you understand what
you're doing and not just brainlessly
recreate what I do. That's why we'll
go step by step, create fun little things, and really explore some of the key notes what they
do and how they work. And we're also going to
make mistakes and get stuck on things because
that's part of the journey. But together, we'll
solve those mistakes, and I'll show you some really
good techniques how you can problem solve to eventually
get your blueprint working. By the end of this
class, you'll have a solid understanding of how blueprints and
Unreal Engine work. You will be able to
turn your ideas into a working blueprint and
eventually make your dream game. That insane short film or
any other unreal project, you had in mind a reality. This class is for everyone
who started exploring UnreL Engine and is now stuck on Blueprints. Does
that sound like you? Well, then I'm super excited to help you and I hope to
see you in my class. Let's tackle Unreal Engines
programming together and learn to understand the fundamental
basics of blueprints.
2. The Blueprint Interface: Hey, guys, welcome,
and I'm super excited that you've
started this class. We're going to dive
into the world of blueprints for Unreal engine, which for some is going to be
a scary monster to tackle. But once you understand the fundamental idea of
how a blueprint works, it's actually pretty
easy and a lot of fun. I can spend hours figuring
out interactive systems, and it's so rewarding
if that works. So let's create a blueprint. In the content browser, right click and
you'll see that we can create a blueprint
class from there. This will open up a
window which asks us to select which kind of
blueprint we want to build. And on the top here sits
the most common ones, which we're going but
expanding all the classes, we can find over 1,000 more. Now, don't be
overwhelmed by this. There are very specific blueprint classes which
are going to make more sense once you understand the general idea
behind the blueprints. We'll come back to this when this is going
to make more sense. So for now, just
collapse that window, and let's have a look
at the common class. Actor class is the
most used one. As the description says, it allows you to build something and place
it in the world. So let's start with that one and explore some of the other
ones later in this course. And I'm going to name it BP
Underscore interactive Cube. BP stands for blueprint, and it's a way to stay
organized in your project. So now we can go ahead and
drag that into the level, and it will show the widget
of the actor type blueprint. It's empty, of course. So
either from the outliner, we can click on Edit or simply double click on the
blueprint class in your content browser. Hand, here it is. The window that you'll spend
most of your time in. So let's explore what we
see and what it's used for. On the left hand side,
we have the components. And here, we can add components that we want to do
something with. So I can click on at and choose from a
long list of items. And let's get started
with a simple cube. This is the same
cube that you would add directly into your
level, by the way. It has its own view port, and you can move it around, scale, rotate, just like
you would do in your level. And interesting is that we
can also see that cube back in the level now since we've
added it to the blueprint. What's very important
to understand is that if we move the
cube in the level, we're actually moving
the entire blueprint. In the detailed s panel, we can see the cube
that we've added. This reflects the components
window inside the blueprint. And we could select a cube from there to specifically
move that actor, but that's not good
practice because it doesn't reflect the position of the cube in the
blueprint anymore. In fact, changing the
position in the blueprint again does not update
anymore in the level. So let's reset what we've
just done in the outliner. Going to work and build everything inside of
the blueprint itself. Alright, let's do
something with this cube. Let's create our first
functional blueprint. And there are two places
we can start scripting, either in the construction
script or the event graph. The construction script is everything that
happens in the editor. For example, let's drag the cube into the
construction window. Right here now is a
reference to the cube, and from there, we can click and drag to connect
it to a node. Unreal will show me a list of all the nodes that I can
connect the cube to, essentially showing all
the features of the cube. Like all of the transform
options are in there. We could scale position or
rotate the cube from here. Now, obviously, we want to set the position or
scale or whatever. Choosing get returns
to current position, which is useful
for other things. For now let's choose
set position. You can even search for that. You'll see relative and world. The relative is the position inside of the blueprint,
which is at zero. The world position is the
position and the level itself. So let's pick a
relative for now, and you can see that this node allows us to enter
a new position. For example, 100 units
higher on the Z axis. And the last thing we
got to do is connect the construct node to
the location node. If you want to see the
changes in the level, we got to click the compile
button on the blueprint. So with almost every
change in your node, always click that
to see the result. And that offsets the position. Hey, your first blueprint
told you it was easy. Now, let's have a better
look at the node. Every node has inputs on the left and outputs
on the right. And in order to activate a node, it always needs an incoming
execute connection, and that starts with the
construction script. The other options like target, new location, and
whatnot, are values. Sometimes you need to have
something connected to it. Other times you don't. For example, I can
disconnect the cube from the target by Alt
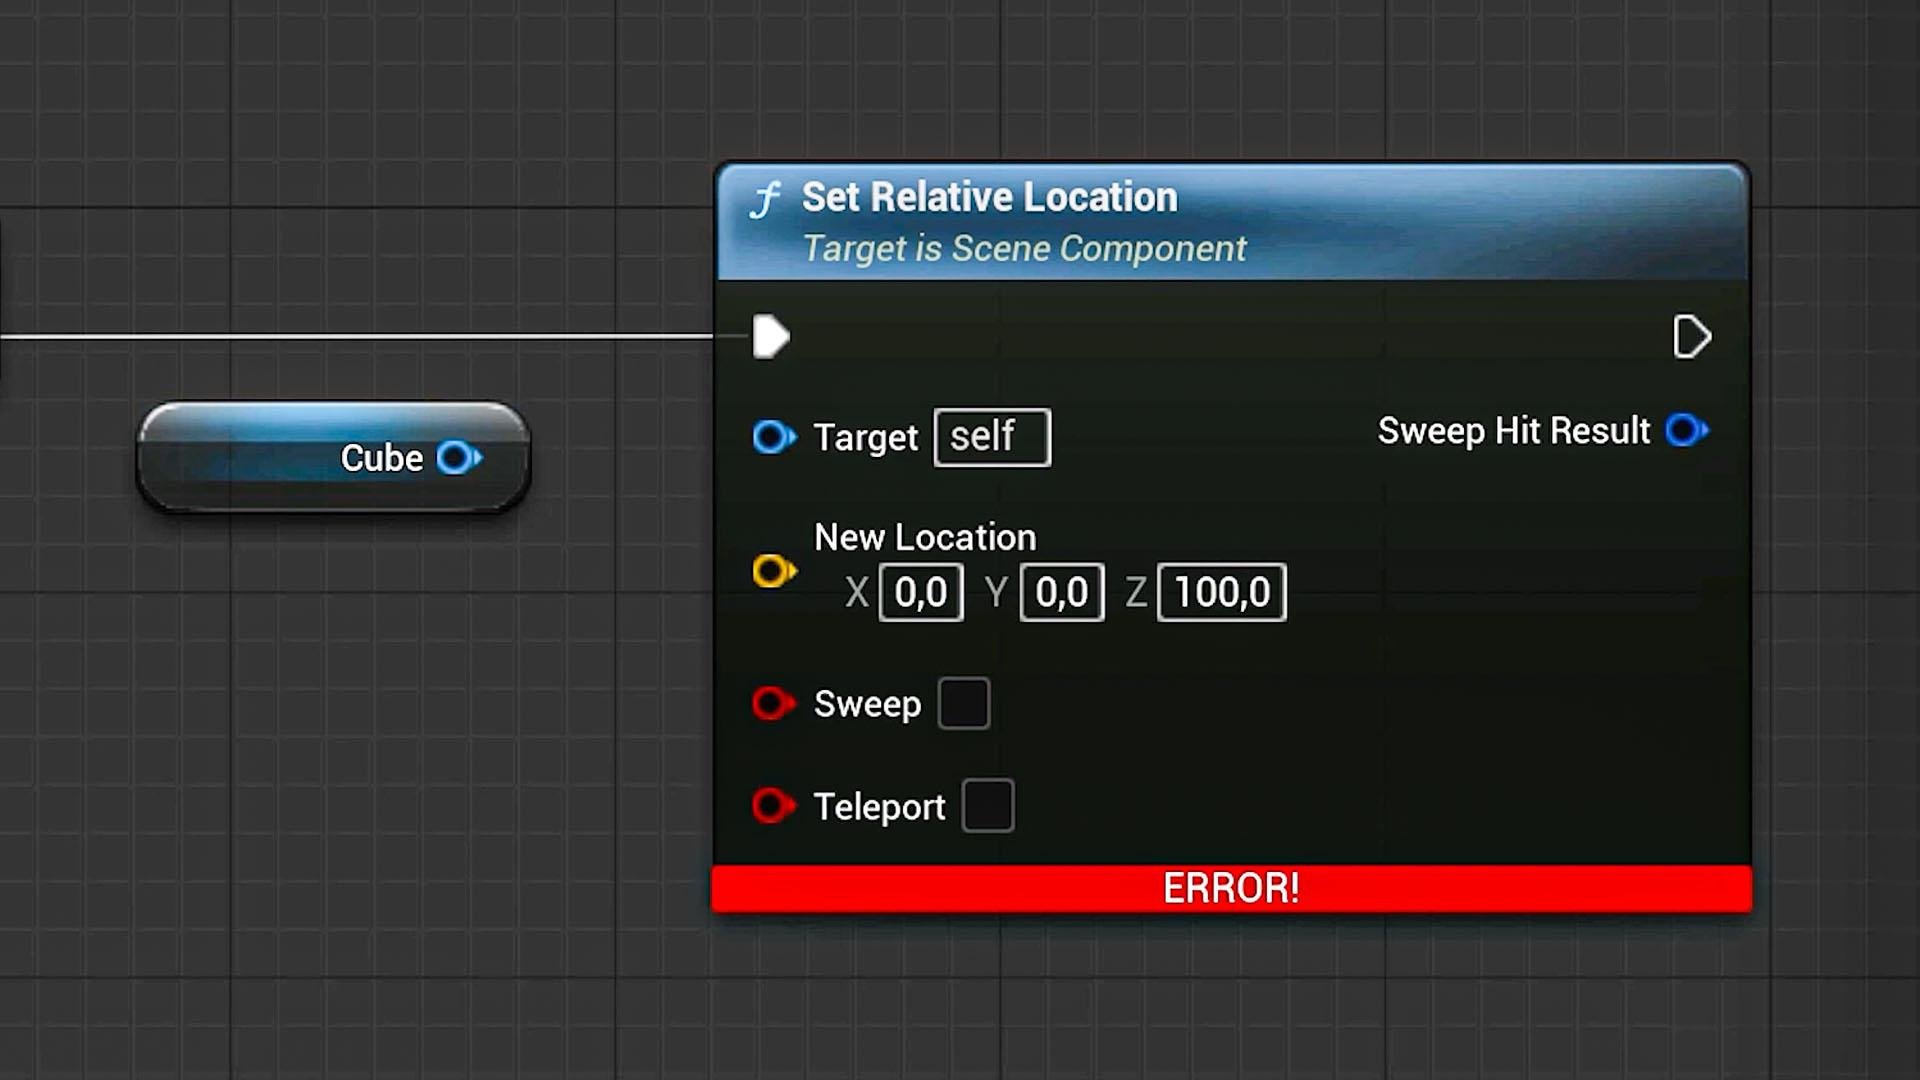
clicking on the value. Compiling the blueprint
now will throw me an error on the
notes because it's trying to execute the command to change the location,
but of what? It's not being told which target it needs to change
the location for, and that throws me an error. On the bottom and the
compiler results, we can read more about the
reason of the error itself. So that is great to figure out where and exactly
what the error is. Very user friendly
in my opinion. Let's connect the cube again and compile to solve the error. Some values on the input can be filled in directly
like the location, so it doesn't need an input, but we can if we want
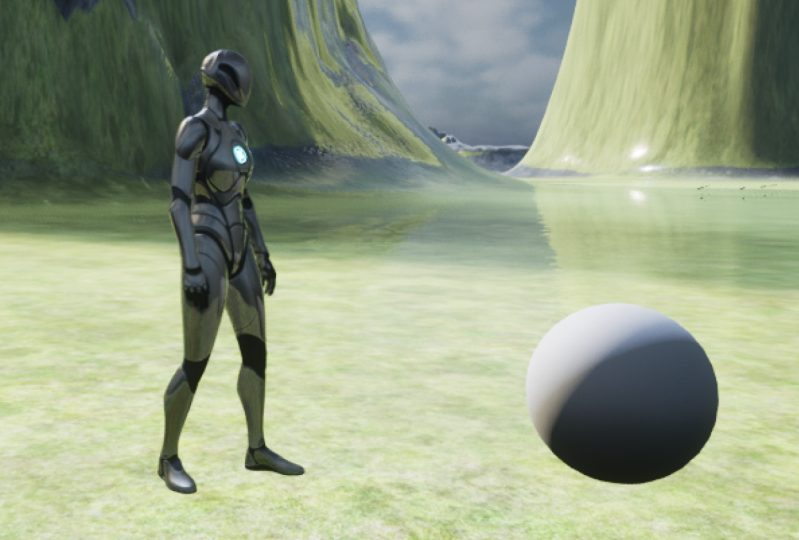
to. Let's do that. I'm going to add a new
component this time a sphere. And from the viewport, I'm going to drag it to
some different position. Go back to the
construction script now. What I want to do is bring the cube to the same
position of the sphere. So the first thing
I got to do is get the value of the location of the sphere and then input it into the new
location of the cube. So drag the sphere into
the node editor and connect it to a get
relative location node. Interesting now is that
the color of the node resembles the color of
the input location pin. That's also an indication
that we connected to it. Click Compile and
boom. It's working. And that brings me to
the difference between the construction script
and the event graph. You see, everything we create in the construction
script is static. Any functionality we
need before we run the game or go into simulation
can be created in here. A great example are templates. And I've got an example, a bunch of assets that I created. These are also blueprint actors. I can drag one into my level. And when I go into
the blueprint itself, you can see that it also has some actors in the
components window. We have the light
fixture itself. Lights and some other meshes
that make up the light. And when I go into the
construction script, you'll see a whole
bunch of nodes in here. Now, let me go back to
my level and select a blueprint to check
out the detail spanel. And all these options
you see here are custom created from within
the construction script. I can change the
color of the light, the intensity, and more. That's all done
within these notes. And I encourage you to go
through them step by step. You can easily read what's going on, and you'll
understand it. Like the first one, we change
the intensity of the light, which is set intensity. We tell out which target, and then we choose
the intensity. And this here comes from the options we have
in the details panel. As I said before, we can only create static
things in here, like changing an option. The moment we want
something dynamic, we got to create those
notes in the event graph. And you can see that I also have a bunch of notes in there because one of the
options I have from the details panel is
to enable flickering, and you can see
that it doesn't do anything because flickering
is something dynamic. It only works when
we play the level. So click on play and you'll see now that the
light is flickering. Now before we end this lesson, I want to show you how the
event graph looks like. Let's open up the Cube
blueprint again and this time, click on the event graph on top. And instead of a
construction script note that we have at the start, we get a bunch of ters such as event begin play and event tick. And I would like to show
you what these are. The event play is being
executed once we run the game, and I'm going to connect
it to a print text note. This is a very simple note
which will use a lot to figure things out and
find potential issues. It also says here,
development only. So it's not really intended
for within a final project. I'm going to change the
text to game start. And the only way to see it in action now is to run the level. And by the way, I did not
compile this time because Unreal automatically does
that when you run the level. But you can see now that
it prompted the text. Click on stop and go
back into the blueprint. I want to connect the
text to the event tick and disconnected from
the event begin play. Watch what happens now? With every new tick or frame, that text is being outputted. So it allows you to update
something every single frame. But there are more events like the actor overlap
that we have here. We can perform some
kind of action whenever we overlap or run
into this blueprint. For example, we run with our
character into the cube, and then the cube has
to turn into a sphere. Sounds like something
fun to make. Well, let's see how we can
do that in the next lesson. For now, remember
that we can add components that we want
to use in a blueprint. From the viewport,
we can then see those things and also
change their properties. And then we have two places to actually create a
blueprint functionality, which is the
construction script for static things like an
options menu for a light, and finally, the event
graph for dynamic features. And that's also the place
that we'll be working in the most of the time.
Thanks for watching.
3. Events in Unreal Engine: When you're designing
a blueprint, we understand that
there are two ways of doing that, either static, which adds functionality to a blueprint that can only
be used within the editor itself or dynamic functionality that gets triggered by an event. So that means something
that needs to happen in order to set our
sequence of nodes in action. And that can obviously only
work when we run the level. So let's open up our interactive cube blueprint again and navigate
to the event graph. By default, we see three
different events in here. But no problem if you would, for example, delete
the event tick. You can always find it
back by right clicking, then going to add an event in which you'll find all
the available events, including the event tick. Now, a specific event can
only occur from one note. If I were to add another
tick note in here, you'll see that it
just highlights the current one.
Is that a problem? Well, let's create something
on the event tick. I would like to rotate my cube so that it
keeps spinning around. And this is how you
want to approach this. Think about what property we
would need for the rotation. Well, that's going
to be set rotation. So let's look for the
set relative location, and it's automatically
going to suggest the cube, which we already have
in the blueprint. And so it automatically
targets the cube. If it didn't or you
deleted that target, you can always drag
your cube mesh from the components
window into the target. Okay, so I'm going to connect the event tick to
the rotation nodes. So now, with every frame, the rotation of the
cube gets updated. Great. But to what? I can only manually
enter a new rotation, but that's not
going to rotate it. So we got to figure out a way to take the current
rotation value at one to it and insert that
back into the new rotation. That way, we keep adding
one with every tick, and it shoot rotates. So let's create a new note this time choosing the get
relative rotation. But wait, we find out
that it's not there. Well, that sucks. Is there a different approach to get the current
rotation, perhaps? Well, if I select my cube, I can see that the
rotation property is part of the transform group. So maybe we can
find it in there. Okay, right click
and search for Get a relative transform.
And yes, it's there. The issue now is
though that this note returns everything in one value. This holds to rotation, the position, and the scale. In cases like this, we
can simply right click the value and choose
split struct pin, which reveals the t values. This is very common when
working with blueprints. Sometimes you want multiple
values in one pin, other times you want
something specific, and then you can just
split the values. In fact, I'm going
to right click on the rotation value as well and split it again because I don't need all three
rotation axises. I only need the Z axis. And this is how to get it. I can now do the same on the
input for the set rotation. So now I can plug the
Z axis into the Z. Obviously, this is not
going to do anything. We have to add one to
it with every tick. So let's disconnect the
pin Alt click and drag the Z value to a place
to add a new node, and we'll look for add and we'll find one
under operators. So we take the current
value and add it by one. The result of that goes
into the set rotation. Alright, let's go ahead and
run this. And look at that. We got a rotating cube.
Isn't that amazing? So, as you can see, it's
not that complicated. I've got no idea
about more than 90% of all these different notes. If I want to achieve something, I try to think logically. What are the steps needed to achieve what I
want to create? And I just use the search bar to look for notes
that makes sense, try them out and
see if they work. If they don't try to
look for another. My goal is to teach you how to think logically
and blueprints so that you can create
anything you want without having to blindly
follow a tutorial. It's very important that you understand
what you're doing. This is pure programming, but blueprints makes
that visually, which is easier for beginners
to get into programming. All right, so what other
events do we have? If you think of something,
try to search for it. Like, I want to press the key, which needs to trigger
something cool. Well, look for that in the
search bar. Well, there it is. It even gives you two
possible events when you press the key or when you release it.
Alright, that's cool. I want to press that key and then set off the rotating cube. So disconnect the event tick
and then set it to the key. Let's run that and hit the key. But what's that? Nothing
is happening. How is that? Well, that's because of
something called possession. And simply put, I am not
controlling the cube. It sits somewhere in the
level and it lives by itself. Some events like a
keypress can only happen when I control the cube or
in other words, possess it. Well, let's learn about
that in the next lesson.
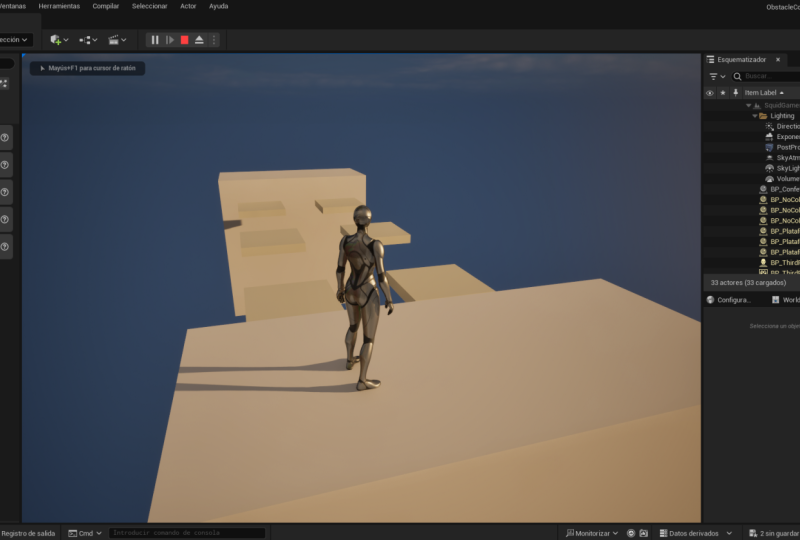
4. Controllable Blueprints - Pawn and Character Classes: When a blueprint
exists in your level, it lives by itself. We cannot control it. We can only execute
events like the tick or at the start when the level
loads or when we run into it. But that means we first need
to possess a blueprint that we can actually control to
bump into the square mesh. So every time we run
into the problem that we need to control or
possess a blueprint, let's start with the easiest, and you might have already
played around with it. In my content browser, I'm going to click
on AD and then choose Add feature
or Content Pack. And right off the bat,
we can choose from a set of different
blueprint templates. You can pick any, but for
better demonstration, I'm going to choose the
third person template and then say Add to project. You can then close
that window and find a new folder in
your content browser. And we're specifically
interested in one item from the template. Open up the Blueprints
folder, and in there, you'll find BP third
person character. And we can drag that
into the scene. I'm going to open up the
blueprint and explore it a bit. And if you port, you can
see different components that are needed to give
us a playable character, like the character itself, but also a camera that follows the character and creates the
view that the player sees. There's a camera boom, making sure that
the camera follows the character as it runs around. But then how do we run around? While, looking at the
construction script, it's completely empty, and
we understand why now? Because it's entirely dynamic. So when we open up
the event graph, you can find all the
notes that make up the movement of the character.
Well, that's great. Let's close the blueprint
and hit run. But wait. I'm still not controlling
the character. I haven't possessed it
yet. What's going on? Well, you can only possess
one blueprint at a time. And by just having
them in your level, the project doesn't know which one you actually
want to control. And the way that
we define this is through a game mode blueprint. It's another type of blueprint. Now, as the third person templates came
with one of those, you've probably already seen it. I'm going to double click on it. Now, we don't really have all of these different tabs in here, like the event graph and such, because a game mode
blueprint is very simple. It's a file that's going to set the default blueprints
for their level. So under the default classes, you'll find something called
the default pawn class. And that's the blueprint
that's going to get loaded to be able
to take control over. So I'm going to close that and look for my world settings. These are the general settings
for your entire level, and you'll find a game
mode setting in here. You can pick it from a
drop down menu or just drag the game mode blueprint
into that setting. So the world says, Look at this game mode blueprint
when you run the game. And the game mode Hey, look at the third person
character blueprint for the player to
take control over. Now, this means that for a blueprint that we
take control over, we don't need those
in the level. So I'll just delete it and run
the game, and there we go. The character blueprint is loaded and spawned
into the level. And if you want it to be
spawned at a specific place, you can add a players
start to your level. Ain't that something cool? So what we can now do is
open up the cube again, and let's create something fun where we run into the cube. I'm going to right
click and look for something like event Colt, maybe, and I can't really
find something like that. So let's scroll up to
the events and see that if we have something
like an event hit. Hm, and there is. And it
says that this event will trigger when this actor
bumps into another actor. That's exactly what we need. And pretty cool is that we get a whole bunch of options here. So even depending on where we hit it from
the hit location, we could create different
kinds of functionality. But let's keep it
simple for now. I'm going to drag my cube into the event graph because I want
to do something with that. What if we change the
mesh from a cube to something else when we run into it? That would be awesome. So let's look for mesh
and see what we have. And I see that we have a
node called set static mesh. Well, that's probably
going to work. And I can choose a different
mesh from this dropdown, something that is in my project. I can find many that come from different packages within
the engine itself, but let's look for sphere and just take anything.
Doesn't really matter here. And, of course, we
want to execute that command when the blueprint
is hit. So connect that. Alright, let's give it a shot. Hit play, and let's
run towards the cube. And boom, we've got a sphere. Great. It works. But let's go back to the
initial problem we had. I'm going to delete the event hit and create a keyboard event for the key and connect that
to the static mesh node. So in order for this to work, I need to take control
over this blueprint. Okay, sounds easy, right? We navigate back to the
game mode blueprint. Open it up and from the
default pawn class, I'm going to choose
my interactive cube, but I can't find it. Hmm. Well, remember when
we created our blueprint. I'll do that again real quick. We chose an actor class. But as you can see, there's also a pawn class or a
character class, which has similar properties. Well, does that mean we got to remake the entire
blueprint again? Well, don't worry. Going back to my interactive
cube Blueprint, you can find a button at the top to go to
the class settings. And here, you can find
the parent class, which is currently set to actor, but we can change it to
pawn when searching for it. So at all times, you can change the type of blueprint
that you have created. Now, when we go back
to the game mode Blueprint and from
the default pawn, choose our interactive cube let's run the game
and look at that. We are a cube. Obviously, we cannot
run around with it because we have no player
controls for the cube. For that, we have to create
all the event graphs first, but we are spawned into the
scene from that blueprint, and that means I possess it. If I press my key, the mesh changes to a sphere. I can't really see it because
I'm inside the sphere now. So let's do something
real quick here. Open up the cube blueprint, go to the viewport,
and I'm going to add a camera into
the components. Let's drag that
camera a bit more to the back and now
run the game again. We're now seeing the
cube through the camera, but we're still in
that same blueprint. So if I press L, we can see change to a sphere. So to conclude there's only one blueprint that
we can take control over. However, with that pawn
or character blueprint, we can interact with other normal or actor
blueprints in the level, and directly controlling
something or interacting with are
different kinds of events. They're not
categorized like that, but we need to keep that
in the back of our minds. Some of you might already
think, but, Jordan, you want to be able to control multiple blueprints
at the same time, like having a bunch of lights in my scene and pressing
different keys, turns them on or off. Well, that is a great question, and there is a solution to that, but that's for the next lesson.
5. Exploring the Level Blueprint: I created a new
level called Lights, and what I have in here is
a plane with some pillars, and I've got three lights in here which I like to
take control over. We've got a blue spotlight here, a sort of fluorescent
green rectangular light, and finally a warm
colored point light. These are not blueprints. I just put these lights
straight into my level. Now, putting these into a blueprint is not useful
as we want to take control over these by pressing a key to turn them on or off. Now, making a pond class
blueprint is also not an option, as that will spawn the
blueprint into the scene. So we have very bad control over where they
will be positioned. Plus, we can only take
control over one blueprint. So we got to figure
out a different way. Well, here's something
interesting. The level itself has
a blueprint as well. On top here, you'll find a
button that is going to list all the blueprints that are specifically linked
to the level, one of which is the game mode,
which we've seen before. We've sort of connected
it to the entire level. But as you can see,
there's also an option to open the level blueprint. And interesting about
this blueprint is that it runs at the highest
level in the hierarchy, which means that we
automatically possess. However, this is not a
normal blueprint class. It's always there by
default, but as you can see, there is no
components window nor a viewport nor a
construction window. That's because the
components are basically all the stuff that sits in your level, such as the lights. We're unable to add
properties to a level, so there's no construction tab, only any event graph for
when the game is run. And so now it becomes very easy. We can simply select the
lights from the level and drag them over into
the level blueprint. And I'm going to create
the events for the number 12 and three keys
on my keyboard. The first one has to
turn on the point light, and there are some different
ways we can do that, and the best way to figure
it out is just to select the point lights in your level and check out the detail spanel. Play around with its
properties to find out the best setting to
use in the blueprint. Like, yes, we can
use the intensity. You know, basically set it to zero and then back
to something else. But then we are hard
coding something in, which is bad practice, and you want to avoid that hard coding as much as possible. Hart coding is where
you are going to put values into the blueprint. Imagine we would set the
lumen when the light is on to 1,000 in the blueprint. But then I go back to
my level and I start to tweak and decide to put the brightness of that
light back to 100. That means that I also
got to go back into my level blueprint and set the intensity there
to 100 as well. Hard coding a value, that number is fixed. So instead of doing that, let's look for a property
that can simply turn the light on or off instead of changing
the intensity value. And under rendering, we can find such an option
called visible. As you can see a simple toggle, that will show or
height the component. In this case, making
the light shine or not. Awesome. Let's go back
to the level blueprint. And from the point
light, let's drag out the pin to connect it
to the node visibility. And there is something
very interesting in here called the
toggle visibility. And you're luck today
because we don't always have a toggle option for
every property. Usually just a set option, and then we need
to manually create some notes around that
to make it toggle. But for now, we can
use the toggle, so connect your key one execute
to the toggle visibility. And I'm going to do the same
for the rectangular light. Also here, toggle visibility. And finally, the
spotlight toggle visibility as well and connect
the key tree to that note. Let's go back and run the game. And you'll notice that
we can turn these lights on and off now with
the appropriate key. Even make some disco
effective. You do that fast. Now, I've got a
small assignment for you before we move
into the next lesson. When I start my level, I want all the lights to be off, but I don't want them to
turn them off in my level. So the blueprint has to do that. They need to start off
when I run the game, and then I can start by turning them on or off again
by pressing my key. It's very simple. Think about the correct events
that are needed to set the state of the light
when I run the game and I'll show you the
solution in the next lesson.
6. Simple Game Mechanics - Bomb Planting System: Hey, welcome back. So my lights are currently on in
the level Designer. I'm going to run my game, and as you can see,
they are now off. I can toggle them back on or off by pressing my
dedicated keys. And I also hope
that works for you. Now, interesting, there are ten different ways to do this. I probably did it
different than you did. So let's have a look at
the level blueprint. What's going on
here? For starters, the key press and visibility toggle still
remains the same. I use the events begin play to set the
starting visibility. I assume that you also use that. Now, let me decouple the
sequence node for a moment. And interesting is that
we can connect the events begin play to the toggle
visibility as well. So that means there are
two different events that can take care of the
execution of that notes, the key press and the
events begin play. Now the problem is that
an event could only execute to one other
node as you can see. So we got to be a bit creative. One thing we could have
done was selecting all the toggle visibility
notes, copying them, and then pasting them over here, and we can hook up the begin
plate to the first note, then the output of that
to the second one, and finally that
one to the third. We're making a chain. And when I run that,
it also works. My lights are off.
But as you can see, there are a lot of notes for
something simple like this. We're making it complex. We're using a copy of something
that's already there, so it's good practice
to always try and work with as minimum
notes as possible. So I'm going to delete
all of that and connect my begin play
to the sequence node. This will execute each command
one by one in a sequence. It works exactly the same, but a bit more cleaner. Alright, let's close it all up. I'm going to open up
my cube level again, and I'm going to open up the
game mode blueprint also and change the default pan back to the third
person character. Because this allows us to
run around the bits and thus help us with the next thing
that we would love to create. I would like to place a
bomb anywhere in the world. Then step away, and when
I press a certain key, that bomb should explode. We're going to take a
very simple approach, so don't worry too much. I'm going to right click
on my content browser and choose to add a new
Niagara system. This is a particle and
fluid simulation system very powerful and very
overwhelming, but don't worry. We can choose from a template, and there's something
pretty fun in here called a confetti burst, perfect for the explosion. So let's hit Create and
name it confetti burst. As for the bomb itself, we can use a cube or something that's
already in the engine. If you like, you can import your own treaty model, it
doesn't really matter. So since this entire action happens from within
the character, we're going to open up and work inside the character blueprint. Just leave all the notes that take care of the movement alone. You can simply ignore that. We'll work on the site. So we're going to think
logical step by step. We're going to bump into
problems and then solve them. So the first thing is we press
a key to plant the bomb. So I'm going to create a
keyboard event for the letter B. When that is fired, a
mesh that represents the bomb should appear in front of the character
on the ground. Let's go to the viewport
and at a cube component. We can scale and reposition it a bit so that it sits in
front of the character. Now, running this, we can see that the cube is in front of the character moving
along because the entire blueprint
is being controlled. But that's a good thing
because it means that the cube will always be at the right spot when we plant it. The only problem is
that at the moment that the cube pawns in
or becomes visible, it should no longer
follow the character. Otherwise, we get
confetti in our face. Well, there's a nice option to overwrite that an object
should follow the character, and that is simply
by enabling physics. We can simply check
that property in the detail spanel when you
have your cube selected. So now we get a cube that
falls and stays put. We can even run into it, which is fun. We
enabled physics. So at the start, obviously, we also want to disable the
visibility of the cube. Not everything needs
to be programmed. Sometimes you can just
toggle some options. But the following dust, when we press the B key, the cube should become visible. We've done that before,
so that should be easy. Drag the cube into
the event graph and connect it to the
set visibility note. We don't have to toggle
at this time and, of course, make sure to check the new visibility
so that it's true. Alright, now we got
to make sure that the cube spawns in
front of the character. And even though it's
invisible from the start, it still does spawn right in front of the
character at the beginning. But then we walk around and we press the Biki to
set it to visible. Obviously, it just appears
from where it already was. So, okay, we got to set a location of the cube,
and we can do that. We've done that before.
Just take the cube and connect it to a
set world location. The way, if you have trouble
to understand the difference between a world or a
relative location, this is a great
moment to try it out. You'll see that relative
is not gonna work, which is the position
inside of the blueprint. As we run around,
the position of the character changes
in the world, but not in the blueprint. The relative position
stays the same. But then what is the new
world location of the cube? Well, obviously, where
the character stands. So let's take the character, which is the skeletal mesh, and let's get its
world location. Connect that to
the new location. Great. Run the game, and
I'm going to walk around a bit and then plant the
bomb. Oh, what is that? It actually appears exactly on the same spot
as my character. You know, it should
be in front of me. And here's where it gets tricky. We're going to have
to solve a problem. As we've seen before, we can split the pins
of the location. So, in theory, we could connect
the X to the X and then connect the Y to an add
node and add a value of, let's say, 200 and put that value into the
next Y location. And finally, the Z.
No it stays the same. So, okay, in theory, we have an offset now. And let's run the
game, walk around and press the B key
a couple of times. And we realize that that offset depends on where the
character is facing to. So this is not really
a good option. We cannot take the
position of the mesh. I'm going to delete all
of this and right click my pins to combine
them together again. We're gonna need the position
of something that is in front of the character. Hmm. What if we just add
something in there, like add a sphere
to the components, and I'm going to drag that sphere in front of my character. Now, as long as I
don't enable physics, that sphere will just follow me and stay exactly in
front of the character. The only thing I got to do
is disable its visibility. There is one problem, though. Even if it's invisible, I can still bump
into other objects. So we got to disable
the collision, as well. You can search for collision. There isn't really an option here to enable or disable that, but I do see that there's a
preset which says block A, and interesting is that there's an option here that
says no collision. Hm, I wonder what that will do. Well, it fixed my problem. So now it all comes together. We're gonna take this sphere, get its world location, and connect that to the
new location of the cube. And Bm, we got the bomb
planting mechanism working. One problem, though, we
got a bug in the game. You know, players can
endlessly respond the bomb, and that makes sense. Every time that we
press the B key, it sets a new world location. There's only one bomb, so that should only happen once. To tackle that problem, we're going to take it
step by step again. So if the player presses B, the bomb spawns in, and we have to remember that
the player did that action, so we cannot perform
it another time. You know, it's like
how humans work. If your child steals a
cookie but you don't see it, they can take as many
cookies as they want. But if you saw them
taking once a cookie, you save that into your memory, and you can tell your kids
not to take another cook. And children do that.
They listen very well. So we got to store this into the memory of the game as well, and that's where
variables comes in. We can find it back here on the bottom left in
the blueprint editor. We already got a few.
These are the components that we edit like the
sphere and the cube. But we can also
create a new one. Click on the Plus and name
the variable planted. And by default, it says that
the variable is a boolean. This is the variable type. We can store all sorts
of things into a memory. A boolean is simply a
true or false statement. But we could also change
it to an integer. This is a number. We can
have a text variable. There's also a vector variable. These are three values,
in other words, XYZ, so to store a location, and to make things worse, there are about 7,000
more variable types. But don't worry, just like
with blueprint classes, you'll only use the
most common ones unless you're already
familiar with unreal and you're working on a bigger project that
has very specific needs. Now a bullion is
fine, true or false. Drag that variable
into the graph, and we got to choose
between get or set. Do we store a new memory or do we look at what
we stored before? We're going to start with
setting the variable. So when I press the B key, we first got to make sure to go through all the actions
to plant the bomb, so drag the set node on the end, then connect it and
set it to true. Now, go back to the beginning. When I press the Biki before I take the entire
action of planting the bomb, I will first check my mind to see if we
have already done that. So this time, we take
the get planted. And the way that we can check this is with a simple branch, a note that you'll
use a lot, as well. If you're into programming, it's basically an IL statement. If a condition is
true, then do that. That's an IL statement. In real, it's a bit different. It's called a branch. It looks at the condition, and if it's true, then it
follows this execution pin. If it's false, then
it follows the other. A great way to split the flow of your notes depending
on a condition. It's already planted,
if it's true, then we don't do anything. Or we could add like a print text saying the
bomb is already planted. If it's false, then that means that we haven't
planted a bomb yet. Then we could do
the whole planting the bomb sequence of notes. And running the game, we can see now that it works perfectly. Alright, the bomb is planted. Let's take some distance
now and make it explode. We can assign the explosion to different keys or
use the same one. You know, we already
have a branch in here, so that means that
we could set up the explosion itself
when planted is true. So drag the confetti
burst into the blueprint, and straightaway
in the view ports, we can see that the
confetti goes off. Also, when we play the
game, it goes off. So let's take a look
into the details panel. Is there something here
that automatically activates this simulation? Well, yes, there is. Auto activate is turned on. So let's turn that off. In the event graph, that means that we're going to
have to take a look at the confetti and link it
to a set activate node. So all I'm doing is reading
the properties from a component which always
comes back as a note. It's that simple. If you don't know
how to do something, just look at the properties. These are all the options you get and what you can change. Now, we also have to set
the correct position. So I'm going to go a
bit faster over this as we should understand
now how that works. Confetti set world
location, connected. Then take the cube or the bomb, get its world location, and put that value into the
new location of the confetti. And finally, if
your bomb explodes, it's gone as well. So perhaps take the cube and connect it to a set
visibility node again, but leave the visibility
unchecked. Alright, let's try. I'm going to place my bomb, run away a bit, and
then make it explode. Yay, confetti. That works. But just like with the bomb, we don't want the player to make it spawn or in this case, explode again because that will happen looking
at my current notes. Nothing in here tells
me that the player should not reactivate
the confetti. But I'm sure that you know
how to do that by now. So that's a small
task for you again. And like before, I will show you the solution in the next
lesson. Thanks for watching.
7. Hit Detection with Line Trace: We're learning that
with common sense, you know which kind of notes to choose and
connect to each other. Sometimes you got to try out a few different notes to find the one that works
for your purpose. And a great tip is to just
use something like hatchiPT to ask it what you want to do and which note you
have to pick for that. It's an incredible tool to
help you with stuff like this. But there are a few
notes in unreal, which might not be that
obvious at first glance, but they are very
important to know about. And one of which is
a bit more complex. So I want to explore
that together with. But first, let's look at the solution from
the previous lesson. So when we planted a bomb, it's always going to
activate the confetti. And this one was very simple. We just had to create
another variable. I call it exploded, and I will check if
exploded is true. If not, then we will
activate the confetti. And if it's true, we
don't do anything. Then on the end of
this note series, we, of course, set exploded to true. It's the exact same as we
did with planting the bomb. And because we have these
values and a variable, we could further build on this. You know, the player
could, for instance, pick up a new bomb and we reset both variables
back to folds, and so the player can
plant a bomb again. That's the power of
working with variables. I'm going to stay inside
of my character Blueprint, right click in an
empty space and search for Trace by channel. And we get a couple of
different options here, box, capsule, line, et cetera. They're all the same except
for the shape of the trace. For now, let's take line. It will make more
sense in a bit. The first thing
I'll do is create a keypress T event and hook
it up to the line trace note. That way, we can
fire it when I press so what does this do and
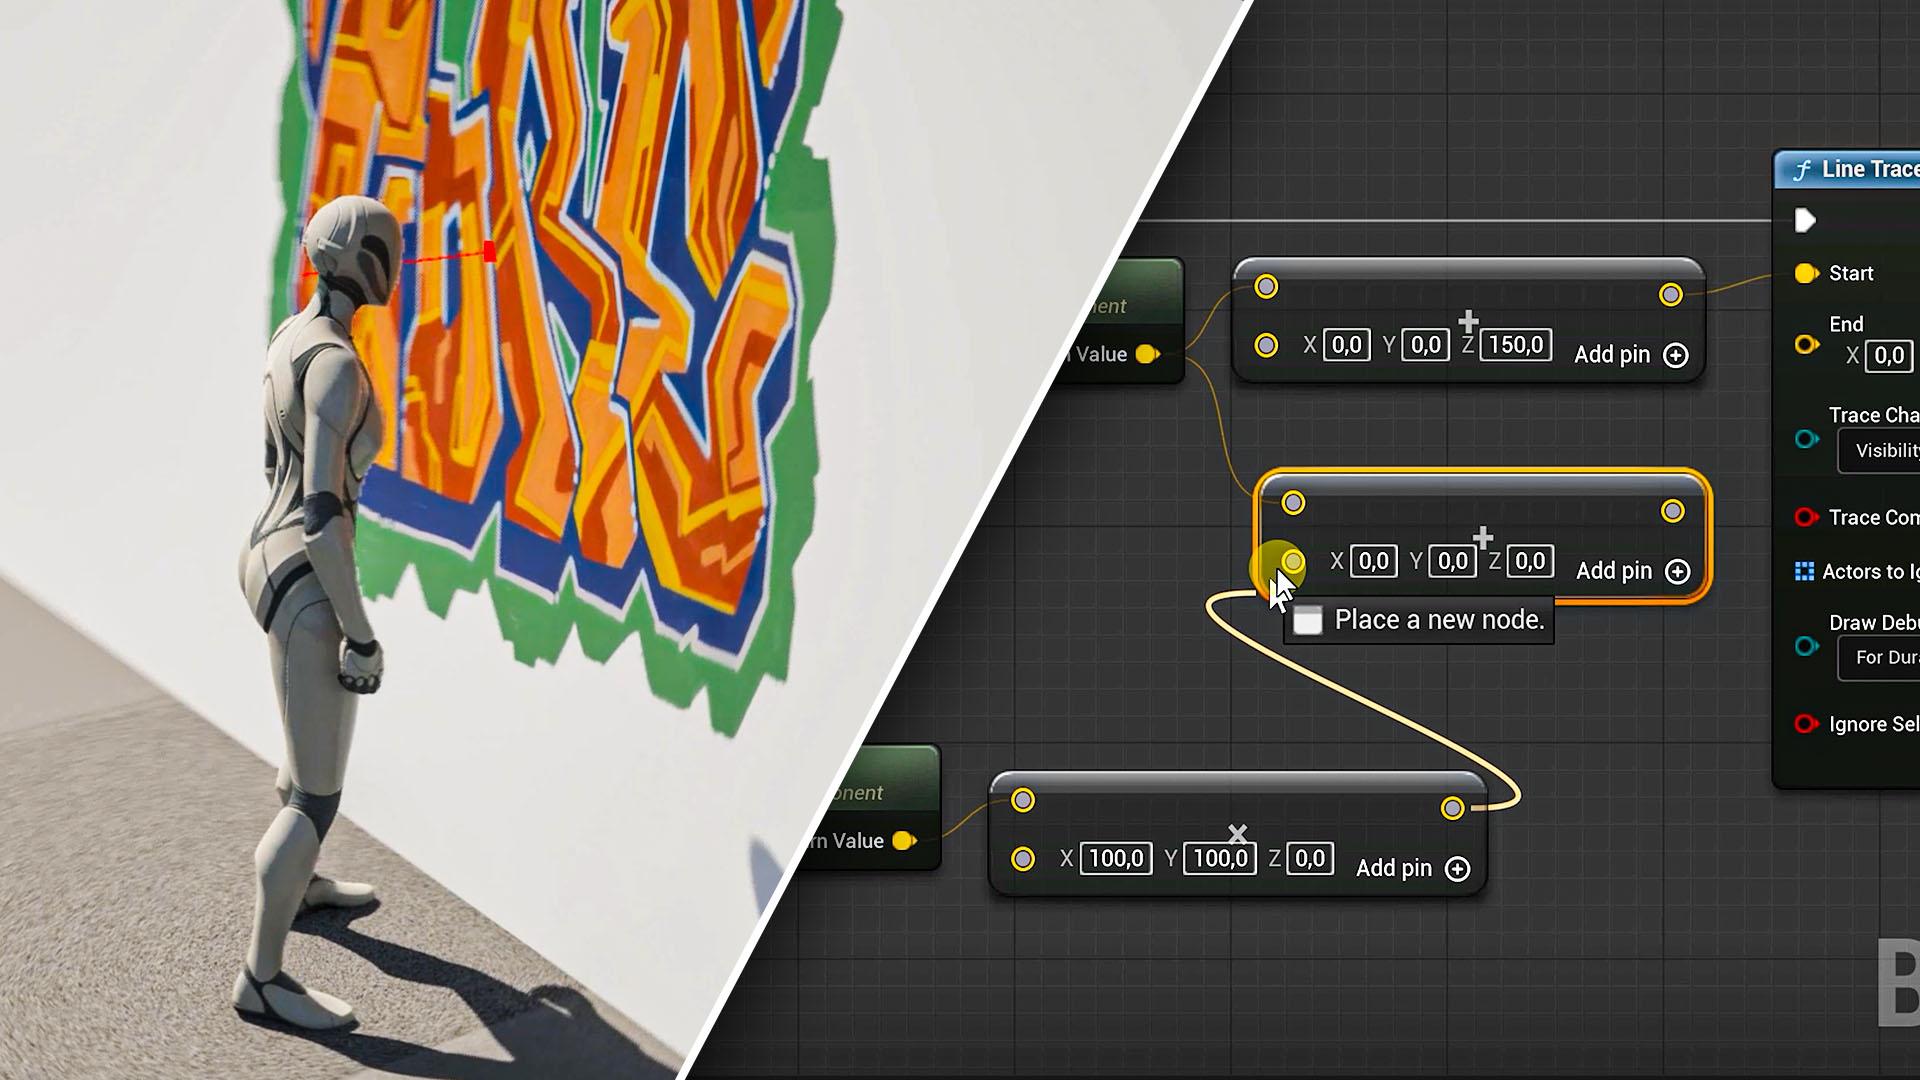
why is it so important? Well, we can shoot a line. Now, we need to define the start and end
position of that line. So if you want to shoot that
line out from the character, we need to make it start with getting the world location
of the character. And we've done that
many times before now. As for the end position, we could take the
same as the start, but connected to an add note. This allows us to add 100
to the current position. You know, then connect
it to the end. Now, if we were to run this, we're not going to see anything. That's because the line
should not be visible. But as we're working on it, we can set the draw
Dbuk to visible. And let's pick for duration so that the line stays
visible long enough. Okay, I'm going to test it out. When I press a T key, you can see a line appear
from the character. Every time I press the key. And the interesting
thing is that we can use that line
now to make it hit with something and
then dynamically take a specific
action on that hit. And one of the things
we immediately think about is a shooter game. You know, you fire a bullet, which is going to be backed
by that invisible line, and if it hits another
player, it dies. But it goes much
broader than that. I want to show you real quick a project that I'm working on. This is for a theater play. Unreal engine will be used as a projection in
the background. And I have this toy, which I modified so that when you fire the gun,
it clicks a button. And from there, I let it
draw a line from above, and where it then
hits the ground, I make a fire spark go off. You doing this, I can make it dynamic because the ground
surface is not straight. So I don't know where
to place the spark. That's where the
line trace comes in. So, you got to see this note as an incredible tool to create
any kind of dynamic events, whether it is for games,
interactive applications, movie renders which you have simulations that turn out
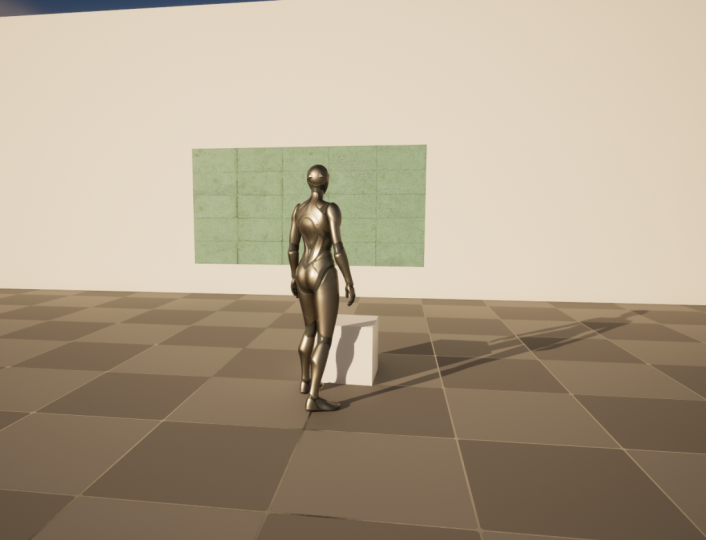
different with every export. But, okay, enough yapping. Let's create something,
something simple to begin with. I want to walk up to a
wall and spray paint some graffiti exactly in
front of me on that wall. So first things
first, I'm going to create a simple
wall from a cube. I'm going to stretch it
out a bit so that we can get a tall and long wall. Plenty of space
for the graffiti. And then we need graffiti. And I assume you're
already familiar with FAP, which is the marketplace
for unreal engine assets. If you search for graffiti and set the price to free,
you'll find some, and you want to look
for decals ideally, and Quickle has some of those. I'll just add the first one
in my project. Very simple. If you drag such a
material onto your level, it will project itself
in the direction of this arrow onto any surface. Okay, so back to our blueprint. The first thing we
want to do is make sure that the line
shoots out correctly. It started at the bottom
of the character. So we're going to move that
up a bit at chest level. So I'm going to do an add
on the start position, and let's put 150
into the Z axis. It's actually 150 centimeters, which makes sense
for a character. The ends position will also get that as it has to
shoot straightforward. Now, the problem is going to be the X and Y value because that depends on where
the character is facing to. Testing it out real quick, you can see that on the X axis, it always shoots out
to the same direction. So we got to figure
out a way to make it shoot in front of the
character at all times. Now, we can do an entire
mathematical calculation, but luckily, there's a
simple note for that called the Get forward vector. It will output a
small X Y Z value based on the direction
the character is facing, so we can connect that
node to a multiply node. The value is always
going to be one or less. If you do X plus
Y, you'll get one. So that's how we're able to figure out the
forward direction. But we got to multiply
instead of adding this time. And since the forward
vector is a small number, thus a relative location, we got to add it to the
world location of the mesh. And finally, we want to add 150 to both the Z axises
to bring it up a bit. Connect the normal
world position to the start and the world position with the added offset from the forward vector to the
end. Let's give it a try. And it kind of works,
but it also doesn't. Somehow it shoots
out from the site, and it took me some time to
figure it out, actually. But going back to the blueprint
and selecting the mesh, you'll find out that
it has been rotated. Now, we can't just
rotate it back to zero because this is the way that the blueprint has been set up. Remember, we have player
controls going on as well, so we can't really play around too much with these assets. So instead, let's take
the capsule component. It encapsulates everything,
such as the character, the camera, et cetera. And it's actually the component that is being controlled
by the player. And Yep, that works. The line is a bit
too high, though, and that's because instead of the anchor point
being on the bottom, as with the mesh, in the
capsule, it's in the middle. So just decrease it to
like 70 or something. So I'm showing you these things
that I run into as well. That way, you can
see the process that I go through to solve an issue. Anyhow, we've got the
line trace working. On the output of the
line trace node, we have an out hit property, and I'm going to right click on it and choose split the pin. You'll see how much
is actually within. There are many
different ways we can check how it hits something
within the level. For a fighting game, you can actually locate the bones in the
opponent's skeletal mesh. But what we're interested
in is the hit location. This is also going to be
the most used property because we want to
spawn the graffiti decal on a specific location, the location of
where the line trace goes in contact with the wall. So yeah, let's add
the graffiti decal. And you might
think, like before, we add decal to the components, drag it into the blueprint
and set its position, just like we did with the
cube in the previous lesson. However, that means we only
have one decal to work with. Actually, if you
went that route, you would have noticed
to be stuck on it. So we've got to figure
out a way to make a new decal span into the level every
time I press my key. That way I can spray paint multiple graffitis on the wall. Let's see if there's
a node for that. Right click and look for spawn. And I can see that there
are multiple things that we can actually spawn into the
level, which is really cool. This might give you some
ideas of what's possible. And to my surprise, there's actually one in
there that lets us spawn a decal at a specific location, and that is exactly
what we need. Alright, so we got to
set the decal material, which is going to be the
one that I downloaded. We can actually just drag that material into
the note property. It easier sometimes. We're
going to have to set a size. Otherwise, we can't
see the decal, and this is something you want
to go back and forward to to figure out to correct
values. I'll save you the pain. I just went for 100 and
every scale attribute and set the X rotation to 90
and the rest to zero. As for the location,
that's going to be the hit location
of the line trace. And finally, we just
got to make sure that the node is being executed
after the line trace note. Alright, let's see
what this does. It works awesome. However, I notice a
couple of issues. The decal is also visible
on the character itself. You know, it should only
be visible on the wall. And when the line trace
doesn't hit an object, it also spray paints
the graffiti. It's on some weird location
as there's no hit location, that's normal because the note will always execute
no matter what. So we got to fix both
of those problems. Let's start with the
decal on the character. I'm going to select
my skeletal mesh and search for decal in
the details panel. And as I thought, we
have an option in here that makes sure that it
won't receive decals. Great. That was an easy fix. Now the second problem. So only when the
line trace hits, we want to decale to span. And from the line trace node, we have a return
value on the bottom. This will simply return true if the line is hit or falls
if there is no hit. So we can simply add
a branch node in between and make
use of that check. So only if the hit is true, we spawn the decale. Otherwise, we don't do anything. So when I don't stand
close enough to the wall, it will not spray
paint the graffiti, only when I'm close enough, and the line hits. Obviously, when everything
works as intended, you want to disable
the draw Dbug so players don't actually
see that line trace. So this is just one example of 1,000 of how you can
use the trace note. I can highly recommend
you play around with this note and see
what other dynamic things that you can create. Explore the sphere and
the cube trace, as well. They are exactly the same, but instead shoot out
a different shape which might give you more options for things you're going. It's been a long couple
of lessons so far, so go take a break
from this class, practice a bit with all of the stuff that you've
already learned, and then we'll
continue later with a very fun simulation that we'll create together.
Thanks for watching.
8. Dynamic Simulation Events: We have been working a lot in the third person
character blueprint. So I thought to do something
different for this lesson. So I created a simple level with some walls and I added
some pins to it. Now, we've got
three balls on top. These are just spheres which
I enabled gravity for, you know, physics.
We've seen this before. And interesting is that with every time that
I run the game, we're going to get
a different result. You know, these balls will
never bounce the same. They'll always end
up somewhere else. That's what's called
a simulation, and you could have a lot of
simulations inside of a game, but also when doing
movie renders or anything else that
uses unreal engine. That means that for any
action we want to create, it has to be dynamic. It has to react on
the simulation, and that's again, where
blueprints comes in. So I have this idea to
change the color of these pins if one of the
balls bump into them, and if they get multiple bumps, their color will keep changing. For example, one bump
will make them green, a second one yellow,
and a third one red. So the first thing we want
to do is remove all of the tins because we're going to replace them by a blueprint. So let's create a
blueprint actor class, and I'll call it BP pin. And inside the components, I'm going to add the cylinder, and I want to rescale it a bit
so that the pin is longer. And you can actually already
drag the blueprint into your scene to get a
better understanding of how much you
have to scale it. It's always better to scale the actual mesh rather
than the blueprint itself. I'm going to rotate
and move it in place. And once I'm done, let's duplicate that blueprint a bunch of times by holding down Alt and then dragging
it to a different position. Alright, we can now go into the Pin blueprint and start
connecting some notes. So we want to find a way to trigger an event whenever
the cylinder is hit. So the first thing we can do
is look for such an event. And under collision,
there's actually one that's called event hit. We've
seen that before. And a great way to test
and see if it works is to connect it to a print
text or string note. Let's run the game. And
unfortunately, it doesn't work. Now, I'm going to
spare you the trouble. But typically, when
a desired event is not being triggered, it could be a setting
within the mesh properties. So, select the cylinder and
go to the detail spanel. There's a setting in
here under collision called Simulation
Generate Hit events, and by default, it's turned off. So just enable. Reason some of these options are disabled by default
is for performance. If you're not using
the event hit, it should also not
register because even though you're not using
some of these event notes, under the hood, these events
do get a ping each time. And when building
out a big world, this could lead to
performance issues. So always double check the component details if there's something in there that
needs to be enabled. Before we move on, there is
one important thing to know. You know, previously,
we had to set the mesh as a target in a note. This time, we don't
have to do that. This means that the event hit is triggered whenever
the blueprint is hit. If I were to have multiple
meshes in here and I want to specifically trigger
the hit for a specific mesh, you can select that mesh, and then if you
right click here, you can see that we can add a specific event for that mesh. And under a collision, we can find the component
hit for cylinder. So this is the exact same event. One is for the mesh specific. The other one is for everything
inside the blueprint. Okay, we got it working now. The screen text will say
hello whenever a pin is hit. So we want to change
the color of the pin. And in order to do
that, we need to make dynamic changes
to the material. Therefore, I will create a
new material and call it pin. Creating materials
is also node based. It works very similar
as with blueprints, and we can do all
sorts of things and plug that into various
material properties in here. We can also put in
textures in here for if you want the pin to look like
a wooden pole or whatever, I'm going to keep it simple
for now and just change the base color to white on
the material property itself. And then I'll go back
to the blueprint, select the cylinder and
change its material to pin, the one that we just created. Alright, I'm going
to take the cylinder and drag it into the blueprint. From there, let's see if
we can find a node to change the base color
parameter of its material. Look for material and
browsing through the list, I need a set note, and here is something
that might work set color parameter value on
material. Let's take that. Alright, so it asks me to
define the parameter name. The parameter is called
base color, right? So let's type that in here. Next, we can choose a new
parameter value or color. You know, let's make it green. And finally, connect
the event to that note so that it can
be triggered upon hit. Alright, let's give it a try. Hmm. That didn't work. Maybe the parameter
name is not correct. Perhaps we got to do something
else with this property. Let's go back to the material and look at the base
color property. Let's right click it and
see what options we get. Oh, interesting. We can
promote it to a parameter. Hmm. That makes sense. These material properties
are just that. Properties, and we can only make changes to
what's happening in front of those properties in which we set a color or texture. We call those parameters, and they go into the property. This means we can also
change the name of the parameter to pin
coolor, for instance. This makes it much
better to work with. And this also makes us better understand that with
very complex materials, we can make changes to
a specific parameter, which might alter the dirt and water or reflection in glass. Alright, I'm going
to change that to white, the default color. And in my blueprint, that parameter name
now becomes pin color. You have 100 notes in here, it also makes much
more sense to see pin color rather
than base color. Alright, run the simulation, and awesome. That works. Now, the idea now is to
change the color three times. And there are various
ways to do that. One way is to create
a numeric value and add one to it each time the
event is being triggered. Then we check what
that number is, and based on that, we change
the color accordingly. But that's a lot of code
for something we can simplify with a D note. You can actually find
a whole bunch of flow control nodes
when you look for it. We already touched upon a few. The dN node where N stands
for a number you set, performs an action for the
amount of times you choose. So we can define that
in the input value. The counter on the output will give us the number at
which the node is at. So if it's the second
time it gets fired, the output number is two. And instead of doing
a whole bunch of branches and checks
if it's number one, two, or three, we can make
use of a switch node. And more specific,
the switch on It where It stands for integer
or a numeric value, and then we can add as many
output pins as we want. So I'm going to add
one for each number. Now, the due end node
starts with one, so we'll just keep
the first zero empty. We could duplicate
the material node three times and have
it change the color. But again, that's not good
programming. Too many notes. You want to keep
it simple, make it work and easy to
adapt in the future. I'll right click
the parameter color and choose promote
it to variable. This will add it to
the variable list. This time, it's not a bullion
as we worked with before, but it's a linear
color type variable. Works exactly the same. Variables can be
get as we do here. We get the value of the color, but we can also set the color. So just drag the variable into the blueprint and choose set, and we'll do that three times. You can also just copy and
paste the set node by the way. Now, connect the
outputs of one, two, and three, and finally change
the color of each one. We can then bring the X
outputs of each node into the color parameter
node so that it actually gets triggered
and change the color. Let's give it a go.
At Yippie. It works. So we're starting to understand that even though
with a few notes, we can do a lot, but also
turns into a mess real quick. Here's, by the way,
the exact same thing without using the
do and switch note, just a bunch of branches, checks and manual counters. It does the exact same. But in a more complex project, if you blueprint all of
your features like this, it becomes a huge mess. So explore the flow control notes a bit more to get
familiar with them. It's definitely
overwhelming at first, but once you start to
understand how they work, they're so much better. Here's the thing. I really
like what I just created, and I want to use this color change a whole lot
more in my project. And when you think
about scaling, even this short note
structure is too much. And that's where
functions comes in. But that's for the next lesson.
9. Blueprint Functions - Reusable Code: Believe we just created
an amazing feature with these spins changing color as another object
collides with it. I want to use it more, but having to copy and paste
these notes becomes a mess. And I also want these notes
to be more easily adjusted, especially when it comes down to properties like the color. Well, that's where
functions comes in, and you can see it
as a custom note. On the left hand side, you'll find a function
sap from which we can click on the Plus
to create a new function, and we'll name it color change
or something like that. Has automatically
been opened up. It has its own work area, and you can see here that we can go back to the event graph. And if you close your function, you can always
open it back up by just double clicking on your function in the
blueprint panel. So I'm going to go back to my event graph and actually put everything into that function
except for the event node, which is not possible. You need to connect it to an incoming execution which
an event doesn't have, because that's
where things start. I'm going to control X, which is cut, and
then in the function, I'll paste the node. We'll connect the start of
the function to the D N node. Then go back to the event graph, and just like a variable, I can drag that function
into my blueprint. And as you can see, it's
just one simple node. You can kind of see
it as a container for all the other nodes. Connecting the component hits to that function will make
everything work exactly the same. And the cool thing is that I can reuse that function as
many times as I want. For instance, I'm going
to go to my view port and duplicate that cylinder so
that we have two of those. And to make it ourselves easier, let's rename these cylinders
to pin one and pin two. Then let's go back to the
event graph and create a component hit for the
second pin as well. With it selected, right click at event collision
on component hit. And we can connect
the same function now to that event as well. And it kind of works,
but not really. You know, my second
bin does not get a color change. Why is that? Let's have a look at the
nodes again in the function. And here is something
that I notice. When we do the color change, we target pin one. So for the other pin, we need
to target that one, too. So we need a parameter in the function
that we can change, and that's easily done. Select the function and
go to the details panel. Here you can see on
the bottom that we can add an input and
output parameter. Let's create an input, and these are the same
as the variables. That means that we can
give it a name like target and then choose
the variable type. And if you don't know
that variable type, you can always hoover the
parameter in this case, the color nodes
because that will show you what kind
of parameter it is, and that's the thing that
we want to make dynamic. It's a mesh component
object reference. So that's exactly what we'll
set as the variable type. Now, before I do anything else, let's go back to
the event graph. See that the function has an
input pin now called target, which is the one that
we just created. So we can link the
pin one mesh to the first function target and pin two to the second function. So even though we're
using the same function, we made it dynamic
by allowing us to use the function
on different targets. And that's the great
thing about functions. We choose how many options or properties we
want to expose as an input or output and this is exactly the
same as any other note. You can actually see it as
a custom reusable note. But we're not done just yet. Let's go back to the function. So at the start, the target has been defined in
the event graph. Now we just got to
make sure that it goes to the actual target
of the color node. So delete pin one and connect our target input to the
target of the color nodes. Alright, let's give it a go. This definitely
solved that problem. Both pins now individually
change their color, but they only change
their color once. It should go to yellow and then red. What's
going on here? Well, let's do some debugging. This is a technique to find
out where the problem is at. I want to see if my
due end node actually counts up because that's eventually what
the color defines. So I need the output of the counter value
out of the function. For that, we'll create
an output variable. And we'll name it counter, and the variable type is
going to be an integer. I can instantly see that by looking at the color
of the counter pin. After sometimes you'll
know these things as well. Now, that gives
us a return note. We got to connect the last
exact pin to the return and output the counter into the counter variable of the
function to pass it through. When we now go back
to the event graph, you'll notice that the
function has an output pin, and we can use that in combination with a
text print note. But instead of the
text saying hello, I wanted to show the
value of the counter. Automatically, it will add a variable conversion
from numeric to a text. Let's run the simulation. And as I thought, yep, it only outputs one. It doesn't count any further. So we've located the problem
by doing some debugging. I use the print text all
the time to find out what's going on in
my blueprint and locate issues I stumble upon. So what is the problem, then? If you were to share your
findings to She GPT, it will tell you a
function will always reset every time
it gets triggered. So flow controls where it needs to remember
something like the amount of dues it did
will be reset back to one, and that makes sense. So although this do end note was great to keep my
notes more organized, with any function, we can't
use it. And that's okay. We're already making
use of a function which is a single reusable note. Inside of that function, it's not a problem to have more nodes and make
it a bit messier. So delete that do nodes and let's manually create
that same functionality. Create a new variable called counter and make sure it's
from an integer type. Then drag it to the
blueprint and choose set. Connect the exact pins, and instead of connecting a get variable of the counter into the
selection of the switch, we can simply use the
output of the set node. It's the exact same. Since these nodes are
so close together, we can do that without
making a mess. Now, we just need to add one
each time it gets triggered. So do a get from the counter value and bring
it through an add node. We'll add one and then
connect it to the set node. So we're taking the
current counter number, adding one to it, which makes two, and we'll save that in the variable
with the set node. Next run, we get
the counter value again, which is now two. We'll add one to it, which
makes three and so on. So we recreated the
do note basically. Let's give it a run and
awesome. It works perfectly. Now, I would like to add one more extension
to the function, but that's going to
be a task for you. I'll give you the solution
in the next lesson again. So I want both pins to change
their colors differently. Pin one goes from green
to yellow to red, but pin two should go to blue, purple, and to orange
or something else. I'll leave that creative
color choice up to you. But make sure that it runs
through the same function. Good luck with that, and I'll
see you in the next lesson.
10. Blueprint Organization Best Practices: Let's have a look
at the solution. What we had to do was create
three more input parameters, variables of the
type linear color. I named these color
one, two, and three. And instead of setting these colors in their
respective variable, we'll connect those inputs. Then going back to
the event graph, we can now set the colors for each instance
of the function. So the first one will
be the standard green, yellow and red, and
for the second pin, it will be blue,
purple and orange. And when we run the
simulation, it works. So this is how functions
work and how you can still have specific
parameters dynamic. And this lesson will
not create much, but perhaps a good idea
to give your brain a little bit of a rest after
all of this new information. So instead, we're going to
clean up our blueprint a bit. Now, if we go into our function, we start to see a huge mess. This is not pleasant
to work in at all. So here are some things
that we can for starters, you can double click
on a line two at a point and then drag
that point around, giving us a better overview of where the connections go to. And what's nice about a
function is that we can also choose where the
input variables should be. So from the details panel, I'll actually drag
target to the bottom, allowing me to better
position the color node and the connected line to it by adding a point
into it as well. We can obviously
select multiple nodes and points to move
them together. You can also select
a point or a node and use your arrow keys
to nudge them around. And this is how you want
to try and make sure that no lines are overlapping each other or going
behind other notes. If you ever need to come
back to make adjustments, you get a much better
overview of what the logic in your blueprint does
instead of having to figure out where
everything is connected to. I also like to see as many
straight lines as possible, and there's a simple
way of doing that. Just select the
notes that you want to align and press
the short key. Q. Try to make a habit of this as you're designing
your node structure. Another thing that is
also a bit messy is when multiple connection
lines go into the same node as with the
set variable color here. If you were to make a
point on one of these, you can connect the
other to that point. So instead of having three
lines go to this note, we now have only one. So these are some of the
techniques that we can apply to clean up the
blueprint structure, and it's for everyone different how far they
want to go with this. When working on an
actual project, my OCD always kicks in and I want everything
aligned perfectly. All right, one last thing
we can do is add comments, and for bigger blueprints, this will be super important. Imagine having hundreds if not thousands of notes in
a single blueprint, and you want to make a
change to a specific system. Where did I make that again? Well, you select a bunch
of notes and press the Ci key to add a
comment box around it. And here, for instance, it
would be the hit counter. You can resize that comment box, and if you move it, everything
inside will move as well. When it's selected, we also get some options in a details panel. From here, you can
actually choose if you want the notes inside
to move with it or not. You can change the size
of the common text, and we can even
change the color. And I use that color
labeling a lot. If you're making a video game, you could have all
the ability logic, have green comments, make all the combat logic, red comments, movement,
blue preps, et cetera. Can instantly see what kind of logic that group
of nodes has. I highly recommend
you make use of that. And finally, we can add comments to single notes or
connection lines. If you select a note, you'll see this little
toggle appear on the top. Clicking on it allows you to
add a comment to that note. For instance, change the
material base color. For unconvential notes, having that custom comment could
really help yourself. And you can always hide it by toggling the comment box
or showing it again. It always remembers
what you typed in here. So if you don't want the
mess of all these comments, but you do want
some information in there for the future
reference, that is possible. I also like to use it a lot on anchor points and the
connection lines, especially when they travel a far distance or I end up
with so many different lines. It helps me to keep
track of what they are connected to and
for which purpose. So these are some of
the basics to keep your blueprint clean
and organized. Align nodes using the shortcut, create anchor points to guide your connection
lines better, and finally add
common boxes around groups of notes
or a single node. And with that, we have reached
the end of this class. Now, I've got a final
conclusion lesson left with a great exercise to practice all the things
that you've learned.
11. Final Projects and Conclusion: First of all, congratulations
for finishing this class. You're officially
ready now to start blueprinting inside
Unreal engine. And even though I've only
scratched the surface, you have a strong
fundamental knowledge now of how blueprints work. From here, you can
further experiment, explore and learn
new techniques. Following YouTube tutorials will go much easier now as you understand better
why specific notes are used and how
they are connected. The way that I
learned to understand programming and blueprints
was to just think of something I wanted
to create and then try out various notes and debugging
until I got it working. And using hechiPT it helps
me push in the right sometimes. No, if
it's for learning, try to avoid those
tutorials that just connect notes without
explaining what they do. You don't really
learn much from that. So here's a final task, an exercise to train everything
that you've learned. And I've got two tasks. You can pick the one that fits what you use UnreLEngine for, or you can do both. The first one is for
game development, and the other one is
for a movie render. So for the game
development blueprint, I would like to see you create a platform game
like in Squid Game, where your character
has to reach the other side by
jumping on these tiles. Now, one of each row of
tiles will fall down. So it's a pure luck based game to jump three times in a
row on the correct tile, and to make it harder
for the player, each time that we run the game, the tiles that will fall
down is randomized. So every new instance of the game is going
to be different. Do keep in mind that one
of each tile in a row needs to stay put and the
other one needs to fall. When the player falls,
the screen goes to this desaturated red color. But when we reach the
end, confetti will pop. Here's, again, an overview
of the assignment and try to create this with as
minimal notes as possible. The project file can be
downloaded if you get stuck. But remember, there are
multiple ways of doing this, and there's not really
a right or wrong way. So if you did succeed and
you compare it with mine, take it with a grain of salt. Good luck. The second assignment
is for a movie render. I had to keep it very
simple because I cannot share a project
with a bunch of assets, so I created a forest
from simple shapes. I also created a level sequence
with a camera movement. When we go into the simulation
at random intervals, these tree trunks light
up and slowly fall down. This is entirely dynamic
created with a blueprint. So every time I run the simulation, it's
gonna be different. This would take days to actually animate
in the sequencer, but with the help
of a blueprint, I was able to create
this in just 5 minutes. Don't get too excited just yet. Creating this is much more difficult than
the platform game. You're going to
have to make use of some notes that we have
not seen in this class. So try to think logical. Go through the list of notes to see if you can find what
you're looking for. Here's again, an overview
of what's needed a simple tree that consists
out of a cylinder and a cone. And, of course, you
can also use a model of an actual tree
if you like that, and at a random moment in time, the tree or a part of the
tree needs to light up. That's done in the material, and then slowly the
tree must fall down. It's a real challenge, so
it's okay if you use he HiPT for this or peek
into the project file. This is definitely
a next level task. In both project files, I've added comments to explain the notes I use
and what they do. So all the answers are in there. But try to create
it first without peeking into the project. I would like to thank you
so much for watching, and I really hope you
enjoyed this class. I wish you all the best in
your Unreal engine journey and good luck with the
assignments. Stay creative.
 Jordy Vandeput, Filmmaker and Youtuber