Transcripts
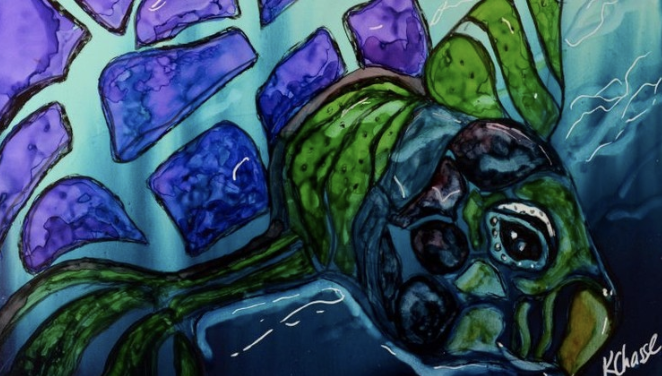
1. Classic Sea turtle Introduction: Welcome to the beginner, step-by-step alcohol. In the project, we will be completing an underwater sea turtle. Hi, I'm Kelly from Kelly chassis fine art. Alcohol ink is an amazing art medium that is just now beginning to be noticed. In this course, you will learn what alcohol inks are, how I use them step-by-step and in real time to create this lovely sea turtles swimming under the water. Watch the video for some sneak peeks at the beautiful painting you'll be creating as a beginner to intermediate course for those of you that wanted to develop your skills with alcohol being, my classes are simple and easy to follow. And my whole reason for teaching is to let you have fun and create. My courses are not about academics, but just about enjoying the process and having fun with colors and playing. We'll learn how to layer the inks and ad placements of shadows using a brush for some details. We'll learn how to pull out paint to layer the inks, and we'll be working with some gel pens for some highlights. So painting as I really a lifetime skill that anyone can learn and enjoy. And I have over thousands of happy students that are already creating some lovely masterpieces taking my live and online courses using watercolor and alcohol. So can be created with me and enjoy all the compliments you have to come on your own special art creations that you'll soon be hanging with the right instruction and a little bit of practice. U2 will soon be able to make your own stunning art pieces. So register now and get started making this beautiful sea turtle today.
2. SeaTurtle Materials : Well, hello there and welcome to our alcohol ain't course. If you are brand new to alcohol inks, This is a great starter force. So this is what they look like. This is made by Adirondacks. There are many other brands that you can get and they have some great color combos or always come out with new stuff. Now remember if you don't have those exact colors, if they've changed those out on you, not to worry, just get something that's really similar, doesn't really matter exactly what color you use. You can really work with any of those. Oh, grab any red, blue, and green, and you can begin to mix a course. You can try other color combos and I recommend trying things out as well. So because they're alcohol-based, these inks will dry very quickly on you. So what a lot of books will use is blending solution. This is made by the same company, Adirondacks. There is also a brand called Kenyatta, which is beautiful little colors that they have and they have some cleanup solution and also have an extender which works similar to this. And you can also use just regular isopropyl, 91% alcohol. You don't want to use a 70% because it has a little bit more water to it and it doesn't work quite as well. So we'll be using UPA paper when this first came out, you PO paper was a little bit difficult to find and I can find it just about everywhere. It's polypropylene, so it's made of a more of a plastic material. You can also use mineral paper for this, which I often use. This is a little bit thicker, a little bit heavier, and it tends to glide a little bit more. And it does not buckle on you as mineral papers a little bit thinner, so you'll have a little sometimes buckling, especially when you spray it. Now you PO paper does come in a number of different sizes, five by 79 by 12. They also have some 22 by 30 sheets. And then if you really like and you want to do some really big alcohol ink paintings, they have the roles of it, which is, I think I don't know how many yards, 60 yards or something like that. So lots of options for sizes for you. I do recommend if you're new to the medium starts mall because it drives fast on you and it's a little easier to work with. So as I had mentioned, I used the 91% alcohol. And depending on where you live, this might be a little bit more challenging to find here in the United States, we can find this pretty much at any local pharmacy or even actually they have it at the supermarket. Now here, if you can only find 99%, that works great to 70% will work. But as I said before, it doesn't flow quite as well, but it's great for cleaning your brushes. So speaking of brushes will use just a fine small brush. Any round brush will work and make sure that it's nylon so you don't ruin those nice sable brushes from the watercolor brushes. They're expensive, so I get something inexpensive for this, especially when you're first starting. It also need some gloves to protect your hands because the inks do stain, I would recommend very good ventilation in your area. I also have a video on a vapor mask. If you are sensitive to the smell which a lot of people can be if you have concerns, check with your doctor. So obviously it will be paper towels. And now when I first started, I used bounty, Riva. Some are bidding on your brand, some have a little bit more length in them, so just be careful of that. And you'll see in the painting here, things will get in neural callings anyway. They just, things will show up from flying in the air. It's so you'd also use just a cotton rag to I also have these little backer boards there, foam and my Mats. I like to have that with me and tape that tape down the UBO paper using some type of blue painters tape or frog tape, something that it doesn't seep down underneath, but I'm going to frame mine so I don't usually see the edges anyway. You'll need two cups for your alcohol, 1for dirty, one for clean. If you want to use a Sharpie, Sharpies are wonderful to get some really fine lines in your alcohol links. Now one thing is you have to make sure that your alcohol is completely dry before you use a Sharpie or if you have a hard time writing with an actually on UBO paper if it's still wet. And then my other fund thing is gel pen. This is a white gel pen. And you have to be careful with this as well as one's made by unit ball. There would have posco pens. There's a lot of different options for, for paint pens. They do tend to not stay white. So make sure if you want to keep it white, you spray it with some sealant and I'll cover that with you shortly. And then you can write over it and it will stay bright white. This is another option for you. We're not using us for the class, but I wanted to make you aware of it. These are Spectrum Nuwa markers and these are alcohol-based pens. And this is another thing that you can use in place of Sharpies. It does reactivate the inks, but they're a great way to get some fine details in your paintings if you want. And this one actually has a wide nib and amora fine nib. So those are real fun. And here's what I use to seal my alcohol things. This is camera varnish. It can be found here in the US, pretty much everywhere, overseas. Sometimes you might have a little bit harder time finding this, but you can use rust still, Liam, there's a couple other options. Check with the alcohol, Inc. Our community, if you live outside the United States and you can maybe find out from someone there what they use to seal it with if you cannot find the Kmart and then also the UV clear resistant spray, this will help protect your alcohol inks from fading. And what I like to do is use UV glass for my alcohol inks, and that helps protect them as well because they are not like fast. They are made basically as a craft item. They were not made for fine art and they are working on that now seeing if they can prolong the light fastness of this.
3. Practicing pouring a wet in wet background: All right, let's begin a practice session for our backgrounds before we actually do it on our painting. So I've got some little pieces of UFO paper here. They've just cut up into little three by five card here. And we're going to try this with blending solution. And without blending solution just so you can see the difference and you can kinda get a feel for your amount of time that you had before it starts to dry on you. So the first one we'll do without the blending solution, I'm using the same colors I'm using in my painting, which is awkward denim and stream. And remember, you can always try some other color combos for your particular painting. It doesn't have to be these. What I like to do, what I know and working on backgrounds and I have to work fairly quickly before these dry, especially without using the blending solution. I like to take my covers off of all three colors and start with my aqua little bit of the denim blue underneath in the score of the stream below that. And that's really all you need for this size card. So you may have to kinda practice with this. Make sure you have enough ink on here. Gives you how to work very quickly with this before it starts to dry. And you can see where I'm just kinda taking my finger and filling in some of those areas that don't get paint on them. And rocking this back and forth. I'm trying to keep most of my lighter shade up to the top and then having the darker underneath. And the reason I'm tipping, as you can see, those nice lines in there. So it looks like it's underwater. And the reflections kind of coming down from the top of the water, from the sun into the water. So you can see I'm just kinda taking my finger and filling in those all areas which you could also make little bubbles if you want. I didn't do this in the original painting, but let me just show you here just taking the tip of my finger while this ink is wet and dabbing the tip of my finger, you can also use your pinky who find that your bubbles are too big thing I want finger you make bigger bubbles or smaller bubbles. And you can see that the ink is still wet. So you see how that's kind of blending back in there. So you, this is a great way to practice on your dry time. So you can see what the incus are gonna do. I'm gonna go back through here and just hit those again. And this is a great way, like I said, for you to kind of get a feel for how fast these dry. Now obviously, the thicker the paint, the longer it's going to take. Without blending solution, this is going to dry a lot quicker. And you can see now that they're not blending back in quite as much, but it still gives that illusion of a bubble. So you kinda do this a few times and test it. Test your dry time. You can see where it's drier in here, so that barely made any kind of attention. So it's starting to dry now and it's no longer doing what I, what I wanted it to do. And we'll try another one with the blending solution. So I'm going to squirt that a good amount on here now this six practice too, because you want to see if everybody is different depending on how fast your work. I'm a very fast painter. So for me, the blending solution kind of slows me down from satellite to be quick at it, get my background's in there and then move on. But you can see how much longer you have for dry time using the blending solution. And it uses quite as much ink bees, you can see how this is really fading and it's just kind of all blending in. I'm not getting those nice sharp define lines that I was getting last time without the blending solution. So again, this is all Preference paste. You might like this look a little bit better than having the streaks in there any like you may like the lighter shades. So you can see how much longer you have. And there's a really kind of you can have a rocket back and forth is as grave, you're using it for bigger sheets because remember, with any of these, if you want to do a larger painting, it would basically do it the same way you just have adjust what you have for products because you obviously would mean more blending solution if you are doing a larger painting. So you can see how this is just a lot smoother. I'm gonna go ahead and just add a little bit more of that stream underneath because they lost that darkness with the underwater and it's still wet enough so this is still moving and now I'm getting some of that, the streaks that I was looking for and the last piece. Now you can also see where I'm holding this with my fingers underneath this bo paper. And you can see where it almost gives an indention of what's underneath. And that is one of the reasons why I like to use the mats or the foam boards to put my paper on tape it down below. I'm working with these because it will pick up any kind of pattern underneath filius on lace or if you lay it on cardboard, any other type of pattern underneath the UBO paper will sometimes come through and you're painting, which can be a really neat look. So you can see here as this is drive a little bit, I'm trying to put some more blue in here and I'm just showing you what this does. Because really when I, when people get frustrated with the alcohol inks and it's about learning the process of it, experimenting, seeing how the inks work, seeing how the dry time works, seeing how alcohol affects sending all of those things. And it's really something that you have to kind of learn by playing with. So another thing I like to use is the silicone Mads here. And you can see if I just spray some alcohol on here, how easy this is to clean up your workstation. So it'll be moving. Once you are comfortable with doing this, maybe a few times, practice it, and then you can go ahead and we'll start on our sea turtle painting.
4. Sketching the turtle: Alright, so we're gonna go ahead and just do a freehand sketch here that I'm going to show you. And you can also of course, go ahead and print off the PDF so you can have a beside you while we draw this. Or you can also choose just to go ahead and print out the PDF and use either a light box or tracing paper to sketch it out on your papers. Well, so I'm just going to grab myself a pencil heres is a mechanical pencil. You can use a number two pencil. And I'm gonna do is quite lightly to start. And I don't do a lot of erasing when I'm doing my sketches, I just try to get the shape in there and then continue to work it through that. And I'm using some darker colors. So most of this is going to be covered too. I'm not worried about that. But I'm gonna start with just that face shape or that circle for the head down here first on the bottom right hand corner and then trying to shape out just the area of the body. And then we'll move on to the little flippers here. And like I said, I don't worry about everything being exactly my first start. I just try to get that basic shape in there first and then work, work with that. Now with UBO paper, you can arrange the best thing to use would be like a, a white racer. And you might have to work it a little bit to get the pencil marks to erase. So then we're gonna get the little mouth in here a little bit. I guess I don't what they call a beaker, what they call them. And let's bring down that head shaped just a little bit more. Almost looks like a shape of a bird here. And get that beacon there. And then the placement of the eye is right about here. There's kind of a little bit circular but not completely around and it does have a little eyelid over the top here. And then beak shape. It does have a little bit of a nose on the top there as well. And we can just go ahead and fill in these little separated areas at the turtle has on their face normally called Scales. I'm not really sure what they're call leathery appearance. They have reptilian. And then across the back here we'll fill that in and the shapes again, it's, I'm not looking at anything in particular when I'm drawing this. So I've just, so you know, this is just out of my head of what a turtle looks like. So it may not be completely correct. They'll look at a photograph. You could do that as well, gives you a little bit better idea. So this is out of my imagination. It might not be perfect, but that's what it's all about, right? And most of my paintings are from my imagination anyway, I will look at photographs sometimes, but I tried to just kind of do my own thing. Whether that's right or not, right? And I guess it's up to the artist's straight. And then I'm just going to divide his little beak, your mouth area here just a little bit. And then shape this in just a little bit underneath his jaw area here. And then they have like these little turtle sticks his head out of the shell. So it's kind of like this little I don't know what you call it, the sill skin area that's on the back here. And then the flippers divide these up into little sections. So give it a little bit of fun in here. And again, I think they have, there's like these little, little shapes on the turtles flippers as well. But this is just the way I'm doing it. Again. If you want to look at a photo and do something that's a little bit more exact. You can definitely do that. Tons of pictures on the internet of turtles. And you can kind of get an idea from this is actually from a watercolor painting that I did a while ago and I thought I'd redo it with the alcohol inks was I had a lot of a lot of folks like this one. So then across the back here, I'm going to just fill in this little area here with another line. And this is where the shells kind of laying up on top of this. And then I'm going to fill these in with just some little random shapes here across the back of the shell is kinda following the body shape as much as I can. These are all different, I think on every turtle are all different shapes. Kinda like fish scales. So we'll go ahead and let you finish this up and then we'll be moving on. We'll be starting with a practice session first for our background before we actually do our poor. So make sure that you watch that and get comfortable with it. And then we'll be moving on to the turtle itself and filling in some of that with the inks. And this all should be dark enough for you so that you won't lose your drawing on here. You could also use masking fluid if you wanted to amass this often you do the background. Alright, let's begin our background section now.
5. Let's begin painting your background: All right, so we're gonna start with our background. We're gonna do a nice wash and I want this to look almost like it's under water. So we have our sketch all finished here, ready to go and I'm putting on my gloves. Make sure you wear gloves because inks will stain your fingers. And we're gonna go ahead and start with UCLA. And I'm going to lay or that with some stream and also some denim. Those are the three background colors that I'll be using. No. The stream is very dark, so this is all about you, your color choices. If you want to do something different, please feel free. Or you can test it out a little piece of paper to see what your colors are gonna do. But I want this really rich and dark. So it's like he's swimming down. So the underneath of Pam will be very dark up. So this is the where the highlights are gonna go and more at the top of the water. And then the next section underneath is going to be stream. And then we're gonna add a little bit of denim so that you get a nice mixture. And I'm not using any blending solution, I'm just squirting on the color here. Now you need to work fast when you're doing this and you want to tilt your painting so that it looks like water. So as I tilt this up and down, we start with down first, try to get some of that darker color underneath. And then I'm going to just kinda fill it with my finger here, touching up those little areas while it's wet, cuz you gotta move fast and then we're gonna tip it the other way. And you can see how this is going to kind of bleed into that lighter shade of blue on top. So it almost looks like some ripples in the water. And if you need to take your finger, you can just kind of fill in any little spots here that didn't get any paint. Make sure you clean off your finger. Who've got that darker color underneath there. But this is the look we're looking for and this will dry it just a little bit lighter but reduce some lifting coming up next. So the next step will be removing some of that color using a blender pen by chameleon is what I'm using, but you could also use just a brush and some alcohol if you don't have a blender pen.
6. Removing ink for highlights: And this next section, we are going to remove some color using a blender pen. But first of all, you want to make sure that your background is fully dry before moving on to this next step. So I'm going to grab a blender pan. This is made by a company called chameleon. And the blender pen basically is filled with blending solution inside. So it's a colorless blender pen. So all this was going to do is basically lift some of this color up. And this has two sides to the blender pend. It has a real fine detailed side and then a little bit wider nib on the side. And I'm gonna be using the wider one only because it's a little bit more sturdy. And I can lift up the paint a little bit by putting some pressure on this one. So the first thing I'm gonna do is just outline the area here first so I can see which area I want to remove some of that dark color from. And this will lift this out so that you'll have a nice soft blue. And we're going to be adding some colors on top of this afterward, but I'm going to just lift this out. I did I add a practice session here for you so that you can see the difference between using a blender pen and using a brush filled with alcohol. So just make sure you watch that that piece and feel comfortable with either the blender pen or the brush. A lot of times, newer students really, by the blender pen, much easier to use and a brush and alcohol because they have a little bit more control with us. So just outlining the shape here and continuing to lift out some of this area. And I'm going to leave some of this darkness is going to be a natural divider or shadow. So I'm just following that middle line here just to lift and you can see how it continuously lift the pain. And then I go to my paper towel and wipe off that excess pain. That's very important to do. Otherwise you're just going to continue to move or spread that ink around. This way you can get a nice light area. So go ahead and finish that up. In the next section, we will continue to work on the turtle's head by lightning. Some areas there as well.
7. Painting the head: Alright, so let's work on the turtle's head and beak area and continue on with that. I'm using a color called butterscotch. You could also use the sunshine yellow and actually might work a little bit better than the butterscotch. It's a little bit lighter. And I have here a little four-by-four tile. I love to use these glossy tiles as a little paint palette that they weren't great because you can just wipe them off with alcohol when you're done with them and reuse them. Now I'm putting a little bit of that butterscotch down here, filling up my brush a little bit of paint and where we've already lifted out that color from the beak, that blue is still there. And I'm just going to very lightly add a little bit of butterscotch in here. And I'm using like a little tapping motion, and this is a very fine brush and I'm using very little ink for this, just the very tip of that brushes filled with ink. You don't want it 2x, you don't want that to bloom out into the blue water area, so you need to keep this very contained. Two, you can see it's still pretty dark. It's almost a greenish color. Blue and your yellow will make green. So you can see where it's nice and smooth. The more ink I add to this, the smoother this becomes. And then I can get a little highlight in here by lifting that paint out once a, once I have it down and you get a nice little highlight in there. And that's really all you need to do is we can go ahead and do the same thing on those other two little bands on the beaker. We can fill that in with a little bit of yellow as well. And you can also use alcohol if you find that it's just it's a little bit too dark for what you like because I'm using that real dark stream. It's very dark delicious tickle alcohol. Want you to see what that will do. And you can see how the alcohol just at this is 91% alcohol. How that will continue to lift that color out a little bit. Now you put paper does stain, especially with those darker colored inks. So you have to keep that in mind when you're choosing your colors depending on what color you want your turtle to be. So you can manipulate a little bit by adding color, removing color, and playing with it until you get it to where you like it. So I think that's quite bright now. I'm happy with that. And make sure we get that a little highlight on the tip of the beak there as well. And I'm going to move on and go ahead and do those two little bands as well. Alright, so the next section we'll be working on is the upper part of the head.
8. Adding more details to the head: All right, so let's work on part two of the head. And if you do have a chameleon pen or a blender pen, you wanna go ahead and grab that. And I'm gonna use the fine tip side on this one because I'm going to just take some paint out of the eye area just to give it a highlight here. And you'll see, once again, I'm getting a little paint on the tip of that brush and then I'm wiping it off onto my napkin over here that we don't do that. It just takes the paint and moves it around. So it's really important that you continually wipe off the paint from the tip of that brush. And then I'll go on over it a second time. So you may need to work on that a few times and just make sure you get all of that, most of the ink out of there. And let's move along to some of the little pieces that we had sketched out. And again, I'm just highlighting those areas or removing the paint from those areas. You could also use masking fluid when you start your painting, if you rather keep these areas white. But I happen to like some of the variations of colors that we get by having some of the, the blew down in here, rather than having it stark white. But again, it's all preference based. And with my classes, It's all about you. I'm just showing you my technique and how I do it. And you can kind of go from there and play. So if any of you have ever used a masking fluid, it's fairly easy to use with the alcohol in Canada, you po paper, you just want to make sure that when you place your masking and fluid down that you let it dry completely before trying to add things to it. And then the other thing is making sure it dries completely before you remove the masking fluid. So when we're moving onto the next part, which is more of the head and we'll be adding some color in there.
9. Head Part 3 Ink Turtle: I'll be using some red. Now this is called a red pepper. And we're going to go ahead and put this right on the backside of the Higgs. We want this to be a little bit darker back here. So I'm going to add this directly to the blues. You'll see, you'll get a little variation of colors on here. So I'm just going to square that onto my tile, cleaning my brush off. And I always clean my brush usually between Arab recolor change. But you will see as I start to add this red pepper here to my turtle head, whose letting air dry just a little bit, get a little thicker, say added here. It's going to create this nice deep color purple on the Turtle. So I'm just mixing those two together and you can see where when I went into my red head, lifted up that blue. So it's already turning my ink. Dark purple, that's mixing those colors together. But for underneath here this is the darker shade anyway, where the underneath of the turtle is. So I'm okay with that. So we're just going to outline those areas and wipe off my brush. We'll see if we can get a little bit of that more brighter red on there. And you can see I just try to stay out of that purple area that's still pretty dark when it's being added to that dark blue underneath though. I'm just following here. You can see where this pretty much stays, right where I put it using a very fine brush for this. And again, the IQ is not really, really wet. And so it's going where I am asking it to. Doesn't always happen, does it? So I'm just mixing that read rate in, creating that purple rate on our paper, rinsed off my brush again in the alcohol and we use some fresh red just to see if there's much of a difference if we add that on top. And you can see where I first put my brush down. It's a little brighter there. But this will create just a little bit of variation in that. Again, just using a tapping motion, trying to tap too much over and over again because again, it we'll just mix right in. So each time I do it, I lift lift up and wipe that red on my paper towel. You can clean your brush with the alcohol if you find that it's mixing too much and you can get a little bit lighter shade. So let's use a little bit of alcohol here so I can show you what I'm doing. I'm just going to add a little bit alcohol to that red and that's coming to lighten it just a little bit more in just a little bit of a highlight down here. So then that ink out a little bit. And that also creates a nice texture in there. So it looks like that water is reflecting on the top of his head a little bit. So let's go back into our yellow again. Going to add a little bit more. You can see how much brighter this is then the beak that we did because we looked at out a good amount of that with blending solution or the blender pen. And I'm not going to cover this completely because I still want some of that blue in there. So I'm blending some of the blue show and just tapping that yellow inherent to create some more green shades. In cleaning up my brush and create a little highlight here. So I took the alcohol wipe that brush off completely and just a little bit of alcohol that's on my brush. I'm lifting out the little highlighted the beak area there. And we'll go further back of the head here. Now the blue and here is a little bit lighter so you can see the difference in the color. And so it's a little bit lighter shade plus I use the one with alcohol in it in the red, so it's lined it slightly. And we're just going to fill in this little section right here as well. And you can see that my IQ is almost dry. So I keep kind of going back to my puddle here to load up on a little bit more of it. And it's always a fine line with this because you are dealing with such a small area. You don't want your ink to be too wet or else it spreads to other areas that you don't want it to in rinsing off my ain't got my brush. And we'll be adding a few more highlights and details to the eye next.
10. Painting the eye: So this section will be detailing the eye of the turtle. And we'll add a little highlight down here with a blender pen just underneath the head. So it kind of really pops out the bottom part of the head there. Otherwise it's really dark down there. And then I'm just taking my blender pen and just covering those areas again, try to pull out a little bit more of that paint so it brightens the eye up just a tiny bit more. And now I'm going to grab it. If you have a sharpie or black pen of some sort, you can go ahead and just fill in the eye area, the nice dark shade of black. I'm just going to fill that area in and also circle around the eye. They have like these little dots. They're trying to get a nice sharp edge on their tool has like a little bit of an eye lid on the top here. So I'm just darkening that not covering the whole thing is you have a little bit of white in there as well as to give the little highlight over there. And you'll notice that I'm constantly taking my pen and just kind of cleaning it off onto my tissue. If you've worked with the algo links, you know that as you tend to reactivate them, they like to stick to the end of your pens. That happens with gel pens sometimes as well. So you just gotta make sure you keep them nice and clean. So in the next section we'll be working on the body area of the sea turtle.
11. Painting in the body : Alright, so we're gonna start on the body of the sea turtle necks. But I do want to show you what I've used here for a little highlight. I have a gel pen. This is a white gel pen made by signal, which is a unit ball brand. And this is a great one for highlighting some details. So what I've done here is just add just a little bit of that white on the top of the head and already I area and just a couple little spots on the mouth of the turtle. So let's move on to the body of the turtle. I'll be using the color twilight purple for this. Now as with all my courses, you can pick and choose any color. I'm just going with the perplex. I like the complimentary color or the purple and the green together. And I really wanted to keep this light. So I love the look of the water. So all I'm doing here is with my very fine detail brush just tapping in a little bit of that purple in here. And we're gonna go ahead and fill all of these little squares are shapes that I have in here. To give us some other colors that you want to try. Feel free to do that. This is quite bright, quite vibrant. We wanted to make a little fun. This is not very realistic, I guess, but I like the vibrancy of it. So you can see where I'm going in a second time and tapping it. And now you can see the texture in there, which gives the turtle and a little bit more depth. And I'm using that tapping motion. And if your ink starts to dry, you can put a little drop again down on your tile and continue on filling these in. Now I wouldn't choose to alcohol to reactivate it only because it will lighten that purple shade. And I want to keep this nice and bright. And you can see now that we have that rarely like cloudy blue on top that we have for the background. So these colors are really popping out a lot more so than what the head is because he's diving down. You'd have that brightness up on the top of the shell. This would be a very pretty done with green if you wanted to make it more realistic or with some yellows. And I'm all for seeing what you can create. Them. Love it when you guys step out of the box and try some new things to put your creative caps on and just go for it. So I'm gonna continue filling all of these M and will speed this up a little bit so you don't have to watch me fill in every single one of these. And we are going to go back into this and just give it a little bit more of some highlights once that dries because I can see where some of these little spots here have made more of a smooth texture because I ink was very wet. So we're gonna go back over those just a couple more times just to give it a little bit more texture. So as we get closer to the head, I'm just adding a little bit of that read pepper to it. So get a real deep shade of purple and just covering up the very edge of the shell. They're closer towards the head. So we'll go ahead and clean up our brush from the purple. And we'll be moving into that neck area and we'll be doing the fins are the flippers next. And we'll be using the color botanical green for this.
12. Adding the flipper details: Alright, so let's go ahead and start the flipper area. Got all that lovely purple in there now. And remember, if that's not your style and that's not your taste, and make sure that you kind of go with what you like and don't like purple, don't use purple. You could make this all green if you wanted to, with greens and yellows. So like I said, it's really all about you. I'm gonna go ahead and just put in this green here. And I'm using my little brush, just kinda filling in. And you'll notice that because I have outlined this with that pencil, you can still see the pencil marks right through here. So it just basically looks black by the time you're done, you have the ink on top of it. So it's a great way to make sure that you don't lose your drawing by using a pencil. And that's why I use a pencil. You can use the chameleon pens. But again, if you kinda reworked this area with a brush them times the alcohol ink will eventually work its way through the pigment and sometimes it will move it. And if you've taken the magical horse painting that I did with alcohol Inc., You may have already seen how that works to a pencils are great with you. Bow and pencils are also great with tile as well, where you've got that glossy finish so they don't work quite as well as with the work on UBO paper because you can smudge it and eventually it will take it off the gloss from the tile, but works wonderful with the UBO paper. So as you can see here, as I work my way through this blue, I'm always adding more drops of the green on here because what happens is as I add the green to the darker area, obviously it's going to reactivate those blues in that stream color that we have on the bottom here. So you'll notice I may go through this a couple of times, wiping off my brush as it starts to reactivate that ink underneath so that it's not too too dark. I mean, we do want it dark because the underneath of the of the shadow area. So I'm okay with it being slightly dark, but you just don't want it to be too, too dark. And as it blends in with that darker green, it will tend to do that. And you can see as I add the fresh ink to that, it does tend to bloom a little bit and really it gets brighter. And I do know this is a little hard to see. I do have quite a bit of writing on here, but this incus so dark and it's a little bit more difficult to see on here. You can tell that it's quite brave. You look at my tile that's nice, bright white. But just because we're working with those darker shades, a little harder to see. So I'll have you fill in the rest of this area and I'm going to think in this up a little bit. I think I've actually gone on the wrong sexualized paying the gradient is the green's a little bit larger. So I'm going to just adjust that and fill in a little bit of this area here as well. As those flippers are a little bit bigger. That other color in between is a little bit smaller, as you can tell from the other flipper there. Again, you can add a little texture to it by just kind of dotting in once it's dry. And I know folks are always asking how do you get that smooth look? Well, you can tell from the background that's not retouched. It's basically one and done. And if you attend to add ink on top of other ink, that's how you'll get that more textured look. I can't say that enough. Some people really love the texture. Look some people like to smooth look some like a mixture of both, which is what I like to get that variation in there. So again, it's all preference based. Everything with art is preference based. You know what works for one, it might not work for another. Two, you really have to kinda play with things. Figure out what you like. Just a little bit more texture to this. And again, just giving myself some fresh ink ear so that it's nice and bright, kinda eats its way through that next layer. That's the best way to describe it eats its way through. Alright, so we're going to be moving on next to creating some movement in the water. And I'm going to show you a practice session first.
13. Practice how to lift inks to make bubbles: Before we try this, actually are painting. Let's go ahead and do a practice session on how to create those ripples on the water. So I'm going to grab that piece of paper that we did our practice session on. Hopefully you still have that. And I'm going to use a blender pen for this and I'm using that fine side of the, of the nib. And you can see where I have to put a little bit of pressure down which kinda flattens it out so it makes it a little bit wider. Which may be what you like, but will also going to show you how to do a little thinner version of the same thing. And you can see I'm just making these little squiggles and almost use little diamond shapes in here. So that creates a little ripples and our water. So let's go ahead and try the other side. It's a little bit stiffer so it's a little easier to maneuver. And you can see it's a lot finer. And again, trying to meet that almost like a diamond pattern in here. Connecting some of them, not connecting others. Just kinda creating some little bit of movement in here. And I may have to go over a couple of times to get it to lift out completely. If you don't have a blender pen, no problem. You can also use a very fine brush. So all I'm doing here is using some blending solution, cleaning that brush shopping. You should have got it nice and clean. And using the very tip of that brush, doing that same motion. Then you can also use 91% alcohols that it's blending solution for this, you just have to be carefully alcohol does tend to spread a little bit more than what the blending solution does. So you may want to just let it air dry just a tiny bit on your brush before you actually try it on your paper. But give them both a try and see which one you like better. And you can also take those little bubbles that we created using our finger with our glove and just kind of in lifting some of that pain out and just dotting them just to give them a little highlight in the bubble. Now if you don't want to do all the little bubbles, you can also add a little texture to your water by using a Spitzer bottle of alcohol. Now this is a big bottle. You can also use little mini Misters if you'd rather have a little bit more control. And I just basically just kind of held us off at a distance and squirted it. And you can see how it really reacted in some larger areas for this. So the mini MR is a little bit finer. And you can get that is made by arranger and you just fill it up with a 91% alcohol and it's got a little square homosexual perfume type bottle. Now you can also use the 91% alcohol on your brush as well. Just by using this tap in motion if you're not getting enough of it on there and you want a little bit more. You can kind of tap your finger, tap on top of your finger and we'll give it a little bit more pressure. So now let's go ahead and you're comfortable with this new practice. A novelists do this on your painting.
14. Adding in water details: All right, so let's create some movement in the water now for this one, I didn't do the bubbles. I'm just doing some basic just a few little water ripples in here. So again, this is all about you. You can do more or less depending on your taste. So I'm gonna take a little bit of red here just to darken this area underneath here. Being careful not touching that green because red and green will make brown. Coming up just above here. Just kidding, I still shadow and this line here. And that's all I needed. And again, scrubbing the blender pen and I'm just going to highlight just a couple of little areas here. And making those diamond shaped ripples again. I don't want to go through my turtle hole. I so I'm just doing a few here here in there just to give a little bit of reflection and a little bit of light in here. So I'm just being careful over here by the turtle. And then just throwing a few more underneath here and a few over on this side here. And you can also do a little bit on the turtle. Again, just a few highlights here and there. And this just gives a little bit of appearance of some light reflecting off of them. So throw a little bit more in here. He more of those diamond shapes. You don't have a whole lot of space in here. So we've got the turtles pretty good size. So we'll just throw a few highlights right on top of him, like he's not even they're still making those diamond ripple shapes. Let's do a little highlight underneath a turtle, Turtle head here. And then underneath here as well. And this will make them really just kinda pop out a little bit more over here. Again, trying to keep that diamond shape in here a little bit as much as I can. I don't want to overwork it too much, so we'll just again highlight here underneath him a little bit more. Alright, so the next part we'll be doing the finishing touches.
15. A few final pen details: So now for our final steps, and I'm going to use a chameleon pen or once again, this is going to be the black one. And all I'm doing is just sharpening some of these edges and giving it a more defined line. And around here. And of course this is optional, right, is fine that sometimes the pen lines help me kinda clean things up a little bit. Maybe where I've gone over the edge a little bit. And it can go a little bit, a definition here. So I'm just gonna kinda follow the surround. I'm going to speed this up for you so you don't have to watch everything. And we'll go from there. Well, I was popping out a few more highlights using that signal gel pen. And let's also what I used to sign my work. So thanks again. And I really hope you enjoyed this. Y.
16. Outro : So thanks so much for joining me today. Is now your time for porridge jags. So a grab all your supplies that we've covered in this course. And let's get ready to have some fun. If you like this course, I have a bunch others. Lots of alcohol ink ones or watercolor and even that some resin classes. So make sure you check those out. So don't forget to post your projects. You can tag me on Instagram, you can tag me on Facebook. Don't forget to join our special exclusive Facebook group that I have. And if you have other questions and things like that as a great place to post it. There's a lot of folks on there now and we love to share and share ideas and their super-helpful. So head over there, check that out. I'll give you the link for that as well. Don't forget to check out my YouTube channel where I do new videos every single Tuesday at nine AM Eastern Standard Time. So make sure you click that subscribe button. Make sure you click that bell and that will give you the notifications. Every time I and you could heal, you will see it. And if you have the chance, please don't forget to leave a review that let others know that this might be a course that they would be interested in as well. And finally, if you have some ideas for classes that you would like to see it, let me know. Thanks so much for joining me again today and hopefully we'll see you again real soon.
 Kellie Chasse, Artist + Entrepreneur + Educator